


一. 概念:张量、算子
1.1 张量
在深度学习的实践中,我们通常使用向量或矩阵运算来提高计算效率。比如w1x1+w2x2+⋯+wNxNw 的计算可以用w⊤x
来代替(其中w=[w1w2⋯wN]⊤,x=[x1x2⋯xN]⊤,这样可以充分利用计算机的并行计算能力,特别是利用GPU来实现高效矩阵运算。
在深度学习框架中,数据经常用张量(Tensor)的形式来存储。张量是矩阵的扩展与延伸,可以认为是高阶的矩阵。1阶张量为向量,2阶张量为矩阵。如果你对Numpy熟悉,那么张量是类似于Numpy的多维数组(ndarray)的概念,可以具有任意多的维度。
张量的大小可以用形状(shape)来描述。比如一个三维张量的形状是 [2,2,5][2, 2, 5][2,2,5],表示每一维(也称为轴(axis))的元素的数量,即第0轴上元素数量是2,第1轴上元素数量是2,第2轴上的元素数量为5。
下图是3种纬度的张量可视化表示。
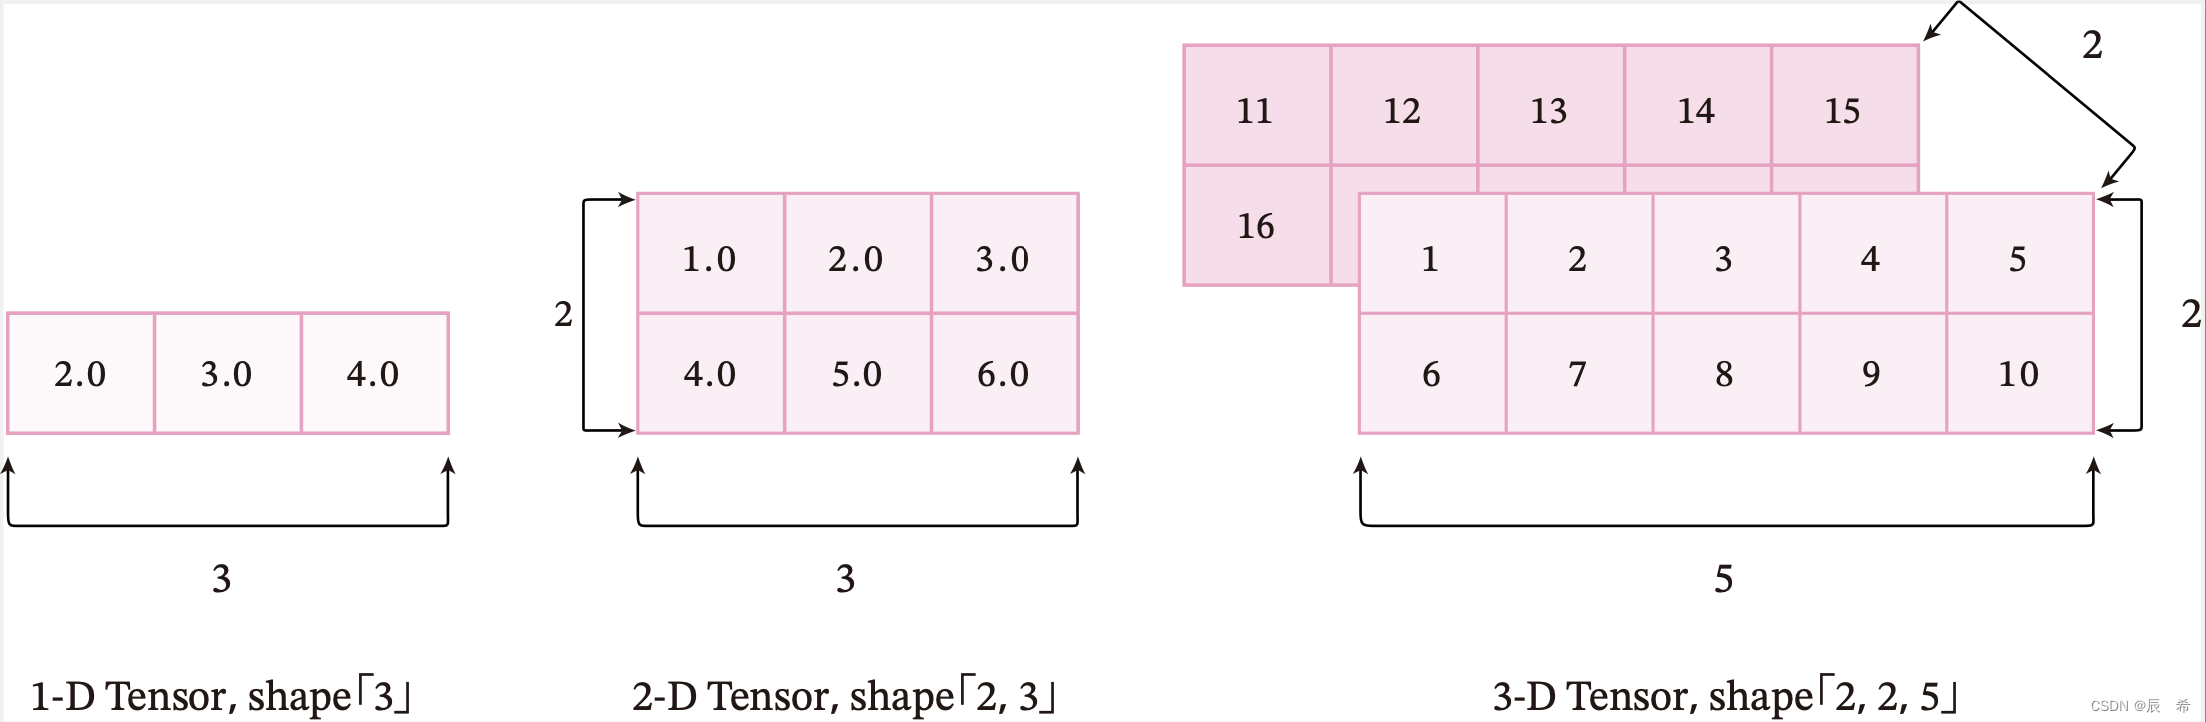
注意:这里的“维度”是“阶”的概念,和线性代数中向量的“维度”含义不同。
张量中元素的类型可以是布尔型数据、整数、浮点数或者复数,但同一张量中所有元素的数据类型均相同。因此我们可以给张量定义一个数据类型(dtype)来表示其元素的类型。
1.2 算子
深度学习算法由一个个计算单元组成,我们称这些计算单元为算子(Operator,简称OP)。在网络模型中,算子对应层中的计算逻辑,例如:卷积层(Convolution Layer)是一个算子;全连接层(Fully-connected Layer, FC layer)中的权值求和过程,是一个算子。再例如:tanh、ReLU等,为在网络模型中被用做激活函数的算子。
二. 使用pytorch实现张量运算
1.2 张量
1.2.1 创建张量
1.2.1.1 指定数据创建张量
(1)指定列表数据[2.0,3.0,4.0],创建一个一维张量。
# 导入torch
import torch
# 创建一维Tensor
ndim_1 = torch.tensor([2.0, 3.0, 4.0])
print(ndim_1)
运行结果:
tensor([2., 3., 4.])
(2)指定列表数据,创建一个二维张量。
# 创建二维Tensor
nidm_2 = torch.tensor([[1.0, 2.0, 3.0],
                                  [4.0, 5.0, 6.0]])
print(ndim_2)
运行结果:
tensor([[1., 2., 3.],
[4., 5., 6.]])
(3)同样地,还可以创建维度为3、4…N等更复杂的多维张量。
# 创建多维Tensor
ndim_3 = torch.tensor([[[1, 2, 3, 4, 5],
                                   [6, 7, 8, 9, 10]],
                                  [[11, 12, 13, 14, 15],
                                   [16, 17, 18, 19, 20]]])
print(ndim_3)
运行结果:
tensor([[[ 1, 2, 3, 4, 5],
[ 6, 7, 8, 9, 10]],
[[11, 12, 13, 14, 15],
[16, 17, 18, 19, 20]]])
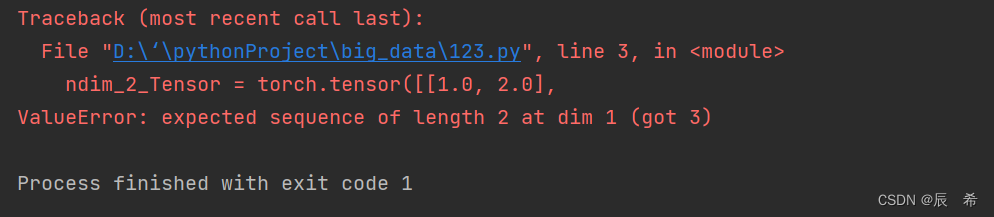
(4)注意:张量在任意一个维度上的元素数量必须相等,否则会报错。
# 尝试定义在不同维度上元素数量不等的Tensor
ndim_2_Tensor = torch.tensor([[1.0, 2.0],
                                  [4.0, 5.0, 6.0]])
运行结果:
1.2.1.2 指定形状创建
如果要创建一个指定形状、元素数据相同的张量,可以使用torch.zeros, torch.ones, torch.full等API。
m, n = 2, 3

# 创建数据全为0,形状为[m, n]的Tensor
zeros_Tensor = torch.zeros([m, n])

# 创建数据全为1,形状为[m, n]的Tensor
ones_Tensor = torch.ones([m, n])

# 创建数据全为指定值,形状为[m, n]的Tensor,这里我们指定数据为8
full_Tensor = torch.full([m, n], 10)

print('zeros Tensor: ', zeros_Tensor)
print('ones Tensor: ', ones_Tensor)
print('full Tensor: ', full_Tensor)
运行结果:
zeros Tensor: tensor([[0., 0., 0.],
[0., 0., 0.]])
ones Tensor: tensor([[1., 1., 1.],
[1., 1., 1.]])
full Tensor: tensor([[10, 10, 10],
[10, 10, 10]])
1.2.1.3 指定区间创建
如果要在指定区间内创建张量,可以使用torch.arange,torch.linspace等API。
# 创建以步长step=2均匀分隔数值区间[start=1, end=6)的一维Tensor
arange_Tensor = torch.arange(1, 6, 2)

# 创建以元素个数num=5均匀分隔数值区间[start=1, stop=5]的Tensor
linspace_Tensor = torch.linspace(1, 5, 5)

print('arange Tensor: ', arange_Tensor)
print('linspace Tensor: ', linspace_Tensor)
运行结果:
arange Tensor: tensor([1, 3, 5])
linspace Tensor: tensor([1., 2.,3., 4., 5.])
1.2.2 张量的属性
1.2.2.1 张量的形状
张量具有如下形状属性:
1、tensor.ndim:张量的维度,例如向量的维度为1,矩阵的维度为2。
2、tensor.shape:张量每个维度上元素的数量。
3、tensor.shape[n]:张量第n维的大小。第n维也称为轴(axis)。
4、tensor.size:返回的是当前张量的形状,返回值是元组tuple的一个子类。
x = torch.tensor([[1, 2, 3, 4],[2, 3, 4, 5], [3, 4, 5, 6]])
print("Number of dimensions:",x.ndim)
print("Shape of Tensor:", x.shape)
print("Elements number along axis 0 of Tensor:", x.shape[0])
print("Elements number along the last axis of Tensor:", x.shape[-1])
print('Number of elements in Tensor: ', x.size())
运行结果:
Number of dimensions: 2
Shape of Tensor: torch.Size([3, 4])
Elementsnumber along axis 0 of Tensor: 3
Elements number along the last axisof Tensor: 4
Number of elements in Tensor: torch.Size([3, 4])
1.2.2.2 形状的改变
x = x.reshape(4, 3)
print(x)
运行结果:
tensor([[1, 2, 3],
[4, 2, 3],
[4, 5, 3],
[4, 5, 6]])
从输出结果看,将张量从[3, 4]的形状reshape为[4, 3]的形状时,张量内的数据不会发生改变,元素顺序也没有发生改变,只有数据形状发生了改变。
a = x.reshape(-1)
print(a)
运行结果:
tensor([1, 2, 3, 4, 2, 3, 4, 5, 3, 4, 5, 6])```
1.2.2.3 张量的数据类型
张量的数据类型支持bool、float16、float32、float64、uint8、int8、int16、int32、int64和复数类型数据。
在创建Tensor的时候可以定义数据类型,可以使用dtype来查看数据类型。
x = torch.tensor([1, 2], dtype=float)
print(x)
print(x.dtype)
print(x.type())
运行结果:
tensor([1., 2.], dtype=torch.float64)
torch.float64
torch.DoubleTensor
1.2.2.4 张量的设备位置
除非额外指定,新的张量将存储在内存中,并采用基于CPU的计算。
print(x.device)
运行结果:
cpu
1.2.3 张量与Numpy数组转换
张量和Numpy数组可以相互转换。
numpy>>>tensor

import numpy as np
n = np.array([[1, 2], [3, 4]])
t = torch.from_numpy(n)
print(t.dtype)
运行结果:
torch.int32
tensor>>>numpy
x = t.numpy()
print(x)
运行结果:
[[1 2]
[3 4]]
1.2.4 张量的访问
1.2.4.1 索引和切片
索引:
x = torch.tensor([[1, 2, 3], [4, 5, 6]])
print(x[1])
运行结果:
tensor([4, 5, 6])
切片:
print(x[0:1])
运行结果:
tensor([[1, 2, 3]])
1.2.4.2 访问张量
print(x[0:2, 1:3])
运行结果:
tensor([[2, 3],
[5, 6]])
1.2.4.3 修改张量
x[0, 0] = 2
print(x)
运行结果:
tensor([[2, 2, 3],
[4, 5, 6]])
1.2.5 张量的运算
张量支持包括基础数学运算、逻辑运算、矩阵运算等100余种运算操作。
1.2.5.1 数学运算
加法运算:
a = torch.tensor([[1., 2.], [3., 4.]])
b = torch.tensor([[5., 6.], [7., 8.]])
print(a + b)
print(a.add(b))
print(torch.add(a, b))
print(a)
# 带下划线的求解会对原有的值进行修改
print(a.add_(b))
print(a)
运行结果:
tensor([[ 6., 8.],
[10., 12.]])
tensor([[ 6., 8.],
[10., 12.]])
tensor([[ 6., 8.],
[10., 12.]])
tensor([[1., 2.],
[3., 4.]])
tensor([[ 6., 8.],
[10., 12.]])
tensor([[ 6., 8.],
[10., 12.]])
减法运算:
print(a - b)
print(torch.sub(a, b))
print(a.sub(b))
print(a.sub_(b))
print(a)
运行结果:
tensor([[1., 2.],
[3., 4.]])
tensor([[1., 2.],
[3., 4.]])
tensor([[1., 2.],
[3., 4.]])
tensor([[1., 2.],
[3., 4.]])
tensor([[1., 2.],
[3., 4.]])
乘法运算
哈达玛积(element wise 对应元素相乘)
print(a * b)
print(torch.mul(a, b))
print(a.mul(b))
print(a)
print(a.mul_(b))
print(a)
运行结果:
tensor([[ 5., 12.],
[21., 32.]])
tensor([[ 5., 12.],
[21., 32.]])
tensor([[ 5., 12.],
[21., 32.]])
tensor([[1., 2.],
[3., 4.]])
tensor([[ 5., 12.],
[21., 32.]])
tensor([[ 5., 12.],
[21., 32.]])
除法运算
print(a/b)
print(torch.div(a, b))
print(a.div(b))
print(a.div_(b))
print(a)
运行结果:
tensor([[1., 2.],
[3., 4.]])
tensor([[1., 2.],
[3., 4.]])
tensor([[1., 2.],
[3., 4.]])
tensor([[1., 2.],
[3., 4.]])
tensor([[1., 2.],
[3., 4.]])
幂运算
a = torch.tensor([1, 2])
print(torch.pow(a, 3))
print(a.pow(3))
print(a**3)
print(a.pow_(3))
print(a)
运行结果:
tensor([1, 8])
tensor([1, 8])
tensor([1, 8])
tensor([1, 8])
tensor([1,8])
对数运算
a = torch.tensor([10, 2],
                 dtype=torch.float32)
print(torch.log(a))
print(torch.log_(a))
print(a.log())
print(a.log_())
运行结果:
tensor([2.3026, 0.6931])
tensor([2.3026, 0.6931])
tensor([ 0.8340,-0.3665])
tensor([ 0.8340, -0.3665])
开方运算
a = torch.tensor([10, 2],
dtype=torch.float32)
print(torch.sqrt(a))
print(torch.sqrt_(a))
print(a.sqrt())
print(a.sqrt_())
运行结果:
tensor([3.1623, 1.4142])
tensor([3.1623, 1.4142])
tensor([1.7783,1.1892])
tensor([1.7783, 1.1892])
1.2.5.2 逻辑运算
a = torch.tensor([[True, True], [True, True]])
b = torch.tensor([[False, False], [False, False]])

print(a & b)    # 与运算
print(a | b)    # 或运算
print(~a)   # 取反
print(a ^ b)    # 异或运算
print(torch.eq(a, b))    # 判断每个分量是否相等
print(torch.equal(a, b))     # 判断整体是否相等
运行结果:
tensor([[False, False],
[False, False]])
tensor([[True, True],
[True, True]])
tensor([[False, False],
[False, False]])
tensor([[True, True],
[True, True]])
tensor([[False, False],
[False, False]])
False
1.2.5.3 矩阵运算
二维矩阵乘法运算操作包括torch.mm()、torch.matmul()、@
矩阵的乘法运算
a = torch.ones(2, 1)
b = torch.ones(1, 2)
print(a @ b)
print(a.matmul(b))
print(torch.matmul(a, b))
print(torch.mm(a, b))
print(a.mm(b))
运行结果:
tensor([[1., 1.],
[1., 1.]])
tensor([[1., 1.],
[1., 1.]])
tensor([[1., 1.],
[1., 1.]])
tensor([[1., 1.],
[1., 1.]])
tensor([[1., 1.],
[1., 1.]])
运行结果:
torch.Size([1, 2, 3, 3])
矩阵的转置:
a = torch.ones(2, 1)
print(a)
print(a.t())
运行结果:
tensor([[1.], [1.]])
tensor([[1., 1.]])
1.2.5.4 广播机制
广播机制需要满足两个条件:
1.每个张量至少有一个维度
2.从后往前比较张量的形状,当前维度的大小要么相等,要么其中一个等于1,要么其中一个不存在。
a = torch.rand(2, 3)
b = torch.rand(3)

# a, 2*3
# b, 1*3 对b进行复制行
# c, 2*3
c = a + b
print(a)
print(b)
print(c)
print(c.shape)
运行结果:
tensor([[0.5143, 0.4515, 0.3642],
[0.8129, 0.6022, 0.7788]])
tensor([0.2096, 0.9447, 0.8450])
tensor([[0.7238, 1.3963, 1.2093],
[1.0225, 1.5469, 1.6239]])
torch.Size([2, 3])
三. 使用pytorch实现数据预处理
1. 读取数据集 house_tiny.csv、boston_house_prices.csv、Iris.csv
house_tiny_path = './house_tiny.csv'
boston_house_prices_path = './boston_house_prices.csv'
Iris_path = './Iris.csv'

house_tiny_data = pd.read_csv(house_tiny_path)
boston_house_prices_data = pd.read_csv(boston_house_prices_path)
Iris_data = pd.read_csv(Iris_path)
# head 之查看前5个数据
print(house_tiny_data.head())
# print(boston_house_prices_data.head())
# print(Iris_data.head())
运行结果:
   NumRooms Alley   Price
0       NaN  Pave  127500
1       2.0   NaN  106000
2       4.0   NaN  178100
3       NaN   NaN  140000
2. 处理缺失值
import pandas as pd

house_tiny_path = './house_tiny.csv'
boston_house_prices_path = './boston_house_prices.csv'
Iris_path = './Iris.csv'

house_tiny_data = pd.read_csv(house_tiny_path)
boston_house_prices_data = pd.read_csv(boston_house_prices_path)
Iris_data = pd.read_csv(Iris_path)

X = house_tiny_data.iloc[:, 0:2]
print(X)
y = house_tiny_data.iloc[:, 2]
print(y)

X = X.fillna(X.mean())
print(X)
运行结果:
  NumRooms Alley
0       NaN  Pave
1       2.0   NaN
2       4.0   NaN
3       NaN   NaN
0    127500
1    106000
2    178100
3    140000
Name: Price, dtype: int64
   NumRooms Alley
0       3.0  Pave
1       2.0   NaN
2       4.0   NaN
3       3.0   NaN
3. 转换为张量格式
将outputs中的所有条目都转换为Tensor格式
# X_tensor, y_tensor = torch.Tensor(X.values), torch.Tensor(y.values)
X_tensor = torch.from_numpy(X.to_numpy())
y_tensor = torch.from_numpy(y.to_numpy())
print(X_tensor, y_tensor)
运行结果:
tensor([[nan, 1., 0.],
[2., 0., 1.],
[4., 0., 1.],
[nan, 0., 1.]]) tensor([127500., 106000., 178100., 140000.])
四、总结
通过本次实验我知道了张量和量子的概念,以及使用pytorch实现张量运算,学习了如何创建张量,张量的属性(张量与numpy数组转换等),以及如何访问张量(索引和切片、访问张量、修改张量),还有张量的四种运算,还使用pytorch进行了数据预处理,有数据集的读取,处理缺失值并转换为张量格式。在学习的过程中,发现了自己学习的一些不足之处,并且加深了自己对于tensor的理解。


 129
129


 被折叠的 条评论
为什么被折叠?
被折叠的 条评论
为什么被折叠?
 到【灌水乐园】发言


