


SpringBoot 介绍
springboot 简介
目前为止,已经学习了多种配置Spring程序的方式。但是无论使用XML、注解、Java配置类还是他们的混合用法,你都会觉得配置文件过于复杂和繁琐,让人头疼!
SpringBoot 帮我们简单、快速地创建一个独立的、生产级别的 Spring 应用(说明:SpringBoot底层是Spring),大多数 SpringBoot 应用只需要编写少量配置即可快速整合 Spring 平台以及第三方技术!
SpringBoot的主要目标是:
- 为所有 Spring 开发提供更快速、可广泛访问的入门体验。
- 开箱即用,设置合理的默认值,但是也可以根据需求进行适当的调整。
- 提供一系列大型项目通用的非功能性程序(如嵌入式服务器、安全性、指标、运行检查等)。
- 约定大于配置,基本不需要主动编写配置类、也不需要 XML 配置文件。
总结:简化开发,简化配置,简化整合,简化部署,简化监控,简化运维。
springboot 快速创建第一个 springboot 项目
创建方式主要有两种:
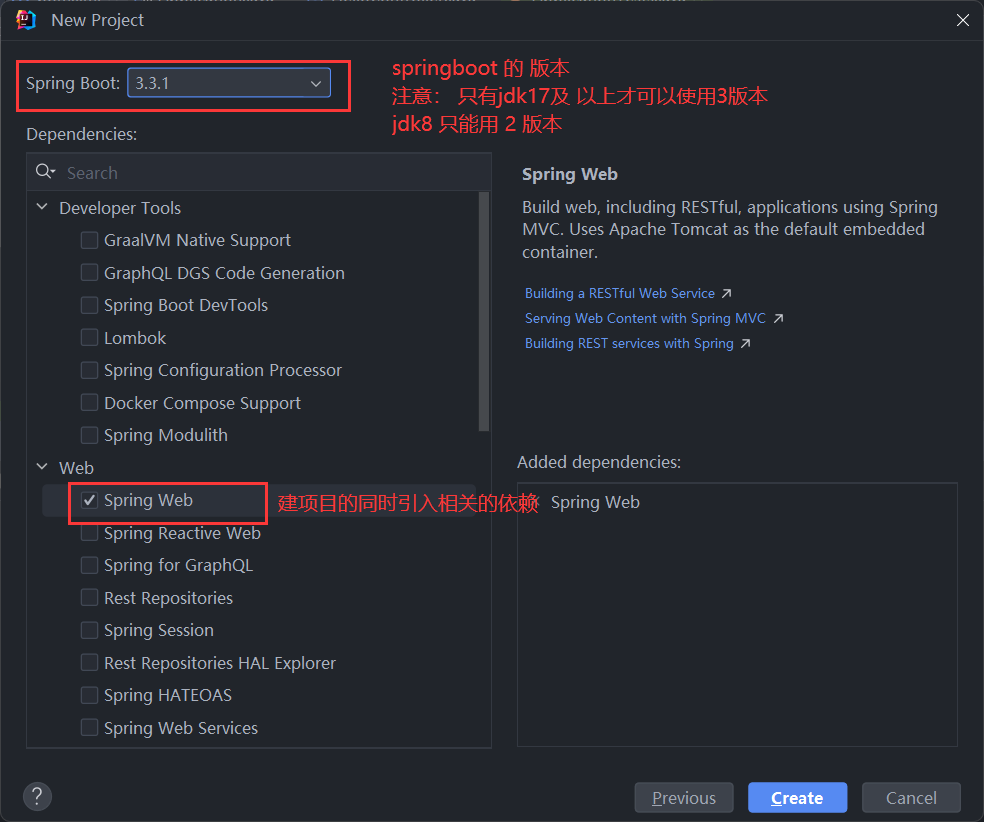
- 直接创建一个 springBoot 项目(要求 jdk 版本必须 17 或 21/22)
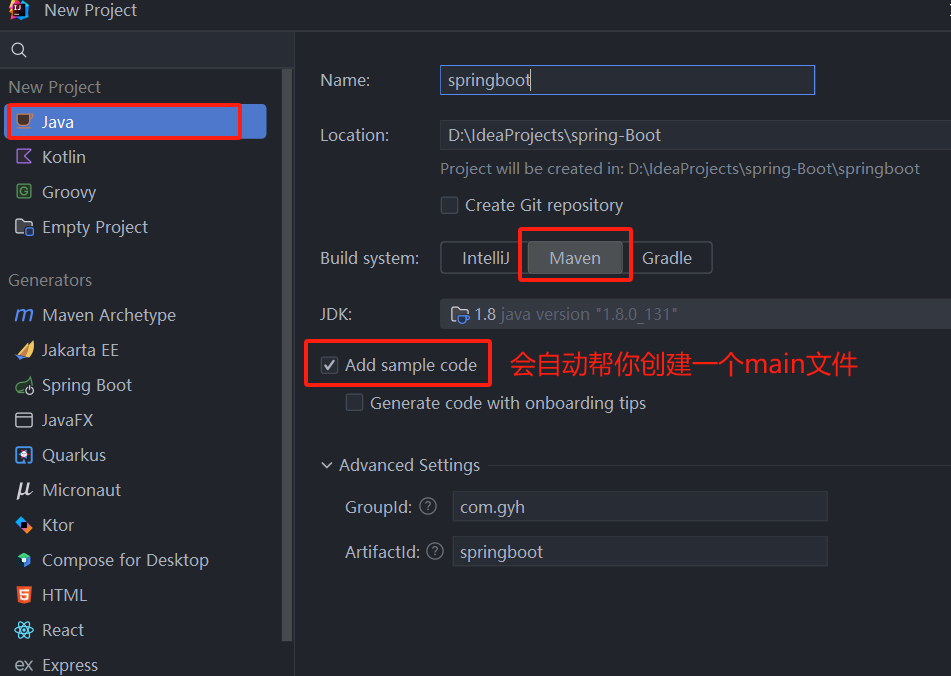
- 创建一个空的 maven 工程 引入相关的依赖配置(jdk 8 版本使用)
注意:jdk8 只能使用 springboot 2 版本 不能使用 3 版本
直接创建一个 spring boot 工程
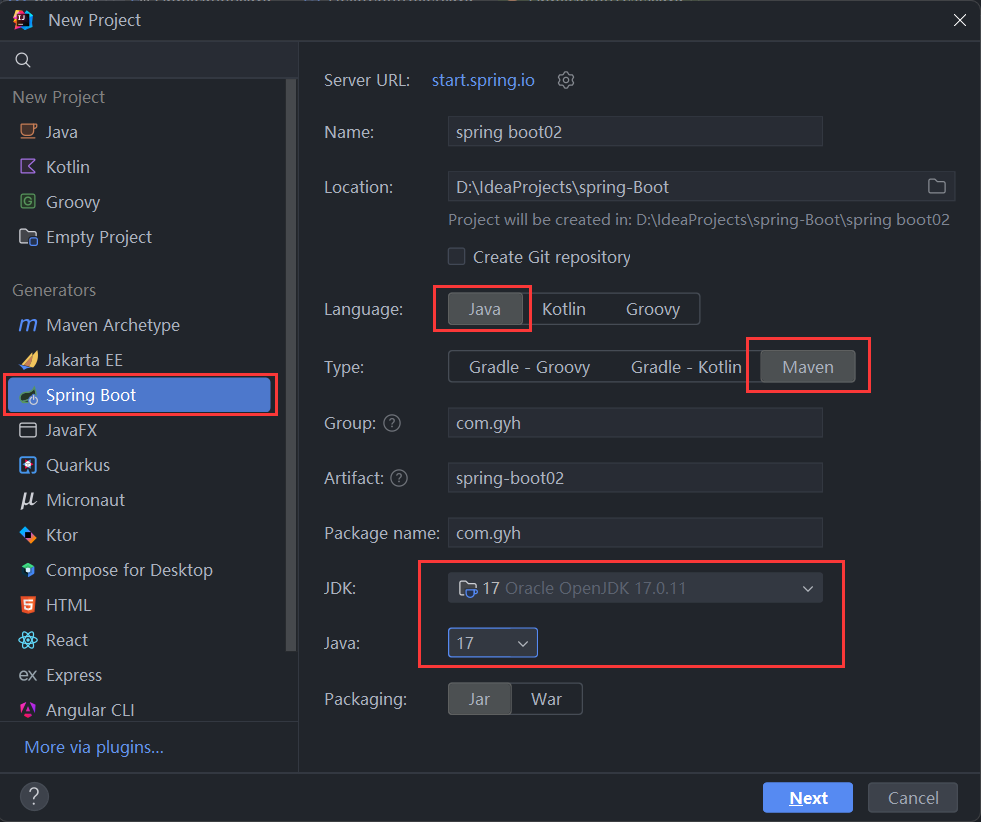
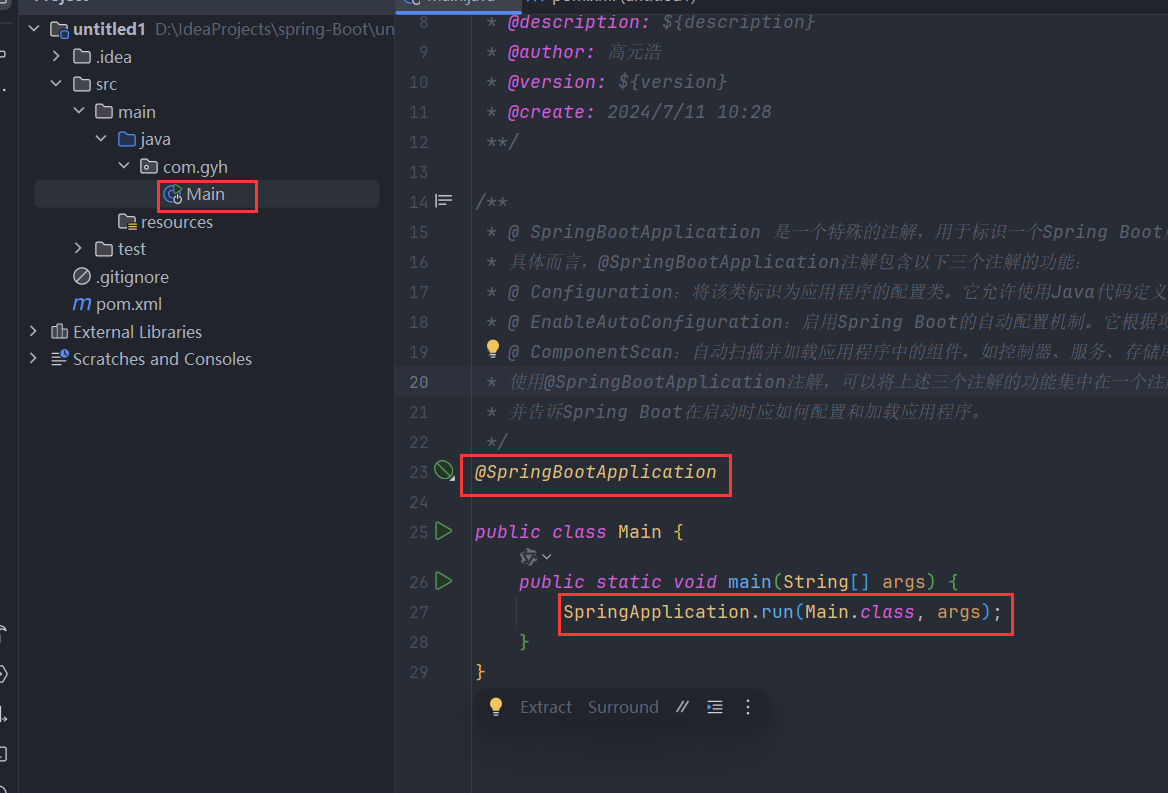
**注意: 注解需要在启动类的同包或者子包下方可生效!无需指定 **
创建一个空 maven 工程
创建步骤:
- 创建Maven工程
- 添加依赖(springboot父工程依赖 , web启动器依赖)
- 编写启动引导类(springboot项目运行的入口)
- 编写处理器Controller
- 启动项目
- 创建一个空的 maven 工程项目
- 引入相关依赖
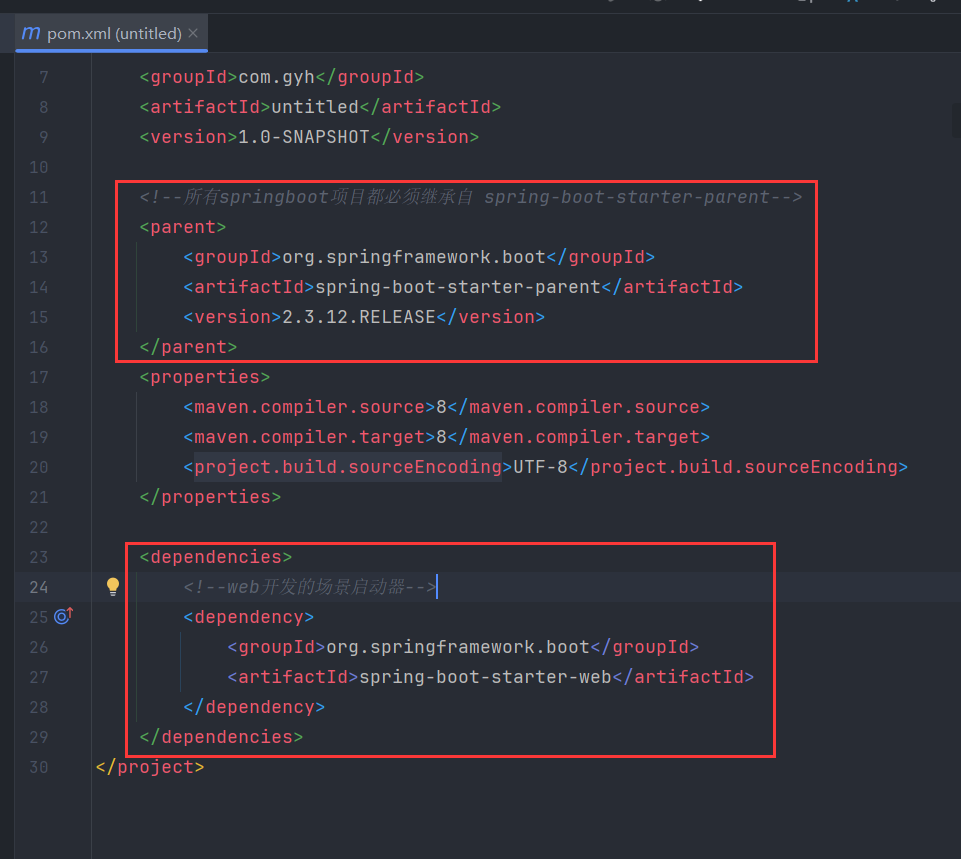
<!--所有springboot项目都必须继承自 spring-boot-starter-parent-->
<parent>
  <groupId>org.springframework.boot</groupId>
  <artifactId>spring-boot-starter-parent</artifactId>
  <version>2.3.12.RELEASE</version>
</parent>
<!--================================================================================-->
<dependencies>
  <!--web开发的场景启动器-->
  <dependency>
    <groupId>org.springframework.boot</groupId>
    <artifactId>spring-boot-starter-web</artifactId>
  </dependency>
</dependencies>
- 编写启动引导类(springboot项目运行的入口)
入门总结
- 为什么依赖不需要写版本?
- 每个boot项目都有一个父项目
spring-boot-starter-parent - parent的父项目是
spring-boot-dependencies - 父项目 版本仲裁中心,把所有常见的jar的依赖版本都声明好了。
- 比如:
mysql-connector-j
- 每个boot项目都有一个父项目
- 启动器(Starter)是何方神圣? Spring Boot提供了一种叫做Starter的概念,它是一组预定义的依赖项集合,旨在简化Spring应用程序的配置和构建过程。Starter包含了一组相关的依赖项,以便在启动应用程序时自动引入所需的库、配置和功能。 主要作用如下:
Spring Boot提供了许多预定义的Starter,例如spring-boot-starter-web用于构建Web应用程序,spring-boot-starter-data-jpa用于使用JPA进行数据库访问,spring-boot-starter-security用于安全认证和授权等等。
使用Starter非常简单,只需要在项目的构建文件(例如Maven的pom.xml)中添加所需的Starter依赖,Spring Boot会自动处理依赖管理和配置。
通过使用Starter,开发人员可以方便地引入和配置应用程序所需的功能,避免了手动添加大量的依赖项和编写冗长的配置文件的繁琐过程。同时,Starter也提供了一致的依赖项版本管理,确保依赖项之间的兼容性和稳定性。
spring boot提供的全部启动器地址:
https://docs.spring.io/spring-boot/docs/current/reference/html/using.html#using.build-systems.starters
命名规范:
- 简化依赖管理:Spring Boot Starter通过捆绑和管理一组相关的依赖项,减少了手动解析和配置依赖项的工作。只需引入一个相关的Starter依赖,即可获取应用程序所需的全部依赖。
- 自动配置:Spring Boot Starter在应用程序启动时自动配置所需的组件和功能。通过根据类路径和其他设置的自动检测,Starter可以自动配置Spring Bean、数据源、消息传递等常见组件,从而使应用程序的配置变得简单和维护成本降低。
- 提供约定优于配置:Spring Boot Starter遵循“约定优于配置”的原则,通过提供一组默认设置和约定,减少了手动配置的需要。它定义了标准的配置文件命名约定、默认属性值、日志配置等,使得开发者可以更专注于业务逻辑而不是繁琐的配置细节。
- 快速启动和开发应用程序:Spring Boot Starter使得从零开始构建一个完整的Spring Boot应用程序变得容易。它提供了主要领域(如Web开发、数据访问、安全性、消息传递等)的Starter,帮助开发者快速搭建一个具备特定功能的应用程序原型。
- 模块化和可扩展性:Spring Boot Starter的组织结构使得应用程序的不同模块可以进行分离和解耦。每个模块可以有自己的Starter和依赖项,使得应用程序的不同部分可以按需进行开发和扩展。
- 官方提供的场景:命名为:
spring-boot-starter-* - 第三方提供场景:命名为:
*-spring-boot-starter
- @SpringBootApplication注解的功效? @SpringBootApplication添加到启动类上,是一个组合注解,他的功效有具体的子注解实现!
@SpringBootConfiguration
@EnableAutoConfiguration
@ComponentScan
public @interface SpringBootApplication {}
@SpringBootApplication注解是Spring Boot框架中的核心注解,它的主要作用是简化和加速Spring Boot应用程序的配置和启动过程。
具体而言,@SpringBootApplication注解起到以下几个主要作用:
- 自动配置:@SpringBootApplication注解包含了@EnableAutoConfiguration注解,用于启用Spring Boot的自动配置机制。自动配置会根据应用程序的依赖项和类路径,自动配置各种常见的Spring配置和功能,减少开发者的手动配置工作。它通过智能地分析类路径、加载配置和条件判断,为应用程序提供适当的默认配置。
- 组件扫描:@SpringBootApplication注解包含了@ComponentScan注解,用于自动扫描并加载应用程序中的组件,例如控制器(Controllers)、服务(Services)、存储库(Repositories)等。它默认会扫描@SpringBootApplication注解所在类的包及其子包中的组件,并将它们纳入Spring Boot应用程序的上下文中,使它们可被自动注入和使用。
- 声明配置类:@SpringBootApplication注解本身就是一个组合注解,它包含了@Configuration注解,将被标注的类声明为配置类。配置类可以包含Spring框架相关的配置、Bean定义,以及其他的自定义配置。通过@SpringBootApplication注解,开发者可以将配置类与启动类合并在一起,使得配置和启动可以同时发生。
总的来说,@SpringBootApplication注解的主要作用是简化Spring Boot应用程序的配置和启动过程。它自动配置应用程序、扫描并加载组件,并将配置和启动类合二为一,简化了开发者的工作量,提高了开发效率。
springboot常用的配置文件种类
springboot提供了两种配置文件。第一种properties 第二种:yml文件。不管是哪种他们的前缀都是application
yaml格式
server:
  port: 8088
  servlet:
    context-path: /bbb
properties格式:
#key=value
server.port=8080
server.servlet.context-path=/aaa
如果上面两个文件同时存在,哪个文件的优先级高。properties高。
springboot中java如何读取配置文件中的内容【重点】
我们习惯把一些自己的信息放入配置文件中,便于修改。比如OSS. 支付。 我们还希望通过java代码能够读取到配置文件中自己的信息。
springboot提供了两种方式用于读取springboot配置文件中信息的方式。
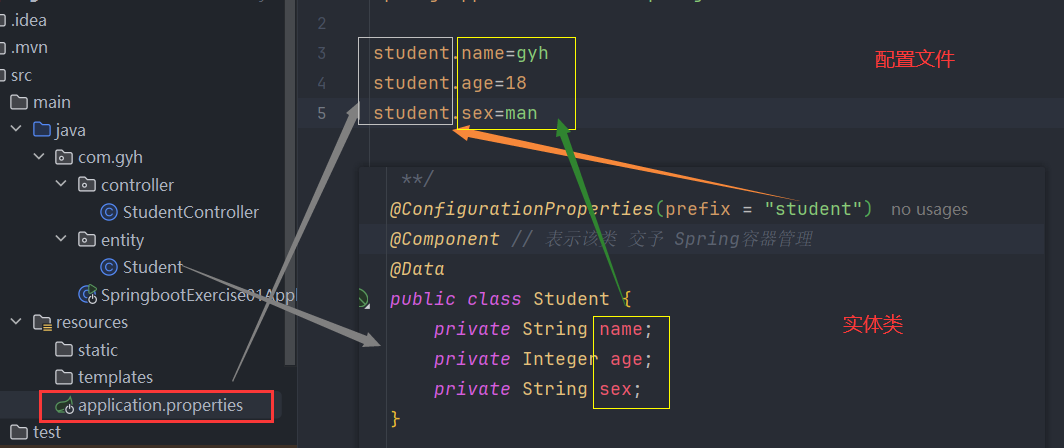
- ** @ConfigurationProperties**
- ** @Value**
第一种 : @ConfigurationProperties
在 conreoller 层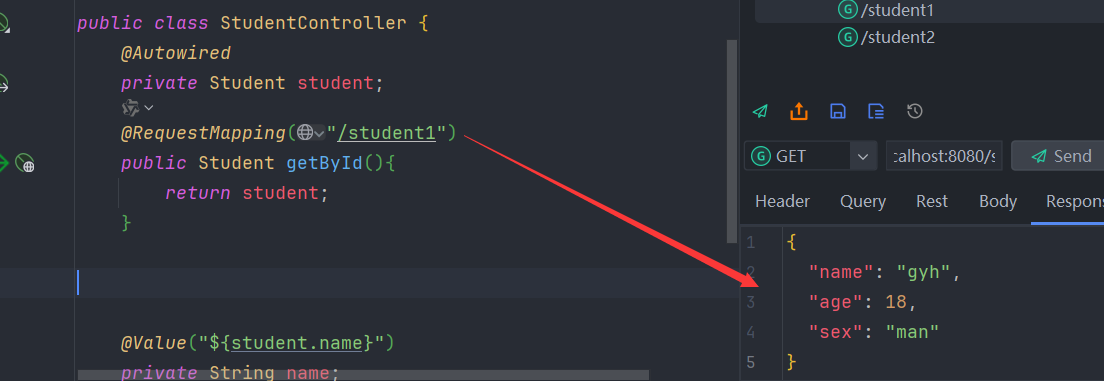
第二种:@Value
@Value 有一个缺点就是 它只能读取 基本类型 和 字符串类型
直接在需要用的的地方使用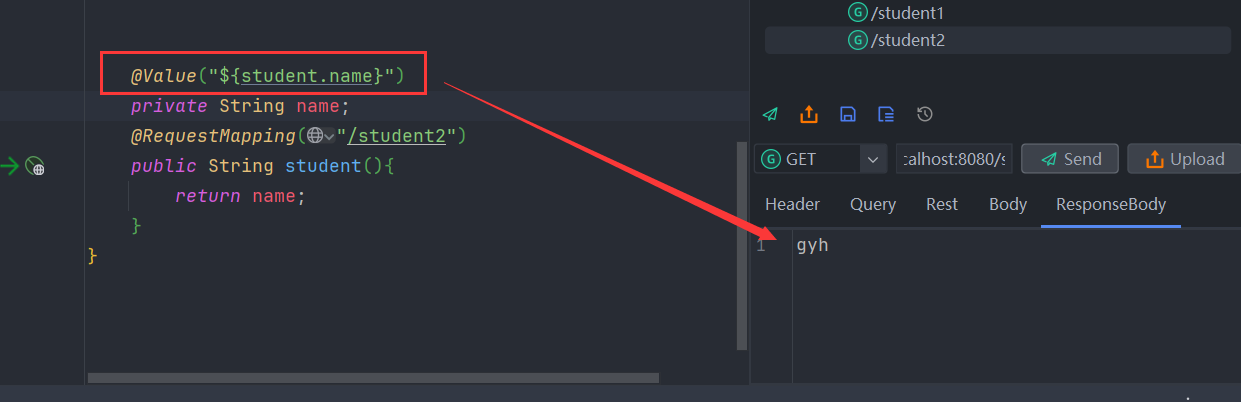
profile多环境配置 [重点]
我们在开发Spring Boot应用时,通常同一套程序会被安装到不同环境,比如:开发、测试、生产等。其中数据库地址、服务器端口等等配置都不同,如果每次打包时,都要修改配置文件,那么非常麻烦。profile功能就是来进行动态配置切换的。
**1) profile配置方式 **
- **多profile文件方式 **
- yml多文档方式
**2) profile激活方式 **
- **配置文件 **
- 命令行参数
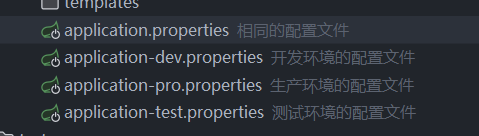
我们需要针对不同的环境来创建不同的配置文件。使用profile来激活对应的配置文件
application-dev.properties  [开发环境的配置文件]
application-test.properties [测试环境的配置文件]
application-pro.properties [生产环境的配置文件]
-------------------------相同配置依然还是放在application.properties中------------------
如何激活配置文件
- **第一种: 在相同的配置文件中 **
**spring.profiles.active = pro ****这里用 pro 生产环境 举例 ** - **第二种:部署时激活对应的环境的配置 **
**java -jar xxx.jar --spring.profiles.active = pro**
springboot注册web组件
**web组件表示的就是servlet,filter组件。 **
回顾: 我们之前讲servlet时的步骤.
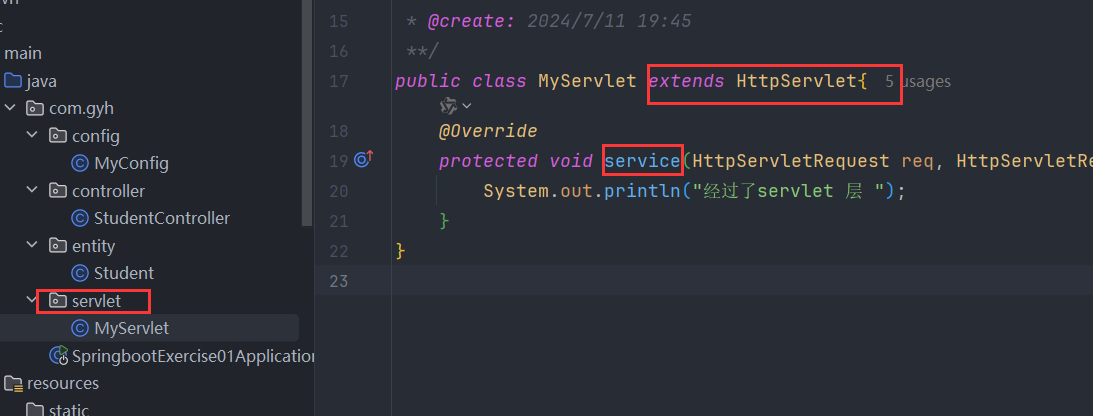
[1]创建一个类并继承HttpServlet 重写service方法
[2]注册到web.xml文件中
<servlet>
  <servlet-name></servlet-name>
  <servlet-class>自己的servlet或第三方的servlet</servlet-class>
</servlet>
<servlet-mapping>
  <servlet-name></servlet-name>
  <url-partern>/my</url-partern>
</servlet-mapping>
思考: 在springboot中还有没有web.xml文件。[没有] 它如何注册servlet? 提供了一个配置类。
springboot 注册 servlet
- 创建一个 servlet 并重写 service 方法
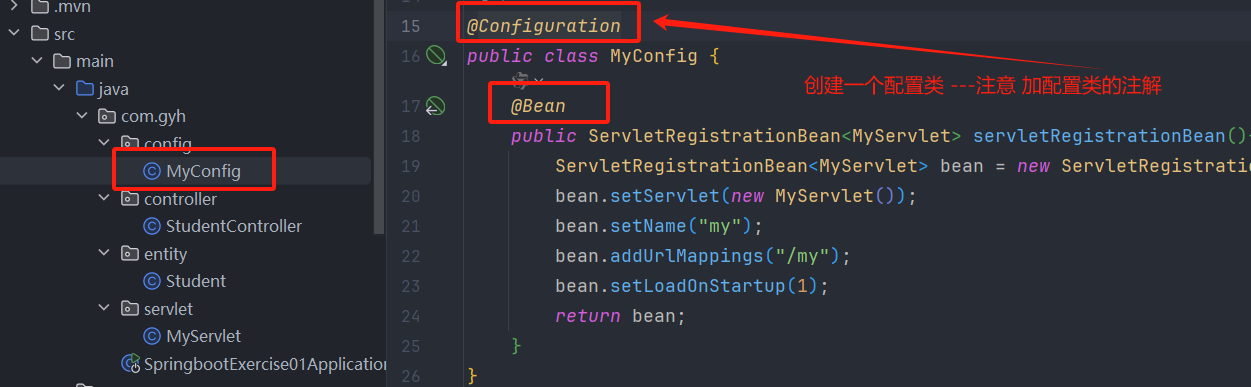
- 创建一个配置类
- 测试访问

注册过滤器
**回顾: **
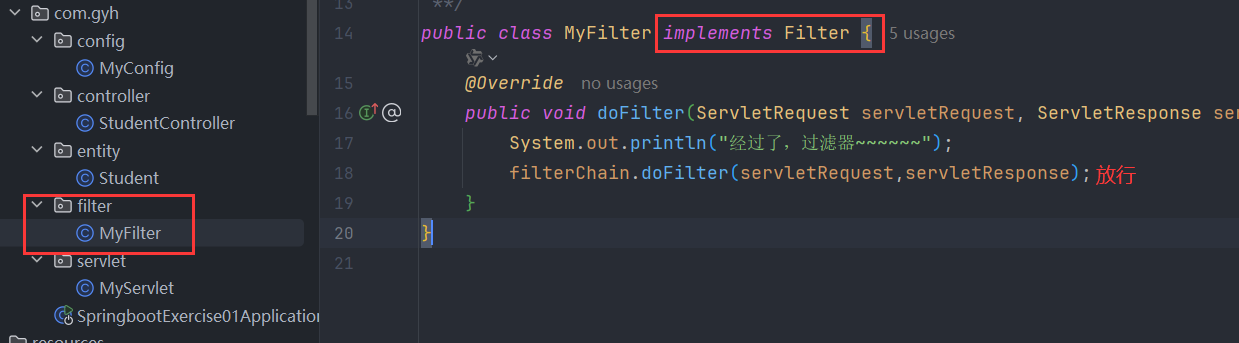
[1]创建一个类并实现Filter接口 doFilter方法
[2]注册到web.xml文件中
<filter>

</filter>
- 创建一个 filter 过滤器
- 在配置类中 配置 过滤器(过滤器仍需要写到配置类中【配置类需要加注解:
@Configuration】)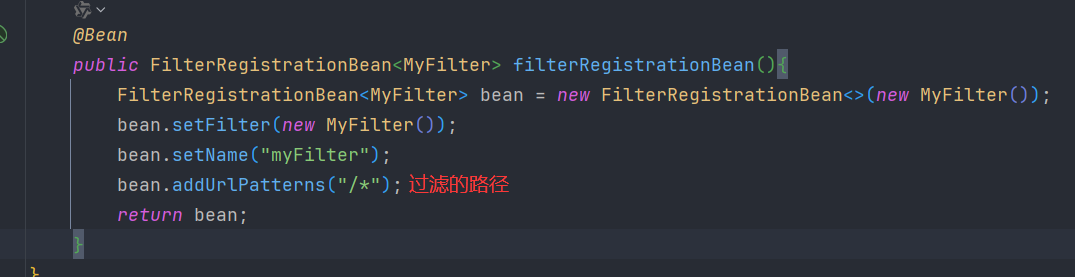
springboot包扫描的原理【面试重点】
ssm项目必须加包扫描。而现在springboot没有在写包扫描了。自带了包扫描的功能。核心在主类上@SpringBootApplication上,它是一个复合注解。里面包含@EnableAutoConfiguration开启自动配置,里面包含@AutoConfigurationPackage。@Import({AutoConfigurationPackages.Registrar.class})需要导入一个自动配置包的类。加载主类所在的包,并按照该包进行扫描。
我们如果不想让他扫描主类所在的包,我们可以使用@CompentScan(basePackages={})来指定自己的包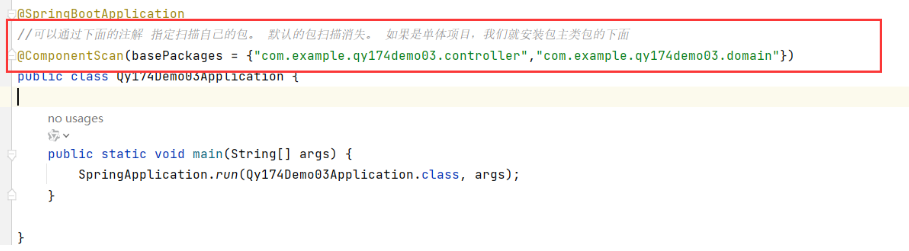
springboot的自动装配原理 【面试重点】
我们原来ssm项目,都需要加载前端控制器DispatcherServlet. 而现在的springboot并没有加载DispatcherServlet。 springboot具备自动装配的功能。
springboot启动时,加载了使用@SpringbootApplication注解的类,该注解是一个复合注解,包含@EnableAutoConfiguration该注解开启了自动装配功能,该复合也是一个符合注解里面包含@Import({AutoConfigurationImportSelector.class}),导入AutoConfigurationImportSelector该类自动装配选择器类,该类会自动加载很多自动装配。每个自动装配会完成对于的自动装配功能

springboot 整合第三方的框架
整合mybatis(使用的 jdk 17 + springBoot3 版本)
添加依赖
<!-- mysql 依赖 -->
<!-- 这里需要注意如果 使用的不是 jdk17和spring boot3 则不能用下面依赖 -->
<dependency>
    <groupId>com.mysql</groupId>
    <artifactId>mysql-connector-j</artifactId>
</dependency>
<!-- mybatis 依赖 -->
<dependency>
  <groupId>org.mybatis.spring.boot</groupId>
  <artifactId>mybatis-spring-boot-starter-test</artifactId>
  <version>3.0.3</version>
  <scope>test</scope>
</dependency>
配置文件
#数据源的信息
spring.datasource.driver-class-name=com.mysql.cj.jdbc.Driver
spring.datasource.url=jdbc:mysql://localhost:3306/company?serverTimezone=Asia/Shanghai
spring.datasource.username=root
spring.datasource.password=root

#配置mybatis映射文件的路径
mybatis.mapper-locations=classpath:mapper/*.xml
实体类
@Data
public class Emp implements Serializable {
    private Integer id;

    private String name;

    private String birthday;

    private String hireDate;

    private Double salary;

    private Integer deptId;
}
映射文件
<?xml version="1.0" encoding="UTF-8"?>
<!DOCTYPE mapper
        PUBLIC "-//mybatis.org//DTD Mapper 3.0//EN"
        "http://mybatis.org/dtd/mybatis-3-mapper.dtd">
<mapper namespace="com.gyh.mapper.EmpMapper">

    <resultMap id="BaseResultMap" type="com.gyh.entity.Emp">
            <id property="id" column="id" jdbcType="INTEGER"/>
            <result property="name" column="name" jdbcType="VARCHAR"/>
            <result property="birthday" column="birthday" jdbcType="VARCHAR"/>
            <result property="hireDate" column="hire_date" jdbcType="VARCHAR"/>
            <result property="salary" column="salary" jdbcType="DOUBLE"/>
            <result property="deptId" column="dept_id" jdbcType="INTEGER"/>
    </resultMap>

    <sql id="Base_Column_List">
        id,name,birthday,
        hire_date,salary,dept_id
    </sql>

    <select id="selectByPrimaryKey" parameterType="java.lang.Long" resultMap="BaseResultMap">
        select
        <include refid="Base_Column_List" />
        from emp
        where  id = #{id,jdbcType=INTEGER}
    </select>
    <select id="selectAll" resultMap="BaseResultMap">
        select *
        from emp
    </select>

    <delete id="deleteByPrimaryKey" parameterType="java.lang.Long">
        delete from emp
        where  id = #{id,jdbcType=INTEGER}
    </delete>
    <insert id="insert" keyColumn="id" keyProperty="id" parameterType="com.gyh.entity.Emp" useGeneratedKeys="true">
        insert into emp
        ( id,name,birthday
        ,hire_date,salary,dept_id
        )
        values (#{id,jdbcType=INTEGER},#{name,jdbcType=VARCHAR},#{birthday,jdbcType=VARCHAR}
        ,#{hireDate,jdbcType=VARCHAR},#{salary,jdbcType=DOUBLE},#{deptId,jdbcType=INTEGER}
        )
    </insert>
    <insert id="insertSelective" keyColumn="id" keyProperty="id" parameterType="com.gyh.entity.Emp" useGeneratedKeys="true">
        insert into emp
        <trim prefix="(" suffix=")" suffixOverrides=",">
                <if test="id != null">id,</if>
                <if test="name != null">name,</if>
                <if test="birthday != null">birthday,</if>
                <if test="hireDate != null">hire_date,</if>
                <if test="salary != null">salary,</if>
                <if test="deptId != null">dept_id,</if>
        </trim>
        <trim prefix="values (" suffix=")" suffixOverrides=",">
                <if test="id != null">#{id,jdbcType=INTEGER},</if>
                <if test="name != null">#{name,jdbcType=VARCHAR},</if>
                <if test="birthday != null">#{birthday,jdbcType=VARCHAR},</if>
                <if test="hireDate != null">#{hireDate,jdbcType=VARCHAR},</if>
                <if test="salary != null">#{salary,jdbcType=DOUBLE},</if>
                <if test="deptId != null">#{deptId,jdbcType=INTEGER},</if>
        </trim>
    </insert>
    <update id="updateByPrimaryKeySelective" parameterType="com.gyh.entity.Emp">
        update emp
        <set>
                <if test="name != null">
                    name = #{name,jdbcType=VARCHAR},
                </if>
                <if test="birthday != null">
                    birthday = #{birthday,jdbcType=VARCHAR},
                </if>
                <if test="hireDate != null">
                    hire_date = #{hireDate,jdbcType=VARCHAR},
                </if>
                <if test="salary != null">
                    salary = #{salary,jdbcType=DOUBLE},
                </if>
                <if test="deptId != null">
                    dept_id = #{deptId,jdbcType=INTEGER},
                </if>
        </set>
        where   id = #{id,jdbcType=INTEGER}
    </update>
    <update id="updateByPrimaryKey" parameterType="com.gyh.entity.Emp">
        update emp
        set
            name =  #{name,jdbcType=VARCHAR},
            birthday =  #{birthday,jdbcType=VARCHAR},
            hire_date =  #{hireDate,jdbcType=VARCHAR},
            salary =  #{salary,jdbcType=DOUBLE},
            dept_id =  #{deptId,jdbcType=INTEGER}
        where   id = #{id,jdbcType=INTEGER}
    </update>
</mapper>
service 及 实现接口类
public interface EmpService {
    R selectAll();

    R insert(Emp emp);

    int delete(Integer id);
}
//====================================================
@Service
public class EmpServiceImpl implements EmpService {
    @Autowired
    private EmpMapper empMapper;

    @Override
    public R selectAll() {
        List<Emp> emps = empMapper.selectAll();
        if (emps != null){
            return new R(200,"查询成功",emps);
        }
        return R.error();
    }

    @Override
    public R insert(Emp emp) {
        int insert = empMapper.insertSelective(emp);
        if (insert > 0){
            return R.ok();
        }
        return R.error();
    }

    @Override
    public int delete(Integer id) {
        return empMapper.deleteByPrimaryKey(id.longValue());
    }
}
controller 层
@RestController
public class EmpController {
    @Autowired
    private EmpService empService;

    @GetMapping("/selAll")
    public R selAll() {
        return empService.selectAll();
    }

    @GetMapping("/insert")
    public R insert(Emp emp) {
        return empService.insert(emp);
    }

    @DeleteMapping("/delete")
    public R delete(Integer id) {
        int delete = empService.delete(id);
        if (delete == 1) {
            return R.ok();
        }
        return R.error();
    }
}
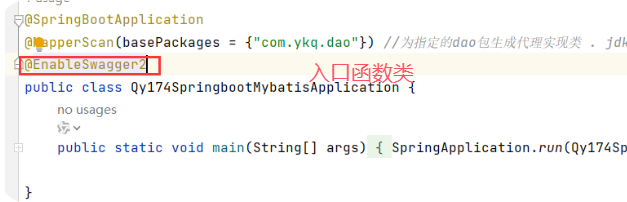
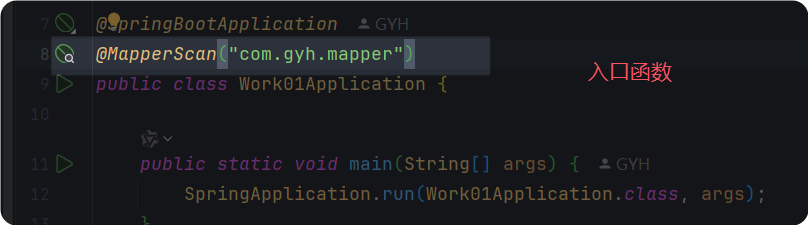
重点
一定要在入口函数上加 此注解 (注解主要的作用是 为 mapper 下的类生成代理实现类)
@MapperScan("com.gyh.mapper")
容易出现的错误
- ** 没有为 mapper 生成代理实现类**
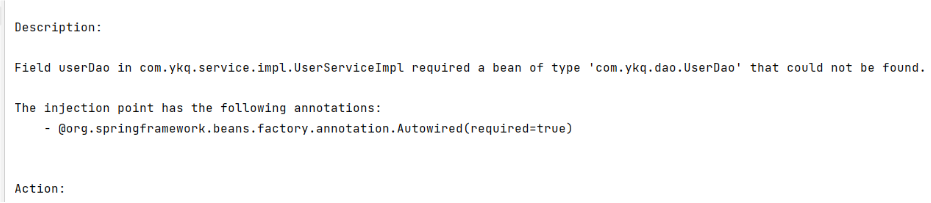

- mybatis和springboot整合的版本太高。


springboot整合swagger2(springboot2版本 + jdk8使用)
什么是 swagger 2 ,为什么要使用它?
Swagger2 是一个规范和完整的框架,用于生成、描述、调用和可视化Restful风格的web服务,现在我们使用spring boot 整合它。作用:接口的文档在线自动生成;
我们之所以用 swagger 是为了更好的前后端分离,我们在后端写的接口 前端工程的并不知此接口的作用,以及要传入的形参 包括得到的结果 是什么意思, 这时候有有一个好的在线文档 交流起来非常方便而 swagger 就帮助我们生成 这个文档,避免我们再去手写这个文档。

怎么使用 swagger2
- 导入依赖
<!--引入swagger2依赖-->
<dependency>
  <groupId>com.spring4all</groupId>
  <artifactId>swagger-spring-boot-starter</artifactId>
  <version>1.9.1.RELEASE</version>
</dependency>
<!--图形化依赖-->
<dependency>
  <groupId>com.github.xiaoymin</groupId>
  <artifactId>swagger-bootstrap-ui</artifactId>
  <version>1.9.6</version>
</dependency>
- 创建 swagger 2 配置类
@Configuration
public class SwaggerConfig {

    //创建swagger实例
    @Bean
    public Docket docket() {
        Docket docket=
                new Docket(DocumentationType.SWAGGER_2)
                        .apiInfo(getInfo())//设置接口文档的信息
                        .select()
                        //指定为那些路径下得到类生成接口文档
                        .apis(RequestHandlerSelectors.basePackage("com.gyh.controller"))
                        .build();
        return docket;
    }

    private ApiInfo getInfo(){
        Contact DEFAULT_CONTACT =
        new Contact("高元浩", "http://www.ldw.com", "110@qq.com");
        ApiInfo DEFAULT =
        new ApiInfo("用户管理系统API", "该系统中的接口专门操作用户的", "v1.0", "http://www.baidu.com",
                DEFAULT_CONTACT, "漫动者", "http://www.jd.com", new ArrayList<VendorExtension>());
        return DEFAULT;
    }
}
- 开启 swagger 2 驱动
- 访问接口
第一种: http://localhost:8080/swagger-ui.html
第二种: http://localhost:8080/doc.html
swagger2常用注解
1. @Api(tags=“”): 使用在接口类上,对接口类的说明
2. @ApiOperation(value=""):接口方法上,对接口方法的说明
3. @ApiImplicitParams(
           @ApiImplicitParam(name=“参数名”,value="参数说明",require="是否必写",dataType="数据类型")
    ) : 接口方法所有参数的概述

4. @ApiModel(value=""): 使用在实体类上,对实体类的说明
5. @ApiModelProperty(value=""):使用在实体类属性上,对属性的说明
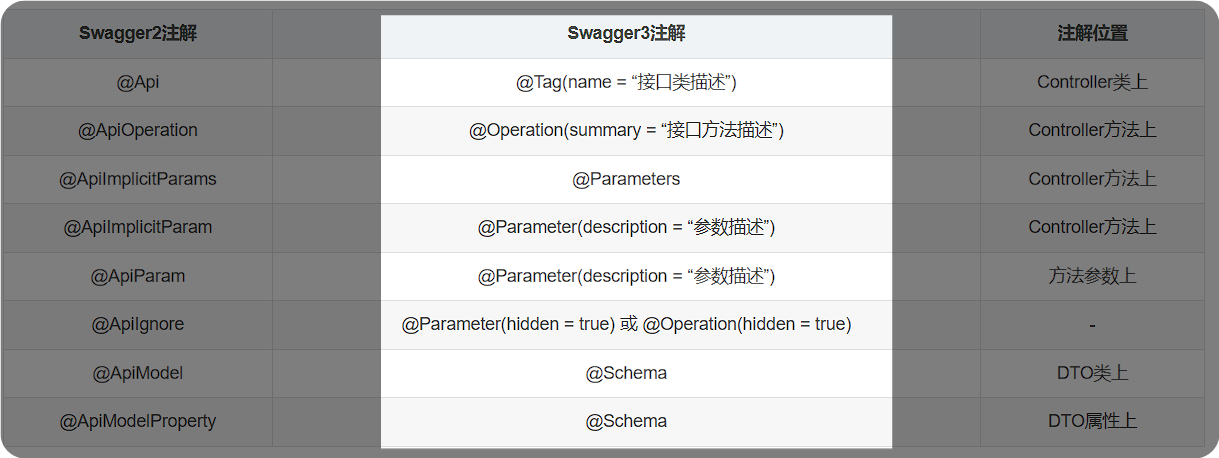
springboot3 整合 swagger3 (jdk17+springboot3)
- 添加依赖
<!--swagger3-->
<dependency>
  <groupId>com.github.xiaoymin</groupId>
  <artifactId>knife4j-openapi3-jakarta-spring-boot-starter</artifactId>
  <version>4.1.0</version>
</dependency>
- **配置 swagger 3 **
@Configuration
public class Swagger3 {
    @Bean
    public OpenAPI springShopOpenAPI() {
        return new OpenAPI()
        .info(new Info().title("员工管理")
              .contact(new Contact())
              .description("员工管理的API文档")
              .version("1.0")
              .license(new License().name("Apache 2.0").url("http://springdoc.org")))
        .externalDocs(new ExternalDocumentation()
                      .description("外部文档")
                      .url("https://springshop.wiki.github.org/docs"));
    }
}
- 在需要的地方添加注解
- 访问地址
http://localhost:8080/doc.html
http://localhost:8080/swagger-ui/index.html
- 相关的注解的说明 (与 swagger 2 不相同)
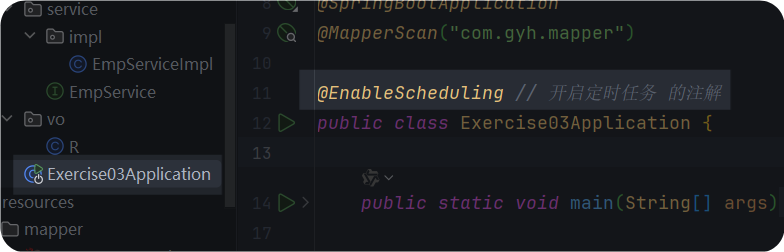
springboot整合定时器
在指定的时间执行相应的业务代码。场景: oss修改图片时,存在一个冗余图片。定时删除冗余图片。
比如: 下单。30分钟未支付取消订单。 比如: 新用户注册成功后,7天发送问候语
- 添加 依赖
<!--        定时器 依赖-->
        <dependency>
            <groupId>org.springframework.boot</groupId>
            <artifactId>spring-boot-starter-quartz</artifactId>
        </dependency>
- 创建定时器的业务类
@Configuration
public class Timer {
    @Scheduled(cron = "0/5 * * * * ?")  //
    public void timer() {
        System.out.println("定时任务执行");
    }
}
- 开启定时器注解驱动
- cron 表达式
springboot整合mybatis-plus
MyBatis-Plus 是一个 MyBatis 的增强工具,在 MyBatis 的基础上只做增强不做改变,为简化开发、提高效率而生。
特点:
- 无侵入:只做增强不做改变,引入它不会对现有工程产生影响,如丝般顺滑
- 损耗小:启动即会自动注入基本 CURD,性能基本无损耗,直接面向对象操作。
- 强大的 CRUD 操作:内置通用 Mapper、通用 Service,仅仅通过少量配置即可实现单表大部分 CRUD 操作,更有强大的条件构造器,满足各类使用需求
- 支持 Lambda 形式调用:通过 Lambda 表达式,方便的编写各类查询条件,无需再担心字段写错
- 支持主键自动生成:支持多达 4 种主键策略(内含分布式唯一 ID 生成器 - Sequence),可自由配置,完美解决主键问题
- 支持 ActiveRecord 模式:支持 ActiveRecord 形式调用,实体类只需继承 Model 类即可进行强大的 CRUD 操作
- 支持自定义全局通用操作:支持全局通用方法注入( Write once, use anywhere )
- 内置代码生成器:采用代码或者 Maven 插件可快速生成 Mapper 、 Model 、 Service 、 Controller 层代码,支持模板引擎,更有超多自定义配置等您来使用
- 内置分页插件:基于 MyBatis 物理分页,开发者无需关心具体操作,配置好插件之后,写分页等同于普通 List 查询。
- 分页插件支持多种数据库:支持 MySQL、MariaDB、Oracle、DB2、H2、HSQL、SQLite、Postgre、SQLServer 等多种数据库
- 内置性能分析插件:可输出 SQL 语句以及其执行时间,建议开发测试时启用该功能,能快速揪出慢查询
- 内置全局拦截插件:提供全表 delete 、 update 操作智能分析阻断,也可自定义拦截规则,预防误操作
使用 mybatis-plus
这里需要分两种情况
- springboot3 版本 和 jdk 17 搭配
- springboot2 版本 和 jdk 8 搭配
spring boot 3 搭配 jdk 17
- **引入依赖 **
<!-- mybatis-plus 依赖-->
<dependency>
  <groupId>com.baomidou</groupId>
  <artifactId>mybatis-plus-spring-boot3-starter</artifactId>
  <version>3.5.7</version>
</dependency>
- 在配置文件中 【配置映射文件路径】【配置日志】
# 配置MySQL驱动类名
spring.datasource.driver-class-name=com.mysql.cj.jdbc.Driver

# 配置数据库连接URL,这里的公司数据库的地址
spring.datasource.url=jdbc:mysql://localhost:3306/company

# 配置数据库用户名
spring.datasource.username=root

# 配置数据库密码
spring.datasource.password=root

# 指定MyBatis-Plus的Mapper文件位置
mybatis-plus.mapper-locations=classpath:mapper/*.xml

# 配置MyBatis-Plus的日志实现为控制台输出
mybatis-plus.configuration.log-impl=org.apache.ibatis.logging.stdout.StdOutImpl
- 分页插件的配置类
@Configuration
public class MybatisPlusConfig {

    /**
     * 添加分页插件
     * 该方法用于配置并返回MybatisPlusInterceptor实例,该插件主要用于支持分页查询。
     * 通过添加PaginationInnerInterceptor来支持MySQL数据库的分页功能。
     *
     * @return MybatisPlusInterceptor 分页插件实例
     */
    @Bean
    public MybatisPlusInterceptor mybatisPlusInterceptor() {
        // 创建MybatisPlusInterceptor实例
        MybatisPlusInterceptor interceptor = new MybatisPlusInterceptor();
        // 添加PaginationInnerInterceptor来处理MySQL的分页逻辑
        interceptor.addInnerInterceptor(new PaginationInnerInterceptor(DbType.MYSQL));
        // 返回配置好的分页插件
        return interceptor;
    }
- 实体类
@Data
@EqualsAndHashCode(callSuper = false)
@Accessors(chain = true)
@TableName("emp")
@Schema(name = "员工实体类", description="Emp对象")
public class Emp implements Serializable {

    private static final long serialVersionUID = 1L;

    @Schema(description="员工编号")
    @TableId(value = "id", type = IdType.AUTO)
    private Integer id;

    @Schema(description="员工姓名")
    private String name;

    @Schema(description="出生日期")
    private String birthday;

    @Schema(description="入职时间")
    private String hireDate;

    @Schema(description="薪资")
    private Double salary;

    @Schema(description="部门编号")
    private Integer deptId;
    // 声明该字段不是数据库字段
    @TableField(exist = false)
    @Schema(description="部门")
    private Dept dept;


}
- mapper
public interface EmpMapper extends BaseMapper<Emp> {
    // 自定义的 查询全部 分页
    IPage<Emp> selectAll(IPage<Emp> page, @Param("ew") Wrapper<Emp> queryWrapper);
}
- service 层
public interface IEmpService extends IService<Emp> {
}
- service 的实现类
@Service
public class EmpServiceImpl extends ServiceImpl<EmpMapper, Emp> implements IEmpService {
}
- 为 mapper 生成代理实现类
- controller 层
@RestController
@RequestMapping("/emp")
@Tag(name = "员工管理")
public class EmpController {

    @Autowired
    private IEmpService iempService;

    @Operation(summary = "查询全部员工")
    @GetMapping("/selleAll")
    public R selectAll() {
        return R.ok(iempService.list());
    }

    @Parameters()
    @PutMapping("/insert")
    public R insert(@Parameter(description = "员工信息") Emp emp) {
        return R.ok(iempService.save(emp));
    }

    @Operation(summary = "删除员工")
    @DeleteMapping("/delete")
    public String delete() {
        return "你好";
    }
}
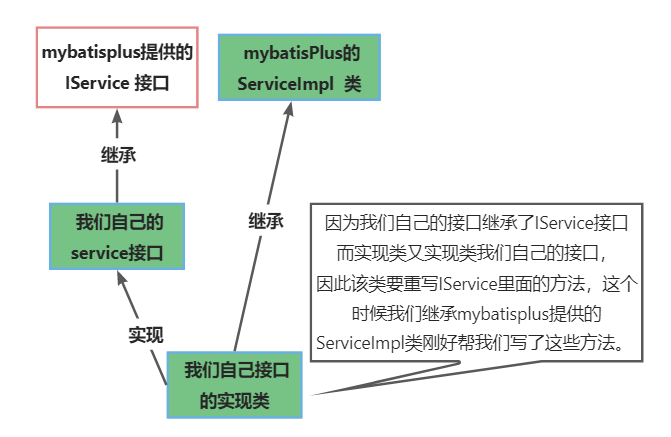
:::tips
mybatis-plus 简化更多的操作,针对于单表;
- service 可直接继承 mybatispPlus /提供接口
IService<Emp>该接口的泛型要写对应的实体类; - 实现 service 接口的类在实现接口的基础上再继承
**ServiceImpl<EmpMapper, Emp>**泛型同样要写对应类的 mapper 和实体类;继承该类的原因是因为,该类实现了 service 层的接口,而 sercive 接口继承了一个IService类,该类里面写好了很多针对单表的操作,我们继承的同时要重写里面的方法,而我们继承的**ServiceImpl<EmpMapper, Emp>**,恰恰帮我们写好这些方法,因此继承后就不用重写方法了,直接使用 mybatis-plus 写好的方法
- 这时候我们只需要正常在 controller 层正常注入 service 正常调用 mybatisPuls 提供好的方法就能完成对单表的,几乎所有操作,操作如下:
:::
持久层接口
jdk 8 + spring boot 3
依赖与上面不同;其他都类似
<dependency>
  <groupId>com.baomidou</groupId>
  <artifactId>mybatis-plus-boot-starter</artifactId>
  <version>3.5.7</version>
</dependency>


 21万+
21万+


 被折叠的 条评论
为什么被折叠?
被折叠的 条评论
为什么被折叠?
 到【灌水乐园】发言


