


这是生成的文件效果

一、导入依赖
        <!--easypoi-->
        <dependency>
            <groupId>cn.afterturn</groupId>
            <artifactId>easypoi-base</artifactId>
            <version>4.2.0</version>
        </dependency>
        <dependency>
            <groupId>cn.afterturn</groupId>
            <artifactId>easypoi-web</artifactId>
            <version>4.1.0</version>
        </dependency>
        <dependency>
            <groupId>cn.afterturn</groupId>
            <artifactId>easypoi-annotation</artifactId>
            <version>4.2.0</version>
        </dependency>
com.alibaba.excel.exception.ExcelGenerateException: java.lang.NoSuchMethodError: org.apache.poi.ss.usermodel.Cell.getCellType()Lorg/apache/poi/ss/usermodel/CellType;我总是会遇到这个问题,原因在于公司的框架引入了hutoolExecl、POI和EasyPOI三种jar包,导致版本冲突,如果要使用EasyPOI,最好把其他的包都删掉,因为EasyPOI会自动引入原生的poi不需要单独引入。
二、创建模板文件
这是我的xls模板文件,单个参数直接用 {{参数名}} 就可以识别到,如果是列表数据,就需要fe语法
{{$fe: maplist t.id 。。。。。。t.projectCategory}} 双花括号从头包括到尾部 maplist是后端传来的map一个键值对

三、Java代码
1、 引入模板文件
TemplateExportParams params = new TemplateExportParams("ftl/supervisionProject.xls");2、生成模板的数据
模板的数据都是由map集合来接受的
Map<String, Object> map = new HashMap<String, Object>();
        map.put("year", "2024");
        map.put("mouth", "01");
        File img=new File("D:\\HuaweiMoveData\\Users\\AK47\\Desktop\\各种图片\\640 (2).jpg");
            ByteArrayOutputStream byteArrayOut = new ByteArrayOutputStream();
        List<Map<String, Object>> listMap = new ArrayList<Map<String, Object>>();
        for (int i = 0; i < 4; i++) {
            Map<String, Object> lm = new HashMap<String, Object>();
            lm.put("id", i + 1 + "");
            lm.put("regionName", i * 10000 + "");
            lm.put("projectName", "A001");
            lm.put("projectCategory", "设计");
            // 插入图片
            BufferedImage bufferImg = ImageIO.read(img);
            ImageIO.write(bufferImg, "jpg", byteArrayOut);
            ImageEntity imageEntity = new ImageEntity(byteArrayOut.toByteArray(), 200, 1000);
            lm.put("img", imageEntity);
            listMap.add(lm);
        }
        map.put("maplist", listMap);
这一步是将图片放入到集合里,execl中的图片需要转为二进制数组存放
ImageIO.write(bufferImg, "jpg", byteArrayOut);将文件流转换到byte数组中
ImageEntity 是easypoi封装好的实体里可以设置图片大小
 // 插入图片
            BufferedImage bufferImg = ImageIO.read(img);
            ImageIO.write(bufferImg, "jpg", byteArrayOut);
            ImageEntity imageEntity = new ImageEntity(byteArrayOut.toByteArray(), 200, 1000);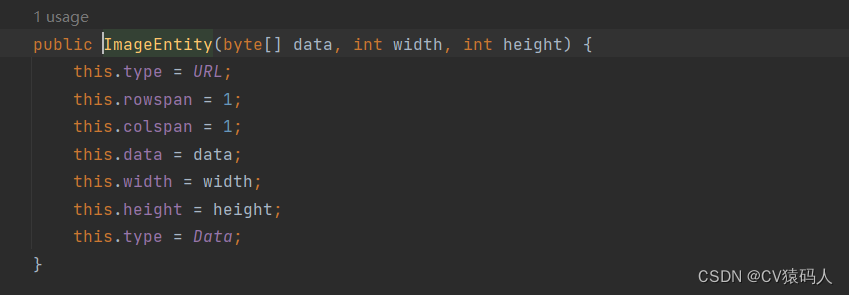
3、写入到文件中,并关闭流
 Workbook workbook = ExcelExportUtil.exportExcel(params, map);
 FileOutputStream fos = new FileOutputStream("D:/AAAAA/test.xls");
 workbook.write(fos);
 fos.close();
这是demo例子全部代码
 TemplateExportParams params = new TemplateExportParams(
                "ftl/supervisionProject.xls");
        Map<String, Object> map = new HashMap<String, Object>();
        map.put("year", "2024");
        map.put("mouth", "01");
        File img = new File("D:\\HuaweiMoveData\\Users\\AK47\\Desktop\\各种图片\\640 (2).jpg");
        ByteArrayOutputStream byteArrayOut = new ByteArrayOutputStream();
        List<Map<String, Object>> listMap = new ArrayList<Map<String, Object>>();
        for (int i = 0; i < 4; i++) {
            Map<String, Object> lm = new HashMap<String, Object>();
            lm.put("id", i + 1 + "");
            lm.put("regionName", i * 10000 + "");
            lm.put("projectName", "A001");
            lm.put("projectCategory", "设计");
            // 插入图片
            BufferedImage bufferImg = ImageIO.read(img);
            ImageIO.write(bufferImg, "jpg", byteArrayOut);
            ImageEntity imageEntity = new ImageEntity(byteArrayOut.toByteArray(), 200, 1000);
            lm.put("img", imageEntity);
            listMap.add(lm);
        }
        map.put("maplist", listMap);
        System.out.println(listMap);
        Workbook workbook = ExcelExportUtil.exportExcel(params, map);
        FileOutputStream fos = new FileOutputStream("D:/AAAAA/test.xls");
        workbook.write(fos);
        fos.close();


 1万+
1万+


 被折叠的 条评论
为什么被折叠?
被折叠的 条评论
为什么被折叠?
 到【灌水乐园】发言


