


1、认识线程(Thread)
1.1 概念
- 进程是包含线程的. 每个进程至少有一个线程存在,即主线程。
- 进程和进程之间不共享内存空间. 同一个进程的线程之间共享同一个内存空间.
比如之前的多进程例子中,每个客户来银行办理各自的业务,但他们之间的票据肯定是不想让别人知道的,否则钱不就被其他人取走了么。而上面我们的公司业务中,张三、李四、王五虽然是不同的执行流,但因为办理的都是一家公司的业务,所以票据是共享着的。这个就是多线程和多进程的最大区别。
- 进程是系统分配资源的最小单位,线程是系统调度的最小单位。

4) Java 的线程 和 操作系统线程 的关系
线程是操作系统中的概念. 操作系统内核实现
了线程这样的机制, 并且对用户层提供了一些 API 供用户使用(例如 Linux 的 pthread 库).Java 标准库中 Thread 类可以视为是对操作系统提供的 API 进行了进一步的抽象和封装.
1.2 第一个多线程程序
- 每个线程都是一个独立的执行流
- 多个线程之间是 "并发" 执行的.
import java.util.Random;
public class ThreadDemo {
    private static class MyThread extends Thread {
        @Override
        public void run() {
            Random random = new Random();
            while (true) {
                // 打印线程名称
                System.out.println(Thread.currentThread().getName());
                try {
                    // 随机停止运行 0-9 秒
 Thread.sleep(random.nextInt(10));
               } catch (InterruptedException e) {
                    e.printStackTrace();
               }
           }
       }
   }
    public static void main(String[] args) {
        MyThread t1 = new MyThread();
        MyThread t2 = new MyThread();
        MyThread t3 = new MyThread();
        t1.start();
        t2.start();
        t3.start();
        Random random = new Random();
        while (true) {
            // 打印线程名称
            System.out.println(Thread.currentThread().getName());
            try {
                Thread.sleep(random.nextInt(10));
           } catch (InterruptedException e) {
                // 随机停止运行 0-9 秒
                e.printStackTrace();
           }
       }
   }
}Thread-0Thread-0Thread-2Thread-1Thread-2Thread-1Thread-0Thread-2mainmainThread-2Thread-1Thread-0Thread-1mainThread-2Thread-2......

1.3 创建线程
class MyThread extends Thread {
    @Override
    public void run() {
        System.out.println("这里是线程运行的代码");
   }
}MyThread t = new MyThread();t.start(); // 线程开始运行class MyRunnable implements Runnable {
@Override
public void run() {
System.out.println("这里是线程运行的代码");
}
}Thread t = new Thread(new MyRunnable());t.start(); // 线程开始运行- 继承 Thread 类, 直接使用 this 就表示当前线程对象的引用.
- 实现 Runnable 接口, this 表示的是 MyRunnable 的引用. 需要使用 Thread.currentThread()
- 匿名内部类创建 Thread 子类对象
// 使用匿名类创建 Thread 子类对象
Thread t1 = new Thread() {
    @Override
    public void run() {
        System.out.println("使用匿名类创建 Thread 子类对象");
   }
};- 匿名内部类创建 Runnable 子类对象
// 使用匿名类创建 Runnable 子类对象
Thread t2 = new Thread(new Runnable() {
    @Override
    public void run() {
        System.out.println("使用匿名类创建 Runnable 子类对象");
   }
});- lambda 表达式创建 Runnable 子类对象
// 使用 lambda 表达式创建 Runnable 子类对象
Thread t3 = new Thread(() -> System.out.println("使用匿名类创建 Thread 子类对象"));
Thread t4 = new Thread(() -> {
    System.out.println("使用匿名类创建 Thread 子类对象");
});
1.4 多线程的优势-增加运行速度
- 使用 System.nanoTime() 可以记录当前系统的 纳秒 级时间戳.
- serial 串行的完成一系列运算. concurrency 使用两个线程并行的完成同样的运算.
public class ThreadAdvantage {
    // 多线程并不一定就能提高速度,可以观察,count 不同,实际的运行效果也是不同的
    private static final long count = 10_0000_0000;
    public static void main(String[] args) throws InterruptedException {
        // 使用并发方式
        concurrency();
        // 使用串行方式
        serial();
   }
    private static void concurrency() throws InterruptedException {
        long begin = System.nanoTime();

        // 利用一个线程计算 a 的值
        Thread thread = new Thread(new Runnable() {
            @Override
            public void run() {
                int a = 0;
                for (long i = 0; i < count; i++) {
                    a--;
               }
           }
       });
        thread.start();
        // 主线程内计算 b 的值
        int b = 0;
        for (long i = 0; i < count; i++) {
            b--;
       }
        // 等待 thread 线程运行结束
        thread.join();

        // 统计耗时
        long end = System.nanoTime();
        double ms = (end - begin) * 1.0 / 1000 / 1000;
        System.out.printf("并发: %f 毫秒%n", ms);
   }
    private static void serial() {
        // 全部在主线程内计算 a、b 的值
        long begin = System.nanoTime();
        int a = 0;
        for (long i = 0; i < count; i++) {
            a--;
       }
        int b = 0;
        for (long i = 0; i < count; i++) {
            b--;
       }
        long end = System.nanoTime();
        double ms = (end - begin) * 1.0 / 1000 / 1000;
        System.out.printf("串行: %f 毫秒%n", ms);
   }
}
并发 : 399.651856 毫秒串行 : 720.616911 毫秒
2. Thread 类及常见方法

2.1 Thread 的常见构造方法

Thread t1 = new Thread();
Thread t2 = new Thread ( new MyRunnable ());Thread t3 = new Thread ( " 这是我的名字 " );Thread t4 = new Thread ( new MyRunnable (), " 这是我的名字 " );
2.2 Thread 的几个常见属性

- ID 是线程的唯一标识,不同线程不会重复
- 名称是各种调试工具用到
- 状态表示线程当前所处的一个情况,下面我们会进一步说明
- 优先级高的线程理论上来说更容易被调度到
- 关于后台线程,需要记住一点:JVM会在一个进程的所有非后台线程结束后,才会结束运行。
- 是否存活,即简单的理解,为 run 方法是否运行结束了
- 线程的中断问题,下面我们进一步说明
public class ThreadDemo {
    public static void main(String[] args) {
        Thread thread = new Thread(() -> {
            for (int i = 0; i < 10; i++) {
                try {
                    System.out.println(Thread.currentThread().getName() + ": 我还
活着");
                    Thread.sleep(1 * 1000);
               } catch (InterruptedException e) {
                    e.printStackTrace();
               }
           }
            System.out.println(Thread.currentThread().getName() + ": 我即将死去");
       });
        System.out.println(Thread.currentThread().getName()
                           + ": ID: " + thread.getId());
        System.out.println(Thread.currentThread().getName()
                           + ": 名称: " + thread.getName());
        System.out.println(Thread.currentThread().getName()
                           + ": 状态: " + thread.getState());
        System.out.println(Thread.currentThread().getName()
                           + ": 优先级: " + thread.getPriority());
        System.out.println(Thread.currentThread().getName()
                           + ": 后台线程: " + thread.isDaemon());
        System.out.println(Thread.currentThread().getName()
                           + ": 活着: " + thread.isAlive());
        System.out.println(Thread.currentThread().getName()
                           + ": 被中断: " + thread.isInterrupted());
        thread.start();
        while (thread.isAlive()) {}
        System.out.println(Thread.currentThread().getName()
                           + ": 状态: " + thread.getState());
   }
}
2.3 启动一个线程-start()
- 覆写 run 方法是提供给线程要做的事情的指令清单
- 线程对象可以认为是把 李四、王五叫过来了
- 而调用 start() 方法,就是喊一声:”行动起来!“,线程才真正独立去执行了。
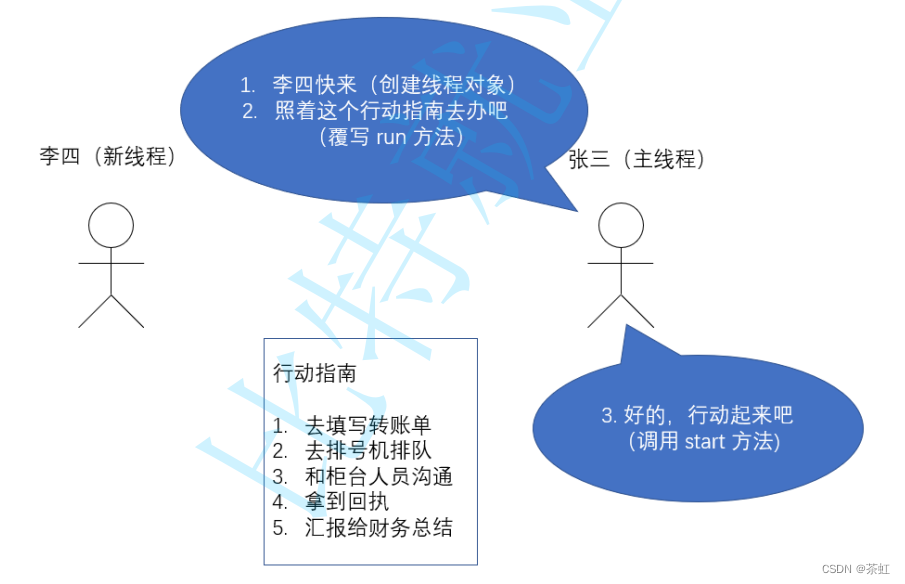
调用 start 方法, 才真的在操作系统的底层创建出一个线程.
2.4 中断一个线程
- 需要给标志位上加 volatile 关键字(这个关键字的功能后面介绍)
public class ThreadDemo {
    private static class MyRunnable implements Runnable {
        public volatile boolean isQuit = false;
        @Override
        public void run() {
            while (!isQuit) {
                System.out.println(Thread.currentThread().getName()
                        + ": 别管我,我忙着转账呢!");
                try {
                    Thread.sleep(1000);
               } catch (InterruptedException e) {
                    e.printStackTrace();
               }
           }
            System.out.println(Thread.currentThread().getName()
                    + ": 啊!险些误了大事");
       }
   }
    public static void main(String[] args) throws InterruptedException {
        MyRunnable target = new MyRunnable();
        Thread thread = new Thread(target, "李四");
        System.out.println(Thread.currentThread().getName()
                + ": 让李四开始转账。");
        thread.start();
        Thread.sleep(10 * 1000);
        System.out.println(Thread.currentThread().getName()
                + ": 老板来电话了,得赶紧通知李四对方是个骗子!");
        target.isQuit = true;
   }
}Thread 内部包含了一个 boolean 类型的变量作为线程是否被中断的标记.

- 使用 thread 对象的 interrupted() 方法通知线程结束.
public class ThreadDemo {
    private static class MyRunnable implements Runnable {
        @Override
        public void run() {
            // 两种方法均可以
            while (!Thread.interrupted()) {
            //while (!Thread.currentThread().isInterrupted()) {
                System.out.println(Thread.currentThread().getName()
                        + ": 别管我,我忙着转账呢!");
                try {
                    Thread.sleep(1000);
               } catch (InterruptedException e) {
                    e.printStackTrace();
                    System.out.println(Thread.currentThread().getName()
                            + ": 有内鬼,终止交易!");
                    // 注意此处的 break
                    break;
               }
           }
            System.out.println(Thread.currentThread().getName()
                    + ": 啊!险些误了大事");
       }
   }
    public static void main(String[] args) throws InterruptedException {
        MyRunnable target = new MyRunnable();
        Thread thread = new Thread(target, "李四");
        System.out.println(Thread.currentThread().getName()
                + ": 让李四开始转账。");
        thread.start();
        Thread.sleep(10 * 1000);
        System.out.println(Thread.currentThread().getName()
                + ": 老板来电话了,得赶紧通知李四对方是个骗子!");
        thread.interrupt();
   }
}当出现 InterruptedException 的时候, 要不要结束线程取决于 catch 中代码的写法. 可以选择忽略这个异常, 也可以跳出循环结束线程.
Thread.interrupted() 判断当前线程的中断标志被设置,清除中断标志Thread.currentThread().isInterrupted() 判断指定线程的中断标志被设置,不清除中断标志
标志位是否清除, 就类似于一个开关.Thread.isInterrupted() 相当于按下开关, 开关自动弹起来了. 这个称为 "清除标志位"Thread.currentThread().isInterrupted() 相当于按下开关之后, 开关弹不起来, 这个称为"不清除标志位".
- 使用 Thread.isInterrupted() , 线程中断会清除标志位.
public class ThreadDemo {
    private static class MyRunnable implements Runnable {
        @Override
        public void run() {
            for (int i = 0; i < 10; i++) {
                System.out.println(Thread.interrupted());
           }
       }
   }
    public static void main(String[] args) throws InterruptedException {
        MyRunnable target = new MyRunnable();
        Thread thread = new Thread(target, "李四");
        thread.start();
        thread.interrupt();
   }
}
true // 只有一开始是 true ,后边都是 false ,因为标志位被清falsefalsefalsefalsefalsefalsefalsefalsefalse
- 使用 Thread.currentThread().isInterrupted() , 线程中断标记位不会清除.
public class ThreadDemo {
    private static class MyRunnable implements Runnable {
        @Override
        public void run() {
            for (int i = 0; i < 10; i++) {
 System.out.println(Thread.currentThread().isInterrupted());
           }
       }
   }
    public static void main(String[] args) throws InterruptedException {
        MyRunnable target = new MyRunnable();
        Thread thread = new Thread(target, "李四");
        thread.start();
        thread.interrupt();
   }
}
true // 全部是 true ,因为标志位没有被清truetruetruetruetruetruetruetruetrue
2.5 等待一个线程-join()
public class ThreadDemo {
    public static void main(String[] args) throws InterruptedException {
        Runnable target = () -> {
            for (int i = 0; i < 10; i++) {
                try {
                    System.out.println(Thread.currentThread().getName()
                                       + ": 我还在工作!");
                    Thread.sleep(1000);
               } catch (InterruptedException e) {
                    e.printStackTrace();
               }
           }
            System.out.println(Thread.currentThread().getName() + ": 我结束了!");
       };
        Thread thread1 = new Thread(target, "李四");
        Thread thread2 = new Thread(target, "王五");
        System.out.println("先让李四开始工作");
        thread1.start();
        thread1.join();
        System.out.println("李四工作结束了,让王五开始工作");
        thread2.start();
        thread2.join();
        System.out.println("王五工作结束了");
   }
}
2.6 获取当前线程引用

public class ThreadDemo {
    public static void main(String[] args) {
        Thread thread = Thread.currentThread();
        System.out.println(thread.getName());
   }
}
2.7 休眠当前线程

public class ThreadDemo {
    public static void main(String[] args) throws InterruptedException {
        System.out.println(System.currentTimeMillis());
        Thread.sleep(3 * 1000);
        System.out.println(System.currentTimeMillis());
   }
}3、线程的状态
3.1 观察线程的所有状态
public class ThreadState {
    public static void main(String[] args) {
        for (Thread.State state : Thread.State.values()) {
            System.out.println(state);
       }
   }
}- NEW: 安排了工作, 还未开始行动
- RUNNABLE: 可工作的. 又可以分成正在工作中和即将开始工作.
- BLOCKED: 这几个都表示排队等着其他事情
- WAITING: 这几个都表示排队等着其他事情
- TIMED_WAITING: 这几个都表示排队等着其他事情
- TERMINATED: 工作完成了.
3.2 线程状态和状态转移的意义


还是我们之前的例子:刚把李四、王五找来,还是给他们在安排任务,没让他们行动起来,就是 NEW 状态;当李四、王五开始去窗口排队,等待服务,就进入到 RUNNABLE 状态。该状态并不表示已经被银行工作人员开始接待,排在队伍中也是属于该状态,即可被服务的状态,是否开始服务,则看调度器的调度;当李四、王五因为一些事情需要去忙,例如需要填写信息、回家取证件、发呆一会等等时,进入BLOCKED 、 WATING 、 TIMED_WAITING 状态,至于这些状态的细分,我们以后再详解;如果李四、王五已经忙完,为 TERMINATED 状态。所以,之前我们学过的 isAlive() 方法,可以认为是处于不是 NEW 和 TERMINATED 的状态都是活着的。
3.3 观察线程的状态和转移

观察 1: 关注 NEW 、 RUNNABLE 、 TERMINATED 状态的转换
- 使用 isAlive 方法判定线程的存活状态.
public class ThreadStateTransfer {
    public static void main(String[] args) throws InterruptedException {
        Thread t = new Thread(() -> {
            for (int i = 0; i < 1000_0000; i++) {
           }
       }, "李四");
        System.out.println(t.getName() + ": " + t.getState());;
        t.start();
        while (t.isAlive()) {
            System.out.println(t.getName() + ": " + t.getState());;
       }
        System.out.println(t.getName() + ": " + t.getState());;
   }
}public static void main(String[] args) {
final Object object = new Object();
Thread t1 = new Thread(new Runnable() {
@Override
public void run() {
synchronized (object) {
while (true) {
try {
Thread.sleep(1000);
} catch (InterruptedException e) {
e.printStackTrace();
}
}
}
}
}, "t1");
t1.start();
Thread t2 = new Thread(new Runnable() {
@Override
public void run() {
synchronized (object) {
System.out.println("hehe");
}
}
}, "t2");
t2.start();
}public static void main(String[] args) {
final Object object = new Object();
Thread t1 = new Thread(new Runnable() {
@Override
public void run() {
synchronized (object) {
try {
// [修改这里就可以了!!!!!]
// Thread.sleep(1000);
object.wait();
} catch (InterruptedException e) {
e.printStackTrace();
}
}
}
}, "t1");
...
}Thread t1 = new Thread(new Runnable() {
@Override
public void run() {
while (true) {
System.out.println("张三");
// 先注释掉, 再放开
// Thread.yield();
}
}
}, "t1");
t1.start();
Thread t2 = new Thread(new Runnable() {
@Override
public void run() {
while (true) {
System.out.println("李四");
}
}
}, "t2");
t2.start();4、多线程带来的的风险-线程安全 (重点)
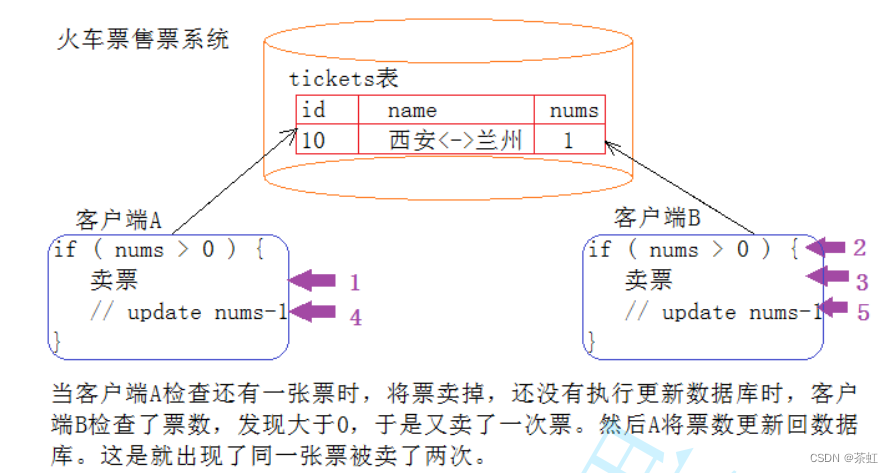
4.1 观察线程不安全
static class Counter {
    public int count = 0;
    void increase() {
        count++;
   }
}
public static void main(String[] args) throws InterruptedException {
    final Counter counter = new Counter();
    Thread t1 = new Thread(() -> {
        for (int i = 0; i < 50000; i++) {
            counter.increase();
       }
   });
    Thread t2 = new Thread(() -> {
        for (int i = 0; i < 50000; i++) {
            counter.increase();
       }
   });
    t1.start();
    t2.start();
    t1.join();
    t2.join();
    System.out.println(counter.count);
}4.2 线程安全的概念
4.3 线程不安全的原因

counter.count 这个变量就是在堆上. 因此可以被多个线程共享访问.
什么是原子性
这点也和线程的抢占式调度密切相关. 如果线程不是 "抢占" 的, 就算没有原子性, 也问题不大.

- 线程之间的共享变量存在 主内存 (Main Memory).
- 每一个线程都有自己的 "工作内存" (Working Memory) .
- 当线程要读取一个共享变量的时候, 会先把变量从主内存拷贝到工作内存, 再从工作内存读取数据.
- 当线程要修改一个共享变量的时候, 也会先修改工作内存中的副本, 再同步回主内存.

2) 一旦线程1 修改了 a 的值, 此时主内存不一定能及时同步. 对应的线程2 的工作内存的 a 的值也不一定能及时同步.
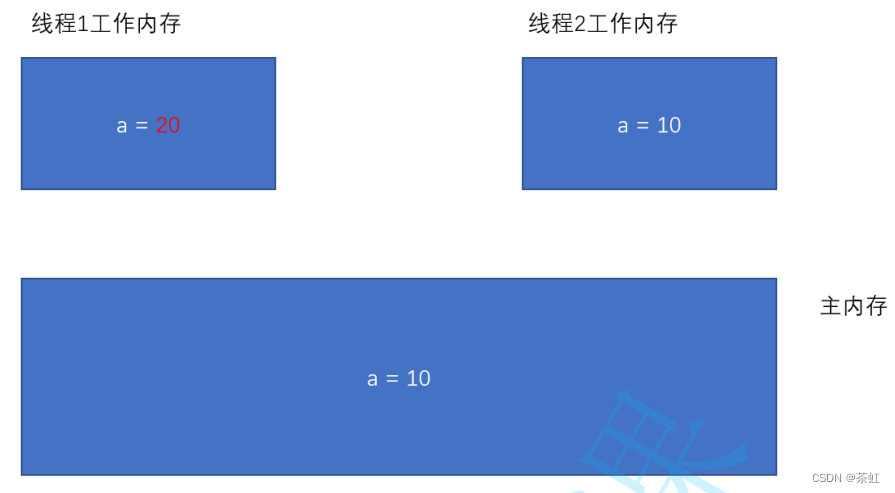
这个时候代码中就容易出现问题.
- 为啥要整这么多内存?
- 为啥要这么麻烦的拷来拷去?
比如某个代码中要连续 10 次读取某个变量的值, 如果 10 次都从内存读, 速度是很慢的. 但是如果只是第一次从内存读, 读到的结果缓存到 CPU 的某个寄存器中, 那么后 9 次读数据就不必直接访问内存了. 效率就大大提高了.
值的一提的是, 快和慢都是相对的. CPU 访问寄存器速度远远快于内存, 但是内存的访问速度又远远快于硬盘.对应的, CPU 的价格最贵, 内存次之, 硬盘最便宜
编译器对于指令重排序的前提是 "保持逻辑不发生变化". 这一点在单线程环境下比较容易判断, 但是在多线程环境下就没那么容易了, 多线程的代码执行复杂程度更高, 编译器很难在编译阶段对代码的执行效果进行预测, 因此激进的重排序很容易导致优化后的逻辑和之前不等价.重排序是一个比较复杂的话题, 涉及到 CPU 以及编译器的一些底层工作原理, 此处不做过多讨论
4.4 解决之前的线程不安全问题
static class Counter {
    public int count = 0;
    synchronized void increase() {
        count++;
   }
}
public static void main(String[] args) throws InterruptedException {
    final Counter counter = new Counter();
    Thread t1 = new Thread(() -> {
        for (int i = 0; i < 50000; i++) {
            counter.increase();
       }
   });
    Thread t2 = new Thread(() -> {
        for (int i = 0; i < 50000; i++) {
            counter.increase();
       }
   });
    t1.start();
    t2.start();
    t1.join();
    t2.join();
    System.out.println(counter.count);
}
5、synchronized 关键字-监视器锁monitor lock
5.1 synchronized 的特性
- 进入 synchronized 修饰的代码块, 相当于 加锁
- 退出 synchronized 修饰的代码块, 相当于 解锁

synchronized用的锁是存在Java对象头里的。

可以粗略理解成, 每个对象在内存中存储的时候, 都存有一块内存表示当前的 "锁定" 状态(类似于厕所的 "有人/无人").
如果当前是 "无人" 状态, 那么就可以使用, 使用时需要设为 "有人" 状态.如果当前是 "有人" 状态, 那么其他人无法使用, 只能排队

理解 "阻塞等待".
针对每一把锁, 操作系统内部都维护了一个等待队列. 当这个锁被某个线程占有的时候, 其他线程尝试进行加锁, 就加不上了, 就会阻塞等待, 一直等到之前的线程解锁之后, 由操作系统唤醒一个新的线程, 再来获取到这个锁.注意:上一个线程解锁之后, 下一个线程并不是立即就能获取到锁. 而是要靠操作系统来 "唤醒". 这也就是操作系统线程调度的一部分工作.假设有 A B C 三个线程, 线程 A 先获取到锁, 然后 B 尝试获取锁, 然后 C 再尝试获取锁, 此时 B和 C 都在阻塞队列中排队等待. 但是当 A 释放锁之后, 虽然 B 比 C 先来的, 但是 B 不一定就能获取到锁, 而是和 C 重新竞争, 并不遵守先来后到的规则.
// 第一次加锁 , 加锁成功lock ();// 第二次加锁 , 锁已经被占用 , 阻塞等待 .lock ();

Java 中的 synchronized 是 可重入锁, 因此没有上面的问题.
- increase 和 increase2 两个方法都加了 synchronized, 此处的 synchronized 都是针对 this 当前对象加锁的.
- 在调用 increase2 的时候, 先加了一次锁, 执行到 increase 的时候, 又加了一次锁. (上个锁还没释放, 相当于连续加两次锁)
static class Counter {
    public int count = 0;
    synchronized void increase() {
        count++;
   }
    synchronized void increase2() {
        increase();
   }
}- 如果某个线程加锁的时候, 发现锁已经被人占用, 但是恰好占用的正是自己, 那么仍然可以继续获取到锁, 并让计数器自增.
- 解锁的时候计数器递减为 0 的时候, 才真正释放锁. (才能被别的线程获取到)
5.2 synchronized 使用示例
public class SynchronizedDemo {
    public synchronized void methond() {
   }
}public class SynchronizedDemo {
public synchronized static void method() {
}
}public class SynchronizedDemo {
public void method() {
synchronized (this) {
}
}
}public class SynchronizedDemo {
public void method() {
synchronized (SynchronizedDemo.class) {
}
}
}
5.3 Java 标准库中的线程安全类
- ArrayList
- LinkedList
- HashMap
- TreeMap
- HashSet
- TreeSet
- StringBuilder
- Vector (不推荐使用)
- HashTable (不推荐使用)
- ConcurrentHashMap
- StringBuffer

StringBuffer 的核心方法都带有 synchronized .
还有的虽然没有加锁, 但是不涉及 "修改", 仍然是线程安全的
- String
6、volatile 关键字

- 改变线程工作内存中volatile变量副本的值
- 将改变后的副本的值从工作内存刷新到主内存
- 从主内存中读取volatile变量的最新值到线程的工作内存中
- 从工作内存中读取volatile变量的副本
- 创建两个线程 t1 和 t2
- t1 中包含一个循环, 这个循环以 flag == 0 为循环条件.
- t2 中从键盘读入一个整数, 并把这个整数赋值给 flag.
- 预期当用户输入非 0 的值的时候, t1 线程结束
static class Counter {
    public int flag = 0; }
public static void main(String[] args) {
    Counter counter = new Counter();
    Thread t1 = new Thread(() -> {
        while (counter.flag == 0) {
            // do nothing
       }
        System.out.println("循环结束!");
   });
    Thread t2 = new Thread(() -> {
        Scanner scanner = new Scanner(System.in);
        System.out.println("输入一个整数:");
        counter.flag = scanner.nextInt();
   });
    t1.start();
    t2.start();
}
// 执行效果
// 当用户输入非0值时, t1 线程循环不会结束. (这显然是一个 bug)static class Counter {
public volatile int flag = 0; }
// 执行效果
// 当用户输入非0值时, t1 线程循环能够立即结束.- 给 increase 方法去掉 synchronized
- 给 count 加上 volatile 关键字.
static class Counter {
    volatile public int count = 0;
    void increase() {
        count++;
   }
}
public static void main(String[] args) throws InterruptedException {
    final Counter counter = new Counter();
    Thread t1 = new Thread(() -> {
        for (int i = 0; i < 50000; i++) {
            counter.increase();
       }
   });
    Thread t2 = new Thread(() -> {
        for (int i = 0; i < 50000; i++) {
            counter.increase();
       }
   });
    t1.start();
    t2.start();
    t1.join();
    t2.join();
    System.out.println(counter.count);
}- 去掉 flag 的 volatile
- 给 t1 的循环内部加上 synchronized, 并借助 counter 对象加锁.
static class Counter {
    public int flag = 0; }
public static void main(String[] args) {
    Counter counter = new Counter();
    Thread t1 = new Thread(() -> {
        while (true) {
            synchronized (counter) {
                if (counter.flag != 0) {
                    break;
               }
           }
            // do nothing
       }
        System.out.println("循环结束!");
   });
    Thread t2 = new Thread(() -> {
        Scanner scanner = new Scanner(System.in);
        System.out.println("输入一个整数:");
        counter.flag = scanner.nextInt();
   });
    t1.start();
    t2.start();
}
7、wait 和 notify
球场上的每个运动员都是独立的 "执行流" , 可以认为是一个 "线程". 而完成一个具体的进攻得分动作, 则需要多个运动员相互配合, 按照一定的顺序执行一定的动作, 线程1 先 "传球" , 线程2 才能 "扣篮".
- wait() / wait(long timeout): 让当前线程进入等待状态.
- notify() / notifyAll(): 唤醒在当前对象上等待的线程.
7.1 wait()方法
- 使当前执行代码的线程进行等待. (把线程放到等待队列中)
- 释放当前的锁
- 满足一定条件时被唤醒, 重新尝试获取这个锁.
wait 要搭配 synchronized 来使用. 脱离 synchronized 使用 wait 会直接抛出异常.
- 其他线程调用该对象的 notify 方法.
- wait 等待时间超时 (wait 方法提供一个带有 timeout 参数的版本, 来指定等待时间).
- 其他线程调用该等待线程的 interrupted 方法, 导致 wait 抛出 InterruptedException 异常.
public static void main(String[] args) throws InterruptedException {
    Object object = new Object();
    synchronized (object) {
        System.out.println("等待中");
        object.wait();
        System.out.println("等待结束");
   }
}7.2 notify()方法
- 方法notify()也要在同步方法或同步块中调用,该方法是用来通知那些可能等待该对象的对象锁的其它线程,对其发出通知notify,并使它们重新获取该对象的对象锁。
- 如果有多个线程等待,则有线程调度器随机挑选出一个呈 wait 状态的线程。(并没有 "先来后到")
- 在notify()方法后,当前线程不会马上释放该对象锁,要等到执行notify()方法的线程将程序执行完,也就是退出同步代码块之后才会释放对象锁。
- 创建 WaitTask 类, 对应一个线程, run 内部循环调用 wait.
- 创建 NotifyTask 类, 对应另一个线程, 在 run 内部调用一次 notify
- 注意, WaitTask 和 NotifyTask 内部持有同一个 Object locker. WaitTask 和 NotifyTask 要想配合就需要搭配同一个 Object.
static class WaitTask implements Runnable {
    private Object locker;
    public WaitTask(Object locker) {
        this.locker = locker;
   }
    @Override
    public void run() {
        synchronized (locker) {
            while (true) {
                try {
                    System.out.println("wait 开始");
                    locker.wait();
                    System.out.println("wait 结束");
               } catch (InterruptedException e) {
                    e.printStackTrace();
               }
           }
       }
   }
}
static class NotifyTask implements Runnable {
    private Object locker;
    public NotifyTask(Object locker) {
        this.locker = locker;
   }
    @Override
    public void run() {
        synchronized (locker) {
            System.out.println("notify 开始");
            locker.notify();
            System.out.println("notify 结束");
       }
   }
}
public static void main(String[] args) throws InterruptedException {
    Object locker = new Object();
    Thread t1 = new Thread(new WaitTask(locker));
    Thread t2 = new Thread(new NotifyTask(locker));
    t1.start();
    Thread.sleep(1000);
    t2.start();
}
7.3 notifyAll()方法
- 创建 3 个 WaitTask 实例. 1 个 NotifyTask 实例.
static class WaitTask implements Runnable {
 // 代码不变
}
static class NotifyTask implements Runnable {
 // 代码不变
}
public static void main(String[] args) throws InterruptedException {
    Object locker = new Object();
    Thread t1 = new Thread(new WaitTask(locker));
    Thread t3 = new Thread(new WaitTask(locker));
    Thread t4 = new Thread(new WaitTask(locker));
    Thread t2 = new Thread(new NotifyTask(locker));
    t1.start();
    t3.start();
    t4.start();
    Thread.sleep(1000);
    t2.start();
}- 修改 NotifyTask 中的 run 方法, 把 notify 替换成 notifyAll
public void run() {
    synchronized (locker) {
        System.out.println("notify 开始");
        locker.notifyAll();
        System.out.println("notify 结束");
   }
}理解 notify 和 notifyAllnotify 只唤醒等待队列中的一个线程. 其他线程还是乖乖等着
notifyAll 一下全都唤醒, 需要这些线程重新竞争锁


7.4 wait 和 sleep 的对比(面试题)
9、多线程案例
9.1 单例模式
class Singleton {
    private static Singleton instance = new Singleton();
    private Singleton() {}
    public static Singleton getInstance() {
        return instance;
   }
}懒汉模式-单线程版
class Singleton {
    private static Singleton instance = null;
    private Singleton() {}
    public static Singleton getInstance() {
        if (instance == null) {
            instance = new Singleton();
       }
        return instance;
   }
}class Singleton {
private static Singleton instance = null;
private Singleton() {}
public synchronized static Singleton getInstance() {
if (instance == null) {
instance = new Singleton();
}
return instance;
}
}- 使用双重 if 判定, 降低锁竞争的频率.
- 给 instance 加上了 volatile.
class Singleton {
    private static volatile Singleton instance = null;
    private Singleton() {}
    public static Singleton getInstance() {
        if (instance == null) {
            synchronized (Singleton.class) {
           if (instance == null) {
               instance = new Singleton();
               }
           }
       }
        return instance;
   }
}
2) 其中线程1 率先获取到锁, 此时线程1 通过里层的 if (instance == null) 进一步确认实例是否已经创建. 如果没创建, 就把这个实例创建出来.

3) 当线程1 释放锁之后, 线程2 和 线程3 也拿到锁, 也通过里层的 if (instance == null) 来确认实例是否已经创建, 发现实例已经创建出来了, 就不再创建了

4) 后续的线程, 不必加锁, 直接就通过外层 if (instance == null) 就知道实例已经创建了, 从而不再尝试获取锁了. 降低了开销.

9.2 阻塞式队列
- 当队列满的时候, 继续入队列就会阻塞, 直到有其他线程从队列中取走元素.
- 当队列空的时候, 继续出队列也会阻塞, 直到有其他线程往队列中插入元素.
- BlockingQueue 是一个接口. 真正实现的类是 LinkedBlockingQueue.
- put 方法用于阻塞式的入队列, take 用于阻塞式的出队列.
- BlockingQueue 也有 offer, poll, peek 等方法, 但是这些方法不带有阻塞特性.
BlockingQueue < String > queue = new LinkedBlockingQueue <> ();// 入队列queue . put ( "abc" );// 出队列 . 如果没有 put 直接 take, 就会阻塞 .String elem = queue . take ();
public static void main(String[] args) throws InterruptedException {
    BlockingQueue<Integer> blockingQueue = new LinkedBlockingQueue<Integer>();
    Thread customer = new Thread(() -> {
        while (true) {
            try {
                int value = blockingQueue.take();
                System.out.println("消费元素: " + value);
           } catch (InterruptedException e) {
                e.printStackTrace();
           }
       }
   }, "消费者");
    customer.start();
    Thread producer = new Thread(() -> {
        Random random = new Random();
        while (true) {
            try {
                int num = random.nextInt(1000);
                System.out.println("生产元素: " + num);
                blockingQueue.put(num);
                Thread.sleep(1000);
           } catch (InterruptedException e) {
                e.printStackTrace();
           }
       }
   }, "生产者");
    producer.start();
    customer.join();
    producer.join();
}- 通过 "循环队列" 的方式来实现.
- 使用 synchronized 进行加锁控制.
- put 插入元素的时候, 判定如果队列满了, 就进行 wait. (注意, 要在循环中进行 wait. 被唤醒时不一定队列就不满了, 因为同时可能是唤醒了多个线程).
- take 取出元素的时候, 判定如果队列为空, 就进行 wait. (也是循环 wait)
public class BlockingQueue {
    private int[] items = new int[1000];
    private volatile int size = 0;
    private int head = 0;
    private int tail = 0;
    public void put(int value) throws InterruptedException {
        synchronized (this) {
            // 此处最好使用 while.
            // 否则 notifyAll 的时候, 该线程从 wait 中被唤醒,
            // 但是紧接着并未抢占到锁. 当锁被抢占的时候, 可能又已经队列满了
            // 就只能继续等待
            while (size == items.length) {
                wait();
           }
            items[tail] = value;
            tail = (tail + 1) % items.length;
            size++;
            notifyAll();
       }
   }
    public int take() throws InterruptedException {
        int ret = 0;
        synchronized (this) {
            while (size == 0) {
                wait();
           }
            ret = items[head];
            head = (head + 1) % items.length;
            size--;
            notifyAll();
       }
        return ret;
   }
    public synchronized int size() {
        return size;
   }
    // 测试代码
    public static void main(String[] args) throws InterruptedException {
        BlockingQueue blockingQueue = new BlockingQueue();
        Thread customer = new Thread(() -> {
            while (true) {
                try {
                    int value = blockingQueue.take();
                    System.out.println(value);
               } catch (InterruptedException e) {
                    e.printStackTrace();
               }
           }
       }, "消费者");
        customer.start();
        Thread producer = new Thread(() -> {
            Random random = new Random();
            while (true) {
                try {
                    blockingQueue.put(random.nextInt(10000));
               } catch (InterruptedException e) {
                    e.printStackTrace();
               }
           }
       }, "生产者");
        producer.start();
        customer.join();
        producer.join();
   }
}
9.3 定时器
- 标准库中提供了一个 Timer 类. Timer 类的核心方法为 schedule .
- schedule 包含两个参数. 第一个参数指定即将要执行的任务代码, 第二个参数指定多长时间之后执行 (单位为毫秒).
Timer timer = new Timer();
timer.schedule(new TimerTask() {
    @Override
    public void run() {
        System.out.println("hello");
   }
}, 3000);- 一个带优先级的阻塞队列
- 队列中的每个元素是一个 Task 对象.
- Task 中带有一个时间属性, 队首元素就是即将
- 同时有一个 worker 线程一直扫描队首元素, 看队首元素是否需要执行
public class Timer {
    public void schedule(Runnable command, long after) {
 // TODO
   }
}static class Task implements Comparable<Task> {
private Runnable command;
private long time;
public Task(Runnable command, long time) {
this.command = command;
// time 中存的是绝对时间, 超过这个时间的任务就应该被执行
this.time = System.currentTimeMillis() + time;
}
public void run() {
command.run();
}
@Override
public int compareTo(Task o) {
// 谁的时间小谁排前面
return (int)(time - o.time);
}
}
}class Timer {
// 核心结构
private PriorityBlockingQueue<Task> queue = new PriorityBlockingQueue();
public void schedule(Runnable command, long after) {
Task task = new Task(command, after);
queue.offer(task);
}
}class Timer {
// ... 前面的代码不变
public Timer() {
// 启动 worker 线程
Worker worker = new Worker();
worker.start();
}
class Worker extends Thread{
@Override
public void run() {
while (true) {
try {
Task task = queue.take();
long curTime = System.currentTimeMillis();
if (task.time > curTime) {
// 时间还没到, 就把任务再塞回去
queue.put(task);
} else {
// 时间到了, 可以执行任务
task.run();
}
} catch (InterruptedException e) {
e.printStackTrace();
break;
}
}
}
}
}class Timer {
// 存在的意义是避免 worker 线程出现忙等的情况
private Object mailBox = new Object();
}public void run() {
while (true) {
try {
Task task = queue.take();
long curTime = System.currentTimeMillis();
if (task.time > curTime) {
// 时间还没到, 就把任务再塞回去
queue.put(task);
// [引入 wait] 等待时间按照队首元素的时间来设定.
synchronized (mailBox) {
// 指定等待时间 wait
mailBox.wait(task.time - curTime);
}
} else {
// 时间到了, 可以执行任务
task.run();
}
} catch (InterruptedException e) {
e.printStackTrace();
break;
}
}
}public void schedule(Runnable command, long after) {
Task task = new Task(command, after);
queue.offer(task);
// [引入 notify] 每次有新的任务来了, 都唤醒一下 worker 线程, 检测下当前是否有
synchronized (mailBox) {
mailBox.notify();
}
}/**
* 定时器的构成:
* 一个带优先级的阻塞队列
* 队列中的每个元素是一个 Task 对象.
* Task 中带有一个时间属性, 队首元素就是即将
* 同时有一个 worker 线程一直扫描队首元素, 看队首元素是否需要执行
*/
public class Timer {
static class Task implements Comparable<Task> {
private Runnable command;
private long time;
public Task(Runnable command, long time) {
this.command = command;
// time 中存的是绝对时间, 超过这个时间的任务就应该被执行
this.time = System.currentTimeMillis() + time;
}
public void run() {
command.run();
}
@Override
public int compareTo(Task o) {
// 谁的时间小谁排前面
return (int)(time - o.time);
}
}
// 核心结构
private PriorityBlockingQueue<Task> queue = new PriorityBlockingQueue();
// 存在的意义是避免 worker 线程出现忙等的情况
private Object mailBox = new Object();
class Worker extends Thread{
@Override
public void run() {
while (true) {
try {
Task task = queue.take();
long curTime = System.currentTimeMillis();
if (task.time > curTime) {
// 时间还没到, 就把任务再塞回去
queue.put(task);
synchronized (mailBox) {
// 指定等待时间 wait
mailBox.wait(task.time - curTime);
}
} else {
// 时间到了, 可以执行任务
task.run();
}
} catch (InterruptedException e) {
e.printStackTrace();
break;
}
}
}
}
public Timer() {
// 启动 worker 线程
Worker worker = new Worker();
worker.start();
}
// schedule 原意为 "安排"
public void schedule(Runnable command, long after) {
Task task = new Task(command, after);
queue.offer(task);
synchronized (mailBox) {
mailBox.notify();
}
}
public static void main(String[] args) {
Timer timer = new Timer();
Runnable command = new Runnable() {
@Override
public void run() {
System.out.println("我来了");
timer.schedule(this, 3000);
}
};
timer.schedule(command, 3000);
}
}9.4 线程池
想象这么一个场景:在学校附近新开了一家快递店,老板很精明,想到一个与众不同的办法来经营。店里没有雇人,而是每次有业务来了,就现场找一名同学过来把快递送了,然后解雇同学。这个类比我们平时来一个任务,起一个线程进行处理的模式。很快老板发现问题来了,每次招聘 + 解雇同学的成本还是非常高的。老板还是很善于变通的,知道了为什么大家都要雇人了,所以指定了一个指标,公司业务人员会扩张到 3 个人,但还是随着业务逐步雇人。于是再有业务来了,老板就看,如果现在公司还没 3 个人,就雇一个人去送快递,否则只是把业务放到一个本本上,等着 3 个快递人员空闲的时候去处理。这个就是我们要带出的线程池的模式。
- 使用 Executors.newFixedThreadPool(10) 能创建出固定包含 10 个线程的线程池.
- 返回值类型为 ExecutorService
- 通过 ExecutorService.submit 可以注册一个任务到线程池中.
ExecutorService pool = Executors.newFixedThreadPool(10);
pool.submit(new Runnable() {
    @Override
    public void run() {
        System.out.println("hello");
   }
});- newFixedThreadPool: 创建固定线程数的线程池
- newCachedThreadPool: 创建线程数目动态增长的线程池.
- newSingleThreadExecutor: 创建只包含单个线程的线程池.
- newScheduledThreadPool: 设定 延迟时间后执行命令,或者定期执行命令. 是进阶版的 Timer.
- 核心操作为 submit, 将任务加入线程池中
- 使用 Worker 类描述一个工作线程. 使用 Runnable 描述一个任务.
- 使用一个 BlockingQueue 组织所有的任务
- 每个 worker 线程要做的事情: 不停的从 BlockingQueue 中取任务并执行.
- 指定一下线程池中的最大线程数 maxWorkerCount; 当当前线程数超过这个最大值时, 就不再新增线程了.
class Worker extends Thread {
    private LinkedBlockingQueue<Runnable> queue = null;
    public Worker(LinkedBlockingQueue<Runnable> queue) {
        super("worker");
        this.queue = queue;
   }
    @Override
    public void run() {
        // try 必须放在 while 外头, 或者 while 里头应该影响不大
        try {
            while (!Thread.interrupted()) {
                Runnable runnable = queue.take();
                runnable.run();
           }
       } catch (InterruptedException e) {
       }
   }
}
public class MyThreadPool {
private int maxWorkerCount = 10;
private LinkedBlockingQueue<Runnable> queue = new LinkedBlockingQueue();
public void submit(Runnable command) {
if (workerList.size() < maxWorkerCount) {
// 当前 worker 数不足, 就继续创建 worker
Worker worker = new Worker(queue);
worker.start();
}
// 将任务添加到任务队列中
queue.put(command);
}
public static void main(String[] args) throws InterruptedException {
MyThreadPool myThreadPool = new MyThreadPool();
myThreadPool.execute(new Runnable() {
@Override
public void run() {
System.out.println("吃饭");
}
});
Thread.sleep(1000);
}
}


 229
229


 被折叠的 条评论
为什么被折叠?
被折叠的 条评论
为什么被折叠?
 到【灌水乐园】发言


