


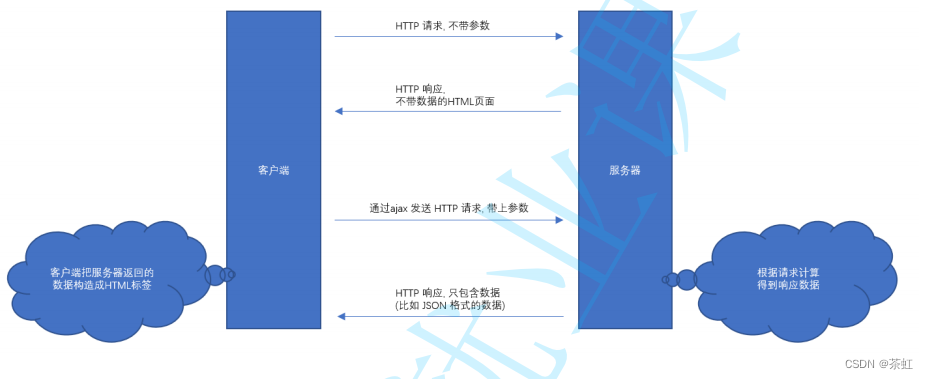
前面的代码中我们基于模板的方式来开发了博客系统。在基于模板方式中,
主要是通过服务器把数据渲染到页面中
,
然后直接返回完整的页面给浏览器。
目前现在更主流的开发方式是 "
前后端分离
"
的方式
.
这种方式下服务器端不关注页面的内容
,
而只是给网页端提供数据。网页端通过 ajax
的方式和服务器之间交互数据
,
网页拿到数据之后再根据数据的内容渲染到页面上。
1、准备工作
1)
创建
web
项目
2)
创建目录结构
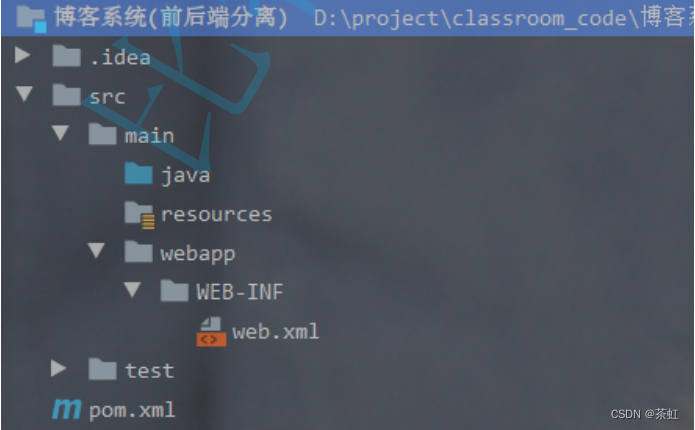
3) 配置 pom.xml
前后端分离的方式不需要使用 Thymeleaf 了.
<?xml version="1.0" encoding="UTF-8"?>
<project xmlns="http://maven.apache.org/POM/4.0.0"
         xmlns:xsi="http://www.w3.org/2001/XMLSchema-instance"
         xsi:schemaLocation="http://maven.apache.org/POM/4.0.0
http://maven.apache.org/xsd/maven-4.0.0.xsd">
    <modelVersion>4.0.0</modelVersion>
    <groupId>org.example</groupId>
    <artifactId>博客系统(前后端分离)</artifactId>
    <version>1.0-SNAPSHOT</version>
    <!-- 指定属性信息 -->
    <properties>
        <encoding>UTF-8</encoding>
        <maven.compiler.source>1.8</maven.compiler.source>
        <maven.compiler.target>1.8</maven.compiler.target>
    </properties>
    <dependencies>
        <!-- 加入 servlet 依赖 -->
        <dependency>
            <groupId>javax.servlet</groupId>
            <artifactId>javax.servlet-api</artifactId>
            <!-- servlet 版本和 tomcat 版本有对应关系,切记 -->
            <version>3.1.0</version>
            <!-- 这个意思是我们只在开发阶段需要这个依赖,部署到 tomcat 上时就不需要了 -->
            <scope>provided</scope>
        </dependency>
        <dependency>
            <groupId>junit</groupId>
            <artifactId>junit</artifactId>
            <version>4.11</version>
            <scope>test</scope>
        </dependency>
        <dependency>
            <groupId>mysql</groupId>
            <artifactId>mysql-connector-java</artifactId>
            <version>5.1.45</version>
        </dependency>
        <!--
https://mvnrepository.com/artifact/com.fasterxml.jackson.core/jackson-databind -
->
        <dependency>
            <groupId>com.fasterxml.jackson.core</groupId>
            <artifactId>jackson-databind</artifactId>
            <version>2.12.3</version>
        </dependency>
    </dependencies>
    <packaging>war</packaging>
    <build>
        <!-- 指定最终 war 包的名称 -->
        <finalName>BlogSystem</finalName>
    </build>
</project>2、数据库设计
同之前的 博客系统
(
使用模板技术
)
包括
:
- 表结构 (文章表, 用户表)
- DBUtil 类
- Blog 类, User 类
- BlogDao 类, UserDao 类
3、准备前端页面
3.1 拷贝页面
把之前写好的博客系统的静态页面拷贝到 webapp 目录中.
此处不需要 templates 目录了.

3.2 封装 ajax
在前后端交互中我们需要用到
ajax
进行数据交互。
我们把之前写过的 ajax
函数拷贝过来
,
放到一个单独的
js
文件中
,
方便后续使用。
创建 js/common.js
// 参数 args 是一个 JS 对象, 里面包含了以下属性
// method: 请求方法
// url: 请求路径
// body: 请求的正文数据
// contentType: 请求正文的格式
// callback: 处理响应的回调函数, 有两个参数, 响应正文和响应的状态码
function ajax(args) {
    var xhr = new XMLHttpRequest();
    xhr.onreadystatechange = function () {
        // 0: 请求未初始化
        // 1: 服务器连接已建立
        // 2: 请求已接收
        // 3: 请求处理中
        // 4: 请求已完成,且响应已就绪
        if (xhr.readyState == 4) {
            args.callback(xhr.responseText, xhr.status)
       }
   }
    xhr.open(args.method, args.url);
    if (args.contentType) {
        xhr.setRequestHeader('Content-type', args.contentType);
   }
    if (args.body) {
        xhr.send(args.body);
   } else {
        xhr.send();
   }
}
4、实现博客列表
4.1 约定前后端交互接口
[请求]
GET /blog
[响应] [
   {
        blogId: 1,
        title: "第一篇博客",
        content: "博客正文",
        userId: 1,
        postTime: "2021-07-07 12:00:00"
   },
   {
        blogId: 2,
        title: "第二篇博客",
        content: "博客正文",
        userId: 1,
        postTime: "2021-07-07 12:10:00"
   },
    ...
]
我们约定,
浏览器给服务器发送一个
GET /blog
这样的
HTTP
请求
,
服务器给浏览器返回了一个
JSON格式的数据.
4.2 实现服务器代码
创建 BlogServlet ,
放到
api
包中
.
@WebServlet("/blog")
public class BlogServlet extends HttpServlet {
    @Override
    protected void doGet(HttpServletRequest req, HttpServletResponse resp)
throws ServletException, IOException {
   }
}
实现 doGet,
完成读取博客列表的功能
.
protected void doGet(HttpServletRequest req, HttpServletResponse resp) throws
ServletException, IOException {
    resp.setContentType("application/json; charset=utf-8");
    BlogDao blogDao = new BlogDao();
    List<Blog> blogs = blogDao.selectAll();
    String jsonString = objectMapper.writeValueAsString(blogs);
    resp.getWriter().write(jsonString);
}
部署程序,
验证服务器是否能正确返回数据
(
使用
URL
http://127.0.0.1:8080/BlogSystem/blog
即可)
4.3 实现客户端代码
修改
blog_list.html,
删除之前写死的博客内容
(
即
<div class="blog">
),
并新增
js
代码处理
ajax
请求
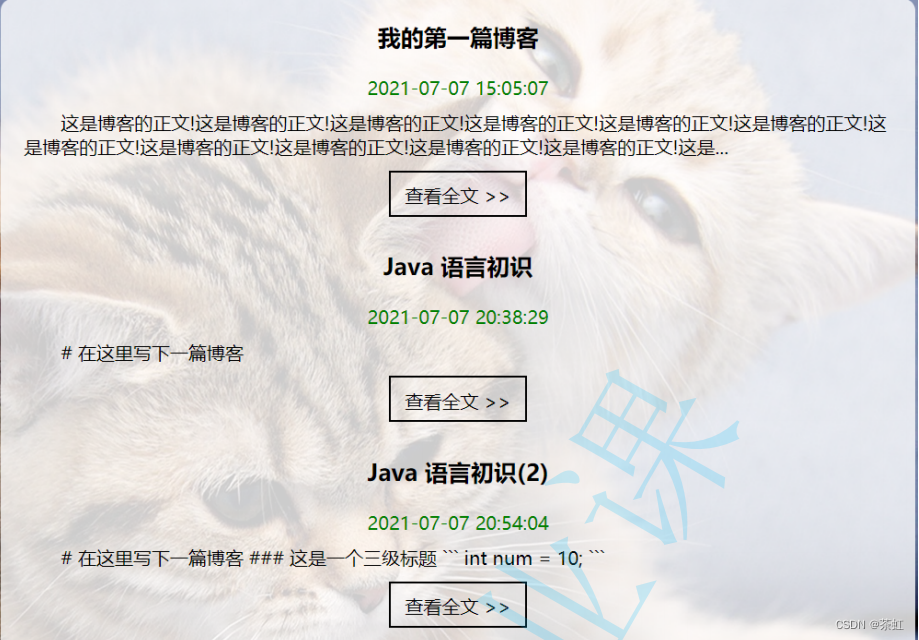
- 使用 ajax 给服务器发送 HTTP 请求.
- 服务器返回的响应是一个 JSON 格式的数据, 根据这个响应数据使用 DOM API 构造页面内容.
- 响应中的 postTime 字段为 ms 级时间戳, 需要转成格式化日期.
- 列表页中拿到的 "content" 字段其实是已经裁剪过的摘要.
- 跳转到博客详情页的 url 形如 blog_content.html?blogId=1 这样就可以让博客详情页知道当前是要访问哪篇博客
ajax({
    url: 'blog',
    method: 'GET',
    callback: function (data, status) {
        if (status == 200) {
            var blogs = JSON.parse(data);
            buildBlogs(blogs)
       } else {
            console.log("status error! " + status);
       }
   }
});
function buildBlogs(blogs) {
    // 获取博客数据的父容器
    var container = document.querySelector(".container-right");
    for (var blog of blogs) {
        // 创建博客 div
        var blogDiv = document.createElement("div");
        blogDiv.className = "blog";
        // 创建博客标题
        var titleDiv = document.createElement("div");
        titleDiv.className = "title";
        titleDiv.innerHTML = blog.title;
        blogDiv.appendChild(titleDiv);
        // 创建日期
        var dateDiv = document.createElement("div");
        dateDiv.className = "date";
        // postTime 是一个 ms 级时间戳, 此处需要转成格式化时间.
        dateDiv.innerHTML = formatDate(blog.postTime);
        blogDiv.appendChild(dateDiv);
        // 创建描述
        var descDiv = document.createElement("div");
        descDiv.className = "desc";
        descDiv.innerHTML = blog.content;
        blogDiv.appendChild(descDiv);
        // 创建跳转按钮
        var detailA = document.createElement("a");
        detailA.href = "blog_content.html?blogId=" + blog.blogId;
        detailA.className = "detail";
        detailA.innerHTML = "查看全文 >>";
        blogDiv.appendChild(detailA);
        // 把 blog 对象挂到 container 中
        container.appendChild(blogDiv);
   }
}
其中的
formatDate
函数实现为
:
可以把这个函数和 ajax 函数放到一起 (放到 common.js 中).这个代码不必我们自己来写, 直接网上搜索 "JS 格式化时间" 即可找到
function formatDate(time) {
    var date = new Date(time);
    var year = date.getFullYear(),
        month = date.getMonth() + 1,//月份是从0开始的
        day = date.getDate(),
        hour = date.getHours(),
        min = date.getMinutes(),
        sec = date.getSeconds();
    var newTime = year + '-' +
       (month < 10 ? '0' + month : month) + '-' +
       (day < 10 ? '0' + day : day) + ' ' +
       (hour < 10 ? '0' + hour : hour) + ':' +
       (min < 10 ? '0' + min : min) + ':' +
       (sec < 10 ? '0' + sec : sec);
    return newTime; }
通过
URL
http://127.0.0.1:8080/BlogSystem/blog_list.html
访问服务器
,
验证效果
4.4 理解数据交互过程
在刚才的页面访问过程中
,
涉及两次
HTTP
请求
-
响应 的交互
. (
不考虑从服务器下载
css, js,
图片等
)

第一次请求: 浏览器从服务器下载 blog_list.html 页面.
第二次请求
:
blog_list.html
中触发了
ajax
请求
,
获得到 博客列表 数据
在前后端分离的模式中
,
往往一个页面的显示需要多次
HTTP
交互过程
.
5、实现博客详情
目前点击博客列表页的 "
查看全文
" ,
能进入博客详情页
,
但是这个博客详情页是写死的内容。
我们期望能够根据当前的 博客 id
从服务器动态获取博客内容
.
5.1 约定前后端交互接口
[请求]
GET /blog?blogId=1 [响应] {
    blogId: 1,
    title: "第一篇博客",
    content: "博客正文",
    userId: 1,
    postTime: "2021-07-07 12:00:00"
},
相比于博客列表页
,
博客详情页的请求中多了一个
blogId
参数
,
响应中只获取到一个博客的内容
.
5.2 实现服务器代码
修改
BlogServlet
的
doGet
方法
- 根据 blogId 参数是否存在, 判定当前是获取博客列表还是获取博客详情
protected void doGet(HttpServletRequest req, HttpServletResponse resp) throws
ServletException, IOException {
    resp.setContentType("application/json; charset=utf-8");
    String blogId = req.getParameter("blogId");
    BlogDao blogDao = new BlogDao();
    String jsonString = null;
    if (blogId == null) {
        // 获取博客列表
        List<Blog> blogs = blogDao.selectAll();
        jsonString = objectMapper.writeValueAsString(blogs);
   } else {
        // 获取博客详情
        Blog blog = blogDao.selectOne(Integer.parseInt(blogId));
        jsonString = objectMapper.writeValueAsString(blog);
   }
    resp.getWriter().write(jsonString);
}
部署程序
,
验证服务器是否能正确返回数据
(
使用
URL
http://127.0.0.1:8080/BlogSystem/blog?
blogId=1
即可
).
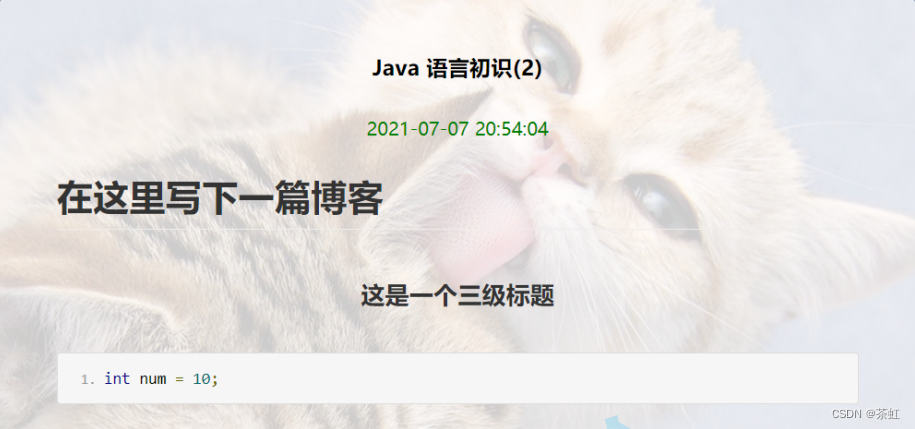
5.3 实现客户端代码
修改
blog_content.html
- 根据当前页面 URL 中的 blogId 参数(使用 location.search 即可得到形如 ?blogId=1 的数据), 给服务器发送 GET /blog 请求.
- 根据获取到的响应数据, 通过 editor.md 转换成 html, 并显示.
1)
引入
editor.md
<!-- 引入 editor.md 的依赖 -->
<link rel="stylesheet" href="editor.md/css/editormd.min.css" />
<script src="js/jquery.min.js"></script>
<script src="editor.md/editormd.js"></script>
2)
修改
html
部分
,
去掉原来写死的博客标题
,
日期
,
然后把博客正文的
p
标签
,
改成
<div
id="content">
并且加上
style="background
-
color: transparent
;
"
<!-- 右侧内容详情 -->
<div class="container-right">
    <div class="blog-content">
        <!-- 博客标题 -->
        <h3></h3>
        <!-- 博客时间 -->
        <div class="date"></div>
        <!-- 博客正文 -->
        <div id="content" style="background-color: transparent;">
        </div>
    </div>
</div>
3)
新增
js
代码
,
从服务器获取博客详情数据
ajax({
    url: 'blog' + location.search,
    method: 'GET',
    callback: function (data, status) {
        if (status == 200) {
            var blog = JSON.parse(data);
            buildBlog(blog);
       } else {
            console.log("status error! " + status);
       }
   }
});
function buildBlog(blog) {
    // 1. 更新标题
    var titleDiv = document.querySelector(".blog-content h3");
    titleDiv.innerHTML = blog.title;
    // 2. 更新时间
    var dateDiv = document.querySelector(".blog-content .date");
    dateDiv.innerHTML = formatDate(blog.postTime);
    // 3. 更新博客正文
    editormd.markdownToHTML('content', { markdown: blog.content });
}
部署程序
,
验证效果
.
6、实现登陆
这部分逻辑和之前的版本基本一致.
- 登陆页面提供一个 form 表单, 通过 form 的方式把用户名密码提交给服务器.
- 服务器端验证用户名密码是否正确.
- 如果密码正确, 则在服务器端创建 Session , 并把 sessionId 通过 Cookie 返回给浏览器.
前后端分离的项目中, 虽然主要使用 ajax 进行前后端交互, 但是也不是完全不能用 form.
6.1 约定前后端交互接口
[请求]
POST /login
Content-Type: application/x-www-form-urlencoded
username=test&password=123
[响应]
HTTP/1.1 302
Location: blog_list.html
6.2 实现服务器代码
创建 LoginServlet
代码和 博客系统(基于模板技术) 中的 LoginServlet 相同.
@WebServlet("/login")
public class LoginServlet extends HttpServlet {
    @Override
    protected void doPost(HttpServletRequest req, HttpServletResponse resp)
throws ServletException, IOException {
        req.setCharacterEncoding("utf-8");
        resp.setContentType("text/html; charset=utf-8");
        // 1. 读取用户名和密码
        String username = req.getParameter("username");
        String password = req.getParameter("password");
        if (username == null || password == null || "".equals(username) ||
"".equals(password)) {
            String html = "<h3>登陆失败! 缺少 username 或 password 字段</h3>";
            resp.getWriter().write(html);
            return;
       }
        // 2. 在数据库中验证用户名密码
        UserDao userDao = new UserDao();
        User user = userDao.selectByName(username);
        if (!password.equals(user.getPassword())) {
            String html = "<h3>登陆失败! 用户名或者密码错误!</h3>";
            resp.getWriter().write(html);
            return;
       }
        // 3. 登陆成功, 设置 Session
        HttpSession session = req.getSession(true);
        session.setAttribute("user", user);
        // 4. 重定向到博客列表页.
        resp.sendRedirect("blog_list.html");
   }
}
6.3 实现客户端代码
修改
login.html
- 给输入框套上一层 form 标签. action 为 login, method 为 POST
- 给 input 加上 name 属性.
- 把提交按钮改成 <input type="submit">
<div class="login-container">
    <!-- 中间的登陆框 -->
    <div class="login-dialog">
        <form action="login" method="POST">
            <h3>登陆</h3>
            <div class="row">
                <span>用户名</span>
                <input type="text" id="username" name="username">
            </div>
            <div class="row">
                <span>密码</span>
                <input type="password" id="password" name="password">
            </div>
            <div class="row">
                <input type="submit" id="submit" value="提交">
            </div>
        </form>
    </div>
</div>
部署程序
,
验证效果
.
7、实现强制要求登陆
当用户访问 博客列表页 和 博客详情页 时, 如果用户当前尚未登陆, 就自动跳转到登陆页面。之前的 "跳转到登陆页面" 是直接服务器返回 302 实现的. 现在需要通过页面的 JS 代码来实现.
7.1 实现服务器代码
1) 创建 Util 类, 实现 checkLoginStatus 方法, 检测当前用户的登陆状态
public class Util {
    public static User checkLoginStatus(HttpServletRequest req) {
        HttpSession session = req.getSession(false);
        if (session == null) {
            return null;
       }
        User user = (User) session.getAttribute("user");
        return user;
   }
}
2)
修改
BlogServlet,
在
doGet
的开头调用
checkLoginStatus
检测该用户是否登陆
,
如果未登录则返回一个 403
响应
.
@Override
protected void doGet(HttpServletRequest req, HttpServletResponse resp) throws
ServletException, IOException {
    // ...... 其他代码不变

    // 检测用户登陆状态
    User user = Util.checkLoginStatus(req);
    if (user == null) {
        resp.setStatus(403);
        resp.getWriter().write("{ reason: \"当前用户尚未登陆!\" }");
        return;
   }

    // ...... 其他代码不变
}
7.2 实现客户端代码
1)
修改
blog_list.html
- 在 ajax 的回调函数中, 判定响应状态码是否为 403 .
- 使用 location.assign 进行页面跳转.
ajax({
    url: 'blog',
    method: 'GET',
    callback: function (data, status) {
        if (status == 200) {
            var blogs = JSON.parse(data);
            buildBlogs(blogs)
       } else if (status == 403) {
            // 当前用户未登录, 重定向到 login.html
            location.assign("login.html");
       } else {
            console.log("status error! " + status);
       }
   }
});
2)
修改
blog_detail.html
修改方式同上
ajax({
    url: 'blog' + location.search,
    method: 'GET',
    callback: function (data, status) {
        if (status == 200) {
            var blog = JSON.parse(data);
            buildBlog(blog);
       } else if (status == 403) {
            // 如果未登录, 直接重定向到 login.html
            location.assign("login.html");
       } else {
            console.log("status error! " + status);
       }
   }
});
部署程序
,
验证效果
.
8、实现显示用户信息
目前页面的用户信息部分是写死的
.
形如
:
我们期望这个信息可以随着用户登陆而发生改变.
- 如果当前页面是博客列表页, 则显示当前登陆用户的信息.
- 如果当前页面是博客详情页, 则显示该博客的作者用户信息.
注意: 当前我们只是实现了显示用户名, 没有实现显示用户的头像以及文章数量等信息.
8.1 约定前后端交互接口
在博客列表页
,
获取当前登陆的用户的用户信息
[请求]
GET /user
[响应] {
 userId: 1,
 username: test
}
在博客详情页
,
获取当前文章作者的用户信息
[请求]
GET /user?blogId=1
[响应] {
 userId: 1,
 username: test
}
8.2 实现服务器代码
创建
UserServlet
public class UserServlet extends HttpServlet {
    private ObjectMapper objectMapper = new ObjectMapper();
    @Override
    protected void doGet(HttpServletRequest req, HttpServletResponse resp)
throws ServletException, IOException {
        resp.setContentType("application/json; charset=utf-8");
        // 1. 先判定当前用户是否已经登陆
        User user = Util.checkLoginStatus(req);
        if (user == null) {
            resp.setStatus(403);
            resp.getWriter().write("{ \"reason\": \"当前尚未登陆\" }");
            return;
       }
        // 2. 读取请求中的 blogId 参数
        String blogId = req.getParameter("blogId");
        String jsonString = null;
        if (blogId == null) {
            // 获取当前登陆用户的信息
            // 这个信息已经在 session 中获取到了.
            jsonString = objectMapper.writeValueAsString(user);
       } else {
            // 获取指定文章作者的用户信息
            BlogDao blogDao = new BlogDao();
            Blog blog = blogDao.selectOne(Integer.parseInt(blogId));
            UserDao userDao = new UserDao();
            User author = userDao.selectById(blog.getUserId());
            jsonString = objectMapper.writeValueAsString(author);
       }
        resp.getWriter().write(jsonString);
   }
}
8.3 实现客户端代码
1)
修改
blog_list.html
- 新增一个 ajax 函数的调用, 以 GET 请求 /user 路径.
- 在响应回调函数中, 根据响应中的用户名, 更新界面的显示.
ajax({
    url: 'user',
    method: 'GET',
    callback: function (data, status) {
        if (status == 200) {
            var user = JSON.parse(data);
            changeUser(user);
       } else {
            console.log("status error! " + status);
       }
   }
});
function changeUser(user) {
    var h3 = document.querySelector(".card h3");
    h3.innerHTML = user.username; }
2) 修改 blog_content.html
修改方式同上
ajax({
    url: 'user' + location.search,
    method: 'GET',
    callback: function (data, status) {
        if (status == 200) {
            var user = JSON.parse(data);
            changeUser(user);
       } else {
            console.log("status error! " + status);
       }
   }
});
function changeUser(user) {
    var h3 = document.querySelector(".card h3");
    h3.innerHTML = user.username; }
部署程序
,
验证效果
.
9、实现注销登陆
9.1 约定前后端交互接口
[请求]
GET /logout
[响应]
HTTP/1.1 302
Location: login.html
9.2 实现服务器代码
创建
LogoutServlet
- 从 session 中删除掉保存的 User 对象.
- 响应重定向到 login.html 页面.
@WebServlet("/logout")
public class LogoutServlet extends HttpServlet {
    @Override
    protected void doGet(HttpServletRequest req, HttpServletResponse resp)
throws ServletException, IOException {
        HttpSession session = req.getSession(false);
        if (session == null) {
            resp.setStatus(403);
            return;
       }
        session.removeAttribute("user");
        resp.setStatus(200);
   }
}客户端代码不需要调整.注销按钮本来就是一个 <a href="logout"> , 点击的时候就会发送 GET /logou 这样的请求.
部署程序, 验证效果.
10、实现发布博客
逻辑和 博客系统(基于模板技术) 基本一致.
10.1 约定前后端交互接口
[请求]
POST /blog
Content-Type: application/x-www-form-urlencoded
title=标题&content=正文...
[响应]
HTTP/1.1 302
Location: blog_list.html
10.2 实现服务器代码
修改
BlogServlet,
新增
doPost
方法
.
@Override
protected void doPost(HttpServletRequest req, HttpServletResponse resp) throws
ServletException, IOException {
    req.setCharacterEncoding("utf-8");
    resp.setContentType("application/json; charset=utf-8");
    // 1. 检查用户是否已经登陆
    User user = Util.checkLoginStatus(req);
    if (user == null) {
        resp.setStatus(403);
        return;
   }
    // 2. 读取请求中的数据
    String title = req.getParameter("title");
    String content = req.getParameter("content");
    if (title == null || content == null || "".equals(title) ||
"".equals(content)) {
        String html = "<h3>title 或者 content 字段缺失! 新增博客失败!</h3>";
        resp.getWriter().write(html);
        return;
   }
    // 3. 构造博客对象
    Blog blog = new Blog();
    blog.setTitle(title);
    blog.setContent(content);
    blog.setUserId(user.getUserId());
    blog.setPostTime(new Timestamp(System.currentTimeMillis()));
    // 4. 把博客对象插入到数据库
    BlogDao blogDao = new BlogDao();
    blogDao.insert(blog);
    // 5. 重定向到博客列表页
    resp.sendRedirect("blog_list.html");
}
10.3 实现客户端代码
修改
blog_edit.html
页面结构
,
- 增加 form 标签, action 为 blog_edit , method 为 POST
- 给 form 指定 height: 100%; 防止编辑器高度不能正确展开.
- 给标题的 input 标签加上 name 属性
- 把提交按钮改成 <input type="submit" value="发布文章">
- 在 <div id="editor"> 里面加上一个隐藏的 textarea
<!-- 编辑框容器 -->
<div class="blog-edit-container">
    <form action="blog_edit" method="POST" style="height: 100%;">
        <!-- 标题编辑区 -->
        <div class="title">
            <input type="text" placeholder="在这里写下文章标题" id="title"
name="title">
            <input type="submit" id="submit" value="发布文章"></input>
        </div>
    <!-- 创建编辑器标签 -->
    <div id="editor">
        <textarea name="content" style="display: none;"></textarea>
    </div>
    </form>
</div>- 在 editor.md 的初始化代码中, 新增一个选项 saveHTMLToTextarea: true
// 初始化编辑器
var editor = editormd("editor", {
    // 这里的尺寸必须在这里设置. 设置样式会被 editormd 自动覆盖掉.
    width: "100%",
    // 高度 100% 意思是和父元素一样高. 要在父元素的基础上去掉标题编辑区的高度
    height: "calc(100% - 50px)",
    // 编辑器中的初始内容
    markdown: "# 在这里写下一篇博客",
    // 指定 editor.md 依赖的插件路径
    path: "editor.md/lib/",
    // 加上这个属性使 编辑器 的内容能保存到用户自己添加的 textarea 中.
    saveHTMLToTextarea: true,
});
部署程序
,
验证效果
.
11、实现删除博客
进入用户详情页时,
如果当前登陆用户正是文章作者
,
则在导航栏中显示
"
删除
"
按钮
,
用户点击时则删除该文章.需要实现两件事:
- 判定当前博客详情页中是否要显示 "删除" 按钮
- 实现删除逻辑.
11.1 约定前后端交互接口
1)
判定是否要显示删除按钮
修改之前的 获取用户 信息的接口
,
在响应中加上一个字段
.
- isYourBlog 为 true 表示当前博客就是登陆用户自己写的.
[请求]
GET /user?blogId=1 [响应] {
 userId: 1,
 username: test,
 isYourBlog: 1,  // 1 表示当前博客就是登陆者的博客. 0 表示当前博客不是登陆者的博客.
}
2)
删除博客
- 使用 DELETE 请求表示删除一个博客.
[请求]
DELETE /blog?blogId=1
[响应]
HTTP/1.1 200
11.2 实现服务器代码
1)
给
User
类新增一个字段
public class User {
    private int userId;
    private String username;
    private String password;
    // 这个字段只是在判定博客详情页是否显示删除按钮时使用.
    private int isYourBlog; }
2) 修改 UserServlet
其他代码不变. 只处理 "博客详情页" 中的逻辑.
// 获取指定文章作者的用户信息
BlogDao blogDao = new BlogDao();
Blog blog = blogDao.selectOne(Integer.parseInt(blogId));
UserDao userDao = new UserDao();
User author = userDao.selectById(blog.getUserId());
author.setYourBlog(author.getUserId() == user.getUserId() ? 1 : 0);
jsonString = objectMapper.writeValueAsString(author);
3) 修改 BlogServlet
- 增加 doDelete 方法, 处理删除逻辑.
逻辑和之前版本基本相同. 但是此处删除完毕不必返回 302 了, 由客户端自己决定重定向逻辑.
protected void doDelete(HttpServletRequest req, HttpServletResponse resp) throws
ServletException, IOException {
    // 1. 验证用户是否登陆
    User user = Util.checkLoginStatus(req);
    if (user == null) {
        resp.setStatus(403);
        return;
   }
    // 2. 读取要删除的 blogId
    String blogId = req.getParameter("blogId");
    if (blogId == null) {
        String html = "<h3>blogId 参数错误!</h3>";
        resp.getWriter().write(html);
        return;
   }
    // 3. 从数据库中删除博客
    BlogDao blogDao = new BlogDao();
    blogDao.delete(Integer.parseInt(blogId));
    // 4. 返回响应数据
    resp.setStatus(200);
}
11.3 实现客户端代码
修改
blog_content.html
- 修改 changeUser 函数, 当获取到的响应中的 isYourBlog 为 true 的时候, 则在导航上添加一个 a标签作为删除按钮.
- 当点击删除按钮的时候, 给服务器发送一个 ajax 请求.
function changeUser(user) {
    var h3 = document.querySelector(".card h3");
    h3.innerHTML = user.username;
    if (user.isYourBlog) {
        // 显示删除按钮
        var navDiv = document.querySelector(".nav");
        var delBtn = document.createElement("a");
        delBtn.innerHTML = "删除";
        delBtn.href = "#";
        delBtn.onclick = deleteBlog;
        navDiv.appendChild(delBtn);
   }
}
function deleteBlog() {
    // 使用 ajax 给服务器发送一个 DELETE 请求
    ajax({
        url: "blog" + location.search,
        method: "DELETE",
        callback: function (data, status) {
            if (status == 200) {
                // 重定向到博客列表页
                location.assign("blog_list.html");
           } else {
                console.log("status error! " + status);
           }
       }
   })
}
部署程序
,
验证效果
.
12、总结
服务器渲染和客户端渲染(
前后端分离
)
都是常见的
web
开发的方式。
目前前后端分离的方式更主流一些.
主要原因
:
- 前后端分离更便于分工协作: 开发开始时, 前端工程师和后端工程师共同约定好交互接口, 然后就可以分别开发, 各自测试. 直到最终双方开发完毕再在一起联调.
- 网络带宽越来越大: 因此渲染一个页面多使用几个 HTTP 请求-响应 也问题不大.
- 用户主机的计算能力越来越强: 无论是手机还是PC, 算力都在突飞猛进的增长. 因此这样的渲染工作对于客户端来说不是什么负担, 但是能降低服务器的负荷.
- 更便于多端开发: 比如同一份服务器代码, 就既可以给网页端提供服务, 也可以给手机app 提供服务.
在前后端分离的模式下,
约定前后端交互接口是一件至关重要的事情
.
约定的方式也有很多种
.
其中一种比较流行的方式称为 "Restful
风格
"
- 使用不同的 HTTP 方法, 表示要执行的动作. 例如 GET 用于获取数据, POST 用于新增数据, PUT 用于修改数据, DELETE 用于删除数据.
- 使用 URL 中的 PATH 表示要操作的资源.
- 使用响应的状态码表示不同的响应结果.
- 使用 JSON 格式作为 body 中的数据组织方式.
我们上面的代码模仿了 Restful 风格, 但是还不算特别严格. 比如我们在提交博客的时候不是使用JSON 格式的数据。实际开发的时候也不必完全拘泥于这样的格式. 都可以灵活对待.
13、其他功能
13.1 实现文章数目统计
提示:根据当前用户, 查询该用户有多少文章, 显示在博客列表页和博客详情页的左侧用户信息区即可。这个数据可以通过 GET
/user
这个接口返回
.
13.2 实现编辑博客
提示
:
- 给博客详情页中的导航栏中增加 "编辑按钮", 也是一个 a 标签, href 为 blogUpdate?blogId=1 , 如果当前登陆的用户和文章作者相同, 则显示编辑按钮.
- 创建 BlogUpdateServlet. 点击 "编辑按钮" 进入访问该 Servlet 的 doGet 方法, 并返回一个博客编辑页面. 这个页面基于 blog_edit.html 修改, 使编辑页面中的编辑框内已经显示出原来文章的内容.
- 点击 "提交按钮" 则访问 BlogUpdateServlet 的 doPost 方法, 此时根据请求中提交的新的博客标题和正文, 修改数据库的内容.
- 给 BlogDao 新增一个 update 方法, 用于修改数据库中的博客数据.
13.3 实现头像管理
提示:
- 在数据库的 User 表中, 新增一列, 表示该用户的头像图片的地址, 形如 avtar/1.jpg . 使用 alter table 可以修改数据库表结构(同学们自行查找资料, 学习 alter table 的用法).
- 在博客列表页中, 点击用户头像, 则弹出对话框要求用户选择一张图片. 此时需要使用一个 form 标签把头像部分包裹起来.
- 服务器端创建一个 Servlet , 用来处理用户上传头像的请求, 把用户上传的图片保存到 webapps/avator 目录中. 同时修改数据库 User 表中的头像列为新的头像文件名.
- 修改 blog_list.html, blog_content.html, BlogListServlet, BlogContentServlet 使博客列表页和详情页能正确显示用户头像. 头像数据通过 GET /user 这个接口返回.
13.4 实现用户 github 链接管理
提示
:
- 在数据库的 User 表中, 新增一列, 表示该用户 github 主页. 使用 alter table 可以修改数据库表结构(同学们自行查找资料, 学习 alter table 的用法).
- 在博客列表页中, 如果用户当前的 github 为空, 则显示一个 a 标签, 提示 "设置 github 链接". 点击后跳转到一个新的页面, 新页面中包含一个 form 用来输入 github 链接.
- 这个数据也通过 GET /user 这个接口返回.
13.5 实现文章分类管理
提示
:
- 在数据库中创建一个分类表, 包含 id, 名称, 所属用户id 三列.
- 给 blog 表新增一列, 表示该博客的 分类 id (每个文章只能属于一个分类, 每个分类可以包含多个文章)
- 在用户新增博客的时候, 让用户在页面中指定当前文章的分类名, 并在提交的时候, 由服务器把分类名转成分类id, 并保存到 blog 表中.
- 在显示博客的页面中显示该博客所属的分类.
- 在左侧用户信息显示区域, 显示出当前用户所拥有的分类的数量(从数据库中统计)
- 点击该数字, 进入分类详细页, 页面中能显示当前一共都有哪些分类(实现一个新的 Servlet 实现). 点击具体分类能够展示该分类下的博客列表(复用 blog_list.html 的代码, 但是需要给 BlogDao 新增方法, 按照分类来查找博客列表).


 641
641


 被折叠的 条评论
为什么被折叠?
被折叠的 条评论
为什么被折叠?
 到【灌水乐园】发言


