


APM-基于Quickwit以及OTLP协议的轻量级Java日志系统
技术栈
- Grafana
- Quickwit
- Jaeger
- Promethus
- Minio
- OLTP协议(OpenTelemetry实现)
日志系统部署
配置准备
初始化文件夹
mkdir -p /data/quickwit/quickwit/data
mkdir -p /data/quickwit/quickwit/config
mkdir -p /data/quickwit/quickwit/index_config
mkdir -p /data/quickwit/minio
mkdir -p/data/quickwit/prometheus
mkdir -p /data/quickwit/grafana/
Quickwit
quickwit.yaml
vim /data/quickwit/quickwit/config/quickwit.yaml
# ============================ Node Configuration ==============================
#
# Website: https://quickwit.io
# Docs: https://quickwit.io/docs/configuration/node-config
#
# Configure AWS credentials: https://quickwit.io/docs/guides/aws-setup#aws-credentials
#
# -------------------------------- General settings --------------------------------
#
# Config file format version.
#
version: 0.8
#
# Node ID. Must be unique within a cluster. If not set, a random node ID is generated on each startup.
#
# node_id: node-1
#
# Quickwit opens three sockets.
# - for its HTTP server, hosting the UI and the REST API (TCP)
# - for its gRPC service (TCP)
# - for its Gossip cluster membership service (UDP)
#
# All three services are bound to the same host and a different port. The host can be an IP address or a hostname.
#
# Default HTTP server host is `127.0.0.1` and default HTTP port is 7280.
# The default host value was chosen to avoid exposing the node to the open-world without users' explicit consent.
# This allows for testing Quickwit in single-node mode or with multiple nodes running on the same host and listening
# on different ports. However, in cluster mode, using this value is never appropriate because it causes the node to
# ignore incoming traffic.
# There are two options to set up a node in cluster mode:
#   1. specify the node's hostname or IP
#   2. pass `0.0.0.0` and let Quickwit do its best to discover the node's IP (see `advertise_address`)
#
# listen_address: 127.0.0.1
#
# rest:
#   listen_port: 7280
#   cors_allow_origins:
#     - "http://localhost:3000"
#   extra_headers:
#     x-header-1: header-value-1
#     x-header-2: header-value-2
#
# grpc:
#   max_message_size: 10 MiB
#
# IP address advertised by the node, i.e. the IP address that peer nodes should use to connect to the node for RPCs.
# The environment variable `QW_ADVERTISE_ADDRESS` can also be used to override this value.
# The default advertise address is `listen_address`. If `listen_address` is unspecified (`0.0.0.0`),
# Quickwit attempts to sniff the node's IP by scanning the available network interfaces.
# advertise_address: 192.168.0.42
#
# In order to join a cluster, one needs to specify a list of
# seeds to connect to. If no port is specified, Quickwit will assume
# the seeds are using the same port as the current node gossip port.
# By default, the peer seed list is empty.
#
# peer_seeds:
#   - quickwit-searcher-0.local
#   - quickwit-searcher-1.local:10000
#
# Path to directory where temporary data (caches, intermediate indexing data structures)
# is stored. Defaults to `./qwdata`.
#
# data_dir: /path/to/data/dir
#
# Metastore URI. Defaults to `data_dir/indexes#polling_interval=30s`,
# which is a file-backed metastore and mostly convenient for testing. A cluster would
# require a metastore backed by Amzon S3 or PostgreSQL.
#
# metastore_uri: s3://your-bucket/indexes
# metastore_uri: postgres://username:password@host:port/db
#
# When using a file-backed metastore, the state of the metastore will be cached forever.
# If you are indexing and searching from different processes, it is possible to periodically
# refresh the state of the metastore on the searcher using the `polling_interval` hashtag.
#
# metastore_uri: s3://your-bucket/indexes#polling_interval=30s
#
# Default index root URI, which defines where index data (splits) is stored,
# following the scheme `{default_index_root_uri}/{index-id}`. Defaults to `{data_dir}/indexes`.
#
# default_index_root_uri: s3://your-bucket/indexes
#
# -------------------------------- Storage settings --------------------------------
# https://quickwit.io/docs/configuration/node-config#storage-configuration
#
# Hardcoding credentials into configuration files is not secure and strongly
# discouraged. Prefer the alternative authentication methods that your storage
# backend may provide.
#
# storage:
#   azure:
#     account: ${QW_AZURE_STORAGE_ACCOUNT}
#     access_key: ${QW_AZURE_STORAGE_ACCESS_KEY}
#
#   s3:
#     access_key_id: ${AWS_ACCESS_KEY_ID}
#     secret_access_key: ${AWS_SECRET_ACCESS_KEY}
#     region: ${AWS_REGION}
#     endpoint: ${QW_S3_ENDPOINT}
#     force_path_style_access: ${QW_S3_FORCE_PATH_STYLE_ACCESS:-false}
#     disable_multi_object_delete: false
#     disable_multipart_upload: false
#
# 打开storage.s3注释(需要注意原yaml默认配置注释前为#+空格,去掉#符号后还需要多删一位空格,否则启动服务会提示yaml加载失败,格式错误)
storage:
  s3:
    # 存储类型
    flavor: ${QW_S3_FLAVOR}   # 默认配置中无此参数,手动添加
    access_key_id: ${AWS_ACCESS_KEY_ID}   # s3的用户名
    secret_access_key: ${AWS_SECRET_ACCESS_KEY}  # s3的密码
    region: ${AWS_REGION}  # 域
    endpoint: ${QW_S3_ENDPOINT} #服务地址+端口,http://s3_host:9010
    force_path_style_access: ${QW_S3_FORCE_PATH_STYLE_ACCESS:-false}  # false
    disable_multi_object_delete: false # 是否禁用删除对象数据
    disable_multipart_upload: false  # 是否禁用上传对象数据

# 添加存储和元数据存储配置s3路径
metastore_uri: s3://${QW_S3_BUCKET}/indexes#polling_interval=30s
default_index_root_uri: s3://${QW_S3_BUCKET}/indexes


# -------------------------------- Metastore settings --------------------------------
# https://quickwit.io/docs/configuration/node-config#metastore-configuration
#
# metastore:
#   postgres:
#     min_connections: 0
#     max_connections: 10
#     acquire_connection_timeout: 10s
#     idle_connection_timeout: 10min
#     max_connection_lifetime: 30min
#
# -------------------------------- Indexer settings --------------------------------
# https://quickwit.io/docs/configuration/node-config#indexer-configuration

indexer:
  enable_otlp_endpoint: ${QW_ENABLE_OTLP_ENDPOINT:-true}
#   split_store_max_num_bytes: 100G
#   split_store_max_num_splits: 1000
#   max_concurrent_split_uploads: 12
#
#
# -------------------------------- Ingest API settings ------------------------------
# https://quickwit.io/docs/configuration/node-config#ingest-api-configuration
#
# ingest_api:
#   max_queue_memory_usage: 2GiB
#   max_queue_disk_usage: 4GiB
#   content_length_limit: 10MiB
#
# -------------------------------- Searcher settings --------------------------------
# https://quickwit.io/docs/configuration/node-config#searcher-configuration
#
# searcher:
#   fast_field_cache_capacity: 1G
#   split_footer_cache_capacity: 500M
#   partial_request_cache_capacity: 64M
#   max_num_concurrent_split_streams: 100
#   max_num_concurrent_split_searches: 100
#   aggregation_memory_limit: 500M
#   aggregation_bucket_limit: 65000
#   split_cache:
#      max_num_bytes: 1G
#      max_num_splits: 10000
#      num_concurrent_downloads: 1
# -------------------------------- Jaeger settings --------------------------------

jaeger:
  enable_endpoint: ${QW_ENABLE_JAEGER_ENDPOINT:-true}
Prometheus
prometheus.yaml
vim /data/quickwit/prometheus/prometheus.yaml
global:
  scrape_interval:     15s
  evaluation_interval: 15s

scrape_configs:
  - job_name: 'prometheus'
    static_configs:
      - targets: ['prometheus:9090']
Grafana
datasources.yaml
vim /data/quickwit/grafana/grafana-datasources.yaml
version: "3.8"
# ========================
# 自定义网络配置
# ========================
networks:
  quickwit:  # 创建专用网络确保服务隔离
    driver: bridge

services:
  # ========================
  # 日志与链路数据存储后端
  # - Quickwit启动过程中,检查是否存在otel-logs-v0_7索引库(用于收集otlp协议推送的索引数据)和otel-traces-v0_7索引库(用于收集跟踪链路的跨度数据),如果不存在,则会自动创建此索引库, 可以通过config.yaml配置文件中将enable_otlp_endpoint设置成false进行关闭
  # - 目前Quickwit官方推荐搭配Jaeger,做为traces数据可视化平台, 集成方式请参见官方文档: https://quickwit.io/docs/distributed-tracing/plug-quickwit-to-jaeger
  # ========================
  quickwit:
    image: quickwit/quickwit:latest
    container_name: quickwit
    command: ["run"]
    environment:
      # 存储类型
      - QW_S3_FLAVOR=minio
      # minio端点
      - QW_S3_ENDPOINT=http://minio:9000
      # 桶名称
      - QW_S3_BUCKET=quickwit-data
      # 账户
      - AWS_ACCESS_KEY_ID=whiteBrocade
      # 密码
      - AWS_SECRET_ACCESS_KEY=whiteBrocade
      # 区域
      - AWS_REGION=us-east-1
      # 开启OTLP相关设置, 并设置OTLP端点
      - QW_ENABLE_OPENTELEMETRY_OTLP_EXPORTER="true"
      - OTEL_EXPORTER_OTLP_ENDPOINT=http://localhost:7281
    volumes:
      # quickwit运行数据
      - /data/quickwit/quickwit/data:/quickwit/qwdata
      # quickwit配置
      - /data/quickwit/quickwit/config/quickwit.yaml:/quickwit/config/quickwit.yaml
      # 索引配置
      - /data/quickwit/quickwit/index_config:/quickwit/index_config
    ports:
      # quickwit的UI界面,http://ip:7280/ui/search
      - 7280:7280 # WEB UI
      - 7281:7281 # OTLP的gRPC端口
    depends_on:
      - minio
    networks:
      - quickwit

  # ========================
  # 对象存储服务(S3兼容)
  # ========================
  minio:
    image: minio/minio:latest
    # 容器名
    container_name: minio
    entrypoint:  # 初始化存储目录
      - sh
      - -euc        # 执行脚本的参数:e(报错退出) u(未定义变量报错) c(执行后续命令)
      - |           # 多行脚本开始, minio创建目录挂载日志
        mkdir -p /data/quickwit-data && \
        minio server /data --console-address :9001
    environment:
      - MINIO_ROOT_USER=whiteBrocade        # 用户名(与Loki配置对应)
      - MINIO_ROOT_PASSWORD=whiteBrocade    # 密码(需加密处理)
      - MINIO_PROMETHEUS_AUTH_TYPE=public   # 开放指标
    volumes:
      - /data/quickwit/minio:/data  # 持久化存储路径
    ports:
      - 9000    # API端口
      - 9001:9001    # UI端口
    networks:
      - quickwit

  # ========================
  # 分布式追踪系统
  # ========================
  jaeger:
    # jaeger可以由多种可用服务组成,jaeger-query是一个支持OpenTelemetry标准(OTLP协议)用来查询OpenTarcing跟踪链路跨度引用轨迹的可视化WebUI服务,默认只提供查询后端存储功能与WebUI;如需使用完整Jaeger功能,请下载Jaeger一体式版本(包含WebUI、收集器、查询、代理功能):all-in-one 或 使用 v2 版本,下载请参见官网:Jaeger – Download Jaeger
    image: jaegertracing/jaeger-query:latest
    container_name: jaeger
    # 不使用官方的存储, 指定使用gRPC推送到quickwit中
    environment:
      - SPAN_STORAGE_TYPE=grpc
      - GRPC_STORAGE_SERVER=quickwit:7281
    ports:
      - 4317:4317 # OTLP的gRPC端口
      - 4318:4318 # OTLP的Http端口
      - 16686:16686 # jaeger-ui端口
    networks:
      - quickwit

  # ========================
  # 服务运行指标与系统指标数据采集存储服务
  # ========================
  prometheus:
    image: prom/prometheus:v3.2.1
    container_name: prometheus
    command:
      - --config.file=/etc/prometheus/prometheus.yaml
      # 必须要添加这个参数, 否则Prometheus不开启remove write功能
      - --web.enable-remote-write-receiver
      - --web.enable-otlp-receiver
      - --enable-feature=exemplar-storage
      - --enable-feature=native-histograms
    ports:
      - 9090:9090
    volumes:
      - /data/quickwit/prometheus/prometheus.yaml:/etc/prometheus/prometheus.yaml
    networks:
      - quickwit

  # ========================
  # 可视化平台
  # ========================
  grafana:
    image: grafana/grafana-enterprise:latest
    # 容器名
    container_name: grafana
    # 数据持久化
    environment:
      - GF_AUTH_ANONYMOUS_ENABLED=true  # 开启匿名访问(生产环境应关闭)
      # 设置 Grafana 的管理员(admin)账户的初始密码为admin
      - GF_SECURITY_ADMIN_PASSWORD=admin
      # 设置 Grafana 的默认用户界面主题为暗黑模式
      - GF_USERS_DEFAULT_THEME=dark
      # 实验性功能
      # traceqlEditor: TraceQL查询语言支持(Tempo集成)
      # traceToMetrics: 从最终数据生成指标(APM分析)
      - GF_FEATURE_TOGGLES_ENABLE=traceqlEditor
      # 下载quickwit插件(下边链接都可以尝试下载)大概30M, Github有时候下载不下来, 不采取environment的方式安装, 采取理想安装的方式
      # - GF_INSTALL_PLUGINS=https://github.com/quickwit-oss/quickwit-datasource/releases/download/v0.4.6/quickwit-quickwit-datasource-0.4.6.zip;quickwit-quickwit-datasource
    volumes:
      # Grafan数据源配置
      - /data/quickwit/grafana/grafana-datasources.yaml:/etc/grafana/provisioning/datasources/datasources.yaml
      # 插件
      - /data/quickwit/grafana/plugins:/var/lib/grafana/plugins
      # Grafana配置
      # - /data/quickwit/grafana/grafana.ini:/etc/grafana/grafana.ini
    ports:
      - 3000:3000 # WEB UI
    networks:
      - quickwit
quickwit插件安装
参考APM-基于Grafana生态以及OTLP协议的Java轻量级日志监控系统中的参见安装Grafana插件
docker-compose.yaml
version: "3.8"
# ========================
# 自定义网络配置
# ========================
networks:
  quickwit:  # 创建专用网络确保服务隔离
    driver: bridge

services:
  # ========================
  # 日志与链路数据存储后端
  # - Quickwit启动过程中,检查是否存在otel-logs-v0_7索引库(用于收集otlp协议推送的索引数据)和otel-traces-v0_7索引库(用于收集跟踪链路的跨度数据),如果不存在,则会自动创建此索引库, 可以通过config.yaml配置文件中将enable_otlp_endpoint设置成false进行关闭
  # - 目前Quickwit官方推荐搭配Jaeger,做为traces数据可视化平台, 集成方式请参见官方文档: https://quickwit.io/docs/distributed-tracing/plug-quickwit-to-jaeger
  # ========================
  quickwit:
    image: quickwit/quickwit:latest
    container_name: quickwit
    command: ["run"]
    environment:
      # 存储类型
      - QW_S3_FLAVOR=minio
      # minio端点
      - QW_S3_ENDPOINT=http://minio:9000
      # 桶名称
      - QW_S3_BUCKET=quickwit-data
      # 账户
      - AWS_ACCESS_KEY_ID=whiteBrocade
      # 密码
      - AWS_SECRET_ACCESS_KEY=whiteBrocade
      # 区域
      - AWS_REGION=us-east-1
      # 开启OTLP相关设置, 并设置OTLP端点
      - QW_ENABLE_OPENTELEMETRY_OTLP_EXPORTER="true"
      - OTEL_EXPORTER_OTLP_ENDPOINT=http://localhost:7281
    volumes:
      # quickwit运行数据
      - /data/quickwit/quickwit/data:/quickwit/qwdata
      # quickwit配置
      - /data/quickwit/quickwit/config/quickwit.yaml:/quickwit/config/quickwit.yaml
      # 索引配置
      - /data/quickwit/quickwit/index_config:/quickwit/index_config
    ports:
      # quickwit的UI界面,http://ip:7280/ui/search
      - 7280 # WEB UI
      - 7281:7281 # OTLP的gRPC端口
    depends_on:
      - minio
    networks:
      - quickwit

  # ========================
  # 对象存储服务(S3兼容)
  # ========================
  minio:
    image: minio/minio:latest
    # 容器名
    container_name: minio
    entrypoint:  # 初始化存储目录
      - sh
      - -euc        # 执行脚本的参数:e(报错退出) u(未定义变量报错) c(执行后续命令)
      - |           # 多行脚本开始, minio创建目录挂载日志
        mkdir -p /data/quickwit-data && \
        minio server /data --console-address :9001
    environment:
      - MINIO_ROOT_USER=whiteBrocade        # 用户名(与Loki配置对应)
      - MINIO_ROOT_PASSWORD=whiteBrocade    # 密码(需加密处理)
      - MINIO_PROMETHEUS_AUTH_TYPE=public   # 开放指标
    volumes:
      - /data/quickwit/minio:/data  # 持久化存储路径
    ports:
      - 9000    # API端口
      - 9001:9001    # UI端口
    networks:
      - quickwit

  # ========================
  # 分布式追踪系统
  # ========================
  jaeger:
    # jaeger可以由多种可用服务组成,jaeger-query是一个支持OpenTelemetry标准(OTLP协议)用来查询OpenTarcing跟踪链路跨度引用轨迹的可视化WebUI服务,默认只提供查询后端存储功能与WebUI;如需使用完整Jaeger功能,请下载Jaeger一体式版本(包含WebUI、收集器、查询、代理功能):all-in-one 或 使用 v2 版本,下载请参见官网:Jaeger – Download Jaeger
    image: jaegertracing/jaeger-query:latest
    container_name: jaeger
    # 不使用官方的存储, 指定使用gRPC推送到quickwit中
    environment:
      - SPAN_STORAGE_TYPE=grpc
      - GRPC_STORAGE_SERVER=quickwit:7281
    ports:
      - 4317 # OTLP的gRPC端口
      - 4318 # OTLP的Http端口
      - 16686 # jaeger-ui端口
    networks:
      - quickwit

  # ========================
  # 服务运行指标与系统指标数据采集存储服务
  # ========================
  prometheus:
    image: prom/prometheus:v3.2.1
    container_name: prometheus
    command:
      - --config.file=/etc/prometheus/prometheus.yaml
      # 必须要添加这个参数, 否则Prometheus不开启remove write功能
      - --web.enable-remote-write-receiver
      - --web.enable-otlp-receiver
      - --enable-feature=exemplar-storage
      - --enable-feature=native-histograms
    ports:
      - 9090:9090
    volumes:
      - /data/quickwit/prometheus/prometheus.yaml:/etc/prometheus/prometheus.yaml
    networks:
      - quickwit

  # ========================
  # 可视化平台
  # ========================
  grafana:
    image: grafana/grafana-enterprise:latest
    # 容器名
    container_name: grafana
    # 数据持久化
    environment:
      - GF_AUTH_ANONYMOUS_ENABLED=true  # 开启匿名访问(生产环境应关闭)
      # 设置 Grafana 的管理员(admin)账户的初始密码为admin
      - GF_SECURITY_ADMIN_PASSWORD=admin
      # 设置 Grafana 的默认用户界面主题为暗黑模式
      - GF_USERS_DEFAULT_THEME=dark
      # 实验性功能
      # traceqlEditor: TraceQL查询语言支持(Tempo集成)
      # traceToMetrics: 从最终数据生成指标(APM分析)
      - GF_FEATURE_TOGGLES_ENABLE=traceqlEditor
      # 下载quickwit插件(下边链接都可以尝试下载)大概30M, Github有时候下载不下来, 不采取environment的方式安装, 采取理想安装的方式
      # - GF_INSTALL_PLUGINS=https://github.com/quickwit-oss/quickwit-datasource/releases/download/v0.4.6/quickwit-quickwit-datasource-0.4.6.zip;quickwit-quickwit-datasource
    volumes:
      # Grafan数据源配置
      - /data/quickwit/grafana/grafana-datasources.yaml:/etc/grafana/provisioning/datasources/datasources.yaml
      # 插件
      - /data/quickwit/grafana/plugins:/var/lib/grafana/plugins
      # Grafana配置
      # - /data/quickwit/grafana/grafana.ini:/etc/grafana/grafana.ini
    ports:
      - 3000:3000 # WEB UI
    networks:
      - quickwit
Java程序部署和观测
代码和部署
Java代码, 部署, OpentTelemetry的JDK见APM-基于Grafana生态以及OTLP协议的Java轻量级日志监控系统中
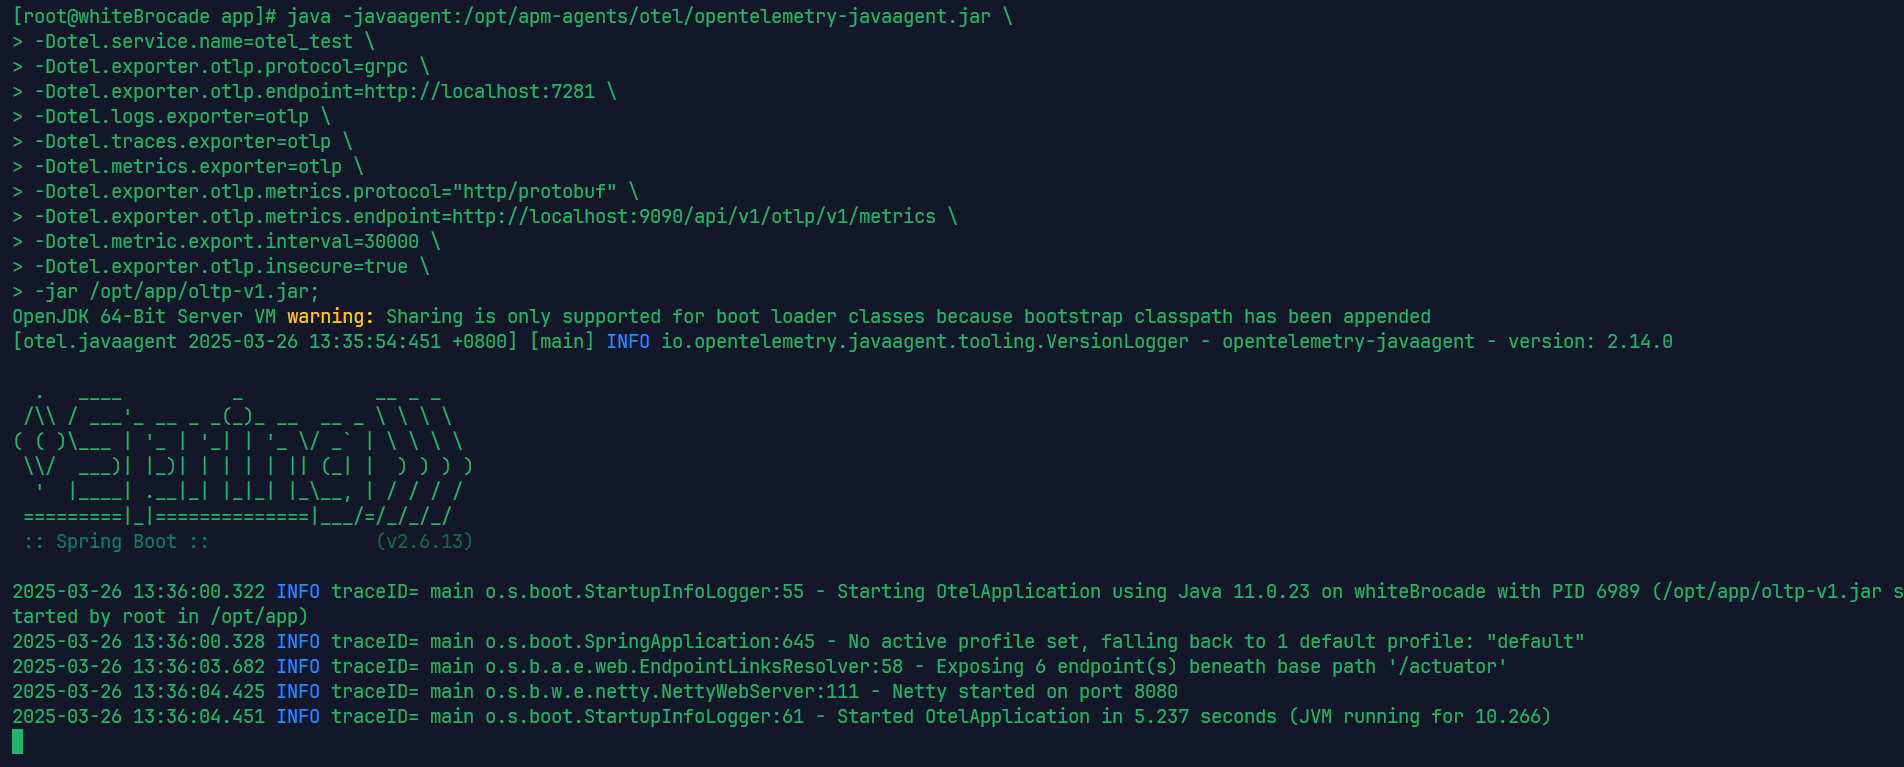
Java启动命令
关键参数含义
- -javaagent:/opt/apm-agents/otel/opentelemetry-javaagent.jar: 添加OpenTelemetry代理插桩
- -Dotel.exporter.otlp.protocol=grpc: 启用gRPC协议发送OTEL遥感数据
- -Dotel.exporter.otlp.endpoint=http://localhost:7281: OTEL收集地址(这里是quickwti进行收集)
- -Dotel.logs.exporter=otlp: log日志走otel协议推送(otel需要在应用服务启动中并且agent代理生效后, 可能会有部分日志缺失)
- -Dotel.metrics.exporter=otlp: metrics走oltp协议推送
- -Dotel.exporter.otlp.metrics.protocol=“http/protobuf”: metrice推送采用http
- -Dotel.exporter.otlp.metrics.endpoint=http://localhost:9090/api/v1/otlp/v1/metrics: metrics推送到promethues中(注意, promethues需要开启- --web.enable-otlp-receiver)
java -javaagent:/opt/apm-agents/otel/opentelemetry-javaagent.jar \
-Dotel.service.name=otel_test \
-Dotel.exporter.otlp.protocol=grpc \
-Dotel.exporter.otlp.endpoint=http://localhost:7281 \
-Dotel.logs.exporter=otlp \
-Dotel.traces.exporter=otlp \
-Dotel.metrics.exporter=otlp \
-Dotel.exporter.otlp.metrics.protocol="http/protobuf" \
-Dotel.exporter.otlp.metrics.endpoint=http://localhost:9090/api/v1/otlp/v1/metrics \
-Dotel.metric.export.interval=30000 \
-Dotel.exporter.otlp.insecure=true \
-jar /opt/app/oltp-v1.jar;
命令需要在/opt/app目录下执行
效果
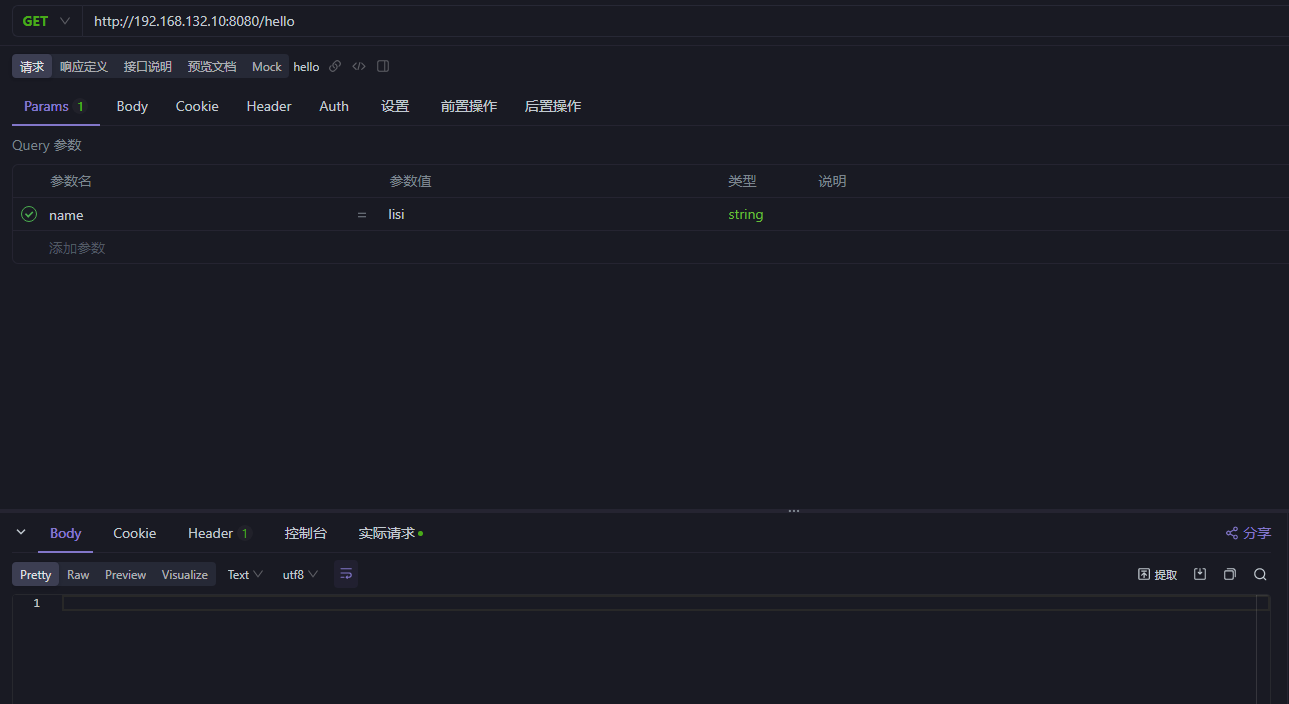
发送请求
发送hello请求
http://192.168.132.10:8080/hello
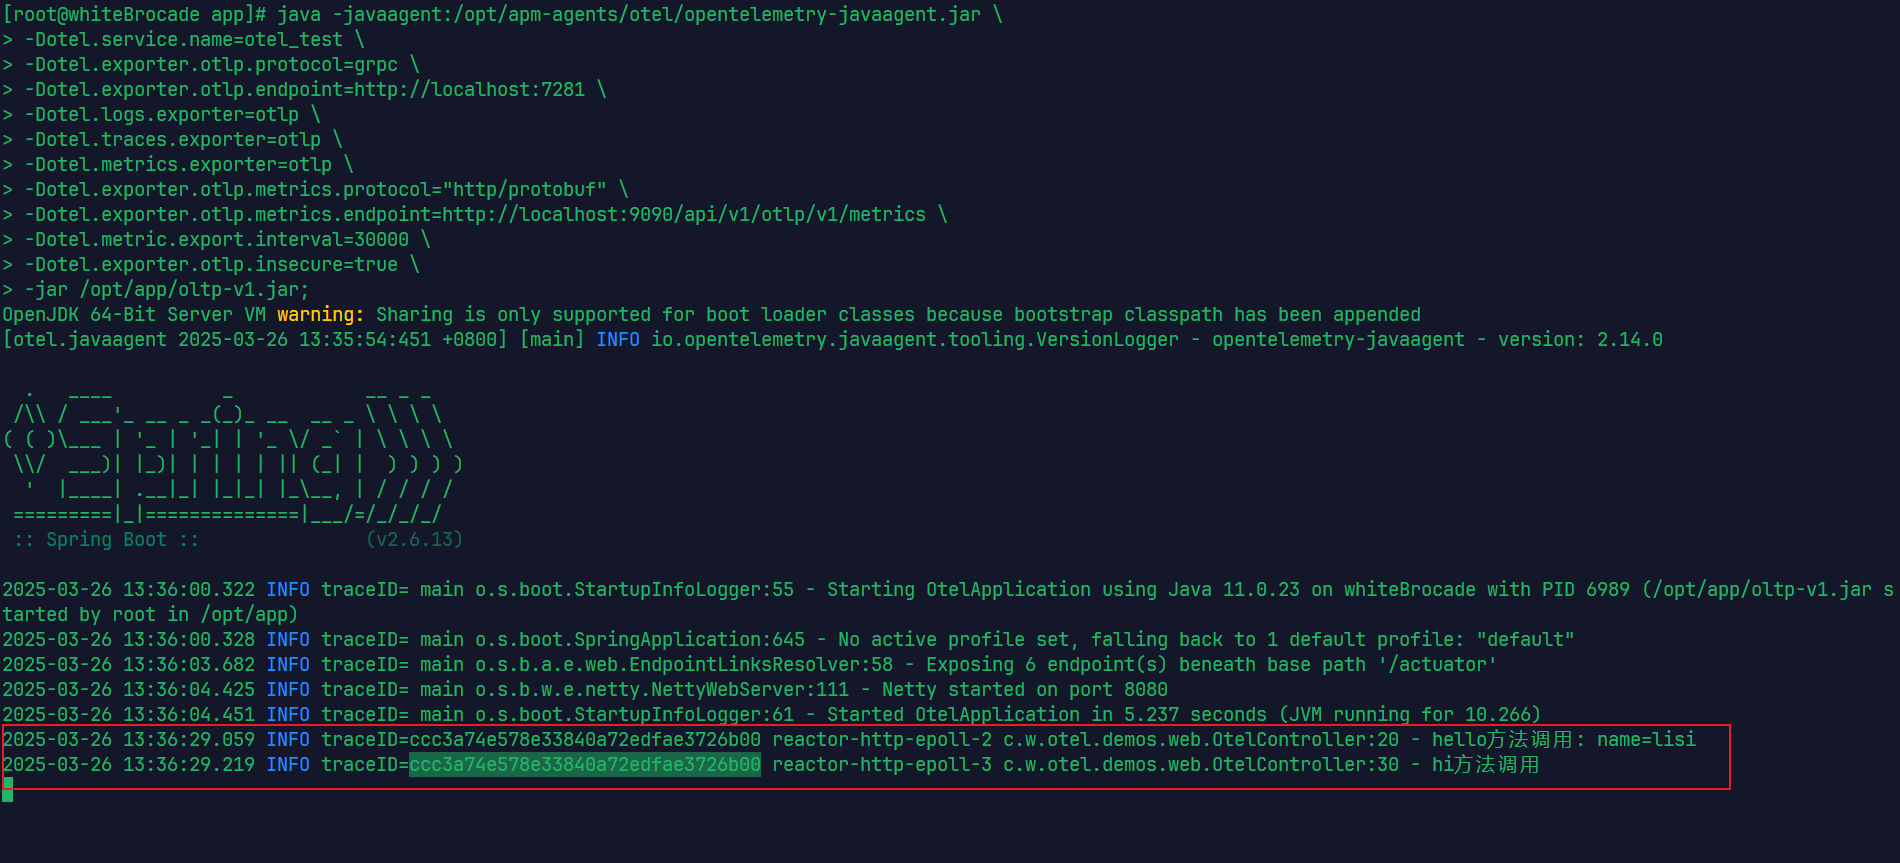
查看app.log日志
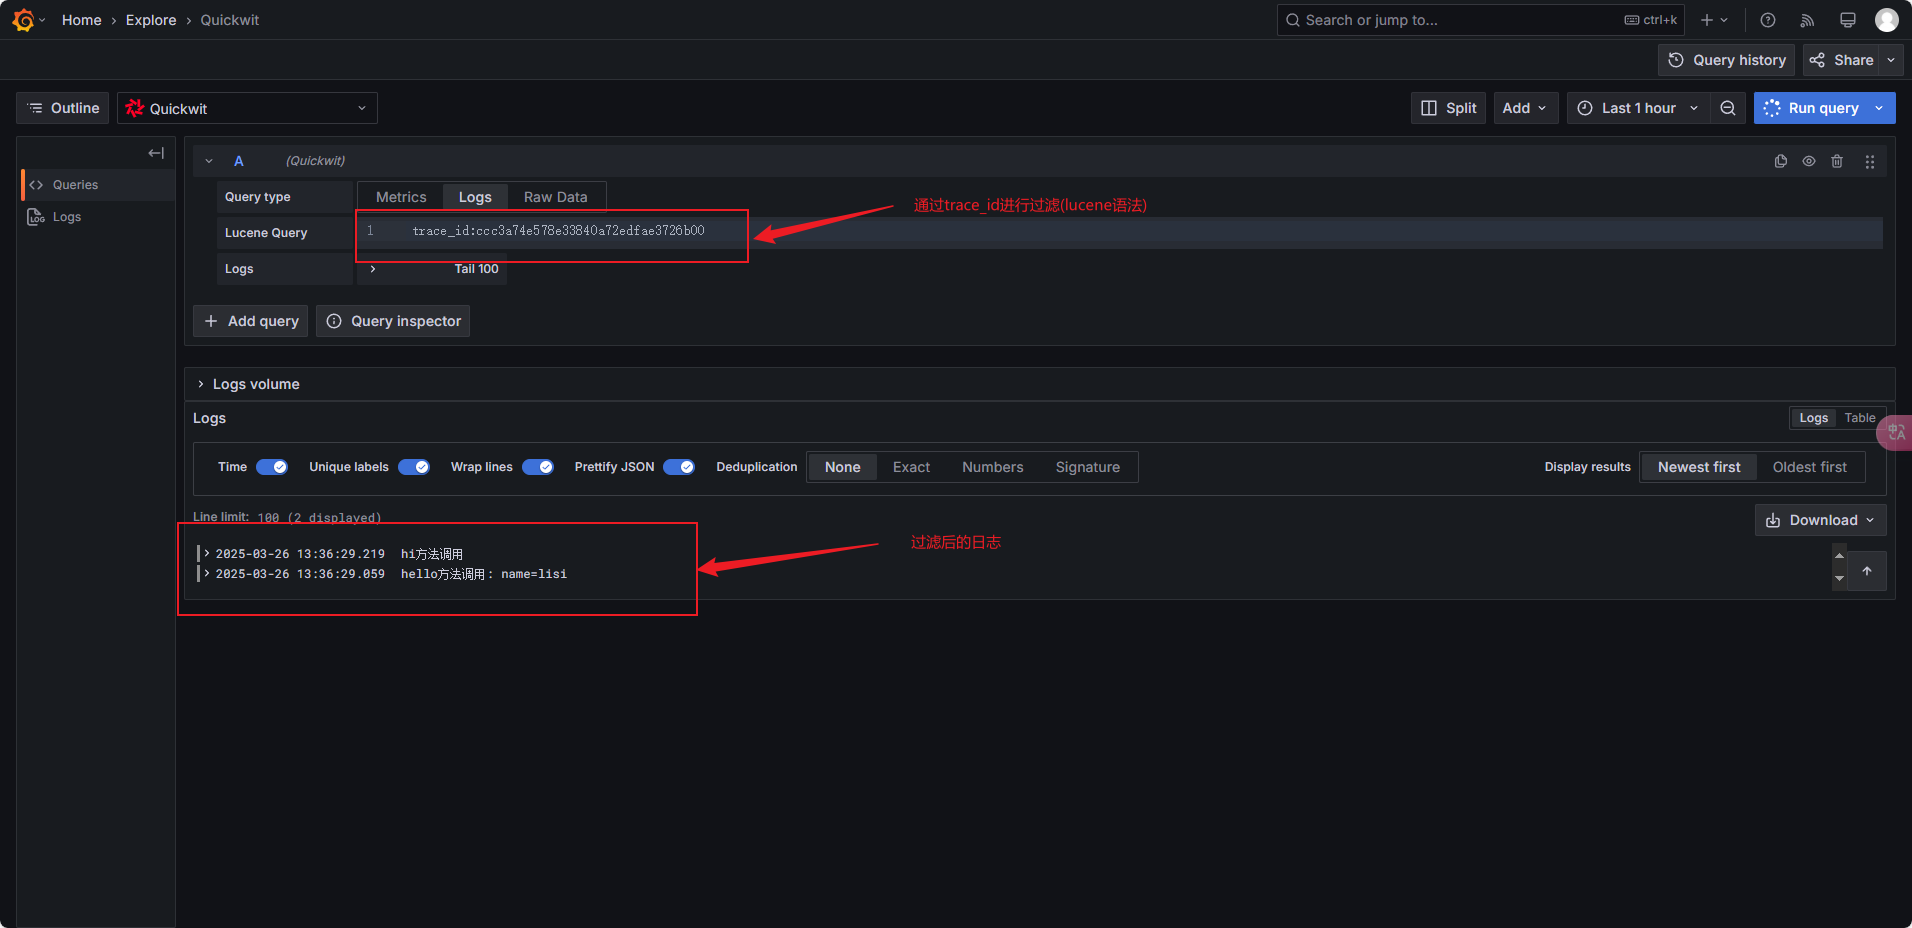
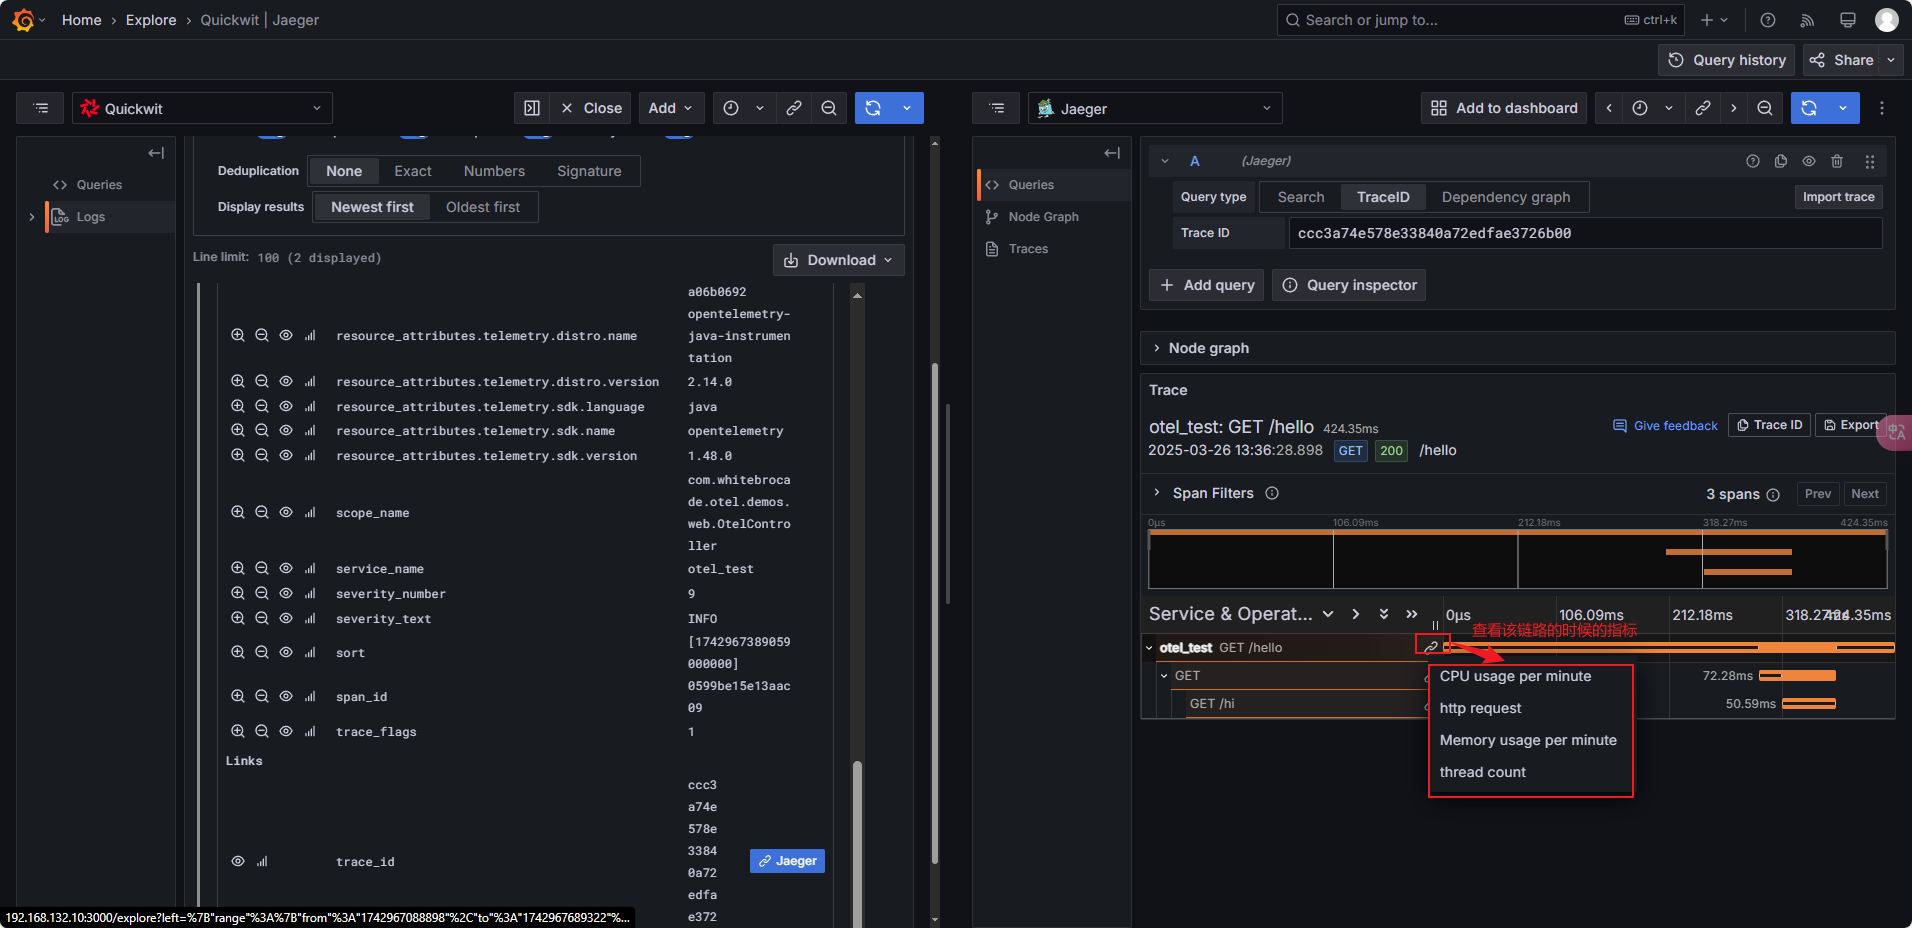
Grafana中quickwit查看日志
查看日志链路

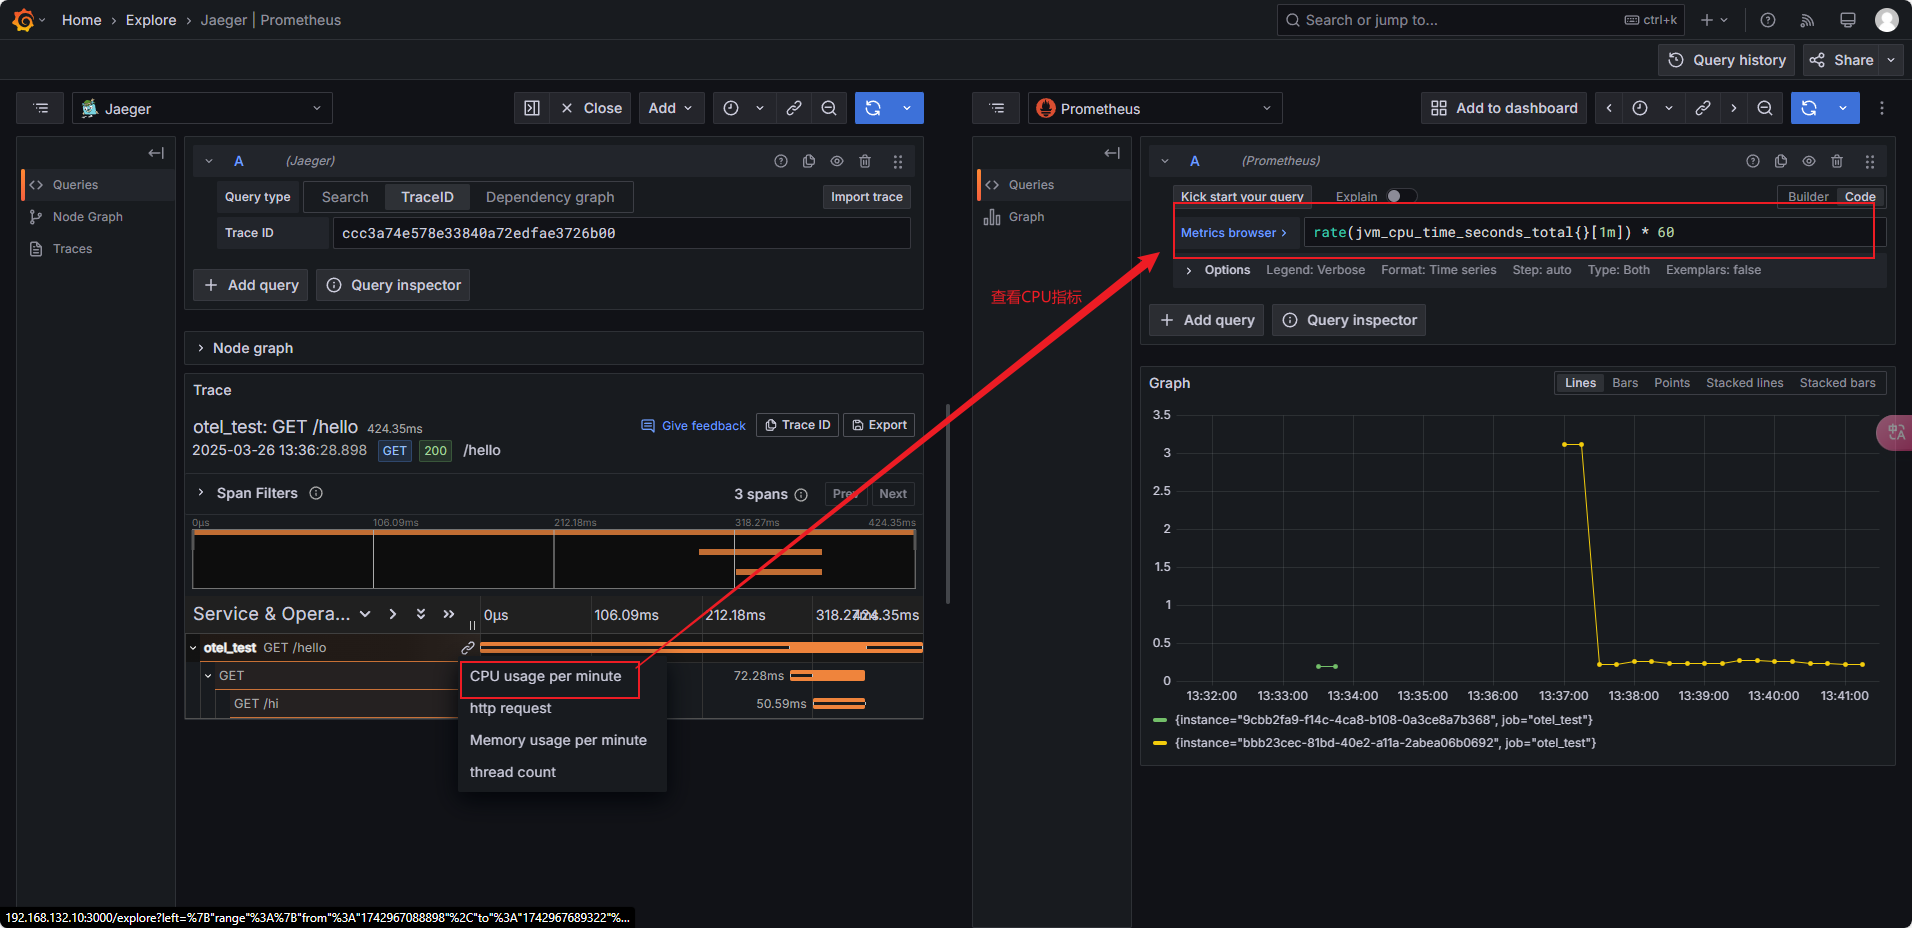
查看指标
总结
对于中小企业,小规模应用以及一定(大)规模的投入生产后的日志管理,是一个成本相对廉价、维护简单,并且性能较高的一个日志管理集成平台
-
日G级别或以下的日志量,可以采用Quickwit单机本地部署(也可以多节点+S3后端存储)
-
TB、PB级的数据量,则可以使用Quickwit多节点部署(或k8s弹性部署)+后端S3存储服务
参考
Plug Quickwit to Jaeger | Quickwit
Quickwit+Jaeger+Prometheus+Grafana搭建Java日志管理平台
quickwit-oss/quickwit-datasource
插件管理 | Grafana 文档 - Grafana 可观测平台
Grafana离线安装部署以及插件安装_grafana离线安装插件


 被折叠的 条评论
为什么被折叠?
被折叠的 条评论
为什么被折叠?
 到【灌水乐园】发言


