


我们的app是如何从桌面图标被启动的嘞?这个问题值得探究。
冷启动与热启动
这两个启动的区别其实很简单,就看启动之前手机后台是否有app存活。
| 名称 | 区别 |
|---|---|
| 冷启动 | 启动时,App的进程不在系统里,需要开启新进程。 |
| 热启动 | 启动时,App的进程还在系统里,不需要开启新进程。 |
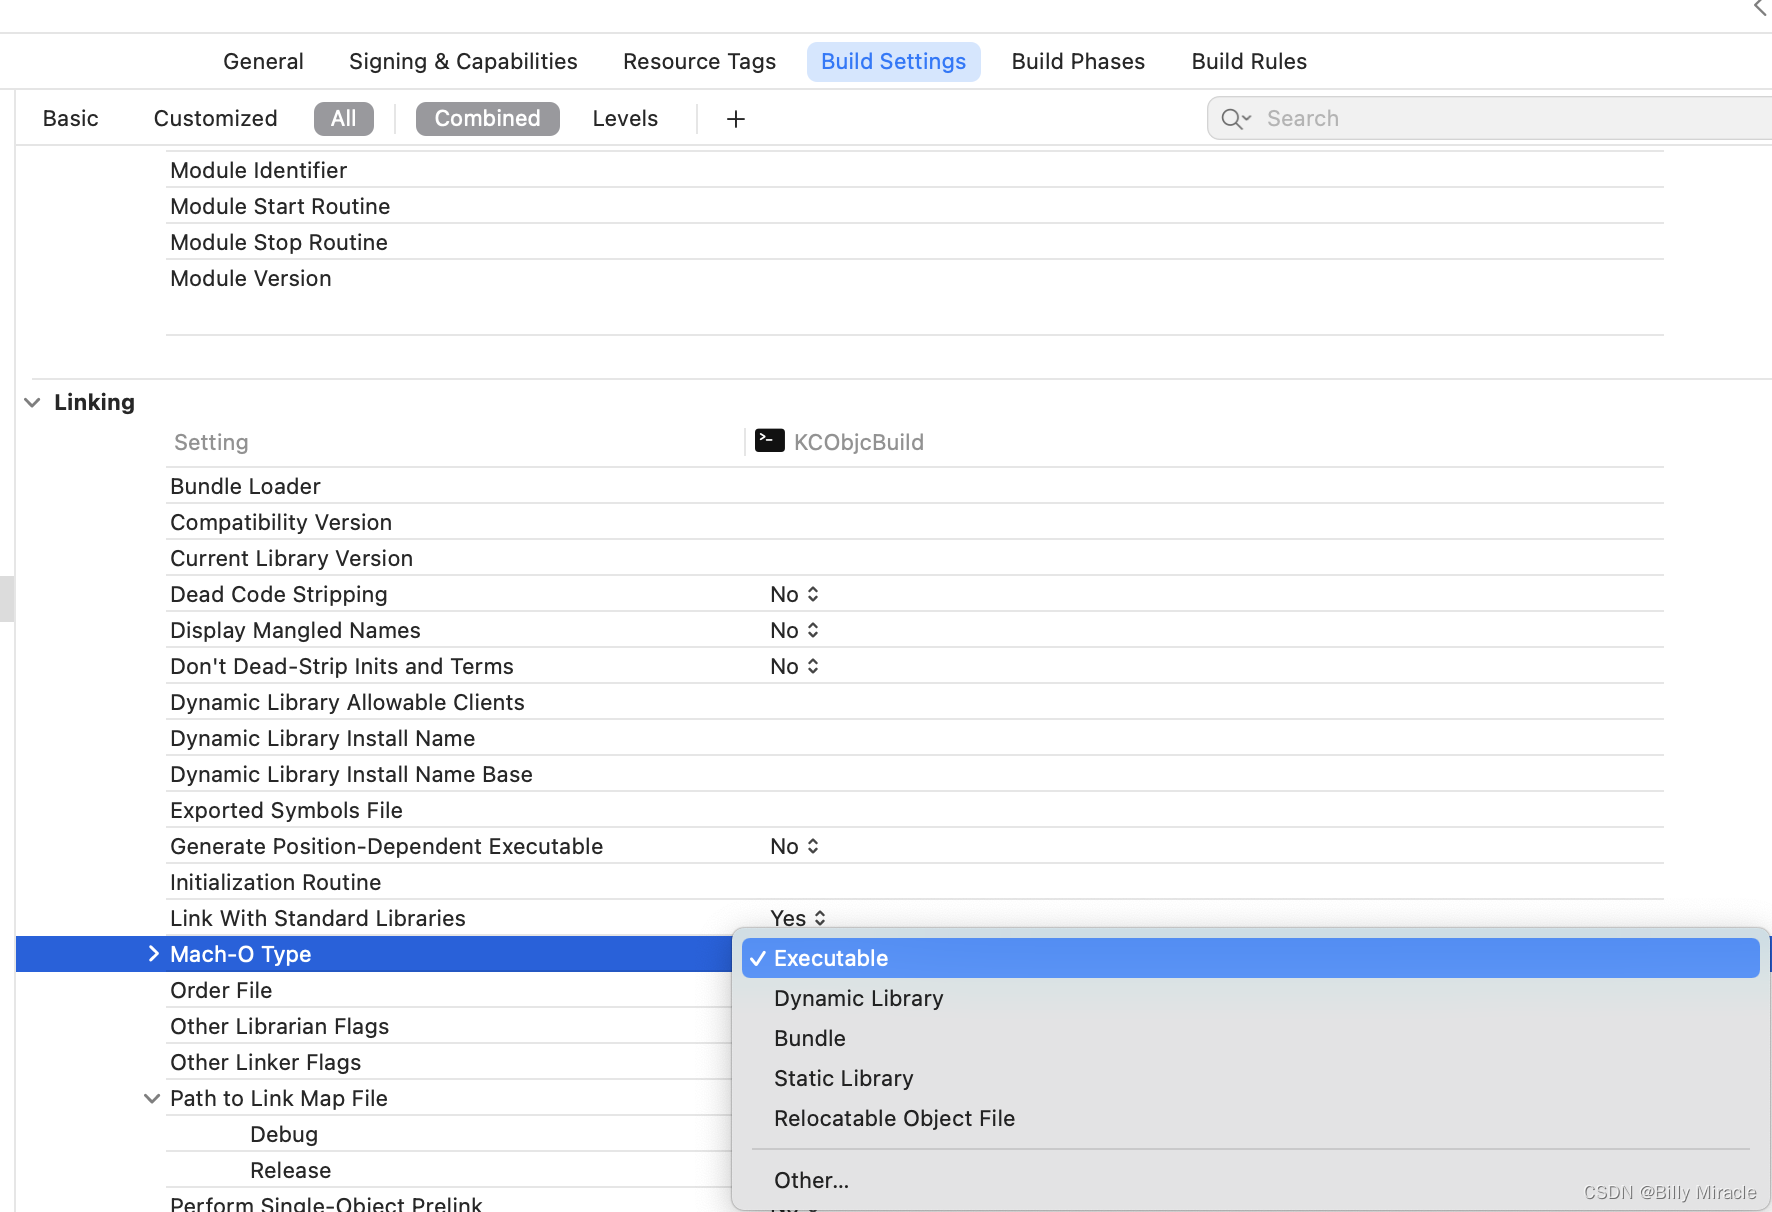
Mach-O
mach-o是iOS/macOS二进制文件的格式,mach-o又分为几种不同的类型。本文介绍了常见的mach-o文件类型以及它们的不同之处。
在Xcode->Build Setting ->Mach-O Type中,我们可以选择下面几种类型:
- Executable(产物为ipa包)
- Dynamic Library(产物为动态库)
- Bundle(产物为bundle文件)
- Static Library(产物为静态库)
- Relocatable Object File(重定向文件)
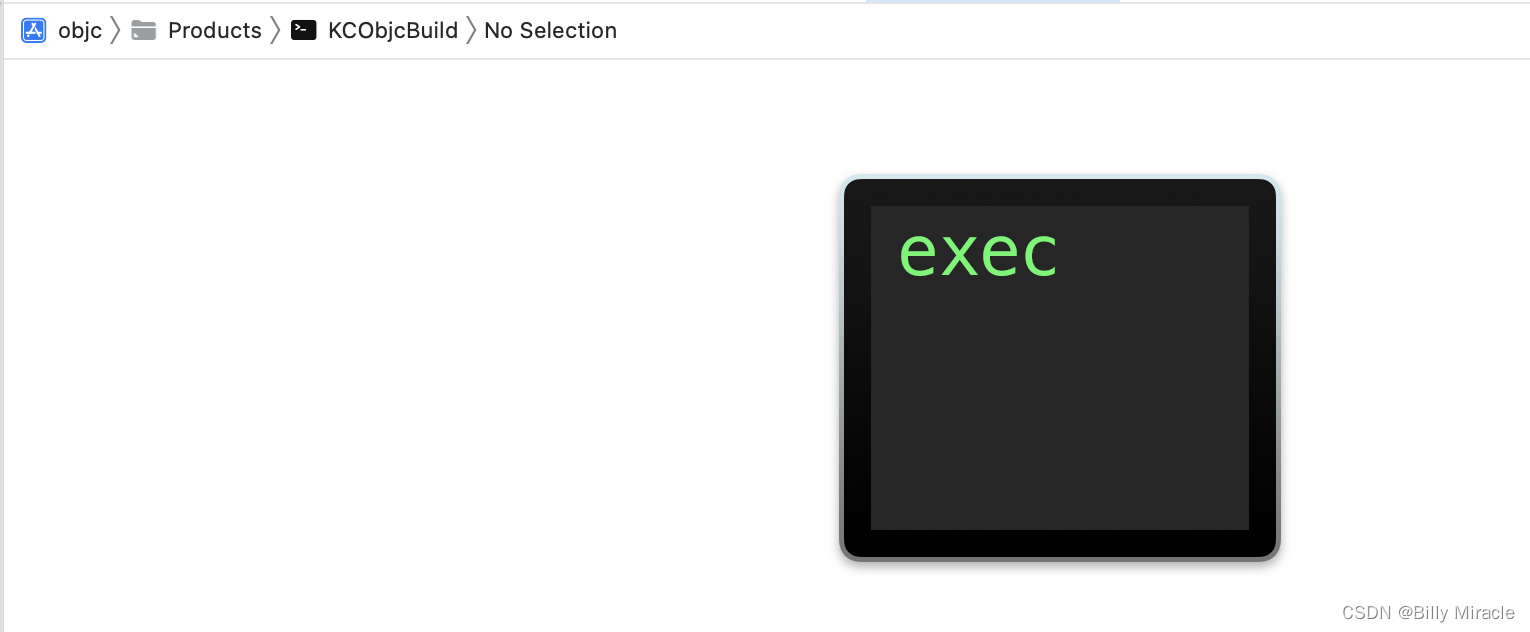
这个exec文件就是mach-o格式的可执行文件。
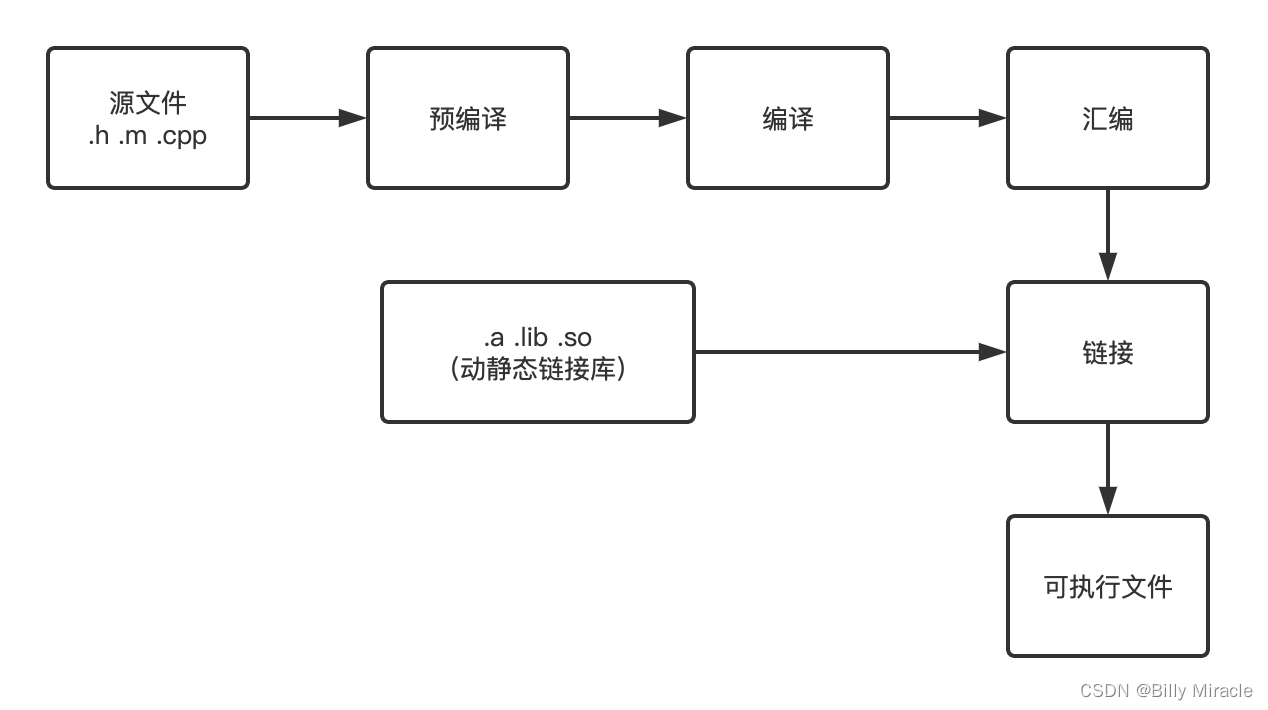
可执行文件生成流程
- 源文件:载入.h、.m、.cpp等文件
- 预编译:替换宏,删除注释,展开头文件,产生.i文件
- 编译:将.i文件转换为汇编语言,产生.s文件
- 汇编:将汇编文件转换为机器码文件,产生.o文件
- 链接:对.o文件中引用其他库的地方进行引用,生成最后的可执行文件
APP启动流程
dyld的概念
点击图标后,系统调用exec()函数,系统将对应的Mach-O文件加载进内存,同时再将dyld加载进内存。dyld就会进行动态链接。其中dyld的主要工作有一下几点:
- 递归加载可执行文件所依赖所有动态库
- 进行
rebase和bingding操作 - 调用
main函数
dyld(the dynamic link editor)是苹果的动态链接器,是苹果操作系统一个重要组成部分,在系统内核做好程序准备工作之后,交由dyld负责连接,加载程序。关于dyld,苹果已经开源dyld源码,我们可以通过阅读源码来了解dyld在pre-main阶段的流程。截止目前dyld已经更新至dyld4了,iOS15以上系统都是使用的dyld4。
app启动起始点
在ViewController的load方法打上断点,使用bt查看堆栈:

可以发现一开始的堆栈是 start然而通过网上查找资料可以发现,在调用start前还调用了_dyld_start。从网上找到这么一张图:
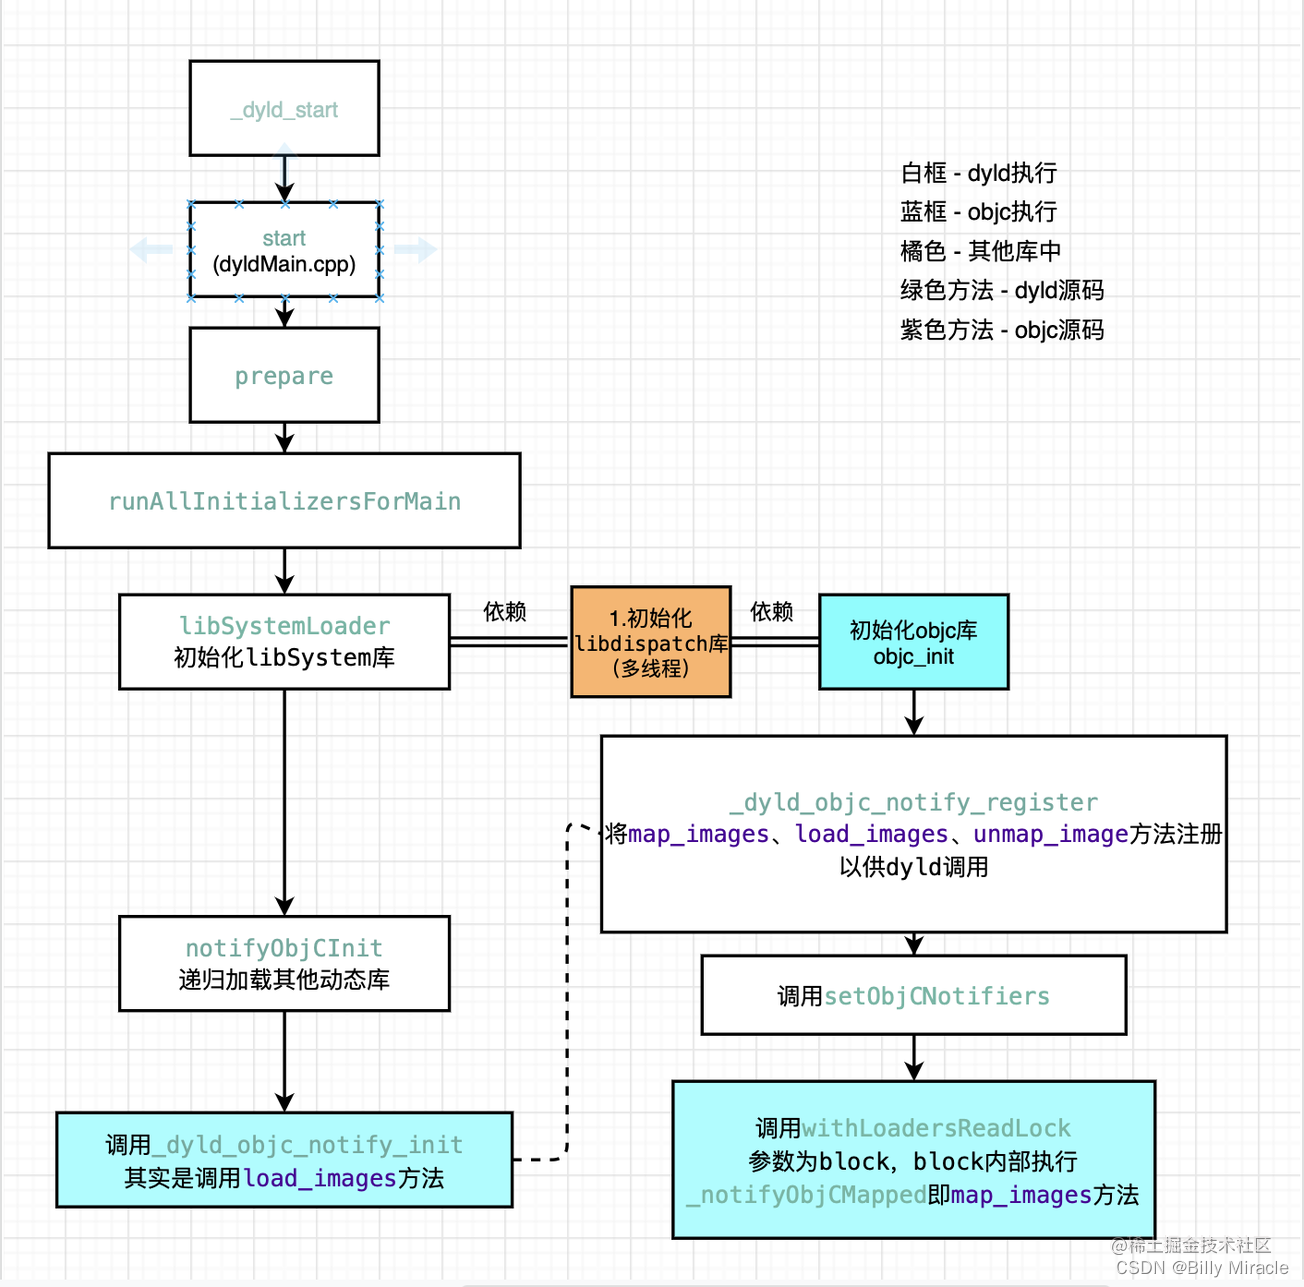
流程和我们查看的堆栈基本一致。
dyld源码分析
在源码中全局搜索_dyld_start,发现源码是由汇编编写完成的,通过下面的注释:
//
// This assembly code just needs to align the stack and jump into the C code for:
//      dyld::start(dyld4::KernelArgs*)
//
我们可以得知,此汇编代码只需要对齐堆栈并跳转到dyld::start(dyld4::KernelArgs*)。通过搜索namespace dyld4,可以找到start函数:
//
// Entry point for dyld. The kernel loads dyld and jumps to __dyld_start which
// sets up some registers and call this function.
//
// Note: this function never returns, it calls exit(). Therefore stack protectors
// are useless, since the epilog is never executed. Marking the fucntion no-return
// disable the stack protector. The stack protector was also causing problems
// with armv7k codegen since it access the random value through a GOT slot in the
// prolog, but dyld is not rebased yet.
//
/*
dyld 的入口点。 内核加载 d 并跳转到 __dyld_start 这会设置一些寄存器并调用此函数。
注意:这个函数从不返回,它调用exit()。
因此,堆栈保护器是无用的,因为永远不会执行epilog。 标记不返回功能禁用堆栈保护器。
堆栈保护器也导致了armv7k codegen的问题,因为它通过prolog中的GOT插槽访问随机值,但dyld尚未重新定位。
*/
void start(const KernelArgs* kernArgs) __attribute__((noreturn)) __asm("start");
void start(const KernelArgs* kernArgs)
{
// Emit kdebug tracepoint to indicate dyld bootstrap has started <rdar://46878536>
// Note: this is called before dyld is rebased, so kdebug_trace_dyld_marker() cannot use any global variables
dyld3::kdebug_trace_dyld_marker(DBG_DYLD_TIMING_BOOTSTRAP_START, 0, 0, 0, 0);
// walk all fixups chains and rebase dyld
// Note: withChainStarts() and fixupAllChainedFixups() cannot use any static DATA pointers as they are not rebased yet
const MachOAnalyzer* dyldMA = getDyldMH();
assert(dyldMA->hasChainedFixups());
uintptr_t slide = (long)dyldMA; // all fixup chain based images have a base address of zero, so slide == load address
__block Diagnostics diag;
dyldMA->withChainStarts(diag, 0, ^(const dyld_chained_starts_in_image* starts) {
dyldMA->fixupAllChainedFixups(diag, starts, slide, dyld3::Array<const void*>(), nullptr);
});
diag.assertNoError();
// Now, we can call functions that use DATA
mach_init();
// set up random value for stack canary
// 栈溢出保护
__guard_setup(kernArgs->findApple());
// setup so that open_with_subsystem() works
_subsystem_init(kernArgs->findApple());
// use placement new to construct ProcessConfig object in __DATA_CONST, before it is made read-only
ProcessConfig& config = *new ((ProcessConfig*)sConfigBuffer) ProcessConfig(kernArgs, sSyscallDelegate);
// make __DATA_CONST read-only (kernel maps it r/w)
dyldMA->forEachSegment(^(const MachOAnalyzer::SegmentInfo& segInfo, bool& stop) {
if ( segInfo.readOnlyData ) {
const uint8_t* start = (uint8_t*)(segInfo.vmAddr + slide);
size_t size = (size_t)segInfo.vmSize;
sSyscallDelegate.mprotect((void*)start, size, PROT_READ);
}
});
#if !SUPPPORT_PRE_LC_MAIN
// stack allocate RuntimeLocks. They cannot be in the Allocator pool which is usually read-only
RuntimeLocks sLocks;
#endif
// create Allocator and APIs/RuntimeState object in that allocator
// 在该分配器中创建分配器和 API/运行时状态对象
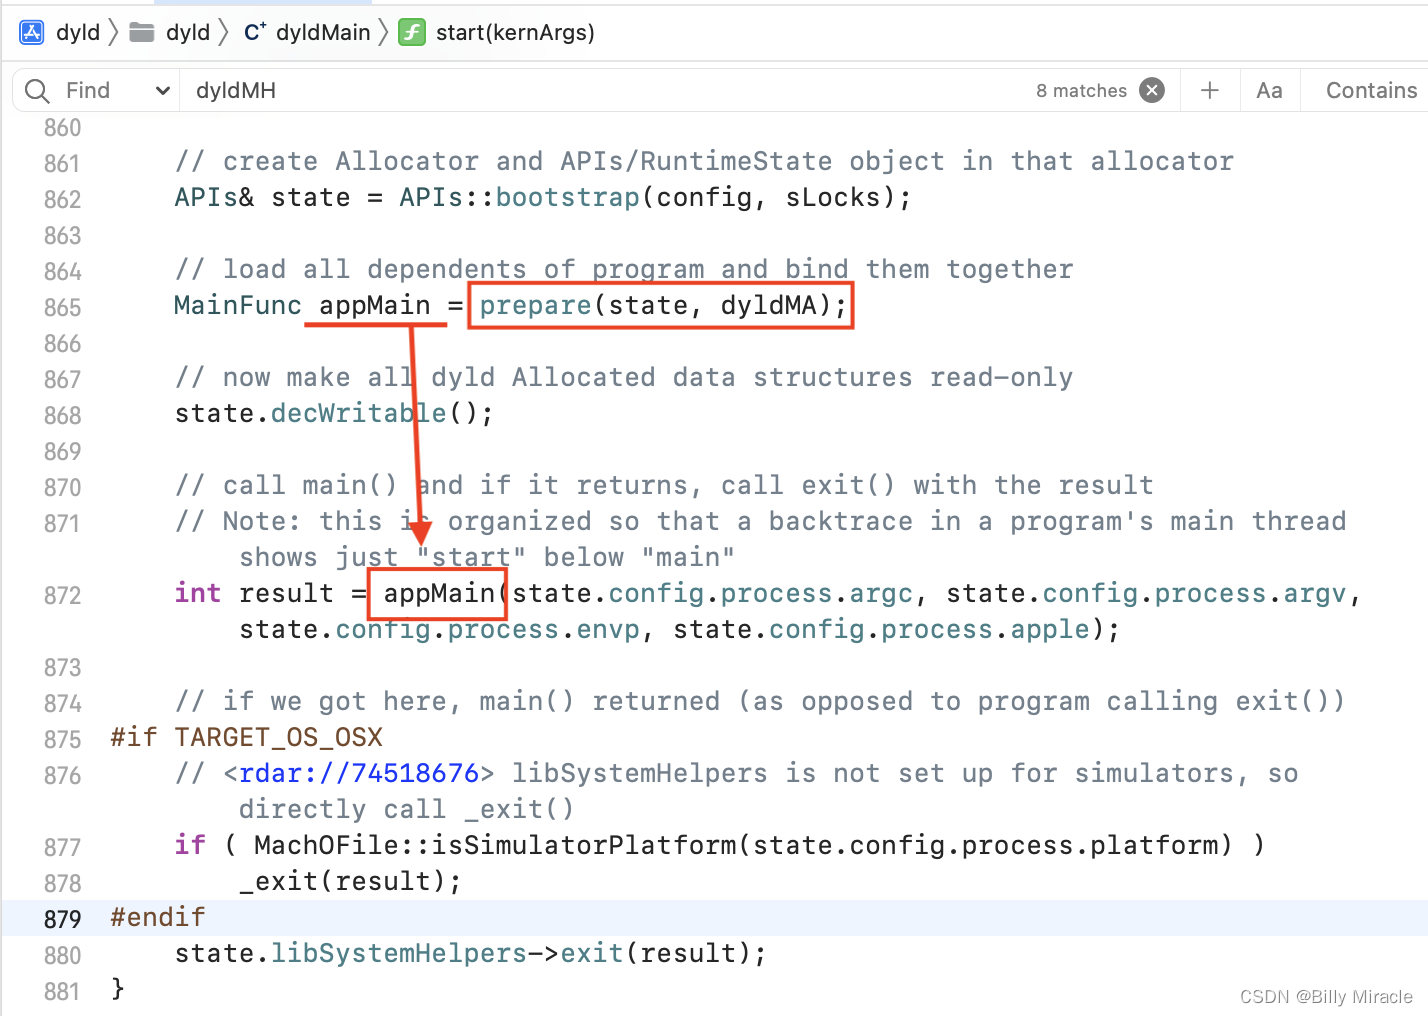
APIs& state = APIs::bootstrap(config, sLocks);
// load all dependents of program and bind them together
// 加载程序的所有依赖项并将它们绑定在一起
// 注意:⚠️调用流程图里提到的prepare()函数
MainFunc appMain = prepare(state, dyldMA);
// now make all dyld Allocated data structures read-only
state.decWritable();
// call main() and if it returns, call exit() with the result
// Note: this is organized so that a backtrace in a program's main thread shows just "start" below "main"
int result = appMain(state.config.process.argc, state.config.process.argv, state.config.process.envp, state.config.process.apple);
// if we got here, main() returned (as opposed to program calling exit())
#if TARGET_OS_OSX
// <rdar://74518676> libSystemHelpers is not set up for simulators, so directly call _exit()
if ( MachOFile::isSimulatorPlatform(state.config.process.platform) )
_exit(result);
#endif
state.libSystemHelpers->exit(result);
}
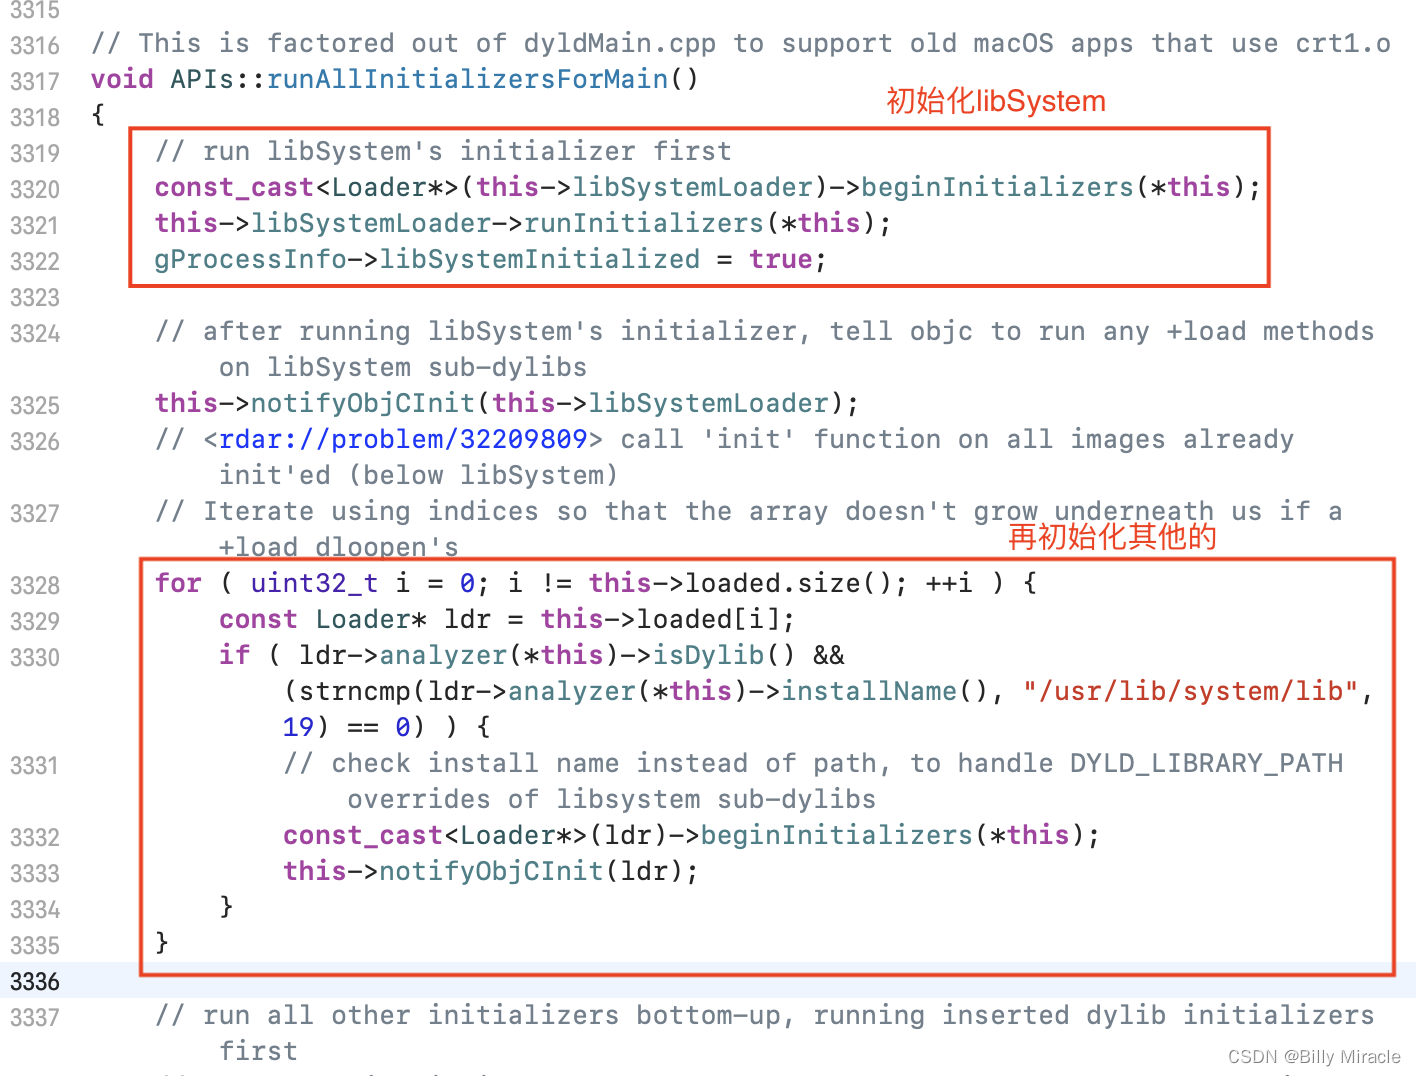
我们可以继续看prepare()函数,立面调用了runAllInitializersForMain():

加载动态库
找到runAllInitializersForMain()源码:
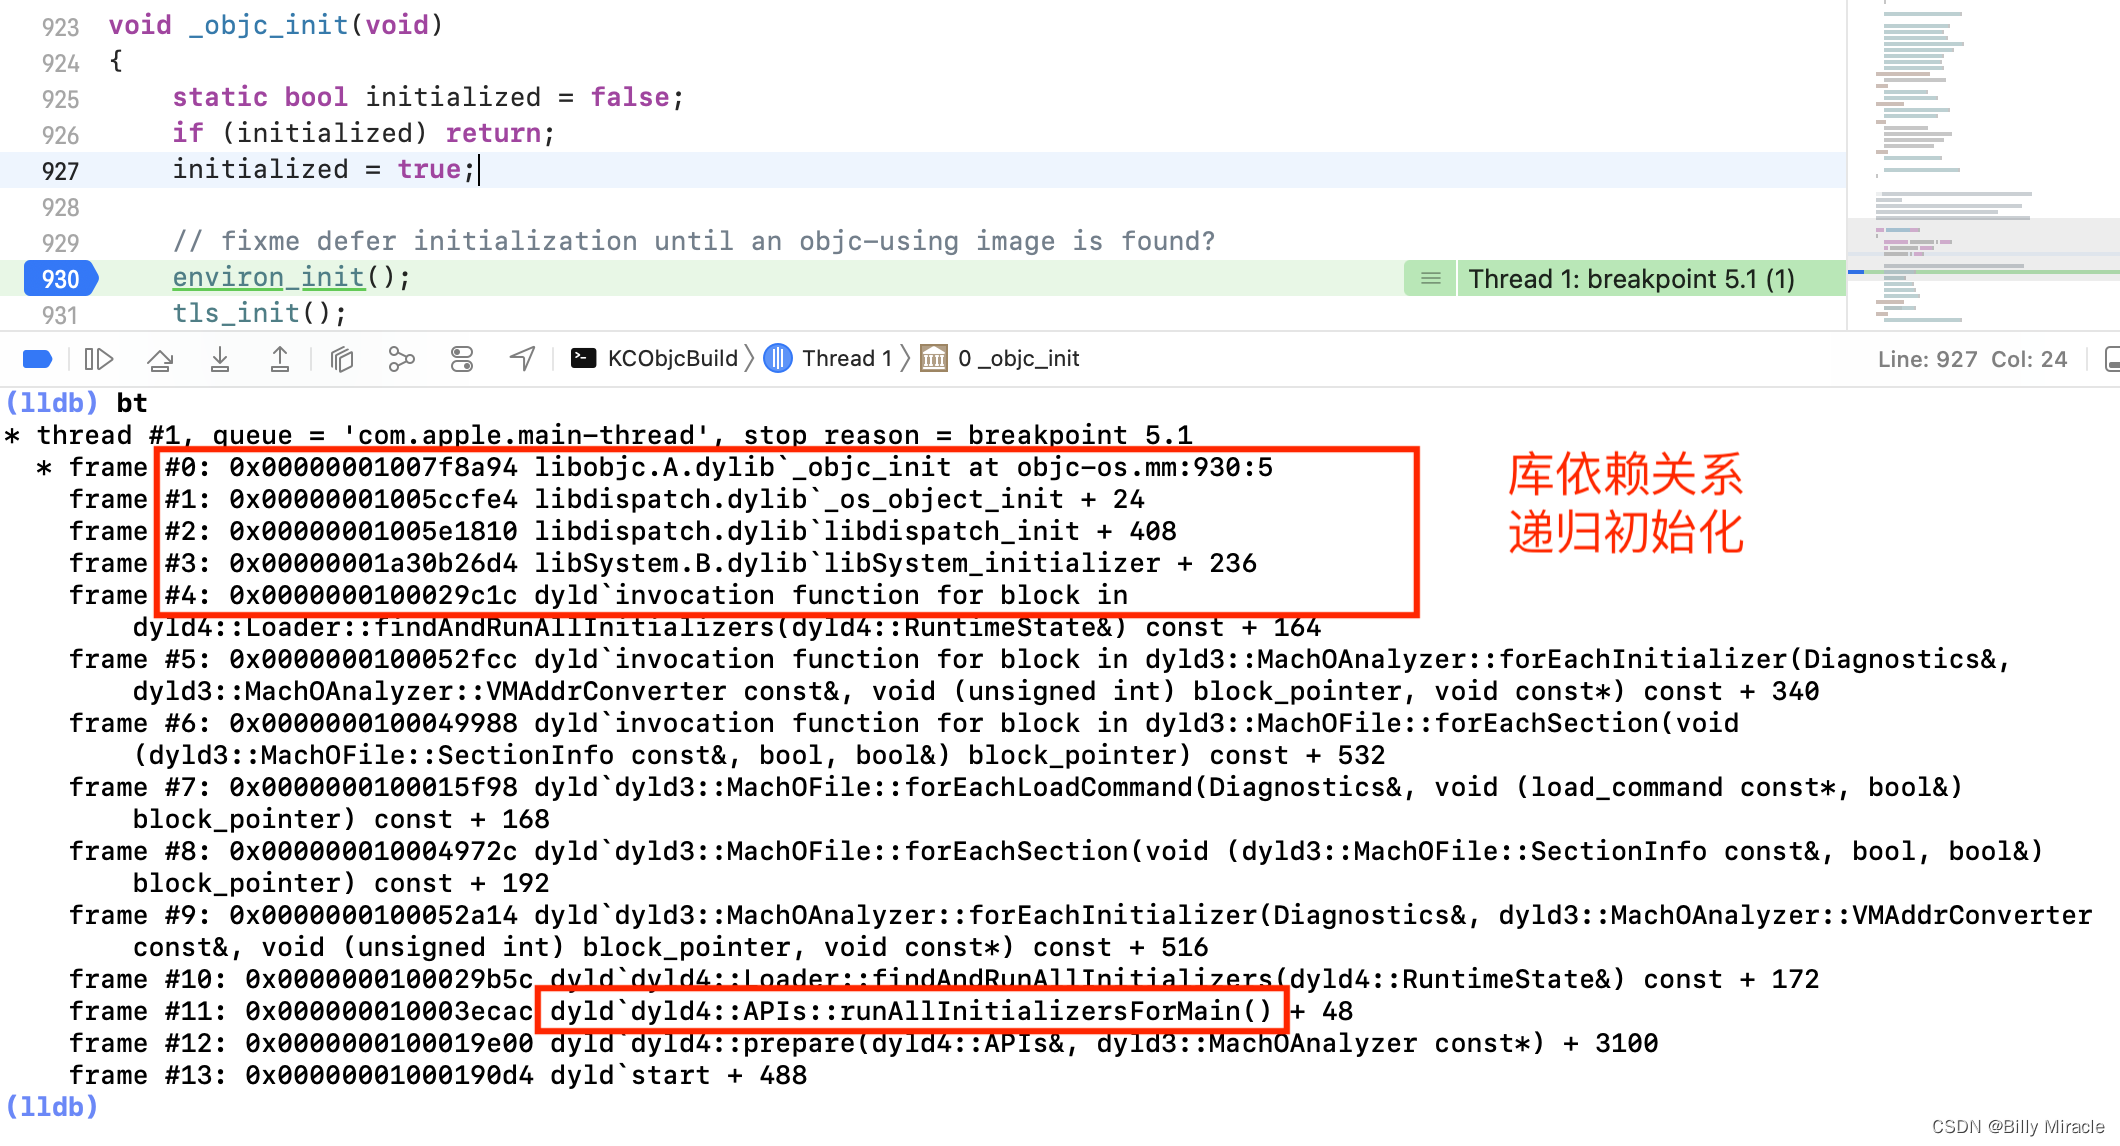
在objc4源码中的_objc_init 方法处断点,并且使用bt命令查看调用栈:
_objc_init里面调用_dyld_objc_notify_register来注册3个方法:
void _objc_init(void)
{
    static bool initialized = false;
    if (initialized) return;
    initialized = true;

    // fixme defer initialization until an objc-using image is found?
    environ_init();
    tls_init();
    static_init();
    runtime_init();
    exception_init();
#if __OBJC2__
    cache_t::init();
#endif
    _imp_implementationWithBlock_init();
	// 调用_dyld_objc_notify_register来注册3个方法
    _dyld_objc_notify_register(&map_images, load_images, unmap_image);

#if __OBJC2__
    didCallDyldNotifyRegister = true;
#endif
}
map_images的调用
先看map_images源码:
map_images(unsigned count, const char * const paths[],
           const struct mach_header * const mhdrs[])
{
    mutex_locker_t lock(runtimeLock);
    return map_images_nolock(count, paths, mhdrs);
}
在dyld源码中搜索_dyld_objc_notify_register方法,可以看到mapped(第一个参数)就是map_images:
void APIs::_dyld_objc_notify_register(_dyld_objc_notify_mapped   mapped,
                                      _dyld_objc_notify_init     init,
                                      _dyld_objc_notify_unmapped unmapped)
{
    if ( config.log.apis )
        log("_dyld_objc_notify_register(%p, %p, %p)\n", mapped, init, unmapped);
    //⚠️
    setObjCNotifiers(mapped, init, unmapped);

    // If we have prebuilt loaders, then the objc optimisations may hide duplicate classes from libobjc.
    // We need to print the same warnings libobjc would have.
    if ( const PrebuiltLoaderSet* mainSet = this->processPrebuiltLoaderSet() )
        mainSet->logDuplicateObjCClasses(*this);
}
继续寻找setObjCNotifiers方法并定位:
void RuntimeState::setObjCNotifiers(_dyld_objc_notify_mapped mapped, _dyld_objc_notify_init init, _dyld_objc_notify_unmapped unmapped)
{
	// 保存三个方法
    _notifyObjCMapped   = mapped;
    _notifyObjCInit     = init;
    _notifyObjCUnmapped = unmapped;

	// 传入块
    withLoadersReadLock(^{
        // callback about already loaded images
        size_t maxCount = this->loaded.size();
        STACK_ALLOC_ARRAY(const mach_header*, mhs, maxCount);
        STACK_ALLOC_ARRAY(const char*, paths, maxCount);
        for ( const Loader* ldr : loaded ) {
            // don't need _mutex here because this is called when process is still single threaded
            const MachOLoaded* ml = ldr->loadAddress(*this);
            if ( ldr->hasObjC ) {
                paths.push_back(ldr->path());
                mhs.push_back(ml);
            }
        }
        if ( !mhs.empty() ) {
            (*_notifyObjCMapped)((uint32_t)mhs.count(), &paths[0], &mhs[0]);
            if ( this->config.log.notifications ) {
                this->log("objc-mapped-notifier called with %ld images:\n", mhs.count());
                for ( uintptr_t i = 0; i < mhs.count(); ++i ) {
                    this->log(" objc-mapped: %p %s\n", mhs[i], paths[i]);
                }
            }
        }
    });
}
可以看到里面对全局变量赋值其实就是保存3个方法,之后调用了withLoadersReadLock并且传入了block,block内部执行了_notifyObjCMapped。那么block的执行就会调用map_images方法。
void RuntimeState::withLoadersReadLock(void (^work)())
{
#if BUILDING_DYLD
    if ( this->libSystemHelpers != nullptr ) {
        this->libSystemHelpers->os_unfair_recursive_lock_lock_with_options(&(_locks.loadersLock), OS_UNFAIR_LOCK_NONE);
        work();
        this->libSystemHelpers->os_unfair_recursive_lock_unlock(&_locks.loadersLock);
    }
    else
#endif
    {
        work();//⚠️
    }
}
可以看到在withLoadersReadLock是直接调用块的。也就是说,map_images是在objc_init的时候就会调用。
load_images的调用
先看我们前面传入的三个参数:
_dyld_objc_notify_register(&map_images, load_images, unmap_image);
⇩
void APIs::_dyld_objc_notify_register(_dyld_objc_notify_mapped   mapped,
                                      _dyld_objc_notify_init     init,
                                      _dyld_objc_notify_unmapped unmapped)
{
    if ( config.log.apis )
        log("_dyld_objc_notify_register(%p, %p, %p)\n", mapped, init, unmapped);
    //⚠️
    setObjCNotifiers(mapped, init, unmapped);
⇩
void RuntimeState::setObjCNotifiers(_dyld_objc_notify_mapped mapped, _dyld_objc_notify_init init, _dyld_objc_notify_unmapped unmapped)
{
	// 保存三个方法
    _notifyObjCMapped   = mapped;
    _notifyObjCInit     = init;
    _notifyObjCUnmapped = unmapped;
还是在runAllInitializersForMain中调用:
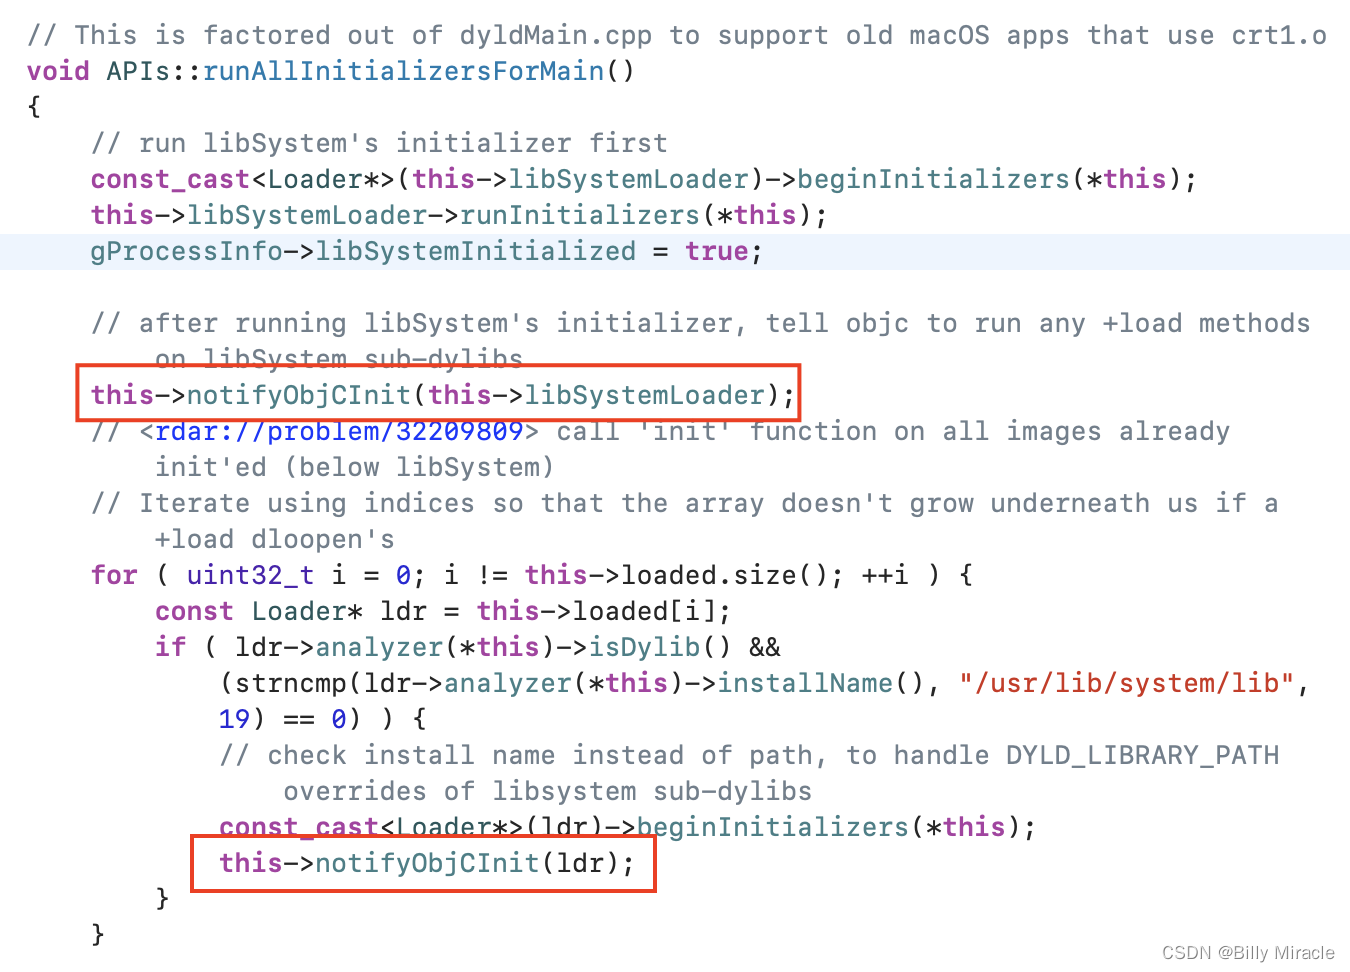
可以看到不论加载libSystem还是其他类都用到了这个方法,点进去看实现:
void RuntimeState::notifyObjCInit(const Loader* ldr)
{
    //this->log("objc-init-notifier checking mh=%p, path=%s, +load=%d, objcInit=%p\n", ldr->loadAddress(), ldr->path(), ldr->mayHavePlusLoad, _notifyObjCInit);
    if ( (_notifyObjCInit != nullptr) && ldr->mayHavePlusLoad ) {
        const MachOLoaded* ml  = ldr->loadAddress(*this);
        const char*        pth = ldr->path();
        dyld3::ScopedTimer timer(DBG_DYLD_TIMING_OBJC_INIT, (uint64_t)ml, 0, 0);
        if ( this->config.log.notifications )
            this->log("objc-init-notifier called with mh=%p, path=%s\n", ml, pth);
        _notifyObjCInit(pth, ml);//⚠️
    }
}
其中除了打log外,主要的目的就是调用_notifyObjCInit,这个值是objc通过_dyld_objc_notify_register传给dyld的,然后在setObjCNotifiers方法中存储的。
可以看到dyld在加载应用程序的时候也是需要objc的。dyld像是一个首脑派发加载任务给objc,objc把动态库加载进内存。
rebase和bind
mach-o文件中的符号地址都是虚拟地址,在程序启动的时候,系统会生成一个随机数(alsr),使用虚拟地址加上alsr才是物理地址,也就是程序正真调用的地址。我们把从虚拟地址换算成物理地址的过程称之为rebase。 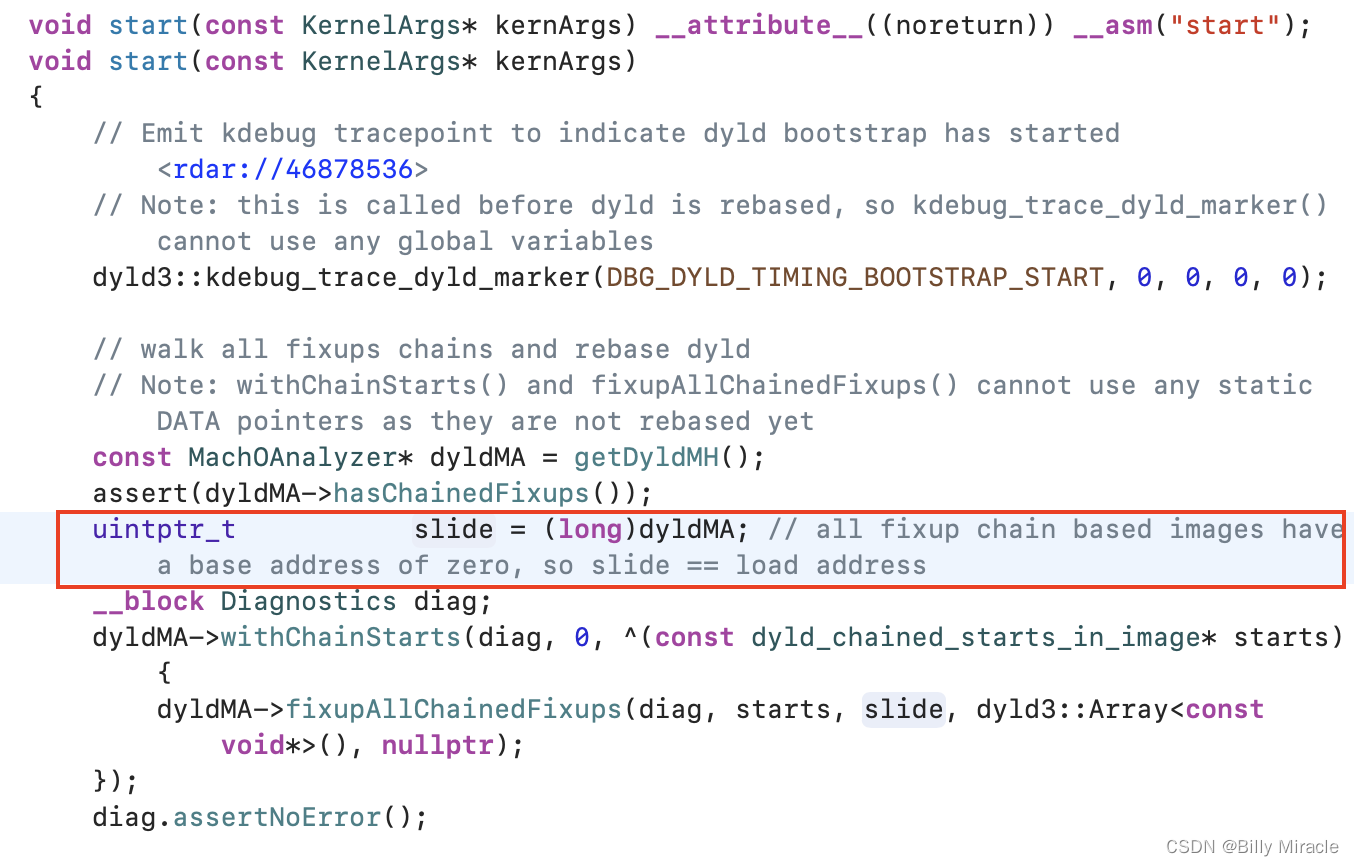
可以看到start中生成了slide这个相当于alsr。注释:所有基于修正链的image的基址均为零,因此slide等于加载地址。在后面调用prepare方法时传入了这个值:
// load all dependents of program and bind them together
MainFunc appMain = prepare(state, dyldMA);
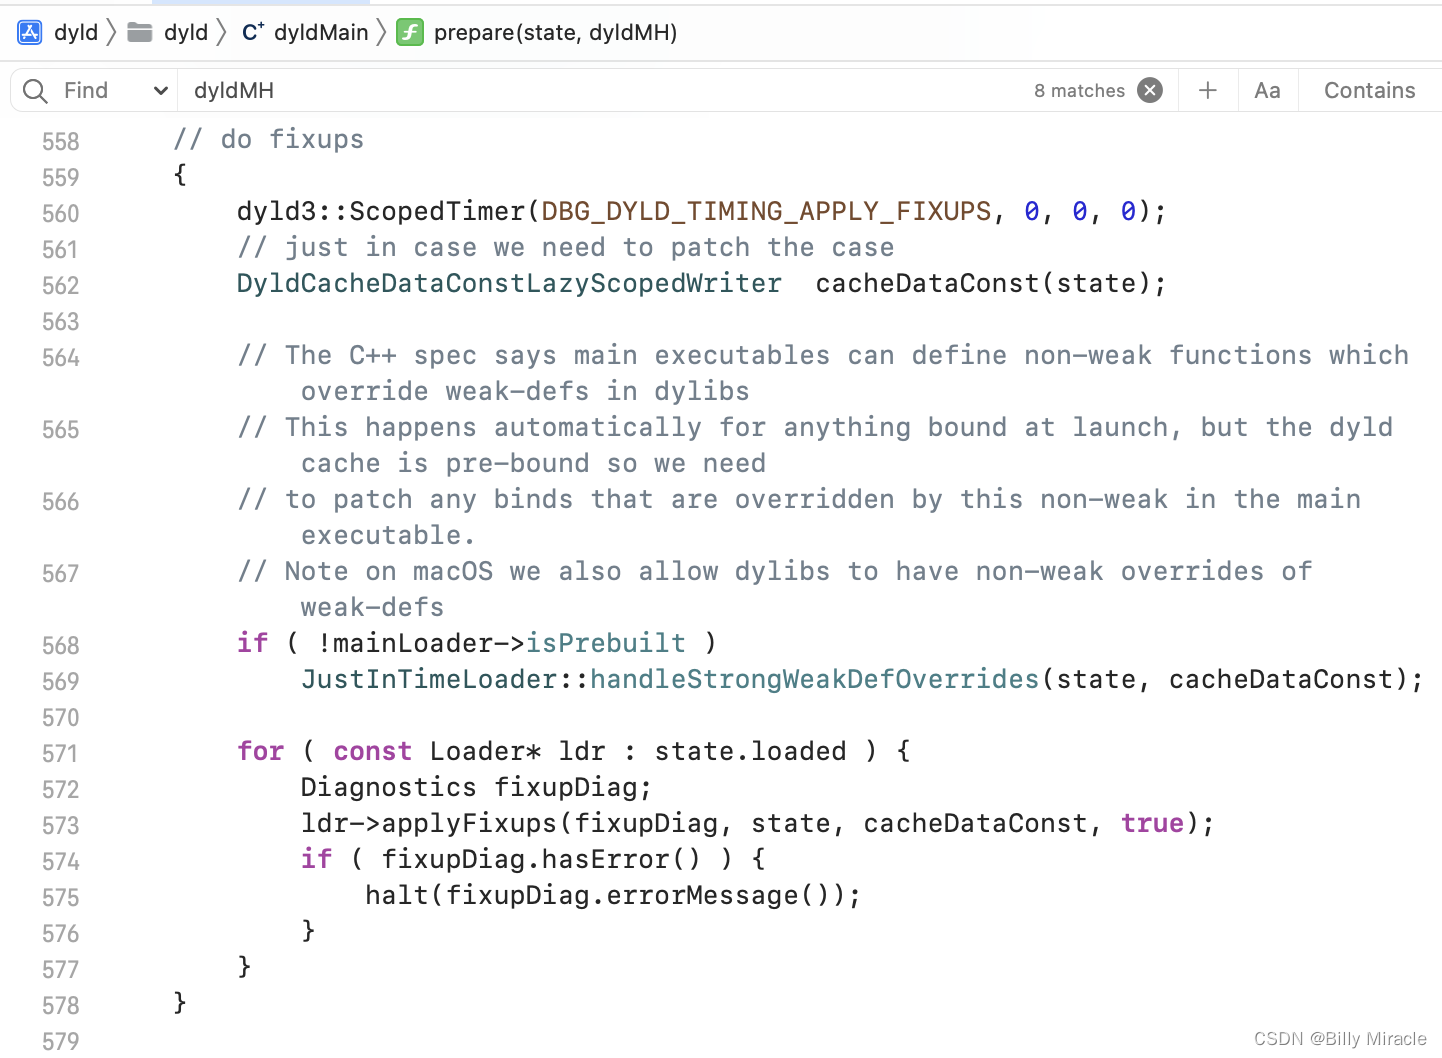
这里的do fixups也是去处理了rebase。
调用main函数
在start()函数里面的后面,调用prepare方法获取main函数,之后直接调用,程序就进入我们的源代码中了。


 1202
1202


 被折叠的 条评论
为什么被折叠?
被折叠的 条评论
为什么被折叠?
 到【灌水乐园】发言


