


一、版本控制系统/版本控制器
1. 版本控制系统:
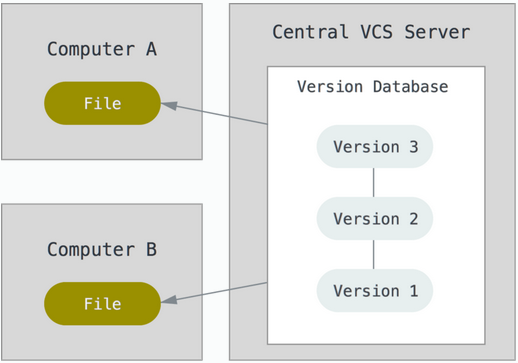
git 分布式 —没有中心代码库,所有机器之间的地位同等(每台机器上都有相同的代码)

svn 集中管理的 —有中心代码库,其他都是客户端
2.git与svn介绍
1.git属于分布式版本控制系统
客户端并不只提取最新版本的文件,而是把原始的代码仓库完整地克隆下来。
优点:
a.由于任何人每次提取操作,实际上都是一次对代码仓库的完整备份,因此近乎所有的操作都可以在本地执行,速度就是相当的快,并且可以在网络断开的时候操作仍然不受影响,可以频繁的进行提交更新,等到有网络的时候再上传到远程的仓库就可以了。
b.git的分支模型,相当的轻量级,被称为“必杀技”。

缺点:
a.每个开发人员都拥有所有的代码,不利于核心代码的保密(如果有重要代码需要保密,则不建议使用git)
2.svn属于集中式的版本控制系统
有一个单一的集中管理的服务器,保存所有文件的修订版本,而协同工作的成员通过客户端连接到这台服务器,进行文件上传和更新。

优点:
a.使用简单,比较符合我们的常规思维
b.同步代码比较简单,只要一步操作即可。

缺点:
a.丢失数据的风险:最显而易见的,由于集中化的特点,如果版本库的服务器磁盘发生故障等,你不能保证所有的数据已经有人提取出来了,最坏的情况是彻底的丢失整个项目的所有历史更改记录。
b.网络中断的情况下,协作就无法进行了,因为无法连接服务器进行上传和更新。
面试题:Git和SVN的区别?
3.git 相关概念—纯命令行
工作区
版本库
暂存区
HEAD
版本号
版本日志
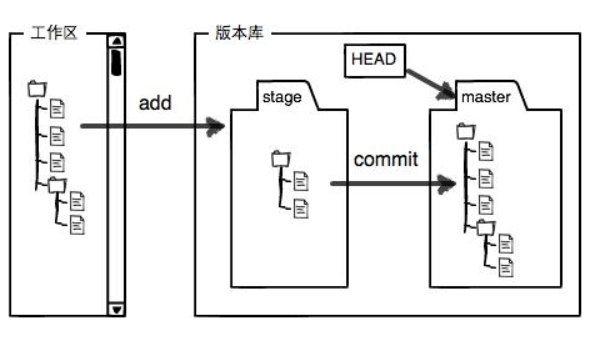
1.工作区(Working Directory)
存放git版本仓库的目录就是工作区(放源代码的地方)

2.暂存区:
Git的版本库里存了很多东西,其中最重要的就是称为stage(或者叫index)的暂存区,(会将代码添加到缓存区,没有问题之后在提交到版本库)

3.版本库(Repository)
工作区有一个隐藏目录.git,这个不算工作区,而是Git的版本库。

4.HEAD:指向你最近一次提交后的结果。(现在是哪个版本,头就会指向这个版本)

1.添加文件到暂存区:
创建两个文件add到stage:
#git add 文件名
或者
#git add *
从暂存区(stage)提交到当前master分支的HEAD:
git commit -m “版本描述信息” #提交暂存区里的修改到版本库的分支
版本号:最核心用的是id号。每个版本都会有一个id号,也就是commit id,
查看版本号:
版本号可以通过版本日志查看
commit完成的功能类似快照,可以使用git log查看每次的commit记录
[root@vm20 gittest]# git log
commit fbecfa3d04ae5038aa11bf55942e46c840077ace                  //id号
二、git部署
环境:
    git-server    192.168.246.214  充当中心代码仓库服务器
    client        192.168.246.213

所有机器关闭防火墙和selinux

安装:所有机器都安装
   [root@git-server ~]# yum install -y git
   [root@git-server ~]# git --version
   git version 1.8.3.1

准备:
    因为Git是分布式版本控制系统,所以,每个机器都必须注册:你的名字和Email地址。
    注意git config命令的--global参数,用了这个参数,表示你这台机器上所有的Git仓库都会使用这个配置。

所有的机器都添加,只要邮箱和用户不一样就可以。
    # git config --global user.email "soho@163.com"     ----设置邮箱
    # git config --global user.name "soho"                   ----加添用户
    # cat /root/.gitconfig
    # git config --global color.ui true		#语法高亮
    # git config --list			#查看全局配置
1、git使用
创建版本库:
1.创建一个空目录**:**在中心服务器上创建
[root@git-server ~]# mkdir /git-test
[root@git-server ~]# useradd git   #创建一个git用户用来运行git
[root@git-server ~]# passwd git  #给用户设置密码git
[root@git-server ~]# cd /git-test/
2.通过git init命令把这个目录变成Git可以管理的仓库:
 第1种情况:可以改代码,还能上传到别人的机器,别人也能从你这里下载但是别人不能上传代码到你的机器上。
 第2种情况:只是为了上传代码用,别人从这台机器上下载代码也可以上传代码到这台机器上,经常用于核心代码库。
创建裸库: 适用于作为远程中心仓库使用
创建裸库才可以从别处push(传)代码过来,使用–bare参数------裸
git init --bare 库名字
创建一裸库:
[root@git-server git-test]# git init --bare testgit
Initialized empty Git repository in /git-test/testgit/
[root@git-server ~]# chown git.git /git-test -R  #修改权限
2.仓库创建完成后查看库目录:
[root@git-server git-test]# cd testgit/
[root@git-server testgit]# ls
branches  config  description  HEAD  hooks  info  objects  refs
1.客户端
1.配置免密登录
[root@client ~]# ssh-keygen    #生成秘钥
[root@client ~]# ssh-copy-id -i git@192.168.246.214   #将秘钥传输到git服务器中的git用户
2.克隆git仓库
[root@client ~]# yum install -y git
[root@client ~]# git clone git@192.168.246.214:/git-test/testgit/
Cloning into 'testgit'...
warning: You appear to have cloned an empty repository.
[root@client ~]# ls  #查看仓库已经克隆下来了
anaconda-ks.cfg    testgit
1.创建文件模拟代码提交到仓库
1.在testgit目录下创建一个测试文件test.txt
[root@client ~]# cd testgit/
[root@client testgit]# vim test.txt   #随便写点东西

2.把文件添加到暂存区:使用 "git add" 建立跟踪
[root@client testgit]# git add test.txt
注: 这里可以使用 git add * 或者 git add -A

3.提交文件到仓库分支:
[root@client testgit]# git commit -m "test1"
[master (root-commit) 2b51ff9] test1
 1 file changed, 2 insertions(+)
 create mode 100644 test.txt
 -m:描述

 4.查看git状态:
[root@client testgit]# git status
# On branch master   #分支位于master
5.修改文件后再此查看状态:
[root@client testgit]# echo '1122334' >> test.txt
[root@client testgit]# git status
# 位于分支 master
# 尚未暂存以备提交的变更:
#   (使用 "git add <file>..." 更新要提交的内容)
#   (使用 "git checkout -- <file>..." 丢弃工作区的改动)
#
#	修改:      readme.txt
#
修改尚未加入提交(使用 "git add" 和/或 "git commit "
6.先add
[root@client testgit]# git add -A
8.再次提交commit:
[root@client testgit]# git commit  -m "add2"
[master 73bf688] add2
 1 file changed, 1 insertion(+)
 [root@client testgit]# git status
# On branch master
nothing to commit, working directory clean
2、版本回退
已经提交了不合适的修改到版本库时,想要撤销本次提交,使用版本回退,不过前提是没有推送到远程库。
查看现在的版本:
[root@client testgit]# git log
显示的哪个版本在第一个就是当前使用的版本。
版本回退(切换):
在Git中,上一个版本就是HEAD^,当然往上100个版本写100个比较容易数不过来,所以写成HEAD~100(一般使用id号来恢复)
回到上一个版本
[root@client testgit]# git reset --hard HEAD^
HEAD is now at 0126755 test1
2.回到指定的版本(根据版本号):
[root@client testgit]# git reset --hard dd66ff
HEAD is now at dd66ff9 add2
==========================================================
注:消失的ID号:
回到早期的版本后再查看git log会发现最近的版本消失,可以使用reflog查看消失的版本ID,用于回退到消失的版本
[root@vm20 gittest]# git reflog
2a85982 HEAD@{0}: reset: moving to 2a859821a2385e136fe83f3a206b287eb0eb8c18
f5bc8c1 HEAD@{1}: commit: test-version2
2a85982 HEAD@{2}: commit (initial): test-version1

[root@git-client testgit]# git reset --hard f5bc8c1
3、删除文件
从工作区删除test.txt,并且从版本库一起删除
++++++++++++++++++++++++++++++++++++++++++++++++++++++++++++++++++++++++++++++
工作区:
[root@client testgit]# touch test.txt
[root@client testgit]# git status
# On branch master
# Untracked files:
#   (use "git add <file>..." to include in what will be committed)
#
#       qf.txt
nothing added to commit but untracked files present (use "git add" to track)
[root@client testgit]# rm -rf test.txt  未添加到暂存区,可直接删除
[root@client testgit]# git status
# On branch master
nothing to commit, working directory clean

+++++++++++++++++++++++++++++++++++++++++++++++++++++++++++++++++++++++++++++++
已从工作区提交到暂存区:
第一种方法
[root@client testgit]# touch test.txt
[root@client testgit]# git status
# On branch master
#
# Initial commit
#
# Untracked files:
#   (use "git add <file>..." to include in what will be committed)
#
#       test.txt
nothing added to commit but untracked files present (use "git add" to track)

[root@client testgit]# git add test.txt
[root@client testgit]# git status
# On branch master
#
# Initial commit
#
# Changes to be committed:
#   (use "git rm --cached <file>..." to unstage)
#
#       new file:   test.txt
#

[root@client testgit]#  git rm --cache test.txt #从暂存区移除
rm 'test.txt'
[root@client testgit]# ls
test.txt
[root@client testgit]# git status
# On branch master
#
# Initial commit
#
# Untracked files:
#   (use "git add <file>..." to include in what will be committed)
#
#       test.txt
nothing added to commit but untracked files present (use "git add" to track)
[root@client testgit]# rm -rf test.txt
[root@client testgit]# git status
# On branch master
#
# Initial commit
#
nothing to commit (create/copy files and use "git add" to track)

第二种方法:
[root@client testgit]# touch  b.txt
[root@client testgit]# git add b.txt
[root@client testgit]# git status
# On branch master
#
# Initial commit
#
# Changes to be committed:
#   (use "git rm --cached <file>..." to unstage)
#
#       new file:   b.txt
#
[root@client testgit]# git rm -f b.txt
rm 'b.txt'
[root@client testgit]# ls
[root@client testgit]# git status
# On branch master
#
# Initial commit
#
nothing to commit (create/copy files and use "git add" to track)

+++++++++++++++++++++++++++++++++++++++++++++++++++++++++++++++++++++++++++++++
直接在暂存区rm掉文件,如何解决
[root@client testgit]# touch c.txt
[root@client testgit]# git add c.txt
[root@client testgit]# ls
c.txt
[root@client testgit]# git status
# On branch master
#
# Initial commit
#
# Changes to be committed:
#   (use "git rm --cached <file>..." to unstage)
#
#       new file:   c.txt
#
[root@client testgit]# rm -rf c.txt
[root@client testgit]# git status
# On branch master
#
# Initial commit
#
# Changes to be committed:
#   (use "git rm --cached <file>..." to unstage)
#
#       new file:   c.txt
#
# Changes not staged for commit:
#   (use "git add/rm <file>..." to update what will be committed)
#   (use "git checkout -- <file>..." to discard changes in working directory)
#
#       deleted:    c.txt
#
[root@client testgit]# git rm --cache c.txt
rm 'c.txt'
[root@client testgit]# ls
[root@client testgit]# git status
# On branch master
#
# Initial commit
#
nothing to commit (create/copy files and use "git add" to track)
[root@client testgit]#
+++++++++++++++++++++++++++++++++++++++++++++++++++++++++++++++++++++++++++++++++++++++++
4、修改文件
暂存区修改名称
[root@client testgit]# touch  a.txt
[root@client testgit]# git status
# On branch master
# Untracked files:
#   (use "git add <file>..." to include in what will be committed)
#
#       a.txt
nothing added to commit but untracked files present (use "git add" to track)
[root@client testgit]# git add a.txt
[root@client testgit]# git status
# On branch master
# Changes to be committed:
#   (use "git reset HEAD <file>..." to unstage)
#
#       new file:   a.txt
#
[root@client testgit]# git mv a.txt  d.txt
[root@client testgit]# git status
# On branch master
# Changes to be committed:
#   (use "git reset HEAD <file>..." to unstage)
#
#       new file:   d.txt
#
[root@client testgit]# ls
d.txt  test.txt
[root@client testgit]# git rm --cache d.txt
[root@client testgit]# rm -rf d.txt
5、将代码上传到仓库的master分支
[root@client testgit]# vi a.txt   #创建一个新文件
hello world
[root@client testgit]# git add a.txt
[root@client testgit]# git commit -m "add"
[root@client testgit]# git push origin master   #上传到中心仓库master分支
Counting objects: 11, done.
Compressing objects: 100% (4/4), done.
Writing objects: 100% (11/11), 828 bytes | 0 bytes/s, done.
Total 11 (delta 0), reused 0 (delta 0)
To git@192.168.246.214:/git-test/testgit/
 * [new branch]      master -> master
测试:
在客户端将仓库删除掉然后在克隆下来查看仓库中是否有文件
[root@client testgit]# cd
[root@client ~]# rm -rf testgit/
[root@client ~]# git clone git@192.168.246.214:/git-test/testgit/
Cloning into 'testgit'...
remote: Counting objects: 11, done.
remote: Compressing objects: 100% (4/4), done.
remote: Total 11 (delta 0), reused 0 (delta 0)
Receiving objects: 100% (11/11), done.
[root@client ~]# cd testgit/
[root@client testgit]# ls
a.txt
[root@client testgit]# cat a.txt
hello world
三、创建分支并合并分支
每次提交,Git都把它们串成一条时间线,这条时间线就是一个分支。截止到目前,只有一条时间线,在Git里,这个分支叫主分支,即master分支。HEAD严格来说不是指向提交,而是指向master,master才是指向提交的,所以,HEAD指向的就是当前分支。
在客户端操作:
[root@client ~]# git clone git@192.168.246.214:/git-test/testgit/
[root@client testgit]# git status
# On branch master   #当前所在为master分支
#
# Initial commit
#
nothing to commit (create/copy files and use "git add" to track)
注意:刚创建的git仓库默认的master分支要在第一次commit之后才会真正建立。然后先git add .添加所有项目文件到本地仓库缓存,再git commit -m "init commit"提交到本地仓库,之后就可以随心所欲地创建或切换分支了。
创建分支:
[root@client testgit]# git branch dev   #创建分支。
[root@client testgit]# git branch    #查看分支。*在哪里就表示当前是哪个分支
  dev
* master
切换分支:
[root@client testgit]# git checkout dev
Switched to branch 'dev'
[root@client testgit]# git branch
* dev
  master
在dev分支创建一个文件;
[root@client testgit]# vi test.txt
[root@client testgit]# git add test.txt
[root@client testgit]# git commit -m "add dev"
[dev f855bdf] add dev
 1 file changed, 1 insertion(+)
 create mode 100644 test.txt
现在,dev分支的工作完成,我们就可以切换回master分支:
 [root@client testgit]# git checkout master
Switched to branch 'master'
切换回master分支后,再查看一个test.txt文件,刚才添加的内容不见了!因为那个提交是在dev分支上,而master分支此刻的提交点并没有变:
[root@client testgit]# ls
a.txt
现在,我们把dev分支的工作成果合并到master分支上:
[root@client testgit]# git merge dev
Updating 40833e0..f855bdf
Fast-forward
 test.txt | 1 +
 1 file changed, 1 insertion(+)
 create mode 100644 test.txt
[root@client testgit]# ls
a.txt  test.txt
现在已经将dev分支的内容合并到master上。确认没有问题上传到远程仓库:
[root@client testgit]# git push origin master
git merge命令用于合并指定分支到当前分支。合并后,再查看test.txt的内容,就可以看到,和dev分支的最新提交是完全一样的。
合并完成后,就可以放心地删除dev分支了:
[root@client testgit]# git branch -d dev
Deleted branch dev (was f855bdf).
删除后,查看branch,就只剩下master分支了:
[root@client testgit]# git branch
* master
部署gitlab服务
准备环境: 关闭防火墙和selinux
192.168.246.214 #gitlab服务器
1.配置yum源
[root@git-server ~]# cd /etc/yum.repos.d/
[root@git-server yum.repos.d]# vi gitlab-ce.repo
[gitlab-ce]
name=Gitlab CE Repository
baseurl=https://mirrors.tuna.tsinghua.edu.cn/gitlab-ce/yum/el$releasever
gpgcheck=0
enabled=1
安装相关依赖
[root@git-server yum.repos.d]# yum install -y postfix curl policycoreutils-python openssh-server
[root@git-server yum.repos.d]# systemctl enable sshd
[root@git-server yum.repos.d]# systemctl start sshd
安装postfix
[root@git-server yum.repos.d]# yum install postfix  -y   #安装邮箱
[root@git-server yum.repos.d]# systemctl enable postfix
[root@git-server yum.repos.d]# systemctl start postfix
[root@git-server yum.repos.d]# yum install -y gitlab-ce  #将会安装gitlab最新版本
配置gitlab登录链接
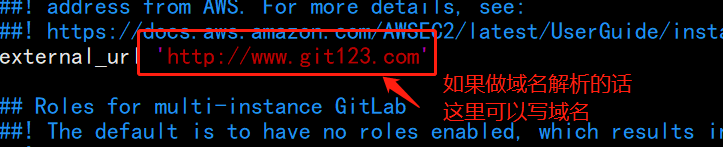
[root@git-server ~]# vim /etc/gitlab/gitlab.rb
1.# 添加对外的域名(gitlab.papamk.com请添加A记录指向本服务器的公网IP):将原来的修改为
external_url 'http://192.168.246.214'
2.设置地区
gitlab_rails['time_zone'] = 'Asia/Shanghai'

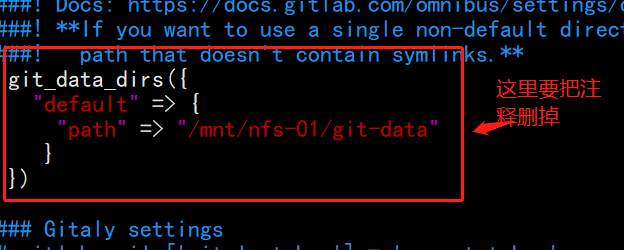
将数据路径的注释去掉,可以更改

开启ssh服务:

初始化Gitlab:
[root@git-server ~]# gitlab-ctl reconfigure #重新加载,需要等很长时间
…

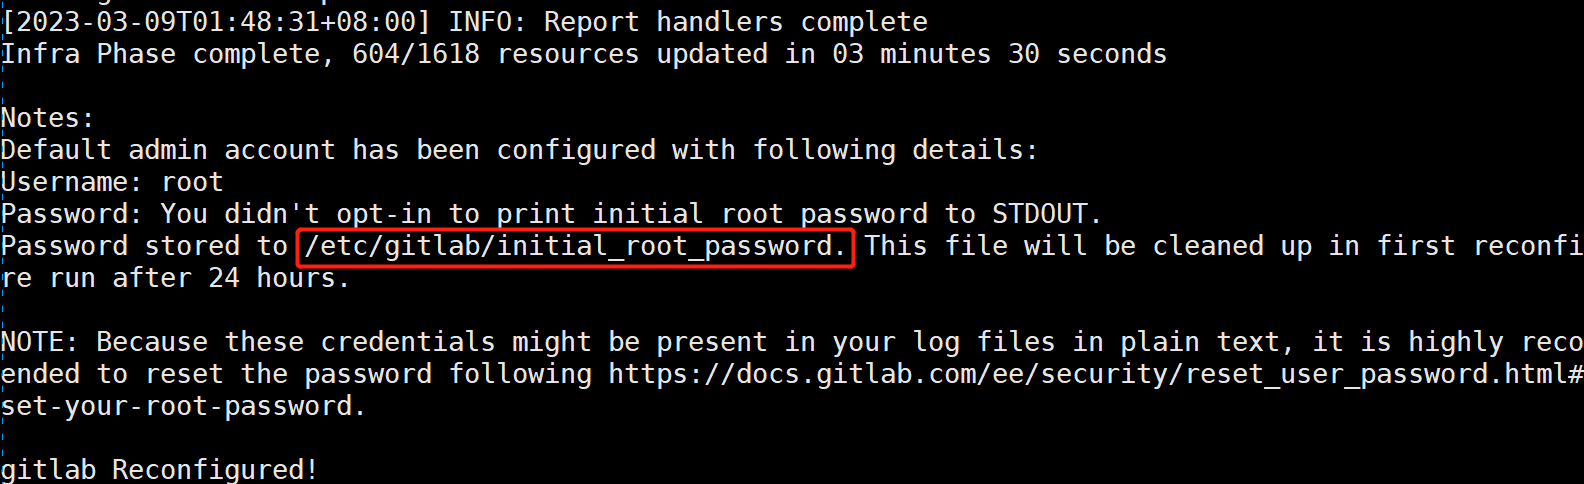
…
启动Gitlab服务:
[root@git-server ~]# gitlab-ctl start #启动

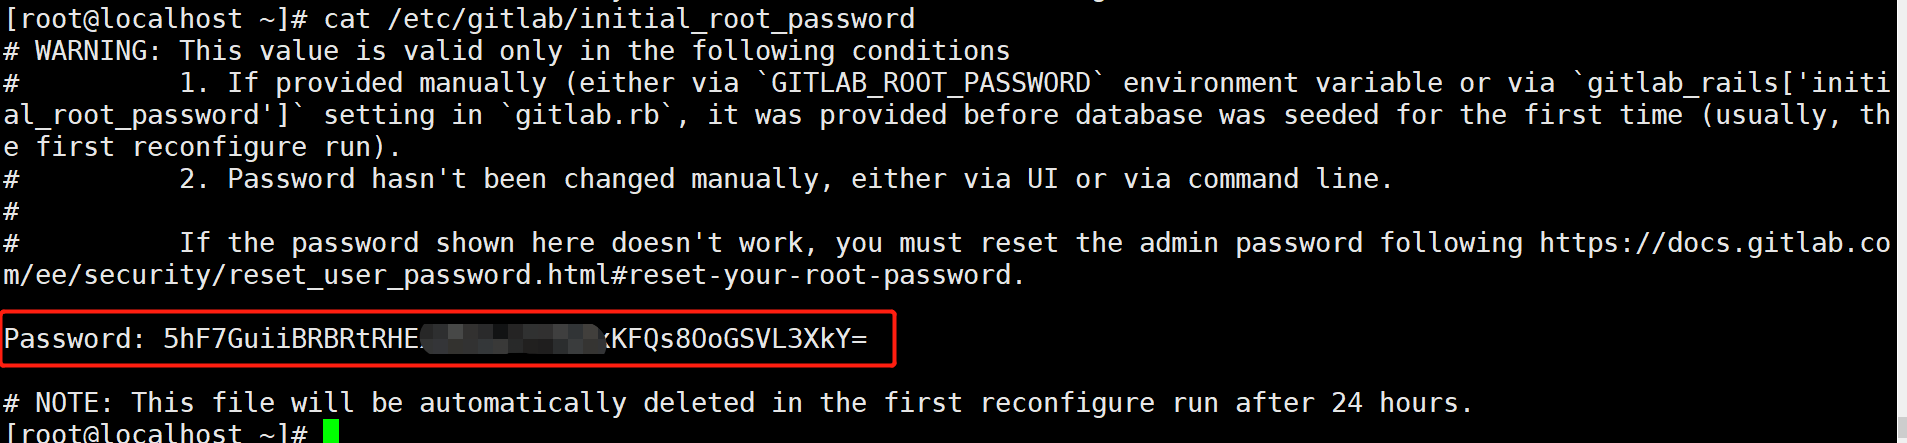
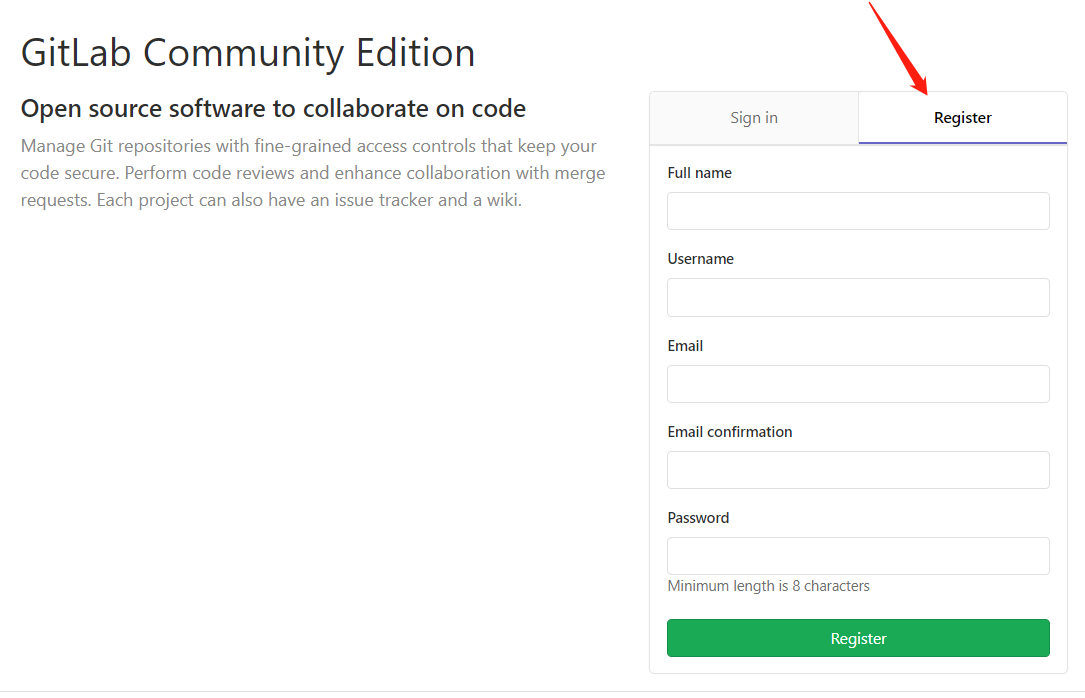
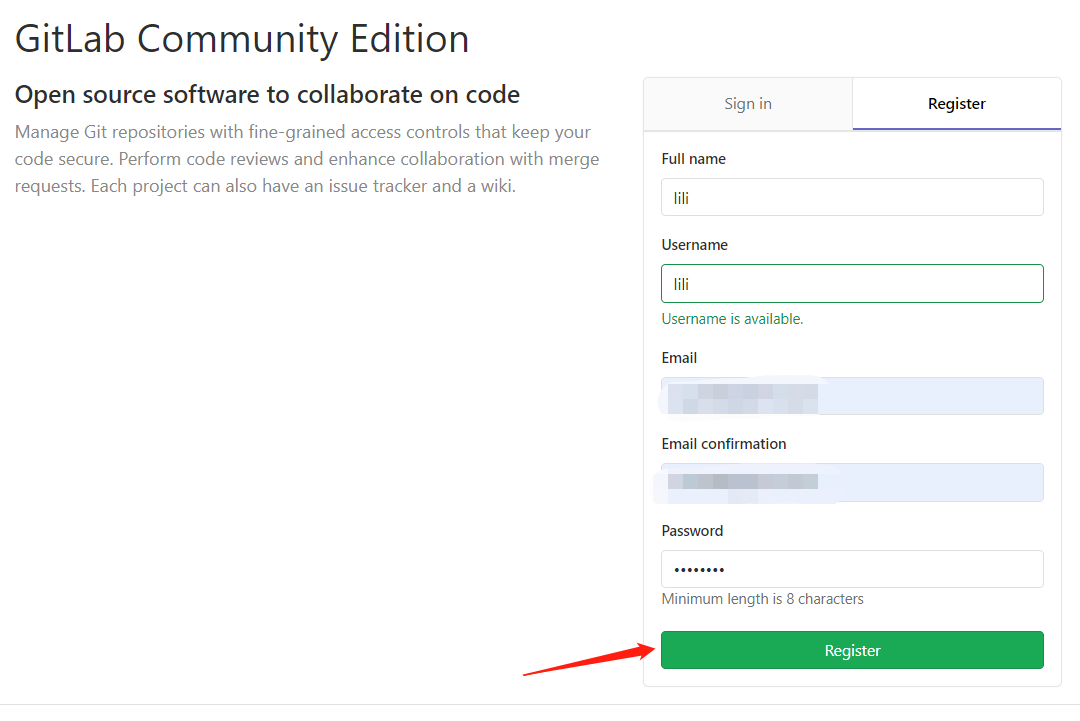
在gitlab14版本以上,会有默认的root用户,密码存在/etc/gitlab/initial_root_password
Gitlab 设置 HTTPS 方式
如果想要以上的 https 方式正常生效使用,则需要把 letsencrypt 自动生成证书的配置打开,这样在执行重
新让配置生效命令 (gitlab-ctl reconfigure) 的时候会自动给域名生成免费的证书并自动在 gitlab 自带的
 nginx 中加上相关的跳转配置,都是全自动的,非常方便。
letsencrypt['enable'] = true
letsencrypt['contact_emails'] = ['caryyu@qq.com']     # 这应该是一组要添加为联系人的电子邮件地址
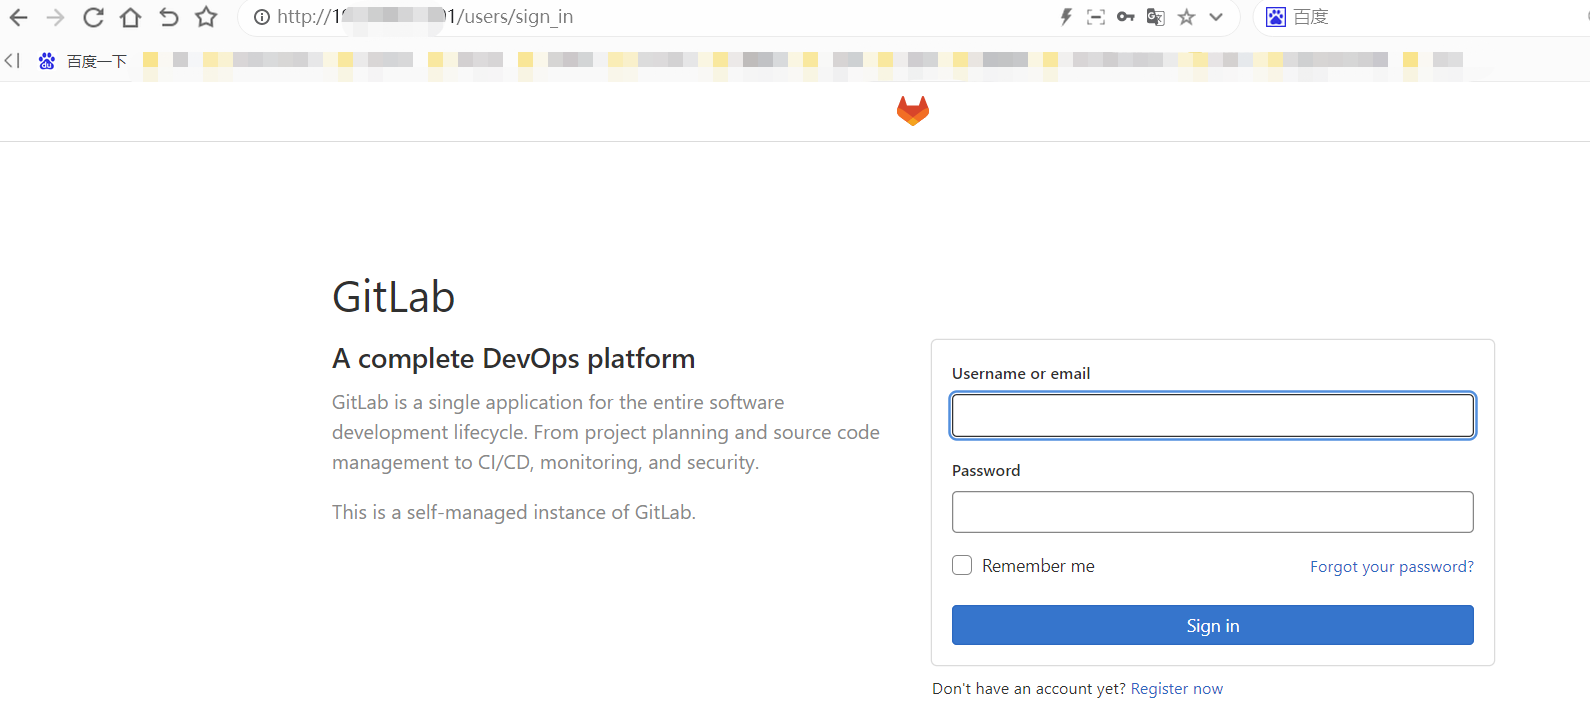
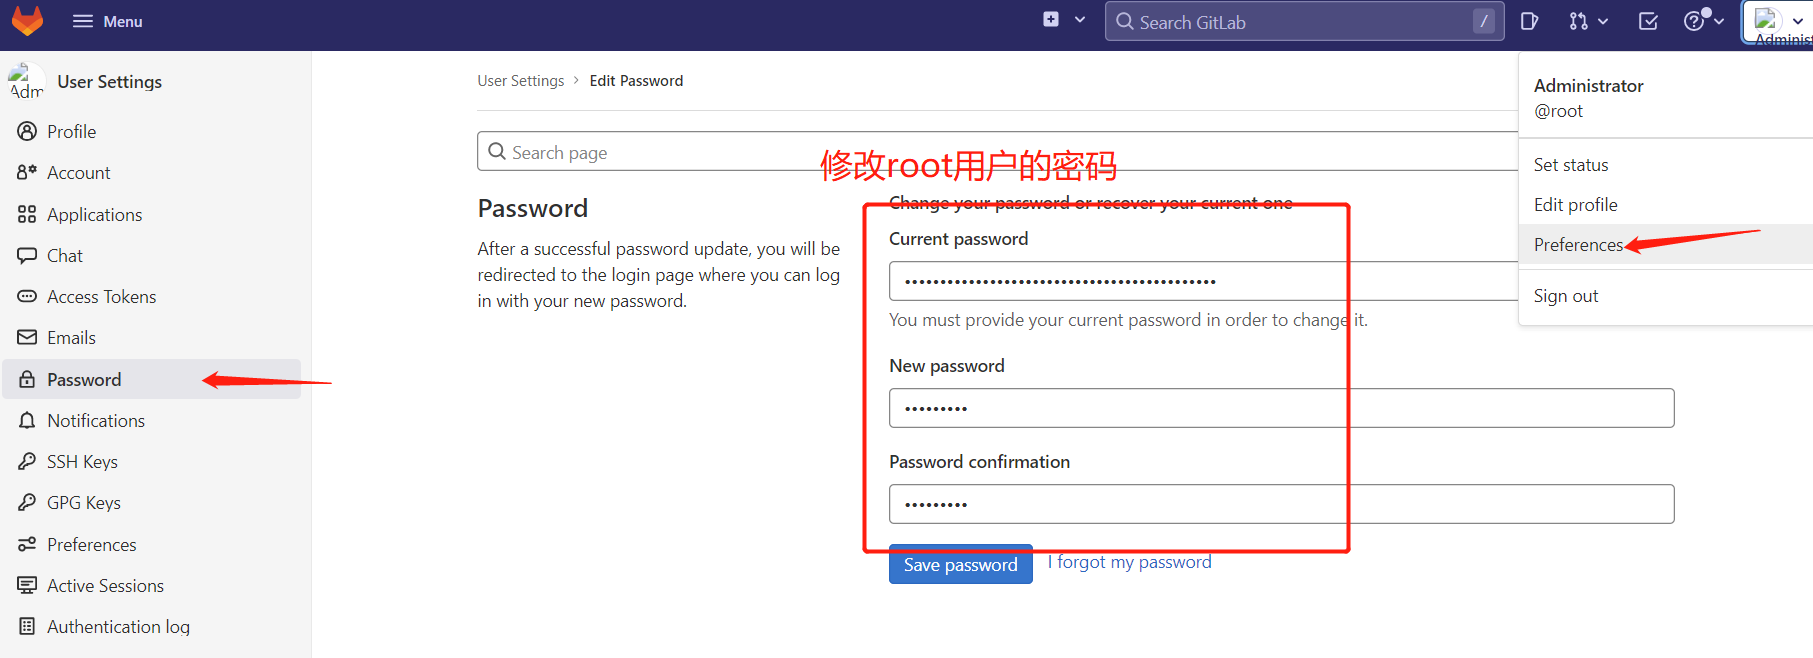
用户为:root
密码:本人设置的密码是12345678


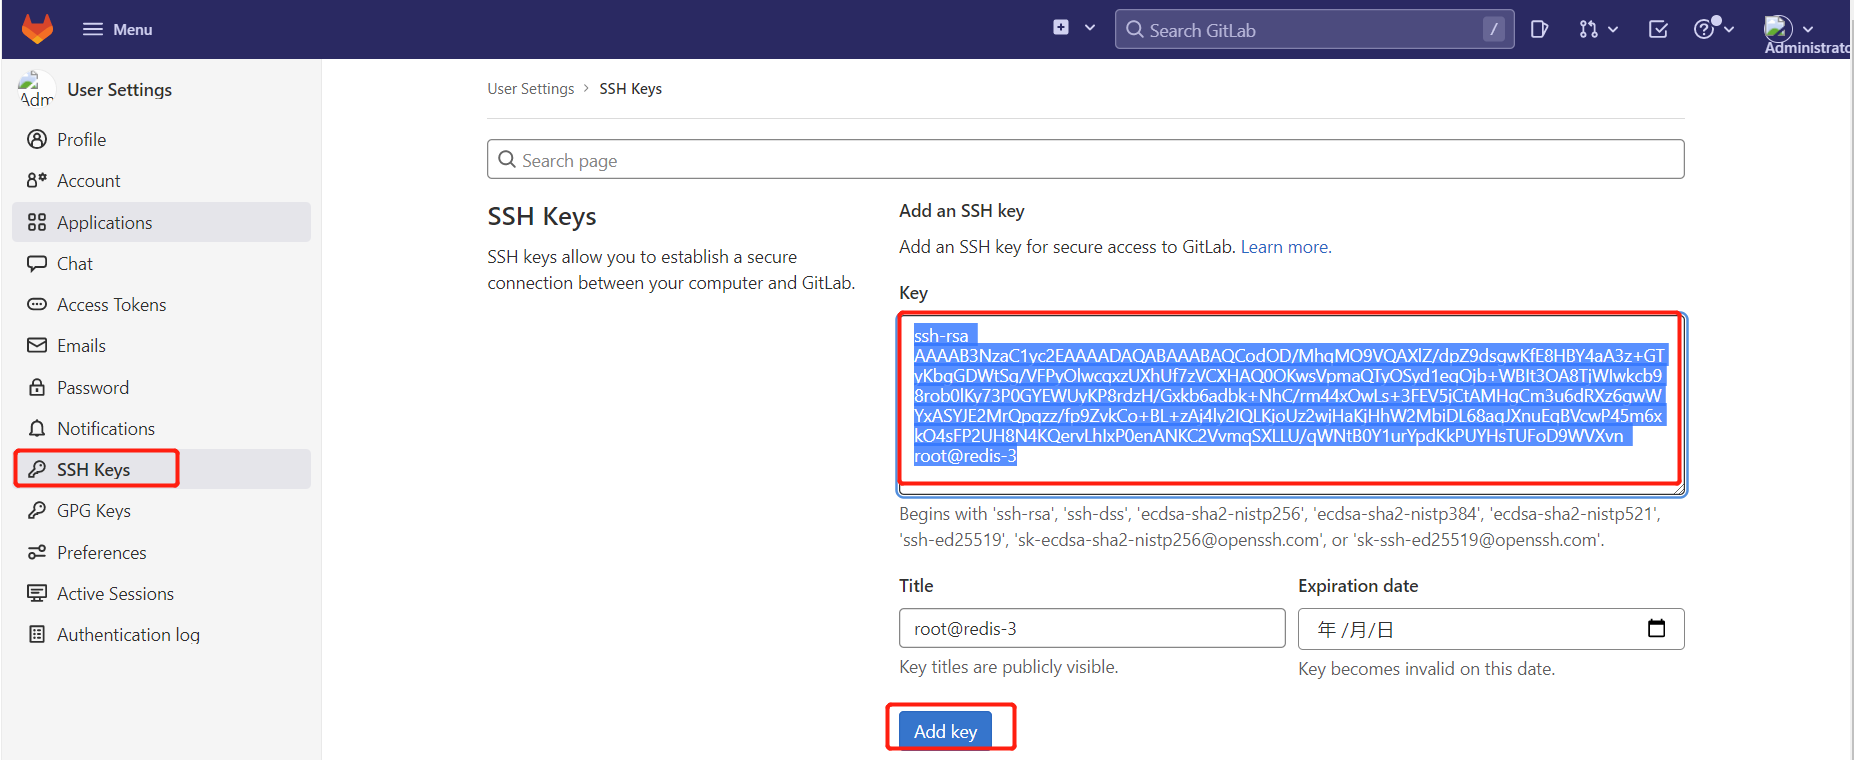
需要创建秘钥

[root@client ~]# ssh-keygen
[root@client ~]# cd .ssh/
[root@client .ssh]# ls
[root@client .ssh]# cat id_rsa.pub
ssh-rsa AAAAB3NzaC1yc2EAAAADAQABAAABAQC0HeO8gaua13h9HCJK5RXVc/cjet9DpLYq2dqmQ0LXfP0Vwj6YjKxu7lE1i/4Y2cmu5lDe8bG22aikyaW38Fnz0bkGfEurdVZii/KCiHBz2lXS1ocuAdloJT4wnc2MUjh/gwc4FuNkWdYvpbMLXSSHIVjv8vB9YbHlPMTMy5N89kMwMmta5C87/8fBO5VtGijgGOueywM+xAzovlfoJbprV/ZBKkhiskSKz4fHyoGFGwllX3kMkNR/soGF5XXA+/99iO3UqSaloF0UzfUCgqfMfMVB5zDHGIB6uTrMe6ccfKp9gnVyD7m4Zmk7MwouBwAfMLIiHmvekBGXqb1YCTgJ root@client


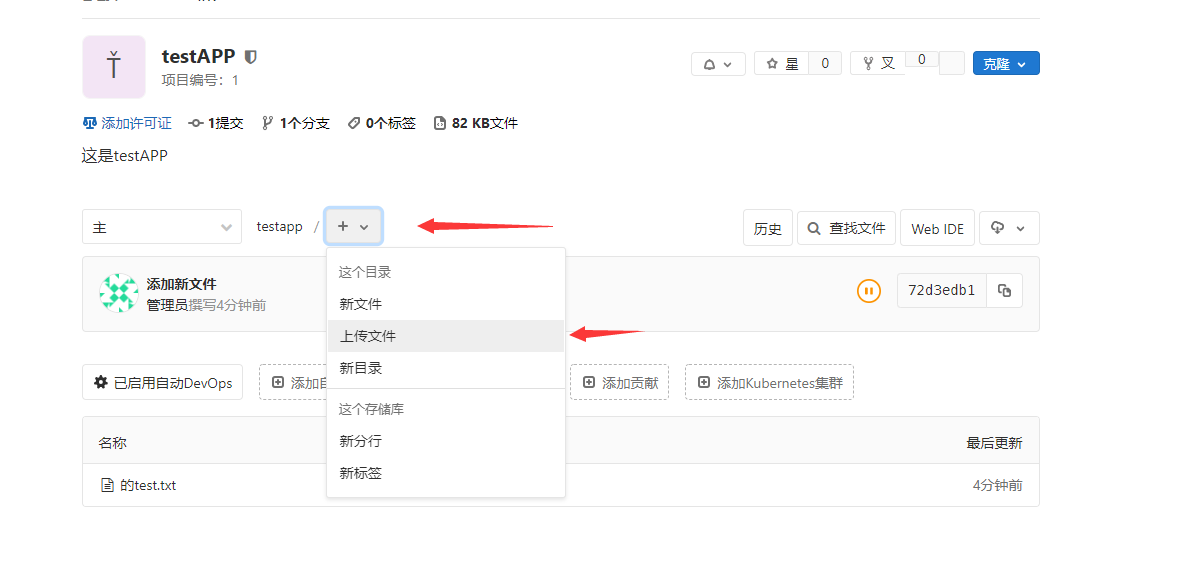
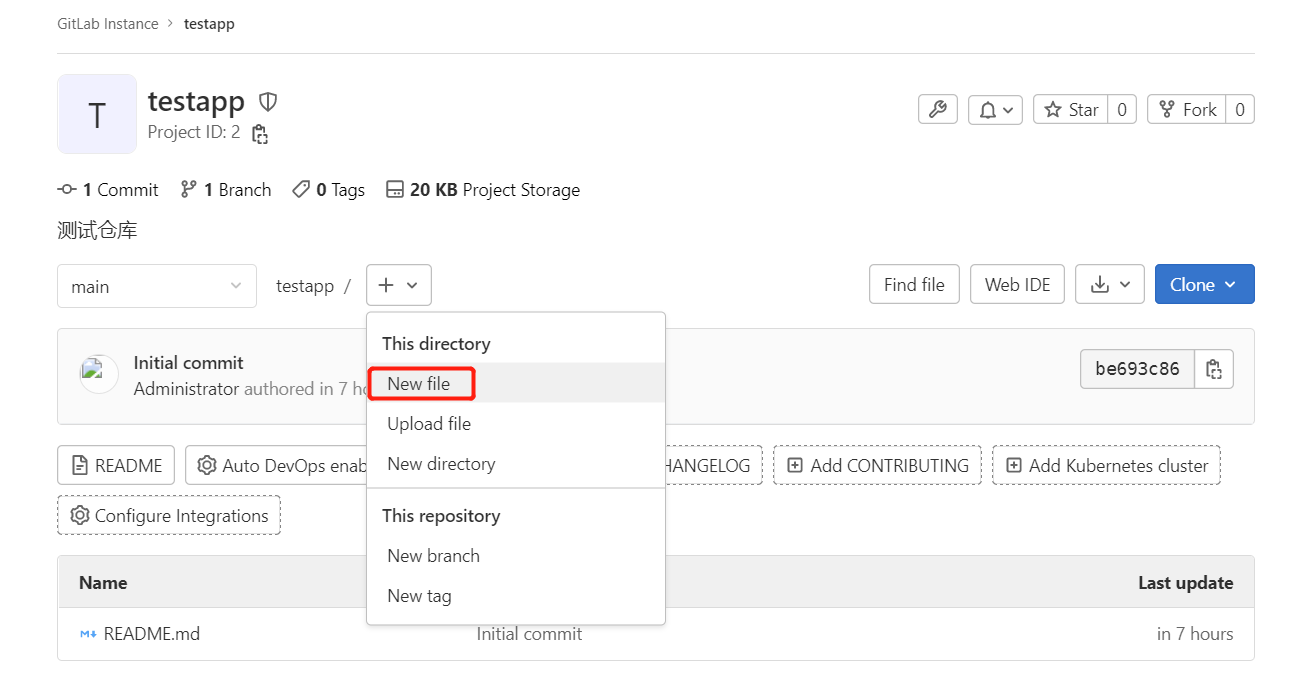
创建一个文件:
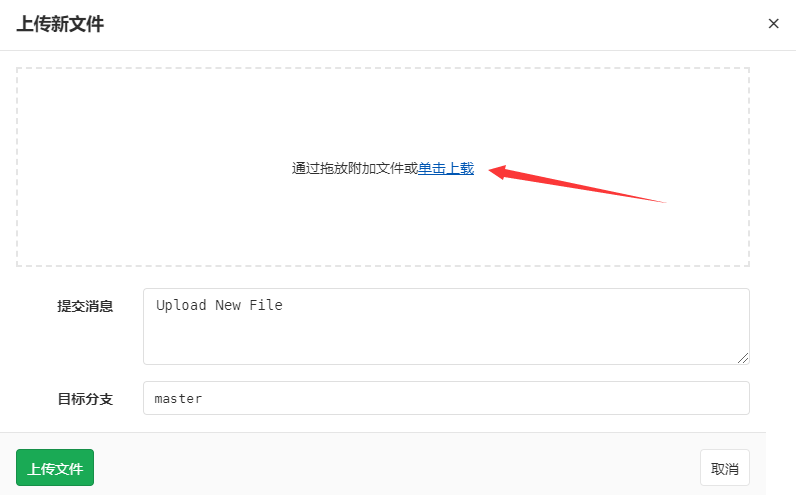
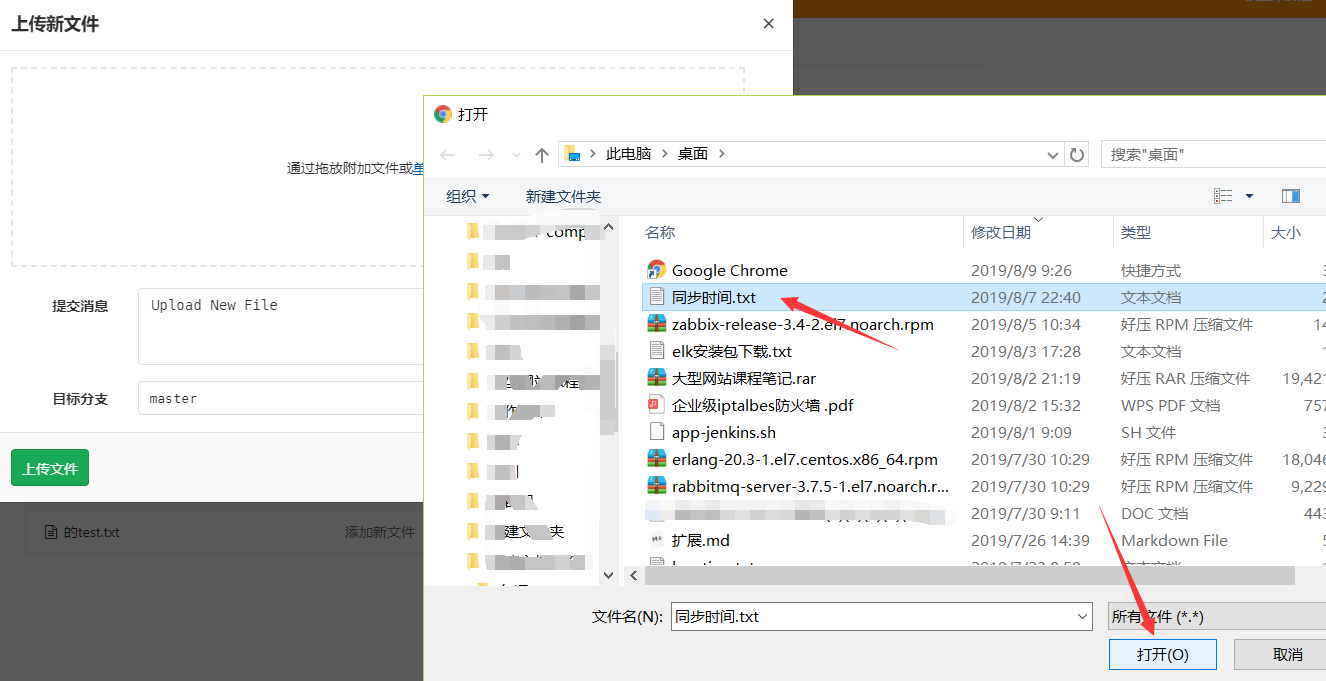
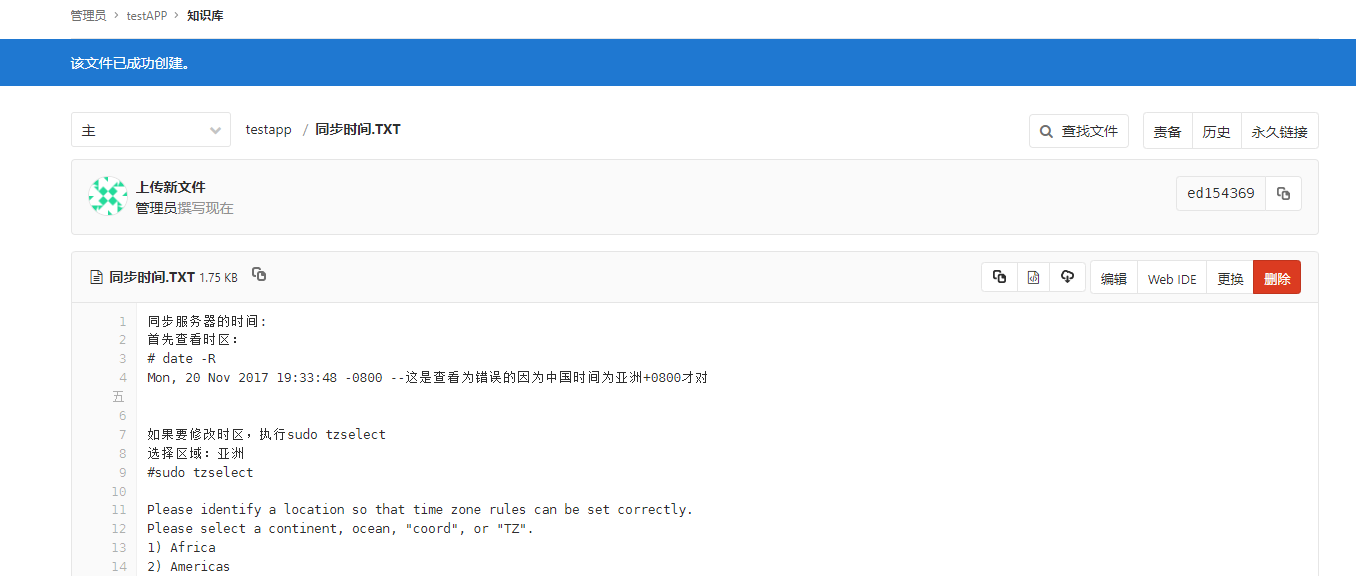
1.newfile:先新建一个文件。
2.uploadfile:再上传即可。

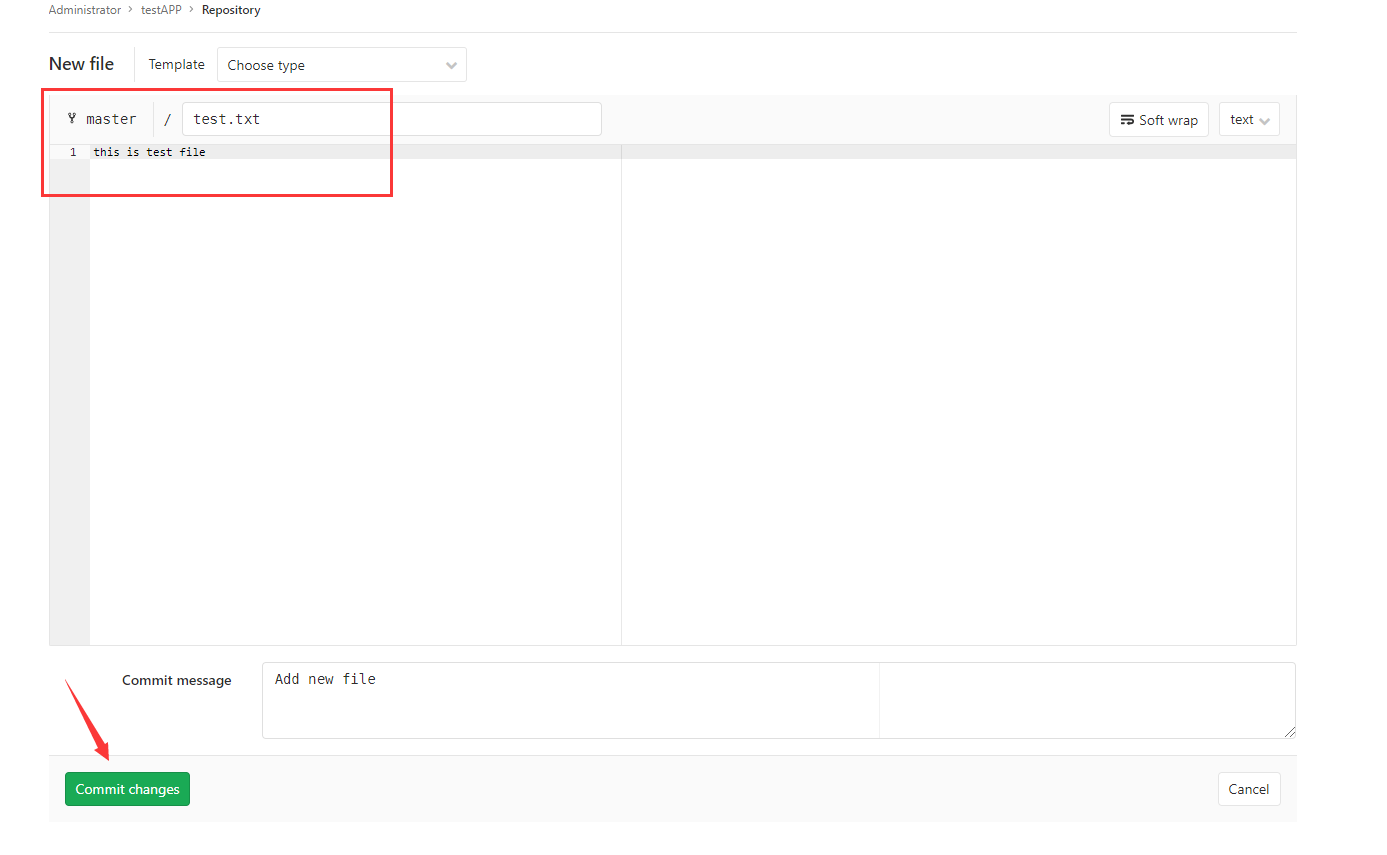
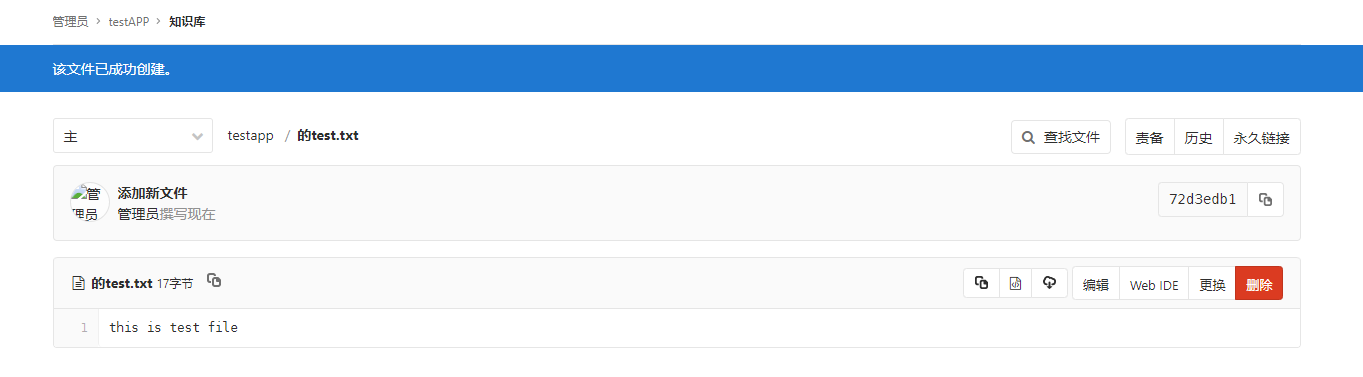
上传一个文件:


新建普通用户

新添加的用户创建成功!
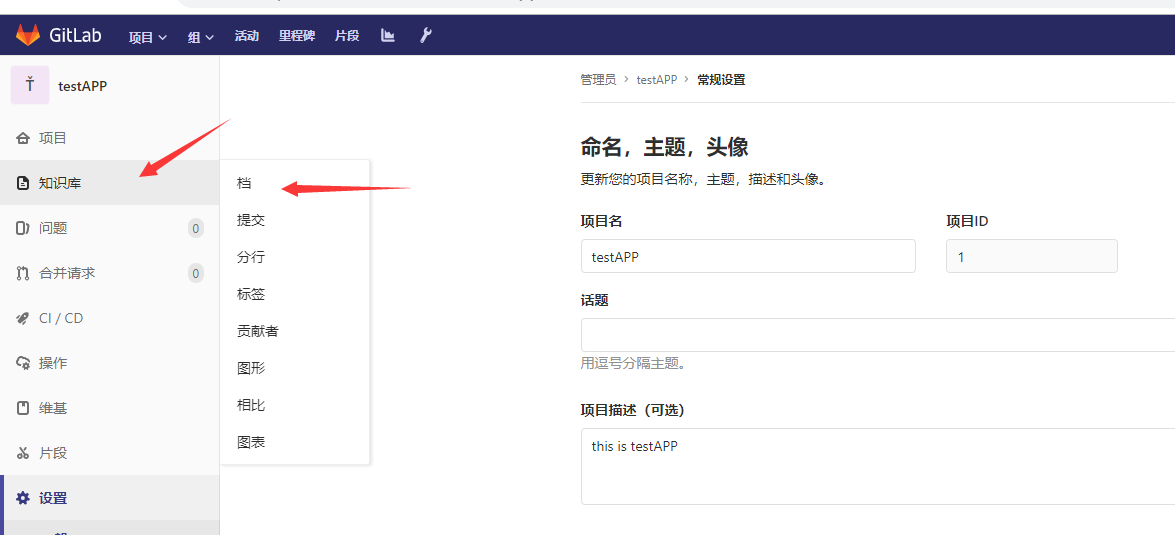
Gitlab新建文件
在git客户端
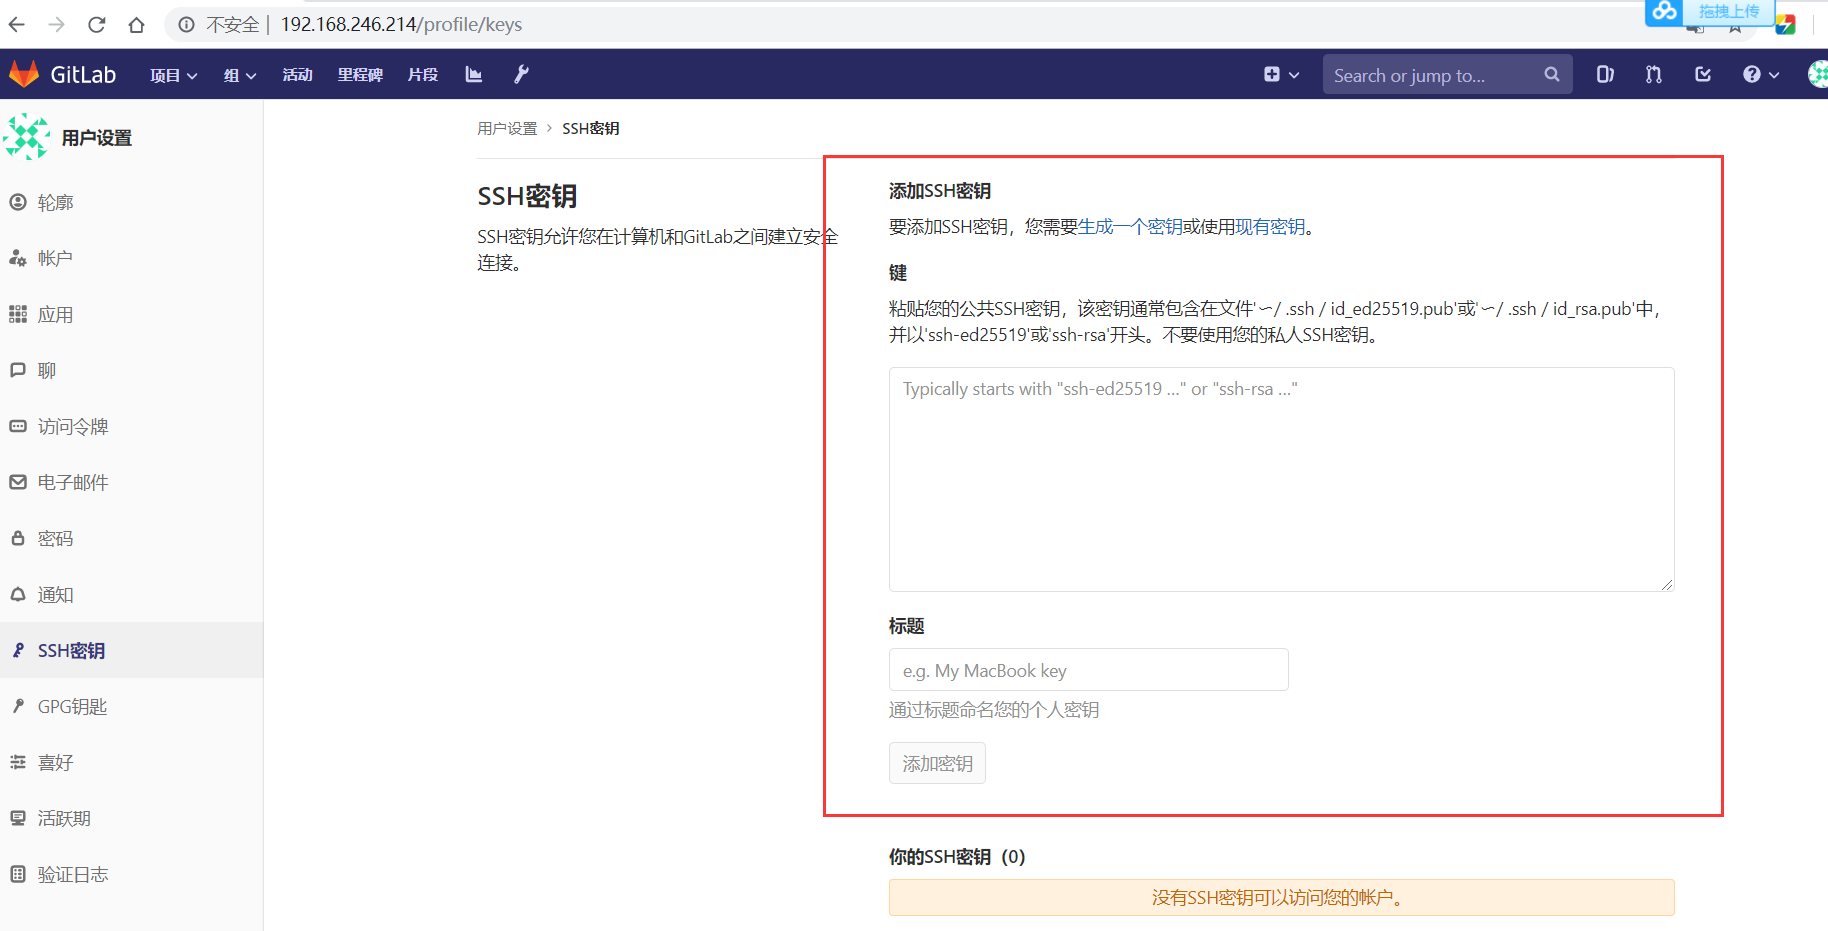
ssh方式拉取代码
查看客户端的公钥
[root@client ~]# cat /root/.ssh/id_rsa.pub
ssh-rsa AAAAB3NzaC1yc2EAAAADAQABAAABAQCodOD/MhqMO9VQAXlZ/dpZ9dsgwKfE8HBY4aA3z+GTyKbgGDWtSg/VFPyOlwcqxzUXhUf7zVCXHAQ0OKwsVpmaQTyOSyd1eqOjb+WBIt3OA8TjWIwkcb98rob0lKy73P0GYEWUyKP8rdzH/Gxkb6adbk+NhC/rm44xOwLs+3FEV5jCtAMHgCm3u6dRXz6gwWYxASYJE2MrQpqzz/fp9ZvkCo+BL+zAj4ly2IQLKjoUz2wjHaKjHhW2MbiDL68aqJXnuEqBVcwP45m6xkO4sFP2UH8N4KQervLhIxP0enANKC2VvmqSXLLU/qWNtB0Y1urYpdKkPUYHsTUFoD9WVXvn root@redis-3
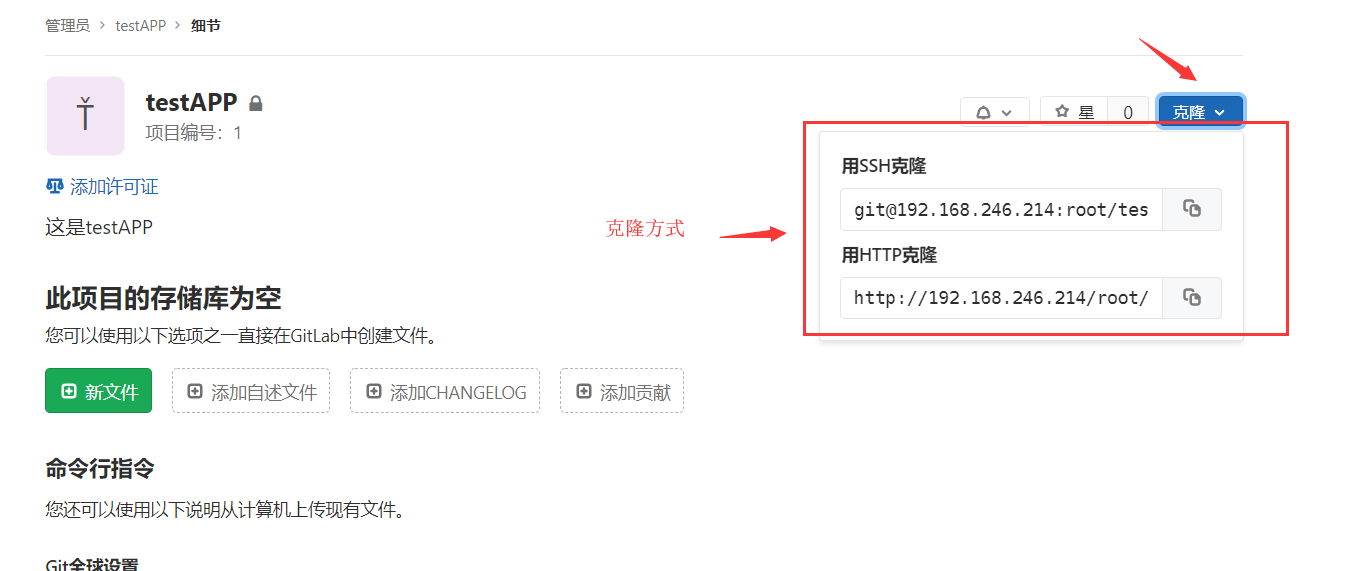
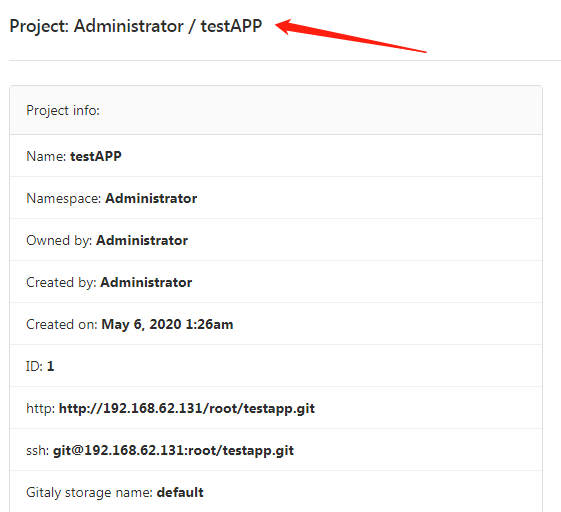
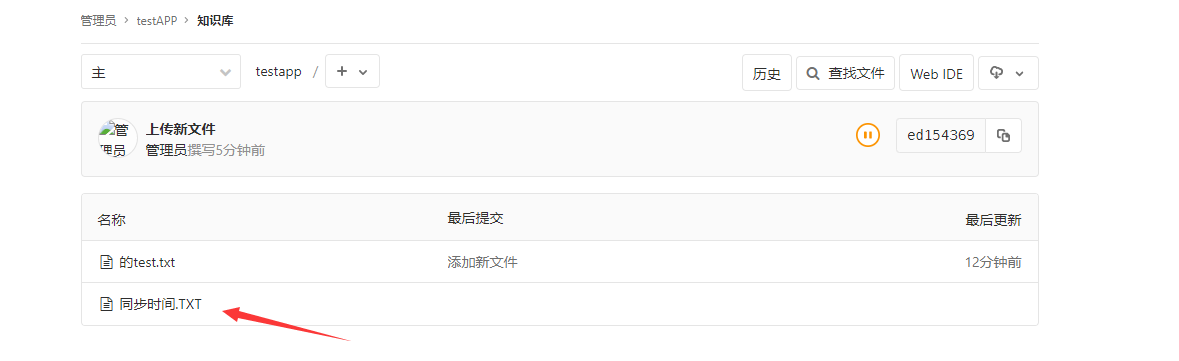
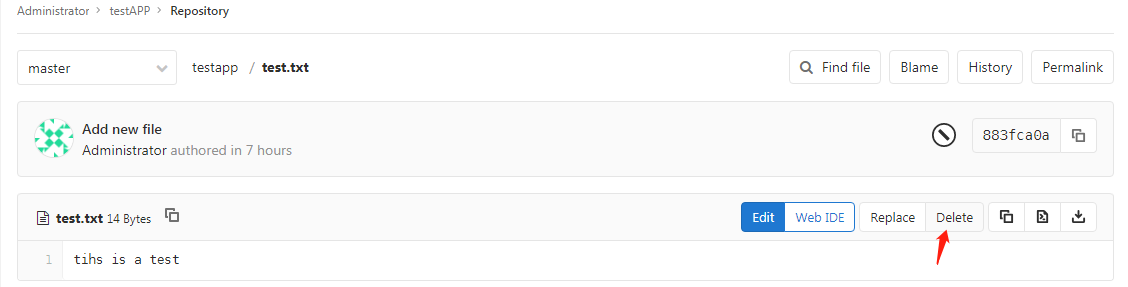
[root@client ~]# git clone git@192.168.246.214:root/testapp.git
Cloning into 'testapp'...
remote: Enumerating objects: 6, done.
remote: Counting objects: 100% (6/6), done.
remote: Compressing objects: 100% (4/4), done.
remote: Total 6 (delta 0), reused 0 (delta 0)
Receiving objects: 100% (6/6), done.
[root@client ~]# ls
testapp
[root@client ~]# cd testapp/
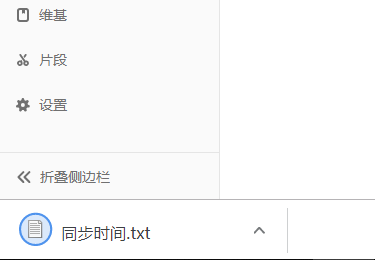
[root@client testapp]# ls
test.txt 同步时间.txt
[root@client testapp]#
http方式拉取代码
[root@client ~]# rm -rf testgit/
[root@client ~]# git clone http://192.168.246.214/root/testapp.git
Cloning into 'testapp'...
Username for 'http://192.168.246.214': root
Password for 'http://root@192.168.246.214':12345678  #为自己设置的密码
remote: Enumerating objects: 6, done.
remote: Counting objects: 100% (6/6), done.
remote: Compressing objects: 100% (4/4), done.
remote: Total 6 (delta 0), reused 0 (delta 0)
Unpacking objects: 100% (6/6), done.
[root@client ~]# ls
testapp
提交代码到gitlab仓库
[root@client testapp]# vim update.txt
1000phone
[root@client testapp]# git add .
[root@client testapp]# git commit -m "update_version1"
[master 091798d] update_version1
 1 file changed, 2 insertions(+)
 create mode 100644 update.txt

[root@nginx-server testapp2]# git push origin main
Username for 'http://192.168.62.166': root
Password for 'http://root@192.168.62.166':
Counting objects: 4, done.
Compressing objects: 100% (2/2), done.
Writing objects: 100% (3/3), 307 bytes | 0 bytes/s, done.
Total 3 (delta 0), reused 0 (delta 0)
To http://192.168.62.166/root/testapp2.git
   201f479..091798d  master -> master
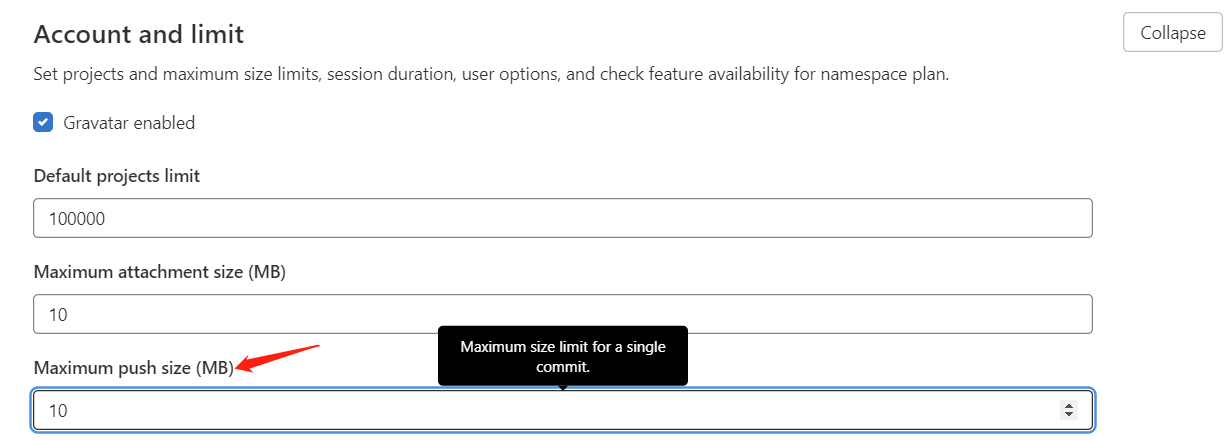
调整上传文件的大小
默认是10M,可根据情况调整
拓展:
1.cat /proc/swaps 查看swap分区是否启动(无)
2.创建 :
dd if=/dev/zero of=/data/swap bs=512 count=8388616
创建swap大小为bs*count=4294971392(4G);
/data/swap目录若无则找/mnt/swap
3.通过mkswap命令将上述空间制作成swap分区:
mkswap /data/swap
4.查看内核参数vm.swappiness中的数值是否为0,如果为0则根据实际需要调		 整成60:
查看: cat /proc/sys/vm/swappiness
设置: sysctl -w vm.swappiness=60
若想永久修改,则编辑/etc/sysctl.conf文件,改文件中有vm.swappiness变量配置,默认为0
5.启用分区:
swapon /data/swap
echo “/data/swap swap swap defaults 0 0” >> /etc/fstab
6.再次使用cat /proc/swaps 查看swap分区是否启动
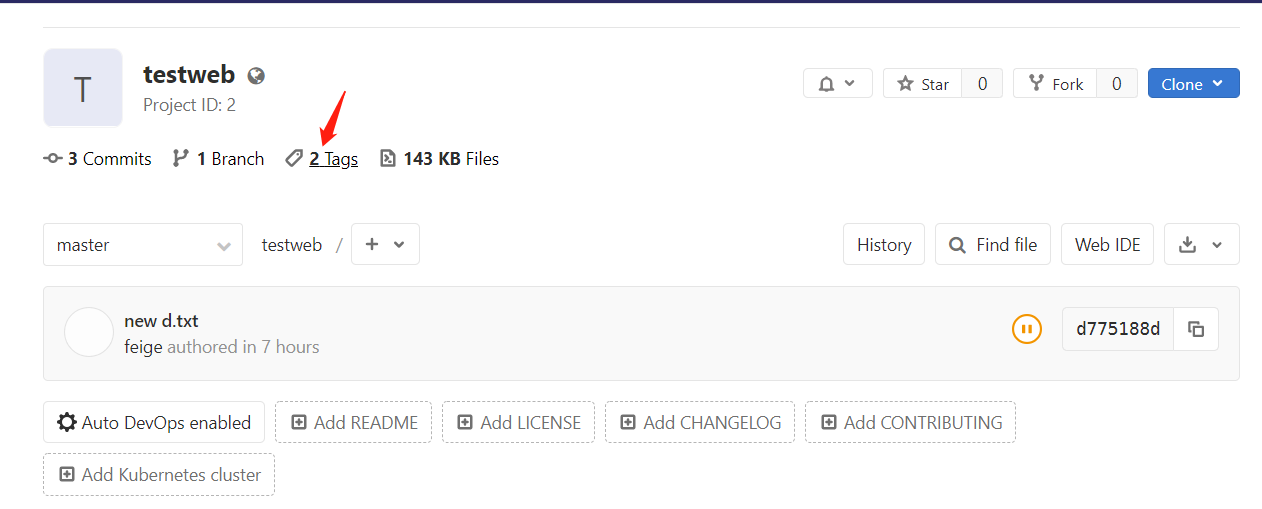
tag版本推送
[root@git-client testweb]# vim e.txt
hello eee
[root@git-client testweb]# git add *
[root@git-client testweb]# git commit -m "new e.txt"
[root@git-client testweb]# git tag -a "v1.1" -m "new e.txt"
[root@git-client testweb]# git push origin v1.1

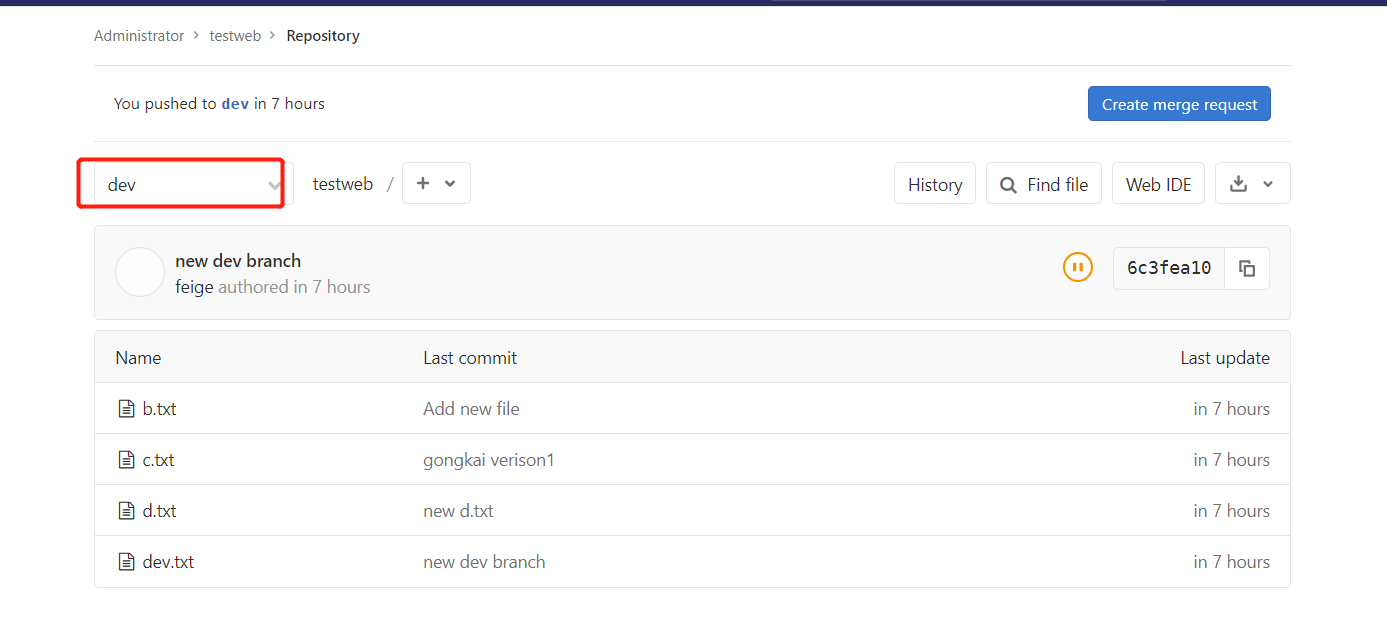
分支版本推送
[root@git-client testweb]# git branch dev
[root@git-client testweb]# git branch
  dev
* master
[root@git-client testweb]# git checkout dev
Switched to branch 'dev'
[root@git-client testweb]# ls
b.txt  c.txt  d.txt
[root@git-client testweb]# vim dev.txt
[root@git-client testweb]# git add *
[root@git-client testweb]# git commit -m "new dev branch"
[dev 6c3fea1] new dev branch
 1 file changed, 1 insertion(+)
 create mode 100644 dev.txt
[root@git-client testweb]# git push origin dev
Gitlab 备份与恢复
1、查看系统版本和软件版本
[root@git-server ~]# cat /etc/redhat-release
CentOS Linux release 7.4.1708 (Core)

[root@git-server ~]# cat /opt/gitlab/embedded/service/gitlab-rails/VERSION
8.15.4
2、数据备份
打开/etc/gitlab/gitlab.rb配置文件,查看一个和备份相关的配置项:
[root@git-server backups]# vim /etc/gitlab/gitlab.rb
gitlab_rails['backup_path'] = "/var/opt/gitlab/backups"	#备份的路径
gitlab_rails['backup_archive_permissions'] = 0644		#备份文件的默认权限
gitlab_rails['backup_keep_time'] = 604800				#保留时长,秒为单位
设置备份保留时长,防止每天执行备份,肯定有目录被爆满的风险,打开/etc/gitlab/gitlab.rb配置文件,找到如下配置
该项定义了默认备份出文件的路径,可以通过修改该配置,并执行 gitlab-ctl reconfigure 或者 gitlab-ctl restart 重启服务生效。
[root@git-server backups]# gitlab-ctl reconfigure
或者
[root@git-server backups]# gitlab-ctl  restart
执行备份命令进行备份
[root@git-server backups]# /opt/gitlab/bin/gitlab-rake gitlab:backup:create

也可以添加到 crontab 中定时执行:
0 2 * * * /opt/gitlab/bin/gitlab-rake gitlab:backup:create
可以到/var/opt/gitlab/backups找到备份包,解压查看,会发现备份的还是比较全面的,数据库、repositories、build、upload等分类还是比较清晰的。
备份完成,会在备份目录中生成一个当天日期的tar包。
[root@git-server ~]# ll /var/opt/gitlab/backups/

3、数据恢复
特别注意:
- 备份目录和gitlab.rb中定义的备份目录必须一致
- GitLab的版本和备份文件中的版本必须一致,否则还原时会报错。
在恢复之前,可以删除一个文件,以便查看效果
执行恢复操作:
[root@git-server ~]# cd /var/opt/gitlab/backups
[root@git-server  backups]# /opt/gitlab/bin/gitlab-rake gitlab:backup:restore BACKUP=/var/opt/gitlab/backups/1678342140_2023_03_09_15.1.0
注意恢复文件的名称


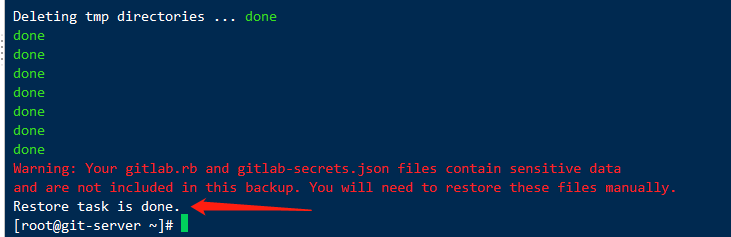
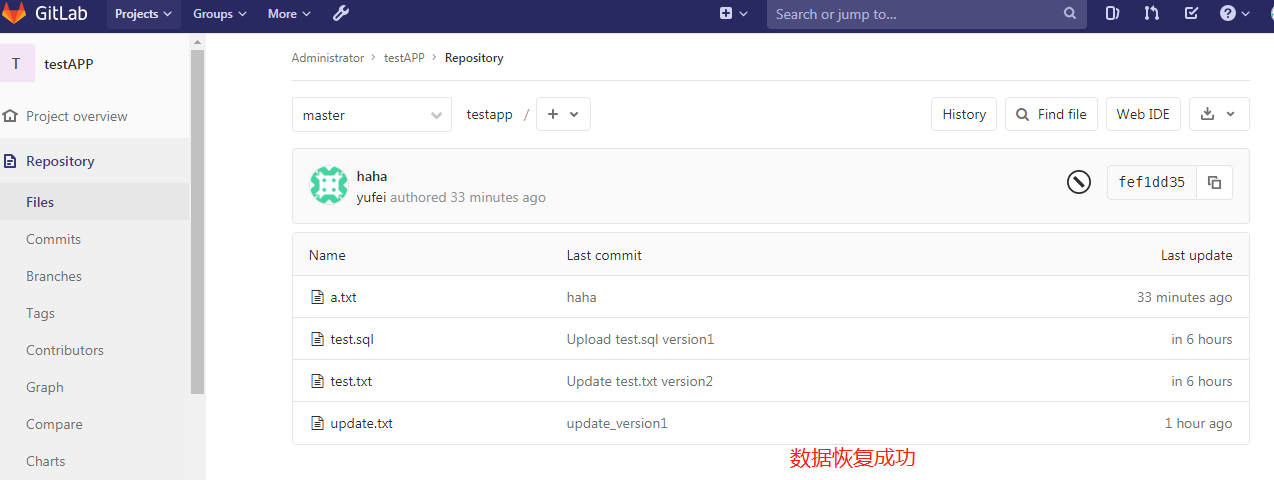
恢复完成后,启动刚刚的两个服务,或者重启所有服务,再打开浏览器进行访问,发现数据和之前的一致:
注意:通过备份文件恢复gitlab必须保证两台主机的gitlab版本一致,否则会提示版本不匹配
查看gitlab端,可以看到数据恢复成功
Gitlab配置邮箱
[root@gitlab-server ~]# vim /etc/gitlab/gitlab.rb
QOOJRFWGOZBHQMSQ

[root@gitlab-server ~]# gitlab-ctl reconfigure
或者
[root@gitlab-server ~]# gitlab-ctl restart
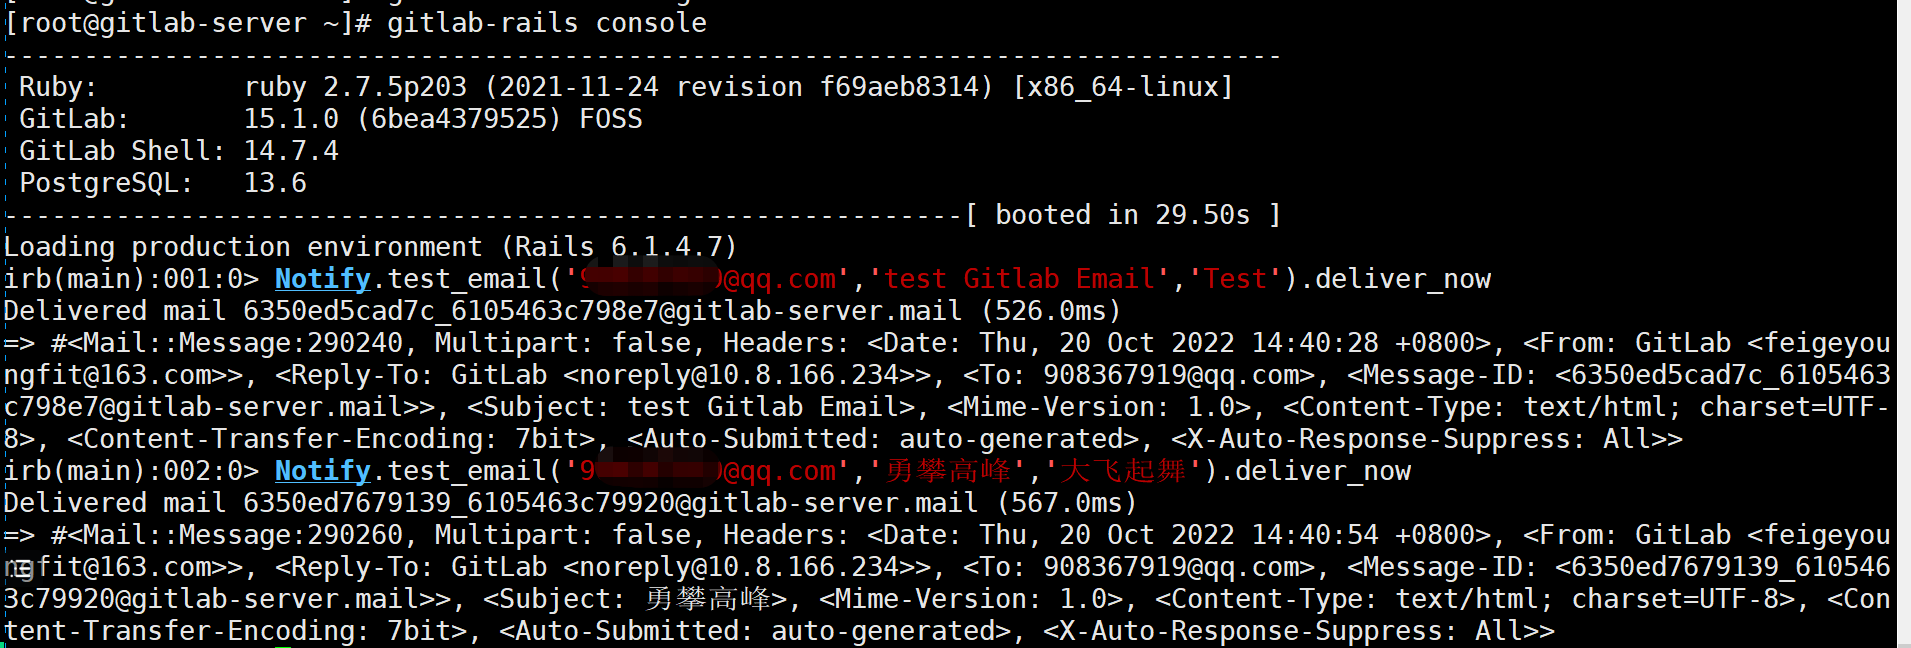
[root@gitlab ~]# gitlab-rails console
irb(main):001:0> Notify.test_email('XXXXXX@gmail.com','test Gitlab Email','Test').deliver_now #输入收件人的邮箱
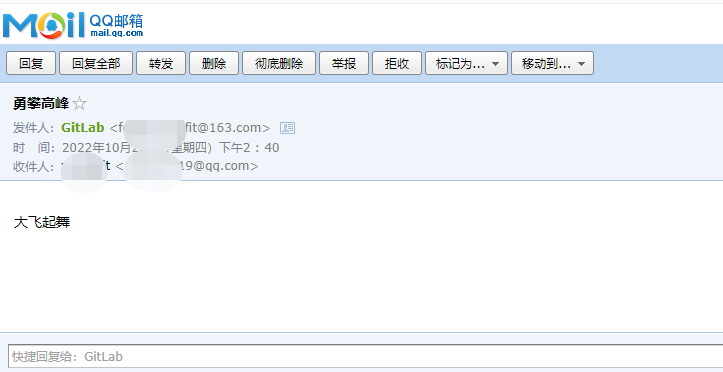
Delivered mail 610835daa71d5_21d35a645978a@sage.novalocal.mail (40062.2ms)=> #<Mail::Message:173540, Multipart: false, Headers: <Date: Mon, 02 Aug 2021 18:13:46 +0000>, <From: GitLab <xxxxxx@qq.com>>, <Reply-To: GitLab <noreply@xx.xx.4.62>>, <To: xxxxxxx@gmail.com>, <Message-ID: <610835daa71d5_21d35a645978a@sage.novalocal.mail>>, <Subject: test Gitlab Email>, <Mime-Version: 1.0>, <Content-Type: text/html; charset=UTF-8>, <Content-Transfer-Encoding: 7bit>, <Auto-Submitted: auto-generated>, <X-Auto-Response-Suppress: All>> #出现这段报文就说明配置成功
Gitlab配置https方式访问
配置ssl证书
我们可以配置私有CA,也可以在阿里云官网上面购买域名之后获取SSL证书
创建私有CA证书
首先在一台服务器上安装一些需要用到的应用
1、检查安装openssl
[root@www ~]# rpm -qa|grep openssl
openssl098e-0.9.8e-29.el7.centos.3.x86_64
openssl-libs-1.0.2k-25.el7_9.x86_64
xmlsec1-openssl-1.2.20-7.el7_4.x86_64
openssl-devel-1.0.2k-25.el7_9.x86_64
openssl-1.0.2k-25.el7_9.x86_64
如果未安装
[root@www ~]#yum install openssl openssl-devel -y
创建所需要的文件
根CA服务器:因为只有 CA 服务器的角色,所以用到的目录只有/etc/pki/CA
网站服务器:只是证书申请者的角色,所以用到的目录只有/etc/pki/tls
[root@www ~]#cd /etc/pki/CA/
[root@www CA]# ls
certs  crl  newcerts  private
[root@www CA]# touch index.txt   #创建生成证书索引数据库文件
[root@www CA]# ls
certs  crl  index.txt  newcerts  private
[root@www CA]# echo 01 > serial   #指定第一个颁发证书的序列号
[root@www CA]# ls
certs  crl  index.txt  newcerts  private  serial
[root@www CA]#
2、创建密钥
在根CA服务器上创建密钥,密钥的位置必须为/etc/pki/CA/private/cakey.pem,这个是openssl.cnf中中指定的路径,只要与配置文件中指定的匹配即可。
[root@www CA]# (umask 066; openssl genrsa -out private/cakey.pem 2048)
Generating RSA private key, 2048 bit long modulus
...........+++
...............+++
e is 65537 (0x10001)
3、生成自签名证书
根CA自签名证书,根CA是最顶级的认证机构,没有人能够认证他,所以只能自己认证自己生成自签名证书。
[root@www CA]# openssl req -new -x509 -key /etc/pki/CA/private/cakey.pem -days 7300 -out /etc/pki/CA/cacert.pem -days 7300
You are about to be asked to enter information that will be incorporated
into your certificate request.
What you are about to enter is what is called a Distinguished Name or a DN.
There are quite a few fields but you can leave some blank
For some fields there will be a default value,
If you enter '.', the field will be left blank.
-----
Country Name (2 letter code) [XX]:CN
State or Province Name (full name) []:BEIJING
Locality Name (eg, city) [Default City]:BEIJING
Organization Name (eg, company) [Default Company Ltd]:CA
Organizational Unit Name (eg, section) []:OPT
Common Name (eg, your name or your server's hostname) []:ca.qf.com
Email Address []:
[root@www CA]# ls
cacert.pem  certs  crl  index.txt  newcerts  private  serial
客户端(gitlab服务器)CA证书申请域名
1、安装openssl
[root@gitlab ~]# yum install openssl openssl-devel -y
2、客户端生成密钥文件
[root@gitlab ~]# (umask 066; openssl genrsa -out /etc/pki/tls/private/www.git123.com.key 2048)
Generating RSA private key, 2048 bit long modulus
..............................+++
..........+++
e is 65537 (0x10001)
[root@gitlab ~]# cd /etc/pki/tls/private/
[root@gitlab private]# ls
www.git123.com.key
[root@gitlab private]#
3、客户端用私钥加密生成证书请求
[root@gitlab private]# ls ../
cert.pem  certs  misc  openssl.cnf  private
[root@gitlab private]# openssl req -new -key /etc/pki/tls/private/www.qf.com.key -days 365 -out /etc/pki/tls/www.qf.com.csr
You are about to be asked to enter information that will be incorporated
into your certificate request.
What you are about to enter is what is called a Distinguished Name or a DN.
There are quite a few fields but you can leave some blank
For some fields there will be a default value,
If you enter '.', the field will be left blank.
-----
Country Name (2 letter code) [XX]:CN
State or Province Name (full name) []:BEIJING
Locality Name (eg, city) [Default City]:BEIJING
Organization Name (eg, company) [Default Company Ltd]:QF
Organizational Unit Name (eg, section) []:OPT
Common Name (eg, your name or your server's hostname) []:www.git123.com
Email Address []:

Please enter the following 'extra' attributes
to be sent with your certificate request
A challenge password []:
An optional company name []:
[root@gitlab private]# ls ../
cert.pem  certs  misc  openssl.cnf  private  www.git123.com.csr
[root@gitlab private]#
4、CA 签署证书(在ca服务器上面操作)
[root@www ~]# vim /etc/pki/tls/openssl.cnf
policy          = policy_match
 82
 83 # For the CA policy
 84 [ policy_match ]
 85 countryName             = match
 86 stateOrProvinceName     = match
 87 organizationName        = supplied
 88 organizationalUnitName  = optional
 89 commonName              = supplied
 90 emailAddress            = optional
CA签署证书
[root@www ~]# openssl ca -in /etc/pki/CA/private/www.git123.com.csr -out /etc/pki/CA/certs/www.git123.com.crt -days 365
Using configuration from /etc/pki/tls/openssl.cnf
Check that the request matches the signature
Signature ok
Certificate Details:
        Serial Number: 1 (0x1)
        Validity
            Not Before: Jul  3 10:12:23 2019 GMT
            Not After : Jul  2 10:12:23 2020 GMT
        Subject:
            countryName               = CN
            stateOrProvinceName       = BEIJING
            organizationName          = QF
            organizationalUnitName    = OPT
            commonName                = www.qf.com
        X509v3 extensions:
            X509v3 Basic Constraints:
                CA:FALSE
            Netscape Comment:
                OpenSSL Generated Certificate
            X509v3 Subject Key Identifier:
                E3:AC:1A:55:2B:28:B9:80:DC:9C:C2:13:70:53:27:AD:3D:44:8F:D3
            X509v3 Authority Key Identifier:
                keyid:5D:2A:81:B2:E7:8D:D8:88:E5:7B:94:CA:75:65:9C:82:2B:A9:B2:3C

Certificate is to be certified until Jul  2 10:12:23 2020 GMT (365 days)
Sign the certificate? [y/n]:y


1 out of 1 certificate requests certified, commit? [y/n]y
Write out database with 1 new entries
Data Base Updated
查看证书的信息
[root@www ~]# openssl x509 -in /etc/pki/CA/certs/www.qf.com.crt -noout -subject
subject= /C=CN/ST=BEIJING/O=QF/OU=OPT/CN=www.git123.com
将生成的证书发放给请求客户端(Gitlab服务器)
[root@www ~]# cd /etc/pki/CA/certs/
[root@www certs]# scp www.git123.com.ctr 10.8.156.42:/etc/pki/CA/certs/
Gitlab中修改配置

在gitlab前面配置Nginx做转发
首先把gitlab内部nginx的端口修改一下
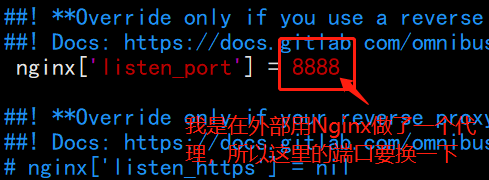
vim /etc/nginx/conf.d/default.conf
upstream  git{
        server  127.0.0.1:8888;
}

server {
    listen 443 ssl;
    server_name www.git123.com;
    ssl_certificate                                 /etc/pki/CA/certs/www.git123.com.crt;
    ssl_certificate_key                            /etc/pki/tls/private/www.git123.com.key;
    ssl_session_timeout 5m;
    ssl_ciphers ECDHE-RSA-AES128-GCM-SHA256:ECDHE:ECDH:AES:HIGH:!NULL:!aNULL:!MD5:!ADH:!RC4;
    ssl_protocols TLSv1 TLSv1.1 TLSv1.2;
    ssl_prefer_server_ciphers on;

    location / {

            client_max_body_size 50m;
            proxy_redirect off;
            proxy_set_header Host $host;
            proxy_set_header X-Real-IP $remote_addr;
            proxy_set_header X-Forwarded-For $proxy_add_x_forwarded_for;
            proxy_pass http://git;
            index index.html index.htm;
        }
}

server{
        listen 80;
        server_name www.git123.com;

        rewrite ^(.*)$ https://$host$1 permanent;

        location / {
        return 301 https://www.git123.com:443$request_uri;
 }
}

Github 远程仓库
1、github.com 注册账户
2、在github上创建仓库
本人账户:
用户名:youngfityu
邮箱: 908367919@qq.com
密码: ***


3、客户端生成本地ssh key
[root@localhost ~]# ssh-keygen -t rsa -C 'meteor@163.com' # 邮箱要与github上注册的相同
Generating public/private rsa key pair.
Enter file in which to save the key (/root/.ssh/id_rsa):
Enter passphrase (empty for no passphrase):
Enter same passphrase again:
Your identification has been saved in /root/.ssh/id_rsa.
Your public key has been saved in /root/.ssh/id_rsa.pub.
The key fingerprint is:
SHA256:RiE6UR1BtzV5avyE2uz6TNPsVHa2D2eHprghrJEkd/g meteor@163.com
The key's randomart image is:
+---[RSA 2048]----+
|    ..oo=o. o.   |
|     o ..o o...  |
|    o   . .. +   |
|     . o    = .  |
|    . + S  = o  =|
|     + *  . oo.=o|
|      o E ..o B.+|
|       o . =.* +o|
|      .   +++ . .|
+----[SHA256]-----+
[root@localhost ~]#
[root@localhost ~]# cat .ssh/id_rsa.pub
ssh-rsa AAAAB3NzaC1yc2EAAAADAQABAAABAQDVThfq4brrlsPGtAknVB0TLPx+7Dd3qlxTbSIrUOsGC5Y8JuNqVTlIntZB4oNj8cSQrWvec9CKm0a8o7WwaJIiqpxurz+YpQHP2KbapftKIxsX4hPf/z+p0El1U6arQa35/xmNsq+cJLH/bDdRG+EMDhuCBmjVZOlLj/hEdeIT6s56AnnCkaWoF+sq58KCF7Tk54jRbs/YiyE4SN7FuA70r+07sA/uj0+lmuk4E190KtQUELhjX/E9stivlqiRhxnKvVUqXDywsjfM8Rtvbi4Fg9R8Wt9fpd4QwnWksYUoR5qZJFYXO4hSZrUnSMruPK14xXjDJcFDcP2eHIzKgLD1 meteor@163.com
4、复制以上的公钥,在github 中添加ssh key


创建好库之后,在库里创建几个文件,方便测试
5、测试:拉取github仓库
[root@localhost ~]# yum install git
[root@localhost ~]# git config --global user.name 'meteor_by'
[root@localhost ~]# git config --global user.email 'meteor@163.com'
[root@localhost tmp]# cd /tmp

[root@localhost tmp]# git clone git@github.com:youngfit/youngfit.git
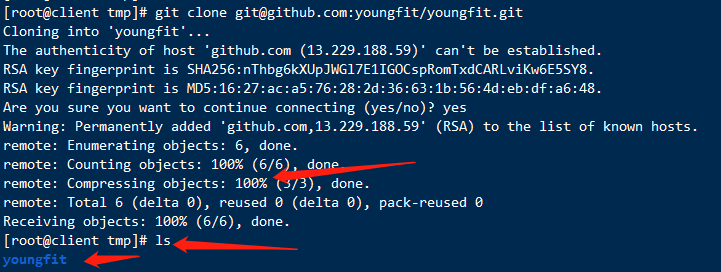
7、在本地添加远程仓库,并推送至github仓库
[root@localhost tmp]# cd /tmp/youngfit/
[root@localhost youngfit]# ls
qf.txt  README.md
[root@localhost youngfit]# cat qf.txt
this is 2002 test file
[root@client youngfit]# ls
qf.txt  README.md
[root@localhost youngfit]# vim a.txt
[root@localhost youngfit]# git add .
[root@localhost youngfit]# git commit -m "yufei"
[master 0f6a3de] yufei
 1 file changed, 2 insertions(+)
 create mode 100644 a.txt
[root@client youngfit]# git push origin master
Counting objects: 4, done.
Compressing objects: 100% (2/2), done.
Writing objects: 100% (3/3), 288 bytes | 0 bytes/s, done.
Total 3 (delta 0), reused 0 (delta 0)
To git@github.com:youngfit/youngfit.git
   ba8225d..0f6a3de  master -> master
去github界面查看

8、连接远程仓库方法
#[root@localhost testapp]# git remote -v
#origin git@github.com:meteor/python1804.git (fetch)
#origin git@github.com:meteor/python1804.git (push)
#[root@localhost python1804]#
#[root@localhost python1804]# git remote rm origin (如果连接远程的方式不是ssh,可以删除重新添加)
#[root@localhost ~]# git remote add origin git@github.com:meteor/python1804.git
#或
#git remote add origin https://github.com/meteor/python1804.git
#git push -u origin master
[root@client youngfit]# git remote -v
origin git@github.com:youngfit/youngfit.git (fetch)
origin git@github.com:youngfit/youngfit.git (push)
[root@client youngfit]# git remote rm origin
[root@client youngfit]# git remote add origin git@192.168.62.131:root/testapp.git
[root@client youngfit]# ls
a.txt qf.txt README.md
[root@client youngfit]# pwd
[root@client ~]# cd /root/testapp/
[root@client testapp]# ls
test.sql test.txt update.txt
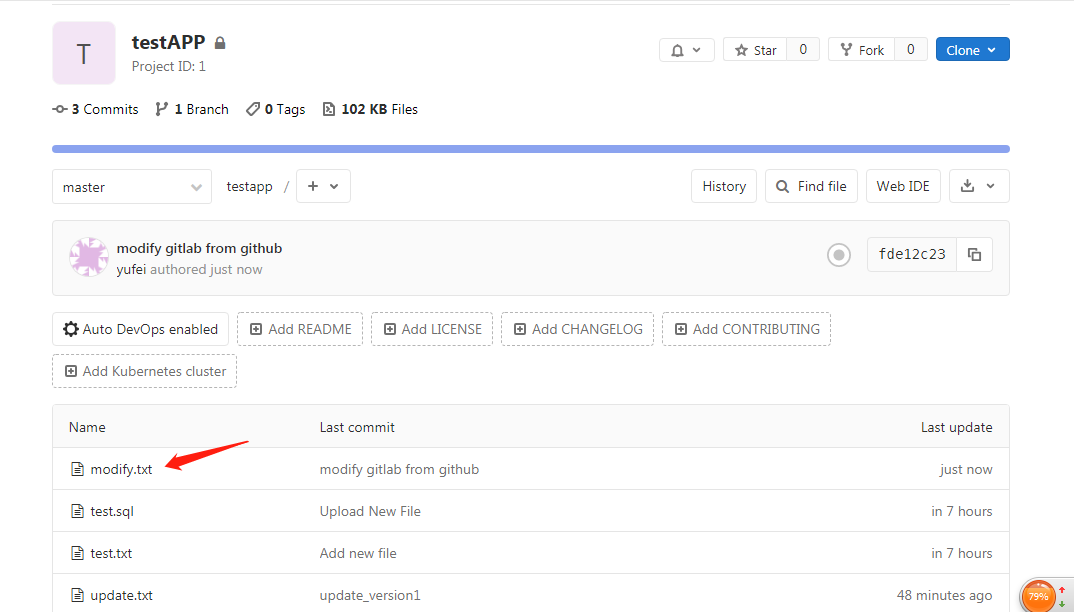
[root@client testapp]# vim modify.txt
[root@client testapp]# git add .
[root@client testapp]# git commit -m "modify gitlab from github"
[master fde12c2] modify gitlab from github
1 file changed, 1 insertion(+)
create mode 100644 modify.txt
[root@client testapp]# git push origin master
Username for 'http://192.168.62.131': root
Password for 'http://root@192.168.62.131':
Counting objects: 4, done.
Compressing objects: 100% (2/2), done.
Writing objects: 100% (3/3), 337 bytes | 0 bytes/s, done.
Total 3 (delta 0), reused 0 (delta 0)
To http://192.168.62.131/root/testapp.git
23bae45..fde12c2 master -> master
去自己部署的gitlab上查看


 2359
2359


 被折叠的 条评论
为什么被折叠?
被折叠的 条评论
为什么被折叠?
 到【灌水乐园】发言


