


文章目录
redhat 7 中DHCP服务器搭建与应用
DHCP基于客户/服务器模式,当DHCP客户端启动时,它会自动与DHCP服务器通信要求提供自动分配IP地址的服务,而安装了DHCP服务软件的服务器则会响应要求。
用户可以利用DHCP服务器管理动态的IP地址分配及其他相关的环境配置工作,如DNS服务器、WINS服务器、Gateway(网关)的设置。
在DHCP机制中可以分为服务器和客户端两个部分,服务器使用固定的IP地址,在局域网中扮演着给客户端提供动态IP地址、DNS配置和网管配置的角色。客户端与IP地址相关的配置,都在启动时由服务器自动分配。
dhcp的服务程序的主配置文件/etc/dhcp/dhcpd.conf中只有3行注释语句,根据注释信息找到模板配置文件/usr/share/doc/dhcp-4.2.5/dhcpd.conf.example,我们可以将文件中的内容复制到配置文件中。
dhcpd服务程序配置文件的架构
标准的配置文件包含有全局配置参数、子网网段声明、地址配置选项以及地址配置参数。其中,全局配置参数用于定义dhcpd服务程序的整体运行参数;子网网段声明用于配置整个子网段的地址属性。
 # dhcpd.conf

# 全局配置选项
option domain-name "example.com";  # 定义域名
option domain-name-servers ns1.example.com, ns2.example.com;  # DNS服务器地址
default-lease-time 600;  # 默认租约时间(秒)
max-lease-time 7200;  # 最大租约时间(秒)

# 子网声明
subnet 192.168.1.0 netmask 255.255.255.0 {
  range 192.168.1.10 192.168.1.100;  # 可分配IP地址范围
  option routers 192.168.1.1;  # 默认网关
  option broadcast-address 192.168.1.255;  # 广播地址
  option subnet-mask 255.255.255.0;  # 子网掩码
}

# 固定地址分配给特定MAC地址的主机
host server1 {
  hardware ethernet 00:11:22:33:44:55;
  fixed-address 192.168.1.50;
}
dhcpd服务程序配置文件的可用参数较多,最常用的参数见表
| 参数 | 作用 |
|---|---|
| ddns-update-style 类型 | 定义DNS服务动态更新的类型 |
| ddns-update-style 类型 | 类型包括:none(不支持动态更新)、 |
| ddns-update-style 类型 | interim(互动更新模式)与ad-hoc(特殊更新模式) |
| allow/ignore client-updates | 允许/忽略客户端更新DNS记录 |
| default-lease-time 21600 | 默认超时时间 |
| max-lease-time 43200 | 最大超时时间 |
| option domain-name-servers 8.8.8.8 | 定义DNS服务器地址 |
| option domain-name “domain.org” | 定义DNS域名 |
| range | 定义用于分配的IP地址池 |
| option subnet-mask | 定义客户端的子网掩码 |
| option routers | 定义客户端的网关地址 |
| broadcast-address 广播地址 | 定义客户端的广播地址 |
| ntp-server IP地址 | 定义客户端的网络时间服务器(NTP) |
| nis-servers IP地址 | 定义客户端的NIS域服务器的地址 |
| hardware 硬件类型 MAC地址 | 指定网卡接口的类型与MAC地址 |
| server-name 主机名 | 向DHCP客户端通知DHCP服务器的主机名 |
| fixed-address IP地址 | 将某个固定的IP地址分配给指定主机 |
| time-offset 偏移差 | 指定客户端与格林尼治时间的偏移差 |
一、dhcp服务器配置实验步骤
1.1简单的DHCP服务配置
实验准备
软件:VMware Workstation Pro
虚拟机:Red Hat Enterprise Linux 7 64 位 多台
DHCP 配置、DHCP中继代理、DHCP多作用域配置
DHCP服务器:192.168.10.10/24
由于VMware Workstation虚拟机软件自带DHCP服务,为了避免与自己配置的dhcpd服务程序产生冲突,应该先将虚拟机软件自带的DHCP功能关闭,但是一定要注意,DHCP客户端与服务器需要处于同一种网络模式—仅主机模式(Hostonly),否则就会产生物理隔离,从而无法获取IP地址。
1、检查VMnet1和VMnet8两张虚拟网卡是否打开
 2、克隆一台redhat 7虚拟机,用作客户端

3、调整仅主机模式下的系统设置,关闭本地DHCP服务,设置子网网段。并设置DHCP服务器与客户端网络适配器模式为仅主机模式。


4、开启服务器,配置静态网络。

5、检查服务器在专用网络内能否正常ping通
[root@localhost 桌面]# ping 192.168.10.1 -c4
PING 192.168.10.1 (192.168.10.1) 56(84) bytes of data.
64 bytes from 192.168.10.1: icmp_seq=1 ttl=128 time=0.124 ms
64 bytes from 192.168.10.1: icmp_seq=2 ttl=128 time=0.108 ms
64 bytes from 192.168.10.1: icmp_seq=3 ttl=128 time=0.123 ms
64 bytes from 192.168.10.1: icmp_seq=4 ttl=128 time=0.125 ms
6、配置yum源,安装DHCP服务。
[root@localhost Desktop]# df -h
Filesystem             Size  Used Avail Use% Mounted on
/dev/mapper/rhel-root   38G  2.9G   35G   8% /
devtmpfs               905M     0  905M   0% /dev
tmpfs                  914M  140K  914M   1% /dev/shm
tmpfs                  914M  8.9M  905M   1% /run
tmpfs                  914M     0  914M   0% /sys/fs/cgroup
/dev/sda1              497M  119M  379M  24% /boot
/dev/sr0               3.5G  3.5G     0 100% /run/media/root/RHEL-7.0 Server.x86_64
[root@localhost Desktop]# mkdir /mnt/cdrom
[root@localhost Desktop]# mount /dev/sr0 /mnt/cdrom
mount: /dev/sr0 is write-protected, mounting read-only
[root@localhost Desktop]# vim /etc/yum.repos.d/a.repo
[a]
name=welcome to redhatroom
baseurl=file:///mnt/cdrom
enabled=1
gpgcheck=0
[root@localhost \]# yum install -y dhcp      \\安装DHCP软件包
[root@localhost \]# rpm -qa | grep dhcp      \\查询安装结果
[root@localhost \]# systemctl start dhcpd    \\启动DHCP服务
[root@localhost \]# systemctl restart dhcpd   \\重启DHCP服务
[root@localhost \]# systemctl status dhcpd	  \\查看DHCP服务运行状态
[root@localhost \]# systemctl enable dhcpd	  \\设置DHCP服务开机自启
[root@localhost \]# systemctl stop dhcpd      \\停止DHCP服务
[root@localhost \]# systemctl list-unit-files | grep dhcp    \\查看开机自启项
[root@localhost \]# cat /usr/share/doc/dhcp-4.2.5/dhcpd.conf.example >> /etc/dhcp/dhcpd.conf
将DHCP服务器的IP地址等网络信息配置完成后,就可以配置dhcpd服务程序了。在配置dhcpd服务程序时,配置文件中的每行参数后面都需要以分号(;)结尾,这个一定要注意。
[root@localhost /]# vim /etc/dhcp/dhcpd.conf
#
# DHCP Server Configuration file.
#   see /usr/share/doc/dhcp*/dhcpd.conf.example
#   see dhcpd.conf(5) man page
#
ddns-update-style none;
ignore client-updates;
  subnet 192.168.10.0 netmask 255.255.255.0 {
  range 192.168.10.100 192.168.10.150;
  option domain-name-servers 192.168.10.10;
  option domain-name "hnsw01.com";
  option routers 192.168.10.1;
  option subnet-mask 255.255.255.0;
  option broadcast-address 192.168.10.255;
  default-lease-time 600;
  max-lease-time 7200;
}
| 参数 | 作用 |
|---|---|
| ddns-update-style none; | 设置DNS服务不自动进行动态更新 |
| ignore client-updates; | 忽略客户端更新DNS记录 |
| subnet 192.168.10.0 netmask 255.255.255.0 { | 作用域为192.168.10.0/24网段 |
| range 192.168.10.100 192.168.10.200; | IP地址池为192.168.10.100-200(约100个IP地址) |
| option domain-name-servers 192.168.10.10; | 定义客户端的DNS地址 |
| option domain-name “hnsw01.com”; | 定义默认的搜索域 |
| option routers 192.168.10.254; | 定义客户端的网关地址 |
| option subnet-mask 255.255.255.0; | 定义客户端默认的子网掩码 |
| option broadcast-address 192.168.10.255; | 定义客户端的广播地址 |
| default-lease-time 600; | 定义默认租约时间(单位:秒) |
| max-lease-time 7200; | 定义最大预约时间(单位:秒) |
| } | 结束符 |
[root@localhost /]# dhcpd                     \\检验配置文件
Internet Systems Consortium DHCP Server 4.2.5
Copyright 2004-2013 Internet Systems Consortium.
All rights reserved.          \\全部正确
For info, please visit https://www.isc.org/software/dhcp/
Not searching LDAP since ldap-server, ldap-port and ldap-base-dn were not specified in the config file
Wrote 0 deleted host decls to leases file.
Wrote 0 new dynamic host decls to leases file.
Wrote 1 leases to leases file.
Listening on LPF/eno16777736/00:0c:29:a5:64:e8/192.168.10.0/24
Sending on   LPF/eno16777736/00:0c:29:a5:64:e8/192.168.10.0/24
Sending on   Socket/fallback/fallback-net
There's already a DHCP server running.

This version of ISC DHCP is based on the release available
on ftp.isc.org.  Features have been added and other changes
have been made to the base software release in order to make
it work better with this distribution.

Please report for this software via the Red Hat Bugzilla site:
    http://bugzilla.redhat.com

exiting.

[root@localhost \]# systemctl restart dhcpd   \\重启DHCP服务
[root@localhost \]# systemctl status dhcpd.service   \\查看DHCP服务状态
Internet Systems Consortium DHCP Server 4.2.5
Copyright 2004-2013 Internet Systems Consortium.
All rights reserved.
For info, please visit https://www.isc.org/software/dhcp/
Not searching LDAP since ldap-server, ldap-port and ldap-base-dn were not specified in the config file
Wrote 0 leases to leases file.
Listening on LPF/eno16777736/00:0c:29:a5:64:e8/192.168.10.0/24
Sending on   LPF/eno16777736/00:0c:29:a5:64:e8/192.168.10.0/24
Sending on   Socket/fallback/fallback-net
把dhcpd服务程序配置妥当之后就可以开启克隆出来的客户端来检验IP分配效果了。
[root@localhost Desktop]# nmcli device connect eno16777736
Device 'eno16777736' successfully activated with '08f0a4ec-6c40-4963-b21a-143897fc020a'.
[root@localhost Desktop]# ifconfig
eno16777736: flags=4163<UP,BROADCAST,RUNNING,MULTICAST>  mtu 1500
        inet 192.168.10.100  netmask 255.255.255.0  broadcast 192.168.10.255
        inet6 fe80::20c:29ff:fe47:ae4f  prefixlen 64  scopeid 0x20<link>
        ether 00:0c:29:47:ae:4f  txqueuelen 1000  (Ethernet)
        RX packets 33  bytes 3112 (3.0 KiB)
        RX errors 0  dropped 0  overruns 0  frame 0
        TX packets 55  bytes 6223 (6.0 KiB)
        TX errors 0  dropped 0 overruns 0  carrier 0  collisions 0

lo: flags=73<UP,LOOPBACK,RUNNING>  mtu 65536
        inet 127.0.0.1  netmask 255.0.0.0
        inet6 ::1  prefixlen 128  scopeid 0x10<host>
        loop  txqueuelen 0  (Local Loopback)
        RX packets 23  bytes 2352 (2.2 KiB)
        RX errors 0  dropped 0  overruns 0  frame 0
        TX packets 23  bytes 2352 (2.2 KiB)
        TX errors 0  dropped 0 overruns 0  carrier 0  collisions 0
如果是在生产环境中配置dhcpd服务,则有可能会因为DHCP没有被防火墙放行而导致失败,此时执行下面的命令即可:
[root@linuxprobe ~]# firewall-cmd --zone=public --permanent --add-service=dhcp
success
[root@linuxprobe ~]# firewall-cmd --reload
success
开启一台客户机,设置网络模式为仅主机模式,测试
[root@localhost 桌面]# cat /etc/sysconfig/network-scripts/ifcfg-eno16777736
HWADDR=00:0c:29:27:9e:b2
TYPE=Ethernet
BOOTPROTO=dhcp
DEFROUTE=yes
PEERDNS=yes
PEERROUTES=yes
IPV4_FAILURE_FATAL=no
IPV6INIT=yes
IPV6_AUTOCONF=yes
IPV6_DEFROUTE=yes
IPV6_PEERDNS=yes
IPV6_PEERROUTES=yes
IPV6_FAILURE_FATAL=no
NAME=eno16777736
UUID=80648cd1-e791-4978-ad23-dcf3ca198444
ONBOOT=yes
[root@localhost 桌面]# ifconfig
eno16777736: flags=4163<UP,BROADCAST,RUNNING,MULTICAST>  mtu 1500
        inet 192.168.10.100  netmask 255.255.255.0  broadcast 192.168.10.255
        inet6 fe80::20c:29ff:fe27:9eb2  prefixlen 64  scopeid 0x20<link>
        ether 00:0c:29:27:9e:b2  txqueuelen 1000  (Ethernet)
        RX packets 91  bytes 10596 (10.3 KiB)
        RX errors 0  dropped 0  overruns 0  frame 0
        TX packets 154  bytes 15523 (15.1 KiB)
        TX errors 0  dropped 0 overruns 0  carrier 0  collisions 0

lo: flags=73<UP,LOOPBACK,RUNNING>  mtu 65536
        inet 127.0.0.1  netmask 255.0.0.0
        inet6 ::1  prefixlen 128  scopeid 0x10<host>
        loop  txqueuelen 0  (Local Loopback)
        RX packets 13  bytes 1360 (1.3 KiB)
        RX errors 0  dropped 0  overruns 0  frame 0
        TX packets 13  bytes 1360 (1.3 KiB)
        TX errors 0  dropped 0 overruns 0  carrier 0  collisions 0
[root@localhost 桌面]# cat /etc/resolv.conf
# Generated by NetworkManager
domain hnsw01.com
search hnsw01.com
nameserver 192.168.10.10
[root@localhost 桌面]# nmcli device show | grep DNS
IP4.DNS[1]:                             192.168.10.10
[root@localhost 桌面]# ip route show
default via 192.168.10.254 dev eno16777736  proto static  metric 1024
192.168.10.0/24 dev eno16777736  proto kernel  scope link  src 192.168.10.101
[root@localhost 桌面]# nmcli device show
GENERAL.设备:                           eno16777736
GENERAL.类型:                           ethernet
GENERAL.硬盘:                           00:0C:29:27:9E:B2
GENERAL.MTU:                            1500
GENERAL.状态:                           100 (连接的)
GENERAL.CONNECTION:                     eno16777736
GENERAL.CON-PATH:                       /org/freedesktop/NetworkManager/ActiveConnection/0
WIRED-PROPERTIES.容器:                  开
IP4.地址[1]:                            ip = 192.168.10.100/24, gw = 192.168.10.1
IP4.DNS[1]:                             192.168.10.1
IP4.DOMAIN[1]:                          hnsw01.com
IP6.地址[1]:                            ip = fe80::20c:29ff:fe27:9eb2/64, gw = ::

GENERAL.设备:                           lo
GENERAL.类型:                           loopback
GENERAL.硬盘:                           00:00:00:00:00:00
GENERAL.MTU:                            65536
GENERAL.状态:                           10 (未管理)
GENERAL.CONNECTION:                     --
GENERAL.CON-PATH:                       --
IP4.地址[1]:                            ip = 127.0.0.1/8, gw = 0.0.0.0
IP6.地址[1]:                            ip = ::1/128, gw = ::
重新修改dhcp服务器配置文件,测试配置参数的实际意义。
[root@localhost 桌面]# vim /etc/dhcp/dhcpd.conf
[root@localhost 桌面]# vim /etc/hostname
[root@localhost 桌面]# bash
[root@dhcpserver 桌面]# cat /etc/dhcp/dhcpd.conf
#
# DHCP Server Configuration file.
#   see /usr/share/doc/dhcp*/dhcpd.conf.example
#   see dhcpd.conf(5) man page
#
ddns-update-style none;
ignore client-updates;
  subnet 192.168.10.0 netmask 255.255.255.0 {
  range 192.168.10.100 192.168.10.150;
   option domain-name-servers 192.168.10.1;
   option domain-name "hnsw01.com";
   option routers 192.168.10.1;
  option subnet-mask 255.255.255.0;
  option broadcast-address 192.168.10.255;
  default-lease-time 600;
  max-lease-time 7200;
}

[root@dhcpserver 桌面]# systemctl restart dhcpd.service
[root@dhcpserver 桌面]# systemctl status dhcpd.service
dhcpd.service - DHCPv4 Server Daemon
   Loaded: loaded (/usr/lib/systemd/system/dhcpd.service; disabled)
   Active: active (running) since 六 2024-10-12 23:33:06 CST; 3s ago
开启一台新的客户机,
[root@localhost 桌面]# nmcli device show
GENERAL.设备:                           eno16777736
GENERAL.类型:                           ethernet
GENERAL.硬盘:                           00:0C:29:6E:87:E8
GENERAL.MTU:                            1500
GENERAL.状态:                           100 (连接的)
GENERAL.CONNECTION:                     eno16777736
GENERAL.CON-PATH:                       /org/freedesktop/NetworkManager/ActiveConnection/0
WIRED-PROPERTIES.容器:                  开
IP4.地址[1]:                            ip = 192.168.10.151/24, gw = 192.168.10.2
IP4.DNS[1]:                             192.168.10.2
IP4.DOMAIN[1]:                          hnsw01.com
IP6.地址[1]:                            ip = fe80::20c:29ff:fe6e:87e8/64, gw = ::

GENERAL.设备:                           lo
GENERAL.类型:                           loopback
GENERAL.硬盘:                           00:00:00:00:00:00
GENERAL.MTU:                            65536
GENERAL.状态:                           10 (未管理)
GENERAL.CONNECTION:                     --
GENERAL.CON-PATH:                       --
IP4.地址[1]:                            ip = 127.0.0.1/8, gw = 0.0.0.0
IP6.地址[1]:                            ip = ::1/128, gw = ::
[root@localhost 桌面]# cat /var/lib/dhclient/dhclient.leases  \\查看本地租约数据库
lease {
  interface "eno16777736";
  fixed-address 192.168.10.66;
  option subnet-mask 255.255.255.0;
  option routers 192.168.10.10;
  option dhcp-lease-time 600;
  option dhcp-message-type 5;
  option domain-name-servers 192.168.10.2;
  option dhcp-server-identifier 192.168.20.10;
  option domain-name "redhat.com";
  renew 4 2024/10/10 15:21:14;
  rebind 4 2024/10/10 15:21:14;
  expire 4 2024/10/10 15:21:14;
}
查看dhcp服务器租约数据库。
[root@dhcpserver 桌面]# cat /var/lib/dhcpd/dhcpd.leases
# The format of this file is documented in the dhcpd.leases(5) manual page.
# This lease file was written by isc-dhcp-4.2.5

server-duid "\000\001\000\001.\235Xq\000\014)\360;\246";

lease 192.168.10.151 {
  starts 6 2024/10/12 16:01:22;
  ends 6 2024/10/12 16:11:22;
  cltt 6 2024/10/12 16:01:22;
  binding state active;
  next binding state free;
  rewind binding state free;
  hardware ethernet 00:0c:29:6e:87:e8;
}
1.2、绑定IP地址
在DHCP协议中有个术语是“预约”,它用来确保局域网中特定的设备总是获取到固定的IP地址。换句话说,就是dhcpd服务程序会把某个IP地址私藏下来,只将其用于相匹配的特定设备。
要想把某个IP地址与某台主机进行绑定,就需要用到这台主机的MAC地址。
[root@localhost /]# vim /etc/dhcp/dhcpd.conf
ddns-update-style none;
ignore client-updates;
subnet 192.168.10.0 netmask 255.255.255.0 {
  range 192.168.10.100 192.168.10.150;
  option domain-name-servers 192.168.10.2;
  option domain-name "hnsw01.com";
  option routers 192.168.10.254;
  option broadcast-address 192.168.10.255;
  default-lease-time 600;
  max-lease-time 7200;
}
host xiaozhang {
  hardware ethernet 00:0c:29:47:ae:4f;
  fixed-address 192.168.10.88;
}

[root@localhost /]# dhcpd                     \\检验配置文件
Internet Systems Consortium DHCP Server 4.2.5
Copyright 2004-2013 Internet Systems Consortium.
All rights reserved.
For info, please visit https://www.isc.org/software/dhcp/
Not searching LDAP since ldap-server, ldap-port and ldap-base-dn were not specified in the config file
Wrote 0 deleted host decls to leases file.
Wrote 0 new dynamic host decls to leases file.
Wrote 1 leases to leases file.
Listening on LPF/eno16777736/00:0c:29:a5:64:e8/192.168.10.0/24
Sending on   LPF/eno16777736/00:0c:29:a5:64:e8/192.168.10.0/24
Sending on   Socket/fallback/fallback-net
There's already a DHCP server running.

This version of ISC DHCP is based on the release available
on ftp.isc.org.  Features have been added and other changes
have been made to the base software release in order to make
it work better with this distribution.

Please report for this software via the Red Hat Bugzilla site:
    http://bugzilla.redhat.com

exiting.
[root@localhost \]# systemctl restart dhcpd   \\重启DHCP服务
[root@localhost 桌面]# systemctl status dhcpd.service
dhcpd.service - DHCPv4 Server Daemon
   Loaded: loaded (/usr/lib/systemd/system/dhcpd.service; disabled)
   Active: active (running) since 四 2023-11-02 08:25:22 CST; 19min ago
     Docs: man:dhcpd(8)
           man:dhcpd.conf(5)
 Main PID: 15207 (dhcpd)
   Status: "Dispatching packets..."
   CGroup: /system.slice/dhcpd.service
           └─15207 /usr/sbin/dhcpd -f -cf /etc/dhcp/dhcpd.conf -user dhcpd -group dhcpd --no-pid
打开克隆机,重启网络服务,查看是否获得了绑定的ip地址;
[root@localhost 桌面]# systemctl restart network
[root@localhost 桌面]# ifconfig
eno16777736: flags=4163<UP,BROADCAST,RUNNING,MULTICAST>  mtu 1500
        inet 192.168.10.88  netmask 255.255.255.0  broadcast 192.168.10.255
        inet6 fe80::20c:29ff:fe47:ae4f  prefixlen 64  scopeid 0x20<link>
        ether 00:0c:29:47:ae:4f  txqueuelen 1000  (Ethernet)
        RX packets 47  bytes 6701 (6.5 KiB)
        RX errors 0  dropped 0  overruns 0  frame 0
        TX packets 206  bytes 17868 (17.4 KiB)
        TX errors 0  dropped 0 overruns 0  carrier 0  collisions 0

lo: flags=73<UP,LOOPBACK,RUNNING>  mtu 65536
        inet 127.0.0.1  netmask 255.0.0.0
        inet6 ::1  prefixlen 128  scopeid 0x10<host>
        loop  txqueuelen 0  (Local Loopback)
        RX packets 125  bytes 12206 (11.9 KiB)
        RX errors 0  dropped 0  overruns 0  frame 0
        TX packets 125  bytes 12206 (11.9 KiB)
        TX errors 0  dropped 0 overruns 0  carrier 0  collisions 0
二、 DHCP配置多作用域
单一的作用域,大部分时间能够满足网络的需求,但随着由于公司的增长和扩张,人员数量不断增加,公司IP的一个网段无法满足日常使用,因此增加了另一个网段。但默认情况下,DHCP服务器只能发出与其自己的网卡位于同一网段中的IP地址。目前,我们的DHCP网卡IP地址是192.168.10.0段,我们新添加的网段是192.168.20.0。那么,DHCP服务器如何同时发出10个和20个网段呢?
1)、更换IP地址更多的网段来容纳更多的IP
2)、在原有的基础上增加新的IP地址
显然,第一种方案更换新的网段会导致已经分配出去的IP地址被回收导致网络会中断,并不是很合理,所以只能在原有的基础上增加新的网段和IP地址来解决这个问题
那如何解决这个问题呢,有两种办法,一种是多网卡多作用域,一种是超级作用域 (Superscope)
多网卡多作用域 (Multiple Scopes on Multiple Network Adapters)
定义:
在这种配置中,每张网卡对应一个独立的作用域,每个作用域为不同的子网提供IP地址。
每个作用域都是独立的,并且通常位于不同的广播域中。
特点:
多个广播域: 每个作用域位于不同的广播域内,这意味着不同作用域中的客户端不能直接通信,除非通过路由器。
独立管理: 每个作用域都需要单独配置和管理,这提供了更高的灵活性和控制。
明确区分: 每个作用域服务于特定的子网,因此更容易追踪和管理不同子网的IP地址分配。
网络隔离: 由于每个作用域位于不同的广播域,这种方式提供了更好的网络隔离和安全性。
适用场景:
当你有多个独立的子网,每个子网需要独立的IP地址池时。
当你需要在网络之间进行隔离,以提高安全性和管理效率时。
当你的网络结构复杂,需要对不同部分进行精细管理时。
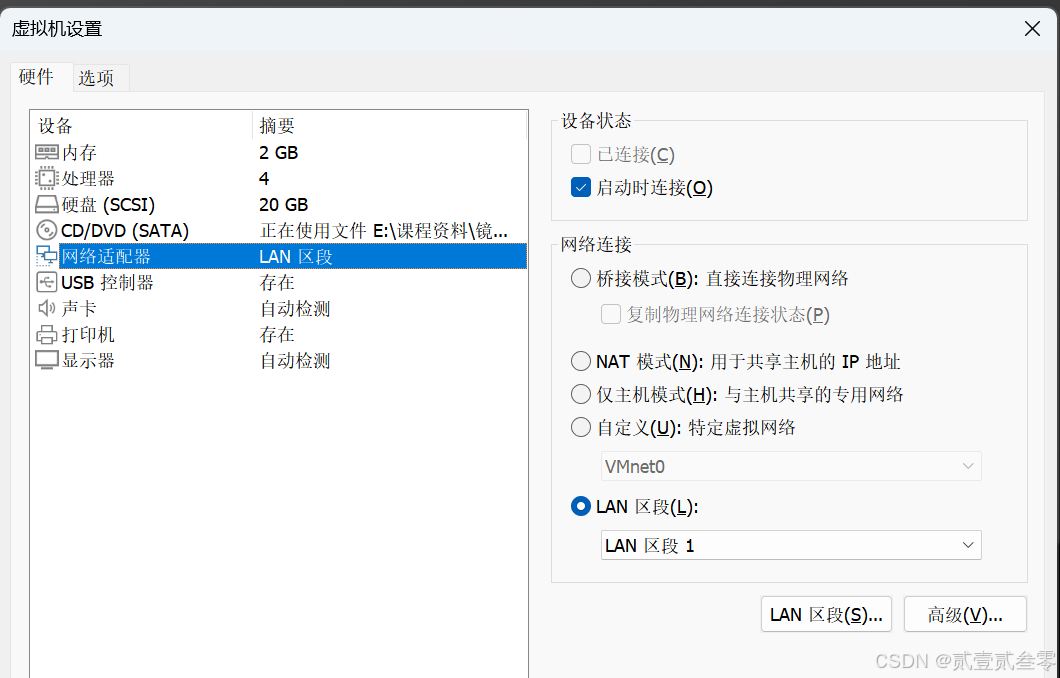
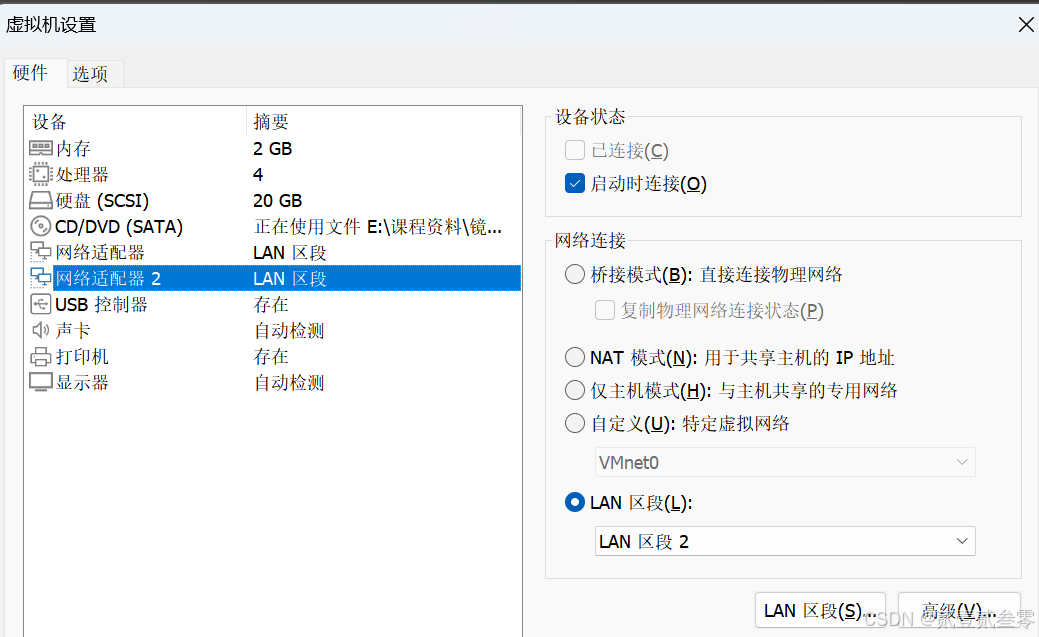
2.1双网卡实现两个作用域
先看图例:

在VMware Workstation Pro菜单虚拟网络编辑器中增加新的虚拟网络VMnet2,类型为仅主机模式。
在DHCP服务器上增加一张新网卡,设置网络连接类型为虚拟网络VMnet2.

1、配置IP地址
为每块网卡配置独立的IP地址。IP地址配置的网段要与DHCP服务器发布的作用域一一对应,如下所示。
[root@localhost 桌面]# ifconfig
eno16777736: flags=4163<UP,BROADCAST,RUNNING,MULTICAST>  mtu 1500
        inet 192.168.10.10  netmask 255.255.255.0  broadcast 192.168.10.255
        inet6 fe80::20c:29ff:fef0:3ba6  prefixlen 64  scopeid 0x20<link>
        ether 00:0c:29:f0:3b:a6  txqueuelen 1000  (Ethernet)
        RX packets 0  bytes 0 (0.0 B)
        RX errors 0  dropped 0  overruns 0  frame 0
        TX packets 27  bytes 3911 (3.8 KiB)
        TX errors 0  dropped 0 overruns 0  carrier 0  collisions 0

eno33554984: flags=4163<UP,BROADCAST,RUNNING,MULTICAST>  mtu 1500
        inet 192.168.20.10  netmask 255.255.255.0  broadcast 192.168.20.255
        inet6 fe80::20c:29ff:fef0:3bb0  prefixlen 64  scopeid 0x20<link>
        ether 00:0c:29:f0:3b:b0  txqueuelen 1000  (Ethernet)
        RX packets 0  bytes 0 (0.0 B)
        RX errors 0  dropped 0  overruns 0  frame 0
        TX packets 27  bytes 3911 (3.8 KiB)
        TX errors 0  dropped 0 overruns 0  carrier 0  collisions 0

lo: flags=73<UP,LOOPBACK,RUNNING>  mtu 65536
        inet 127.0.0.1  netmask 255.0.0.0
        inet6 ::1  prefixlen 128  scopeid 0x10<host>
        loop  txqueuelen 0  (Local Loopback)
        RX packets 390  bytes 33200 (32.4 KiB)
        RX errors 0  dropped 0  overruns 0  frame 0
        TX packets 390  bytes 33200 (32.4 KiB)
        TX errors 0  dropped 0 overruns 0  carrier 0  collisions 0
2、配置dhcpd.conf
搭建DHCP服务器网络环境后,编辑配置文件,即可完成多作用域的设置,如下所示。
[root@localhost /]# vim /etc/dhcp/dhcpd.conf
ddns-update-style none;
ignore client-updates;
subnet 192.168.10.0 netmask 255.255.255.0 {
  range 192.168.10.100 192.168.10.200;
  option domain-name-servers 192.168.10.2;
  option domain-name "redhat.com";
  option routers 192.168.10.254;
  option broadcast-address 192.168.10.255;
  default-lease-time 600;
  max-lease-time 7200;
}

ddns-update-style none;
ignore client-updates;
subnet 192.168.20.0 netmask 255.255.255.0 {
  range 192.168.20.100 192.168.20.200;
  option domain-name-servers 192.168.20.2;
  option domain-name "redhat.com";
  option routers 192.168.20.254;
  option broadcast-address 192.168.20.255;
  default-lease-time 600;
  max-lease-time 7200;
}

[root@localhost /]# dhcpd                     \\检验配置文件
[root@localhost \]# systemctl restart dhcpd   \\重启DHCP服务
[root@localhost 桌面]# ping 192.168.10.1 -c4
PING 192.168.10.1 (192.168.10.1) 56(84) bytes of data.
64 bytes from 192.168.10.1: icmp_seq=1 ttl=64 time=0.160 ms
64 bytes from 192.168.10.1: icmp_seq=2 ttl=64 time=0.202 ms
64 bytes from 192.168.10.1: icmp_seq=3 ttl=64 time=0.178 ms
64 bytes from 192.168.10.1: icmp_seq=4 ttl=64 time=0.176 ms

--- 192.168.10.1 ping statistics ---
4 packets transmitted, 4 received, 0% packet loss, time 3000ms
rtt min/avg/max/mdev = 0.160/0.179/0.202/0.015 ms
[root@localhost 桌面]# ping 192.168.20.1 -c4
PING 192.168.20.1 (192.168.20.1) 56(84) bytes of data.
64 bytes from 192.168.20.1: icmp_seq=1 ttl=64 time=0.145 ms
64 bytes from 192.168.20.1: icmp_seq=2 ttl=64 time=0.149 ms
64 bytes from 192.168.20.1: icmp_seq=3 ttl=64 time=0.159 ms
64 bytes from 192.168.20.1: icmp_seq=4 ttl=64 time=0.122 ms

--- 192.168.20.1 ping statistics ---
4 packets transmitted, 4 received, 0% packet loss, time 2999ms
rtt min/avg/max/mdev = 0.122/0.143/0.159/0.019 ms   \\测试两张网卡的连通性
开启两个DHCP客户端,分别设置网络连接为仅主机模式、VMnet2,开机测试。
超级作用域 (Superscope)
定义:
超级作用域是一组逻辑上关联的多个作用域(即多个IP地址范围),它们可以被看作是一个整体来管理和分配。
一个超级作用域通常用于在同一物理网络上提供连续或不连续的IP地址范围。
特点:
单个广播域: 所有的作用域都位于同一个广播域内,这意味着这些作用域中的客户端可以相互通信而不需要路由器。
统一管理: 通过超级作用域,管理员可以更方便地管理多个IP地址池,而不必单独配置每个作用域。
自动选择: 当客户端请求IP地址时,DHCP服务器会从超级作用域中的任意一个可用的作用域中分配IP地址。
适用于扩展: 如果需要在一个子网内扩展IP地址范围,可以简单地添加新的作用域到现有的超级作用域中。
适用场景:
当你需要在一个大的单一子网内提供更多的IP地址时。
当你需要简化对多个IP地址池的管理时。
2.2、配置DHCP超级作用域
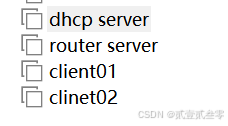
| 虚拟机 | IP | 网络模式 |
|---|---|---|
| DHCP server | 192.168.1.10 | LAN1 |
| DHCP server | 192.168.2.10 | LAN1 |
| client01 | 192.168.1.0 /24 | LAN1 |
| client02 | 192.168.2.0 /24 | LAN1 |

[root@localhost 桌面]# ifconfig
eno16777736: flags=4163<UP,BROADCAST,RUNNING,MULTICAST>  mtu 1500
        ether 00:0c:29:80:75:49  txqueuelen 1000  (Ethernet)
        RX packets 0  bytes 0 (0.0 B)
        RX errors 0  dropped 0  overruns 0  frame 0
        TX packets 0  bytes 0 (0.0 B)
        TX errors 0  dropped 0 overruns 0  carrier 0  collisions 0

lo: flags=73<UP,LOOPBACK,RUNNING>  mtu 65536
        inet 127.0.0.1  netmask 255.0.0.0
        inet6 ::1  prefixlen 128  scopeid 0x10<host>
        loop  txqueuelen 0  (Local Loopback)
        RX packets 130  bytes 11020 (10.7 KiB)
        RX errors 0  dropped 0  overruns 0  frame 0
        TX packets 130  bytes 11020 (10.7 KiB)
        TX errors 0  dropped 0 overruns 0  carrier 0  collisions 0

[root@localhost 桌面]# nmtui
[root@localhost 桌面]# vim /etc/sysconfig/network-scripts/ifcfg-eno16777736
[root@localhost 桌面]# cat /etc/sysconfig/network-scripts/ifcfg-eno16777736
TYPE=Ethernet
BOOTPROTO=none
DEFROUTE=yes
IPV4_FAILURE_FATAL=no
IPV6INIT=yes
IPV6_AUTOCONF=yes
IPV6_DEFROUTE=yes
IPV6_FAILURE_FATAL=no
NAME=eno16777736
UUID=80648cd1-e791-4978-ad23-dcf3ca198444
ONBOOT=yes
HWADDR=00:0c:29:80:75:49
IPADDR0=192.168.1.10
IPADDR1=192.168.2.10
PREFIX0=24
GATEWAY0=192.168.1.10
IPV6_PEERDNS=yes
IPV6_PEERROUTES=yes
[root@localhost 桌面]# systemctl restart network
[root@localhost 桌面]# ifconfig
eno16777736: flags=4163<UP,BROADCAST,RUNNING,MULTICAST>  mtu 1500
        inet 192.168.1.10  netmask 255.255.255.0  broadcast 192.168.1.255
        inet6 fe80::20c:29ff:fe80:7549  prefixlen 64  scopeid 0x20<link>
        ether 00:0c:29:80:75:49  txqueuelen 1000  (Ethernet)
        RX packets 0  bytes 0 (0.0 B)
        RX errors 0  dropped 0  overruns 0  frame 0
        TX packets 44  bytes 6314 (6.1 KiB)
        TX errors 0  dropped 0 overruns 0  carrier 0  collisions 0

lo: flags=73<UP,LOOPBACK,RUNNING>  mtu 65536
        inet 127.0.0.1  netmask 255.0.0.0
        inet6 ::1  prefixlen 128  scopeid 0x10<host>
        loop  txqueuelen 0  (Local Loopback)
        RX packets 782  bytes 66680 (65.1 KiB)
        RX errors 0  dropped 0  overruns 0  frame 0
        TX packets 782  bytes 66680 (65.1 KiB)
        TX errors 0  dropped 0 overruns 0  carrier 0  collisions 0

[root@localhost 桌面]# ip a
1: lo: <LOOPBACK,UP,LOWER_UP> mtu 65536 qdisc noqueue state UNKNOWN
    link/loopback 00:00:00:00:00:00 brd 00:00:00:00:00:00
    inet 127.0.0.1/8 scope host lo
       valid_lft forever preferred_lft forever
    inet6 ::1/128 scope host
       valid_lft forever preferred_lft forever
2: eno16777736: <BROADCAST,MULTICAST,UP,LOWER_UP> mtu 1500 qdisc pfifo_fast state UP qlen 1000
    link/ether 00:0c:29:80:75:49 brd ff:ff:ff:ff:ff:ff
    inet 192.168.1.10/24 brd 192.168.1.255 scope global eno16777736
       valid_lft forever preferred_lft forever
    inet 192.168.2.10/24 brd 192.168.2.255 scope global eno16777736
       valid_lft forever preferred_lft forever
    inet6 fe80::20c:29ff:fe80:7549/64 scope link
       valid_lft forever preferred_lft forever

[root@dhcpserver network-scripts]# lsblk
NAME          MAJ:MIN RM  SIZE RO TYPE MOUNTPOINT
sda             8:0    0   20G  0 disk
├─sda1          8:1    0  500M  0 part /boot
└─sda2          8:2    0 19.5G  0 part
  ├─rhel-root 253:0    0 17.5G  0 lvm  /
  └─rhel-swap 253:1    0    2G  0 lvm  [SWAP]
sr0            11:0    1  3.5G  0 rom  /run/media/root/RHEL-7.0 Server.x86_64
[root@dhcpserver network-scripts]# mkdir /mnt/cdrom
[root@dhcpserver network-scripts]# mount /dev/sr0 /mnt/cdrom/
mount: /dev/sr0 写保护,将以只读方式挂载
[root@dhcpserver network-scripts]# vim /etc/yum.repos.d/a.repo
[root@dhcpserver network-scripts]# yum repolist
已加载插件:langpacks, product-id, subscription-manager
This system is not registered to Red Hat Subscription Management. You can use subscription-manager to register.
a                                                                                    | 4.1 kB  00:00:00
(1/2): a/group_gz                                                                    | 134 kB  00:00:00
(2/2): a/primary_db                                                                  | 3.4 MB  00:00:00
源标识                                                源名称                                           状态
a                                                     a                                                4,305
repolist: 4,305
[root@dhcpserver network-scripts]# cat /etc/yum.repos.d/a.repo
[a]
name=a
baseurl=file:///mnt/cdrom
enable=1
gpgcheck=0
[root@dhcpserver network-scripts]# yum install dhcp -y
已加载插件:langpacks, product-id, subscription-manager
This system is not registered to Red Hat Subscription Management. You can use subscription-manager to register.
正在解决依赖关系
--> 正在检查事务
---> 软件包 dhcp.x86_64.12.4.2.5-27.el7 将被 安装
--> 解决依赖关系完成

依赖关系解决

============================================================================================================
 Package               架构                    版本                                源                  大小
============================================================================================================
正在安装:
 dhcp                  x86_64                  12:4.2.5-27.el7                     a                  506 k

事务概要
============================================================================================================
安装  1 软件包

总下载量:506 k
安装大小:1.4 M
Downloading packages:
Running transaction check
Running transaction test
Transaction test succeeded
Running transaction
  正在安装    : 12:dhcp-4.2.5-27.el7.x86_64                                                             1/1
a/productid                                                                          | 1.6 kB  00:00:00
  验证中      : 12:dhcp-4.2.5-27.el7.x86_64                                                             1/1

已安装:
  dhcp.x86_64 12:4.2.5-27.el7

完毕!

[root@dhcpserver network-scripts]# vim /etc/dhcp/dhcpd.conf
[root@dhcpserver network-scripts]# cat /etc/dhcp/dhcpd.conf
#
# DHCP Server Configuration file.
#   see /usr/share/doc/dhcp*/dhcpd.conf.example
#   see dhcpd.conf(5) man page
#
ddns-update-style none;
ignore client-updates;
shared-network 1-2{
  subnet 192.168.1.0 netmask 255.255.255.0 {
  range 192.168.1.150 192.168.1.150;
  option domain-name-servers 192.168.1.10;
  option domain-name "hnsw01.com";
  option routers 192.168.1.10;
  option subnet-mask 255.255.255.0;
  option broadcast-address 192.168.1.255;
  default-lease-time 800;
  max-lease-time 7200;
}
  subnet 192.168.2.0 netmask 255.255.255.0 {
  range 192.168.2.150 192.168.2.150;
  option domain-name-servers 192.168.2.10;
  option domain-name "hnsw01.com";
  option routers 192.168.2.10;
  option subnet-mask 255.255.255.0;
  option broadcast-address 192.168.2.255;
  default-lease-time 800;
  max-lease-time 7200;
}
}
[root@localhost 桌面]# dhcpd
Internet Systems Consortium DHCP Server 4.2.5
Copyright 2004-2013 Internet Systems Consortium.
All rights reserved.
For info, please visit https://www.isc.org/software/dhcp/
Not searching LDAP since ldap-server, ldap-port and ldap-base-dn were not specified in the config file
Wrote 0 leases to leases file.
Listening on LPF/eno16777736/00:0c:29:80:75:49/1-2
Sending on   LPF/eno16777736/00:0c:29:80:75:49/1-2
Sending on   Socket/fallback/fallback-net
[root@localhost 桌面]# systemctl restart dhcpd.service
[root@localhost 桌面]# systemctl status dhcpd.service
dhcpd.service - DHCPv4 Server Daemon
   Loaded: loaded (/usr/lib/systemd/system/dhcpd.service; disabled)
   Active: active (running) since 二 2024-10-29 22:21:42 CST; 5s ago
     Docs: man:dhcpd(8)
           man:dhcpd.conf(5)
 Main PID: 4890 (dhcpd)
   CGroup: /system.slice/dhcpd.service
           └─4890 /usr/sbin/dhcpd -f -cf /etc/dhcp/dhcpd.conf -user dhcpd -group dhcpd --no-pid

10月 29 22:21:42 localhost.localdomain systemd[1]: Started DHCPv4 Server Daemon.
10月 29 22:21:42 localhost.localdomain dhcpd[4890]: Internet Systems Consortium DHCP Server 4.2.5
10月 29 22:21:42 localhost.localdomain dhcpd[4890]: Copyright 2004-2013 Internet Systems Consortium.
10月 29 22:21:42 localhost.localdomain dhcpd[4890]: All rights reserved.
10月 29 22:21:42 localhost.localdomain dhcpd[4890]: For info, please visit https://www.isc.org/software/dhcp/
10月 29 22:21:42 localhost.localdomain dhcpd[4890]: Not searching LDAP since ldap-server, ldap-port and ldap-base-dn were not specified in the config file
10月 29 22:21:42 localhost.localdomain dhcpd[4890]: Wrote 0 leases to leases file.
10月 29 22:21:42 localhost.localdomain dhcpd[4890]: Listening on LPF/eno16777736/00:0c:29:80:75:49/1-2
10月 29 22:21:42 localhost.localdomain dhcpd[4890]: Sending on   LPF/eno16777736/00:0c:29:80:75:49/1-2
10月 29 22:21:42 localhost.localdomain dhcpd[4890]: Sending on   Socket/fallback/fallback-net
[root@localhost 桌面]# systemctl enable dhcpd
ln -s '/usr/lib/systemd/system/dhcpd.service' '/etc/systemd/system/multi-user.target.wants/dhcpd.service'
分别开启client01、client02客户机测试,
client01客户机
[root@localhost 桌面]# ifconfig
eno16777736: flags=4163<UP,BROADCAST,RUNNING,MULTICAST>  mtu 1500
        inet 192.168.1.150  netmask 255.255.255.0  broadcast 192.168.1.255
        inet6 fe80::20c:29ff:fe1b:ecbb  prefixlen 64  scopeid 0x20<link>
        ether 00:0c:29:1b:ec:bb  txqueuelen 1000  (Ethernet)
        RX packets 14  bytes 2254 (2.2 KiB)
        RX errors 0  dropped 0  overruns 0  frame 0
        TX packets 20  bytes 2040 (1.9 KiB)
        TX errors 0  dropped 0 overruns 0  carrier 0  collisions 0

lo: flags=73<UP,LOOPBACK,RUNNING>  mtu 65536
        inet 127.0.0.1  netmask 255.0.0.0
        inet6 ::1  prefixlen 128  scopeid 0x10<host>
        loop  txqueuelen 0  (Local Loopback)
        RX packets 5  bytes 464 (464.0 B)
        RX errors 0  dropped 0  overruns 0  frame 0
        TX packets 5  bytes 464 (464.0 B)
        TX errors 0  dropped 0 overruns 0  carrier 0  collisions 0
client02客户机
[root@localhost 桌面]# ifconfig
eno16777736: flags=4163<UP,BROADCAST,RUNNING,MULTICAST>  mtu 1500
        inet 192.168.2.150  netmask 255.255.255.0  broadcast 192.168.2.255
        inet6 fe80::20c:29ff:fe40:7b57  prefixlen 64  scopeid 0x20<link>
        ether 00:0c:29:40:7b:57  txqueuelen 1000  (Ethernet)
        RX packets 14  bytes 1972 (1.9 KiB)
        RX errors 0  dropped 0  overruns 0  frame 0
        TX packets 19  bytes 2213 (2.1 KiB)
        TX errors 0  dropped 0 overruns 0  carrier 0  collisions 0

lo: flags=73<UP,LOOPBACK,RUNNING>  mtu 65536
        inet 127.0.0.1  netmask 255.0.0.0
        inet6 ::1  prefixlen 128  scopeid 0x10<host>
        loop  txqueuelen 0  (Local Loopback)
        RX packets 5  bytes 464 (464.0 B)
        RX errors 0  dropped 0  overruns 0  frame 0
        TX packets 5  bytes 464 (464.0 B)
        TX errors 0  dropped 0 overruns 0  carrier 0  collisions 0
        [root@localhost 桌面]# ping 192.168.2.10 -c4
PING 192.168.2.10 (192.168.2.10) 56(84) bytes of data.
64 bytes from 192.168.2.10: icmp_seq=1 ttl=64 time=0.296 ms
64 bytes from 192.168.2.10: icmp_seq=2 ttl=64 time=0.207 ms
64 bytes from 192.168.2.10: icmp_seq=3 ttl=64 time=0.207 ms
64 bytes from 192.168.2.10: icmp_seq=4 ttl=64 time=0.214 ms

--- 192.168.2.10 ping statistics ---
4 packets transmitted, 4 received, 0% packet loss, time 3001ms
rtt min/avg/max/mdev = 0.207/0.231/0.296/0.037 ms
[root@localhost 桌面]# ping 192.168.1.10 -c4
PING 192.168.1.10 (192.168.1.10) 56(84) bytes of data.
64 bytes from 192.168.1.10: icmp_seq=1 ttl=64 time=0.333 ms
64 bytes from 192.168.1.10: icmp_seq=2 ttl=64 time=0.212 ms
64 bytes from 192.168.1.10: icmp_seq=3 ttl=64 time=0.209 ms
64 bytes from 192.168.1.10: icmp_seq=4 ttl=64 time=0.222 ms

--- 192.168.1.10 ping statistics ---
4 packets transmitted, 4 received, 0% packet loss, time 3000ms
rtt min/avg/max/mdev = 0.209/0.244/0.333/0.051 ms
[root@localhost 桌面]# ping 192.168.1.150 -c4             \\测试是否能与client01通信,发现无法ping通
PING 192.168.1.150 (192.168.1.150) 56(84) bytes of data.
From 192.168.20.20 icmp_seq=1 Destination Host Unreachable
From 192.168.20.20 icmp_seq=2 Destination Host Unreachable
From 192.168.20.20 icmp_seq=3 Destination Host Unreachable
From 192.168.20.20 icmp_seq=4 Destination Host Unreachable
--- 192.168.1.150 ping statistics ---
4 packets transmitted, 0 received, +4 errors, 100% packet loss, time 2999ms
pipe 4
回到dhcp服务,配置路由转发
[root@localhost 桌面]# sysctl -a | grep forw
net.ipv4.conf.all.forwarding = 0
net.ipv4.conf.all.mc_forwarding = 0
net.ipv4.conf.default.forwarding = 0
net.ipv4.conf.default.mc_forwarding = 0
net.ipv4.conf.eno16777736.forwarding = 0
net.ipv4.conf.eno16777736.mc_forwarding = 0
net.ipv4.conf.lo.forwarding = 0
net.ipv4.conf.lo.mc_forwarding = 0
net.ipv4.ip_forward = 0
net.ipv6.conf.all.forwarding = 0
net.ipv6.conf.all.mc_forwarding = 0
net.ipv6.conf.default.forwarding = 0
net.ipv6.conf.default.mc_forwarding = 0
net.ipv6.conf.eno16777736.forwarding = 0
net.ipv6.conf.eno16777736.mc_forwarding = 0
net.ipv6.conf.lo.forwarding = 0
net.ipv6.conf.lo.mc_forwarding = 0
[root@localhost network-scripts]# echo "1" >> /proc/sys/net/ipv4/ip_forward  \\临时开启路由转发(重启后失效)
[root@dhcpserver network-scripts]# cat /proc/sys/net/ipv4/ip_forward
1
[root@dhcpserver network-scripts]# echo "net.ipv4.ip_forward = 1" >> /etc/sysctl.conf \\永久开启路由转发
[root@dhcpserver network-scripts]# sysctl -p
net.ipv4.ip_forward = 1
使用client02重新测试,成功Ping通
[root@localhost 桌面]# ip a                \\如果是使用的之前做过实验的客户机,务必检查之前的ip与网关是否已移除
1: lo: <LOOPBACK,UP,LOWER_UP> mtu 65536 qdisc noqueue state UNKNOWN
    link/loopback 00:00:00:00:00:00 brd 00:00:00:00:00:00
    inet 127.0.0.1/8 scope host lo
       valid_lft forever preferred_lft forever
    inet6 ::1/128 scope host
       valid_lft forever preferred_lft forever
2: eno16777736: <BROADCAST,MULTICAST,UP,LOWER_UP> mtu 1500 qdisc pfifo_fast state UP qlen 1000
    link/ether 00:0c:29:40:7b:57 brd ff:ff:ff:ff:ff:ff
    inet 192.168.2.150/24 brd 192.168.2.255 scope global dynamic eno16777736
       valid_lft 701sec preferred_lft 701sec
    inet6 fe80::20c:29ff:fe40:7b57/64 scope link
       valid_lft forever preferred_lft forever

[root@localhost 桌面]# ping 192.168.1.150 -c4
PING 192.168.1.150 (192.168.1.150) 56(84) bytes of data.
64 bytes from 192.168.1.150: icmp_seq=1 ttl=64 time=0.457 ms
64 bytes from 192.168.1.150: icmp_seq=2 ttl=64 time=0.279 ms
64 bytes from 192.168.1.150: icmp_seq=3 ttl=64 time=0.350 ms
64 bytes from 192.168.1.150: icmp_seq=4 ttl=64 time=0.332 ms

--- 192.168.1.150 ping statistics ---
4 packets transmitted, 4 received, 0% packet loss, time 2999ms
rtt min/avg/max/mdev = 0.279/0.354/0.457/0.067 ms
使用client01测试成功Ping通client02
[root@localhost 桌面]# ip a
1: lo: <LOOPBACK,UP,LOWER_UP> mtu 65536 qdisc noqueue state UNKNOWN
    link/loopback 00:00:00:00:00:00 brd 00:00:00:00:00:00
    inet 127.0.0.1/8 scope host lo
       valid_lft forever preferred_lft forever
    inet6 ::1/128 scope host
       valid_lft forever preferred_lft forever
2: eno16777736: <BROADCAST,MULTICAST,UP,LOWER_UP> mtu 1500 qdisc pfifo_fast state UP qlen 1000
    link/ether 00:0c:29:1b:ec:bb brd ff:ff:ff:ff:ff:ff
    inet 192.168.1.150/24 brd 192.168.1.255 scope global dynamic eno16777736
       valid_lft 503sec preferred_lft 503sec
    inet6 fe80::20c:29ff:fe1b:ecbb/64 scope link
       valid_lft forever preferred_lft forever

[root@localhost 桌面]# ping 192.168.2.150 -c4
PING 192.168.2.150 (192.168.2.150) 56(84) bytes of data.
64 bytes from 192.168.2.150: icmp_seq=1 ttl=63 time=0.450 ms
64 bytes from 192.168.2.150: icmp_seq=2 ttl=64 time=0.195 ms
64 bytes from 192.168.2.150: icmp_seq=3 ttl=64 time=0.185 ms
64 bytes from 192.168.2.150: icmp_seq=4 ttl=64 time=0.193 ms

--- 192.168.2.150 ping statistics ---
4 packets transmitted, 4 received, 0% packet loss, time 3000ms
rtt min/avg/max/mdev = 0.185/0.255/0.450/0.113 ms
三、配置DHCP中继代理
当网络中存在多个子网的时候,通过搭建一台或者几台DHCP 服务器,就能够承担整个网络的IP地址分配工作,完全没有必要为每个子网建立一台DHCP 服务器。由于客户计算机只能通过广播发送DHCP请求,而这些请求一般不能跨越路由器,因此需采用特殊的设置使客户机获得其他子网的 TCP/IP信息。
DHCP客户机能够通过 DHCP中继代理计算机转发 DHCP的请求。DHCP 中继代理计算机能听取DHCP广播,由于它了解DHCP服务器的IP地址,因此通过正常的IP数据包可将原广播包转发到服务器中,然后再将服务器的回应信息回复给客户机。这样,就好像子网中存在一个 DHCP服务器一样。
1 DHCP中继工作过程
DHCP中继代理的过程
(1)DHCP客户端广播dhcp discover包
(2)DHCP中继代理将dhcp discover包以单播发送到DHCP服务器
(3)DHCP服务器以单播发送DHCP offer包给DHCP中继代理
(4)DHCP中继代理广播dhcp offer包
(5)DHCP客户端广播dhcp request包
(6)DHCP中继代理以单播转发dhcp request包给DHCP服务器
(7)DHCP服务器以单播发送dhcp ack包给DHCP中继代理
(8)DHCP中继代理广播dhcp ack包给客户端。
实例1 某学院内部有两个子网,IP地址网段分别为192.168.1.0/24 以及192.168.3.0/24。现需要使用一台 DHCP服务器,为这两个子网客户机分配IP地址。其学院网络拓扑结构如图2.13所示。

| 主机名 | ip | LAN |
| dhcp server | 192.168.3.10 | LAN1 |
| router server | 192.168.3.2 | LAN1 |
| router server | 192.168.1.3 | LAN2 |
| clinet01 | 192.168.3.0/24 | LAN1 |
| clinet02 | 192.168.1.0/24 | LAN2 |
实验准备
软件:VMware Workstation Pro
虚拟机:Red Hat Enterprise Linux 7 服务器(dhcp server\router server),Red Hat Enterprise Linux 7 客户端(clinet01\clinet02)
网络模式:LAN1\LAN2
3.1、配置DHCP服务器
配置DHCP服务器,IP地址192.168.3.10及网关192.168.3.2(指向中继外网卡),设置网络连接为LAN1。
[root@localhost 桌面]# vim /etc/sysconfig/network-scripts/ifcfg-eno16777736
[root@localhost 桌面]# cat /etc/sysconfig/network-scripts/ifcfg-eno16777736
HWADDR=00:0C:29:F0:3B:A6
TYPE=Ethernet
BOOTPROTO=none
DEFROUTE=yes
PEERDNS=yes
PEERROUTES=yes
IPV4_FAILURE_FATAL=no
IPV6INIT=yes
IPV6_AUTOCONF=yes
IPV6_DEFROUTE=yes
IPV6_PEERDNS=yes
IPV6_PEERROUTES=yes
IPV6_FAILURE_FATAL=no
NAME=eno16777736
UUID=80648cd1-e791-4978-ad23-dcf3ca198444
ONBOOT=yes
IPADDR=192.168.3.10
NETMASK=255.255.255.0
GATEWAY=192.168.3.2
[root@localhost 桌面]# systemctl restart network
[root@localhost 桌面]# ifconfig
eno16777736: flags=4163<UP,BROADCAST,RUNNING,MULTICAST>  mtu 1500
        inet 192.168.3.10  netmask 255.255.255.0  broadcast 192.168.3.255
        inet6 fe80::20c:29ff:fef0:3ba6  prefixlen 64  scopeid 0x20<link>
        ether 00:0c:29:f0:3b:a6  txqueuelen 1000  (Ethernet)
        RX packets 16  bytes 2213 (2.1 KiB)
        RX errors 0  dropped 0  overruns 0  frame 0
        TX packets 85  bytes 10176 (9.9 KiB)
        TX errors 0  dropped 0 overruns 0  carrier 0  collisions 0

lo: flags=73<UP,LOOPBACK,RUNNING>  mtu 65536
        inet 127.0.0.1  netmask 255.0.0.0
        inet6 ::1  prefixlen 128  scopeid 0x10<host>
        loop  txqueuelen 0  (Local Loopback)
        RX packets 418  bytes 36116 (35.2 KiB)
        RX errors 0  dropped 0  overruns 0  frame 0
        TX packets 418  bytes 36116 (35.2 KiB)
        TX errors 0  dropped 0 overruns 0  carrier 0  collisions 0

[root@localhost 桌面]# mkdir /mnt/cdrom
[root@localhost 桌面]# mount /dev/sr0 /mnt/cdrom/
mount: /dev/sr0 写保护,将以只读方式挂载
[root@localhost 桌面]# vim /etc/yum.repos.d/a.repo
[root@localhost 桌面]# yum repolist
已加载插件:langpacks, product-id, subscription-manager
This system is not registered to Red Hat Subscription Management. You can use subscription-manager to register.
a                                                                                                                                     | 4.1 kB  00:00:00
(1/2): a/primary_db                                                                                                                   | 3.4 MB  00:00:00
(2/2): a/group_gz                                                                                                                     | 134 kB  00:00:00
源标识                                                                        源名称                                                                    状态
a                                                                             a                                                                         4,305
repolist: 4,305
[root@localhost 桌面]# yum install -y dhcp
已加载插件:langpacks, product-id, subscription-manager
This system is not registered to Red Hat Subscription Management. You can use subscription-manager to register.
正在解决依赖关系
--> 正在检查事务
---> 软件包 dhcp.x86_64.12.4.2.5-27.el7 将被 安装
--> 解决依赖关系完成

依赖关系解决

=============================================================================================================================================================
 Package                            架构                                 版本                                          源                               大小
=============================================================================================================================================================
正在安装:
 dhcp                               x86_64                               12:4.2.5-27.el7                               a                               506 k

事务概要
=============================================================================================================================================================
安装  1 软件包

总下载量:506 k
安装大小:1.4 M
Downloading packages:
Running transaction check
Running transaction test
Transaction test succeeded
Running transaction
  正在安装    : 12:dhcp-4.2.5-27.el7.x86_64                                                                                                              1/1
a/productid                                                                                                                           | 1.6 kB  00:00:00
  验证中      : 12:dhcp-4.2.5-27.el7.x86_64                                                                                                              1/1

已安装:
  dhcp.x86_64 12:4.2.5-27.el7

完毕!

[root@localhost 桌面]# vim /etc/dhcp/dhcpd.conf
[root@localhost 桌面]# cat /etc/dhcp/dhcpd.conf
#
# DHCP Server Configuration file.
#   see /usr/share/doc/dhcp*/dhcpd.conf.example
#   see dhcpd.conf(5) man page
subnet 192.168.1.0 netmask 255.255.255.0 {
  range 192.168.1.100 192.168.1.200;
  option routers 192.168.1.3;
  option subnet-mask 255.255.255.0;
  default-lease-time 600;
  max-lease-time 7200;
}

subnet 192.168.3.0 netmask 255.255.255.0 {
  range 192.168.3.100 192.168.3.200;
  option routers 192.168.3.2;
  option subnet-mask 255.255.255.0;
  default-lease-time 600;
  max-lease-time 7200;
}
[root@localhost 桌面]# dhcpd
Internet Systems Consortium DHCP Server 4.2.5
Copyright 2004-2013 Internet Systems Consortium.
All rights reserved.
For info, please visit https://www.isc.org/software/dhcp/
Not searching LDAP since ldap-server, ldap-port and ldap-base-dn were not specified in the config file
Wrote 0 leases to leases file.
Listening on LPF/eno16777736/00:0c:29:f0:3b:a6/192.168.3.0/24
Sending on   LPF/eno16777736/00:0c:29:f0:3b:a6/192.168.3.0/24
Sending on   Socket/fallback/fallback-net
[root@localhost 桌面]# systemctl restart dhcpd.service
[root@localhost 桌面]# systemctl enable dhcpd.service
ln -s '/usr/lib/systemd/system/dhcpd.service' '/etc/systemd/system/multi-user.target.wants/dhcpd.service'
[root@localhost 桌面]# systemctl status dhcpd.service
dhcpd.service - DHCPv4 Server Daemon
   Loaded: loaded (/usr/lib/systemd/system/dhcpd.service; enabled)
   Active: active (running) since 六 2024-10-12 19:04:24 CST; 15s ago
3.2、配置DCHP中继代理
中继代理服务器关机后添加一块网卡,根据网络拓扑图,设置DCHP中继代理服务器两张网卡模式分别为LAN1,网卡地址192.168.3.2/24,设置LAN2网卡地址192.168.1.3/24.
[root@localhost network-scripts]# vim ifcfg-eno16777736
[root@localhost network-scripts]# cat ifcfg-eno16777736
TYPE=Ethernet
BOOTPROTO=none
DEFROUTE=yes
IPV4_FAILURE_FATAL=no
IPV6INIT=yes
IPV6_AUTOCONF=yes
IPV6_DEFROUTE=yes
IPV6_FAILURE_FATAL=no
NAME=eno16777736
UUID=80648cd1-e791-4978-ad23-dcf3ca198444
ONBOOT=yes
HWADDR=00:0C:29:C2:8E:B2     \\注意由于有两张网卡,mac地址必须设置,否则易出错
IPADDR0=192.168.3.2
PREFIX0=24
IPV6_PEERDNS=yes
IPV6_PEERROUTES=yes

[root@localhost network-scripts]# vim ifcfg-eno33554984
[root@localhost network-scripts]# cat ifcfg-eno33554984
TYPE=Ethernet
BOOTPROTO=none
DEFROUTE=yes
IPV4_FAILURE_FATAL=no
IPV6INIT=yes
IPV6_AUTOCONF=yes
IPV6_DEFROUTE=yes
IPV6_FAILURE_FATAL=no
NAME=eno33554984
UUID=71cb0cd5-2f80-4305-92f1-8967cfceab35
ONBOOT=yes
HWADDR=00:0C:29:C2:8E:BC             \\注意由于有两张网卡,mac地址必须设置,否则易出错
IPADDR0=192.168.1.3
PREFIX0=24
IPV6_PEERDNS=yes
IPV6_PEERROUTES=yes


[root@localhost network-scripts]# systemctl restart network
[root@localhost network-scripts]# ifconfig
eno16777736: flags=4163<UP,BROADCAST,RUNNING,MULTICAST>  mtu 1500
        inet 192.168.3.2  netmask 255.255.255.0  broadcast 192.168.3.255
        inet6 fe80::20c:29ff:fec2:8eb2  prefixlen 64  scopeid 0x20<link>
        ether 00:0c:29:c2:8e:b2  txqueuelen 1000  (Ethernet)
        RX packets 0  bytes 0 (0.0 B)
        RX errors 0  dropped 0  overruns 0  frame 0
        TX packets 68  bytes 9737 (9.5 KiB)
        TX errors 0  dropped 0 overruns 0  carrier 0  collisions 0

eno33554984: flags=4163<UP,BROADCAST,RUNNING,MULTICAST>  mtu 1500
        inet 192.168.1.3  netmask 255.255.255.0  broadcast 192.168.1.255
        inet6 fe80::20c:29ff:fec2:8ebc  prefixlen 64  scopeid 0x20<link>
        ether 00:0c:29:c2:8e:bc  txqueuelen 1000  (Ethernet)
        RX packets 0  bytes 0 (0.0 B)
        RX errors 0  dropped 0  overruns 0  frame 0
        TX packets 51  bytes 7128 (6.9 KiB)
        TX errors 0  dropped 0 overruns 0  carrier 0  collisions 0

lo: flags=73<UP,LOOPBACK,RUNNING>  mtu 65536
        inet 127.0.0.1  netmask 255.0.0.0
        inet6 ::1  prefixlen 128  scopeid 0x10<host>
        loop  txqueuelen 0  (Local Loopback)
        RX packets 10  bytes 980 (980.0 B)
        RX errors 0  dropped 0  overruns 0  frame 0
        TX packets 10  bytes 980 (980.0 B)
        TX errors 0  dropped 0 overruns 0  carrier 0  collisions 0
[root@localhost network-scripts]# ping 192.168.3.10 -c4       \\测试与DHCP服务器的连通性,若ping不通,检查网络模式
PING 192.168.3.10 (192.168.3.10) 56(84) bytes of data.
64 bytes from 192.168.3.10: icmp_seq=1 ttl=64 time=0.885 ms
64 bytes from 192.168.3.10: icmp_seq=2 ttl=64 time=0.187 ms
64 bytes from 192.168.3.10: icmp_seq=3 ttl=64 time=0.345 ms
64 bytes from 192.168.3.10: icmp_seq=4 ttl=64 time=0.273 ms

--- 192.168.3.10 ping statistics ---
4 packets transmitted, 4 received, 0% packet loss, time 3000ms
rtt min/avg/max/mdev = 0.187/0.422/0.885/0.273 ms

[root@localhost network-scripts]# mkdir /mnt/cdrom
[root@localhost network-scripts]# mount /dev/sr0 /mnt/cdrom/
mount: /dev/sr0 写保护,将以只读方式挂载
[root@localhost network-scripts]# vim /etc/yum.repos.d/a.repo
[root@localhost network-scripts]# yum repolist
[root@localhost network-scripts]# yum install -y dhcp
出于安全考虑,Linux系统默认是禁⽌数据包转发的。所谓转发即当主机拥有多于⼀块的⽹卡时,其中⼀块收到数据包,根据数据包的⽬的ip地址将数据包发往本机另⼀块⽹卡,该⽹卡根据路由表继续发送数据包。这通常是路由器所要实现的功能。
开启路由转发功能
[root@localhost network-scripts]# echo "1" >> /proc/sys/net/ipv4/ip_forward  \\临时开启路由转发(重启后失效)
[root@localhost network-scripts]# echo "net.ipv4.ip_forward = 1" >> /etc/sysctl.conf  \\永久开启路由转发
[root@localhost network-scripts]# sysctl -p
net.ipv4.ip_forward = 1
[root@localhost network-scripts]# cat /etc/sysctl.conf
# System default settings live in /usr/lib/sysctl.d/00-system.conf.
# To override those settings, enter new settings here, or in an /etc/sysctl.d/<name>.conf file
#
# For more information, see sysctl.conf(5) and sysctl.d(5).
net.ipv4.ip_forward = 1
[root@localhost network-scripts]# sysctl -a | grep forward
net.ipv4.conf.all.forwarding = 1
net.ipv4.conf.all.mc_forwarding = 0
net.ipv4.conf.default.forwarding = 1
net.ipv4.conf.default.mc_forwarding = 0
net.ipv4.conf.eno16777736.forwarding = 1
net.ipv4.conf.eno16777736.mc_forwarding = 0
net.ipv4.conf.eno33554992.forwarding = 1
net.ipv4.conf.eno33554992.mc_forwarding = 0
net.ipv4.conf.lo.forwarding = 1
net.ipv4.conf.lo.mc_forwarding = 0
net.ipv4.ip_forward = 1                  \\已开启
net.ipv6.conf.all.forwarding = 0
net.ipv6.conf.all.mc_forwarding = 0
net.ipv6.conf.default.forwarding = 0
net.ipv6.conf.default.mc_forwarding = 0
net.ipv6.conf.eno16777736.forwarding = 0
net.ipv6.conf.eno16777736.mc_forwarding = 0
net.ipv6.conf.eno33554992.forwarding = 0
net.ipv6.conf.eno33554992.mc_forwarding = 0
net.ipv6.conf.lo.forwarding = 0
net.ipv6.conf.lo.mc_forwarding = 0
3.3、启用中继代理
dhcrelay命令可以提供中继DHCP和BOOTP请求,从一个没有DHCP服务器的子网直接连接到其它子网内的一个或多个DHCP服务器。该命令在DHCP中继服务器上使用,同时支持DHCPv4/BOOTP和DHCPv6协议。
[root@localhost network-scripts]# systemctl stop NetworkManager.service
[root@localhost network-scripts]# systemctl disable NetworkManager.service
[root@localhost network-scripts]# dhcrelay 192.168.3.10
Dropped all unnecessary capabilities.
Internet Systems Consortium DHCP Relay Agent 4.2.5
Copyright 2004-2013 Internet Systems Consortium.
All rights reserved.
For info, please visit https://www.isc.org/software/dhcp/
Listening on LPF/eno33554984/00:0c:29:c2:8e:bc
Sending on   LPF/eno33554984/00:0c:29:c2:8e:bc
Listening on LPF/eno16777736/00:0c:29:c2:8e:b2
Sending on   LPF/eno16777736/00:0c:29:c2:8e:b2
Sending on   Socket/fallback
[root@localhost network-scripts]# systemctl restart NetworkManager.service
3.4、测试
1)开户一台LIUNX客户端,设置网络模式为LAN2,连接网卡
[root@localhost 桌面]# vim /etc/sysconfig/network-scripts/ifcfg-eno16777736
[root@localhost 桌面]# cat /etc/sysconfig/network-scripts/ifcfg-eno16777736
TYPE=Ethernet
BOOTPROTO=dhcp
DEFROUTE=yes
IPV4_FAILURE_FATAL=no
IPV6INIT=yes
IPV6_AUTOCONF=yes
IPV6_DEFROUTE=yes
IPV6_FAILURE_FATAL=no
NAME=eno16777736
UUID=80648cd1-e791-4978-ad23-dcf3ca198444
ONBOOT=yes
IPV6_PEERDNS=yes
IPV6_PEERROUTES=yes
[root@localhost 桌面]# dhclient -d
Internet Systems Consortium DHCP Client 4.2.5
Copyright 2004-2013 Internet Systems Consortium.
All rights reserved.
For info, please visit https://www.isc.org/software/dhcp/

Listening on LPF/eno16777736/00:0c:29:6e:87:e8
Sending on   LPF/eno16777736/00:0c:29:6e:87:e8
Sending on   Socket/fallback
DHCPDISCOVER on eno16777736 to 255.255.255.255 port 67 interval 4 (xid=0x364dd13b)
DHCPREQUEST on eno16777736 to 255.255.255.255 port 67 (xid=0x364dd13b)
DHCPOFFER from 192.168.1.3
DHCPACK from 192.168.1.3 (xid=0x364dd13b)
bound to 192.168.1.100 -- renewal in 287 seconds.
^Z
[5]+  已停止               dhclient -d
[root@localhost 桌面]# systemctl restart network
[root@localhost 桌面]# ifconfig
eno16777736: flags=4163<UP,BROADCAST,RUNNING,MULTICAST>  mtu 1500
        inet 192.168.1.100  netmask 255.255.255.0  broadcast 192.168.1.255
        inet6 fe80::20c:29ff:fe6e:87e8  prefixlen 64  scopeid 0x20<link>
        ether 00:0c:29:6e:87:e8  txqueuelen 1000  (Ethernet)
        RX packets 107  bytes 20193 (19.7 KiB)
        RX errors 0  dropped 0  overruns 0  frame 0
        TX packets 183  bytes 39212 (38.2 KiB)
        TX errors 0  dropped 0 overruns 0  carrier 0  collisions 0

lo: flags=73<UP,LOOPBACK,RUNNING>  mtu 65536
        inet 127.0.0.1  netmask 255.0.0.0
        inet6 ::1  prefixlen 128  scopeid 0x10<host>
        loop  txqueuelen 0  (Local Loopback)
        RX packets 9  bytes 920 (920.0 B)
        RX errors 0  dropped 0  overruns 0  frame 0
        TX packets 9  bytes 920 (920.0 B)
        TX errors 0  dropped 0 overruns 0  carrier 0  collisions 0
2)开启另一台LIUNX客户端,设置网络模式为LAN1,连接网卡
[root@localhost 桌面]# cat /etc/sysconfig/network-scripts/ifcfg-eno16777736
HWADDR=00:0c:29:27:9e:b2
TYPE=Ethernet
BOOTPROTO=dhcp
DEFROUTE=yes
PEERDNS=yes
PEERROUTES=yes
IPV4_FAILURE_FATAL=no
IPV6INIT=yes
IPV6_AUTOCONF=yes
IPV6_DEFROUTE=yes
IPV6_PEERDNS=yes
IPV6_PEERROUTES=yes
IPV6_FAILURE_FATAL=no
NAME=eno16777736
UUID=80648cd1-e791-4978-ad23-dcf3ca198444
ONBOOT=yes
[root@localhost 桌面]# dhclient -d
Internet Systems Consortium DHCP Client 4.2.5
Copyright 2004-2013 Internet Systems Consortium.
All rights reserved.
For info, please visit https://www.isc.org/software/dhcp/

Listening on LPF/eno16777736/00:0c:29:27:9e:b2
Sending on   LPF/eno16777736/00:0c:29:27:9e:b2
Sending on   Socket/fallback
DHCPDISCOVER on eno16777736 to 255.255.255.255 port 67 interval 7 (xid=0x6069d73d)
DHCPREQUEST on eno16777736 to 255.255.255.255 port 67 (xid=0x6069d73d)
DHCPOFFER from 192.168.3.10
DHCPACK from 192.168.3.10 (xid=0x6069d73d)
bound to 192.168.3.100 -- renewal in 258 seconds.
^Z
[3]+  已停止               dhclient -d
[root@localhost 桌面]# ifconfig
eno16777736: flags=4163<UP,BROADCAST,RUNNING,MULTICAST>  mtu 1500
        inet 192.168.3.100  netmask 255.255.255.0  broadcast 192.168.3.255
        inet6 fe80::20c:29ff:fe27:9eb2  prefixlen 64  scopeid 0x20<link>
        ether 00:0c:29:27:9e:b2  txqueuelen 1000  (Ethernet)
        RX packets 143  bytes 20548 (20.0 KiB)
        RX errors 0  dropped 0  overruns 0  frame 0
        TX packets 95  bytes 23097 (22.5 KiB)
        TX errors 0  dropped 0 overruns 0  carrier 0  collisions 0

lo: flags=73<UP,LOOPBACK,RUNNING>  mtu 65536
        inet 127.0.0.1  netmask 255.0.0.0
        inet6 ::1  prefixlen 128  scopeid 0x10<host>
        loop  txqueuelen 0  (Local Loopback)
        RX packets 2  bytes 140 (140.0 B)
        RX errors 0  dropped 0  overruns 0  frame 0
        TX packets 2  bytes 140 (140.0 B)
        TX errors 0  dropped 0 overruns 0  carrier 0  collisions 0
3)测试网络连通性
[root@localhost 桌面]# ping 192.168.1.3 -c2     \\测试与DHCP中继服务器网络连通性
PING 192.168.1.3 (192.168.1.3) 56(84) bytes of data.
64 bytes from 192.168.1.3: icmp_seq=1 ttl=64 time=0.241 ms
64 bytes from 192.168.1.3: icmp_seq=2 ttl=64 time=0.349 ms

--- 192.168.1.3 ping statistics ---
2 packets transmitted, 2 received, 0% packet loss, time 1000ms
rtt min/avg/max/mdev = 0.241/0.295/0.349/0.054 ms
[root@localhost 桌面]# ping 192.168.3.2 -c2       \\测试与DHCP中继服务器网络连通性
PING 192.168.3.2 (192.168.3.2) 56(84) bytes of data.
64 bytes from 192.168.3.2: icmp_seq=1 ttl=64 time=0.326 ms
64 bytes from 192.168.3.2: icmp_seq=2 ttl=64 time=0.255 ms

--- 192.168.3.2 ping statistics ---
2 packets transmitted, 2 received, 0% packet loss, time 1000ms
rtt min/avg/max/mdev = 0.255/0.290/0.326/0.039 ms
[root@localhost 桌面]# ping 192.168.3.10 -c2    \\测试与DHC服务器网络连通性
PING 192.168.3.10 (192.168.3.10) 56(84) bytes of data.
64 bytes from 192.168.3.10: icmp_seq=1 ttl=64 time=0.641 ms
64 bytes from 192.168.3.10: icmp_seq=2 ttl=64 time=0.342 ms

--- 192.168.3.10 ping statistics ---
2 packets transmitted, 2 received, 0% packet loss, time 1000ms
rtt min/avg/max/mdev = 0.342/0.491/0.641/0.151 ms
[root@localhost 桌面]# ping 192.168.1.100 -c2    \\测试与client2网络连通性
PING 192.168.1.100 (192.168.1.100) 56(84) bytes of data.
64 bytes from 192.168.1.100: icmp_seq=1 ttl=63 time=0.906 ms
64 bytes from 192.168.1.100: icmp_seq=2 ttl=63 time=0.275 ms

--- 192.168.1.100 ping statistics ---
2 packets transmitted, 2 received, 0% packet loss, time 1000ms
rtt min/avg/max/mdev = 0.275/0.590/0.906/0.316 ms
4)查看DHCP服务器租约数据库文件
[root@dhcpserver 桌面]# cat /var/lib/dhcpd/dhcpd.leases
# The format of this file is documented in the dhcpd.leases(5) manual page.
# This lease file was written by isc-dhcp-4.2.5

server-duid "\000\001\000\001.\235\023\353\000\014)\360;\246";

lease 192.168.1.100 {
  starts 6 2024/10/12 12:04:14;
  ends 6 2024/10/12 12:14:14;
  cltt 6 2024/10/12 12:04:14;
  binding state active;
  next binding state free;
  rewind binding state free;
  hardware ethernet 00:0c:29:6e:87:e8;
}
lease 192.168.3.100 {
  starts 6 2024/10/12 12:06:18;
  ends 6 2024/10/12 12:16:18;
  cltt 6 2024/10/12 12:06:18;
  binding state active;
  next binding state free;
  rewind binding state free;
  hardware ethernet 00:0c:29:27:9e:b2;
5) dhcrelay 192.168.3.10命令只能临时生效,重启电脑后就失效了,重启中继服务器,打开网络模式为LAN2的client 2.
[root@localhost 桌面]# dhclient -r   //
[root@localhost 桌面]# dhclient -d
Internet Systems Consortium DHCP Client 4.2.5
Copyright 2004-2013 Internet Systems Consortium.
All rights reserved.
For info, please visit https://www.isc.org/software/dhcp/

Listening on LPF/eno16777736/00:0c:29:6e:87:e8
Sending on   LPF/eno16777736/00:0c:29:6e:87:e8
Sending on   Socket/fallback
DHCPDISCOVER on eno16777736 to 255.255.255.255 port 67 interval 7 (xid=0xd758f4)
DHCPDISCOVER on eno16777736 to 255.255.255.255 port 67 interval 20 (xid=0xd758f4)
DHCPDISCOVER on eno16777736 to 255.255.255.255 port 67 interval 10 (xid=0xd758f4)
DHCPDISCOVER on eno16777736 to 255.255.255.255 port 67 interval 14 (xid=0xd758f4)
DHCPDISCOVER on eno16777736 to 255.255.255.255 port 67 interval 10 (xid=0xd758f4)
No DHCPOFFERS received.
No working leases in persistent database - sleeping.
^C
[root@localhost 桌面]# ifconfig
eno16777736: flags=4163<UP,BROADCAST,RUNNING,MULTICAST>  mtu 1500
        inet6 fe80::20c:29ff:fe6e:87e8  prefixlen 64  scopeid 0x20<link>
        ether 00:0c:29:6e:87:e8  txqueuelen 1000  (Ethernet)
        RX packets 210  bytes 35658 (34.8 KiB)
        RX errors 0  dropped 0  overruns 0  frame 0
        TX packets 290  bytes 53454 (52.2 KiB)
        TX errors 0  dropped 0 overruns 0  carrier 0  collisions 0

lo: flags=73<UP,LOOPBACK,RUNNING>  mtu 65536
        inet 127.0.0.1  netmask 255.0.0.0
        inet6 ::1  prefixlen 128  scopeid 0x10<host>
        loop  txqueuelen 0  (Local Loopback)
        RX packets 22  bytes 2380 (2.3 KiB)
        RX errors 0  dropped 0  overruns 0  frame 0
        TX packets 22  bytes 2380 (2.3 KiB)
        TX errors 0  dropped 0 overruns 0  carrier 0  collisions 0
可以看到,此时无法再获取到IP地址,我们再次的开中继服务器,编辑配置文件,配置中继转发服务
[root@localhost 桌面]# cp /lib/systemd/system/dhcrelay.service /etc/systemd/system
[root@localhost 桌面]# vim /etc/systemd/system/dhcrelay.service
[root@localhost 桌面]# cat /etc/systemd/system/dhcrelay.service
[Unit]
Description=DHCP Relay Agent Daemon
Documentation=man:dhcrelay(8)
After=network.target

[Service]
ExecStart=/usr/sbin/dhcrelay -d --no-pid 192.168.3.10    //dhcp服务器IP

[Install]
WantedBy=multi-user.target
[root@localhost 桌面]# systemctl status dhcrelay
dhcrelay.service - DHCP Relay Agent Daemon
   Loaded: loaded (/etc/systemd/system/dhcrelay.service; disabled)
   Active: inactive (dead)
     Docs: man:dhcrelay(8)
[root@localhost 桌面]# systemctl start dhcrelay
[root@localhost 桌面]# systemctl enable dhcrelay.service
ln -s '/etc/systemd/system/dhcrelay.service' '/etc/systemd/system/multi-user.target.wants/dhcrelay.service'
[root@localhost 桌面]# systemctl status dhcrelay.service
dhcrelay.service - DHCP Relay Agent Daemon
   Loaded: loaded (/etc/systemd/system/dhcrelay.service; enabled)
   Active: active (running) since 六 2024-10-12 20:37:14 CST; 4min 54s ago
[root@localhost 桌面]#reboot
再次打开client02,测试,成功获取到IP
[root@localhost 桌面]# dhclient -d
Internet Systems Consortium DHCP Client 4.2.5
Copyright 2004-2013 Internet Systems Consortium.
All rights reserved.
For info, please visit https://www.isc.org/software/dhcp/

Listening on LPF/eno16777736/00:0c:29:6e:87:e8
Sending on   LPF/eno16777736/00:0c:29:6e:87:e8
Sending on   Socket/fallback
DHCPDISCOVER on eno16777736 to 255.255.255.255 port 67 interval 4 (xid=0x15adcfa9)
DHCPREQUEST on eno16777736 to 255.255.255.255 port 67 (xid=0x15adcfa9)
DHCPOFFER from 192.168.1.3
DHCPACK from 192.168.1.3 (xid=0x15adcfa9)
bound to 192.168.1.100 -- renewal in 272 seconds.
^C
[root@localhost 桌面]# ifconfig
eno16777736: flags=4163<UP,BROADCAST,RUNNING,MULTICAST>  mtu 1500
        inet 192.168.1.100  netmask 255.255.255.0  broadcast 192.168.1.255
        inet6 fe80::20c:29ff:fe6e:87e8  prefixlen 64  scopeid 0x20<link>
        ether 00:0c:29:6e:87:e8  txqueuelen 1000  (Ethernet)
        RX packets 237  bytes 42539 (41.5 KiB)
        RX errors 0  dropped 0  overruns 0  frame 0
        TX packets 323  bytes 60779 (59.3 KiB)
        TX errors 0  dropped 0 overruns 0  carrier 0  collisions 0


 998
998

 被折叠的 条评论
为什么被折叠?
被折叠的 条评论
为什么被折叠?
 到【灌水乐园】发言


