


目录
继承 Thread, 重写 run
class MyThread extends Thread{
    @Override
    public void run() {
        System.out.println("hello world");
    }
}
public class ThreadDemo1 {
    public static void main(String[] args) {
        Thread t = new MyThread();
        t.start();
    }
}
首先我们可以看这上面就是代码
其中,MyThread类中的那个run方法就是这个线程的入口方法,然后根据上面的这个类,创建出main方法中那个的实例(线程实例,才是真线程)
再通过t.start()来调用start方法,然后才会真正调用系统api,在系统内核中创建出线程.
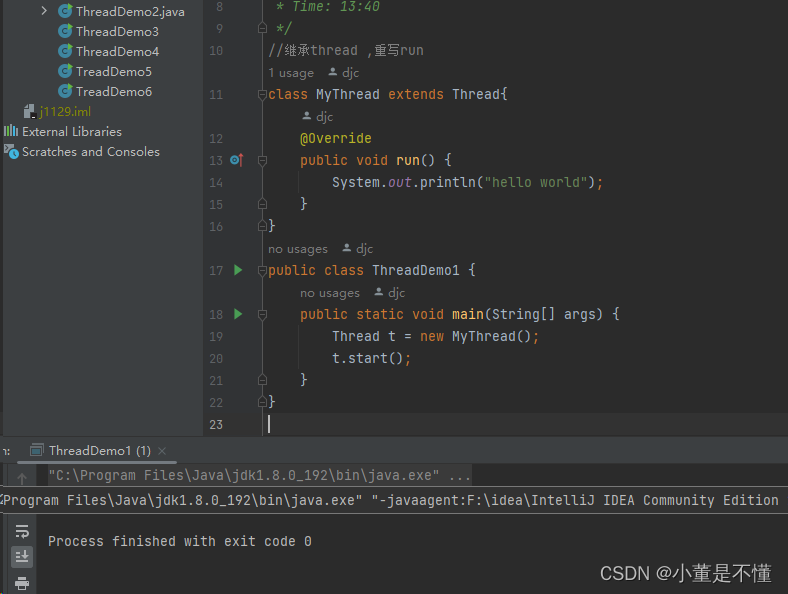
最后运行结果,可以看到,虽然我们没有手动去调用run方法,但是线程会去执行上面的run方法!!!
实现 Runnable, 重写 run
class MyThread1 implements Runnable{
    @Override
    public void run() {
        while (true){
            System.out.println("hello xiaodong");
            try {
                Thread.sleep(1000);
            } catch (InterruptedException e) {
                throw new RuntimeException(e);
            }
        }
    }
}
public class ThreadDemo2 {
    public static void main(String[] args) throws InterruptedException {
        Thread t = new Thread(new MyThread1());
        t.start();
        while(true){
            System.out.println("hello dong");
            Thread.sleep(1000);
        }
    }
}
首先,这个和第一个不一样,它是implements于Runnable的,并不是上面的extends要注意.!!!
可以看出,我们在run方法中,写了一个死循环,main方法中也有一个,虽然这是两个死循环,但是由于是多线程存在的,所以可以同时运行,其中的Thread.sleep();就是用来输出时有一个时间的间隔
继承 Thread, 重写 run, 使用匿名内部类
public class ThreadDemo3 {
    public static void main(String[] args) throws InterruptedException {
        Thread t = new Thread(){
            @Override
            public void run() {
                while(true){
                    System.out.println("xiao");
                    try {
                        Thread.sleep(1000);
                    } catch (InterruptedException e) {
                        throw new RuntimeException(e);
                    }
                }
            }
        };
        t.start();
        while (true){
            System.out.println("dong");
            Thread.sleep(1000);
        }
    }
}
在这个使用匿名内部类的写法中,顾名思义可以看出,没有在外面额外写一个单独的类了.
而是在创建一个实例的同时,直接把run方法写一下跟在后面.
实现 Runnable, 重写 run, 使用匿名内部类
public class ThreadDemo4 {
    public static void main(String[] args) throws InterruptedException {
        Thread t = new Thread(new Runnable() {
            @Override
            public void run() {
                while(true){
                    System.out.println("xiao");
                    try {
                        Thread.sleep(1000);
                    } catch (InterruptedException e) {
                        throw new RuntimeException(e);
                    }
                }
            }
        });
        t.start();
        while (true){
            System.out.println("dong");
            Thread.sleep(1000);
        }
    }
}
这个匿名内部类的方法和上面一个大差不差,但是有一个要注意
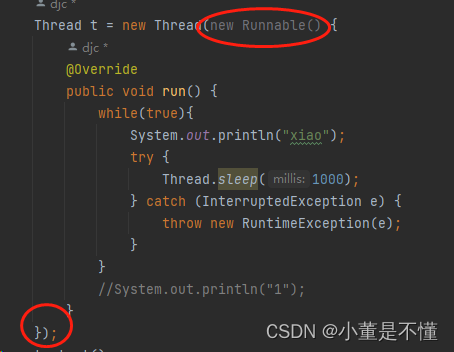
可以在图中看出,这个在创建实例的时候,new Runnnable要跟在new Thread那个括号里面,而且看这个结构结尾的红圈,可以看出,整个代码的结构体也是在new Thread后面那个括号里面,这个千万注意!!!
使用 lambda 表达式
public class TreadDemo5 {
    public static void main(String[] args) throws InterruptedException {
        Thread t = new Thread(() -> {
           while (true){
               System.out.println("xiaodong");
               try {
                   Thread.sleep(1000);
               } catch (InterruptedException e) {
                   throw new RuntimeException(e);
               }
           }
        });
        t.start();
        while(true){
            System.out.println("dong");
            Thread.sleep(1000);
        }
    }
}

从图中可以看出,这个方法整体和第四种有点类似,但是注意new Thread的括号里面,这个里面是再写了一个()以后跟上->这个,而且结构体也是在new Thread的括号之中,要注意!!!
最后,要注意一点,在这个创建线程的方法中.除了第五种,前四种方法,都重写了run方法!!!


 被折叠的 条评论
为什么被折叠?
被折叠的 条评论
为什么被折叠?
 到【灌水乐园】发言


