


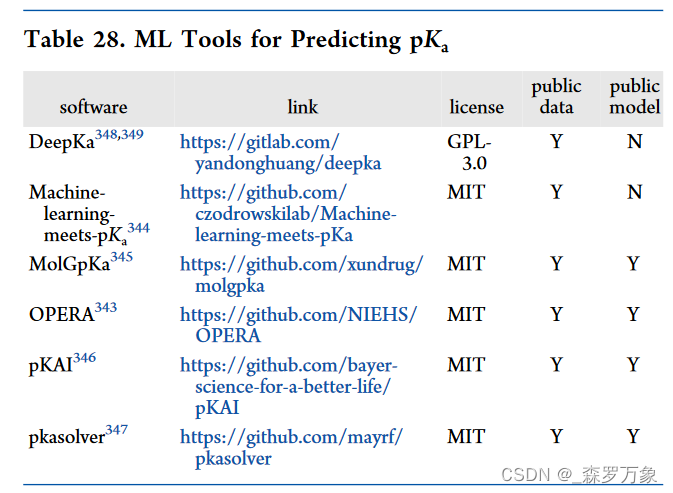
汇总内容来自 Open-Source Machine Learning in Computational Chemistry 中表格涉及的内容
文章目录
1.DeepKa
预测蛋白质的 pka,文章是 Basis for Accurate Protein p Ka Prediction with Machine Learning 和 Protein pK(a) Prediction with Machine Learning,后者提出 DeepKa,使用的数据是 continuous constant-pH molecular dynamics (CpHMD) 计算得到的。代码是 DeepKa,下面是代码分析:
- 仓库里的 data 和 datasets 文件夹可以看 Data 介绍
- pka_process 文件夹可以看 pka_process 介绍,主要作用是把 cleaned_source_data 中的初始数据处理成 model_input 中的可供模型读入的数据
- pka_predict 文件夹可以看 pka_predict 介绍
由于主要是关于蛋白质的 pka 预测,和小分子 pka 预测不同,暂时不再详细分析代码
2.Machine learning meets pKa
预测单解离中心小分子的 pka,文章是 Machine learning meets pKa,代码是 Machine-learning-meets-pKa,下面是代码分析:
- datasets 文件夹可以看 Datasets 介绍,数据量是 5921 + 280 + 123
- scripts 文件夹包含了一些处理脚本
- predict_sdf 利用训练好的模型预测 pka,介绍看 Prediction tool
- run_pipeline 预处理数据,介绍看 Preparation pipeline
- train_model 训练模型,介绍看 Prediction tool
- Modelling 是模型对比
2.1.train_model.py
SEED = 24
parser = ArgumentParser()
parser.add_argument('--no-openeye', '-noe', action='store_true')
parser.add_argument('--num-processes', '-np', type=int, default=12)
args = parser.parse_args()

sdf_path = 'datasets/combined_training_datasets_unique.sdf'
if args.no_openeye:
    sdf_path = 'datasets/combined_training_datasets_unique_no_oe.sdf'

print('Loading training dataset...')
all_df = PandasTools.LoadSDF(sdf_path)
- 分析命令行指令和载入预处理好的数据,oe 的解释如下,预处理过程使用 rdkit 则指定 no_oe
For the data preparation pipeline, ChemAxon Marvin[1] is required, to use the prediction model with the included Python script, ChemAxon Marvin[1] is not required. By default OpenEye QUACPAC/Tautomers[2] is used for tautomer and charge standardization. If you want to use RDKit[3] instead, you can use the --no-openeye flag for the run_pipeline.sh script as well as for the train_model.py and predict_sdf.py scripts.
- LoadSDF 读入 sdf 转化成 dataframe,ROMol 列是 rdkit.Chem.rdchem.Mol 分子对象,而不是 smiles
- no_oe 的 all_df 长下面这样,oe 的类似,marvin 指的是 ChemAxon Marvin 计算出的数据:
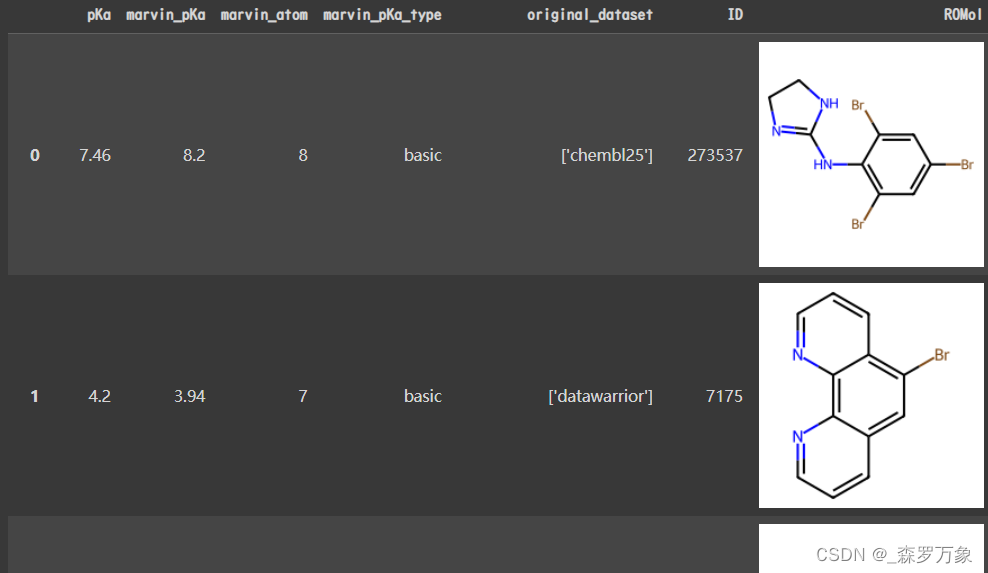
- 原始数据集是 chembl25 和 datawarrior,预处理过程可以在 run_pipeline 中找到,其中第一步数据预处理由 gen_clean_mono_dataset 执行,marvin_pka 等就是在这步产生的
脚本功能是 This script prepares SDF files which can then be used for machine learning.
This includes sanitizing, filtering molecules with bad functional groups and
unwanted elements, removing salts, filtering by Lipinski’s rule of five and
unify different tautomers.
def main(args: Namespace) -> None:
    """
    Main function of this script

    Parameters
    ----------
    args : Namespace
        Namespace object containing the parsed commandline arguments
    """

    df = PandasTools.LoadSDF(args.infile).set_index('ID', verify_integrity=True)
    print(f'Initial: {len(df)}')

    df = cleaning(df, args.keep_props)
    print(f'After cleaning: {len(df)}')

    df = filtering(df)
    print(f'After filtering: {len(df)}')

    if not args.no_openeye:
        print('Using OpenEye QuacPac for tautomer and charge standardization...')
        df = run_oe_tautomers(df)
        print(f'After QuacPac tautomers: {len(df)}')
    else:
        print('Using RDKit MolVS for tautomer and charge standardization...')
        df = run_molvs_tautomers(df)
        print(f'After MolVS: {len(df)}')

    df = run_marvin_pka(df)
    print(f'After Marvin pKa: {len(df)}')

    df = filter_strong_outlier_by_marvin(df)
    print(f'After removing strong outlier: {len(df)}')

    df.columns = ['ROMol'] + args.keep_props + ['marvin_pKa', 'marvin_atom', 'marvin_pKa_type']

    PandasTools.WriteSDF(df, args.outfile, idName='RowID', properties=df.columns)
- 基本处理过程是 cleaning,filtering,run_marvin_pka,filter_strong_outlier_by_marvin
- run_marvin_pka 脚本的功能是利用 ChemAxon Marvin 计算 pka,得到单解离中心的分子
Calculates pKa values for configured pH range with ChemAxon Marvin
and returns only monoprotic structures.
print('Calculating fingerprints...')
fmorgan3 = []
for mol in all_df.ROMol:
    fmorgan3.append(Chem.GetMorganFingerprintAsBitVect(mol, radius=3, nBits=4096, useFeatures=True))
fmorgan3 = np.array(fmorgan3)

np = max(1, args.num_processes)
print(f'Training 5-fold CV Random Forest on {np} cores (this may take some time)...')
cvr = CVRegressor(est=RandomForestRegressor, params=dict(n_estimators=1000, n_jobs=np, random_state=SEED),
                  n_folds=5, shuffle=True)
cvr.fit(fmorgan3, all_df.pKa.astype(float, copy=False), random_state=SEED)

print('Saving model to file...')
with open('RF_CV_FMorgan3_pKa.pkl', 'wb') as f:
    f.write(pkltools.optimize(pkl.dumps(cvr, protocol=pkl.HIGHEST_PROTOCOL)))
- 计算分子指纹,得到 num_processes,创建 CVRegressor 训练器进行模型训练,之后保存模型
- 特征是分子指纹,预测目标是实际数据 pka 列,而不是 marvin_pka 列
2.2.predict_sdf
df = PandasTools.LoadSDF(args.sdf)
try:
    df.set_index('ID', inplace=True, verify_integrity=True)
except ValueError:
    print('Warning: Molblock names are not unique (or missing), adding an unique index')
    df.ID = list(range(len(df)))
    df.ID = df.ID.astype(str)
    df.set_index('ID', inplace=True)
    for ix, mol in df.ROMol.items():
        mol.SetProp('_Name', ix)
print(f'{len(df)} molecules loaded')

print('Loading model...')
with open('RF_CV_FMorgan3_pKa.pkl', 'rb') as f:
    model = pkl.load(f)

print('Start preparing dataset...')
df = cleaning(df, list(df.columns[df.columns != 'ROMol']))
print(f'After cleaning: {len(df)}')

df = filtering(df)
print(f'After filtering: {len(df)}')

if not args.no_openeye:
    print('Using OpenEye QuacPac for tautomer and charge standardization...')
    df = run_oe_tautomers(df)
    print(f'After QuacPac tautomers: {len(df)}')
else:
    print('Using RDKit MolVS for tautomer and charge standardization...')
    df = run_molvs_tautomers(df)
    print(f'After MolVS: {len(df)}')

print('Calculating fingerprints...')
fmorgan3 = []
for mol in df.ROMol:
    fmorgan3.append(Chem.GetMorganFingerprintAsBitVect(mol, radius=3, nBits=4096, useFeatures=True))
fmorgan3 = np.array(fmorgan3)

print('Predicting...')
df['pKa_prediction'] = model.predict(fmorgan3)

print('Writing result file...')
PandasTools.WriteSDF(df, args.out, properties=df.columns, idName='RowID')
- 读入数据集,预处理,计算分子指纹,再用模型预测 pka
2.3.Modelling
- 尝试多种模型和多种分子特征,对比训练和预测
- novartis_testset 和 avlilumove_testset 作为外部测试集
- DataFrame.set_index 用已有的列设置索引,下面是两个文件的样子
novartis_testset = PandasTools.LoadSDF('datasets/novartis_cleaned_mono_unique_notraindata.sdf').set_index('ID', verify_integrity=True)
avlilumove_testset = PandasTools.LoadSDF('datasets/AvLiLuMoVe_cleaned_mono_unique_notraindata.sdf').set_index('ID', verify_integrity=True)
len(novartis_testset), len(avlilumove_testset) #(280, 123)

3.MolGpKa
- 预测小分子 pka,文章是 MolGpka: A Web Server for Small Molecule p Ka Prediction Using a Graph-Convolutional Neural Network,代码是 MolGpKa,下面是代码分析:
- benchmark_delta_pka 文件夹包含的是测试模型性能的数据
- models 文件夹包含的是模型权重
- src 文件夹包含的是数据处理和训练模型的代码,prepare_dataset_graph 把分子数据转化成 graph 数据
- molgpka_api_example 是发送网络请求获得数据的代码
3.1.benchmark_delta_pka
In order to test the substitution effects extensively, we created a benchmark set by performing matched molecular pair analysis on experimental pKa data sets collected by Baltruschat et al. The benchmark set contains 4322 data points.
All data was listed in experimental_substituents_effects.csv.
We created graphic representation for cases with more than five substituent (shown in visualization_experiment_substituents_effects_acids.xlsx and visualization_experiment_substituents_effects_bases.xlsx).
import pandas as pd
df=pd.read_csv("experimental_substituents_effects.csv",sep='	')
- df 长下面这样
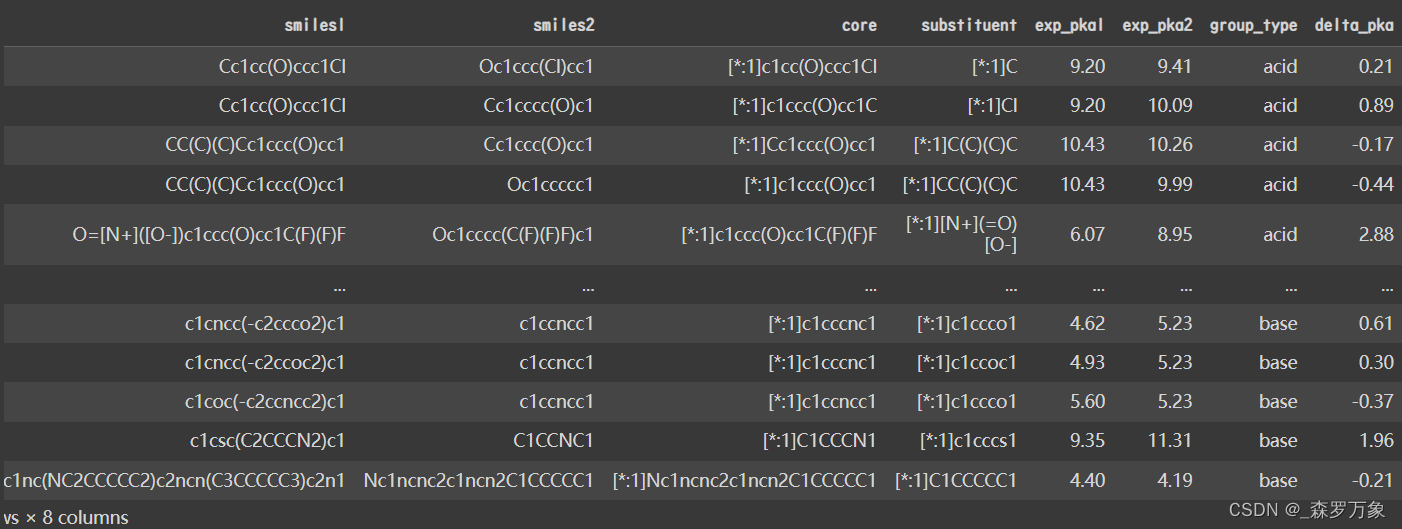
- 两个 core 一致的分子通过 substituent 的变化,得到了不同的实验 pka1 和 pka2
- visualization__experiment_substituents_effects_bases.xlsx 长下面这样

3.1.prepare_dataset_graph
if __name__=="__main__":
    mol_path = "datasets/mols.sdf"
    mols = Chem.SDMolSupplier(mol_path, removeHs=False)
    train_dataset, valid_dataset = generate_datasets(mols)

    train_path = "datasets/train.pickle"
    valid_path = "datasets/valid.pickle"
    dump_datasets(train_dataset, train_path)
    dump_datasets(valid_dataset, valid_path)
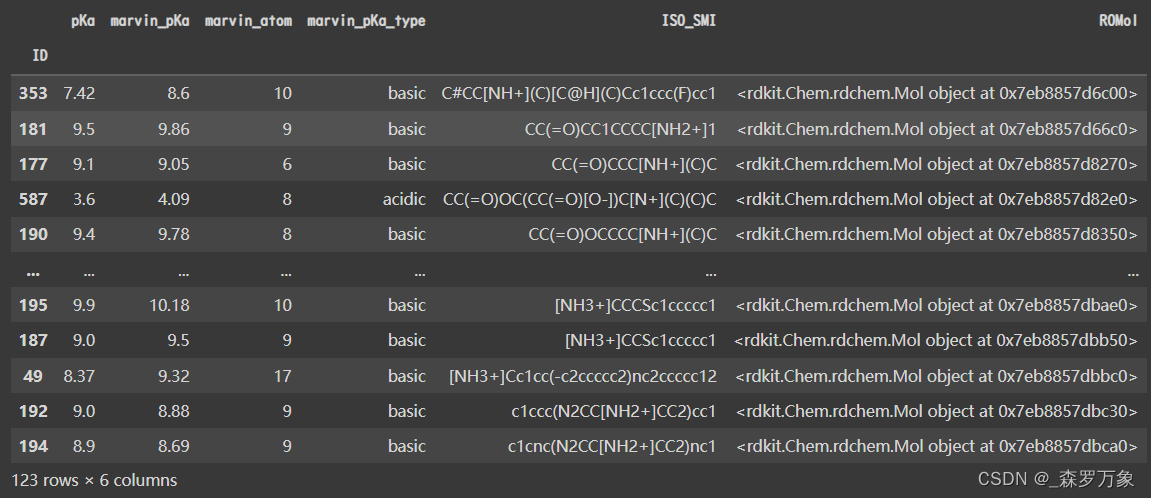
- 把仓库里的 mols.sdf.tar.gz 压缩文件解压之后用 LoadSDF 读入,长下面这样(读入过程有一些 warning)
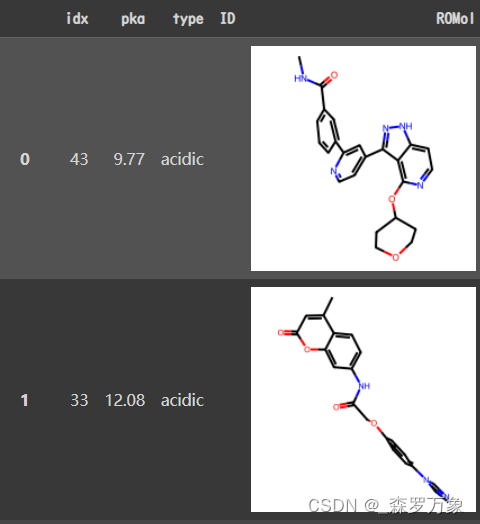
- 共 19998 行,type 只有 acidic
mol.sdf is an example file format for model training, validation and test, including idx and pka. idx is the atom id for the ionizable group center, pka is the pka value.
- 文章中提到训练模型使用的数据是通过 ACDlans 计算得到的,并不是实验数据,电离中心 idx 是用 Epik 来鉴定的
def generate_datasets(mols):
    datasets = []
    for mol in mols:
        if not mol:
            continue
        atom_idx = int(mol.GetProp("idx"))
        pka = float(mol.GetProp("pka"))
        data = mol2vec(mol, atom_idx, evaluation=False, pka=pka)
        datasets.append(data)

    train_dataset, valid_dataset = train_test_split(datasets, test_size=0.1)
    return train_dataset, valid_dataset
- 将数据转化成可读入形式,主要是 mol2vec 函数,训练模式,将 evaluation 设为 False
def mol2vec(mol, atom_idx, evaluation=True, pka=None):
    node_f = get_atom_features(mol, atom_idx)
    edge_index = get_bond_pair(mol)
    if evaluation:
        batch = np.zeros(len(node_f), )
        data = Data(x=torch.tensor(node_f, dtype=torch.float32),
                    edge_index=torch.tensor(edge_index, dtype=torch.long),
                    batch=torch.tensor(batch, dtype=torch.long))
    else:
        data = Data(x=torch.tensor(node_f, dtype=torch.float32),
                    edge_index=torch.tensor(edge_index, dtype=torch.long),
                    pka=torch.tensor([[pka]], dtype=torch.float))
    return data
- 将分子转化为分子图表示,每个原子都具体特征 get_atom_features
- get_bond_pair 中可以看出分子图表示为双向图
- 利用电离中心原子序号 atom_idx 设计了原子特征,比如是否是电离原子,离电离原子的最远距离
- 原子特征中利用了子结构匹配,搜索酸碱性,具体情况可以看文章
3.2.train_graph
batch_size = 128

device = 'cuda' if torch.cuda.is_available() else 'cpu'
model= GCNNet().to(device)
optimizer = torch.optim.Adam(model.parameters(), lr=0.0001)
scheduler = torch.optim.lr_scheduler.ReduceLROnPlateau(optimizer, mode='min',
                                                       factor=0.7, patience=10,
                                                       min_lr=0.00001)

train_loader, valid_loader = prepare_dataset()

hist = {"loss":[], "mse":[], "mae":[]}
for epoch in range(1, 1001):
    PATH = "models/weight_{}.pth".format(epoch)
    train_loss = train(epoch)
    mse, mae = test(valid_loader)

    hist["loss"].append(train_loss)
    hist["mse"].append(mse)
    hist["mae"].append(mae)
    if mse <=  min(hist["mse"]):
        torch.save(model.state_dict(), PATH)
    print(f'Epoch: {epoch}, Train loss: {train_loss:.3}, Test_mse: {mse:.3}, Test_mae: {mae:.3}')
- 读入分子图数据,训练 GCN,保存模型参数
- 剩下的与数据部分关联不大,暂时不再分析
4.OPERA
- 预测化学物质 pka,文章是 Open-source QSAR models for pKa prediction using multiple machine learning approaches,代码是 OPERA,代码和数据不仅包含 pka 还包括其他内容,而且代码基本是 matlab 写的
5.pKAI
- 预测蛋白质 pka,文章是 A Fast and Interpretable Deep Learning Approach for Accurate Electrostatics-Driven pKa Predictions in Proteins,代码是 pKAI,主要代码在 pKAI 文件夹内
6.pkasolver
- 预测小分子 pka,模型先在计算的大量数据上训练,再通过实验数据微调。用 Dimorphite-DL 鉴定质子化位点,可以计算不同质子化情况下的 pka 。文章是 Improving Small Molecule pKa Prediction Using Transfer Learning with Graph Neural Networks,代码是 pkasolver,下面是代码解析
- data/Baltruschat 文件夹包含的是数据,这些数据文件在上面的 Machine learning meets pKa 的文件夹中也有,微调所用的实验数据就是 Machine learning meets pKa 中收集的数据
- notebooks 文件夹包含的是一些使用示例
- pkasolver 文件夹包含模型构建和训练的代码
- scripts/misc 文件夹包含了一点预处理数据的代码
- How to use pkasolver to predict microstate pka values 提到了另一个复现数据的仓库,实际指的应该就是 Machine learning meets pKa 的那个


 被折叠的 条评论
为什么被折叠?
被折叠的 条评论
为什么被折叠?
 到【灌水乐园】发言


