


目录
Service基础用法
Service是什么
Service是Android中实现程序后台运行的解决方案,它非常适合执行那些不需要和用户交互而且还要求长期运行的任务。Service的运行不依赖于任何用户界面,即使程序被切换到后台,或者用户打开了另外一个应用程序,Service仍然能够保持正常运行。
不过需要注意的是,Service并不是运行在一个独立的进程当中的,而是依赖于创建Service时所在的应用程序进程。当某个应用程序进程被杀掉时,所有依赖于该进程的Service也会停止运行。
定义一个Service
在Android studio项目中定义一个个Service。
新建一个ServiceTest项目,然后右击com.example.servicetest→New→Service→Service
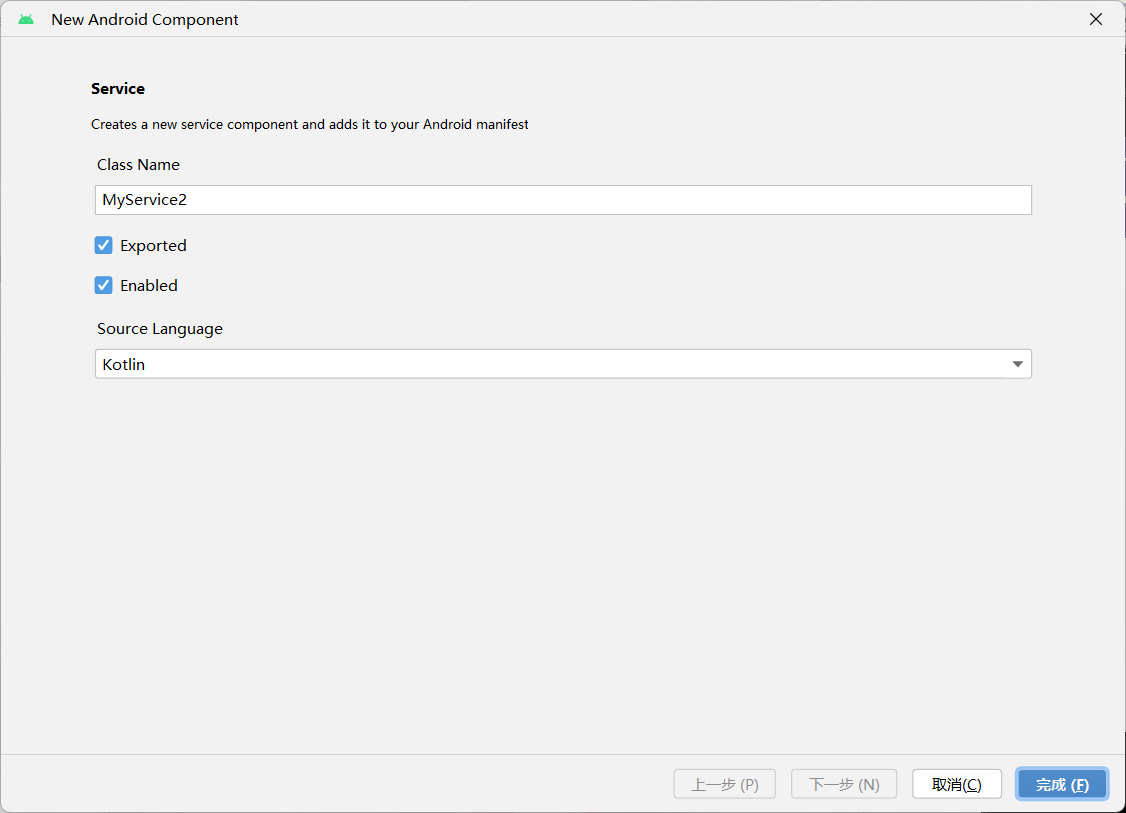
Exported属性表示是否将这个Service暴露给外部其他程序访问
Enabled属性表示是否启用这个Service
此时已经创建一个空的Service类,在类中有一个onBind()方法是Service中唯一的抽象方法,必须实现
在Service中重写下面的方法,使Service可以出来事情
class MyService : Service() {
	 ...
	 override fun onCreate() {
	 	super.onCreate()
	 }

	 override fun onStartCommand(intent: Intent, flags: Int, startId: Int): Int {
	 	return super.onStartCommand(intent, flags, startId)
	 }

	 override fun onDestroy() {
	 	super.onDestroy()
	 }
}
它们是每个Service中最常用到的3个方法了。其中onCreate()方法会在Service创建的时候调用,onStartCommand()方法会在每次Service启动的时候调用,onDestroy()方法会在Service销毁的时候调用。
通常情况下,如果希望Service一旦启动就立刻去执行某个动作,就可以将逻辑写在onStartCommand()方法里。而当Service销毁时,又应该在onDestroy()方法中回收那些不再使用的资源
另外需要注意,每一个Service都需要在AndroidManifest.xml文件中进行注册才能生效,不过智能的
Android Studio早已自动完成了注册
启动和停止Service
启动和停止的方法主要是借助Intent来实现的
修改ServiceTest项目中的activity_main.xml代码,添加了两个按钮分别用于启动和停止Service
然后修改MainActivity中的代码
class MainActivity : AppCompatActivity() {
	 override fun onCreate(savedInstanceState: Bundle?) {
		 super.onCreate(savedInstanceState)
		 setContentView(R.layout.activity_main)
		 startServiceBtn.setOnClickListener {
		 val intent = Intent(this, MyService::class.java)
		 	startService(intent) // 启动Service
		 }
		 stopServiceBtn.setOnClickListener {
			 val intent = Intent(this, MyService::class.java)
			 stopService(intent) // 停止Service
		 }
	 }
}
在“Start Service”按钮的点击事件里,构建了一个Intent对象,并调用startService()方法来启动MyService
在“Stop Service”按钮的点击事件里,同样构建了一个Intent对象,并调用stopService()方法来停止MyService
startService()和stopService()方法都是定义在Context类中的,所以在Activity里可以直接调用这两个方法
修改MyService中的代码加入打印日志
class MyService : Service() {
	 ...
	 override fun onCreate() {
		 super.onCreate()
		 Log.d("MyService", "onCreate executed")
	 }

	 override fun onStartCommand(intent: Intent, flags: Int, startId: Int): Int {
		 Log.d("MyService", "onStartCommand executed")
		 return super.onStartCommand(intent, flags, startId)
	 }

	 override fun onDestroy() {
		 super.onDestroy()
		 Log.d("MyService", "onDestroy executed")
	 }
}
运行程序
点击一下“Start Service”按钮,Logcat中的打印日志如下

然后再点击一下“Stop Service”按钮,Logcat中的打印日志如下

由此证明,MyService确实已经成功启动和停止
Activity和Service进行通信
实现在MyService里提供一个下载功能,然后在Activity中可以决定何时开始下载,以及随时查看下载进度
修改ServiceTest项目中的MyService代码
class MyService : Service() {

	 private val mBinder = DownloadBinder()

	 class DownloadBinder : Binder() {

		 fun startDownload() {
		 	Log.d("MyService", "startDownload executed")
		 }

		 fun getProgress(): Int {
			 Log.d("MyService", "getProgress executed")
			 return 0
		 }

	 }

	 override fun onBind(intent: Intent): IBinder {
	 	return mBinder
	 }
	 ...
}
这里新建了一个DownloadBinder类,并让它继承自Binder,然后在它的内部提供了开始下载以及查看下载进度的方法。当然这只是两个模拟方法,并没有实现真正的功能,在这两个方法中分别打印了一行日志
接着,在MyService中创建了DownloadBinder的实例,然后在onBind()方法里返回了这个实例,这样MyService中的工作就全部完成了
修改activity_main.xml中的代码再添加两个按钮,钮分别是用于Activity绑定和取消绑定Service的
修改MainActivity中的代码
class MainActivity : AppCompatActivity() {

	 lateinit var downloadBinder: MyService.DownloadBinder

	 private val connection = object : ServiceConnection {

		 override fun onServiceConnected(name: ComponentName, service: IBinder) {
			 downloadBinder = service as MyService.DownloadBinder
			 downloadBinder.startDownload()
			 downloadBinder.getProgress()
		 }

		 override fun onServiceDisconnected(name: ComponentName) {
		 }
	 }
	 override fun onCreate(savedInstanceState: Bundle?) {
		 ...
		 bindServiceBtn.setOnClickListener {
			 val intent = Intent(this, MyService::class.java)
			 bindService(intent, connection, Context.BIND_AUTO_CREATE) // 绑定Service
		 }
		 unbindServiceBtn.setOnClickListener {
		 	unbindService(connection) // 解绑Service
		 }
	 }
}
这里首先创建了一个ServiceConnection的匿名类实现,并在里面重写了onServiceConnected()方法和onServiceDisconnected()方法
onServiceConnected()方法方法会在Activity与Service成功绑定的时候调用,而onServiceDisconnected()方法只有在Service的创建进程崩溃或者被杀掉的时候才会调用
在onServiceConnected()方法中,又通过向下转型得到了DownloadBinder的实例,有了这个实例,Activity和Service之间的关系就变得非常紧密了
现在可以在Activity中根据具体的场景来调用DownloadBinder中的任何public方法,即实现了指挥Service。这里仍然只是做了个简单的测试,在onServiceConnected()方法中调用了DownloadBinder的startDownload()和getProgress()方法
然后在“Bind Service”按钮的点击事件里完成Activity和Service的绑定
这里仍然构建了一个Intent对象,然后调用bindService()方法将MainActivity和MyService进行绑定bindService()方法接收3个参数
- 第一个参数就是刚刚构建出的Intent对象,
- 第二个参数是前面创建出的ServiceConnection的实例
- 第三个参数则是一个标志位,这里传入BIND_AUTO_CREATE表示在Activity和Service进行绑定后自动创建Service。这会使得MyService中的onCreate()方法得到执行,但onStartCommand()方法不会执行
调用一下unbindService()方法可以解除Activity和Service之间的绑定,这也是“Unbind Service”按钮的点击事件里实现的功能
运行程序,点击一下“Bind Service”按钮,Logcat中的打印日志如下

通过日志看出来首先是MyService的onCreate()方法得到了执行,然后startDownload()和getProgress()方法都得到了执行,说明确实已经在Activity里成功调用了Service里提供的方法。
另外需要注意,任何一个Service在整个应用程序范围内都是通用的,即MyService不仅可以和MainActivity绑定,还可以和任何一个其他的Activity进行绑定,而且在绑定完成后,它们都可以获取相同的DownloadBinder实例
Service的更多技巧
使用前台Service
从Android 8.0系统开始,只有当应用保持在前台可见状态的情况下Service才能保证稳定运行,一旦应用进入后台之后,Service随时都有可能被系统回收
而如果希望Service能够一直保持运行状态,就可以考虑使用前台Service。前台Service和普通Service最大的区别就在于,它一直会有一个正在运行的图标在系统的状态栏显示,下拉状态栏后可以看到更加详细的信息,非常类似于通知的效果
修改前面MyService中的代码
class MyService : Service() {
	 ...
	 override fun onCreate() {
		 super.onCreate()
		 Log.d("MyService", "onCreate executed")
		 val manager = getSystemService(Context.NOTIFICATION_SERVICE) as NotificationManager
		 if (Build.VERSION.SDK_INT >= Build.VERSION_CODES.O) {
			 val channel = NotificationChannel("my_service", "前台Service通知",NotificationManager.IMPORTANCE_DEFAULT)
			 manager.createNotificationChannel(channel)
		 }
		 val intent = Intent(this, MainActivity::class.java)
		 val pi = PendingIntent.getActivity(this, 0, intent, 0)
		 val notification = NotificationCompat.Builder(this, "my_service")
			 .setContentTitle("This is content title")
			 .setContentText("This is content text")
			 .setSmallIcon(R.drawable.small_icon)
			 .setLargeIcon(BitmapFactory.decodeResource(resources, R.drawable.large_icon))
			 .setContentIntent(pi)
			 .build()
		 startForeground(1, notification)
	 }
 ...
}
这里只是修改了onCreate()方法中的代码,这其中的大部分代码是在另一章博客中 Android使用手机的多媒体(代码解释)已经解释过了
只不过这次在构建Notification对象后并没有使用NotificationManager将通知显示出来,而是调用了startForeground()方法
这个方法接收两个参数:第一个参数是通知的id,类似于notify()方法的第一个参数;第二个参数则是
构建的Notification对象。调用startForeground()方法后就会让MyService变成一个前台Service,并在系统状态栏显示出来
另外,使用前台Service必须在AndroidManifest.xml文件中进行权限声明才行,如下所示:
<manifest xmlns:android="http://schemas.android.com/apk/res/android"
	 package="com.example.servicetest">
	 <uses-permission android:name="android.permission.FOREGROUND_SERVICE" />
	 ...
</manifest>
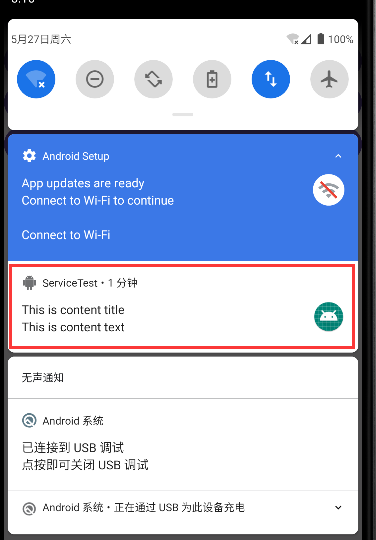
运行程序,并点击“Start Service”按钮,MyService就会以前台Service的模式启动了,并且在系统状态栏会显示一个通知图标,下拉状态栏后可以看到该通知的详细内容
现在即使退出应用程序,MyService也会一直处于运行状态,而且不用担心会被系统回收。
当然,MyService所对应的通知也会一直显示在状态栏上面。如果用户不希望的程序一直运行,也可以选择手动杀掉应用,这样MyService就会跟着一起停止运行了
使用IntentService
Service中的代码都是默认运行在主线程当中的,如果直接在Service里处理一些耗时的逻辑,就很容易出现ANR(Application NotResponding)的情况。
所以这个时候就需要用到Android多线程编程的技术了,应该在Service的每个具体的方法里开启一个子线程,然后在这里处理那些耗时的逻辑。不过,Service一旦启动,就会一直处于运行状态,必须调用stopService()或stopSelf()方法,或者被系统回收,Service才会停止。
虽说这种写法并不复杂,但是总会有一些程序员忘记开启线程,或者忘记调用stopSelf()方法。为了可以简单地创建一个异步的、会自动停止的Service,Android专门提供了一个IntentService类,这个类就很好地解决了前面所提到的两种尴尬
在前面的ServiceTest项目中新建一个MyIntentService类继承自IntentService
class MyIntentService : IntentService("MyIntentService") {

	 override fun onHandleIntent(intent: Intent?) {
		 // 打印当前线程的id
		 Log.d("MyIntentService", "Thread id is ${Thread.currentThread().name}")
	 }

	 override fun onDestroy() {
		 super.onDestroy()
		 Log.d("MyIntentService", "onDestroy executed")
	 }
}
这里首先要求必须先调用父类的构造函数,并传入一个字符串,这个字符串可以随意指定,只在调试的时候有用。
然后要在子类中实现onHandleIntent()这个抽象方法,这个方法中可以处理一些耗时的逻辑,而不用担心ANR的问题,因为这个方法已经是在子线程中运行的了。这里为了证实一下,在onHandleIntent()方法中打印了当前线程名
另外,根据IntentService的特性,这个Service在运行结束后应该是会自动停止的,所以又重写了
onDestroy()方法,在这里也打印了一行日志,以证实Service是不是停止了
修改activity_main.xml中的代码,加入一个用于启动MyIntentService的按钮
修改MainActivity中的代码
class MainActivity : AppCompatActivity() {
	 ...
	 override fun onCreate(savedInstanceState: Bundle?) {
		 ...
		 startIntentServiceBtn.setOnClickListener {
			 // 打印主线程的id
			 Log.d("MainActivity", "Thread id is ${Thread.currentThread().name}")
			 val intent = Intent(this, MyIntentService::class.java)
			 startService(intent)
		 }
	 }
}
在“Start IntentService”按钮的点击事件里启动了MyIntentService,并在这里打印了一下主线程名,稍后用于和IntentService进行比对
最后不要忘记,Service都是需要在AndroidManifest.xml里注册的
运行程序,点击“Start IntentService”按钮后,Logcat中的打印日志如下

可以看到,不仅MyIntentService和MainActivity所在的线程名不一样,而且onDestroy()方法也得到了执行,说明MyIntentService在运行完毕后确实自动停止了


 1791
1791


 被折叠的 条评论
为什么被折叠?
被折叠的 条评论
为什么被折叠?
 到【灌水乐园】发言


