


1、下载MySQL
官网地址:
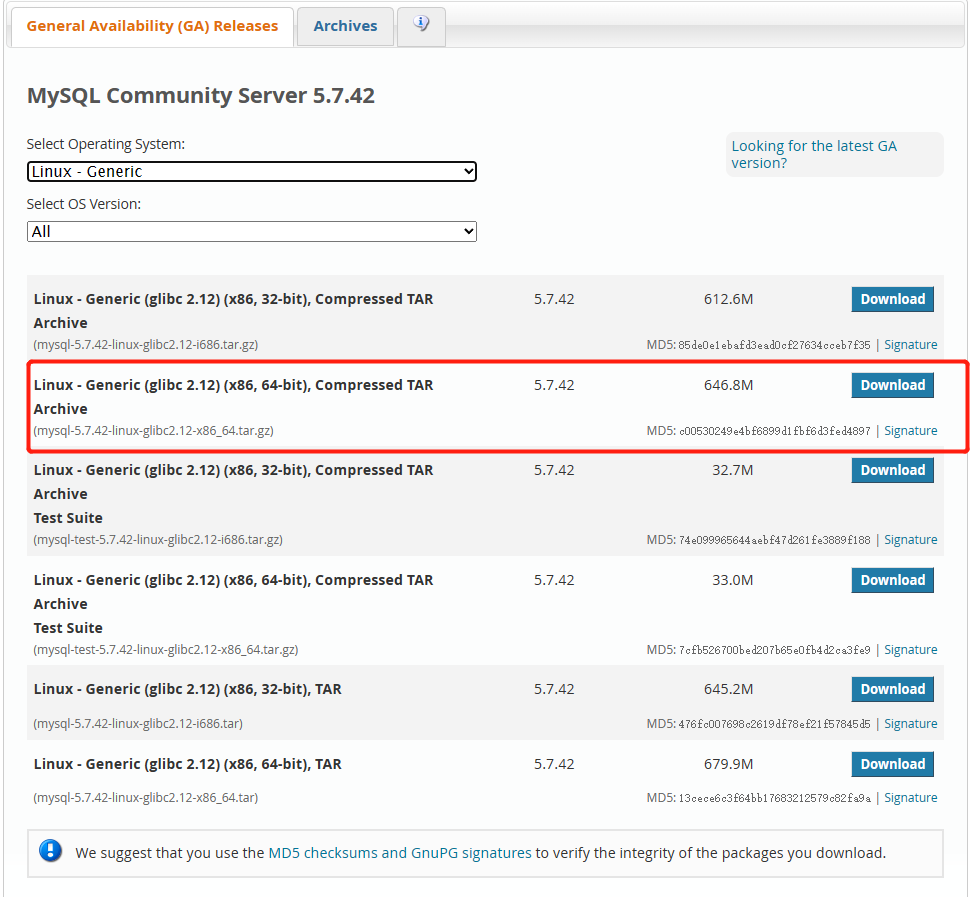
MySQL :: Download MySQL Community Server
百度网盘:
链接:百度网盘 请输入提取码
提取码:kwr2
2、上传至Linux
3、解压
tar -zxvf mysql-5.7.42-linux-glibc2.12-x86_64.tar.gz4、重命名
mv mysql-5.7.42-linux-glibc2.12-x86_64 mysql5、移动到/usr/local/目录下
mv mysql /usr/local/6、进入mysql主目录
cd /usr/local/mysql/7、添加用户组和用户
# 添加mysql组
groupadd mysql
# 创建mysql用户并加入到mysql组
useradd -g mysql mysql
8、安装
# 1、创建mysql的数据文件目录
mkdir /usr/local/mysql/data# 将mysql的主目录的所有权改为mysql
chown -R mysql:mysql /usr/local/mysql/# 3、安装:指定安装目录和数据目录
./bin/mysqld --initialize --user=mysql --basedir=/usr/local/mysql --datadir=/usr/local/mysql/data/# 出现红框中的信息就是安装成功了

# 4、再把mysql的权限改回去,以免以后配置什么东西出问题,但是对于data目录除外,data目录的所有者还是mysql
chown -R root .

chown -R mysql data/
9、制作MYSQL启动脚本
# 拷贝启动文件
cp support-files/mysql.server /etc/init.d/mysqld
# 设置启动文件的权限
chmod 755 /etc/init.d/mysqld
# 拷贝文件
cp bin/my_print_defaults /usr/bin/
10、修改/etc/init.d/mysqld
vim /etc/init.d/mysqld

# 配置mysql的主目录
basedir=/usr/local/mysql/
# 配置mysql的数据目录
datadir=/usr/local/mysql/data/
# 配置mysql的端口
port=3306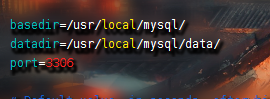
11、修改/etc/my.cnf
vim /etc/my.cnf

[mysqld]
# 配置MySQL的主目录
basedir=/usr/local/mysql/
# 配置MySQL的数据目录
datadir=/usr/local/mysql/data/
socket=/tmp/mysql.sock
user=mysql
tmpdir=/tmp
# Disabling symbolic-links is recommended to prevent assorted security risks
symbolic-links=0
# Settings user and group are ignored when systemd is used.
# If you need to run mysqld under a different user or group,
# customize your systemd unit file for mariadb according to the
# instructions in http://fedoraproject.org/wiki/Systemd

[mysqld_safe]
# 配置MySQL的错误日志文件路径
log-error=/usr/local/mysql/data/error.log
# 配置MySQL的pid文件路径
pid-file=/usr/local/mysql/mysql.pid

#
# include all files from the config directory
#
!includedir /etc/my.cnf.d
12、配置MYSQL的环境变量
vim /etc/profile

export PATH=$PATH:/usr/local/mysql/bin/

# 刷新环境变量
source /etc/profile
13、启动mysql
# mysql启动命令
service mysqld start
# mysql停止命令
service mysqld stop
# mysql重启命令
service mysqld restart
14、命令行登录MySQL并修改密码
# 登录,# 输入第8步安装mysql生成的临时密码(f?nHlYT-z6;3)
 mysql -uroot -p
 # 修改密码
 set password=password('root');
15、设置开机自启
# 赋予可执行权限

chmod +x /etc/init.d/mysqld

# 添加服务

chkconfig --add mysqld

# 显示服务列表

chkconfig --list
# 如果看到mysql的服务,并且3,4,5都是on的话则成功,如果是off,则键入

chkconfig --level 345 mysqld on

# 重启linux

reboot

# 验证

netstat -na | grep 3306
16、配置MySQL主写从读
1、配置主机
1.1、修改主机/etc/my.cnf
[mysqld]
basedir=/usr/local/mysql/
datadir=/usr/local/mysql/data/
socket=/tmp/mysql.sock
user=mysql
tmpdir=/tmp/
# Disabling symbolic-links is recommended to prevent assorted security risks
symbolic-links=0
# Settings user and group are ignored when systemd is used.
# If you need to run mysqld under a different user or group,
# customize your systemd unit file for mariadb according to the
# instructions in http://fedoraproject.org/wiki/Systemd

# 唯一id,主数据库必须比从数据库小
server-id=1
# logbin文件
log-bin=/usr/local/mysql/data/master.bin
# 开启读写功能
read-only=0

[mysqld_safe]
log-error=/usr/local/mysql/data/error.log
pid-file=/usr/local/mysql/mysql.pid
#
# include all files from the config directory
#
!includedir /etc/my.cnf.d
1.2、重启mysql服务
service mysqld restart1.3、创建从机访问主机用户
# 使用root用户登录mysql
mysql -uroot -proot
# 创建远程连接账号并授权给从数据库
create user '用户名'@'IP地址' identified by '密码';
# 或者使用下面的命令
# 创建用户
create user '用户名'@'%' identified by '密码';
# 授予权限
grant replication slave on *.* to '用户名'@'%';
# 刷新权限
flush privileges;
1.4、查看主机状态
show master status;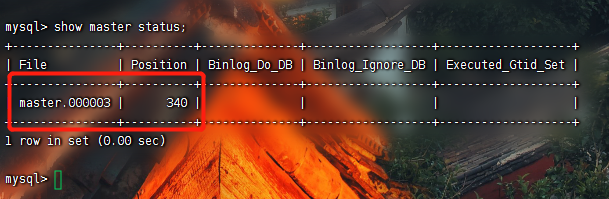
2、配置从机
2.1、修改从机/etc/my.cnf/
[mysqld]
# 配置MySQL的主目录
basedir=/usr/local/mysql/
# 配置MySQL的数据目录
datadir=/usr/local/mysql/data/
socket=/tmp/mysql.sock
user=mysql
tmpdir=/tmp
# Disabling symbolic-links is recommended to prevent assorted security risks
symbolic-links=0
# Settings user and group are ignored when systemd is used.
# If you need to run mysqld under a different user or group,
# customize your systemd unit file for mariadb according to the
# instructions in http://fedoraproject.org/wiki/Systemd

server-id=2
# 启用mysql中继日志文件
relay-log=slave_relay_bin

[mysqld_safe]
# 配置MySQL的错误日志文件路径
log-error=/usr/local/mysql/data/error.log
# 配置MySQL的pid文件路径
pid-file=/usr/local/mysql/mysql.pid

#
# include all files from the config directory
#
!includedir /etc/my.cnf.d
2.2、重启MySQL服务
service mysqld restart2.3、连接MySQL并执行相关语句
# 登录mysql
mysql -uroot -proot
# 执行下面的语句
change master to master_host="192.168.1.99",master_port=3306,master_user="slave",master_password="123456",master_log_file="master.000002",master_log_pos=154;
# 启动主从
start slave;
# 查看主从的状态
show slave status \G;
看到 Slave_IO_Running和Slave_SQL_Running两个属性都位Yes则主从搭建成功!


 3557
3557


 被折叠的 条评论
为什么被折叠?
被折叠的 条评论
为什么被折叠?
 到【灌水乐园】发言


