


 本文详细介绍了Linux系统中如何创建、查看、管理ext4和xfs文件系统,包括设置卷标、调整文件系统参数、修复损坏的文件系统以及创建和挂载swap分区。此外,还讲解了如何创建和使用RAID5阵列,以及对RAID5阵列的维护操作。
2 文件系统
查看文件系统
查看当前系统支持的文件系统ls /lib/modules/3.10.0-862.el7.x86_64/kernel/fs

扩展分区不能创建文件系统
逻辑分区和主分区可以创建文件系统
mke2fs
ext系列文件系统管理工具
mkfs.ext3创建ext系列文件系统
常用参数:
-b | 指定区块大小,单位为字节 |
-c | 检查是否有损坏的区块 |
-F | 不管指定的设备为何,强制执行mke2fs |
-L | 设置卷标 |
-M | 记录最后一次挂入的目录 |
-q | 执行时不显示任何信息 |
-r | 指定要建立的ext2文件系统版本 |
-v | 执行时显示详细信息 |
-V | 显示版本信息 |
-l | 添加日志功能 |
-m | 默认预留5%为管理人员预留空间占总空间的百分比 |
2.1 创建ext系列文件系统
mkfs.ext4 /dev/sdb1

2.2 查看分区信息
tune2fs -l /dev/sdb1
[root@centos7 ~]#tune2fs -l /dev/sdb1
tune2fs 1.42.9 (28-Dec-2013)
Filesystem volume name:   <none>
Last mounted on:          <not available>
Filesystem UUID:          5a6141f9-80b8-4c4c-ac53-c868c1283c73
Filesystem magic number:  0xEF53
Filesystem revision #:    1 (dynamic)
Filesystem features:      has_journal ext_attr resize_inode dir_index filetype extent 64bit flex_bg sparse_super large_file huge_file uninit_bg dir_nlink extra_isize
Filesystem flags:         signed_directory_hash
Default mount options:    user_xattr acl
Filesystem state:         clean                  #文件系统状态
Errors behavior:          Continue
Filesystem OS type:       Linux
Inode count:              131072                 #索引节点数
Block count:              524288
Reserved block count:     26214
Free blocks:              498132              #保留块计数
Free inodes:              131061              #剩余块
First block:              0
Block size:               4096
Fragment size:            4096
Group descriptor size:    64
Reserved GDT blocks:      255
Blocks per group:         32768
Fragments per group:      32768
Inodes per group:         8192
Inode blocks per group:   512
Flex block group size:    16
Filesystem created:       Thu Jan  5 22:45:06 2023 #创建时间
Last mount time:          n/a                       #最后挂载时间
Last write time:          Thu Jan  5 22:45:07 2023 #最后写入时间
Mount count:              0                #文件挂载数
Maximum mount count:      -1               #最大挂载数量
Last checked:             Thu Jan  5 22:45:06 2023
Check interval:           0 (<none>)
Lifetime writes:          65 MB
Reserved blocks uid:      0 (user root)
Reserved blocks gid:      0 (group root)
First inode:              11
Inode size:	          256     #占用的磁盘空间
Required extra isize:     28
Desired extra isize:      28
Journal inode:            8
Default directory hash:   half_md4
Directory Hash Seed:      6c7d91c3-a773-4e21-8788-dfa4086351e3
Journal backup:           inode blocks
设置卷标e2label -L
e2label /dev/sdb1 /mnt/sdb1添加acl功能
tune2fs -o / devsdb
centos6之前,手动创建的分区,没有acl功能
2.3 创建xfs文件系统
centos7一般用xfx文件系统
mkfs.xfs /dev/sdb2
 [root@centos7 ~]#mkfs.xfs /dev/sdb2
meta-data=/dev/sdb2              isize=512    agcount=4, agsize=262144 blks
         =                       sectsz=512   attr=2, projid32bit=1
         =                       crc=1        finobt=0, sparse=0
data     =                       bsize=4096   blocks=1048576, imaxpct=25
         =                       sunit=0      swidth=0 blks
naming   =version 2              bsize=4096   ascii-ci=0 ftype=1
log      =internal log           bsize=4096   blocks=2560, version=2
         =                       sectsz=512   sunit=0 blks, lazy-count=1
realtime =none                   extsz=4096   blocks=0, rtextents=0
blkid查看磁盘信息
设置卷标
e2label /dev/sdb1 /mnt/sdb22.4 文件系统修复
1 尝试破坏文件系统
[root@centos7 ~]#dd if=/dev/zero of=/dev/sdb2 count=1M count=10
10+0 records in
10+0 records out
5120 bytes (5.1 kB) copied, 0.000228538 s, 22.4 MB/s
2 修复前取消挂载
umount /mnt/sdb2
[root@centos7 ~]#umount /mnt/sdb23 修复
fsck -y /dev/sdb2
 [root@centos7 ~]#fsck -y /dev/sdb2
fsck from util-linux 2.23.2
If you wish to check the consistency of an XFS filesystem or
repair a damaged filesystem, see xfs_repair(8).
由于是干净的磁盘,所以很快就修复了
3.0挂载
一个设备可以同时挂载多个目录
一个目录==不可==以挂载多个设备
如果挂载在,只有最后一个挂载生效
语法格式:mount [参数] [设备] [挂载点]
常用参数:
-t | 指定挂载类型 #一般自动识别文件系统进行挂载 |
-l | 显示已加载的文件系统列表 |
-h | 显示帮助信息并退出 |
-V | 显示程序版本 |
-n | 加载不写入文件“/etc/mtab”中的文件系统 |
-r | 将文件系统加载为只读模式 |
-a | 加载文件“/etc/fstab”中描述的所有文件系统 |
-U | 使用UUID挂载 |
-B | 挂载目录到目录目录 |
-o | 多个选项使用逗号分割 |
参考实例
查看当前系统中已有的文件系统信息(可结合管道符与grep命令进行过滤):
sysfs on /sys type sysfs (rw,nosuid,nodev,noexec,relatime,seclabel)
proc on /proc type proc (rw,nosuid,nodev,noexec,relatime)
devtmpfs on /dev type devtmpfs (rw,nosuid,seclabel,size=916724k,nr_inodes=229181,mode=755)
securityfs on /sys/kernel/security type securityfs (rw,nosuid,nodev,noexec,relatime)

*************************************
省略部分信息
挂载/etc/fstab文件中所有已定义的设备文件:
[root@linuxcool ~]# mount -a将光盘设备挂载到指定目录:
 [root@centos7 ~]#mount /dev/sdb2 /mnt/sdb2
 [root@centos7 ~]#lsblk   #查看挂载情况
NAME   MAJ:MIN RM  SIZE RO TYPE MOUNTPOINT
sda      8:0    0  200G  0 disk
├─sda1   8:1    0    1G  0 part /boot
├─sda2   8:2    0   50G  0 part /
├─sda3   8:3    0    4G  0 part [SWAP]
├─sda4   8:4    0    1K  0 part
└─sda5   8:5    0   30G  0 part /data
sdb      8:16   0   50G  0 disk
├─sdb1   8:17   0    2G  0 part
├─sdb2   8:18   0    4G  0 part /mnt/sdb2   #挂载ok
├─sdb3   8:19   0    1G  0 part
└─sdb5   8:21   0    1G  0 part
sr0     11:0    1  4.2G  0 rom
强制以xfs文件系统挂载硬盘设备到指定目录:
[root@centos7 ~]# mount -t xfs /dev/sdb2 /mnt/sdb23.1取消挂载
语法格式:umount [参数] [设备/挂载目录]
常用参数:
-a | 卸载/etc/mtab中记录的所有文件系统 |
-h | 显示帮助 |
-n | 卸载时不要将信息存入/etc/mtab文件中 |
-r | 尝试以只读的方式重新挂入文件系统 |
-t | 仅卸载选项中所指定的文件系统 |
-v | 执行时显示详细的信息 |
-V | 显示版本信息 |
参考实例
卸载指定的文件系统:
[root@centos7 ~]# umount /dev/sdb2卸载指定的文件系统并显示过程:
[root@linuxcool ~]# umount -v /dev/cdrom
umount: /media/cdrom (/dev/sr0) unmounted
查看当前使用目录的用户
lsof /mnt/sdb2
 [root@centos7 ~]#lsof /mnt/sdb2
 #显示root用户正在使用该目录
COMMAND  PID USER   FD   TYPE DEVICE SIZE/OFF     NODE NAME
bash    4317 root  cwd    DIR    8,2       24 34917069 /mnt/sdb2
关闭进程 把所有使用该目录的用户踢出shell
 [root@centos7 ~]#fuser -km /mnt/sdb2
/mnt/sdb2:               1rce     2rc     3rc     5rc     7rc     8rc     9rc    10rc    11rc    12rc    13rc    14rc    16rc    17rc    18rc    19rc    21rc    22rc    23rc    24rc    26rc    29rc    30rc    31rc    32rc    33rc    34rc    35rc    36rc    43rc    44rc    45rc    46rc    54rc    56rc    57rc    59rc
==================================================省略很多
Connection closing...Socket close.

Connection closed by foreign host.

Disconnected from remote host(192.168.137.140:22) at 00:53:35.

Type `help' to learn how to use Xshell prompt.
3.2 永久挂载
vim /etc/fstab文件
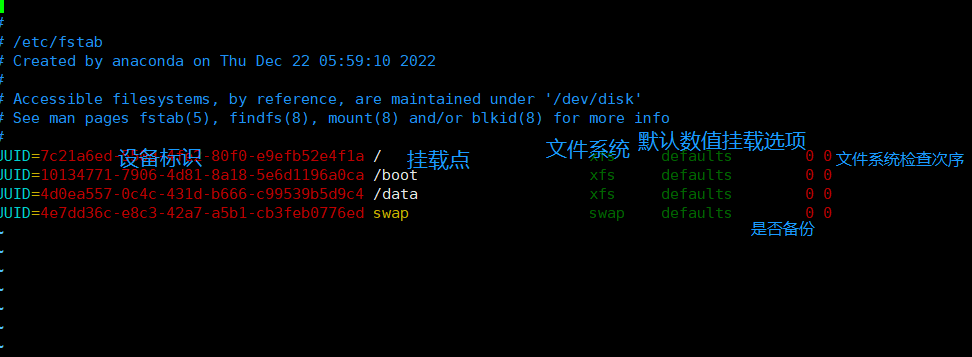
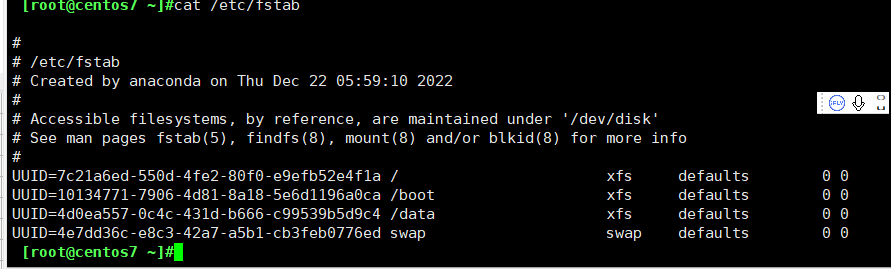
cat一下
挂载后
 [root@centos7 ~]#mount /dev/sdb2 /mnt/sdb2
 [root@centos7 ~]#lsblk -f
NAME   FSTYPE  LABEL              UUID                              MOUNTPOINT
sda
├─sda1 xfs                     10134771-7906-4d81-8a18-5e6d1196a0ca /boot
├─sda2 xfs                     7c21a6ed-550d-4fe2-80f0-e9efb52e4f1a /
├─sda3 swap                    4e7dd36c-e8c3-42a7-a5b1-cb3feb0776ed [SWAP]
├─sda4
└─sda5 xfs                     4d0ea557-0c4c-431d-b666-c99539b5d9c4 /data
sdb              卷标
├─sdb1 ext4    /mnt/sdb1       5a6141f9-80b8-4c4c-ac53-c868c1283c73  挂载点
├─sdb2 xfs                     b8ce3bef-2a5e-422c-9574-17c9ca43a457 /mnt/sdb2
├─sdb3
└─sdb5
sr0    iso9660 CentOS 7 x86_64 2018-05-03-20-55-23-00
永久挂载
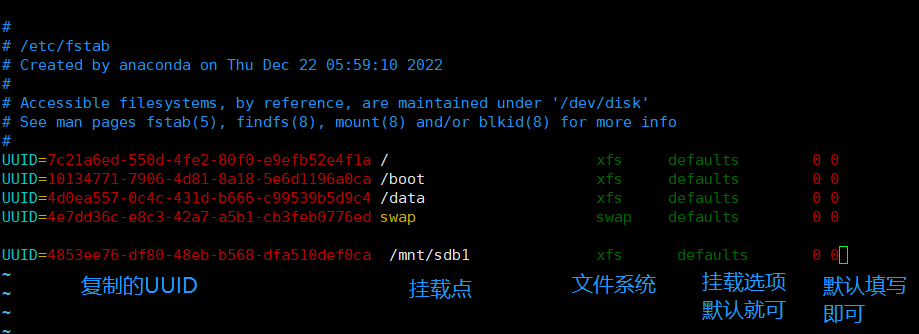
复制要挂载分区的UUID,或者进入文件后使用命令``:r!blkid /dev/sdb1`
打开/etc/fstab文件
vim /etc/fstab
mount -a 把dev/fstab文件生效,然后查看一下
[root@centos7 ~]#mount -a
[root@centos7 ~]#lsblk
NAME MAJ:MIN RM SIZE RO TYPE MOUNTPOINT
sda 8:0 0 200G 0 disk
├─sda1 8:1 0 1G 0 part /boot
├─sda2 8:2 0 50G 0 part /
├─sda3 8:3 0 4G 0 part [SWAP]
├─sda4 8:4 0 1K 0 part
└─sda5 8:5 0 30G 0 part /data
sdb 8:16 0 50G 0 disk
├─sdb1 8:17 0 2G 0 part /mnt/sdb1 #显示挂载成功了
├─sdb2 8:18 0 4G 0 part /mnt/sdb2
├─sdb3 8:19 0 1G 0 part
└─sdb5 8:21 0 1G 0 part
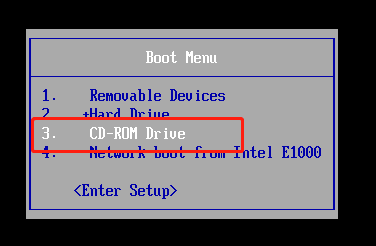
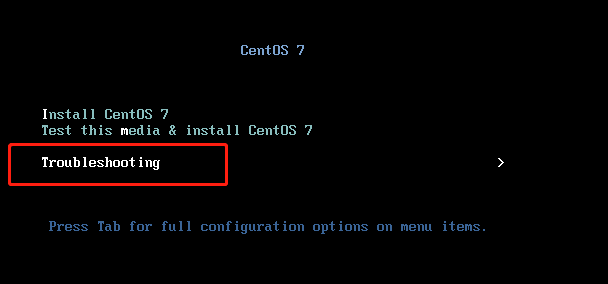
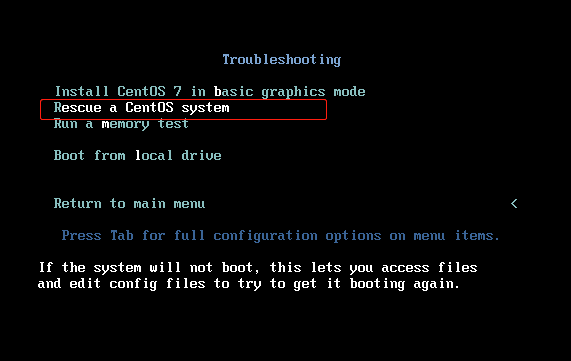
sr0 11:0 1 4.2G 0 rom 3.3实验 xfs系统出故障修复
centos 7.5
假设把UUID少一位。,进入 /etc/fstab文件把UUID删除一位
然后机器重启,一直启动不成功后会出现一下界面
这个时候从新启动使用救援光盘,从新启动
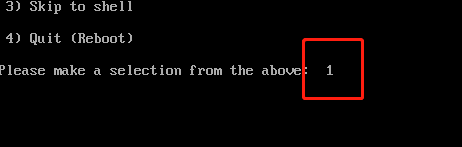
使用命令 vi /sysimage/etc/fstab
centos6 把启动顺序,也就是最后的数字改为 1 就可以
wq保存退出后使用exit退出就可以启动了。
4.0 swap
查看swap分区
 [root@centos7 ~]#free -h
              total        used        free      shared  buff/cache   available
Mem:           1.8G        414M        969M         10M        437M        1.2G
Swap:          4.0G          0B        4.0G
4.1添加swap空间
1 在一个磁盘上添加一个swap分区
 [root@centos7 ~]#fdisk /dev/sdb


 #分区
Command (m for help): n
Partition number (4-128, default 4):
First sector (34-104857566, default 16781312):
Last sector, +sectors or +size{K,M,G,T,P} (16781312-104857566, default 104857566): +4G
Created partition 4
Command (m for help): n
Partition number (4-128, default 4):
First sector (34-104857566, default 16781312):
Last sector, +sectors or +size{K,M,G,T,P} (16781312-104857566, default 104857566): +4G
Created partition 4

#修改swap的ID
Command (m for help): t
Partition number (1-4, default 4): 4
Partition type (type L to list all types): l   #查看ID对应关系
  1 EFI System                     C12A7328-F81F-11D2-BA4B-00A0C93EC93B
  2 MBR partition scheme           024DEE41-33E7-11D3-9D69-0008C781F39F
  3 Intel Fast Flash               D3BFE2DE-3DAF-11DF-BA40-E3A556D89593
  4 BIOS boot                      21686148-6449-6E6F-744E-656564454649
  5 Sony boot partition            F4019732-066E-4E12-8273-346C5641494F
  6 Lenovo boot partition          BFBFAFE7-A34F-448A-9A5B-6213EB736C22
  7 PowerPC PReP boot              9E1A2D38-C612-4316-AA26-8B49521E5A8B
  8 ONIE boot                      7412F7D5-A156-4B13-81DC-867174929325
  9 ONIE config                    D4E6E2CD-4469-46F3-B5CB-1BFF57AFC149
 10 Microsoft reserved             E3C9E316-0B5C-4DB8-817D-F92DF00215AE
 11 Microsoft basic data           EBD0A0A2-B9E5-4433-87C0-68B6B72699C7
 12 Microsoft LDM metadata         5808C8AA-7E8F-42E0-85D2-E1E90434CFB3
 13 Microsoft LDM data             AF9B60A0-1431-4F62-BC68-3311714A69AD
 14 Windows recovery environment   DE94BBA4-06D1-4D40-A16A-BFD50179D6AC
 15 IBM General Parallel Fs        37AFFC90-EF7D-4E96-91C3-2D7AE055B174
 16 Microsoft Storage Spaces       E75CAF8F-F680-4CEE-AFA3-B001E56EFC2D
 17 HP-UX data                     75894C1E-3AEB-11D3-B7C1-7B03A0000000
 18 HP-UX service                  E2A1E728-32E3-11D6-A682-7B03A0000000
 #查看这个
 19 Linux swap                     0657FD6D-A4AB-43C4-84E5-0933C84B4F4F

 ======================================省略很多

 #选择19
Partition type (type L to list all types): 19
Changed type of partition 'Linux filesystem' to 'Linux swap'
#查看下分区情况
Command (m for help): p

Disk /dev/sdb: 53.7 GB, 53687091200 bytes, 104857600 sectors
Units = sectors of 1 * 512 = 512 bytes
Sector size (logical/physical): 512 bytes / 512 bytes
I/O size (minimum/optimal): 512 bytes / 512 bytes
Disk label type: gpt
Disk identifier: 5F271151-D559-4A60-BF36-6EB73E55EC3A


#         Start          End    Size  Type            Name
 1         2048      4196351      2G  Linux filesyste Linux filesystem
 2      4196352     12584959      4G  Linux filesyste Linux filesystem
 3     14684160     16781311      1G  Linux filesyste Linux filesystem
 4     16781312     25169919      4G  Linux swap   #改为合适的文件系统Id了

#保存退出
Command (m for help): w
The partition table has been altered!

Calling ioctl() to re-read partition table.
Syncing disks.
2 创建文件系统mkswap /dev/sdb4
swap 专用
[root@centos7 ~]#mkswap /dev/sdb4
Setting up swapspace version 1, size = 4194300 KiB
no label, UUID=5de7559c-8e46-4309-8e55-a33a0dc8fa4f
3 写入/etv/fstaba 文件
vim /etc/fstab
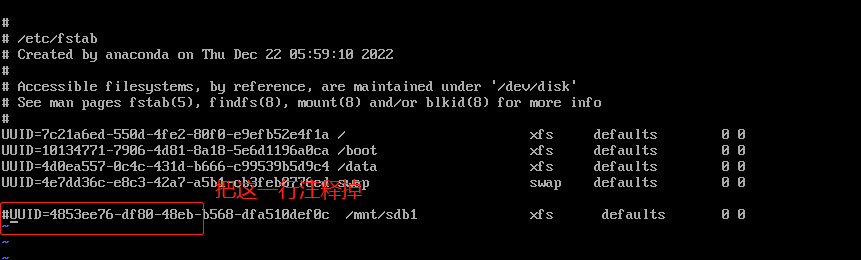
#
# /etc/fstab
# Created by anaconda on Thu Dec 22 05:59:10 2022
#
# Accessible filesystems, by reference, are maintained under '/dev/disk'
# See man pages fstab(5), findfs(8), mount(8) and/or blkid(8) for more info
#
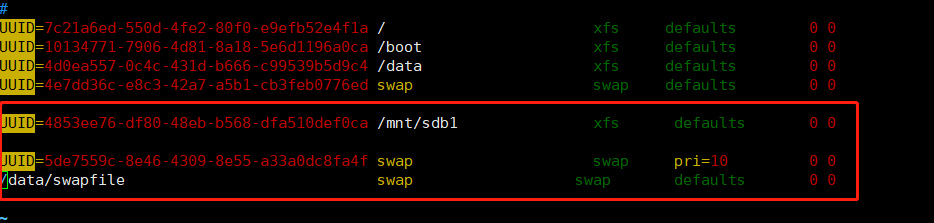
UUID=7c21a6ed-550d-4fe2-80f0-e9efb52e4f1a / xfs defaults 0 0
UUID=10134771-7906-4d81-8a18-5e6d1196a0ca /boot xfs defaults 0 0
UUID=4d0ea557-0c4c-431d-b666-c99539b5d9c4 /data xfs defaults 0 0
UUID=4e7dd36c-e8c3-42a7-a5b1-cb3feb0776ed swap swap defaults 0 0
UUID=4853ee76-df80-48eb-b568-dfa510def0c /mnt/sdb1 xfs defaults 0 0
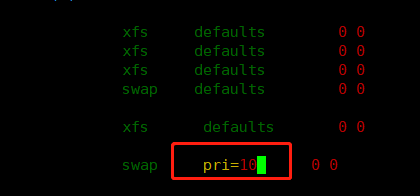
#写入信息 #注意这项 #swap
UID=5de7559c-8e46-4309-8e55-a33a0dc8fa4f swap swap defaults 0 03 使刚才写入、/etc/fstab swap 生效
使用命令 swapon -a
使用命令swapon -s查看swap生效的设备
[root@centos7 ~]#swapon -a
 [root@centos7 ~]#swapon -s
 #新增了/dev/sdb4                                 #数字越大,优先级越高
Filename                       Type		 Size  Used	 Priority
/dev/sda3                  	partition	4194300	0	-1
/dev/sdb4                	partition	4194300	0	-2
#查看一下swap的空间由原先的4 G 变成了8G
[root@centos7 ~]#free -h
              total        used        free      shared  buff/cache   available
Mem:           1.8G        422M        953M         10M        445M        1.2G
Swap:          8.0G          0B        8.0G
4.2优先级修改
 #重新写入信息
 [root@centos7 ~]#swapon -a
 #查看一下
 [root@centos7 ~]#swapon -s
Filename				Type		Size	Used	Priority
/dev/sda3                              	partition	4194300	0	-1
/dev/sdb4                              	partition	4194300	0	-2
 [root@centos7 ~]#swapoff /dev/sdb4
 #/dev/sdb4 优先级变成了  10
[root@centos7 ~]#swapon -a
 [root@centos7 ~]#swapon -s
Filename				Type		Size	Used	Priority
/dev/sda3                              	partition	4194300	0	-1
/dev/sdb4                              	partition	4194300	0	10
5 测试优先级
首先写入一个大文件 ,磁盘空间不够就会使用swap分区
[root@centos7 ~]#dd if=/dev/zero of=/dev/null bs=3G count=1
0+1 records in
0+1 records out
2147479552 bytes (2.1 GB) copied, 7.85901 s, 273 MB/s
查看一下,此时、dev/sdb的swap分区空间已经开始使用
 [root@centos7 ~]#swapon  -s
Filename				Type		Size	Used	Priority
/dev/sda3           	partition	4194300 	0	     -1
/dev/sdb4           	partition	4194300	303104	10
4.3迁移swap空间
实验前添加一个文件作为swap磁盘
 [root@centos7 ~]#dd if=/dev/zero of=/swapfile bs=1 count=2G count=1
1+0 records in
1+0 records out
1 byte (1 B) copied, 0.000195054 s, 5.1 kB/s
# 查看一下
 [root@centos7 ~]#ll /swapfile
-rw-r--r--. 1 root root 2147479552 Jan  6 16:26 /swapfile
#格式化文件
root@centos7 ~]#mkswap /swapfile
Setting up swapspace version 1, size = 2097144 KiB
no label, UUID=25188579-d706-4fed-98cf-1d71cd8df340
root@centos7 ~]#mkswap /swapfile
Setting up swapspace version 1, size = 2097144 KiB
no label, UUID=25188579-d706-4fed-98cf-1d71cd8df340
#查看一下
 [root@centos7 ~]#blkid /swapfile
/swapfile: UUID="25188579-d706-4fed-98cf-1d71cd8df340" TYPE="swap"
#写入/etc/fstab文件
[root@centos7 ~]#vim /etc/fstab
UID=25188579-d706-4fed-98cf-1d71cd8df340 swap                  swap       defaults       0 0
#使写入文件生效
[root@centos7 ~]#swapon -a
swapon: /swapfile: insecure permissions 0644, 0600 suggested.
#查看一下
[root@centos7 ~]#swapon -s
Filename				Type		Size	Used	Priority
/dev/sda3                              	partition	4194300	0	-1
/dev/sdb4                              	partition	4194300	275672	10
/swapfile                              	file	2097144	0	-2
#更改文件权限,为了更好的使用
[root@centos7 ~]#chmod 600 /swapfile
迁移swap空间
#禁用/swapfile 文件
[root@centos7 ~]#swapoff /swapfile
#查看一下,没有/swapfile 文件了
[root@centos7 ~]#swapon -s
Filename				Type		Size	Used	Priority
/dev/sda3                              	partition	4194300	0	-1
/dev/sdb4                              	partition	4194300	272084	10
#移动文件到/data
[root@centos7 ~]#mv /swapfile  /data/
#更改路径
[root@centos7 ~]#vim /etc/fstab
/data/swapfile              swap                        swap       defaults       0 0
 [root@centos7 ~]#swapon -a
 #已经挂载成功了,可以用了
 [root@centos7 ~]#swapon -s
Filename				Type		Size	Used	Priority
/dev/sda3                              	partition	4194300	0	-1
/dev/sdb4                              	partition	4194300	272084	10
/data/swapfile                         	file	2097144	0	-2
4.4删除swap分区
 #禁用文件
 [root@centos7 ~]#swapoff /data/swapfile /dev/sdb4
 #查看一下,恢复到之前的大小
  [root@centos7 ~]#swapon -s
Filename				Type		Size	Used	Priority
/dev/sda3                              	partition	4194300	0	-1
删除刚才添加到两行vim /etc/fstab
或者直接删除文件或者分区
4.5迁移/home到一个独立的分区
1先创建一个分区/sda6
#分区
[root@centos7 ~]#fdisk /dev/sda
Welcome to fdisk (util-linux 2.23.2).
Changes will remain in memory only, until you decide to write them.
Be careful before using the write command.
Command (m for help): n
All primary partitions are in use
Adding logical partition 6
First sector (178264064-419430399, default 178264064):
Using default value 178264064
Last sector, +sectors or +size{K,M,G} (178264064-419430399, default 419430399): +10G
Partition 6 of type Linux and of size 10 GiB is set
Command (m for help): p
Disk /dev/sda: 214.7 GB, 214748364800 bytes, 419430400 sectors
Units = sectors of 1 * 512 = 512 bytes
Sector size (logical/physical): 512 bytes / 512 bytes
I/O size (minimum/optimal): 512 bytes / 512 bytes
Disk label type: dos
Disk identifier: 0x000abc6a
Device Boot Start End Blocks Id System
/dev/sda1 * 2048 2099199 1048576 83 Linux
/dev/sda2 2099200 106956799 52428800 83 Linux
/dev/sda3 106956800 115345407 4194304 82 Linux swap / Solaris
/dev/sda4 115345408 419430399 152042496 5 Extended
/dev/sda5 115347456 178262015 31457280 83 Linux
/dev/sda6 178264064 199235583 10485760 83 Linux
Command (m for help): w
The partition table has been altered!
Calling ioctl() to re-read partition table.
WARNING: Re-reading the partition table failed with error 16: Device or resource busy.
The kernel still uses the old table. The new table will be used at
the next reboot or after you run partprobe(8) or kpartx(8)
Syncing disks.
#使得分区生效
[root@centos7 ~]#partprobe
Warning: Unable to open /dev/sr0 read-write (Read-only file system). /dev/sr0 has been opened read-only.
#查看一下分区
[root@centos7 ~]#lsblk
NAME MAJ:MIN RM SIZE RO TYPE MOUNTPOINT
sda 8:0 0 200G 0 disk
├─sda1 8:1 0 1G 0 part /boot
├─sda2 8:2 0 50G 0 part /
├─sda3 8:3 0 4G 0 part [SWAP]
├─sda4 8:4 0 1K 0 part
├─sda5 8:5 0 30G 0 part /data
└─sda6 8:6 0 10G 0 part
sdb 8:16 0 50G 0 disk
├─sdb1 8:17 0 2G 0 part
├─sdb2 8:18 0 4G 0 part
├─sdb3 8:19 0 1G 0 part
└─sdb4 8:20 0 4G 0 part
sr0 11:0 1 4.2G 0 rom
#创建文件系统
[root@centos7 ~]#mkfs.xfs /dev/sda6
meta-data=/dev/sda6 isize=512 agcount=4, agsize=655360 blks
= sectsz=512 attr=2, projid32bit=1
= crc=1 finobt=0, sparse=0
data = bsize=4096 blocks=2621440, imaxpct=25
= sunit=0 swidth=0 blks
naming =version 2 bsize=4096 ascii-ci=0 ftype=1
log =internal log bsize=4096 blocks=2560, version=2
= sectsz=512 sunit=0 blks, lazy-count=1
realtime =none extsz=4096 blocks=0, rtextents=0
查看文件系统是否创建
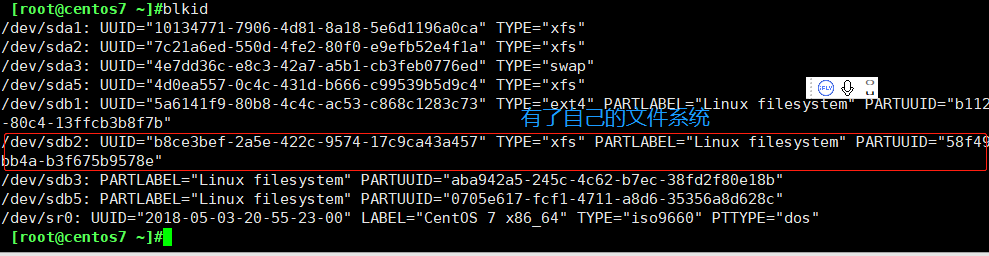
[root@centos7 ~]#blkid
/dev/sda2: UUID="7c21a6ed-550d-4fe2-80f0-e9efb52e4f1a" TYPE="xfs"
/dev/sdb1: UUID="4853ee76-df80-48eb-b568-dfa510def0ca" TYPE="xfs" PARTLABEL="Linux filesystem" PARTUUID="b1123250-5fbc-4d05-80c4-13ffcb3b8f7b"
/dev/sdb2: UUID="b8ce3bef-2a5e-422c-9574-17c9ca43a457" TYPE="xfs" PARTLABEL="Linux filesystem" PARTUUID="58f49684-efe3-4f35-bb4a-b3f675b9578e"
/dev/sda1: UUID="10134771-7906-4d81-8a18-5e6d1196a0ca" TYPE="xfs"
/dev/sda3: UUID="4e7dd36c-e8c3-42a7-a5b1-cb3feb0776ed" TYPE="swap"
/dev/sda5: UUID="4d0ea557-0c4c-431d-b666-c99539b5d9c4" TYPE="xfs"
/dev/sr0: UUID="2018-05-03-20-55-23-00" LABEL="CentOS 7 x86_64" TYPE="iso9660" PTTYPE="dos"
/dev/sdb4: UUID="5de7559c-8e46-4309-8e55-a33a0dc8fa4f" TYPE="swap" PARTUUID="77f22f5b-28dc-4058-8f3e-ae29e40d8698"
/dev/sdb3: PARTLABEL="Linux filesystem" PARTUUID="aba942a5-245c-4c62-b7ec-38fd2f80e18b"
/dev/sda6: UUID="7d25ecf1-adb6-4967-9e9f-9bfd8173008f" TYPE="xfs"
2在刚才创建的分区建立一个目录/home
#查看一下/home 文件
[root@centos7 ~]#ls /home
chen  chenbo  zhang
创建目录
[root@centos7 ~]#mkdir /mnt/home
#挂载目录
[root@centos7 ~]#mount /dev/sda6 /mnt/home
2迁移分区
使用cp命令复制更好一些,随后可以再删除
#复制
[root@centos7 ~]#cp -av /home/. /mnt/home
‘/home/./chen’ -> ‘/mnt/home/./chen’
‘/home/./chen/.mozilla’ -> ‘/mnt/home/./chen/.mozilla’
‘/home/./chen/.mozilla/extensions’ -> ‘/mnt/home/./chen/.mozilla/extensions’
‘/home/./chen/.mozilla/plugins’ -> ‘/mnt/home/./chen/.mozilla/plugins’
‘/home/./chen/.bash_logout’ -> ‘/mnt/home/./chen/.bash_logout’
‘/home/./chen/.bash_profile’ -> ‘/mnt/home/./chen/.bash_profile’
‘/home/./chen/.bashrc’ -> ‘/mnt/home/./chen/.bashrc’
‘/home/./chen/.cache’ -> ‘/mnt/home/./chen/.cache’
‘/home/./chen/.cache/gdm’ -> ‘/mnt/home/./chen/.cache/gdm’
‘/home/./chen/.cache/gdm/session.log.old’ -> ‘/mnt/home/./chen/.
=======================省略很多
#查看一下是否复制成功
[root@centos7 ~]#ls /mnt/home
chen  chenbo  zhang
#查看复制过来的文件大小
[root@centos7 ~]#du -sh /mnt/home
7.8M	/mnt/home
#查看原来的大小
[root@centos7 ~]#du -sh /home
7.8M	/home
#大小一样,复制成功!
3 把磁盘写入/etc/fstab 文件
 [root@centos7 ~]#vim /etc/fstab
 #UID=7d25ecf1-adb6-4967-9e9f-9bfd8173008f /home                 xfs     defaults        0 0

#使文件生效
[root@centos7 ~]#mount -a
根目录迁移很难,要进入救援模式,不推荐这样子操作
5.0外部设备
5.1光盘
1 eject
命令用于退出抽取式设备。若设备已挂入,则eject会先将该设备卸除再退出。
语法格式: eject [参数] [设备]
常用参数:
-a | 控制设备的自动退出功能 |
-c | 选择光驱柜中的光驱 |
-d | 显示预设的设备,而不是实际执行动作 |
-f | 退出抽取式磁盘 |
-h | 显示帮助 |
-n | 显示指定的设备 |
-q | 退出磁带 |
-r | 退出光盘 |
-s | 以SCSI指令来退出设备 |
-t | 关闭光盘的托盘 |
-v | 执行时,显示详细的说明 |
参考实例
不加参数默认弹出:
[root@linuxcool ~]# eject 指定设备:
[root@linuxcool ~]# eject -r /dev/cdrom2制作ISO光盘文件
#制作
[root@centos7 /dev]#cp /de/sr0 /data/centos.iso
cp: cannot stat ‘/de/sr0’: No such file or directory
 [root@centos7 /dev]#cp /dev/sr0 /data/centos.iso
^C
#查看一下
[root@centos7 /dev]#file /data/centos.iso
/data/centos.iso: # ISO 9660 CD-ROM filesystem data 'CentOS 7 x86_64' (bootable)
#新建挂载的目录
[root@centos7 ~]#mkdir /mnt/iso
 [root@centos7 ~]#mount /data/centos.iso  /mnt/iso
mount: /dev/loop0 is write-protected, mounting read-only
#查看一下
[root@centos7 ~]#ls /mnt/iso
CentOS_BuildTag  EULA  images    LiveOS    repodata              RPM-GPG-KEY-CentOS-Testing-7
EFI              GPL   isolinux  Packages  RPM-GPG-KEY-CentOS-7  TRANS.TBL
 [root@centos7 ~]#
#打包
[root@centos7 ~]#mkisofs -r -o /data/etc.iso /etc/
I: -input-charset not specified, using utf-8 (detected in locale settings)
Using SYSTE000.;1 for  /system-release-cpe (system-release)
Using CENTO000.;1 for  /centos-release-upstream (centos-release)
Using 65_0_000.CON;1 for  /etc/fonts/conf.d/65-0-lohit-tamil.conf (65-0-lohit-devanagari.conf)
Using 65_0_001.CON;1 for  /etc/fonts/conf.d/65-0-lohit-devanagari.conf (65-0-lohit-punjabi.conf)
Using 65_0_002.CON;1 for  /etc/fonts/conf.d/65-0-lohit-punjabi.conf (65-0-lohit-telugu.conf)
Using 65_0_003.CON;1 for  /etc/fonts/conf.d/65-0-lohit-telugu.conf (65-0-lohit-oriya.conf)
Using 65_0_004.CON;1 for  /etc/fonts/conf.d/65-0-lohit-oriya.conf (65-0-lohit-marathi.conf)
Using 65_0_005.CON;1 for  /etc/fonts/conf.d/65===============省略很多
#查看一下,已经打包成ISO文件
 [root@centos7 ~]#ll /data/etc.iso
-rw-r--r--. 1 root root 40044544 Jan  6 17:56 /data/etc.iso
#可以挂载,然后就可以使用,这里就不操作了,ISO文件的文件权限是rw的,不能修改,使用。
5.2挂载USB介质
查看USB设备是否识别
lsusb
被内核探测为scsi设备
/dev/sdax /dev/sdbx 或者;类似设备文件
在图形环境中自动挂载
图标在【计算机】窗口中创建
挂载在/run/media/
手动挂载
mount 、dev/sdb1 /mnt
6.0 raid
centos6
vmware
准备干净的磁盘
块磁盘分区,注意id格式
使用的命令
语法格式:mdadm [参数] 设备名
常用参数
-D | 显示RAID设备的详细信息 |
-A | 加入一个以前定义的RAID |
-B | 创建一个没有超级块的RAID设备 |
-F | 选项监控模式 |
-G | 更改RAID设备的大小或形态 |
-I | 添加设备到RAID中,或从RAID中删除设备 |
-z | 组建RAID1、RAID4、RAID5、RAID6后从每个RAID成员获取的空间容量 |
-s | 扫描配置文件或/proc/mdstat以搜寻丢失的信息 |
-C | 把RAID信息写入每个成员超级块中 |
-v | 显示RAID创建过程中的详细信息 |
-B | 不把RAID信息写入每个成员的超级块中 |
-l | 指定RAID的级别 |
-n | 指定RAID中活动设备的数目 |
-f | 把RAID成员列为有问题,以便移除该成员 |
-r | 把RAID成员移出RAID设备 |
-a | 向RAID设备中添加一个成员 |
--re-add | 把最近移除的RAID成员重新添加到RAID设备中 |
-E | 查看RAID成员详细信息 |
-c | 创建一个RAID设备时默认为512kb |
-R | 开始部分组装RAID |
-S | 停用RAID设备,释放所有资源 |
-x | 指定初始RAID设备的备用成员的数量 |
--zero-superblock | 如果RAID设备包含一个有效的超级块,该块使用零覆盖 |
6.1 raid0实现
需要准备两块干净的磁盘。分区也可以。分区必须在不同的磁盘,不然没有实际意义
这里使用/dev/sdc /dev/sdd
每个分区空间设置为2G
#给/dev/sdc分区
[root@centos6 ~]#fdisk /dev/sdc
Device contains neither a valid DOS partition table, nor Sun, SGI or OSF disklabel
Building a new DOS disklabel with disk identifier 0xfc278329.
Changes will remain in memory only, until you decide to write them.
After that, of course, the previous content won't be recoverable.

Warning: invalid flag 0x0000 of partition table 4 will be corrected by w(rite)

WARNING: DOS-compatible mode is deprecated. It's strongly recommended to
         switch off the mode (command 'c') and change display units to
         sectors (command 'u').

Command (m for help): n
Command action
   e   extended
   p   primary partition (1-4)
p
Partition number (1-4): 1
First cylinder (1-2610, default 1):
Using default value 1
#分2G 的大小
Last cylinder, +cylinders or +size{K,M,G} (1-2610, default 2610): +2G

#设置格式
Command (m for help): T
Selected partition 1
Hex code (type L to list codes): L
17  Hidden HPFS/NTF 65  Novell Netware  b7  BSDI fs         fc  VMware VMKCORE
18  AST SmartSleep  70  DiskSecure Mult b8  BSDI swap       fd  Linux raid auto
1b  Hidden W95 FAT3 75  PC/IX           bb  Boot Wizard hid fe  LANstep
1c  Hidden W95 FAT3 80  Old Minix       be  Solaris boot    ff  BBT
1e  Hidden W95 FAT1
#设置格式为fd
Hex code (type L to list codes): fd
Changed system type of partition 1 to fd (Linux raid autodetect)

#保存退出
Command (m for help): w
The partition table has been altered!

Calling ioctl() to re-read partition table.
Syncing disks.
#对/dev/sdd分2G的分区
 [root@centos6 ~]#fdisk /dev/sdd
Device contains neither a valid DOS partition table, nor Sun, SGI or OSF disklabel
Building a new DOS disklabel with disk identifier 0x3dc7aa1e.
Changes will remain in memory only, until you decide to write them.
After that, of course, the previous content won't be recoverable.
====================操作如上,省略代码
#查看一下
 [root@centos6 ~]#lsblk
NAME   MAJ:MIN RM  SIZE RO TYPE MOUNTPOINT
sr0     11:0    1 1024M  0 rom
sda      8:0    0  200G  0 disk
├─sda1   8:1    0  9.8G  0 part /boot
├─sda2   8:2    0 48.8G  0 part /
├─sda3   8:3    0 29.3G  0 part /data
├─sda4   8:4    0    1K  0 part
├─sda5   8:5    0  9.8G  0 part [SWAP]
└─sda6   8:6    0   10G  0 part
sdb      8:16   0   50G  0 disk
├─sdb1   8:17   0    2G  0 part
├─sdb2   8:18   0    4G  0 part
├─sdb3   8:19   0    5G  0 part
└─sdb4   8:20   0    5G  0 part
  #两块硬盘分区成功!
sdc      8:32   0   20G  0 disk
└─sdc1   8:33   0    2G  0 part
sdd      8:48   0   20G  0 disk
└─sdd1   8:49   0    2G  0 part
#挂载磁盘并命名
[root@centos6 ~]#mdadm -C -a yes /dev/md0 -l 0 -n 2  /dev/sd{c,d}1
mdadm: Defaulting to version 1.2 metadata
mdadm: array /dev/md0 started.
 [root@centos6 ~]#ll /dev/md0
brw-rw---- 1 root disk 9, 0 Jan  5 21:46 /dev/md0
#查看一下raid磁盘状态
 [root@centos6 ~]#mdadm -D /dev/md0
/dev/md0:
        Version : 1.2
  Creation Time : Thu Jan  5 21:46:24 2023
     Raid Level : raid0
     Array Size : 4204544 (4.01 GiB 4.31 GB)
   Raid Devices : 2
  Total Devices : 2
    Persistence : Superblock is persistent

    Update Time : Thu Jan  5 21:46:24 2023
          State : clean
 Active Devices : 2
Working Devices : 2
 Failed Devices : 0
  Spare Devices : 0

     Chunk Size : 512K

           Name : centos6:0  (local to host centos6)
           UUID : 469e3439:7958c9ce:718ea809:cad2ad60
         Events : 0

    Number   Major   Minor   RaidDevice State
       0       8       33        0      active sync   /dev/sdc1
       1       8       49        1      active sync   /dev/sdd1

#创建ext4 文件系统
[root@centos6 ~]#mkfs.ext4 /dev/md0
mke2fs 1.41.12 (17-May-2010)
Filesystem label=
OS type: Linux
Block size=4096 (log=2)
Fragment size=4096 (log=2)
Stride=128 blocks, Stripe width=256 blocks
262944 inodes, 1051136 blocks
52556 blocks (5.00%) reserved for the super user
First data block=0
Maximum filesystem blocks=1077936128
33 block groups
32768 blocks per group, 32768 fragments per group
7968 inodes per group
Superblock backups stored on blocks:
	32768, 98304, 163840, 229376, 294912, 819200, 884736

Writing inode tables: done
Creating journal (32768 blocks): done
Writing superblocks and filesystem accounting information: done

This filesystem will be automatically checked every 21 mounts or
180 days, whichever comes first.  Use tune2fs -c or -i to override.
#查看磁盘/dev/md0  UUID 并记录
[root@centos6 ~]#blkid
/dev/sda1: UUID="03738c90-266e-4e15-845b-bf059c91d81f" TYPE="ext4"
/dev/sda2: UUID="535bffed-e204-434a-aa33-e603a9588ead" TYPE="ext4"
/dev/sda3: UUID="b5968017-ff55-4a68-99c8-30fb332bf7a2" TYPE="ext4"
/dev/sda5: UUID="cefcf75b-3d22-4ba1-9e95-29ddef216233" TYPE="swap"
/dev/sdc1: UUID="469e3439-7958-c9ce-718e-a809cad2ad60" UUID_SUB="511e4d0b-b3d0-36f2-e55e-0a061da638d1" LABEL="centos6:0" TYPE="linux_raid_member"
/dev/sdd1: UUID="469e3439-7958-c9ce-718e-a809cad2ad60" UUID_SUB="42b90446-a96f-d5cd-1ee6-2b188e8d9909" LABEL="centos6:0" TYPE="linux_raid_member"
  #记录备用
/dev/md0: UUID="988bb4cd-1221-4daf-890c-aed2235f27b4" TYPE="ext4"
#创建磁盘挂载点目录
 [root@centos6 ~]#mkdir /mnt/raid
 #挂载磁盘
 [root@centos6 ~]#vim /etc/fstab
  #写入信息生效果
 [root@centos6 ~]#mount -a
 #查看是否挂载
 [root@centos6 ~]#df -h
Filesystem      Size  Used Avail Use% Mounted on
/dev/sda2        48G  4.0G   42G   9% /
tmpfs           498M   72K  498M   1% /dev/shm
/dev/sda1       9.5G   55M  9.0G   1% /boot
/dev/sda3        29G   44M   28G   1% /data
/dev/md0        3.9G  8.1M  3.7G   1% /mnt/raid
#测试速度
 [root@centos6 ~]#dd if=/dev/zero of=/mnt/raid/f1 bs=1M count=1024
1024+0 records in
1024+0 records out
1073741824 bytes (1.1 GB) copied, 4.91888 s, 218 MB/s
 [root@centos6 ~]#dd if=/dev/zero of=/data/f2  bs=1M count=1024
1024+0 records in
1024+0 records out
1073741824 bytes (1.1 GB) copied, 1.78665 s, 601 MB/s
 [root@centos6 ~]#dd if=/data/f2 of=/dev/null
2097152+0 records in
2097152+0 records out
1073741824 bytes (1.1 GB) copied, 4.24604 s, 253 MB/s
mdadm后面的参数含义:
-C (create)创建
/dev/md5 创建的路径
-l RAID 的性能等级
-n 使用的磁盘数
-x 使用的备用盘,最后须指出每个被使用的硬盘
-c 指定大小
6.2raid5实现
需要准备4块干净的磁盘。分区也可以,每个分区必须在不同的磁盘。不然没有实际意义
这里使用/dev/sdc /dev/sdd /dev/sde /dev/sdef
分别建立一个分区并作为实验磁盘
/dev/sdc2 /dev/sdd2 /dev/sde1 /dev/sdef1
每个分区空间设置为1G,id设置为fd
#同步磁盘文件信息
[root@centos6 ~]#partx -a /dev/sdc
BLKPG: Device or resource busy
error adding partition 1
 [root@centos6 ~]#partx -a /dev/sdd
BLKPG: Device or resource busy
error adding partition 1
 [root@centos6 ~]#partx -a /dev/sde
BLKPG: Device or resource busy
error adding partition 1
 [root@centos6 ~]#partx -a  /dev/sdf
BLKPG: Device or resource busy
error adding partition 1
#创建raid5磁盘阵列
 [root@centos6 ~]#mdadm -C -a yes /dev/md5 -l 5 -n 3 -x 1 -c 1M /dev/sd{c2,d2,e1,f1}
mdadm: Defaulting to version 1.2 metadata
mdadm: array /dev/md5 started.
#查看raid信息
 [root@centos6 ~]#cat /proc/mdstat
Personalities : [raid0] [raid6] [raid5] [raid4]
  #md5创建成功                     #(s)表示此分区是备用磁盘(分区)
md5 : active raid5 sde1[4] sdf1[3](S) sdd2[1] sdc2[0]
      2115584 blocks super 1.2 level 5, 1024k chunk, algorithm 2 [3/3] [UUU]

md127 : active raid0 sdd1[1] sdc1[0]
      4204544 blocks super 1.2 512k chunks

unused devices: <none>
#创建文件系统
[root@centos6 ~]#mkfs.ext4 /dev/md5
mke2fs 1.41.12 (17-May-2010)
Filesystem label=
OS type: Linux
Block size=4096 (log=2)
Fragment size=4096 (log=2)
Stride=256 blocks, Stripe width=512 blocks
132464 inodes, 528896 blocks
26444 blocks (5.00%) reserved for the super user
First data block=0
Maximum filesystem blocks=545259520
17 block groups
32768 blocks per group, 32768 fragments per group
7792 inodes per group
Superblock backups stored on blocks:
32768, 98304, 163840, 229376, 294912
Writing inode tables: done
Creating journal (16384 blocks): done
Writing superblocks and filesystem accounting information: done
This filesystem will be automatically checked every 26 mounts or
180 days, whichever comes first. Use tune2fs -c or -i to override.
#挂载文件系统
[root@centos6 ~]#vim /etc/fstab
[root@centos6 ~]#df -h
Filesystem Size Used Avail Use% Mounted on
/dev/sda2 48G 4.0G 42G 9% /
tmpfs 498M 72K 498M 1% /dev/shm
/dev/sda1 9.5G 55M 9.0G 1% /boot
/dev/sda3 29G 1.1G 27G 4% /data
/dev/md127 3.9G 1.1G 2.7G 28% /mnt/raid
#创建挂载点
[root@centos6 ~]#mkdir /mnt/raid5
#查看一下
[root@centos6 ~]#df -h
Filesystem Size Used Avail Use% Mounted on
/dev/sda2 48G 4.0G 42G 9% /
tmpfs 498M 72K 498M 1% /dev/shm
/dev/sda1 9.5G 55M 9.0G 1% /boot
/dev/sda3 29G 1.1G 27G 4% /data
/dev/md127 3.9G 1.1G 2.7G 28% /mnt/raid
#出现了md5 #大小2G
/dev/md5 2.0G 3.1M 1.9G 1% /mnt/raid5
#检验写速度
[root@centos6 ~]#dd if=/dev/zero of=/mnt/raid5/f1 bs=1M count=1024
1024+0 records in
1024+0 records out
1073741824 bytes (1.1 GB) copied, 4.57103 s, 235 MB/s
#测试读速度
[root@centos6 ~]#dd if=/mnt/raid5/f1 of=/mnt/null
2097152+0 records in
2097152+0 records out
1073741824 bytes (1.1 GB) copied, 7.32347 s, 147 MB/s


 933
933

 被折叠的 条评论
为什么被折叠?
被折叠的 条评论
为什么被折叠?
 到【灌水乐园】发言


