


【Python】采用OpenCV和Flask来进行网络图像推流的低延迟高刷FPS方法(项目模板)
gitee项目模板:
网络图像推流项目模板(采用OpenCV和Flask来进行网络图像推流的低延迟高刷FPS方法)
前文:
【最简改进】基于OpenCV-Python+Flask的人脸检测网络摄像头图像输出(将本地图像转为网络URL地址,可输出带识别框的图像)
高刷方式
首先 在前文中 我们用OpenCV获取的图像转为bytes类型 然后发送给flask端网页进行图像推流 但由于OpenCV和网络部分都会占用系统资源 所以FPS不高 亦或是延迟较高
尤其是在树莓派等系统资源不够多的系统上运行时 延时非常明显
另外 还可能进行人脸识别、手势识别等功能 所以延迟进一步提高
但采用多线程的方式 可以在以上满足所有条件的情况下 将延时控制在150ms内 切FPS能达到30
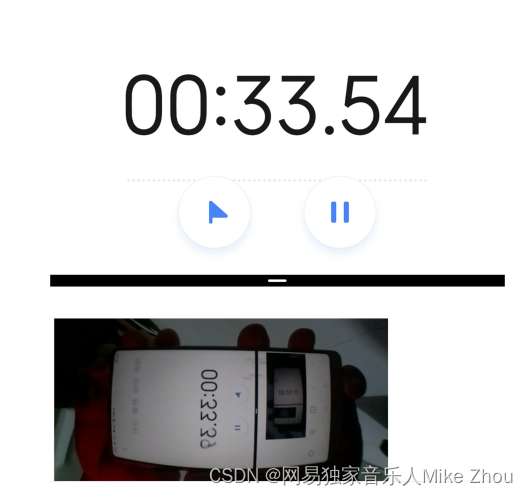
以上还是手机端浏览效果 服务端是由树莓派本身建立的
手机用的自带的浏览器 本身就有一定延迟
网络线程
网络线程其实就一个 就是flask的app.run函数
def start_server():
    web_app.run(host='0.0.0.0', port=local_post)

thread_send = threading.Thread(target=start_server)
thread_send.setDaemon(True)
thread_send.start()
而图像推流依靠以下函数:
def send_img():
    global cam_img
    global pause_all_flag
    while pause_all_flag == 0:
        image = cv2.imencode('.jpg', cam_img)[1].tobytes()
        yield (b'--frame\r\n'
               b'Content-Type: image/jpeg\r\n\r\n' + image + b'\r\n')
        if pause_all_flag == 1:
            break
    return


@web_app.route('/video_feed')
def video_feed():
    return Response(send_img(), mimetype='multipart/x-mixed-replace; boundary=frame')
另外 表单提取和推送也很简单
@web_app.route('/', methods=['GET', 'POST'])
def index():
    global kill_all_flag
    global pause_all_flag
    global command_str

    if request.method == 'POST':
        command_str = str(request.form.get('WEB_COMMAND'))

        if kill_all_flag == 0 and pause_all_flag == 0:
            command_jugg()
        elif kill_all_flag == 0 and pause_all_flag == 1:
            print(command_str)
            if command_str == "继续程序":
                pause_all_flag = 0
                print("Continue")
            else:
                print("程序已暂停,继续请按键")
        else:
            print("程序已终止,请重启程序")

    now_today = time.time()
    time_hour = time.localtime(now_today).tm_hour
    time_min = time.localtime(now_today).tm_min

    if time_hour < 10:
        time_hour = "0"+str(time_hour)
    if time_min < 10:
        time_min = "0"+str(time_min)
    local_time_str = str(time.localtime(now_today).tm_year)+"-"+str(time.localtime(now_today).tm_mon)+"-"+str(time.localtime(now_today).tm_mday)+" "+str(time_hour)+":"+str(time_min)

    data = {
        '当前时间:': [ local_time_str]
        }

    return render_template('index.html',data_dict=data)
这三个部分其实是共用一个线程的
视频线程
视频线程的话 如果有检测、识别等部分 可以单独列一个线程 这里推荐使用最纯粹的视频获取线程作为一个单独的线程:
这里我是放在主线程里
def img_main():
    global pause_all_flag
    global kill_all_flag
    global cam_img

    while True:
        time.sleep(0.1)
        while pause_all_flag==0:
            cam_img = cv2.flip(cv2_cap.read()[1],1)
            cv2.imshow("http://"+local_ip+":"+str(local_post)+"/ (img: video_feed)",cam_img)
            # 展示图像
            if pause_all_flag == 1:
                pause_all_flag = 1
                print("暂停程序")
                cv2.destroyAllWindows()
                break
            if cv2.waitKey(10) == 27:   # 通过esc键退出摄像
                kill_all_flag = 1
                pause_all_flag = 1
                print("结束程序")
                cv2.destroyAllWindows()
                break
        if kill_all_flag == 1:
            break
    cv2_cap.release()
    print("全部退出")
    return
几乎是感觉不到延迟的:

整体代码
import cv2
from flask import Flask, render_template, Response, request
import threading
import socket
import time

global pause_all_flag
pause_all_flag = 0
global kill_all_flag
kill_all_flag = 0

global command_str
command_str = None

local_post = 1212
while True:
    try:
        web_socket = socket.socket(socket.AF_INET,socket.SOCK_DGRAM)
        web_socket.connect(("8.8.8.8",80))
        local_ip = str(web_socket.getsockname()[0])
        web_socket.close()
        print("Network Enable")
        break
    except:
        print("Network Error...")
        time.sleep(5)

web_app = Flask(__name__)

cv2_cap = cv2.VideoCapture(1)  # 开启摄像头

global cam_img
ok, cam_img = cv2_cap.read()  # 读取摄像头图像
if ok is False:
    print('无法读取到摄像头1!')
    cv2_cap.release()
    cam_img=None

    cv2_cap = cv2.VideoCapture(0)  # 开启摄像头
    ok, cam_img = cv2_cap.read()  # 读取摄像头图像
    if ok is False:
        pause_all_flag = 1
        kill_all_flag = 1
        print('无法读取到摄像头0!')

try:
    high=cam_img.shape[0]
    width=cam_img.shape[1]
except:
    pause_all_flag = 1
    kill_all_flag = 1


def command_jugg():
    global kill_all_flag
    global pause_all_flag
    global command_str

    print(command_str)
    command_str = None

@web_app.route('/', methods=['GET', 'POST'])
def index():
    global kill_all_flag
    global pause_all_flag
    global command_str

    if request.method == 'POST':
        command_str = str(request.form.get('WEB_COMMAND'))

        if kill_all_flag == 0 and pause_all_flag == 0:
            command_jugg()
        elif kill_all_flag == 0 and pause_all_flag == 1:
            print(command_str)
            if command_str == "继续程序":
                pause_all_flag = 0
                print("Continue")
            else:
                print("程序已暂停,继续请按键")
        else:
            print("程序已终止,请重启程序")

    now_today = time.time()
    time_hour = time.localtime(now_today).tm_hour
    time_min = time.localtime(now_today).tm_min

    if time_hour < 10:
        time_hour = "0"+str(time_hour)
    if time_min < 10:
        time_min = "0"+str(time_min)
    local_time_str = str(time.localtime(now_today).tm_year)+"-"+str(time.localtime(now_today).tm_mon)+"-"+str(time.localtime(now_today).tm_mday)+" "+str(time_hour)+":"+str(time_min)

    data = {
        '当前时间:': [ local_time_str]
        }

    return render_template('index.html',data_dict=data)


def img_main():
    global pause_all_flag
    global kill_all_flag
    global cam_img

    while True:
        time.sleep(0.1)
        while pause_all_flag==0:
            cam_img = cv2.flip(cv2_cap.read()[1],1)
            cv2.imshow("http://"+local_ip+":"+str(local_post)+"/ (img: video_feed)",cam_img)
            # 展示图像
            if pause_all_flag == 1:
                pause_all_flag = 1
                print("暂停程序")
                cv2.destroyAllWindows()
                break
            if cv2.waitKey(10) == 27:   # 通过esc键退出摄像
                kill_all_flag = 1
                pause_all_flag = 1
                print("结束程序")
                cv2.destroyAllWindows()
                break
        if kill_all_flag == 1:
            break
    cv2_cap.release()
    print("全部退出")
    return

def send_img():
    global cam_img
    global pause_all_flag
    while pause_all_flag == 0:
        image = cv2.imencode('.jpg', cam_img)[1].tobytes()
        yield (b'--frame\r\n'
               b'Content-Type: image/jpeg\r\n\r\n' + image + b'\r\n')
        if pause_all_flag == 1:
            break
    return


@web_app.route('/video_feed')
def video_feed():
    return Response(send_img(), mimetype='multipart/x-mixed-replace; boundary=frame')

def start_server():
    web_app.run(host='0.0.0.0', port=local_post)

def main():
    thread_send = threading.Thread(target=start_server)
    thread_send.setDaemon(True)
    thread_send.start()

    img_main()

    time.sleep(1)
    print("已退出所有程序")
    return

if __name__ == "__main__":
    main()
<html>
    <!--meta http-equiv="refresh" content="5"-->
    <head>
        <title>OpenCV网络控制系统</title>
    </head>
    <body>
        <h1>OpenCV网络控制系统</h1>
        <form action="/" method="post" style="float:left">
            <p>
                <input type="submit" style="font-size:100px" name="WEB_COMMAND" value="刷新网页">
            </p>
            <p>
            <table>
                {% for k,v in data_dict.items() %}
                    <tr>
                        <td>{{k}}</td>
                        <td>{{v[0]}}</td>
                        <td>{{v[1]}}</td>
                        <td>{{v[2]}}</td>
                        <td>{{v[3]}}</td>
                        <td>{{v[4]}}</td>
                    </tr>
                    {% endfor %}
                </table>
            </p>
        </form>
        <img src="{{ url_for('video_feed') }}" height="540" style="float:left">

    </body>
</html>
附录:列表的赋值类型和py打包
列表赋值
BUG复现
闲来无事写了个小程序 代码如下:
# -*- coding: utf-8 -*-
"""
Created on Fri Nov 19 19:47:01 2021

@author: 16016
"""

a_list = ['0','1','2','3','4','5','6','7','8','9','10','11','12','13','14','15']
#print(len(a_list))
#b_list = ['','','','','','','','','','','','','','','','']
c_list = [[],[],[],[],[],[],[],[],[],[],[],[],[],[],[],[]]
#for i in range(16):
if len(a_list):
    for j in range(16):
        a_list[j]=str(a_list[j])+'_'+str(j)
        print("序号:",j)
        print('a_list:\n',a_list)


        c_list[j]=a_list
        print('c_list[0]:\n',c_list[0])
        print('\n')
#        b_list[j]=a_list[7],a_list[8]
#        print(b_list[j])
        # 写入到Excel:
#print(c_list,'\n')
我在程序中 做了一个16次的for循环 把列表a的每个值后面依次加上"_"和循环序号
比如循环第x次 就是把第x位加上_x 这一位变成x_x 我在输出测试中 列表a的每一次输出也是对的
循环16次后列表a应该变成[‘0_0’, ‘1_1’, ‘2_2’, ‘3_3’, ‘4_4’, ‘5_5’, ‘6_6’, ‘7_7’, ‘8_8’, ‘9_9’, ‘10_10’, ‘11_11’, ‘12_12’, ‘13_13’, ‘14_14’, ‘15_15’] 这也是对的
同时 我将每一次循环时列表a的值 写入到空列表c中 比如第x次循环 就是把更改以后的列表a的值 写入到列表c的第x位
第0次循环后 c[0]的值应该是[‘0_0’, ‘1’, ‘2’, ‘3’, ‘4’, ‘5’, ‘6’, ‘7’, ‘8’, ‘9’, ‘10’, ‘11’, ‘12’, ‘13’, ‘14’, ‘15’] 这也是对的
但是在第1次循环以后 c[0]的值就一直在变 变成了c[x]的值
相当于把c_list[0]变成了c_list[1]…以此类推 最后得出的列表c的值也是每一项完全一样
我不明白这是怎么回事
我的c[0]只在第0次循环时被赋值了 但是后面它的值跟着在改变
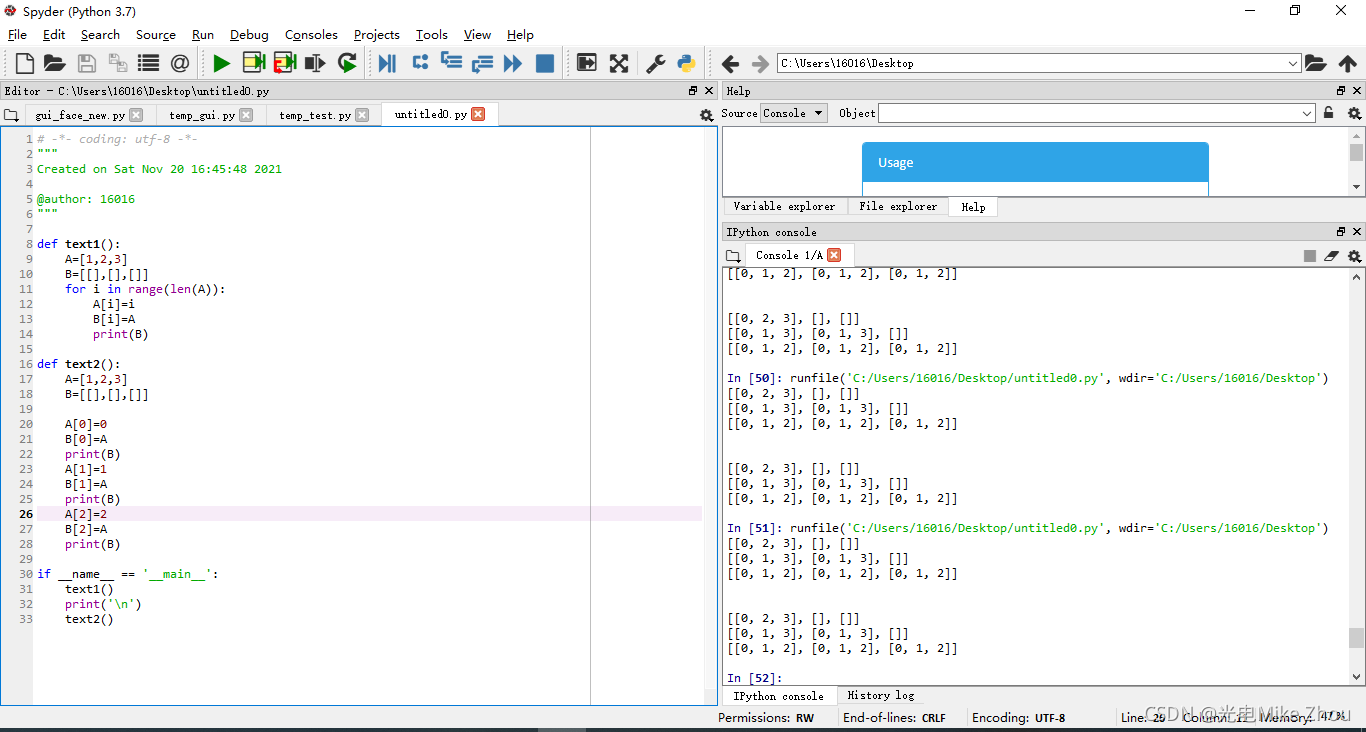
如图:
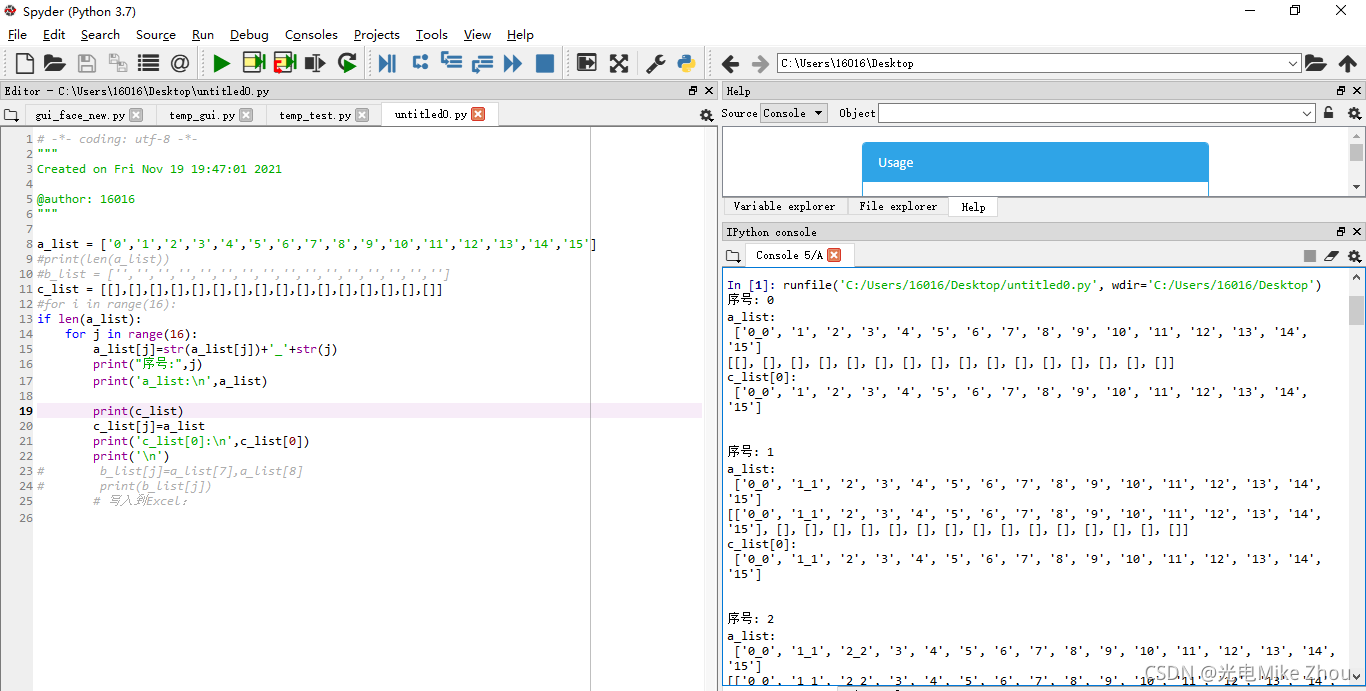
第一次老出bug 赋值以后 每次循环都改变c[0]的值 搞了半天都没搞出来
无论是用appen函数添加 还是用二维数组定义 或者增加第三个空数组来过渡 都无法解决
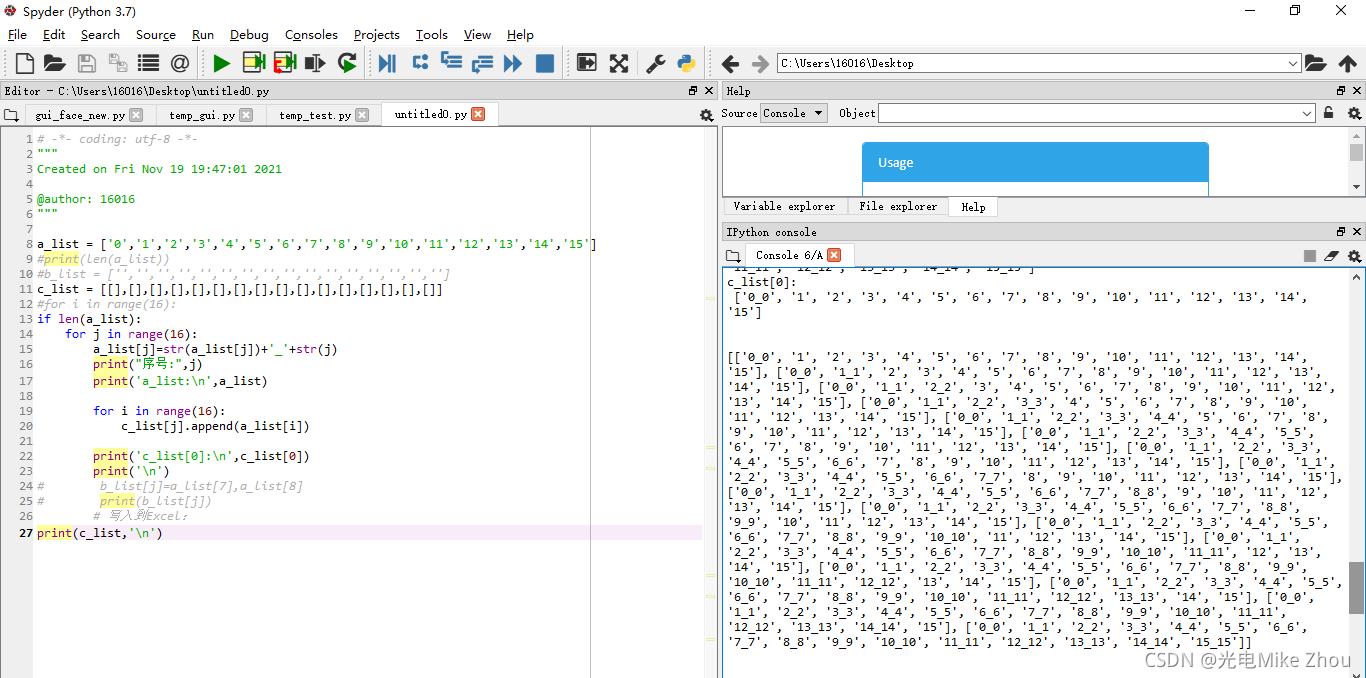
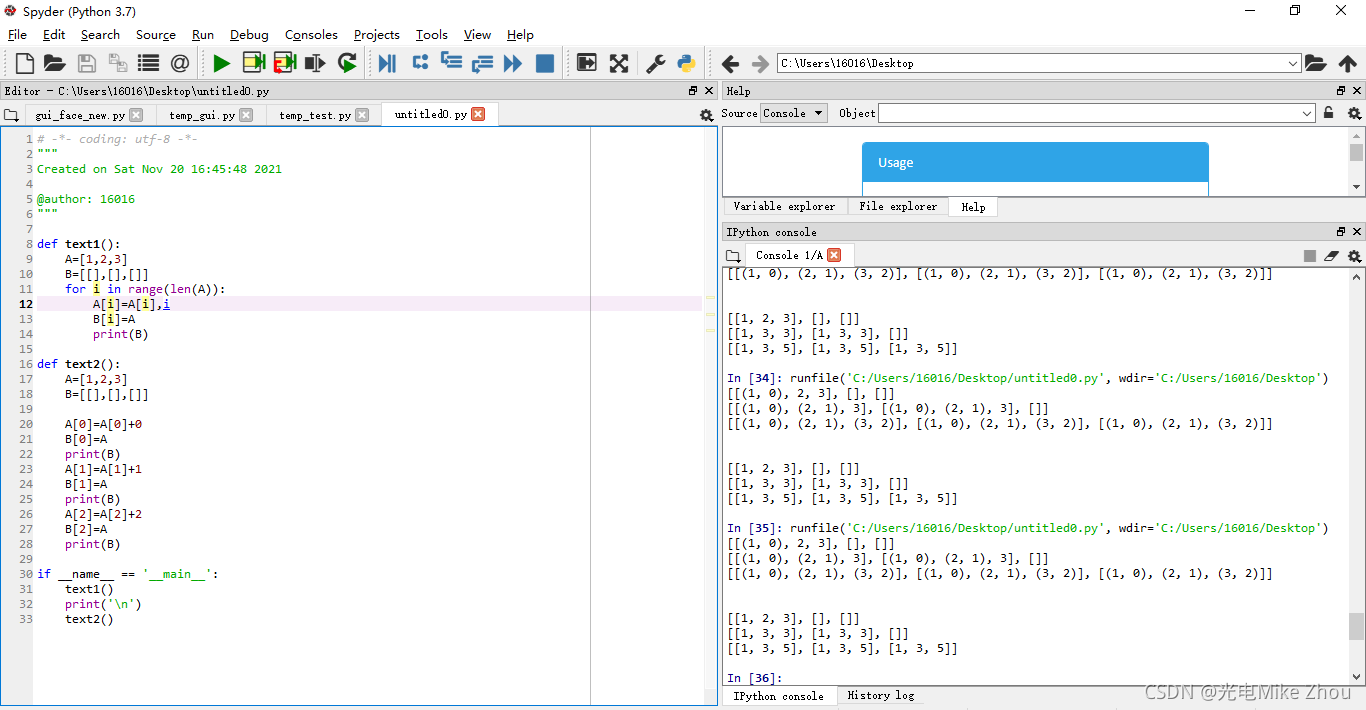
代码改进
后来在我华科同学的指导下 突然想到赋值可以赋的是个地址 地址里面的值一直变化 导致赋值也一直变化 于是用第二张图的循环套循环深度复制实现了
代码如下:
# -*- coding: utf-8 -*-
"""
Created on Fri Nov 19 19:47:01 2021

@author: 16016
"""

a_list = ['0','1','2','3','4','5','6','7','8','9','10','11','12','13','14','15']
#print(len(a_list))
#b_list = ['','','','','','','','','','','','','','','','']
c_list = [[],[],[],[],[],[],[],[],[],[],[],[],[],[],[],[]]
#for i in range(16):
if len(a_list):
    for j in range(16):
        a_list[j]=str(a_list[j])+'_'+str(j)
        print("序号:",j)
        print('a_list:\n',a_list)


        for i in range(16):
            c_list[j].append(a_list[i])
        print('c_list[0]:\n',c_list[0])
        print('\n')
#        b_list[j]=a_list[7],a_list[8]
#        print(b_list[j])
        # 写入到Excel:
print(c_list,'\n')
解决了问题
优化
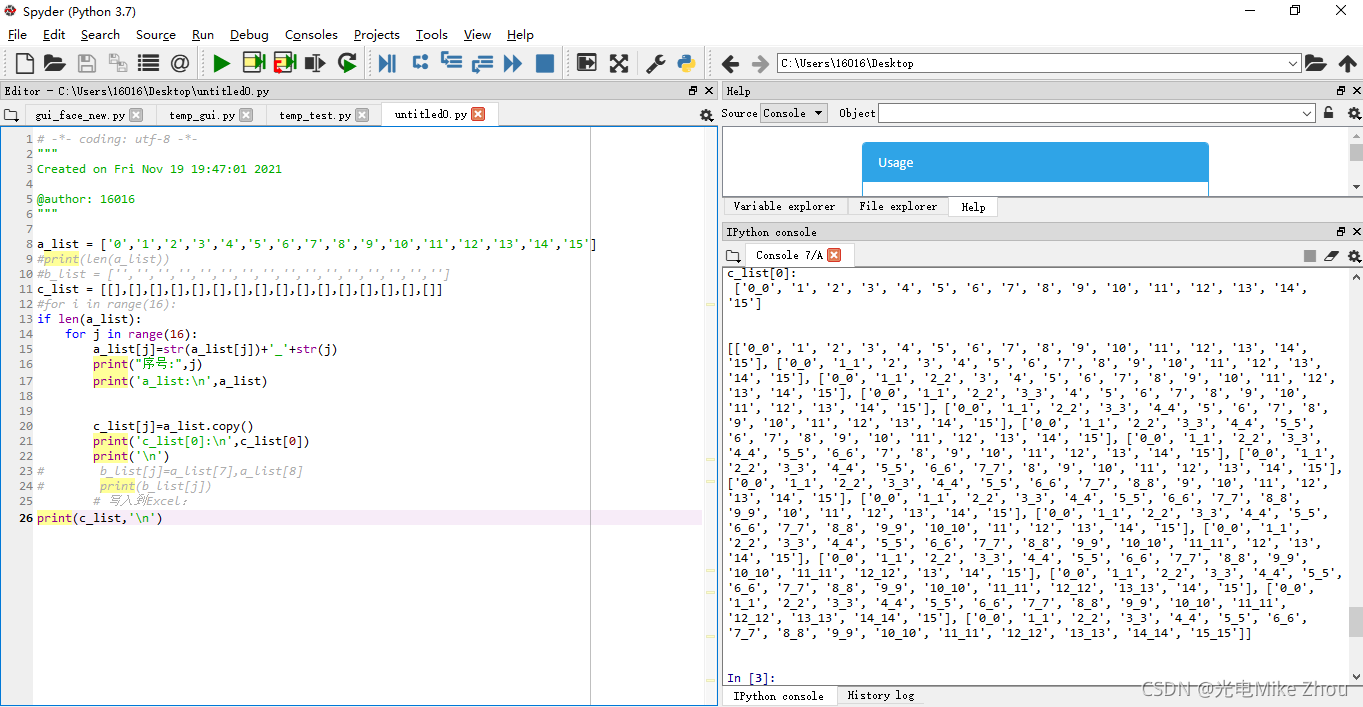
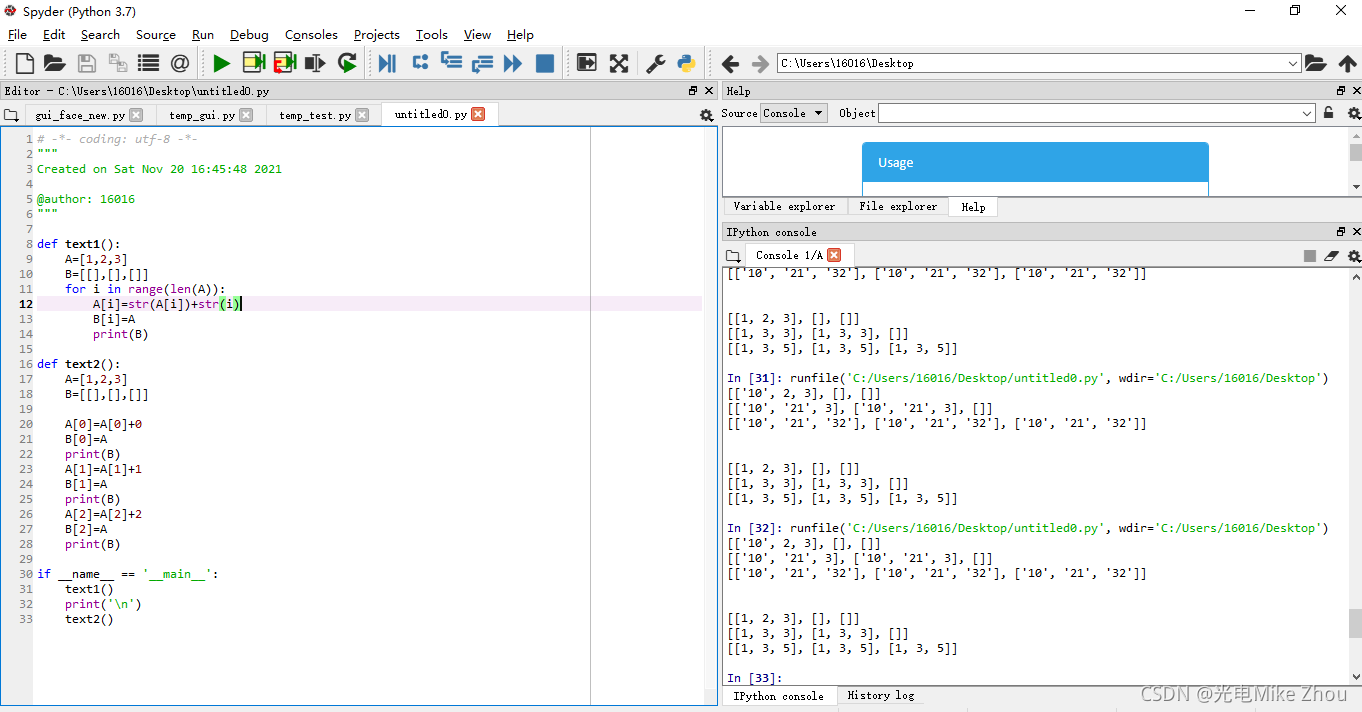
第三次是请教了老师 用copy函数来赋真值
代码如下:
# -*- coding: utf-8 -*-
"""
Created on Fri Nov 19 19:47:01 2021

@author: 16016
"""

a_list = ['0','1','2','3','4','5','6','7','8','9','10','11','12','13','14','15']
#print(len(a_list))
#b_list = ['','','','','','','','','','','','','','','','']
c_list = [[],[],[],[],[],[],[],[],[],[],[],[],[],[],[],[]]
#for i in range(16):
if len(a_list):
    for j in range(16):
        a_list[j]=str(a_list[j])+'_'+str(j)
        print("序号:",j)
        print('a_list:\n',a_list)


        c_list[j]=a_list.copy()
        print('c_list[0]:\n',c_list[0])
        print('\n')
#        b_list[j]=a_list[7],a_list[8]
#        print(b_list[j])
        # 写入到Excel:
#print(c_list,'\n')
同样能解决问题
最后得出问题 就是指针惹的祸!
a_list指向的是个地址 而不是值 a_list[i]指向的才是单个的值 copy()函数也是复制值而不是地址
如果这个用C语言来写 就直观一些了 难怪C语言是基础 光学Python不学C 遇到这样的问题就解决不了
C语言yyds Python是什么垃圾弱智语言
总结
由于Python无法单独定义一个值为指针或者独立的值 所以只能用列表来传送
只要赋值是指向一个列表整体的 那么就是指向的一个指针内存地址 解决方法只有一个 那就是将每个值深度复制赋值(子列表内的元素提取出来重新依次连接) 或者用copy函数单独赋值
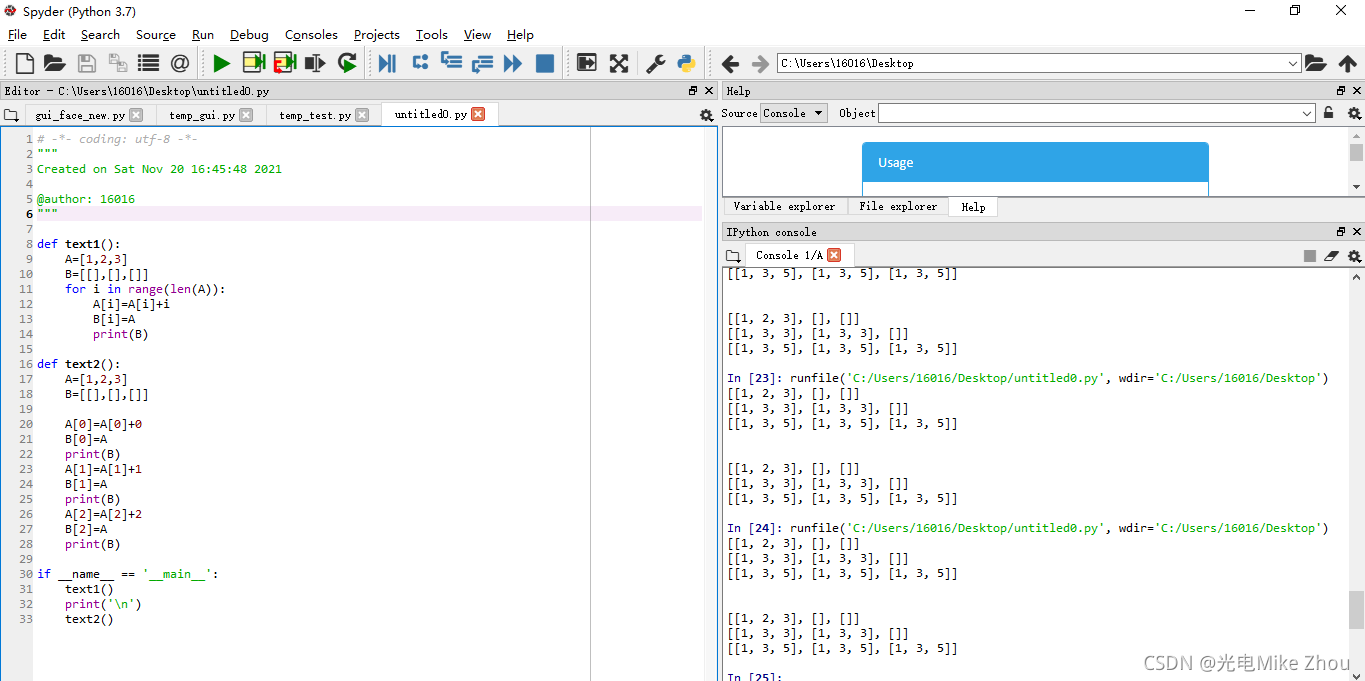
如图测试:

部分代码:
# -*- coding: utf-8 -*-
"""
Created on Sat Nov 20 16:45:48 2021

@author: 16016
"""

def text1():
    A=[1,2,3]
    B=[[],[],[]]
    for i in range(len(A)):
        A[i]=A[i]+i
        B[i]=A
        print(B)

def text2():
    A=[1,2,3]
    B=[[],[],[]]

    A[0]=A[0]+0
    B[0]=A
    print(B)
    A[1]=A[1]+1
    B[1]=A
    print(B)
    A[2]=A[2]+2
    B[2]=A
    print(B)

if __name__ == '__main__':
    text1()
    print('\n')
    text2()
py打包
Pyinstaller打包exe(包括打包资源文件 绝不出错版)
依赖包及其对应的版本号
PyQt5 5.10.1
PyQt5-Qt5 5.15.2
PyQt5-sip 12.9.0
pyinstaller 4.5.1
pyinstaller-hooks-contrib 2021.3
Pyinstaller -F setup.py 打包exe
Pyinstaller -F -w setup.py 不带控制台的打包
Pyinstaller -F -i xx.ico setup.py 打包指定exe图标打包
打包exe参数说明:
-F:打包后只生成单个exe格式文件;
-D:默认选项,创建一个目录,包含exe文件以及大量依赖文件;
-c:默认选项,使用控制台(就是类似cmd的黑框);
-w:不使用控制台;
-p:添加搜索路径,让其找到对应的库;
-i:改变生成程序的icon图标。
如果要打包资源文件
则需要对代码中的路径进行转换处理
另外要注意的是 如果要打包资源文件 则py程序里面的路径要从./xxx/yy换成xxx/yy 并且进行路径转换
但如果不打包资源文件的话 最好路径还是用作./xxx/yy 并且不进行路径转换
def get_resource_path(relative_path):
    if hasattr(sys, '_MEIPASS'):
        return os.path.join(sys._MEIPASS, relative_path)
    return os.path.join(os.path.abspath("."), relative_path)
而后再spec文件中的datas部分加入目录
如:
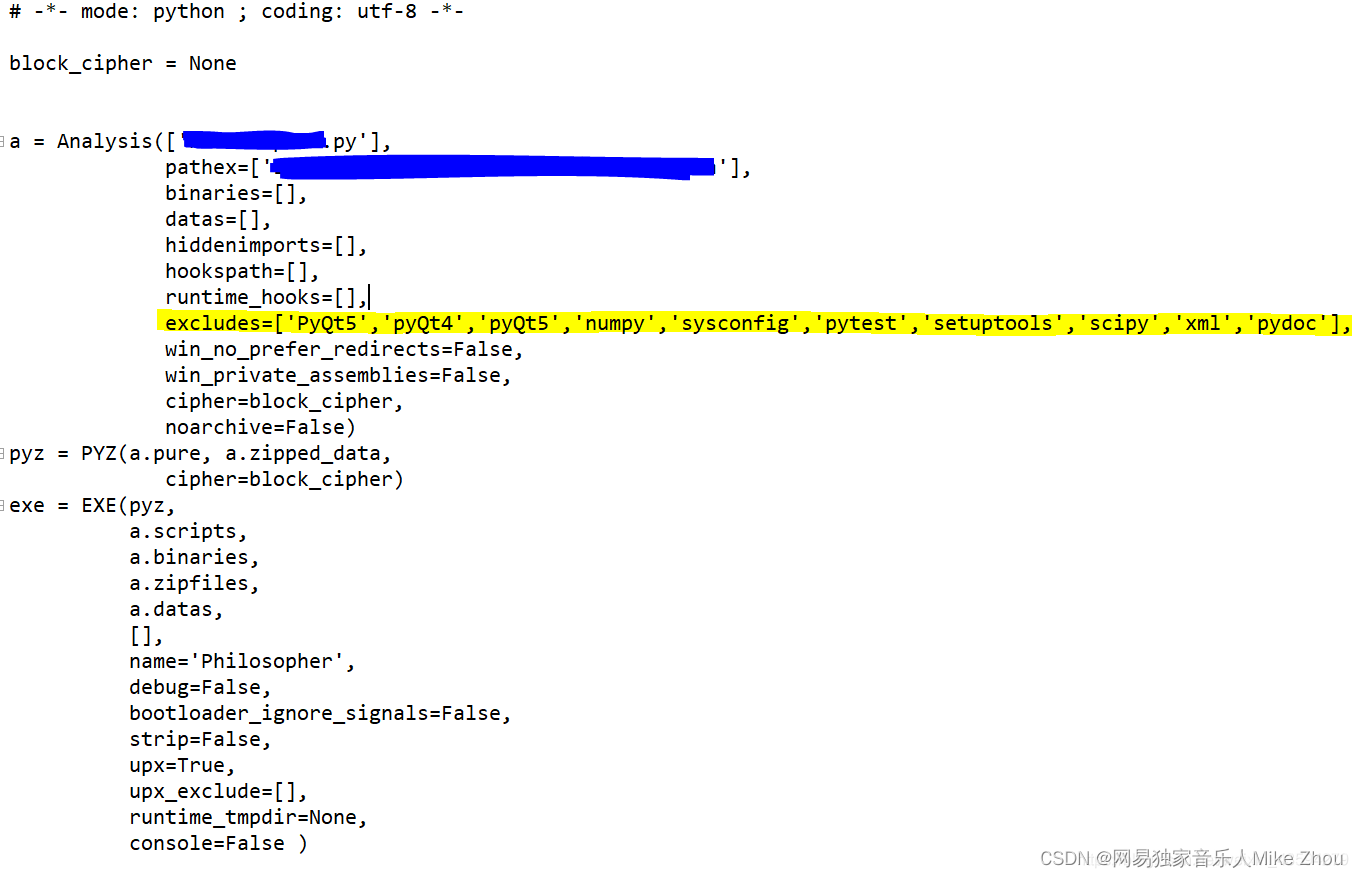
a = Analysis(['cxk.py'],
             pathex=['D:\\Python Test\\cxk'],
             binaries=[],
             datas=[('root','root')],
             hiddenimports=[],
             hookspath=[],
             hooksconfig={},
             runtime_hooks=[],
             excludes=[],
             win_no_prefer_redirects=False,
             win_private_assemblies=False,
             cipher=block_cipher,
             noarchive=False)
而后直接Pyinstaller -F setup.spec即可
如果打包的文件过大则更改spec文件中的excludes 把不需要的库写进去(但是已经在环境中安装了的)就行
这些不要了的库在上一次编译时的shell里面输出
比如:
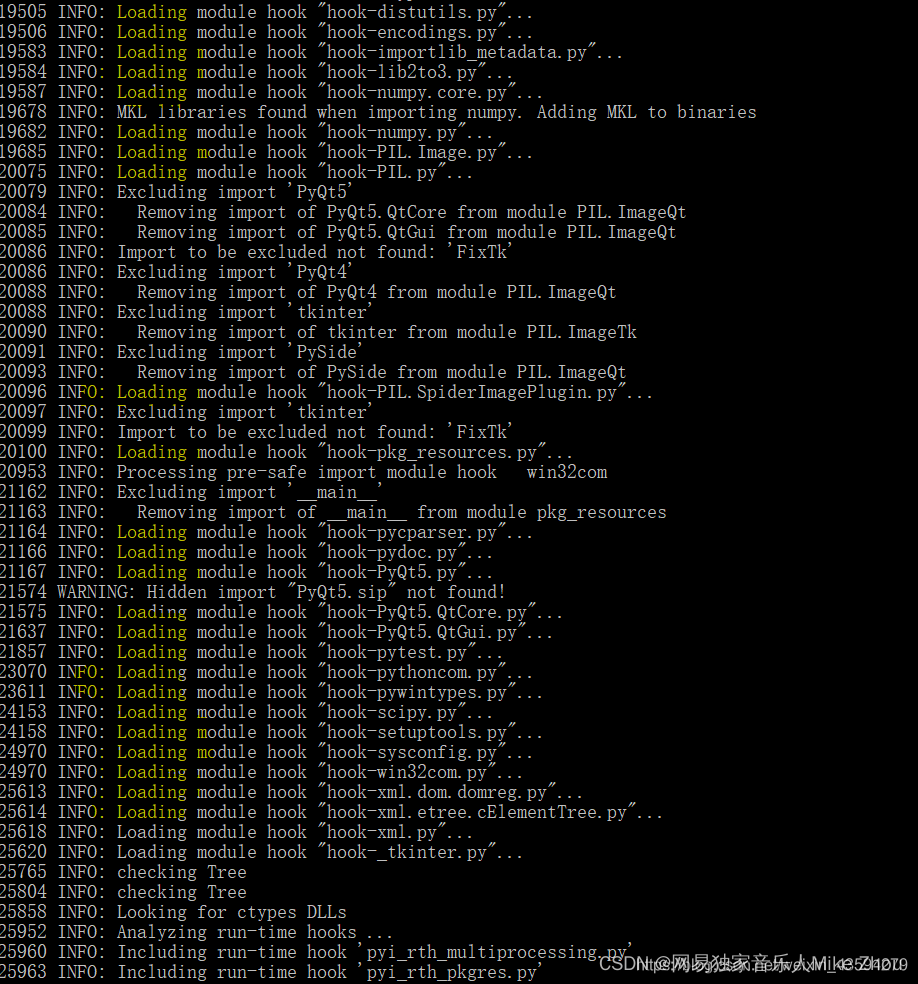
然后用pyinstaller --clean -F 某某.spec


 4748
4748


 被折叠的 条评论
为什么被折叠?
被折叠的 条评论
为什么被折叠?
 到【灌水乐园】发言


