


手动搭建springboot项目
maven项目手动改造为springboot项目
新建maven项目
pom文件引入依赖
<?xml version="1.0" encoding="UTF-8"?>
<project xmlns="http://maven.apache.org/POM/4.0.0"
         xmlns:xsi="http://www.w3.org/2001/XMLSchema-instance"
         xsi:schemaLocation="http://maven.apache.org/POM/4.0.0 http://maven.apache.org/xsd/maven-4.0.0.xsd">
    <modelVersion>4.0.0</modelVersion>

    <groupId>com.blabla</groupId>
    <artifactId>myself</artifactId>
    <packaging>pom</packaging>
    <version>1.0-SNAPSHOT</version>

    <!--springboot工程需要继承的父工程-->
    <parent>
        <groupId>org.springframework.boot</groupId>
        <artifactId>spring-boot-starter-parent</artifactId>
        <version>2.3.5.RELEASE</version>
    </parent>
    <dependencies>
        <!--web开发的起步依赖/场景启动器-->
        <dependency>
            <groupId>org.springframework.boot</groupId>
            <artifactId>spring-boot-starter-web</artifactId>
        </dependency>
         <!--mybatis场景启动器-->
        <dependency>
            <groupId>org.mybatis.spring.boot</groupId>
            <artifactId>mybatis-spring-boot-starter</artifactId>
            <version>2.1.0</version>
        </dependency>
        <!--mysql-->
        <dependency>
            <groupId>mysql</groupId>
            <artifactId>mysql-connector-java</artifactId>
            <version>5.1.46</version>
        </dependency>
        <dependency>
            <groupId>org.springframework.boot</groupId>
            <artifactId>spring-boot-starter-jdbc</artifactId>
        </dependency>
        <!--pojo注解-->
        <dependency>
            <groupId>org.projectlombok</groupId>
            <artifactId>lombok</artifactId>
            <scope>provided</scope>
        </dependency>
    </dependencies>

</project>
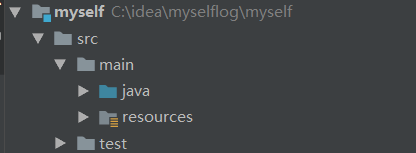
创建启动类,搭建项目目录
添加springboot配置文件 application.xml

启动类代码非常简单,如下:
package com;

import org.springframework.boot.SpringApplication;
import org.springframework.boot.autoconfigure.SpringBootApplication;

// 启动springboot项目
@SpringBootApplication
public class MyselfLog {
    public static void main(String[] args) {
        SpringApplication.run(MyselfLog.class,args);
    }
}
这里要注意启动类和其它需要加载的类的包路径关系,开发用到的类必须在启动类的包路径下,否则springboot启动扫描加载时扫描不到;
到这一步其实可以启动下看下是否正常启动,没问题进行下一步;
controller/service/dao开发代码
controller层
package com.blabla.controller;

import com.blabla.service.LogService;
import org.apache.ibatis.annotations.Param;
import org.springframework.web.bind.annotation.*;

import javax.annotation.Resource;

@RestController
@RequestMapping("/blabla")
public class LogController {
    @Resource
    private LogService logService;
    @GetMapping("/getlog")
    public String getFirstLog(Integer userid){
        return logService.getFirstLog(userid)+" everyday is best";
    }
    /*
    这里采用get请求插入,有兴趣的同学可以走postman测试,用post请求;
    */
    @GetMapping("/insert")
    public boolean insertLog(@Param("userid") Integer userid, @Param("sign")String sign, @Param("ext")String ext){
        return logService.insertLog(userid,sign,ext);
    }
}
service层
这里直接建类了,不建接口了,企业开发要做接口统一
package com.blabla.service;

import com.blabla.dao.LogDao;
import org.springframework.stereotype.Service;

import javax.annotation.Resource;

@Service
public class LogService {
    @Resource
    private LogDao logDao;
    public String getFirstLog(Integer userid){

        return logDao.getLog(userid)+ " you and me";
    }

    public boolean insertLog(Integer userid, String sign, String ext) {
        Integer integer = logDao.insertLog(userid, sign, ext);
        if(integer != null){
            return true;
        }
        return false;
    }
}
这里还未进行数据库连接时,可以直接service返回字符串启动访问看是否返回正常;
dao层(连接数据库)
连接数据库配置
在application.xml配置文件中做如下配置:
spring:
  datasource:
    # 如果使用的是高版本的mysql数据库驱动,强制要求使用时区
    # url: jdbc:mysql:///springboot?serverTimezone=UTC
    url: jdbc:mysql://192.168.200.130:3306/db1?characterEncoding=utf-8&useSSL=false
    username: root
    password: root
    # 如果使用的是高版本的mysql数据库驱动,建议使用新的驱动,类名如下:
    # com.mysql.cj.jdbc.Driver
    driver-class-name: com.mysql.jdbc.Driver
dao开发
package com.blabla.dao;

import com.blabla.pojo.Log;
import org.apache.ibatis.annotations.Mapper;
import org.apache.ibatis.annotations.Param;

@Mapper
public interface LogDao {

   Log getLog(Integer userid);

   Integer insertLog(@Param("userid") Integer userid, @Param("sign") String sign, @Param("ext") String ext);
}
mapper配置文件开发:
在resources目录下建立文件夹方mapper文件,目录如下

注意映射文件目录和dao的目录结构,尽量保证一样,不然扫描可能会出现问题,需要增加额外配置,这里不展开了;
mapper文件内容如下:
<?xml version="1.0" encoding="UTF-8" ?>
<!DOCTYPE mapper PUBLIC "-//mybatis.org//DTD Mapper 3.0//EN" "http://mybatis.org/dtd/mybatis-3-mapper.dtd">
<!--命名空间  指向dao类-->
<mapper namespace="com.blabla.dao.LogDao">
    <!--type映射的类-->
    <resultMap id="resultLog" type="com.blabla.pojo.Log">
        <id column="id" property="id"/>
        <result column="userid" property="userid" />
        <result column="user_sign" property="userSign"/>
        <result column="cre_date" property="creDate"/>
        <result column="update_date" property="updateDate"/>
        <result column="ext" property="ext"/>
    </resultMap>
    <select id="getLog" resultMap="resultLog">
        select * from myselflog where userid = #{userid}
    </select>
    <insert id="insertLog">
        insert into myselflog values (null ,#{userid},#{sign},now(),now(),#{ext})
    </insert>
</mapper>
至此项目构建完毕,启动项目输入url进行访问,效果如下
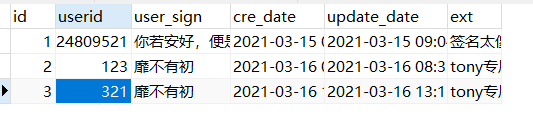
1.查询url:
http://localhost:8080/blabla/getlog?userid=123
注意:数据库中userid不是唯一的,如果自己建demo可能是重复的会报错

数据库数据:
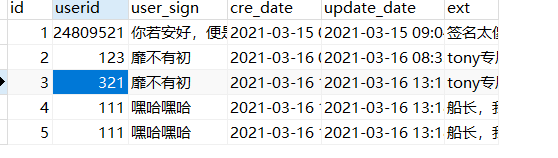
插入数据url:
http://localhost:8080/blabla/insert?userid=111&sign=xxx&ext=xxx
至此手动搭建springboot项目完毕
代码已经上传码云:https://gitee.com/a-long-time-to-name-it/springboot-build01
欢迎一起探讨,这是小白搭建。


 4168
4168


 被折叠的 条评论
为什么被折叠?
被折叠的 条评论
为什么被折叠?
 到【灌水乐园】发言


