【SSM+Android项目开发】【第一节】【基础页面切换】【项目实例】
前言
各位可以参考一下我们自己手机里面的APP,除去核心信息界面以外,还存在
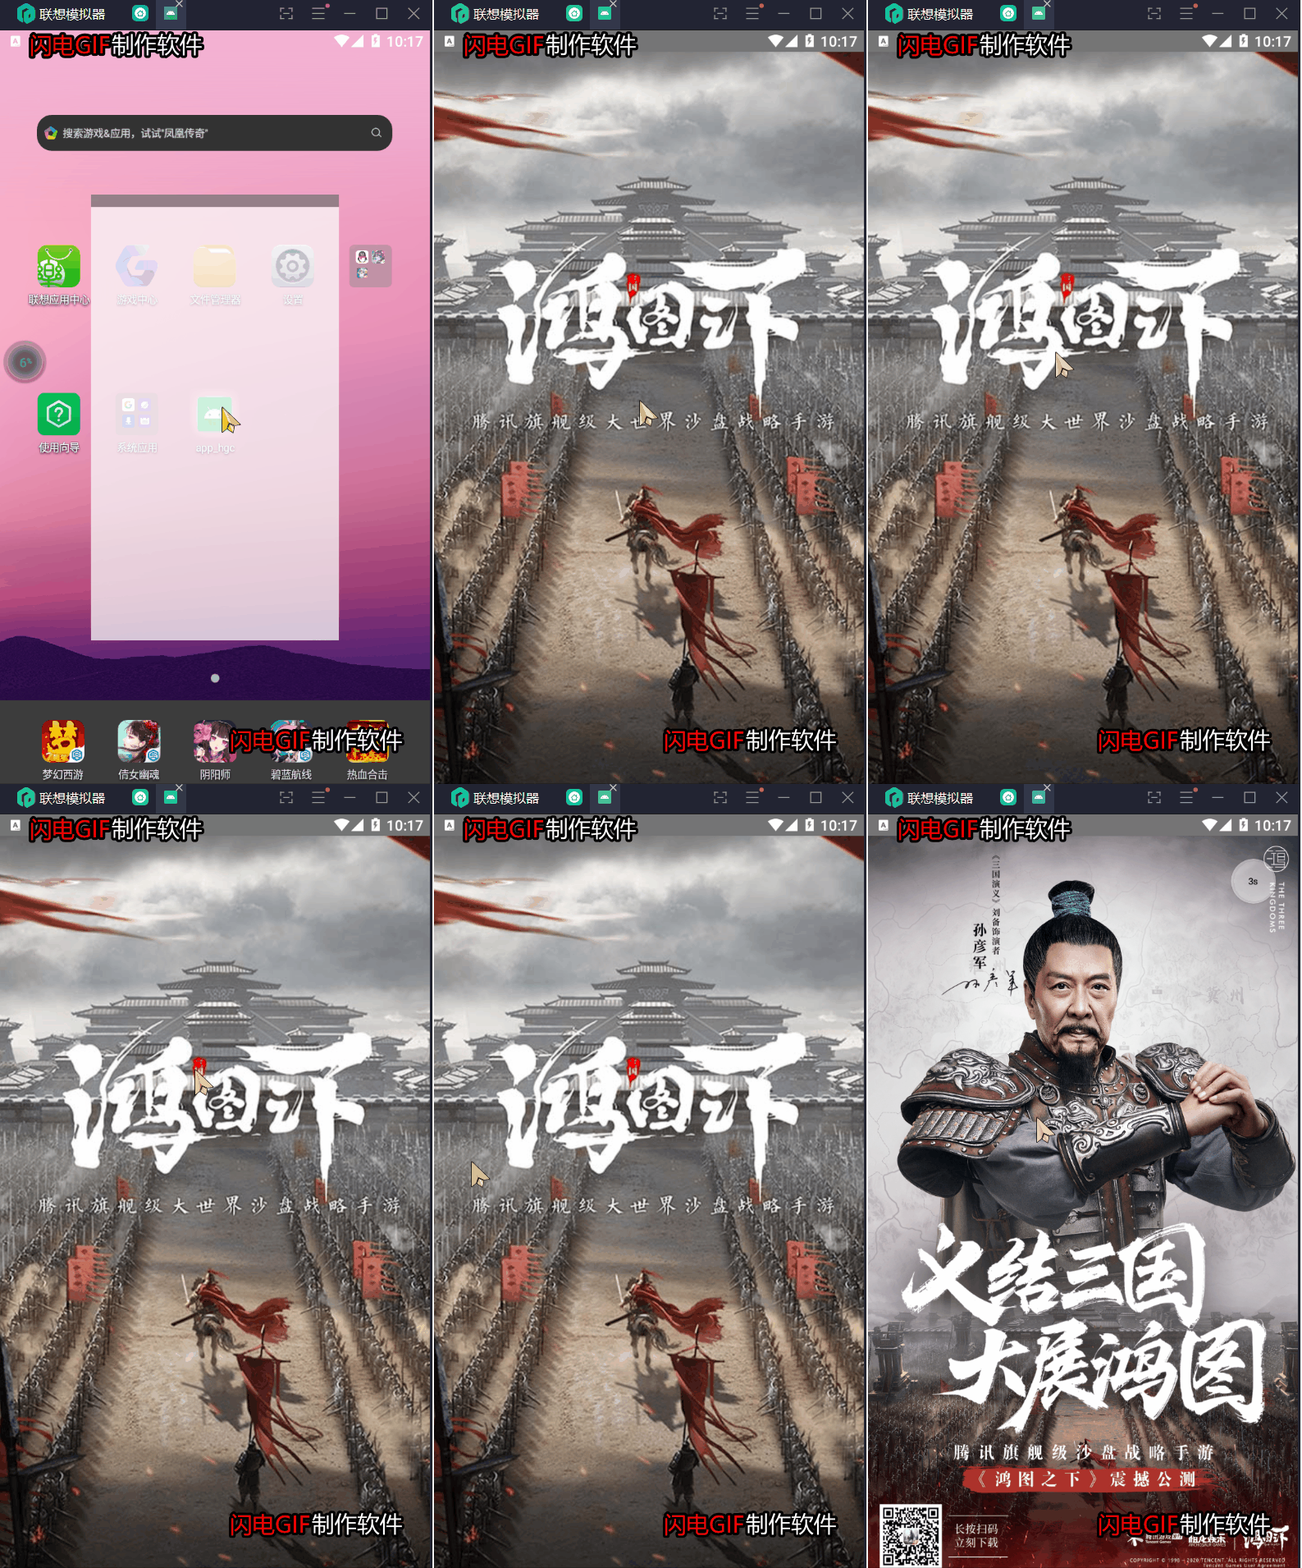
- 闪屏页:免除打开软件出现黑屏的尴尬
- 广告页:部分软件用来恰饭部分,在我的项目是把它作为切换页面的中转站
- 导航页:软件第一次启动才出现的部分,主要用来介绍软件的功能
- 登陆页:dddd(懂得都懂)
- 注册页:dddd
跳转逻辑

一、闪屏页-SplashActivity
-
逻辑讲述
设置一个有背景图片的页面,使该页面经过几秒后自动切换到下一个页面 -
布局

<?xml version="1.0" encoding="utf-8"?>
<androidx.constraintlayout.widget.ConstraintLayout xmlns:android="http://schemas.android.com/apk/res/android"
    xmlns:app="http://schemas.android.com/apk/res-auto"
    xmlns:tools="http://schemas.android.com/tools"
    android:layout_width="match_parent"
    android:layout_height="match_parent"
    android:background="@drawable/bg_start"
    tools:context=".SplashActivity">
</androidx.constraintlayout.widget.ConstraintLayout>
- java代码部分
public class SplashActivity extends AppCompatActivity {

    @Override
    protected void onCreate(Bundle savedInstanceState) {
        super.onCreate(savedInstanceState);
        setContentView(R.layout.activity_splash);

        //实机演示时,发现手机成功安装该软件后,直接在安装完成页面打开软件会出现关机现象
        //通过搜索得出的解释是点击打开按钮和点击图标启动时,Intent的参数传递的不一样,activity的启动方式不同,
        if ((getIntent().getFlags() & Intent.FLAG_ACTIVITY_BROUGHT_TO_FRONT) !=0){
            finish();
            return;
        }

        //启动线程,在该Activity停留2000毫秒后将组件跳转到广告页
        new Handler().postDelayed(new Runnable() {
            @Override
            public void run() {
                Intent intent=new Intent(getApplicationContext(),AdActivity.class);
                startActivity(intent);
                SplashActivity.this.finish();
            }
        },2000);
    }
}
- 知识点:线程、intent(意图)
- 效果演示

二、广告页-AdActivity
-
逻辑讲述
设置一个有背景图片的页面,点击该背景图片会打开手机浏览器跳转到对应网页。并在背景之上设置了一个可点击的卡片视图,点击跳过会跳转到对应界面。 -
布局文件

<?xml version="1.0" encoding="utf-8"?>
<androidx.constraintlayout.widget.ConstraintLayout xmlns:android="http://schemas.android.com/apk/res/android"
    xmlns:app="http://schemas.android.com/apk/res-auto"
    xmlns:tools="http://schemas.android.com/tools"
    android:layout_width="match_parent"
    android:layout_height="match_parent"
    tools:context=".AdActivity">
    <FrameLayout
        android:layout_width="match_parent"
        android:layout_height="match_parent">
        <ImageButton
            android:id="@+id/ad_ib"
            android:layout_width="match_parent"
            android:layout_height="match_parent"
            android:src="@drawable/ad_ad1"
            android:padding="0dp"
            android:scaleType="fitXY"/>
        <androidx.cardview.widget.CardView
            android:id="@+id/ad_bt"
            android:layout_width="50dp"
            android:layout_height="50dp"
            app:cardCornerRadius="25dp"
            android:layout_gravity="right"
            android:layout_marginRight="25dp"
            android:layout_marginTop="25dp"
            app:cardBackgroundColor="@color/white_A50"
            android:clickable="true">
            <TextView
                android:id="@+id/ad_tv"
                android:layout_width="wrap_content"
                android:layout_height="wrap_content"
                android:layout_gravity="center"
                android:textSize="10dp"
                android:text="跳过"
                android:textColor="@color/black"/>
        </androidx.cardview.widget.CardView>
    </FrameLayout>
</androidx.constraintlayout.widget.ConstraintLayout>
- java代码部分
public class AdActivity extends AppCompatActivity {

    SharedPreferences sp;//安卓自带的轻量级型存储库,可以存储一些小型数据,我一般称为全局变量
    CardView bt;//可点击的卡片视图,倒计时结束后可点击跳过,跳转到下一个页面
    ImageButton ib;//图片按钮组件,设置了点击后跳转到对应网页
    TextView tv;//文本框组件,设置了用来显示倒计时
    MyCountDownTimer myCountDownTimer;//安卓自带倒计时类

    @Override
    protected void onCreate(Bundle savedInstanceState) {
        super.onCreate(savedInstanceState);
        setContentView(R.layout.activity_ad);

        //启动全局变量
        sp=getSharedPreferences("sp",MODE_PRIVATE);
        //打开全局变量逻辑器
        SharedPreferences.Editor editor=sp.edit();

        //装配数据
        init();

        //初始化变量
        Intent intent = null;

        //初始化状态,调试软件
        //editor.putString("state","xxx").commit();

        //根据全局变量判断state,选择要跳转的Activity的意图
        switch (sp.getString("state","")){
            case "":
                //表示第一次启动未经历导航页,将预备启动导航页面
                intent=new Intent(getApplicationContext(),GuideActivity.class);
                break;
            case "login":
                //表示已经经历导航页但未登录,将预备启动登陆页面
                intent=new Intent(getApplicationContext(),LoginActivity.class);
                break;
            case "main":
                //表示已经登陆,将预备启动主界面
                intent=new Intent(getApplicationContext(),MainActivity.class);
                break;
            default:
                //表示出现异常情况,将对state值初始化并直接关闭程序,主要用于调试初始化软件
                Toast.makeText(getApplicationContext(),"参数出错,正在初始化退出",Toast.LENGTH_LONG).show();
                editor.putString("state","");
                editor.apply();
                finish();
        }


        //启动倒计时
        myCountDownTimer= new MyCountDownTimer(5000, 1000);
        myCountDownTimer.start();
        //设置按钮点击监听器,点击将跳转到预备activity
        Intent finalIntent = intent;
        bt.setOnClickListener(v -> {
            String message=tv.getText().toString().trim();
            //判断倒计时是否结束
            if (Objects.equals(message, "跳过")){
                //跳转页面
                startActivity(finalIntent);
                finish();
            }else{
                //显示吐丝
                Toast.makeText(this, "等待倒计时结束后点击跳过", Toast.LENGTH_SHORT).show();
            }
        });


        //设置图片按钮点击监听器,点击将跳转到对应的url
        ib.setOnClickListener(v -> {
            Uri uri = Uri.parse("https://war.qq.com/cp/a20200818xzz/index_p.shtml");
            Intent intent1 = new Intent(Intent.ACTION_VIEW, uri);
            startActivity(intent1);
        });
    }

    //将视图组件映射到对象
    private void init() {
        bt = this.findViewById(R.id.ad_bt);
        ib = this.findViewById(R.id.ad_ib);
        tv = (TextView) findViewById(R.id.ad_tv);
    }


    //继承倒计时
    class MyCountDownTimer extends CountDownTimer {
        TextView tv=(TextView) findViewById(R.id.ad_tv);
        /**
         * @param millisInFuture    The number of millis in the future from the call
         *                          to {@link #start()} until the countdown is done and {@link #onFinish()}
         *                          is called.
         * @param countDownInterval The interval along the way to receive
         *                          {@link #onTick(long)} callbacks.
         */
        public MyCountDownTimer(long millisInFuture, long countDownInterval) {
            super(millisInFuture, countDownInterval);
        }

        //设置倒计时进行中的文本框内容
        @Override
        public void onTick(long millisUntilFinished) {
            tv.setText(millisUntilFinished/1000+"s");
        }

        //设置倒计时结束时的文本框内容
        @Override
        public void onFinish() {
            tv.setText("跳过");
        }
    }


    //销毁倒计时
    @Override
    protected void onDestroy() {
        if (myCountDownTimer != null) {
            myCountDownTimer.cancel();
        }
        super.onDestroy();
    }
}
- 知识点:intent(意图)、CountDownTimer、SharedPreferences
- 效果演示

二、导航页-GuideActivity
-
逻辑讲述
设置一个多面控件viewpage,在最后一页设置按钮跳转到其他活动 -
布局文件
<?xml version="1.0" encoding="utf-8"?>
<androidx.constraintlayout.widget.ConstraintLayout xmlns:android="http://schemas.android.com/apk/res/android"
    xmlns:app="http://schemas.android.com/apk/res-auto"
    xmlns:tools="http://schemas.android.com/tools"
    android:layout_width="match_parent"
    android:layout_height="match_parent"
    tools:context=".GuideActivity">
    <androidx.viewpager.widget.ViewPager
        android:id="@+id/guide_vp"
        android:layout_width="match_parent"
        android:layout_height="match_parent"/>

</androidx.constraintlayout.widget.ConstraintLayout>
- java代码部分
 public class GuideActivity extends AppCompatActivity {

    ViewPager vp;//设置多面控件viewpager
    ArrayList<View> arrayList;//视图数组
    View view1,view2,view3,view4;//对应的视图
    Button bt;//按钮控件,点击后将跳转到登录页
    SharedPreferences sp;//全局变量
    SharedPreferences.Editor editor;//全局变量逻辑器

    @Override
    protected void onCreate(Bundle savedInstanceState) {
        super.onCreate(savedInstanceState);
        setContentView(R.layout.activity_guide);

        //将创建的对象对应组件
        init();

        //将视图列表装载到适配器
        vp.setAdapter(new ViewPager_1(getApplicationContext(),arrayList));

        //设置按钮点击监听器,点击按钮后跳转到登录页,并修改state值
        bt.setOnClickListener(new View.OnClickListener() {
            @Override
            public void onClick(View v) {
                editor.putString("state","login");
                editor.commit();
                Intent intent=new Intent(getApplicationContext(),LoginActivity.class);
                startActivity(intent);
                finish();
            }
        });

    }


    //将创建的对象对应组件
    private void init() {
        vp=this.findViewById(R.id.guide_vp);
        //将视图添加到数组中
        LayoutInflater inflater=getLayoutInflater();
        view1=inflater.inflate(R.layout.guide_view_1,null);
        view2=inflater.inflate(R.layout.guide_view_2,null);
        view3=inflater.inflate(R.layout.guide_view_3,null);
        view4=inflater.inflate(R.layout.guide_view_4,null);
        bt=view4.findViewById(R.id.guide_bt);
        arrayList=new ArrayList<>();
        arrayList.add(view1);
        arrayList.add(view2);
        arrayList.add(view3);
        arrayList.add(view4);

        //获取全局变量
        sp=getSharedPreferences("sp",MODE_PRIVATE);
        editor=sp.edit();
    }
}
- 知识点:ViewPager、LayoutInflater、Adapter
- 效果演示
(补了广告页的点击图片跳转网页的效果)

- 其他代码
可以看到在导航页设置了一个ViewPager的适配器:
vp.setAdapter(new ViewPager_1(getApplicationContext(),arrayList));
并配备了四个xml视图:
view1=inflater.inflate(R.layout.guide_view_1,null);
view2=inflater.inflate(R.layout.guide_view_2,null);
view3=inflater.inflate(R.layout.guide_view_3,null);
view4=inflater.inflate(R.layout.guide_view_4,null);
ViewPager_1.java
public class ViewPager_1 extends PagerAdapter {


    Context context;
    ArrayList<View> list;

    public ViewPager_1(Context context, ArrayList<View> list) {
        this.context=context;
        this.list=list;
    }

    public int getCount() {
        return list.size();
    }

    public boolean isViewFromObject(View view,Object object) {
        return view==object;
    }

    public Object instantiateItem(ViewGroup container, int position) {
        container.addView(list.get(position));
        return list.get(position);
    }

    public void destroyItem(ViewGroup container, int position,Object object) {
        container.removeView(list.get(position));
    }
}
guide_view_1.xml

<?xml version="1.0" encoding="utf-8"?>
<LinearLayout xmlns:android="http://schemas.android.com/apk/res/android"
    android:layout_width="match_parent"
    android:layout_height="match_parent">
    <ImageView
        android:layout_width="match_parent"
        android:layout_height="match_parent"
        android:src="@drawable/bg_guide1"
        android:scaleType="fitXY"/>

</LinearLayout>
guide_view_2.xml

<?xml version="1.0" encoding="utf-8"?>
<LinearLayout xmlns:android="http://schemas.android.com/apk/res/android"
    android:layout_width="match_parent"
    android:layout_height="match_parent">
    <ImageView
    android:layout_width="match_parent"
    android:layout_height="match_parent"
    android:src="@drawable/bg_guide2"
    android:scaleType="fitXY"/>

</LinearLayout>
guide_view_3.xml

<?xml version="1.0" encoding="utf-8"?>
<LinearLayout xmlns:android="http://schemas.android.com/apk/res/android"
    android:layout_width="match_parent"
    android:layout_height="match_parent">
    <ImageView
        android:layout_width="match_parent"
        android:layout_height="match_parent"
        android:src="@drawable/bg_guide3"
        android:scaleType="fitXY"/>

</LinearLayout>
guide_view_4.xml

<?xml version="1.0" encoding="utf-8"?>
<LinearLayout xmlns:android="http://schemas.android.com/apk/res/android"
    android:layout_width="match_parent"
    android:layout_height="match_parent">
    <LinearLayout
        android:layout_width="match_parent"
        android:layout_height="match_parent"
        android:orientation="vertical"
        android:background="@drawable/bg_guide4"
        android:scaleType="fitXY">

        <Button
            android:id="@+id/guide_bt"
            android:layout_width="wrap_content"
            android:layout_height="wrap_content"
            android:layout_gravity="center"
            android:layout_marginTop="300dp"
            android:background="@color/blackHalf"
            android:text="进入应用"
            android:textStyle="normal"
            android:textColor="@color/white" />

    </LinearLayout>
</LinearLayout>
由于该部分较为基础,这里项目描述的可能不是太详细,请见谅
最后,请大家在评论区批评指正


 1198
1198

 被折叠的 条评论
为什么被折叠?


