


Bean的装配方式之annotation注解装配
上一篇文章提到过bean的装配,不明白的可以查看上一篇链接–https://blog.csdn.net/weixin_54061333/article/details/117917508
下面是annotation装配的方式–
annotation分为以下几种
- @Component 注解描述Sping中的bean,可用于任何层次。
- @Repository 注解数据访问层
- @Service 注解业务层
- @Controller注解控制层
- @Autowired 用于对Bean的属性变量,属性的setter方法及构造进行标注,配合对应的注解完成装配工作,默认按照bean类型进行装配。
- @ Resource 有两个重要属性 name=“bean实例名称” type=“bean实例类型”,如果不指定name或者type默认按name进行装配;
- @Qualifier 与@Autowired配合使用,会讲默认按bean类型装配修改为按照bean实例名称装配。
下面在代码中进一步说明–
代码中有Student类,Teacher类以及Worker类分别实现Person接口,
假定 Teacher为管理类, Worker为服务类,Student为数据访问类
package charpter0615;
public interface Person {
public void say();
}
package com.test.chapter0615;
import javax.annotation.Resource;

import org.springframework.beans.factory.annotation.Autowired;
import org.springframework.stereotype.Controller;
import charpter0615.Person;

@Controller("teacher")//老师是控制层吧
public class Teacher implements Person{
	private String TeacherName;
	private String TeacherSubject;
		public Teacher() {
		}

public void setTeacherName(String teacherName) {
		TeacherName = teacherName;
	}
	public void setTeacherSubject(String teacherSubject) {
		TeacherSubject = teacherSubject;
	}
@Resource(name="student")
private Student student;
@Autowired//自动注入student
public void setStudent(Student student) {
	this.student=student;
}
@Resource(name="worker")
@Autowired//自动注入worker
private Worker worker;

public void setWorker(Worker worker) {
	this.worker=worker;
}
	@Override
	public void say() {
		this.student.say();
		System.out.println("同学们好!!我是你们的老师--"+this.TeacherName+"从今天起教你们--"+this.TeacherSubject);
		this.worker.say();
	}
}
package com.test.chapter0615;
import org.springframework.stereotype.Repository;
import charpter0615.Person;
@Repository("student")//使用@Repository注解将Student类识别为bean
public class Student implements Person {
private String studentName;
private String studentGrade;
private int studentAge;
	public Student(String studentName ,String studentGrade,int studentAge) {
		this.studentName=studentName;
		this.studentAge=studentAge;
		this.studentGrade=studentGrade;
	}
		@Override
	public void say() {
		// TODO Auto-generated method stub
		System.out.println("老师好!!我是"+this.studentName+"--"+this.studentGrade+"班的学生"+"今年"+this.studentAge+"岁");
	}
}
package com.test.chapter0615;
import org.springframework.stereotype.Service;
import charpter0615.Person;
@Service("worker")//使用@Service注解将Worker类识别为bean
public class Worker implements Person{
	@Override
	public void say() {
		// TODO Auto-generated method stub
		System.out.println("Work said : It's my pleasure to service for you!");
	}
}
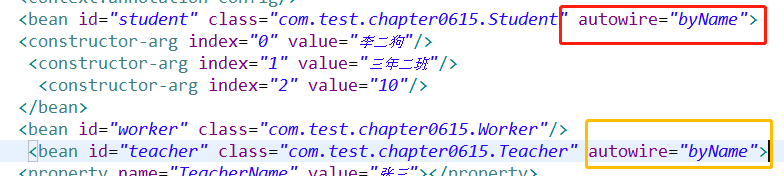
配置xml文件
<?xml version="1.0" encoding="UTF-8" ?>
<beans xmlns="http://www.springframework.org/schema/beans"
       xmlns:xsi="http://www.w3.org/2001/XMLSchema-instance"
       xmlns:context="http://www.springframework.org/schema/context"
       xsi:schemaLocation="http://www.springframework.org/schema/beans
       http://www.springframework.org/schema/beans/spring-beans-4.3.xsd
       http://www.springframework.org/schema/context
        http://www.springframework.org/schema/context/spring-context-4.3.xsd">
        <context:annotation-config/>
        <bean id="student" class="com.test.chapter0615.Student" autowire="byName">
        <constructor-arg index="0" value="李二狗"/>
         <constructor-arg index="1" value="三年二班"/>
          <constructor-arg index="2" value="10"/>
        </bean>
        <bean id="worker" class="com.test.chapter0615.Worker"/>
         <bean id="teacher" class="com.test.chapter0615.Teacher" autowire="byName">
         <property name="student" ref="student"></property>
        <property name="worker" ref="worker"></property>
        <property name="TeacherName" value="张三"></property>
        <property name="TeacherSubject" value="数学"></property>
        </bean>
</beans>
创建测试类–
package com.test.chapter0615;

import org.springframework.context.ApplicationContext;
import org.springframework.context.support.ClassPathXmlApplicationContext;
import charpter0615.Person;
public class Testtwo {
	public static void main(String[] args) {

ApplicationContext app = new ClassPathXmlApplicationContext("applicationcontext.xml");
	Person per =(Person )app.getBean("teacher");
	per.say();
}
}
 通过annotation注解相比于单纯的xml方式能简化一部分代码,比如注入student和work的部分
 有了注解@Autowired会自动帮你注入,通常配置文件需要结合annotation和xml共同配置;
还有一种扫描式注入,
 需要指定扫描的位置就可以了,其余的配置跟上面差不许多;
以上就是annotation注解的详细内容,如有不当指出还请指出;
有没有发现上面用到了自动装配@autowired,下面说一下自动装配
@Autowired自动装配
自动装配@Autowired 有四个值:
- default,由配置bean开头时<beans后指定 格式如下–
<beans default-autowire=“byName” >
- byName–按照属性名自动装配;
- byType按照属性类型自动装配;
- constructor按照构造参数的数据类型进行byType模式的自动装配
- no --在默然情况下不进行自动装配,必须按照<property ref进行装配
 自动装配@Autowired 主要用于注入的时候
共同学习共同进步,见证成长;


 2989
2989


 被折叠的 条评论
为什么被折叠?
被折叠的 条评论
为什么被折叠?
 到【灌水乐园】发言


