


**结构图:**((复制的大佬博客里面的图,链接放在最后了))
先把YOLOV3网络结构部分图放这:

在YOLOV3的源码内,存在两块,一块是YOLO的主干网络Darknet53和不同特征层的融合问题,我先学习的是主干网络部分,先学习各个模块构成的函数,接着去YOLO这个类中去学习各个模块的套用以及排列使用。
还有一张结构图也是对学习模块化帮助很大:

这张图虽然没有各个层的通道数以及图片大小的直观标注,但是看网络结构的模块化和模块的使用更加方便,所以我是结合两个图和YOLO的源代码学习。
第一部分,先看各个模块化的实现代码
1. CBL模块
一个卷积层,一个BN层,一个ReLU层结合

def conv2d(filter_in, filter_out, kernel_size):          #yolov3结构中的CBL模块,conv+bn+leakrelu
    pad = (kernel_size - 1) // 2 if kernel_size else 0
    #如果 kernel_size 的值为零(表示不使用卷积内核),则将 pad 的值设置为零,否则将 pad 的值设置为 (kernel_size - 1) // 2
    #pad=ks-1//2,使得卷积前后图片不变大小
    return nn.Sequential(OrderedDict([
        ("conv", nn.Conv2d(filter_in, filter_out, kernel_size=kernel_size, stride=1, padding=pad, bias=False)),
        ("bn", nn.BatchNorm2d(filter_out)),
        ("relu", nn.LeakyReLU(0.1)),
    ]))
解释:定义一个conv2的函数,参数包括输入图片大小,输出图片大小以及卷积核的尺寸
pad,也就是填充,ks如果不是0的话,pad=ks-1//2,这样设置是为了让卷积前后图片的大小不变
conv2返回一个nn.Sequential(),这个类似于一个盒子,里面装了一次nn.conv,nn.bn,nn.relu。
2. Res Unit模块(残差块)
两个CBL模块加上一个初始X在后续做Add操作,整体是一个残差结构

class BasicBlock(nn.Module):
  #残差块,图中的Res_unit块,两层cbl然后末尾加上输入 X,做残差结构
    def __init__(self, inplanes, planes):
        super(BasicBlock, self).__init__()
        self.conv1  = nn.Conv2d(inplanes, planes[0], kernel_size=1, stride=1, padding=0, bias=False)
        self.bn1    = nn.BatchNorm2d(planes[0])
        self.relu1  = nn.LeakyReLU(0.1)

        self.conv2  = nn.Conv2d(planes[0], planes[1], kernel_size=3, stride=1, padding=1, bias=False)
        self.bn2    = nn.BatchNorm2d(planes[1])
        self.relu2  = nn.LeakyReLU(0.1)

    def forward(self, x):
        residual = x               #残差边

        out = self.conv1(x)
        out = self.bn1(out)
        out = self.relu1(out)

        out = self.conv2(out)
        out = self.bn2(out)
        out = self.relu2(out)

        out += residual
        return out
解释:定义一个BasicBlock类,括号是继承自(nn.module)类,是一个子类
_init_ 函数 ,我的理解是再一个类最开始的时候给一堆声明,super一行是做初始化,剩下的都是在给self.conv1以及等等做声明和幅值。
forward函数是前向传播函数,基本大部分网络结构都是在这个函数里面排列块,两个参数,self和输入X,self可能是每一个类下面定义的函数都需要带的参数,X就是输入,residual=x,就是图片中的残差边,然后经过两个CBL块,也就是forward函数中间六个语句,最后用out+=residual,来实现模块中的ADD操作。
con1中,1*1卷积,步长1,填充0,卷积前后图片尺寸不发生变化
conv2中,3*3卷积,步长1,填充2,同样不变
残差结构不改变图片输入输出尺寸
3.Res_X模块
X代表的是残差结构堆叠的次数

    def _make_layer(self, planes, blocks):
        # 实现图片里面Res_x的模块,cbl+x个Res_unit
        layers = []
        # 下采样,步长为2,卷积核大小为3
        layers.append(("ds_conv", nn.Conv2d(self.inplanes, planes[1], kernel_size=3, stride=2, padding=1, bias=False)))  #下采样,图片压缩,通道数增加
        layers.append(("ds_bn", nn.BatchNorm2d(planes[1])))
        layers.append(("ds_relu", nn.LeakyReLU(0.1)))
        # 加入残差结构
        self.inplanes = planes[1]
        for i in range(0, blocks):                        #残差块堆叠的次数
            layers.append(("residual_{}".format(i), BasicBlock(self.inplanes, planes)))
        return nn.Sequential(OrderedDict(layers))
解释:先定义一个_make_layer函数,planes是通道数,blocks是残差块堆叠次数
.append函数是在列表里加东西,所以layers里面存的实际就是一个CBL模块,
self.inplanes=planes[1],就是把CBL最后一层的输出通道数和残差块的输入通道数设置为一样的,
一个循环结构,根据给定的blocks数量,重复加入残差块,然后返回。
CBL层中,conv使用的3*3卷积,步长为2,填充为1,416尺寸经过卷积后,
((416-3+2)/2)+1=208,
由于残差结构里面卷积前后不改变图片尺寸,所以经过一个Res_x后,第一个CBL中的C会导致图片尺寸减小一半。
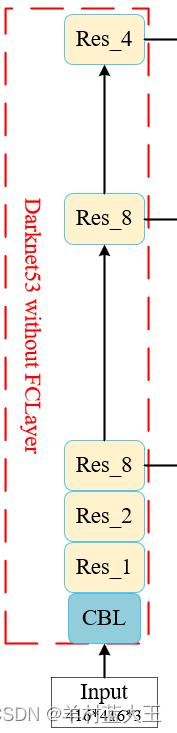
第二部分,Darknet网络
输入图片先经过CBL层,然后blocks数分别为1,2,8,8,4的Res_x层,就是把提到的模块堆叠和排序
class DarkNet(nn.Module):
    def __init__(self, layers):
        super(DarkNet, self).__init__()
        self.inplanes = 32
        # 416,416,3 -> 416,416,32
        self.conv1  = nn.Conv2d(3, self.inplanes, kernel_size=3, stride=1, padding=1, bias=False)  #图片大小不变,通道数变成32
        self.bn1    = nn.BatchNorm2d(self.inplanes)
        self.relu1  = nn.LeakyReLU(0.1)

        # 416,416,32 -> 208,208,64
        self.layer1 = self._make_layer([32, 64], layers[0])      #layer[o]=1             【32,64】是上面残差块两次卷积的通道数
        # 208,208,64 -> 104,104,128
        self.layer2 = self._make_layer([64, 128], layers[1])          #layer[1]=2
        # 104,104,128 -> 52,52,256
        self.layer3 = self._make_layer([128, 256], layers[2])      #layer[2]=8
        # 52,52,256 -> 26,26,512
        self.layer4 = self._make_layer([256, 512], layers[3])       #layer[3]=8
        # 26,26,512 -> 13,13,1024
        self.layer5 = self._make_layer([512, 1024], layers[4])          #layer[4]=4

        self.layers_out_filters = [64, 128, 256, 512, 1024]

        # 进行权值初始化
        for m in self.modules():
            if isinstance(m, nn.Conv2d):
                n = m.kernel_size[0] * m.kernel_size[1] * m.out_channels
                m.weight.data.normal_(0, math.sqrt(2. / n))
            elif isinstance(m, nn.BatchNorm2d):
                m.weight.data.fill_(1)
                m.bias.data.zero_()
def darknet53():
    model = DarkNet([1, 2, 8, 8, 4])
    return model
解释:定义一个DarkNet的子类继承自nn.module
定义_init_,参数是一个列表,也就是最下面的【1,2,8,8,4】残差块的blocks的大小
先经过一个CBL层,输入通道数3,输出通道数变为32,图片大小不变
layer1是用的make-layer函数,也就是开始定义的Res_x,输入通道接上面输出32,输出变为64,layer2,3,4,5,类似,输入输出通道数变化[32,64]-->[64,128]-->[128,256]-->[256,512]-->[512,1024]
图片大小也在不断变化[416,416]-->[208,208]-->[104,104]-->[52,52]-->[26,26]-->[13,13]
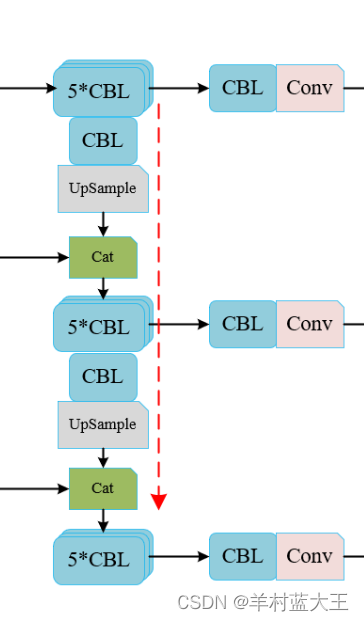
第三部分,特征金字塔部分
通过主干网络提取的三个特征层,通过堆叠操作输出不同维度的特征,更好的检测识别,这也是YOLOV3相比于之前改进和优化的地方,结合结构图和代码也是能比较清晰的理解。
CBL*5+CBL+CONV模块
定义一个make_last_layers函数函数内容就是
简单的利用五个CBL堆叠起来,不改变图片尺寸,在后面加一个CBL层,再加一个1*1卷积,重复利用3*3和1*1卷积操作是为了降低计算量。
为了在后面在YOLOBODY中调用方便所设立
def make_last_layers(filters_list, in_filters, out_filter):
                                            #五个CBL模块堆叠,加上最后一层CBL加上一层conv
    m = nn.Sequential(
        conv2d(in_filters, filters_list[0], 1),           #1*1卷积  调整通道数
        conv2d(filters_list[0], filters_list[1], 3),       #3*3卷积  特征提取,使用1*1和3*3减少计算量
        conv2d(filters_list[1], filters_list[0], 1),
        conv2d(filters_list[0], filters_list[1], 3),
        conv2d(filters_list[1], filters_list[0], 1),

        conv2d(filters_list[0], filters_list[1], 3),
        nn.Conv2d(filters_list[1], out_filter, kernel_size=1, stride=1, padding=0, bias=True)
    )
    return m
定义一个YOLOBODY类,
在初始化函数中,参数包括anchors_mask和num_class
anchors—= [[6, 7, 8], [3, 4, 5], [0, 1, 2]],帮助代码找到对应先验框,
num_class是预测类的种类数量
首先用darknet53这个函数获得主干网络输出的三个特征层,存在self.backbone里面
然后声明图片的的各个模块,分别存在layer0(对应图片最下面的),layer1,layer2,以及两个conv2和两个上采样层
在前向传播函数中,
获取self.backbone中的三个特征层,x0对应的是52*52*256,x1对应的是26*26*512,x2对应的是13*13*1024
第一个输出的特征层就是x2,13*13,经过一个make_last_layers,直接输出为out,13*13的特征层
第二个输出特征层就是x2+x1,也就是x2经过CBL*5以后,在经过1*CBL和上采样,尺寸变为26*26,与x1的尺寸一样,利用concat来把两个特征层在通道数上拼接,经过一个make_last_layers,输出为26*26的特征层,
第三个输出与第二个一样,最后输出为52*52的特征层,
函数最后返回三个特征层。
class YoloBody(nn.Module):
    def __init__(self, anchors_mask, num_classes, pretrained = False):
        super(YoloBody, self).__init__()
        #---------------------------------------------------#
        #   生成darknet53的主干模型
        #   获得三个有效特征层,他们的shape分别是:
        #   52,52,256
        #   26,26,512
        #   13,13,1024
        #---------------------------------------------------#
        self.backbone = darknet53()                        #获取三个特征层
        if pretrained:
            self.backbone.load_state_dict(torch.load("model_data/darknet53_backbone_weights.pth"))

        #---------------------------------------------------#
        #   out_filters : [64, 128, 256, 512, 1024]
        #---------------------------------------------------#
        out_filters = self.backbone.layers_out_filters

        #------------------------------------------------------------------------#
        #   计算yolo_head的输出通道数,对于voc数据集而言
        #   final_out_filter0 = final_out_filter1 = final_out_filter2 = 75
        #------------------------------------------------------------------------#
        self.last_layer0            = make_last_layers([512, 1024], out_filters[-1], len(anchors_mask[0]) * (num_classes + 5))       #分类数量

        self.last_layer1_conv       = conv2d(512, 256, 1)
        self.last_layer1_upsample   = nn.Upsample(scale_factor=2, mode='nearest')     #256+512=768
        self.last_layer1            = make_last_layers([256, 512], out_filters[-2] + 256, len(anchors_mask[1]) * (num_classes + 5))

        self.last_layer2_conv       = conv2d(256, 128, 1)
        self.last_layer2_upsample   = nn.Upsample(scale_factor=2, mode='nearest')      #256+128=384
        self.last_layer2            = make_last_layers([128, 256], out_filters[-3] + 128, len(anchors_mask[2]) * (num_classes + 5))

    def forward(self, x):
        #---------------------------------------------------#
        #   获得三个有效特征层,他们的shape分别是:
        #  x0-> 52,52,256;    x1->26,26,512;   x2->13,13,1024
        #---------------------------------------------------#
        x2, x1, x0 = self.backbone(x)

        #---------------------------------------------------#
        #   第一个特征层
        #   out0 = (batch_size,255,13,13)
        #---------------------------------------------------#
        # 13,13,1024 -> 13,13,512 -> 13,13,1024 -> 13,13,512 -> 13,13,1024 -> 13,13,512
        out0_branch = self.last_layer0[:5](x0)
        out0        = self.last_layer0[5:](out0_branch)

        # 13,13,512 -> 13,13,256 -> 26,26,256
        x1_in = self.last_layer1_conv(out0_branch)
        x1_in = self.last_layer1_upsample(x1_in)

        # 26,26,256 + 26,26,512 -> 26,26,768
        x1_in = torch.cat([x1_in, x1], 1)           #一般torch.cat()是为了把多个tensor进行拼接而存在的,在给定维度上对输入的张量序列seq 进行连接操作
        #---------------------------------------------------#
        #   第二个特征层
        #   out1 = (batch_size,255,26,26)
        #---------------------------------------------------#
        # 26,26,768 -> 26,26,256 -> 26,26,512 -> 26,26,256 -> 26,26,512 -> 26,26,256
        out1_branch = self.last_layer1[:5](x1_in)
        out1        = self.last_layer1[5:](out1_branch)

        # 26,26,256 -> 26,26,128 -> 52,52,128
        x2_in = self.last_layer2_conv(out1_branch)
        x2_in = self.last_layer2_upsample(x2_in)

        # 52,52,128 + 52,52,256 -> 52,52,384
        x2_in = torch.cat([x2_in, x2], 1)
        #---------------------------------------------------#
        #   第一个特征层
        #   out3 = (batch_size,255,52,52)
        #---------------------------------------------------#
        # 52,52,384 -> 52,52,128 -> 52,52,256 -> 52,52,128 -> 52,52,256 -> 52,52,128
        out2 = self.last_layer2(x2_in)
        return out0, out1, out2                    #三个回归预测结果


 3281
3281


 被折叠的 条评论
为什么被折叠?
被折叠的 条评论
为什么被折叠?
 到【灌水乐园】发言


