


参考openstack官网教程配置了swift服务,详细配置如下。侵权删除。建议在配置的时候注意看清楚IP地址,密码,和其他编码的配置,不要全盘复制粘贴!
说明:
(1)本次配置的openstack版本是Rocky
(2)操作系统版本是Centos 7
(3)注意存储节点上也要安装openstack客户端
yum install centos-release-openstack-rocky -y
yum install python-openstackclient -y
yum install openstack-selinux -y(4)配置片段中的省略号 (
...) 表示您应该保留的潜在默认配置选项。(5)注意命令前有#号或者$号是命令,不带的是文本。
(6)注意命令运行的节点是控制节点还是存储节点
(7) 准备两个对象存储节点,主机名分别为object1和object2。
(8)注意之前在控制节点上配置swift数据库,账号和密码
目录
(1)存储节点1配置
根据自己的情况来配置,最后可以ping通百度就行。
设置主机名为object1
# hostnamectl set-hostname object1
# bash
编辑/etc/hosts文件
# vim /etc/hosts
192.168.100.101 controller
192.168.100.102 compute
192.168.100.103 cinder
192.168.100.104 object1
192.168.100.105 object2
(2)存储节点2的配置
IPADDR=192.168.100.105
NETMASK=255.255.255.0
GATEWAY=192.168.100.2
根据自己的情况来配置,最后可以ping通百度就行。
设置主机名为object1
# hostnamectl set-hostname object2
# bash
编辑/etc/hosts文件
# vim /etc/hosts
192.168.100.101 controller
192.168.100.102 compute
192.168.100.103 cinder
192.168.100.104 object1
192.168.100.105 object2
(3)配置控制节点controller
首先获取admin的凭据,即可使用openstack命令。
# source admin-openstack.sh创建swift用户,我的密码是1234,你根据自己的来配置就行。这条命令有输出
# openstack user create --domain default --password-prompt swift
User Password:1234
Repeat User Password:1234
将admin角色添加到swift用户:
# openstack role add --project service --user swift admin这条命令无输出。
创建swift服务实体:
# openstack service create --name swift \
  --description "OpenStack Object Storage" object-store
创建对象存储服务 API 端点:
# openstack endpoint create --region RegionOne \
  object-store public http://controller:8080/v1/AUTH_%\(project_id\)s
# openstack endpoint create --region RegionOne \
object-store internal http://controller:8080/v1/AUTH_%\(project_id\)s# openstack endpoint create --region RegionOne \
object-store admin http://controller:8080/v1安装和配置组件
安装软件包
# yum install openstack-swift-proxy python-swiftclient \
  python-keystoneclient python-keystonemiddleware \
  memcached
从对象存储源存储库中获取代理服务配置文件
# curl -o /etc/swift/proxy-server.conf https://opendev.org/openstack/swift/raw/branch/stable/rocky/etc/proxy-server.conf-sample编辑/etc/swift/proxy-server.conf文件并完成以下操作
在该[DEFAULT]部分中,配置绑定端口、用户和配置目录:
[DEFAULT]
...
bind_port = 8080
user = swift
swift_dir = /etc/swift在该[pipeline:main]部分中,删除tempurland tempauth模块并添authtokenandkeystoneauth 模块:(不要更改模块的顺序)
[pipeline:main]
pipeline = catch_errors gatekeeper healthcheck proxy-logging cache container_sync bulk ratelimit authtoken keystoneauth container-quotas account-quotas slo dlo versioned_writes proxy-logging proxy-server在该[app:proxy-server]部分中,启用自动帐户创建:
[app:proxy-server]
use = egg:swift#proxy
...
account_autocreate = True在该[filter:authtoken]部分中,配置身份服务访问:(注意密码)
[filter:authtoken]
paste.filter_factory = keystonemiddleware.auth_token:filter_factory
...
www_authenticate_uri = http://controller:5000
auth_url = http://controller:35357
memcached_servers = controller:11211
auth_type = password
project_domain_id = default
user_domain_id = default
project_name = service
username = swift
password = 1234
delay_auth_decision = True在该[filter:cache]部分中,配置memcached位置
[filter:cache]
use = egg:swift#memcache
...
memcache_servers = controller:11211
(4)安装和配置存储节点
以下的命令每个存储节点上都要运行!!!object1和object2都要运行
安装支持的实用程序包:
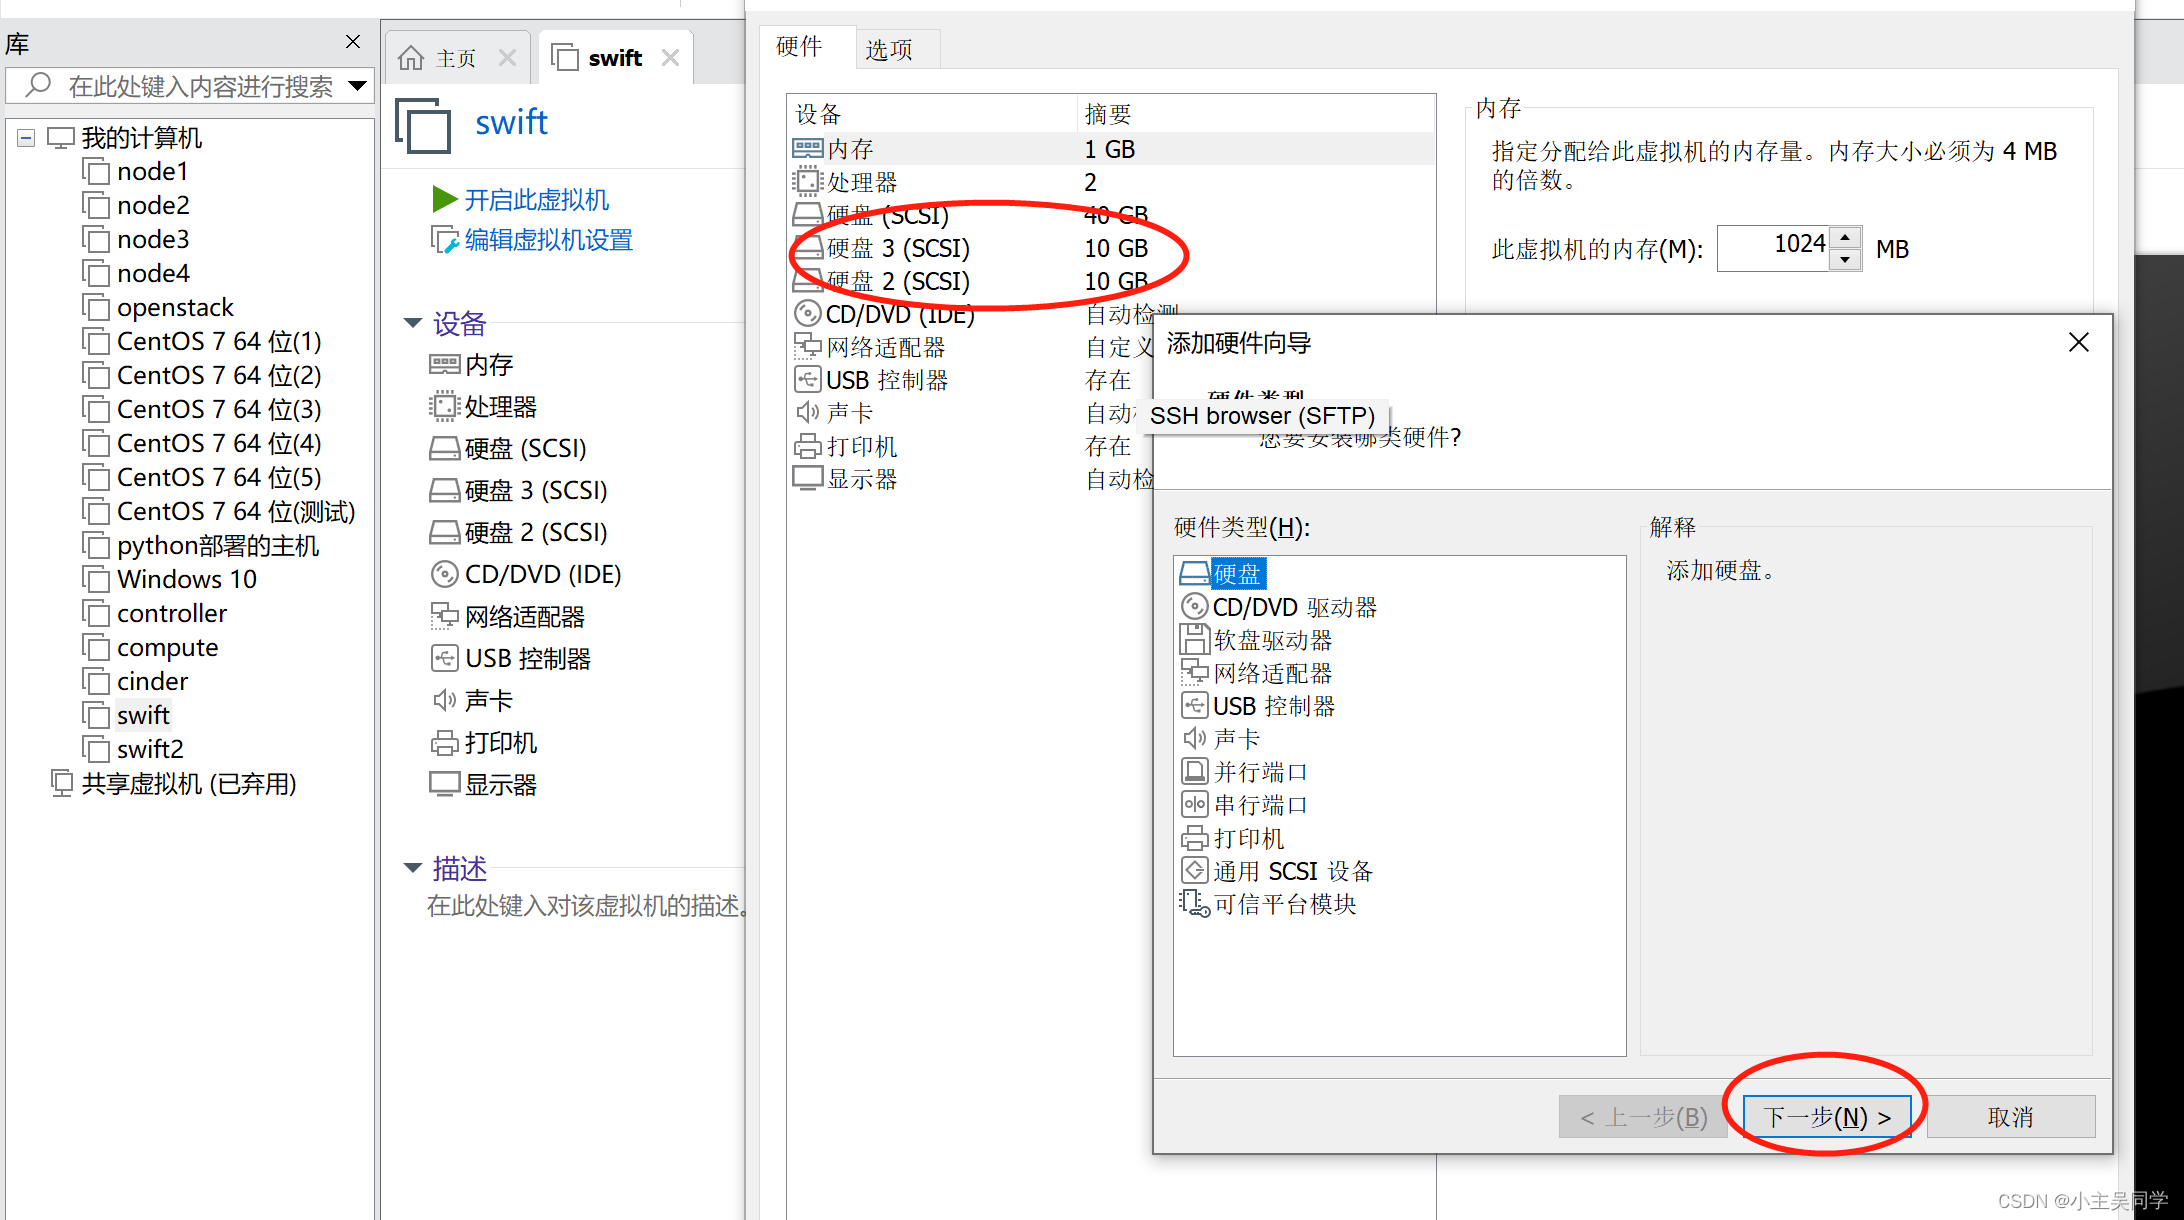
# yum install xfsprogs rsync确保虚拟机中新增两片存储sdb和sdc,相当于sda作为windows中的C盘,sbd和sdc相当于D盘和E盘,存储大概10G或者20G都可以。要加两块。
将 /dev/sdb和/dev/sdc设备格式化为 XFS
# mkfs.xfs /dev/sdb
# mkfs.xfs /dev/sdc
创建挂载点目录结构
# mkdir -p /srv/node/sdb
# mkdir -p /srv/node/sdc
编辑vim /etc/fstab文件并将以下内容添加到其中
/dev/sdb /srv/node/sdb xfs noatime,nodiratime,nobarrier,logbufs=8 0 2
/dev/sdc /srv/node/sdc xfs noatime,nodiratime,nobarrier,logbufs=8 0 2
安装设备。
# mount /srv/node/sdb
# mount /srv/node/sdc创建或编辑/etc/rsyncd.conf文件以包含以下内容:
uid = swift
gid = swift
log file = /var/log/rsyncd.log
pid file = /var/run/rsyncd.pid
address = MANAGEMENT_INTERFACE_IP_ADDRESS

[account]
max connections = 2
path = /srv/node/
read only = False
lock file = /var/lock/account.lock

[container]
max connections = 2
path = /srv/node/
read only = False
lock file = /var/lock/container.lock

[object]
max connections = 2
path = /srv/node/
read only = False
lock file = /var/lock/object.lock替换MANAGEMENT_INTERFACE_IP_ADDRESS为存储节点上管理网络的IP地址。我的是object1的地址。
启动rsyncd服务并将其配置为在系统启动时启动:
# systemctl enable rsyncd.service
# systemctl start rsyncd.service
安装软件包:
# yum install openstack-swift-account openstack-swift-container \
  openstack-swift-object
从对象存储源存储库中获取记帐户、容器和对象服务配置文件:
# curl -o /etc/swift/account-server.conf https://opendev.org/openstack/swift/raw/branch/stable/rocky/etc/account-server.conf-sample
# curl -o /etc/swift/container-server.conf https://opendev.org/openstack/swift/raw/branch/stable/rocky/etc/container-server.conf-sample
# curl -o /etc/swift/object-server.conf https://opendev.org/openstack/swift/raw/branch/stable/rocky/etc/object-server.conf-sample编辑/etc/swift/account-server.conf文件并完成以下操作:
配置[DEFAULT]绑定IP地址、绑定端口、用户、配置目录、挂载点目录:
[DEFAULT]
bind_ip = MANAGEMENT_INTERFACE_IP_ADDRESS
bind_port = 6202
user = swift
swift_dir = /etc/swift
devices = /srv/node
mount_check = True替换MANAGEMENT_INTERFACE_IP_ADDRESS为存储节点上管理网络的IP地址。
在该[pipeline:main]部分中,启用相应的模块:
[pipeline:main]
pipeline = healthcheck recon account-server在该[filter:recon]部分中,配置缓存目录:
[filter:recon]
use = egg:swift#recon
...
recon_cache_path = /var/cache/swift编辑/etc/swift/container-server.conf文件并完成以下操作:
配置[DEFAULT]绑定IP地址、绑定端口、用户、配置目录、挂载点目录
[DEFAULT]
...
bind_ip = MANAGEMENT_INTERFACE_IP_ADDRESS
bind_port = 6201
user = swift
swift_dir = /etc/swift
devices = /srv/node
mount_check = True在该[pipeline:main]部分中,启用相应的模块:
[pipeline:main]
pipeline = healthcheck recon container-server在该[filter:recon]部分中,配置缓存目录:
[filter:recon]
use = egg:swift#recon
...
recon_cache_path = /var/cache/swift编辑/etc/swift/object-server.conf文件并完成以下操作
配置[DEFAULT]绑定IP地址、绑定端口、用户、配置目录、挂载点目录:
[DEFAULT]
...
bind_ip = MANAGEMENT_INTERFACE_IP_ADDRESS
bind_port = 6200
user = swift
swift_dir = /etc/swift
devices = /srv/node
mount_check = True在该[pipeline:main]部分中,启用相应的模块:
[pipeline:main]
pipeline = healthcheck recon object-server在该[filter:recon]部分中,配置侦察(米)缓存和锁定目录:
[filter:recon]
use = egg:swift#recon
...
recon_cache_path = /var/cache/swift
recon_lock_path = /var/lock
确保正确拥有挂载点目录结构
# chown -R swift:swift /srv/node创建recon目录并确保它的正确所有权:
# mkdir -p /var/cache/swift
# chown -R root:swift /var/cache/swift
# chmod -R 775 /var/cache/swift
(5)创建和配置初始化ring
以下操作均在控制节点controller上运行。
创建账户Ring
切换到/etc/swift目录。
创建基础account.builder文件:(没有输出)
# swift-ring-builder account.builder create 10 3 1对每个存储节点上的每个存储设备重复此命令
# swift-ring-builder account.builder add \
  --region 1 --zone 1 --ip 192.168.100.104 --port 6202 --device sdb --weight 100
Device d0r1z1-10.0.0.51:6202R10.0.0.51:6202/sdb_"" with 100.0 weight got id 0
# swift-ring-builder account.builder add \
  --region 1 --zone 1 --ip 192.168.100.104 --port 6202 --device sdc --weight 100
Device d1r1z2-10.0.0.51:6202R10.0.0.51:6202/sdc_"" with 100.0 weight got id 1
# swift-ring-builder account.builder add \
  --region 1 --zone 2 --ip 192.168.100.105 --port 6202 --device sdb --weight 100
Device d2r1z3-10.0.0.52:6202R10.0.0.52:6202/sdb_"" with 100.0 weight got id 2
# swift-ring-builder account.builder add \
  --region 1 --zone 2 --ip 192.168.100.105 --port 6202 --device sdc --weight 100
Device d3r1z4-10.0.0.52:6202R10.0.0.52:6202/sdc_"" with 100.0 weight got id 3
Device d0r1z1-10.0.0.51:6202R10.0.0.51:6202/sdb_"" with 100.0 weight got id 0为系统输出。
验证ring内容
# swift-ring-builder account.builder
account.builder, build version 4
1024 partitions, 3.000000 replicas, 1 regions, 2 zones, 4 devices, 100.00 balance, 0.00 dispersion
The minimum number of hours before a partition can be reassigned is 1
The overload factor is 0.00% (0.000000)
Devices:    id  region  zone      ip address  port  replication ip  replication port      name weight partitions balance meta
             0       1     1       10.0.0.51  6202       10.0.0.51              6202      sdb  100.00          0 -100.00
             1       1     1       10.0.0.51  6202       10.0.0.51              6202      sdc  100.00          0 -100.00
             2       1     2       10.0.0.52  6202       10.0.0.52              6202      sdb  100.00          0 -100.00
             3       1     2       10.0.0.52  6202       10.0.0.52              6202      sdc  100.00          0 -100.00
重新平衡环
# swift-ring-builder account.builder rebalance
Reassigned 1024 (100.00%) partitions. Balance is now 0.00.  Dispersion is now 0.00
创建容器Ring
切换到/etc/swift目录。
创建基础container.builder文件:
# swift-ring-builder container.builder create 10 3 1对每个存储节点上的每个存储设备重复此命令
# swift-ring-builder container.builder add \
  --region 1 --zone 1 --ip 192.168.100.104 --port 6201 --device sdb --weight 100
Device d0r1z1-10.0.0.51:6201R10.0.0.51:6201/sdb_"" with 100.0 weight got id 0
# swift-ring-builder container.builder add \
  --region 1 --zone 1 --ip 192.168.100.104 --port 6201 --device sdc --weight 100
Device d1r1z2-10.0.0.51:6201R10.0.0.51:6201/sdc_"" with 100.0 weight got id 1
# swift-ring-builder container.builder add \
  --region 1 --zone 2 --ip 192.168.100.105 --port 6201 --device sdb --weight 100
Device d2r1z3-10.0.0.52:6201R10.0.0.52:6201/sdb_"" with 100.0 weight got id 2
# swift-ring-builder container.builder add \
  --region 1 --zone 2 --ip 192.168.100.105 --port 6201 --device sdc --weight 100
Device d3r1z4-10.0.0.52:6201R10.0.0.52:6201/sdc_"" with 100.0 weight got id 3
验证Ring内容
# swift-ring-builder container.builder
container.builder, build version 4
1024 partitions, 3.000000 replicas, 1 regions, 2 zones, 4 devices, 100.00 balance, 0.00 dispersion
The minimum number of hours before a partition can be reassigned is 1
The overload factor is 0.00% (0.000000)
Devices:    id  region  zone      ip address  port  replication ip  replication port      name weight partitions balance meta
             0       1     1       10.0.0.51  6201       10.0.0.51              6201      sdb  100.00          0 -100.00
             1       1     1       10.0.0.51  6201       10.0.0.51              6201      sdc  100.00          0 -100.00
             2       1     2       10.0.0.52  6201       10.0.0.52              6201      sdb  100.00          0 -100.00
             3       1     2       10.0.0.52  6201       10.0.0.52              6201      sdc  100.00          0 -100.00
重平衡环
# swift-ring-builder container.builder rebalance
Reassigned 1024 (100.00%) partitions. Balance is now 0.00.  Dispersion is now 0.00
创建对象ring
对象服务器使用对象环来维护本地设备上的对象位置列表。
切换到/etc/swift目录
创建基础object.builder文件
# swift-ring-builder object.builder create 10 3 1对每个存储节点上的每个存储设备重复此命令
# swift-ring-builder object.builder add \
  --region 1 --zone 1 --ip 192.168.100.104 --port 6200 --device sdb --weight 100
Device d0r1z1-10.0.0.51:6200R10.0.0.51:6200/sdb_"" with 100.0 weight got id 0
# swift-ring-builder object.builder add \
  --region 1 --zone 1 --ip 192.168.100.104 --port 6200 --device sdc --weight 100
Device d1r1z2-10.0.0.51:6200R10.0.0.51:6200/sdc_"" with 100.0 weight got id 1
# swift-ring-builder object.builder add \
  --region 1 --zone 2 --ip 192.168.100.105 --port 6200 --device sdb --weight 100
Device d2r1z3-10.0.0.52:6200R10.0.0.52:6200/sdb_"" with 100.0 weight got id 2
# swift-ring-builder object.builder add \
  --region 1 --zone 2 --ip 192.168.100.105 --port 6200 --device sdc --weight 100
Device d3r1z4-10.0.0.52:6200R10.0.0.52:6200/sdc_"" with 100.0 weight got id 3
验证环内容:
# swift-ring-builder object.builder
object.builder, build version 4
1024 partitions, 3.000000 replicas, 1 regions, 2 zones, 4 devices, 100.00 balance, 0.00 dispersion
The minimum number of hours before a partition can be reassigned is 1
The overload factor is 0.00% (0.000000)
Devices:    id  region  zone      ip address  port  replication ip  replication port      name weight partitions balance meta
             0       1     1       10.0.0.51  6200       10.0.0.51              6200      sdb  100.00          0 -100.00
             1       1     1       10.0.0.51  6200       10.0.0.51              6200      sdc  100.00          0 -100.00
             2       1     2       10.0.0.52  6200       10.0.0.52              6200      sdb  100.00          0 -100.00
             3       1     2       10.0.0.52  6200       10.0.0.52              6200      sdc  100.00          0 -100.00
重平衡环:
# swift-ring-builder object.builder rebalance
Reassigned 1024 (100.00%) partitions. Balance is now 0.00.  Dispersion is now 0.00
分发环配置文件
将
account.ring.gz、container.ring.gz和object.ring.gz文件复制到/etc/swift每个存储节点和运行代理服务的任何其他节点上的目录中。
(6)完成安装
试用Red Hat Enterprise Linux 7 和 CentOS 7
改变/etc/swift/swift.conf从 Object Storage 源存储库中获取文件
# curl -o /etc/swift/swift.conf \
https://opendev.org/openstack/swift/raw/branch/stable/rocky/etc/swift.conf-sample编辑/etc/swift/swift.conf文件并完成以下操作
在该[swift-hash]部分中,为您的环境配置哈希路径前缀和后缀。
[swift-hash]
...
swift_hash_path_suffix = HASH_PATH_SUFFIX
swift_hash_path_prefix = HASH_PATH_PREFIX
使用唯一的随机的字符串,将 HASH_PATH_PREFIX 和 HASH_PATH_SUFFIX 替换为唯一值,对这些价值观保密,不要更改或丢失它们。
在该[storage-policy:0]部分中,配置默认存储策略
[storage-policy:0]
...
name = Policy-0
default = yes 将swift.conf文件复制到/etc/swift每个存储节点和运行代理服务的任何其他节点上的目录。
在所有节点上,确保配置目录的正确所有权
# chown -R root:swift /etc/swift在控制器节点和运行代理服务的任何其他节点上,启动对象存储代理服务及其依赖项,并将它们配置为在系统启动时启动:
# systemctl enable openstack-swift-proxy.service memcached.service
# systemctl start openstack-swift-proxy.service memcached.service
在存储节点上,启动对象存储服务并将它们配置为在系统启动时启动:所有存储节点上都运行。
# systemctl enable openstack-swift-account.service openstack-swift-account-auditor.service \
  openstack-swift-account-reaper.service openstack-swift-account-replicator.service
# systemctl start openstack-swift-account.service openstack-swift-account-auditor.service \
  openstack-swift-account-reaper.service openstack-swift-account-replicator.service
# systemctl enable openstack-swift-container.service \
  openstack-swift-container-auditor.service openstack-swift-container-replicator.service \
  openstack-swift-container-updater.service
# systemctl start openstack-swift-container.service \
  openstack-swift-container-auditor.service openstack-swift-container-replicator.service \
  openstack-swift-container-updater.service
# systemctl enable openstack-swift-object.service openstack-swift-object-auditor.service \
  openstack-swift-object-replicator.service openstack-swift-object-updater.service
# systemctl start openstack-swift-object.service openstack-swift-object-auditor.service \
  openstack-swift-object-replicator.service openstack-swift-object-updater.service
(7)验证操作
在控制器节点上运行
如果您使用的是 Red Hat Enterprise Linux 7 或 CentOS 7,并且其中一个或多个步骤不起作用,请检查
/var/log/audit/audit.log文件中的 SELinux 消息,指示拒绝对swift进程执行操作。如果存在,请将目录的安全上下文更改为类型、 角色和用户/srv/node的最低安全级别 (s0) :swift_data_tobject_rsystem_u# chcon -R system_u:object_r:swift_data_t:s0 /srv/node
首先获取demo凭证
# source demo-openstack.sh显示服务状态
# swift stat
                        Account: AUTH_ed0b60bf607743088218b0a533d5943f
                     Containers: 0
                        Objects: 0
                          Bytes: 0
    X-Account-Project-Domain-Id: default
                    X-Timestamp: 1444143887.71539
                     X-Trans-Id: tx1396aeaf17254e94beb34-0056143bde
         X-Openstack-Request-Id: tx1396aeaf17254e94beb34-0056143bde
                   Content-Type: text/plain; charset=utf-8
Accept-Ranges: bytes创建container1容器
$ openstack container create container1
+---------------------------------------+------------+------------------------------------+
| account                               | container  | x-trans-id                         |
+---------------------------------------+------------+------------------------------------+
| AUTH_ed0b60bf607743088218b0a533d5943f | container1 | tx8c4034dc306c44dd8cd68-0056f00a4a |
+---------------------------------------+------------+------------------------------------+将测试文件上传到container1容器:
$ openstack object create container1 FILE
+--------+------------+----------------------------------+
| object | container  | etag                             |
+--------+------------+----------------------------------+
| FILE   | container1 | ee1eca47dc88f4879d8a229cc70a07c6 |
+--------+------------+----------------------------------+替换FILE为要上传到 container1容器的本地文件的名称。
列出container1容器中的文件:
$ openstack object list container1
+------+
| Name |
+------+
| FILE |
+------+从container1容器下载测试文件:
$ openstack object save container1 FILE替换FILE为上传到 container1容器的文件的名称。


 2659
2659


 被折叠的 条评论
为什么被折叠?
被折叠的 条评论
为什么被折叠?
 到【灌水乐园】发言


