


软件测试所有内容笔记正在陆续更新中,笔记已经在本地记录,全部为自己手动记录的笔记及总结,正在开始更新中,后续会逐步更新并完善到
软件测试学习内容总结专栏。
本节内容为:Python编程语言与测试框架
文章目录
1. python pytest测试实战 1
课程价值
理解 pytest 框架结构
掌握运行及常用的运行参数
掌握参数化与数据驱动
大纲
pytest 介绍与安装
pytest 常用执行参数
pytest 框架结构
pytest 参数化与数据驱动
pytest 介绍与安装
pytest 介绍
- 单元测试,代码测试
- 构面web,app,接口以pytest为基础,所有自动化课程都在用pytest
- python界比较主流的单元测试框架,unittest,pytest,nose…
- 入门难度低,第三方库丰富性,通用性,与allure生成的报告非常的美观
pytest 安装
- pytest 官网:http://www.pytest.org
- 安装
pip install pytest- Pycharm pytest 配置
- 版本验证
pytest --version
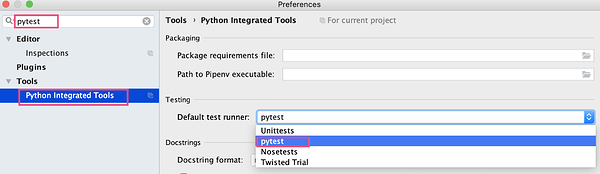
Pycharm 配置
-
进入 pycharm 设置
-
搜索 pytest
-
设置 test runner
-
删除 pycharm 运行记录

pytest 运行
编写用例
- 编写计算机代码
- 编写一条计算机【相加】功能的测试用例
calc.py文件
# 计算器
class Calculator:
    # 加法
    def add(self, a, b):
        return a + b
    # 减法
    def sub(self, a, b):
        return a - b
    # 乘法
    def mul(self, a, b):
        return a * b
    # 除法
    def div(self, a, b):
        return a / b
test_calc.py 文件
#  python_pytest包名
from python_pytest.calc import Calculator
class TestCalc:
    def test_add(self):
        # 实例化计算器类
        calc = Calculator()
        # 调用 add 方法
        result = self.calc.add(1, 1)
        # 得到结果之后,要有断言
        assert result == 2
pytest 规则
- 测试文件、测试函数、测试方法,名称需要以 test_ 开头
- 测试类名称需要 Test 开头
- 测试类中不能包含 init 方法
pytest 运行方式
- Pycharm 界面运行
- 运行整个测试文件:在文件上点击鼠标右键,选择 run
- 点击绿色小三角,运行对应的测试类或者测试方法
- 命令行方式运行
- 运行当前目录下所有测试文件:pytest
- 运行指定的测试文件:pytest 文件名
- 运行指定文件中的指定的类或者方法:
pytest 文件名::测试类名::测试方法名 - 查看执行过程中的详细信息和打印信息:
pytest -vs - 只收集测试用例不运行:
pytest --collect-only - 生成执行结果文件:
pytest --junitxml=./result.xml
测试用例的识别与运行
pytestpytest -v(最高级别信息 --verbose) 打印详细运行日志信息pytest -v -s 文件名(s是带控制台输出结果,也是输出详细)-s打印print的内容pytest 文件名.py( 执行单独一个pytest模块)pytest 文件名.py::类名(运行某个模块里面某个类)pytest 文件名.py::类名::文件名(运行某个模块里面某个类里面的方法)
测试用例常用参数
- pytest -x 文件名 (一旦运行报错,就停止运行)
- pytest - -maxfail=[num] (当运行错误达到num的时候就停止运行)
pytest -k“类名 and not 方法名” (执行某个关键字的用例)pytest -m [标记名] @pytest.mark.[标记名](将运行有这个标记的测试用例)
常用的执行参数
pytest --collect-only(只收集用例)pytest --junitxml=./result.xml(生成执行结果文件)pytest --setup-show(回溯 fixture 的执行过程)- 更多的用法使用 pytest --help 查看帮助文档
test_a 函数名、TestCalc 类名、test_add 方法名
pytest test_calc.py::TestCalc -vs
pytest test_calc.py::TestCalc::test_add -vs
pytest test_calc.py::test_a -vs
pytest --collect-only
pytest test_calc.py --junitxml=./result.xml
pytest 框架结构
- 模块级 (setup_module / teardown_module) 模块始末,全局的(优先最高)
- 函数级 (setup_function / teardown_function) 只对函数用例生效(不在类中)
- 类级 (setup_class / teardown_class) 只在类中前后运行一次(在类中)
- 方法级 (setup_method / teardown_methond) 开始于方法始末(在类中)
- 类里面的(setup / teardown)运行在调用方法的前后
setup / teardown默认为方法级别,setup_method / teardown_methond
Unittest:https://docs.python.org/3/library/unittest.html
test fixture:测试装置; -做准备工作,数据准备,清理的工作,测试用例之前和测试用例之后要做的事
test case:测试用例
test suite:测试套件,将测试用例组装起来
test runner:测试执行器,用来执行测试用例
类似于setup、teardown
def setup_module(self):
    print('模块级别 setup')
def teardown_module(self):
    print('模块级别的 teardown')

def setup_function(self):
    print('函数级别 setup')
def teardown_function(self):
    print('函数级别的 teardown')

class TestDemo:
    def setup_class(self):
        print('类级别 setup')
    def teardown_class(self):
        print('类级别的 teardown')

    def setup(self):
        print('方法级别 setup')
    def teardown(self):
        print('方法级别的 teardown')

    def test_demo1(self):
        print('test_demo1')
    def test_demo2(self):
        print('test_demo2')

class TestDemo1:
   def setup(self):
        print('方法级别 setup')
    def teardown(self):
        print('方法级别的 teardown')

    def test_demo1(self):
        print('test_demo1')
test_calc.py 改造
from python_pytest.calc import Calculator
class TestCalc():
    def setup_class(self):
        print('开始计算')
        # 实例化计算器类
        self.calc = Calculator()
    def teardown_class(self):
        print('计算结束')

    def test_add(self):
        result = self.calc.add(1, 1)
        assert result == 2
★★★★★
self.calc = Calculator()
在setup方法中创建实例calc,但实例是局部变量,别的方法调用不到,calc的作用域只限制在setup这个方法中,所以其他的方法想要调用setup方法中的这个实例的话,要改变它的作用域,把它的作用域变得更大一些,在calc前面加上self.,把calc变为实例变量
pytest 参数化
参数化与数据驱动
- 参数化?
- 待测试的输入和输出是一组数据,可以把测试数据组织起来,用不同的测试数据调用相同的测试方法
- 数据驱动?
- 数据驱动就是数据的改变从而驱动自动化测试的执行,最终引起测试结果的改变。说的直白些,就是参数化的应用。
- 参数化
- 单个参数化:参数名称写在字符串中,参数值用列表传递
- 多个参数:参数名称写在字符串中,参数值用
列表套列表或者元组的方式传递 eg:@pytest.mark.parametrize('a, b, expect', [(1,1,2)]) - 测试用例起别名:ids=[ ]
- 笛卡尔积:用两个装饰器分别传入参数
- 从 yaml 中读取参数:数据读取成为参数化中需要的参数格式
pytest 参数化
- 参数化装饰函数
- ids 参数增加可读性
mark.parametrize 参数化
- 场景:
- 测试数据是传入的,测试的预期结果也是传入的,二个不同的参数一一对应,输入的数据经过调用执行后结果是否与预期一致
- 解决:
- 使用 mark 中的
@pytest.mark.parametrize进行参数化和数据驱动更灵活
- 使用 mark 中的
- 应用:
- 在方法,类上加上装饰器都可以
- 另外组合方式可以实现更多测试用例的自动生成
判断result是浮点数,并处理
if isinstance(result,float):
result = round(result,2)
class TestCalc():
    def setup_class(self):
        print('开始计算')
        # 实例化计算器类
        self.calc = Calculator()
    def teardown_class(self):
        print('计算结束')

    @pytest.mark.parametrize('a, b, expect', [
            (1,1,2), (0.1,0.1,0.2), (-1,-1,-2), (0.1,0.2,0.3)
        ], ids=['int','float','negative','round'])
    def test_add(self, a, b, expect):
        # 调用 add 方法
        result = self.calc.add(a, b)
        # 判断result是浮点数,并处理
        if isinstance(result, float):
            result = round(result, 2)
        # 得到结果之后,要有断言
        assert result == expect
用yaml文件实现
calc.yaml文件
a 最低0.47元/天 解锁文章


 4808
4808


 被折叠的 条评论
为什么被折叠?
被折叠的 条评论
为什么被折叠?
 到【灌水乐园】发言


