


增删改查(CURD)
提示:在之前的文章中,我们做好了准备工作,测试成功之后,我们做增删改查,这里建议大家单个功能操作成功之后,再操作下一个功能
注意:我们再做项目的时候,回出现很多细节的小问题,如果全部功能都操作完成之后,再运行项目的话,可能回出现问题,这样我们寻找问题的时候会有些困难!
提示:写完文章后,目录可以自动生成,如何生成可参考右边的帮助文档
前言
提示:这里接上一篇文章,把增删改查的功能继续完善
本篇文章中,介绍的是最简单,基础的增删改查的功能!
提示:以下是增删改查的具体内容,是全部操作整理到一起了;再做的时候记得把功能分开做;操作完成应该功能之后,再操作下一个功能
一、我们需要准备实体类
实体类:内含最基础的方法,一些基本的属性
提示:我们需要两个实体类
Deparment【部门】 作为外键部门
Employee【员工】 作为主表
①Department
/**
 * @author scy
 * @create 2021-12-21 15:59
 */
//部门名字
public class Department implements Serializable {
    private static final long serialVersionUID = 3101613282324740629L;
    private Integer id;//
    private String deptname;//

    public Department() {
    }

    public Department(Integer id, String deptname) {
        this.id = id;
        this.deptname = deptname;
    }

    public static long getSerialVersionUID() {
        return serialVersionUID;
    }

    public Integer getId() {
        return id;
    }

    public void setId(Integer id) {
        this.id = id;
    }

    public String getDeptname() {
        return deptname;
    }

    public void setDeptname(String deptname) {
        this.deptname = deptname;
    }

    @Override
    public String toString() {
        return "Department{" +
                "id=" + id +
                ", deptname='" + deptname + '\'' +
                '}';
    }
}
②Employee
/**
 * @author scy
 * @create 2021-12-15 9:41
 */
//可序列化  Serializable  序列化就是一种用来处理对象流的机制
public class Employee implements Serializable {
    private static final long serialVersionUID = 1423771930125710351L;
    private Integer id;//
    private String lastName;
    private String gender;//性别
    private String email;

    //所属部门
    private Department dept;

    public Employee(Department dept) {
        this.dept = dept;
    }

    public Department getDept() {
        return dept;
    }

    @Override
    public String toString() {
        return "Employee{" +
                "id=" + id +
                ", lastName='" + lastName + '\'' +
                ", gender='" + gender + '\'' +
                ", email='" + email + '\'' +
                ", dept=" + dept +
                '}';
    }

    public void setDept(Department dept) {
        this.dept = dept;
    }

    public Employee() {
    }

    public Employee(Integer id, String lastName, String gender, String email) {
        this.id = id;
        this.lastName = lastName;
        this.gender = gender;
        this.email = email;
    }

    public Integer getId() {
        return id;
    }

    public void setId(Integer id) {
        this.id = id;
    }

    public String getLastName() {
        return lastName;
    }

    public void setLastName(String lastName) {
        this.lastName = lastName;
    }

    public String getGender() {
        return gender;
    }

    public void setGender(String gender) {
        this.gender = gender;
    }

    public String getEmail() {
        return email;
    }

    public void setEmail(String email) {
        this.email = email;
    }

}
二、准备mapper接口类
EmployeeMapper接口类
public interface EmployeeMapper {
    //查询全部的员工
    public List<Employee> getEmpByAll();

    //增加
    public int addEmp(Employee employee);

    //删除
    public int deleteEmp(Integer id);

    //根据id查询
    public Employee getEmpById(Integer id);
    //修改
    public int updateEmp(Employee employee);


}
三、准备mapper.xml文件
EmployeeMapper.xml
<?xml version="1.0" encoding="UTF-8" ?>
<!DOCTYPE mapper
        PUBLIC "-//mybatis.org//DTD Mapper 3.0//EN"
        "http://mybatis.org/dtd/mybatis-3-mapper.dtd">
<!--制动跳转的包-->
<mapper namespace="ssm.dao.EmployeeMapper">

    <!--查询全部的语法-->
    <select id="getEmpByAll" resultMap="empall">
    select * from t_emp
</select>

    <resultMap id="empall" type="employee">
        <id column="id" property="id"></id>
        <result column="last_name" property="lastName"/>
        <result column="gender" property="gender"/>
        <result column="email" property="email"/>
        <association property="dept" select="ssm.dao.DepartmentMapper.getDeptById" column="d_id"/>
    </resultMap>

    <!--增加的方法-->
    <insert id="addEmp" parameterType="employee">
        insert into t_emp(last_name,gender,email)
        values (#{lastName},#{gender},#{email})
    </insert>

    <!--删除的方法-->
    <delete id="deleteEmp" parameterType="Integer">
        delete from t_emp where id=#{id}
    </delete>

    <!--查询单个的方法-->
    <select id="getEmpById" resultType="employee">
        select * from t_emp where id = #{id}
    </select>

    <!--修改的方法-->
    <update id="updateEmp">
        update t_emp
        set last_name=#{lastName},gender=#{gender},email=#{email}
        where id=#{id}
    </update>
</mapper>
四、准备service接口类
EmployeeService接口类【一定要添加@service注解】
@Service
public class EmployeeService {
    /*从spring容器中 自动注入*/
    @Autowired
    EmployeeMapper mapper;

    //调用dao查询全部
    public List<Employee> getEmpAll() {
        return mapper.getEmpByAll();
    }

    //增加
    public int addEmp(Employee employee){
        return mapper.addEmp(employee);
    }

    //删除
    public  int deleteEmp(Integer id){
        return mapper.deleteEmp(id);
    }

    //根据id查询
    public Employee getEmpById(Integer id){
        return mapper.getEmpById(id);
    }
    //修改
    public int updateEmp(Employee employee){
        return mapper.updateEmp(employee);
    }
}
五、准备Controller测试
EmployeeController
@Controller
public class EmployeeController {
//调用service 自动注入
@Autowired
EmployeeService employeeService;
@RequestMapping("/getEmpall")
/*@RequestMapping(value = "/getEmpall",method = RequestMethod.GET)*/
public String getEmpall(Model model){
List<Employee> empAll = employeeService.getEmpAll();
//存入model
model.addAttribute("empall",empAll);
return "emp_list";
}
//添加员工
@RequestMapping(value = "/getEmpall",method = RequestMethod.POST)
public String addEmp(Employee employee){
employeeService.addEmp(employee);
return "redirect:/getEmpall";
}
//删除员工
@RequestMapping("/getEmpall/{id}")
public String deleteEmp(@PathVariable("id") int id){
employeeService.deleteEmp(id);
return "redirect:/getEmpall";
}
//修改前查询
//修改前查询信息 带参数 get请求
@RequestMapping(value = "/getEmpall/{id}",method =RequestMethod.GET)
public String getEmpById(@PathVariable("id") Integer id,Model model){
//根据ID查询到员工
Employee empByid = employeeService.getEmpById(id);
//使用model存储到request域
model.addAttribute("emp",empByid);
return "update_emp";
}
//修改的方法
@RequestMapping(value = "/getEmpall",method = RequestMethod.PUT)
public String updateEmp(Model model,Employee employee){
//增加数据
employeeService.updateEmp(employee);
//查询全部
return "redirect:/getEmpall";
}
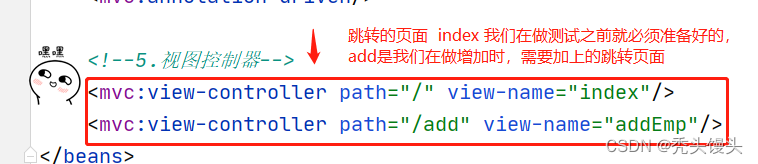
}六.操作时需要准备的页面
提示:准备页面是方便我们做页面跳转,相对应的跳转页面需要在做功能的时候就完善!
①addEmp.html
增加的页面 在做完增加的方法时,需要写增加的页面做跳转
<!DOCTYPE html>
<html lang="en" xmlns:th="http://www.thymeleaf.org">
<head>
    <meta charset="UTF-8">
    <title>Title</title>
</head>
<body>
我是ADD增加页面!
<form th:action="@{/getEmpall}" method="post">
    姓名:<input type="text" name="lastName">
    邮箱:<input type="text" name="email">


    性别:<input type="radio" name="gender"value="1"/>男🚹
         <input type="radio" name="gender"value="0"/>女🚹
    <input type="submit" value="提交">
</form>
</body>
</html>
②修改的页面 update_emp.html
<!DOCTYPE html>
<html lang="en" xmlns:th="http://www.thymeleaf.org">
<head>
    <meta charset="UTF-8">
    <title>Title</title>
</head>
<body>
这里是修改的页面
<form th:action="@{/getEmpall}" method="post">
    编号:<span th:text="${emp.id}"></span><br>
   <!-- 修改的id:-->
    <input type="hidden" name="id" th:value="${emp.id}">
    <!--修改的——method参数,提交的条件-->
    <input type="hidden" name="_method" th:value="put">
    用户名:<input type="text" name="lastName" th:value="${emp.lastName}">
    邮箱:<input type="text" name="email" th:value="${emp.email}">
    性别:
    <input type="radio" name="gender" value="1" th:field="${emp.gender}">男🚹
    <input type="radio" name="gender" value="0" th:field="${emp.gender}">女🚺<br>

    <input type="submit" value="确定修改">
</form>
</body>
</html>
③查询全部的页面,以及删除时的跳转 emp_list
【做删除时需要引用 jquery-1.11.0.js】
<!DOCTYPE html>
<html lang="en" xmlns:th="http://www.thymeleaf.org">
<head>
    <meta charset="UTF-8">
    <title>Title</title>
</head>
<body>
<table border="1" width="800px">
    <tr>
        <td>编号</td>
        <td>姓名</td>
        <td>性别</td>
        <td>邮箱</td>
        <td>部门名</td>
        <td>操作 (<a th:href="@{/add}">add</a>)</td>
    </tr>
    <!--遍历数据-->
    <tr th:each="emp:${empall}">
        <td th:text="${emp.id}"></td>
        <td th:text="${emp.lastName}"></td>
        <td th:if="${emp.gender}==1">男</td>
        <td th:if="${emp.gender}==0">女</td>
        <td th:text="${emp.email}"></td>
        <!--<td th:text="${emp.dept.deptname}"></td>-->
        <td th:text="${emp.dept}!=null ? ${emp.dept.deptname}:'暂时没有部门'"></td>

        <td>
            <!--修改-->
            (<a th:href="@{'/getEmpall/' + ${emp.id}}">update</a>)
            <!--删除-->
         (<a class="del" th:href="@{'/getEmpall/' + ${emp.id}}">delete</a>)
        </td>
    </tr>
</table>
<!--用于做删除提交delete的方式-->
<form id="deleteForm" method="post">
    <input type="hidden" name="_method" value="delete">
</form>
<!--引入jqury文件-->
<script th:src="@{/static/js/jquery-1.11.0.js}"></script>
<script>
    $(function(){
//1.为delete绑定要执行的路径
        $(".del").click(function(event) {
            var flag=confirm("你确定要删除!!");
            if (flag){
                //1.获取删除的信息  获取id
                var $form= $("#deleteForm");
                //将当前form的action设置为超链接的href
                $form.attr("action",$(this).attr("href"));
                //发送表单提交
                $form.submit();
                //取消超链接默认跳转行为(弹出)
                event.preventDefault();
            }else{
                alert("取消删除!")
                return false;
            }
        });
    });
</script>
</body>
</html>
注意:
总结
提示:
SSM(Spring+SpringMVC+MyBatis)框架集由Spring、MyBatis两个开源框架整合而成(SpringMVC是Spring中的部分内容),常作为数据源较简单的web项目的框架。
Spring
Spring就像是整个项目中装配bean的大工厂,在配置文件中可以指定使用特定的参数去调用实体类的构造方法来实例化对象。
Spring的核心思想是IoC(控制反转),即不再需要程序员去显式地`new`一个对象,而是让Spring框架帮你来完成这一切。
SpringMVC
SpringMVC在项目中拦截用户请求,它的核心Servlet即DispatcherServlet承担中介或是前台这样的职责,将用户请求通过HandlerMapping去匹配Controller,Controller就是具体对应请求所执行的操作。SpringMVC相当于SSH框架中struts。
mybatis
mybatis是对jdbc的封装,它让数据库底层操作变的透明。mybatis的操作都是围绕一个sqlSessionFactory实例展开的。mybatis通过配置文件关联到各实体类的Mapper文件,Mapper文件中配置了每个类对数据库所需进行的sql语句映射。
页面发送请求给控制器,控制器调用业务层处理逻辑,逻辑层向持久层发送请求,持久层与数据库交互,后将结果返回给业务层,业务层将处理逻辑发送给控制器,控制器再调用视图展现数据


 977
977


 被折叠的 条评论
为什么被折叠?
被折叠的 条评论
为什么被折叠?
 到【灌水乐园】发言


