


JSX语法(JSX 是 JavaScript 语法的扩展):
- 如果再jsx要写行内样式需要使用style={{coler:red}}形式(样式接受⼀个样式对象,但是前提是需要花括号提供js环境)
-
Babel ( 将 ES6 代码转为 ES5 代码、内嵌了对 JSX 的⽀持)
 const element = (
     <h1 className="greeting">
         Hello, world!
     </h1>
 );

 const element = React.createElement(
 'h1',
 {className: 'greeting'},
 'Hello, world!'
 );
const element = {
     type: 'h1',
     props: {
         className: 'greeting',
         children: 'Hello, world!'
     }
 };
class绑定:
样式的类名指定不能写class,要写className;
JSX 允许在大括号中嵌入任何表达式
const myId="22"
<h2 className="bg" id={myId}>111111</h2>
<div style={{color:'red'}}>yuwqiuyi</div>
列表渲染:
function NumberList(props) {
  const numbers = props.numbers;
  const listItems = numbers.map((number) =>
    <li key={number.toString()}>
      {number}
    </li>
  );
  return (
    <ul>{listItems}</ul>
  );
}

const numbers = [1, 2, 3, 4, 5];
ReactDOM.render(
  <NumberList numbers={numbers} />,
  document.getElementById('root')
);
组件定义:
// 函数式组件 默认开启严格模式
function Demo(){
  return <h2 onClick={()=>{cosole.log(222}}>我是函数式组件</h2>
}

//类组件
class Weather extends React.Component{
  state={is:false,wind:"微风"}
  render(){
    const {is,wind,user,password}=this.state
    return (
        <h2 onClick={this.changeWeather}> 12{is?2:8} 风速{wind}  我叫{name},年龄{age}</h2>)
  }
  changeWeather=(event)=>{
      const is=!this.state.is
      this.setState({is});   //修改state
  }
}
事件处理以及传参问题
//如果采⽤ JSX 的语法你需要传⼊⼀个函数作为事件处理函数,⽽不是⼀个字符串(DOM 元素的写法)
<button onclick="activateLasers()">
激活按钮
</button>
//React 中写法为:
<button onClick={activateLasers}>
激活按钮
</button>

class Child extends React.Component {
    fn() {
        console.log(this)
        //this的结果是undefined
    }
    fn2=(m)=> {
        console.log(m)
    }
    render() {
        return (
            <div>
                <h1 onClick={this.fn}>我是⼦组件</h1>
                //在react中,这样写加括号表示函数⽴即执⾏
                <h1 onClick={this.fn2(3)}>我是⼦组件</h1>
                //在react中,可以用以下两种方法进行传参
                <h1 onClick={this.fn.bind(this,3)}>我是⼦组件</h1>
                <h1 onClick={()=>this.fn(3)}>我是⼦组件</h1>
            </div>
        )
    }
}
ReactDOM.render(
<Child />,
document.getElementById('app')
);
this指向问题
//为什么直接赋值给函数this指向会丢失?
"use strict"
let obj = {
    display: function() {
        console.log(this)
    }
};
function handleClick(callback) {
    callback()
}
handleClick(obj.display) // undefined 正常会指向window,严格模式下就是undefined
解决方案
1、在构造函数中绑定this
constructor(){
    super()
    this.fn=this.fn.bind(this)
}
2、调⽤的时候绑定this
<h1 onClick={this.fn.bind(this)}>我是⼦组件</h1>
3、使⽤箭头函数
fn=()=> {
    console.log(this)
}
render() {
    return (
        <div>
        <h1 onClick={this.fn}>我是⼦组件</h1>
        </div>
    )
}
特殊情况(vue中的slot插槽)
 <Welcome>
     <h1>hello</h1>
 </Welcome>
因为welcome本身是⼀个组件,代表了⼀⼤段html结构,这时候加⼀个h1,并不知道应该把这个h1加到组件的哪个位置上,所以需要指定this.props.children类似于vue中的slot
 function Welcome(props) {
     return <div>
         <p>1111</p>
         <div>{props.children}</div>
     </div>;
 }

 <Welcome>
 <h1>hello</h1>
 </Welcome>
 //或者⽤下⾯的⽅式,把children看成是⼀个属性
 <Welcome children={<h1>hello</h1>}/>
如果传⼊单个内容,返回的就是⼀个对象,如果传⼊多个内容的话,返回的就是数组
所以也不需要像是vue具名插槽那样,如果需要放置在不同位置,直接通过数组的⽅式访问即可

import React, { Component } from 'react'

export default class Context extends Component {
    render() {
        return (
            <div>
                <div>生产者</div>
                <Children render={(name) => <Son name={name} />} />
            </div>
        )
    }
}

class Children extends Component {
    state = { name: 'tom' }
    render() {
        const {name} = this.state
        return (
            <div>
                子组件
                {this.props.render(name)}
            </div>
        )
    }
}

class Son extends Component {
    render() {
        return (
            <div>
                孙组件{this.props.name}
            </div>
        )
    }
}
类组件
⾸先super代表⽗类的构造函数,作⽤是⽤来新建⽗类的this对象,结果返回⼦类实例对象
⼦类必须在constructor⽅法中调⽤super⽅法,否则新建实例时会报错。
这是因为⼦类⾃⼰的this对象,必须先通过⽗类的构造函数完成塑造,得到 与⽗类同样的实例属性和⽅法,然后再对其进⾏加⼯,加上⼦类⾃⼰的实例 属性和⽅法。如果不调⽤super⽅法,⼦类就得不到this对象。
ES5 的继承,实质是先创造⼦类的实例对象this,然后再将⽗类的⽅法添加到this上⾯(Parent.apply(this))。
ES6 的继承机制完全不同,实质是先将⽗类实例对象的属性和⽅法,加到this上⾯(所以必须先调⽤super⽅法) 然后再⽤⼦类的构造函数修改this。
state 状态管理器,必须是对象的形式
1.不能直接修改 State
 // 错误写法
 this.state.comment = 'Hello';
 // 正确写法
 this.setState({comment: 'Hello'});
2.构造函数是唯⼀可以给 this.state 赋值的地⽅,也就是初始值另外特殊的,还可以简化,state可以不写在构造函数中
class Clock extends React.Component{
    constructor(props){
        super(props);
        //this.state={date:new Date()} 可以不写在这里
    }
    state={date:bew Date()} //可以加在这里 ES6的新写法
}class Demo extends React.Component{
constructor(){
super()
this.state={
info:1
}
}
fn=()=>{
for(let i=0;i<10;i++){
console.log(this.state.info); //10个0 ⻚⾯显示1
this.setState({
info:this.state.info+1
})
}
}
render(){
return(
<div onClick={this.fn}>{this.state.info}</div>
)
}
}
ReactDOM.render(
<Demo/>,
document.getElementById('app')
);
但是有些情况下我们确实需要⽴即拿到结果,该怎么解决呢?
setState接收的参数还可以是⼀个函数,在这个函数中可以拿先前的状态,并通过这个函数的返回值得到
下⼀个状态。
this.setState((prev)=>{
console.log(prev.info);
return{
info:prev.info+1
}
})
setState接受第⼆个参数,即状态更新后的回调函数
this.setState({
info:this.state.info+1
},()=>{
alert(this.state.info)
})
props不容更改
组件⽆论是使⽤函数声明还是通过 class 声明,都决不能修改⾃身的 props
父子组件传值:
const p={name:'jerry',age:12}
//类组件
<Weather {...p}/>

class Weather extends React.Component{
    render(){
        const {name,age}=this.props
         return (<h2> 我叫{name},年龄{age}</h2>)
    }
}

//函数组件
<Demo {...p}/>

function Demo(props){
  return <h2>我是函数式组件 {props.name}</h2>
}
子父组件传值:

refs属性( 获取dom节点)
//第一种
<h2 ref={this.myRef} }>rrr</h2>
myRef=React.createRef()
console.log(this.myRef.current) //获取dom节点

//第二种
this.refs.submit
<input ref='submit' type='button'>

//第三种
<input type="text" ref={input => this.textInput = input} />
console.log(this.textInput);
受控组件与非受控组件
<form onSubmit={this.handleSubmit}>
    {/* 受控组件 */}
    <select value={this.state.value} onChange={this.handleChange}>
        <option value="grapefruit">葡萄柚</option>
        <option value="lime">酸橙</option>
        <option value="coconut">椰子</option>
        <option value="mango">芒果</option>
    </select>
    {/* 非受控组件 */}
    <input type="text" ref={this.input} />
    <input type="submit" value="提交" />
</form>

state = { value: 'coconut' };
input = React.createRef();
handleChange = (event) => {
    this.setState({ value: event.target.value });
}
handleSubmit = (event) => {
    alert('受控组件:' + this.state.value + '非受控组件:' + this.input.current.value);
    event.preventDefault();
}
生命周期
旧生命周期:

新生命周期(删3个 加2个):

//必须前⾯添加static 否则报错
static getDerivedStateFromProps(props, state) {
    //必须要返回⼀个状态对象,不然也会报错
    return {state1: props.abc }
}class News extends React.Component{
state={newsArr:[]}
myList=React.createRef()
componentDidMount(){
setInterval(()=>{
const {newsArr} =this.state
const news =`星期${newsArr.length+1}`
this.setState({newsArr:[news,...newsArr]})
},2000)
}
getSnapshotBeforeUpdate(){
return this.myList.current.scrollHeight;
}
componentDidUpdate(preProps,preState,height){
this.myList.current.scrollTop+=this.myList.current.scrollHeight-height
}
render(){
return (
<ul className="news" ref={this.myList}>
{this.state.newsArr.map((item)=>{
return <li>{item}</li>
})}
</ul>
)
}
}componentWillUnmount (相当于vue中的beforeDestroy 关闭定时器)
render 函数第一次执行的时候会将渲染的数据在内存中保存一份,当第二次数据发生了改变后,render 会将这次的虚拟DOM与缓存中的虚拟DOM进行对比(diff 算法)
只要 this.state 、 this.props 发生了改变那么 render 函数就会执行
componentDidUpdate(prevProps, prevState) {
    if (prevState.count !== this.state.count) {
        document.title = `You clicked ${this.state.count} times`;
    }
}
shouldComponentUpdate (nextProps, nextState)返回⼀个布尔值。在组件接收到新的props或者state时被调⽤。在初始化时或者使⽤forceUpdate时不被调⽤。
shouldComponentUpdate(nextProps,nextState) {
    if (nextProps.m1 === this.props.m1 && nextState.m2 === this.state.m2) {
        return false;
    } else {
        return true;
    }
}
componentDidUpdate(prevProps, prevState, snapshot) {
  // 典型用法(不要忘记比较 props):
  if (this.props.userID !== prevProps.userID) {
    this.fetchData(this.props.userID);
  }
}
你也可以在 componentDidUpdate() 中直接调用 setState(),但请注意它必须被包裹在一个条件语句里,正如上述的例子那样进行处理,否则会导致死循环。
pureComponent
1.setState存在两个不合理之处
- 1.setState⽆论是否更新了state,render函数都会重现调⽤,这是不合理的
- 2.如果⽗组件更新了,⽆论⼦组件变⽤没⽤到⽗组件的数据也都会重新渲染⼦组件,这是不合理的
//判断两次不⼀致再更新,否则不更新
shouldComponentUpdate(nextProps,nextState){
    if(this.props.someprops===nextProps.someprops){
        return false
    }else{
        return true
    }
}class Mouse extends React.PureComponent {}react强制更新页面
- this.setState({})
- this.forceUpdate()
react脚⼿架
脚手架安装:
创建项目:yarn create react-app 项目名
启动项目:npm start

脚⼿架⽂件介绍:
样式模块化:
css:中间的名字必须是module不能改
CSS Modules 允许通过⾃动创建 [filename]\_[classname]\_\_[hash] 格式的唯⼀ classname 来确定 CSS 的作⽤域。
react请求(跨域):
const { createProxyMiddleware } = require('http-proxy-middleware');
module.exports = function(app) {
    app.use(
        createProxyMiddleware("/api", {
            target: "https://api.binstd.com",//跨域地址
            changeOrigin: true,
            pathRewrite:{
            "^/api":""
        }
    })
);react-router路由组件:
import React,{Component} from "react"
import './App.css';
import { BrowserRouter as Router, Route, Link } from "react-router-dom";
function Login() {
    return <div>Register</div>;
}

function Register() {
    return <div>Login</div>;
}

class App extends Component{
    render(){
        return(
            <Router>
                <div className="App">
                    <Link to="/login">Login</Link>
                    <Link to="/register">Register</Link>
                    <Route path="/login" component={Login}></Route>
                    <Route path="/register"  render={(props) => {
                        console.log(props)
                        <div>Home</div>}}>
                    </Route>
                </div>
            </Router>
        )
    }
}
export default App;
//children :⽤法和render基本⼀致
//但是重点观察match字段
//对于没有匹配上的路由,children⾥的match字段会是null,⽽render函数根本就不会运⾏
//这就允许你动态调整你的 UI 界⾯,基于路线是否匹配,如果路线匹配我们则添加⼀个 active 类

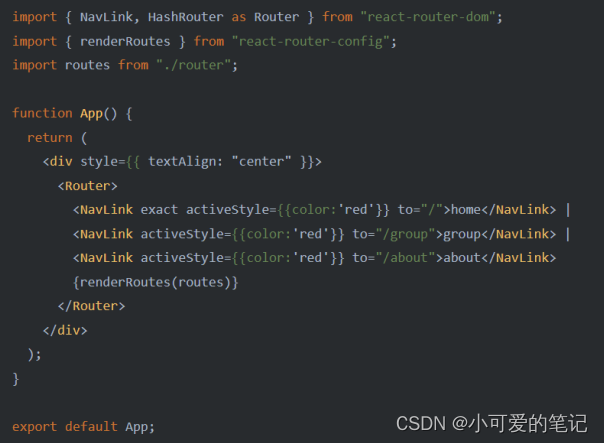
NavLink的使用(路由链接的高亮效果):
- activeClassName(string):设置选中样式,默认值为active
- activeStyle(object):当元素被选中时,为此元素添加样式
- exact(bool):为true时,只有当导致和完全匹配class和style才会应⽤
- strict(bool):为true时,在确定为位置是否与当前URL匹配时,将考虑位置pathname后的斜线
- isActive(func)判断链接是否激活的额外逻辑的功能
class MyNavLink extends Component{
    render(){
        return <NavLink activeClassName="haha" to={this.props.to}>{this.props.children}                </NavLink>
    }
}
//调用:
<MyNavLink>login</MyNavLink><NavLink replace={true} activeClassName="haha" to="/register/b">Register</NavLink>路由可以开启replace模式,这样路由跳转的时候不会留下痕迹,⽆法通过浏览器的返回键返回,⽽是会直接替换当前路由
Switch的使用:
- 匹配到第⼀个就不会继续向下匹配,这种⽅式还可以提⾼性能
<Switch>
    <Route path="/login" component={Login}></Route>
    <Route path="/register" component={Register}></Route>
    <Route path="/register" component={Welcome}></Route>
</Switch>
路径的严格匹配与模糊匹配:
- 默认使用模糊匹配,输入的路径必须包含匹配的路径,顺序一致
- 尽量不开启严格匹配(如果出现了⽗⼦路由的情况,严格匹配会导致匹配不上⼦路由)
路由的重定向(Redirect):
- 默认路由,当所有路由都无法匹配时,进入该路由
<Switch>
    <Route path="/login" component={Login}></Route>
    <Route path="/register" component={Welcome}></Route>
    <Redirect to="/login"></Redirect>
</Switch>
嵌套路由:
- 注册子路由写上父路由的path值
- 路由的匹配是按照注册路由的顺序执行的
//第一种
<Route path={`${this.props.match.url}/home`} component={Home}></Route>
//第二种
<Route path="/home" render={({match})=>
    <Detail>
        <Route path={`${match.url}/index`} component={Index}></Route>
        <Route path={`${match.url}/about`} component={About}></Route>
    </Detail>
}></Route>
路由传参:
params:
<Link to="/about/${obj.id}">about</Link>
<Route path="/about/:id component={test}/>
const id =this.props.match.params
search:
<Link to="/about?name=tom&age=18">about</Link>
<Route path="/about component={test}/>
const id =this.props.location.search
state(类似于post请求的参数):
<Link to={{path:'/about',state:{name:'tom',age:18}}}>about</Link>
<Route path="/about component={test}/>
const id =this.props.location.state
路由跳转的两种模式:
默认是push
修改replace:直接在<Link replace to='XXX'>标签上添加一个replace属性即可
路由跳转⽅式总结:
<Link to={{
    pathname: '/courses',
    search: '?sort=name',
    hash: '#the-hash',
    state: { fromDashboard: true }
}}/>
编程式导航:
- this.props.history.push()
- this.props.history.replace()
- this.props.history.goBack()
- this.props.history.goForward()
- this.props.history.go()
BrowserRouter和HashRouter的区别:
- BrowserRouter刷新无任何影响,因为state保存在history对象中
- HashRouter刷新后会导致路由丢失state参数
withRouter:
//withRouter实现原理:
//将组件包裹进 Route, 然后返回
const withRouter = () => {
    return () => {
        return <Route component={Nav} />
    }
}
// 这⾥是简化版
const withRouter = ( Component ) => () => <Route component={ Component }/>
1、先引入import { withRouter} from "react-router-dom"2、定义一般组件class XX extends ...3、export default withRouter( XX )
HOOK(useHistory):
import React from 'react';
import { useHistory } from 'react-router-dom';
export default function Demo() {
const history=useHistory();
function jump(){
    history.push("/login")
}
return <div onClick={jump}>helloA </div>;
}
解决多级路径刷新样式丢失问题:
public/index.html中引入样式不写./写/或者%PUBLIC_URL%
路由懒加载:
import  {lazy, Suspense } from 'react'
const Home = lazy(() => import('./pages/Home'))

<Suspense fallback={<h1>loading....</h1>}>
    <Switch>
        <Route path="/home" component={Home} />
        <Route path="/About" component={About} />
    </Switch>
</Suspense>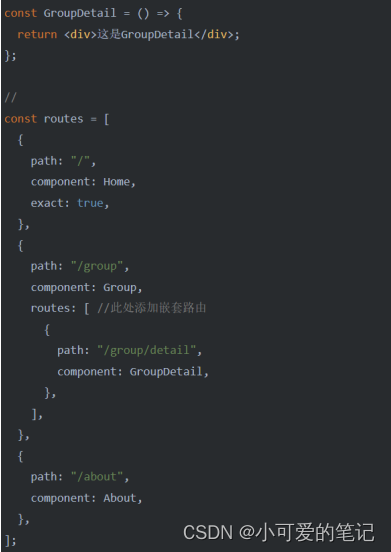
现在如果直接去访问嵌套路由的路径,会发现渲染不出来

代理:

条件渲染:
if
if (isLoggedIn) {
   return <UserGreeting />;
}
   return <GuestGreeting />;

<Greeting isLoggedIn={false} />,
与运算符 &&
如果条件是 true,&& 右侧的元素就会被渲染,如果是 false,React 会忽略并跳过它。
<div>
   {unreadMessages.length > 0 &&
     <h2>
        You have {unreadMessages.length} unread messages.
     </h2>
    }
</div>

<Mailbox unreadMessages={messages} />,
三目运算符
  <div>
      {isLoggedIn
        ? <LogoutButton onClick={this.handleLogoutClick} />
        : <LoginButton onClick={this.handleLoginClick} />
      }
  </div>
隐藏组件:
function son (props){
	const {show} = props;
	if (!show){
	  return null;  // 提前返回null,不渲染子组件的内容
	}
	return (<p> 这是子组件的内容 </p> )
}

function father () {
  const [show, setShow] = useState(true)
  const notShow = () => {
    setShow(false); // 阻止子组件的渲染
  }

  return (
  	<div>
        <button onClick={notShow}>点击按钮,阻止渲染子组件</button>
        <son show={show} />
	</div>
  )
}
Redux:

在Redux中,所有的数据被保存在一个被称为store的容器中 ,在一个应用程序中只能有一个store对象。当一个store接收到一个action,它将把这个action代理给相关的reducer。reducer是一个纯函数,它可以查看之前的状态,执行一个action并且返回一个新的状态。
action:
action是把数据从应用传到 store 的有效载荷,
它是 store 数据的唯一来源;
要通过本地或远程组件更改状态,需要分发一个action;
const action = {
    type: 'ADD_TODO',
    payload: 'Learn Redux'
};
reducer(必须是一个纯函数):
Reducer 是⼀个纯函数,它接受 Action 和当前 State 作为参数,返回⼀个新的 State。
const reducer = function (prevState, action) {
    // ...
    return new_state;
};store:
store就是把action和reducer联系到一起的对象,
store本质上是一个状态树,保存了所有对象的状态。
任何UI组件都可以直接从store访问特定对象的状态。
//createStore函数接受另⼀个函数作为参数,返回新⽣成的 Store 对象。
import { createStore } from 'redux';
const store = createStore(fn);
const state = store.getState();//我们建议把type类型都设置为常量,因为写成字符串很容易出现错误
//字符串写错了,系统不会报错, 但是如果常量写错了,系统会报错
const ADD_TODO = '添加 TODO';
function addTodo(text) {
return {
type: ADD_TODO,
text
}
}
const action = addTodo('Learn Redux');// 使⽤action creator创建⼀个异步action
export function incrementAsync(params) {
// 异步action中第1个参数叫dispatch,第2个参数是getState
return function(dispatch,getState) {
// 在异步action中就可以写异步代码
setTimeout(()=>{
// 在异步代码,还需要派发⼀个同步的action
dispatch(increment())
},3000)
}
}import { createStore,applyMiddleware } from 'redux';
//applyMiddleware⽤来调⽤中间件
import myReducer from "./reducer"
import thunk from "redux-thunk";
const store = createStore(myReducer,applyMiddleware(thunk));
export default storeredux我们需要⽤store.subscribe主动监测
import React from 'react';
import ReactDOM from 'react-dom';
import { Provider } from 'react-redux';
import App from './App';
import store from './redux/store';

ReactDOM.render(
    <React.StrictMode>
        //在此处添加Provider即可
        <Provider store={store}>
            <App />
        </Provider>
    </React.StrictMode>,
document.getElementById('root')
react-redux:

redux-thunk
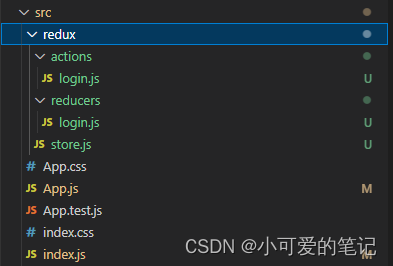
actions/login.js
const ADD_TODO = 'add';
// 使⽤action creator创建⼀个异步action
export function loginAction(payload) {
  // 异步action中第1个参数叫dispatch,第2个参数是getState
  return function(dispatch,getState) {
      // 在异步action中就可以写异步代码
      setTimeout(()=>{
          // 在异步代码,还需要派发⼀个同步的action
          dispatch({
            type:ADD_TODO,
            payload
          })
      },3000)
  }
}
reducers/login.js
const initState = {
  role: '孙子',
  name: '我'
}
export function loginReducer (prevState = initState, action) {
  const { type, payload } = action
  switch (type) {
    case 'add':
      return payload
    default:
      return prevState
  }
}import {legacy_createStore as createStore,combineReducers,applyMiddleware} from "redux"
import {loginReducer} from "./reducers/login"
import thunk from "redux-thunk";
const rootReducer = combineReducers({
loginReducer
})
export default createStore(rootReducer,applyMiddleware(thunk))App.js
import React from 'react'
import { connect} from 'react-redux'
import {loginAction} from './redux/actions/login'


function Son (props) {
  console.log(props)
  const {loginActionFun}=props
  const {role,name}=props.loginReducer
  const change=()=>{
    loginActionFun(
      {
        role:'我',
        name:'孙子'
      }
    )
  }
  return (
    <div>
      <p>我是孙子</p>
      <p>孙子是我</p>
      <p>猜猜谁是孙子?</p>
      <p>{role+'是'+name}</p>
      <button onClick={change}>改变</button>
    </div>
  )
}
export default connect(
  (state)=>{
    return state
  },{
    loginActionFun:loginAction
  }
)(Son)
index.js
import { Provider } from 'react-redux'

<Provider store={store}>
    <App />
</Provider>
redux-saga

actions/login.js
const ADD_TODO = 'add2';
// 使⽤action creator创建⼀个异步action
export function loginAction(payload) {
return{
    type:ADD_TODO,
    payload
  }
}
reducers/login.js
const initState = {
  role: '孙子',
  name: '我'
}
export function loginReducer (prevState = initState, action) {
  const { type, payload } = action
  switch (type) {
    case 'addTop':
      return payload
    default:
      return prevState
  }
}import { put,call, takeEvery,delay} from 'redux-saga/effects'
const ADD_TODO = 'addTop';
const ADD_ee = 'add2';
export default function* watchlogin(){
yield takeEvery(ADD_ee,worklogin)
}
function* worklogin(){
const res=yield call(fetch,"https://cnodejs.org/api/v1/topics?limit=10&page=7")
yield delay(3000)
const data=yield res.json()
yield put({
type: ADD_TODO,
payload:{
name:data.data[0].content
}
})
}sagas/rootSaga.js
import { all } from 'redux-saga/effects'
import watchlogin from './login'
export function*rootSaga(){
  yield all([watchlogin()])
}
store.js
import {legacy_createStore as createStore,combineReducers,applyMiddleware} from "redux"
import {loginReducer} from "./reducers/login"
import createSagaMiddleware from 'redux-saga'
import {rootSaga} from './sagas/rootSaga'

const sagaMiddleware = createSagaMiddleware()
const rootReducer = combineReducers({
  loginReducer
})
const store=createStore(rootReducer,applyMiddleware(sagaMiddleware))
sagaMiddleware.run(rootSaga)
export default store
App.js
import React from 'react'
import { connect} from 'react-redux'
import {loginAction} from './redux/actions/login'


function Son (props) {
  console.log(props)
  const {loginActionFun}=props
  const {role,name}=props.loginReducer
  const change=()=>{
    loginActionFun()
  }
  return (
    <div>
      <p>我是孙子</p>
      <p>孙子是我</p>
      <p>猜猜谁是孙子?</p>
      <p>{role+'是'+name}</p>
      <button onClick={change}>改变</button>
    </div>
  )
}
export default connect(
  (state)=>{
    return state
  },{
    loginActionFun:loginAction
  }
)(Son)
index.js
import { Provider } from 'react-redux'

<Provider store={store}>
    <App />
</Provider>
高阶函数:
1、一类特别的函数
参数是函数
返回是函数
2、常见的高阶函数
定时器设置函数
数组的forEach()/map()
promise
react-redux中的connect函数
Hook :
import React, {useState, useEffect,useRef} from 'react'useState 会返回⼀对值:当前状态和⼀个让你更新它的函数
 const [count, setCount] = useState(0) = [0, ƒ]
 setCount(count + 1)
<h1>{count}</h1>if(true){
const [age,setAge]=useState(18);
}React Hook "useState" 被有条件地调⽤。 在每个组件渲染 react-hooks/rules-of-hooks 中,必须以完全相同的顺序调⽤ React Hooks

useEffect(生命周期):
// componentDidMount
useEffect(()=>{
  console.log('componentDidMount')
},[])

// componentDidUpdate
useEffect(()=>{
  console.log('componentDidUpdate')
})

//在某些情况下,每次渲染后都执⾏清理或者执⾏ effect 可能会导致性能问题。
useEffect(()=>{
  console.log('count被修改了')
},[count])

// componentWillUnmount
useEffect(()=>{
  //ajax请求
  console.log('componentDidUpdate')
  return ()=>{
    //清除定时器
    console.log('componentWillUnMount')
  }
})
useContext:
import {createContext}from 'react'
const Context=createContext()
export default Context;import React,{useState}from 'react'
import Child from "./Child"
import Context from './context';
export default function Parent() {
const [count, setCount] = useState("⽗数据");
return (
<div>
<p onClick={()=>setCount("aaaaaaaaaa")}>我是⽗组件</p>
<Context.Provider value={count}>
{/*需要把接收数据的组件放在provider⾥⾯就可以将数据传递给该组件及其⼦组件,这⾥也可以解构赋值⼀下 */
<Child msg="我是⽗组件的数据"></Child>
</Context.Provider>
</div>
)
}import React ,{useContext}from 'react'
import Context from './context';
export default function Childs2(props) {
//孙⼦组件需要主动调⽤useContext⽅法拿到上下⽂的数据,如果要传递多个数据,使⽤对象即可
const a = useContext(Context)
return (
<div>
<p>我是孙⼦组件,{props.mymsg}</p>
<h1>{a}</h1>
</div>
)
}useMemo:
const double = useMemo(() => {
    return count * 2
  }, [count === 3])
<h2>{double}</h2>
useCalback:
import React, { PureComponent, useCallback, useRef } from 'react'
class Counter extends PureComponent {
  speak () {
    console.log('154')
  }
  render () {
    const { props } = this
    return (
      <h1 onClick={props.onClick}>23424</h1>
    )
  }
}

function App () {
  const counterRef = useRef()
  const onClick = useCallback(() => {
    counterRef.current.speak()
  }, [counterRef])
  return (
    <div>
      <Counter ref={counterRef} onClick={onClick} />
    </div>
  )
}
export default App;
ref:
const myRef = useRef()
<input type="text" ref={myRef}/>
console.log(myRef.current.value)
项目实践代码片段:
菜单权限过滤:
export function filterMenu(data,role){
  return data.filter(item=>{
    return item.meta.role.indexOf(role)!=1
  }).map(item=>{
    if(item.children){
      item.children=filterMenu(item.children,role)
    }
  })
}
//异步路由
renderRoute=(menu)=>{
    let routerList=[]
    const asyncRoute=(data)=>{
        data.forEach((item)=>{
            if(item.children){
                asyncRoute(item.children)
            }else{
                routerList.push(
                  <Route path={item.path} component={lazy(()=>import('./views'))} />
                )
            }
        })
    }
}
useImperativeHandle的作用是将子组件的指定元素暴漏给父组件使用

moment日期插件


 1463
1463

 被折叠的 条评论
为什么被折叠?
被折叠的 条评论
为什么被折叠?
 到【灌水乐园】发言


