


一、react与vue对比
Vue是双向数据绑定,react是单项数据绑定,没有指令,配合JSX
<input value={ v } onInput={e=> setState{{v:'abc'}} }>15以前 React.createClass{{options对象}}
16版本
class App implaments React.Compont{
    val='abc'
    construct(){
        / *  数据初始化  */
    } , render(){
        /* JSX */
    }
 },
this.setState 修改数据
16.8以后 支持hooks
任何组件都是一个闭包,纯函数(始终不依赖上下文环境遍历,只看入参和出参)
Vue:API的支持,属性改变,自动通知并且依赖订阅发布模式,达成改一个,通知多个更新react:Fiber研发3年,调度并管理组件数据机制,利用requestldleCallback,将任务拆分为逐个小任务,平滑的在每一帧渲染空闲执行
周边生态:
- React,react-router,axios,redux,antd-design
- 小程序:taro(多端开发)
- 整合:DVA (简化API)
- 脚手架:create-react-app
二、脚手架使用
npm i -g create-react-app / yarn add create-react-app

create-react-app -V

# 创建项目
create-react-app 项目名字

# 运行
cd 项目名字
npm start
React.StrictMode:日志会多一遍,可以选择注释掉
import logo from './logo.svg';
import './App.css';
// 16 class 写法
import React from 'react';
class App extends React.Component {
  state = {
    name: 'hhhh',
    num: 0
  }
  constructor(props) { //  数据初始化
    super(props); //接受参数
    this.state.num = 1;
    this.test = this.test.bind(this)
  }
  change(changeNum) {
    console.log(changeNum)
    let  Num = changeNum+1;
    this.setState({ //数据变更
      num: Num
    })
  }
  test(){
    console.log(this)
  }
  render() {
    return (
      <div className="App">
        <header className="App-header">
          <img src={logo} className="App-logo" alt="logo" />
          <p>
            Edit <code>src/App.js</code> and save to reload. {this.state.name}
          </p>
          <button onClick={() => this.change(this.state.num)}>{this.state.num}</button>
          <button onClick={ this.test }>测试this</button>
        </header>
      </div>
    )
  }
}
// function App() {
//   return (
//     <div className="App">
//       <header className="App-header">
//         <img src={logo} className="App-logo" alt="logo" />
//         <p>
//           Edit <code>src/App.js</code> and save to reload.
//         </p>
//         <a
//           className="App-link"
//           href="https://reactjs.org"
//           target="_blank"
//           rel="noopener noreferrer"
//         >
//           Learn React
//         </a>
//       </header>
//     </div>
//   );
// }

export default App;
三、相关基础
组件
React中的组件是Web应用程序中可重用的代码块。它们可以分解为小的、独立的部分,从而使构建大型应用程序变得更加容易。
React中有两种类型的组件:类组件和函数组件。类组件是使用ES6类语法定义的,它们有自己的状态和生命周期方法。函数组件是使用函数定义的,它们没有自己的状态或生命周期方法。在React16.8版本之后,函数组件引入了Hooks,使得它们也能够管理自己的状态和生命周期方法。
// 父组件
import React from "react";
import Children from "./chilren";
export default class Parent extends React.Component {
    constructor(props){
        super(props);
        this.state = {
            isShow: true,
        };
    }
    destroy() {
        this.setState({
            isShow: false
        })
    }
    render() {
        return (
            <div>
                { this.state.isShow?<Children msg={'我来了'}/>:null }
                <button onClick={e => this.destroy()}>销毁子组件</button>
            </div>

        )
    }
}

// 子组件
import React from "react";
export default class Children extends React.Component{
    constructor(props){
        super(props);
    }

    render(){
        let { msg } = this.props;
        return (
            <div>
                { this.props.msg }
            </div>
        )
    }
}
JSX
JSX是一种JavaScript语法扩展,它允许在JavaScript中编写类似HTML的代码。在React中,JSX用于描述组件的UI。JSX代码被转换成JavaScript对象,这些对象描述了组件的UI结构和内容。
function App()
{
    return
        (
            <div>
                <h1>Hello,World!</h1>
            </div>
        )
}


// React中
// React.Fragment 分出来一个模块,有点像vue中template
// 注释方法  {/* 这里是注释 */}
 render() {
        return (
            <React.Fragment>
                {/* 这里是注释 */}
                <div>
                    <h1>我是react中的一段</h1>
                </div>
            </React.Fragment>

        )
    }
props
Props是React中组件之间通信的一种机制。它是一个组件的属性,可以通过父组件传递给子组件。组件可以使用props来接收外部数据,并将它们渲染为UI。
State
State是React组件的内部状态。它是一个对象,用于存储组件的数据。当组件的状态发生变化时,React会重新渲染组件,并根据新的状态更新UI。
// 声明 state
constructor(props){
        super(props);
        this.state = {
            num: 1,
        };
    }

// setState 修改state值
change() {
        this.setState({
            num: 3
        })

    }
四、生命周期
React组件生命周期方法分为三类:挂载、更新和卸载
挂载
挂载是将组件添加到DOM的过程中,依次执行以下方法:
- constructor
- getDerivedStateFromProps
- render
- componentDidMount
更新
组件已经在DOM中,但其props或state发生变化时的过程,依次执行以下方法:
- getDerivedStateFromProps
- shouldComponentUpdata
- render
- getSnapshotBeforeUpdate
- componentDidUpdate
卸载
将组件从DOM中移除的过程组件会执行以下方法:
- componentWillUnmount
举例:
import React from "react";

export default class Cycle extends React.Component {

    constructor(props){
        super(props);
        this.state = {
            num: 1,
        };
        console.log('constructor')
    }
    getDerivedStateFromProps
    componentDidMount() {
        // 类似于Vue中的mounted,需要优先保障元素渲染(设计思想不同)
        console.log('componentDidMount');
        // 发请求并修改数据
    }
    componentWillUnmount(){
        console.log('componentWillUnmount');
    }
    // 对比是否需要更新(优化)
    shouldComponentUpdate(){
        console.log('shouldComponentUpdata');
        if(this.state.num === 3) {
            console.log('更新')
            return true
        }
        else{
            console.log('更新')
            return false;
        }
    }
    change() {
        this.setState({
            num: 3
        })

    }
    render() {
        console.log('渲染了。。')
        return (
            <div>
                <h1>生命周期{ this.state.num }</h1>
                <button onClick = {e=> this.change() }>更改数据</button>
            </div>
        )
    }
}
输出:
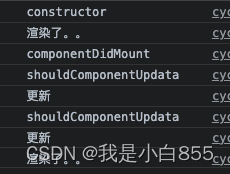


 1309
1309


 被折叠的 条评论
为什么被折叠?
被折叠的 条评论
为什么被折叠?
 到【灌水乐园】发言


