


three.js小白的学习之路。
shadertoy与three.js中shader代码的转换
最近开始重新审视shadertoy网站,这里面有太多大佬们创造的奇奇怪怪的glsl代码片段,实现了各种绚丽多彩的图案。但是,shadertoy中预定义了很多uniforms变量,其中最令我困惑的就是iResolution与three.js中uv的关系。
在shadertoy中经常可以看到如下的代码片段:
vec2 fragUv = (fragCoord - 0.5 * iResolution.xy) / iResolution.y;上述代码的意思是,通过分辨率(iResolution)和片元的顶点位置信息,计算出每一个点的uv坐标信息,其中fragCoord就是gl_FragCoord。
但是在three.js中,我们可以简单地在顶点着色器中使用这么一行代码(注意:这里的uv是顶点着色器里的uv,是three.js提供的变量,和底下shader代码段里定义的vec2 uv不是一回事!):
vec2 vUv = uv;three.js中会自动进行差值,获取每一个位置的uv信息。
那这两者之间,如何转换?翻阅了大佬们的一些文章,结合这一篇关于shadertoy的介绍,找到了答案:
vec2 fragUv = vUv - 0.5;没座!(杨坤音) 就是这么简单。那么就可以将iResolution的x和y分量计算出来,对应相等即可:
进而推算出:
这不二元一次方程嘛,解出来的解为:
其实推断出来 fragUv = vUv - 0.5 是一个比较麻烦的过程,可以参考我上面标注的那一篇博客。
shadertoy转换到three.js中的shader
这里参考了guowei大佬在shadertoy中的一个动效,其源码如下:
float circle(float radius, vec2 center, vec2 uv) {
	float d = distance(center, uv);
    return 1.0 - smoothstep(radius-1./iResolution.y, radius+1./iResolution.y, d);
}

vec2 angleRadius(vec2 uv) {
	float anglePixel = atan(uv.y, uv.x);
    float lengthPixel = length(uv);

    return vec2(anglePixel, lengthPixel);
}

float filterPositive(float n) {
    return smoothstep(0.0, 0.005, n);
}

void mainImage( out vec4 fragColor, in vec2 fragCoord )
{
    vec2 uv = (fragCoord - 0.5 * iResolution.xy)/iResolution.y; //many thanks to FabriceNeyret2

    float radius = 0.3;
    float ringThick = 0.05;

    vec2 stPolar = angleRadius(uv);

    float sPolar = stPolar.x * 3.0 + iTime * 10.0;

    float cosSPolarTemp = cos(sPolar);
    float cosSPolar = filterPositive(cosSPolarTemp);

    vec3 color = vec3(cosSPolar);


    float inCircleAA = smoothstep(radius, radius + 0.005, angleRadius(uv).y); //AA version
    float smallCircleAA = smoothstep(radius - ringThick, radius - ringThick + 0.005, angleRadius(uv).y); //AA version
    vec3 col = 1.0 - vec3(inCircleAA);
    vec3 col_2 = 1.0 - vec3(smallCircleAA);
    vec3 colorGap = col - col_2;
    vec3 finalColor = color * colorGap;
    vec3 colorMask = vec3(10, 1.5, 1.0);
    finalColor /= 10.0;
    finalColor *= colorMask;

    float centerCircleAA = smoothstep(0.1, 0.1 + 0.005, angleRadius(uv).y); //AA version
    vec3 centerCircleColor = 1.0 - vec3(centerCircleAA);
    centerCircleColor /= 10.0;
    centerCircleColor *= colorMask;

    vec2 centerC = vec2(0.0, 0.0);
    float bubbleRadius = abs(sin(iTime * 3.0)) / 3.0;
    float bubbleCircleColor = circle(bubbleRadius, centerC, uv);
    vec4 bubbleColor = vec4(vec3(bubbleCircleColor) / 10.0 * colorMask, 1.0);

    fragColor = vec4(finalColor + centerCircleColor, 1.0);
    fragColor += bubbleColor;
}
大佬的代码很神秘,我竟然看不懂!(哭死,有看懂的大佬帮忙解释一下)
结合上文的推导,将有关iResolution相关代码片段的进行替换,写到three.js中就应该是这样:
const time = { value: 0 };
const shader = {
  uniforms: {
    iTime: time,
  },
  vertexShader: `
    varying vec2 vUv;
    void main() {
      vUv = uv;
      gl_Position = projectionMatrix * modelViewMatrix * vec4(position, 1.0);
    }
  `,
  fragmentShader: `
  uniform float iTime;
  varying vec2 vUv;

  // 动态变化大小的圆
  float circle(float radius, vec2 center, vec2 uv) {
    float d = distance(center, uv);
    return 1.0 - smoothstep(radius-1. / (gl_FragCoord.y / vUv.y), radius+1. / (gl_FragCoord.y / vUv.y), d);
  }

  vec2 angleRadius(vec2 uv) {
    float anglePixel = atan(uv.y, uv.x);
    float lengthPixel = length(uv);

    return vec2(anglePixel, lengthPixel);
  }

  float filterPositive(float n) {
      return smoothstep(0.0, 0.005, n);
  }

  void main() {
    vec2 uv = vUv - 0.5;

    float radius = 0.3;
    float ringThick = 0.05;
    vec2 stPolar = angleRadius(uv);

    float sPolar = stPolar.x * 3.0 + iTime * 10.0; // stPolar.x * n,n就是圆环的个数

    float cosSPolarTemp = cos(sPolar);
    float cosSPolar = filterPositive(cosSPolarTemp);

    vec3 color = vec3(cosSPolar);

    float inCircleAA = smoothstep(radius, radius + 0.005, angleRadius(uv).y);
    float smallCircleAA = smoothstep(radius - ringThick, radius - ringThick + 0.005, angleRadius(uv).y);
    vec3 col = 1.0 - vec3(inCircleAA);
    vec3 col_2 = 1.0 - vec3(smallCircleAA);
    vec3 colorGap = col - col_2;
    vec3 finalColor = color * colorGap;
    vec3 colorMask = vec3(10, 1.5, 1.0);
    finalColor /= 10.0;
    finalColor *= colorMask;

    float centerCircleAA = smoothstep(0.1, 0.1 + 0.005, angleRadius(uv).y);
    vec3 centerCircleColor = 1.0 - vec3(centerCircleAA);
    centerCircleColor /= 10.0;
    centerCircleColor *= colorMask;

    vec2 centerC = vec2(0.0, 0.0);
    float bubbleRadius = abs(sin(iTime * 3.0)) / 3.0;
    float bubbleCircleColor = circle(bubbleRadius, centerC, uv);

    vec4 bubbleColor = vec4(vec3(bubbleCircleColor) / 10.0 * colorMask, 1.0);

    gl_FragColor = vec4(finalColor + centerCircleColor, 1.0);
    gl_FragColor += bubbleColor;
  }
  `,
};
先搞一个平面试一试效果:
嗯,去掉所有的黑色,在片元着色器里面加上如下的代码:
// 在main函数的最后
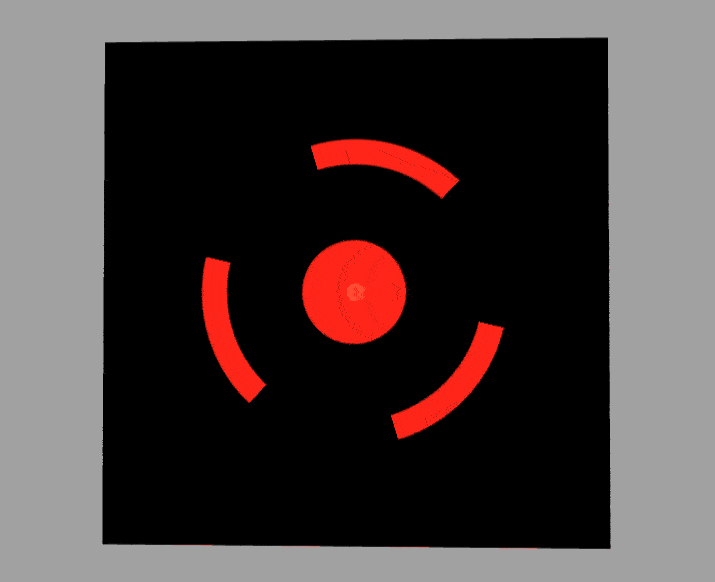
if(gl_FragColor.x < 0.01) gl_FragColor.a = 0.0; // 黑色部分变成透明色最终效果如下:

其他部分代码如下:
const geo = new Three.PlaneGeometry(500, 500, 100, 100);
const mat = new Three.ShaderMaterial({
  ...shader,
  transparent: true, // 一定要加,不然不透明
});
const mesh = new Three.Mesh(geo, mat);
scene.add(mesh);

const loop = () => {
  time.value += 0.03; // 动起来
  renderer.render(scene, camera);
  requestAnimationFrame(loop);
};
高德地图 + three.js 实现贴地呼吸动效
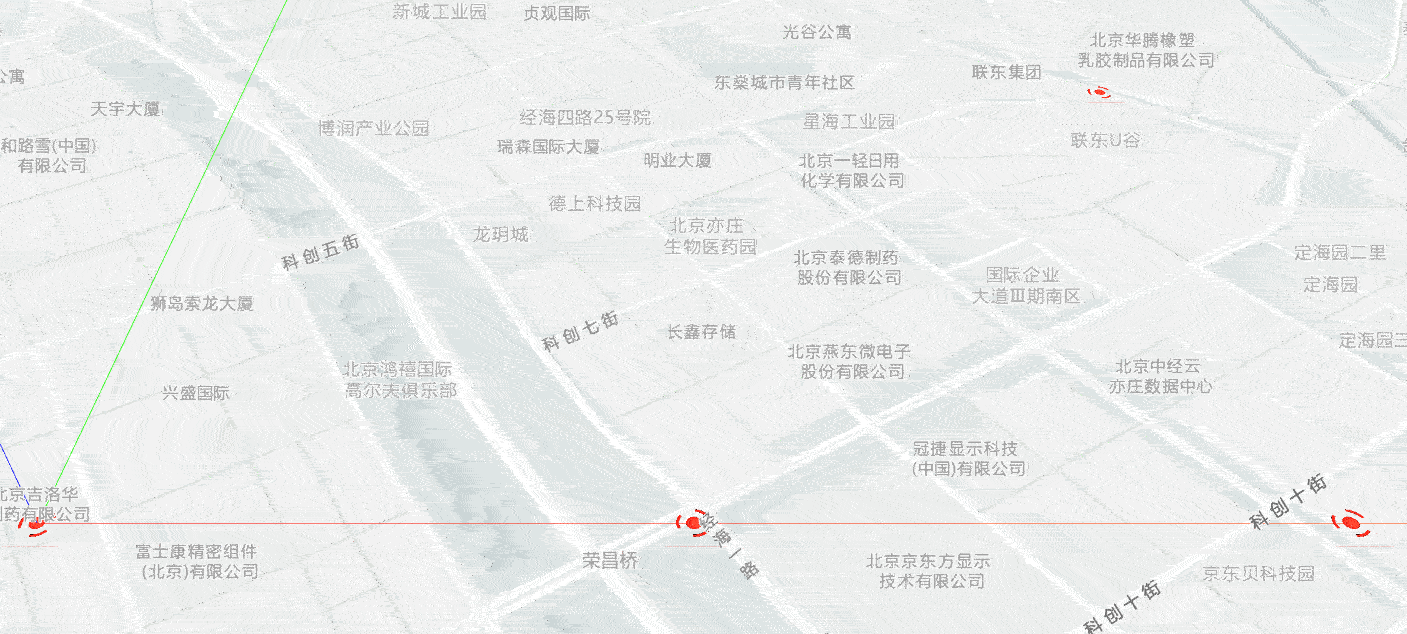
既然完成了转换,最近也在学高德地图的相关API,正好实现一个类似于我之前的波纹图效果的贴地呼吸图。
实现效果如下:
具体实现代码如下,其中基本的代码和我的这一篇博客一样,只不过根据这个模型增加了一个生成方法addModel:
import { onMounted } from "vue";
import * as Three from "three";
import AMapLoader from "@amap/amap-jsapi-loader";
import "@amap/amap-jsapi-types";

let map: AMap.Map;
let camera: Three.PerspectiveCamera,
  scene: Three.Scene,
  renderer: Three.WebGLRenderer;

const time = { value: 0 };

const animate = () => {
  time.value += 0.03;
  (map as any).render();
  requestAnimationFrame(animate);
};

const shader = {
  uniforms: {
    iTime: time,
  },
  vertexShader: `
    varying vec2 vUv;
    void main() {
      vUv = uv;
      gl_Position = projectionMatrix * modelViewMatrix * vec4(position, 1.0);
    }
  `,
  fragmentShader: `
  uniform float iTime;
  varying vec2 vUv;

  // 动态变化大小的圆
  float circle(float radius, vec2 center, vec2 uv) {
    float d = distance(center, uv);
    return 1.0 - smoothstep(radius-1. / (gl_FragCoord.y / vUv.y), radius+1. / (gl_FragCoord.y / vUv.y), d);
  }

  vec2 angleRadius(vec2 uv) {
    float anglePixel = atan(uv.y, uv.x);
    float lengthPixel = length(uv);

    return vec2(anglePixel, lengthPixel);
  }

  float filterPositive(float n) {
      return smoothstep(0.0, 0.005, n);
  }

  void main() {
    vec2 uv = vUv - 0.5;

    float radius = 0.3;
    float ringThick = 0.05;

    vec2 stPolar = angleRadius(uv);

    float sPolar = stPolar.x * 3.0 + iTime * 10.0; // stPolar.x * n,n就是圆环的个数

    float cosSPolarTemp = cos(sPolar);
    float cosSPolar = filterPositive(cosSPolarTemp);

    vec3 color = vec3(cosSPolar);

    float inCircleAA = smoothstep(radius, radius + 0.005, angleRadius(uv).y);
    float smallCircleAA = smoothstep(radius - ringThick, radius - ringThick + 0.005, angleRadius(uv).y);
    vec3 col = 1.0 - vec3(inCircleAA);
    vec3 col_2 = 1.0 - vec3(smallCircleAA);
    vec3 colorGap = col - col_2;
    vec3 finalColor = color * colorGap;
    vec3 colorMask = vec3(10, 1.5, 1.0);
    finalColor /= 10.0;
    finalColor *= colorMask;

    float centerCircleAA = smoothstep(0.1, 0.1 + 0.005, angleRadius(uv).y);
    vec3 centerCircleColor = 1.0 - vec3(centerCircleAA);
    centerCircleColor /= 10.0;
    centerCircleColor *= colorMask;

    vec2 centerC = vec2(0.0, 0.0);
    float bubbleRadius = abs(sin(iTime * 3.0)) / 3.0;
    float bubbleCircleColor = circle(bubbleRadius, centerC, uv);

    vec4 bubbleColor = vec4(vec3(bubbleCircleColor) / 10.0 * colorMask, 1.0);

    gl_FragColor = vec4(finalColor + centerCircleColor, 1.0);
    gl_FragColor += bubbleColor;
    if(gl_FragColor.x < 0.01) gl_FragColor.a = 0.0; // 黑色部分变成透明色
  }
  `,
};

const addModel = () => {
  const data = (map as any).customCoords.lngLatsToCoords([
    [116.52, 39.79],
    [116.54, 39.79],
    [116.56, 39.79],
    [116.58, 39.79],
    [116.52, 39.75],
    [116.54, 39.77],
    [116.56, 39.81],
    [116.58, 39.83],
  ]);

  const geo = new Three.PlaneGeometry(200, 200);
  const mat = new Three.ShaderMaterial({
    ...shader,
    transparent: true,
  });

  data.forEach((item: [number, number]) => {
    const mesh = new Three.Mesh(geo, mat);
    mesh.position.set(...item, 5);
    scene.add(mesh);
  });
};

const init = (gl: any) => {
  camera = new Three.PerspectiveCamera(
    60,
    window.innerWidth / window.innerHeight,
    10,
    1 << 30
  );
  renderer = new Three.WebGLRenderer({
    context: gl,
  });
  renderer.autoClear = false;

  scene = new Three.Scene();

  const axes = new Three.AxesHelper(10000);
  scene.add(axes);

  const aLight = new Three.AmbientLight(0xffffff, 0.3);
  scene.add(aLight);

  addModel();
};

const render = () => {
  renderer.resetState();
  (map as any).customCoords.setCenter([116.52, 39.79]);
  const {
    near,
    far,
    fov,
    up,
    lookAt,
    position,
  }: {
    near: number;
    far: number;
    fov: number;
    up: [number, number, number];
    lookAt: [number, number, number];
    position: [number, number, number];
  } = (map as any).customCoords.getCameraParams();
  camera.near = near;
  camera.far = far;
  camera.fov = fov;
  camera.position.set(...position);
  camera.up.set(...up);
  camera.lookAt(...lookAt);
  camera.updateProjectionMatrix();

  renderer.render(scene, camera);

  renderer.resetState();
};

const onWindowResize = () => {
  camera.aspect = window.innerWidth / window.innerHeight;
  camera.updateProjectionMatrix();
  renderer.setSize(window.innerWidth, window.innerHeight);
};
window.addEventListener("resize", onWindowResize);

onMounted(() => {
  window._AMapSecurityConfig = {
    securityJsCode: "你的安全密钥",
  };

  AMapLoader.load({
    key: "你的key", // 申请好的Web端开发者Key,首次调用 load 时必填
    version: "2.0", // 指定要加载的 JSAPI 的版本,缺省时默认为 1.4.15
  })
    .then(() => {
      map = new AMap.Map("container", {
        center: [116.54, 39.79],
        zooms: [3, 20],
        zoom: 14,
        viewMode: "3D",
        pitch: 50,
      });

      // 创建GL图层
      const glLayer = new AMap.GLCustomLayer({
        zIndex: 10,
        init,
        render,
      });
      map.add(glLayer);
      animate();
    })
    .catch((e) => {
      console.log(e);
    });
});PS:有木有好的方法生成实景的山地模型?请大佬们不吝赐教!


 被折叠的 条评论
为什么被折叠?
被折叠的 条评论
为什么被折叠?
 到【灌水乐园】发言


