


1.
项目介绍
使用
C
语言实现腾讯
QQ
界面风格的聊天软件,实现
AI
对话。
2.
项目目标
1.
掌握
C
语言开发客户端软件的基本方法
2.
掌握
C
语言实现用户界面渲染、用户界面响应的底层机制
3.
掌握网络编程的基本概念
4.
掌握多线程开发的基本用法
适合初学者的“提升项目”
3.
项目演示
开始表演
5.
学习条件
已经掌握
C
语言的基础用法
:
变量、字符串,条件判断
if
,循环语句
for/while
等基础内容
如果还没有
C
语言基础,建议先学习【零基础
-5
天入门
C
语言】
https://ke.qq.com/webcourse/index.html#cid=377567&term_id=100449934&taid=3062105523995359
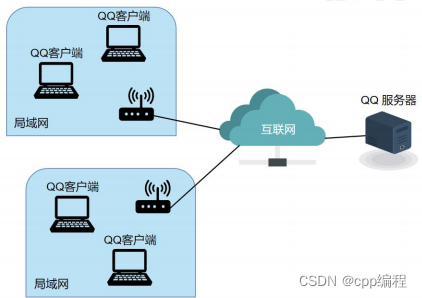
6.
项目架构
7.
项目准备
1.
安装好
VS2019
或者
VS2010
VS2010
下载地址:
https://ke.qq.com/webcourse/index.html?cw_id=339501&ac_type=3#cid=377567&term_id=100449934
2019 下载地址:
https://ke.qq.com/webcourse/index.html?cw_id=339498&ac_type=3#cid=377567&term_id=100449934&taid=11919268686185183&type=1024
2.
安装好
easyx
Easyx-
适用于
VS2019
版本:
https://ke.qq.com/webcourse/index.html?cw_id=339507&ac_type=3#cid=377567&term_id=100449934&taid=11919272981152479&type=1024
Easyx-
适用
VS2019
以下的版本
:
https://ke.qq.com/webcourse/index.html?cw_id=339508&ac_type=3#cid=377567&term_id=100449934&taid=11919277276119775&type=1024
3.
领取项目素材
1.
图片素材
2. 库文件

1.
客户端项目实现
1.
创建空项目
2.
导入素材
导入素材
res
目录到项目目录下。
3.
添加第
3
方库文件
tx_qq.lib
tx_qq.h
#include "tx_qq.h" #pragma comment(lib, "tx_qq.lib") int main(void) { printf("hello world\n"); return 0; }
4.
输入对方
IP
地址
char ip_addr[32]; int main(void) { printf("请输入对方的 IP 地址: "); scanf_s("%s", ip_addr, sizeof(ip_addr)); return 0; }
IP
地址是什么?
5.
网络通信之前的初始化
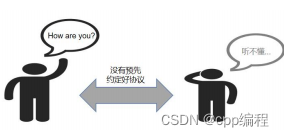
5.1
网络开发快速入门
什么是网络协议
最常用的网络协议 TCP 与 UDP

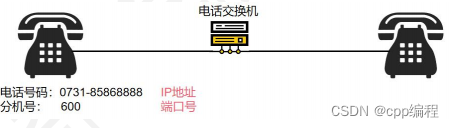
什么是 IP 地址

什么是端口
端口号,就是“在同一个地方,问需要什么服务”

298 服务

198 服务

最常用的端口号:
80
端口
- WEB
服务
www.baidu.com
就是
www.baidu.com
:80
什么是套接字
【IP +
端口号】 组合成一个“插座” ,这个“插座”就是套接字
使用“套接字”,发送数据
/
接收数据
5.2
网络通信前的初始化
1
)指定网络协议
2
)设置网络地址
3
)指定通信的端口
4
)指定对端的
IP
地址
5
)创建套接字
SOCKET
serverSocket;
sockaddr_in sockAddr;
#define PORT 2021
#include <winsock.h>
#pragma comment(lib, "ws2_32.lib")
调用初始化函数
int main(void) {

printf("请输入对方的 IP 地址: ");

scanf_s("%s", ip_addr, sizeof(ip_addr));
if (!TCPInit(&serverSocket, &sockAddr, ip_addr, PORT)) { printf("网络初始化失败!\n"); return -1; }return 0; }
6.
连接奇牛客服端
void connect() { // 连接服务器端(发起网络连接请求) connect(serverSocket, (SOCKADDR*)&sockAddr, sizeof(sockAddr)); printf("已经接入!\n"); }
调用
connect
int main(void) { printf("请输入对方的 IP 地址: "); scanf_s("%s", ip_addr, sizeof(ip_addr)); if (!init()) { printf("网络初始化失败!\n"); return -1; }printf("正在连接奇牛客服...\n"); connect(); return 0; }
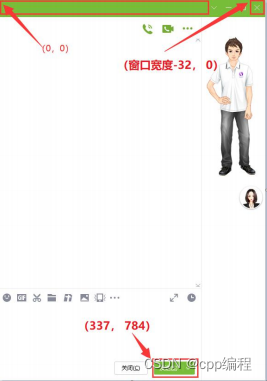
7.
初始化图形
QQ
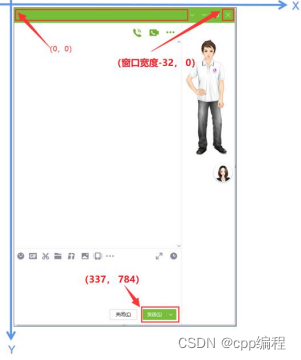
HWND hwnd; // 聊天窗口句柄 int screenWidth; int screenHeight; int msgHeight; // 新气泡的 y 坐标 IMAGE imgBg; //聊天窗口背景 IMAGE imageArrows[2]; //气泡的箭头 IMAGE imageHeads[2]; //人物的头像 // 三个按钮 Button btnClose; Button btnTitle; Button btnSend; void initUI() { // 1. 创建聊天窗口 initgraph(WINDOW_WIDTH, WINDOW_HEIGHT, EW_SHOWCONSOLE); // 创建绘图窗口 setbkmode(TRANSPARENT); // 2. 移动窗口位置 screenWidth = GetSystemMetrics(SM_CXSCREEN); screenHeight = GetSystemMetrics(SM_CYSCREEN); hwnd = GetHWnd(); //获取当前窗口句柄 SetWindowLong( //设置窗口属性说 hwnd, GWL_STYLE, //设定一个新的窗口风格。 //GetWindowLong 获取指定串口的属性 GetWindowLong(hwnd, GWL_STYLE) - WS_CAPTION);//WS_CAPTION 带标题栏的窗口风格 MoveWindow(hwnd, screenWidth / 8, 100, WINDOW_WIDTH, WINDOW_HEIGHT, false); // 3. 绘制背景图片 loadimage(&imgBg, "res/bg.png"); putimage(0, 0, &imgBg); // 4. 加载气泡尾巴和头像 loadimage(&imageArrows[0], "res/left_arrow.jpg", 6, 8, true); loadimage(&imageArrows[1], "res/right_arrow.jpg", 6, 8, true); loadimage(&imageHeads[1], "res/niu.jpg", 44, 51, true); loadimage(&imageHeads[0], "res/rock.jpg", 55, 51, true); // 5. 初始化 3 个按钮
// 5.1 初始化关闭按钮 initButton(&btnClose, "res/close_normal.jpg", "res/close_press.jpg", 32, 33, 0); btnClose.x = WINDOW_WIDTH - 32; btnClose.y = 0; // 5.2 初始化标题按钮 initButton(&btnTitle, "res/title.jpg", "res/title.jpg", 460, 39, 0); btnTitle.x = 0; btnTitle.y = 0; // 5.3 初始化发送按钮 initButton(&btnSend, "res/send_normal.jpg", "res/send_press.jpg", 88, 28, 0); btnSend.x = 337; btnSend.y = 784; // 6. 初始化气泡位置 msgHeight = 120; // 7. 设置编辑区域的文本颜色 setcolor(BLACK); }
位置说明:
调用 initUI
int main(void) {printf("请输入对方的 IP 地址: "); scanf_s("%s", ip_addr, sizeof(ip_addr)); if (!init()) { printf("网络初始化失败!\n"); return -1; }printf("正在连接奇牛客服...\n"); connect(); initUI(); return 0; }
这段代码,使用了
Button
组件,实际上
easyx
没有
Button
组件,快速入门,开发自己的高
级组件!
8.
创建多线程,并发处理信息编辑和信息接收
程序,通过“多线程”来实现“一心多用”
int main(void) { printf("请输入对方的 IP 地址: "); scanf_s("%s", ip_addr, sizeof(ip_addr)); if (!init()) { printf("网络初始化失败!\n"); return -1; }printf("正在连接奇牛客服...\n"); connect(); initUI(); DWORD threadID = 0; HANDLE handleSecond = CreateThread(NULL, 0, ThreadFuncRcv, 0, 0, &threadID); HANDLE handleEdit = CreateThread(NULL, 0, msgEditHandle, NULL, 0, &threadID); return 0; }
定义线程函数
DWORD WINAPI ThreadFuncRcv(LPVOID param) { return NULL; }DWORD WINAPI msgEditHandle(LPVOID param) { return NULL; }
9.
实现编辑功能
DWORD WINAPI msgEditHandle(LPVOID param) { textBox(10, 663, 420, 110, LINE_HEIGHT, WHITE, BLACK, msgEdit, &msgLen); return NULL; }
此时还不能实现
UI
互动,其他功能还没有实现。
10.
实现界面的消息处理
void mainUI() { while (1) { MOUSEMSG m = GetMouseMsg(); FlushMouseMsgBuffer(); //不能少,后缀快速拖动顶部的标题按钮,将导致鼠标消息太多, 出现混乱!switch (m.uMsg) { case WM_MOUSEMOVE: if (checkButtonSelect(&btnTitle, &m)) { } else if (checkButtonSelect(&btnSend, &m)) { btnSend.pressed = true; drawButton(&btnSend); }else if (checkButtonSelect(&btnClose, &m)) { btnClose.pressed = true; drawButton(&btnClose); } else { // 检查鼠标是否从按钮内移动到按钮之外 if (btnClose.pressed == true) { // 鼠标从关闭按钮移出 btnClose.pressed = false; drawButton(&btnClose); }if (btnSend.pressed == true) { // 鼠标从发送按钮移出 btnSend.pressed = false; drawButton(&btnSend); } }break; case WM_LBUTTONDOWN: if (checkButtonSelect(&btnTitle, &m)) { }else if (checkButtonSelect(&btnClose, &m)) { btnClose.pressed = true; drawButton(&btnClose); }else if (checkButtonSelect(&btnSend, &m)) { btnSend.pressed = true;
drawButton(&btnSend); }break; case WM_LBUTTONUP: if (checkButtonSelect(&btnClose, &m)) { //btnClose.pressed = false; //drawButton(&btnClose); closegraph(); exit(0); }else if (checkButtonSelect(&btnSend, &m)) { }else if (checkButtonSelect(&btnTitle, &m)) { }break; } } }
调用 mainUI
int main(void) { printf("请输入对方的 IP 地址: "); scanf_s("%s", ip_addr, sizeof(ip_addr)); if (!init()) { printf("网络初始化失败!\n"); return -1; }printf("正在连接奇牛客服...\n"); connect(); initUI(); DWORD threadID = 0; HANDLE handleSecond = CreateThread(NULL, 0, ThreadFuncRcv, 0, 0, &threadID); HANDLE handleEdit = CreateThread(NULL, 0, msgEditHandle, NULL, 0, &threadID); mainUI(); system("pause");
return 0; }
如果服务端已经开启,可以检查以下效果。
1.
编辑功能:中文编辑,英文编辑,混合编辑,换行,退格删除
2.
发送按钮和关闭按钮的滑动变色效果
3.
关闭按钮的关闭功能
11.
实现窗口的拖动功能
和客户端的窗口拖动相同。
因为已经把默认的标题栏隐藏,所以需要额外实现窗口的拖动功能。
void mainUI() { bool titleDrag = false; //表示“标题栏”是否被单击拖动 int titleLastX; //窗口的上一次位置(X 坐标位置) int titleLastY; //窗口的上一次位置(X 坐标位置) while (1) { MOUSEMSG m = GetMouseMsg(); FlushMouseMsgBuffer(); //不能少,后缀快速拖动顶部的标题按钮,讲导致鼠标消息太多, 出现混乱!switch (m.uMsg) {
case WM_MOUSEMOVE: // 鼠标滑过标题栏 if (checkButtonSelect(&btnTitle, &m)) { if (btnTitle.pressed == true) { if (titleDrag == false) { // 此时标题栏已经被点击按下,正准备拖动 titleLastX = m.x; // 记录初始坐标 titleLastY = m.y; titleDrag = true; }else { // 此时标题栏已经被点击按下,正在拖动 // 计算拖动偏移量 int offX = m.x - titleLastX; int offY = m.y - titleLastY; moveWindow(hwnd, offX, offY); // 根据拖动偏移量,移动窗口 } } } else if (checkButtonSelect(&btnSend, &m)) { btnSend.pressed = true; drawButton(&btnSend); }else if (checkButtonSelect(&btnClose, &m)) { btnClose.pressed = true; drawButton(&btnClose); } else { // 检查鼠标是否从按钮内移动到按钮之外 if (btnClose.pressed == true) { // 鼠标从关闭按钮移出 btnClose.pressed = false; drawButton(&btnClose); }if (btnSend.pressed == true) { // 鼠标从发送按钮移出 btnSend.pressed = false; drawButton(&btnSend); } }break; case WM_LBUTTONDOWN: if (checkButtonSelect(&btnTitle, &m)) { btnTitle.pressed = true; // 单击按下标题栏 }else if (checkButtonSelect(&btnClose, &m)) { btnClose.pressed = true; drawButton(&btnClose); }
else if (checkButtonSelect(&btnSend, &m)) { btnSend.pressed = true; drawButton(&btnSend); }break; case WM_LBUTTONUP: if (checkButtonSelect(&btnClose, &m)) { //btnClose.pressed = false; //drawButton(&btnClose); closegraph(); exit(0); }else if (checkButtonSelect(&btnSend, &m)) { }else if (checkButtonSelect(&btnTitle, &m)) { // 松开标题栏按钮(左键抬起) btnTitle.pressed = false; titleDrag = false; }break; } } }
测试效果。
12.
发送信息
左键抬起时发送。
msg_t msgAll[5]; int msgCount = 0; int currentMsgIndex = -1; //当前最近的一条信息的索引 void mainUI() { bool titleDrag = false; //表示“标题栏”是否被单击拖动 int titleLastX; //窗口的上一次位置(X 坐标位置) int titleLastY; //窗口的上一次位置(X 坐标位置) while (1) { MOUSEMSG m = GetMouseMsg(); FlushMouseMsgBuffer(); //不能少,后缀快速拖动顶部的标题按钮,讲导致鼠标消息太多, 出现混乱!
switch (m.uMsg) { case WM_MOUSEMOVE: // 鼠标滑过标题栏 if (checkButtonSelect(&btnTitle, &m)) { if (btnTitle.pressed == true) { if (titleDrag == false) { // 此时标题栏已经被点击按下,正准备拖动 titleLastX = m.x; // 记录初始坐标 titleLastY = m.y; titleDrag = true; }else { // 此时标题栏已经被点击按下,正在拖动 // 计算拖动偏移量 int offX = m.x - titleLastX; int offY = m.y - titleLastY; moveWindow(hwnd, offX, offY); // 根据拖动偏移量,移动窗口 } } } else if (checkButtonSelect(&btnSend, &m)) { btnSend.pressed = true; drawButton(&btnSend); }else if (checkButtonSelect(&btnClose, &m)) { btnClose.pressed = true; drawButton(&btnClose); } else { // 检查鼠标是否从按钮内移动到按钮之外 if (btnClose.pressed == true) { // 鼠标从关闭按钮移出 btnClose.pressed = false; drawButton(&btnClose); }if (btnSend.pressed == true) { // 鼠标从发送按钮移出 btnSend.pressed = false; drawButton(&btnSend); } }break; case WM_LBUTTONDOWN: if (checkButtonSelect(&btnTitle, &m)) { btnTitle.pressed = true; // 单击按下标题栏 }else if (checkButtonSelect(&btnClose, &m)) { btnClose.pressed = true; drawButton(&btnClose);
}else if (checkButtonSelect(&btnSend, &m)) { btnSend.pressed = true; drawButton(&btnSend); }break; case WM_LBUTTONUP: if (checkButtonSelect(&btnClose, &m)) { //btnClose.pressed = false; //drawButton(&btnClose); closegraph(); exit(0); }else if (checkButtonSelect(&btnSend, &m)) { btnSend.pressed = false; drawButton(&btnSend); int ret = send(serverSocket, msgEdit, msgLen, 0); printf("已经发送%d 个字符\n", ret); currentMsgIndex = (currentMsgIndex + 1) % (sizeof(msgAll) / sizeof(msgAll[0]));msgEdit[msgLen] = 0; strcpy(msgAll[currentMsgIndex].msg, msgEdit); memset(msgEdit, 0, sizeof(msgEdit)); msgLen = 0; msgAll[currentMsgIndex].type = SEND; msgCount++; //drawMsg(); drawMsg(msgAll, currentMsgIndex, &msgHeight, imageArrows, imageHeads); }else if (checkButtonSelect(&btnTitle, &m)) { // 松开标题栏按钮(左键抬起) btnTitle.pressed = false; titleDrag = false; }break; } } }
测试效果。
13.
接收信息
DWORD WINAPI ThreadFuncRcv(LPVOID param) { char buff[4096]; while (1) { int ret = recv(serverSocket, buff, sizeof(buff), 0); if (ret <= 0) return false; buff[ret] = 0; //添加字符串结束符 printf("收到:%s\n", buff); currentMsgIndex = (currentMsgIndex + 1) % (sizeof(msgAll) / sizeof(msgAll[0])); strcpy(msgAll[currentMsgIndex].msg, buff); msgAll[currentMsgIndex].type = RECEIVE; msgCount++; //drawMsg(); drawMsg(msgAll, currentMsgIndex, &msgHeight, imageArrows, imageHeads); }return NULL; }
添加音效。
14.
客户端项目开发总结
1.
使用多线程,实现主界面的消息处理、消息接收、信息编辑,三条线并发执行。
2.
使用图形库
easyx,
实现界面组件的开发和使用。
3.
表情功能、文件传输、视频电话、音频电话、账号登录等待完善。
2.
服务端实现
1.
创建空项目
2.
导入素材
导入素材
res
目录到项目目录下。
3.
添加第
3
方库文件
tx_qq.lib
tx_qq.h
#include "tx_qq.h" #pragma comment(lib, "tx_qq.lib") int main(void) { printf("hello world\n"); return 0; }
4.
网络通信之前的初始化
初始化:
1
)初始化网络协议
2
)创建套接字
3
)设置网络地址
4
)绑定套接字
#include <winsock.h> #pragma comment(lib, "ws2_32.lib") #define PORT 2021 SOCKET serverSocket; bool init() { WSADATA wsaData; int err = WSAStartup(MAKEWORD(1, 1), &wsaData); if (err != 0) { return false; }serverSocket = socket(PF_INET, SOCK_STREAM, IPPROTO_TCP); sockaddr_in sockAddr; sockAddr.sin_family = PF_INET; sockAddr.sin_addr.S_un.S_addr = 0; sockAddr.sin_port = htons(PORT); // 绑定套接字 bind(serverSocket, (SOCKADDR*)&sockAddr, sizeof(sockAddr)); // 创建监听队列 listen(serverSocket, 1); return NULL; }
调用
init
int main() { init(); ...... system("pause"); return 0; }
5.
等待客户端发起连接
SOCKET clientSock;
void waitAccept() { SOCKADDR client; // 监控端的网络地址(相当于客户端的网络地址) int nSize = sizeof(client); printf("等待客户端发起连接...\n"); clientSock = accept(serverSocket, &client, &nSize); printf("客户端已经接入!\n"); }
调用
waitAccept
int main(void) { init(); waitAccept(); return 0; }
6.
初始化图形
QQ
HWND hwnd; // 聊天窗口句柄 int screenWidth; int screenHeight; int msgHeight; // 新气泡的 y 坐标 IMAGE imgBg; //聊天窗口背景 IMAGE imageArrows[2]; //气泡的箭头 IMAGE imageHeads[2]; //人物的头像 // 三个按钮 Button btnClose; Button btnTitle; Button btnSend; void initUI() { // 1. 创建聊天窗口 initgraph(WINDOW_WIDTH, WINDOW_HEIGHT, EW_SHOWCONSOLE); // 创建绘图窗口 setbkmode(TRANSPARENT); // 2. 移动窗口位置 screenWidth = GetSystemMetrics(SM_CXSCREEN); screenHeight = GetSystemMetrics(SM_CYSCREEN); hwnd = GetHWnd(); //获取当前窗口句柄 SetWindowLong( //设置窗口属性说
hwnd, GWL_STYLE, //设定一个新的窗口风格。 //GetWindowLong 获取指定串口的属性 GetWindowLong(hwnd, GWL_STYLE) - WS_CAPTION);//WS_CAPTION 带标题栏的窗口风格 MoveWindow(hwnd, screenWidth * 0.7 , 100, WINDOW_WIDTH, WINDOW_HEIGHT, false); // 3. 绘制背景图片 loadimage(&imgBg, "res/bg.png"); putimage(0, 0, &imgBg); // 4. 加载气泡尾巴和头像 loadimage(&imageArrows[0], "res/left_arrow.jpg", 6, 8, true); loadimage(&imageArrows[1], "res/right_arrow.jpg", 6, 8, true); loadimage(&imageHeads[0], "res/niu.jpg", 44, 51, true); loadimage(&imageHeads[1], "res/rock.jpg", 55, 51, true); // 5. 初始化 3 个按钮 // 5.1 初始化关闭按钮 initButton(&btnClose, "res/close_normal.jpg", "res/close_press.jpg", 32, 33, 0); btnClose.x = WINDOW_WIDTH - 32; btnClose.y = 0; // 5.2 初始化标题按钮 initButton(&btnTitle, "res/title.jpg", "res/title.jpg", 460, 39, 0); btnTitle.x = 0; btnTitle.y = 0; // 5.3 初始化发送按钮 initButton(&btnSend, "res/send_normal.jpg", "res/send_press.jpg", 88, 28, 0); btnSend.x = 337; btnSend.y = 784; // 6. 初始化气泡位置 msgHeight = 120; // 7. 设置编辑区域的文本颜色 setcolor(BLACK); }
位置说明:
调用 initUI
int main(void) { init(); waitAccept(); initUI(); return 0; }
7.
创建多线程,并发处理信息编辑和信息接收
int main() { init(); waitAccept(); initUI(); DWORD dwThreadID = 0; HANDLE handleSecond = CreateThread(NULL, 0, ThreadFuncRcv, 0, 0, &dwThreadID); HANDLE handleEdit = CreateThread(NULL, 0, msgEditHandle, NULL, 0, &dwThreadID);
mainUI(); system("pause"); return 0; }
线程函数
DWORD WINAPI ThreadFuncRcv(LPVOID param) { return NULL; }DWORD WINAPI msgEditHandle(LPVOID param) { return NULL; }
8.
实现编辑功能
char msgEdit[1024]; int msgLen; DWORD WINAPI msgEditHandle(LPVOID param) { textBox(10, 663, 420, 110, LINE_HEIGHT, WHITE, BLACK, msgEdit, &msgLen); return NULL; }
此时还不能实现
UI
互动,其他功能还没有实现。
9.
实现界面的消息处理
void mainUI() { while (1) { MOUSEMSG m = GetMouseMsg(); FlushMouseMsgBuffer(); //不能少,后缀快速拖动顶部的标题按钮,将导致鼠标消息太多, 出现混乱!switch (m.uMsg) { case WM_MOUSEMOVE: if (checkButtonSelect(&btnTitle, &m)) { } else if (checkButtonSelect(&btnSend, &m)) { btnSend.pressed = true;
drawButton(&btnSend); }else if (checkButtonSelect(&btnClose, &m)) { btnClose.pressed = true; drawButton(&btnClose); } else { // 检查鼠标是否从按钮内移动到按钮之外 if (btnClose.pressed == true) { // 鼠标从关闭按钮移出 btnClose.pressed = false; drawButton(&btnClose); }if (btnSend.pressed == true) { // 鼠标从发送按钮移出 btnSend.pressed = false; drawButton(&btnSend); } }break; case WM_LBUTTONDOWN: if (checkButtonSelect(&btnTitle, &m)) { }else if (checkButtonSelect(&btnClose, &m)) { btnClose.pressed = true; drawButton(&btnClose); }else if (checkButtonSelect(&btnSend, &m)) { btnSend.pressed = true; drawButton(&btnSend); }break; case WM_LBUTTONUP: if (checkButtonSelect(&btnClose, &m)) { //btnClose.pressed = false; //drawButton(&btnClose); closegraph(); exit(0); }else if (checkButtonSelect(&btnSend, &m)) { }else if (checkButtonSelect(&btnTitle, &m)) { }
break; } } }
调用
mainUI
int main(void) { init(); waitAccept(); initUI(); DWORD dwThreadID = 0; HANDLE handleSecond = CreateThread(NULL, 0, ThreadFuncRcv, 0, 0, &dwThreadID); HANDLE handleEdit = CreateThread(NULL, 0, msgEditHandle, NULL, 0, &dwThreadID); mainUI(); return 0; }
10.
实现窗口的拖动功能
因为已经把默认的标题栏隐藏,所以需要额外实现窗口的拖动功能。
void mainUI() { bool titleDrag = false; //表示“标题栏”是否被单击拖动 int titleLastX; //窗口的上一次位置(X 坐标位置) int titleLastY; //窗口的上一次位置(X 坐标位置) while (1) { MOUSEMSG m = GetMouseMsg(); FlushMouseMsgBuffer(); //不能少,后缀快速拖动顶部的标题按钮,讲导致鼠标消息太多, 出现混乱!switch (m.uMsg) { case WM_MOUSEMOVE: // 鼠标滑过标题栏 if (checkButtonSelect(&btnTitle, &m)) { if (btnTitle.pressed == true) { if (titleDrag == false) { // 此时标题栏已经被点击按下,正准备拖动 titleLastX = m.x; // 记录初始坐标 titleLastY = m.y; titleDrag = true;
}else { // 此时标题栏已经被点击按下,正在拖动 // 计算拖动偏移量 int offX = m.x - titleLastX; int offY = m.y - titleLastY; moveWindow(hwnd, offX, offY); // 根据拖动偏移量,移动窗口 } } } else if (checkButtonSelect(&btnSend, &m)) { btnSend.pressed = true; drawButton(&btnSend); }else if (checkButtonSelect(&btnClose, &m)) { btnClose.pressed = true; drawButton(&btnClose); } else { // 检查鼠标是否从按钮内移动到按钮之外 if (btnClose.pressed == true) { // 鼠标从关闭按钮移出 btnClose.pressed = false; drawButton(&btnClose); }if (btnSend.pressed == true) { // 鼠标从发送按钮移出 btnSend.pressed = false; drawButton(&btnSend); } }break; case WM_LBUTTONDOWN: if (checkButtonSelect(&btnTitle, &m)) { btnTitle.pressed = true; // 单击按下标题栏 }else if (checkButtonSelect(&btnClose, &m)) { btnClose.pressed = true; drawButton(&btnClose); }else if (checkButtonSelect(&btnSend, &m)) { btnSend.pressed = true; drawButton(&btnSend); }break; case WM_LBUTTONUP: if (checkButtonSelect(&btnClose, &m)) { //btnClose.pressed = false;
//drawButton(&btnClose); closegraph(); exit(0); }else if (checkButtonSelect(&btnSend, &m)) { }else if (checkButtonSelect(&btnTitle, &m)) { // 松开标题栏按钮(左键抬起) btnTitle.pressed = false; titleDrag = false; }break; } } }
11.
发送消息
msg_t msgAll[5]; int msgCount = 0; int currentMsgIndex = -1; //当前最近的一条信息的索引 void mainUI() { bool titleDrag = false; //表示“标题栏”是否被单击拖动 int titleLastX; //窗口的上一次位置(X 坐标位置) int titleLastY; //窗口的上一次位置(X 坐标位置) while (1) { MOUSEMSG m = GetMouseMsg(); FlushMouseMsgBuffer(); //不能少,后缀快速拖动顶部的标题按钮,将导致鼠标消息太多, 出现混乱!switch (m.uMsg) { case WM_MOUSEMOVE: if (checkButtonSelect(&btnTitle, &m)) { if (btnTitle.pressed == true) { if (titleDrag == false) { // 此时标题栏已经被点击按下,正准备拖动 titleLastX = m.x; // 记录初始坐标 titleLastY = m.y; titleDrag = true; }else { // 此时标题栏已经被点击按下,正在拖动
// 计算拖动偏移量 int offX = m.x - titleLastX; int offY = m.y - titleLastY; moveWindow(hwnd, offX, offY); // 根据拖动偏移量,移动窗口 } } }else if (checkButtonSelect(&btnSend, &m)) { btnSend.pressed = true; drawButton(&btnSend); }else if (checkButtonSelect(&btnClose, &m)) { btnClose.pressed = true; drawButton(&btnClose); }else {// 检查鼠标是否从按钮内移动到按钮之外 if (btnClose.pressed == true) { // 鼠标从关闭按钮移出 btnClose.pressed = false; drawButton(&btnClose); }if (btnSend.pressed == true) { // 鼠标从发送按钮移出 btnSend.pressed = false; drawButton(&btnSend); } }break; case WM_LBUTTONDOWN: if (checkButtonSelect(&btnTitle, &m)) { btnTitle.pressed = true; // 单击按下标题栏 }else if (checkButtonSelect(&btnClose, &m)) { btnClose.pressed = true; drawButton(&btnClose); }else if (checkButtonSelect(&btnSend, &m)) { btnSend.pressed = true; drawButton(&btnSend); }break; case WM_LBUTTONUP: if (checkButtonSelect(&btnClose, &m)) { closegraph();
exit(0); }else if (checkButtonSelect(&btnSend, &m)) { btnSend.pressed = false; drawButton(&btnSend); //int ret = send(serverSocket, msgEdit, msgLen, 0); int ret = send(clientSock, msgEdit, msgLen, 0); printf("已经发送%d 个字符\n", ret); currentMsgIndex = (currentMsgIndex + 1) % (sizeof(msgAll) / sizeof(msgAll[0]));msgEdit[msgLen] = 0; strcpy(msgAll[currentMsgIndex].msg, msgEdit); memset(msgEdit, 0, sizeof(msgEdit)); msgLen = 0; msgAll[currentMsgIndex].type = SEND; msgCount++; //drawMsg(); drawMsg(msgAll, currentMsgIndex, &msgHeight, imageArrows, imageHeads); }else if (checkButtonSelect(&btnTitle, &m)) { // 松开标题栏按钮(左键抬起) btnTitle.pressed = false; titleDrag = false; }break; } } }
12.
接收信息
DWORD WINAPI ThreadFuncRcv(LPVOID param) { while (1) { char buff[1024]; int ret = recv(clientSock, buff, sizeof(buff), 0); if (ret <= 0) { printf("对方已下线\n");
closesocket(clientSock); //TerminateThread(); waitAccept(); }else {buff[ret] = 0; printf("[收到] %s\n", buff); currentMsgIndex = (currentMsgIndex + 1) % (sizeof(msgAll) / sizeof(msgAll[0])); strcpy(msgAll[currentMsgIndex].msg, buff); msgAll[currentMsgIndex].type = RECEIVE; msgCount++; //drawMsg(); drawMsg(msgAll, currentMsgIndex, &msgHeight, imageArrows, imageHeads); } }return NULL; }
3.
项目提升
完整版
QQ
项目演示
https://www.bilibili.com/video/BV1ua4y1n73P
多线程的并发和同步
编辑线程,接受消息线程,主线程,没有对共享资源做互斥,理论上存在技术风险。
解决方案,对多线程的共享资源实现互斥访问(比如:
easyx
的颜色控制)。
万分之一的 BUG
概率(我也没有遇到)
服务端的高并发实现
百万级并发,即是电信级企业项目。
其它功能的实现
视频聊天
语音聊天
文件传输
远程控制
......
今天的分享就到这里了,大家要好好学C语言/C++哟~
欢迎转行和学习编程的伙伴,利用更多的资料学习成长比自己琢磨更快哦!
对于准备学习C/C++编程的小伙伴,如果你想更好的提升你的编程核心能力(内功)不妨从现在开始!
整理分享(多年学习的源码、项目实战视频、项目笔记,基础入门教程)加下方群获取哦~
C语言C++编程学习交流圈子,QQ群:763855696 【点击进入】


 810
810

 被折叠的 条评论
为什么被折叠?
被折叠的 条评论
为什么被折叠?
 到【灌水乐园】发言


