


一、注解的介绍
在Java中,注解(Annotation)是JDK5.0引入的一个重要特性。注解提供了一种元数据机制,可以用于描述和定义程序中的元素(类、方法、成员变量等)。注解是一种能被添加到java源代码中的元数据,方法、类、参数和包都可以用注解来修饰。注解可以看作是一种特殊的标记,可以用在方法、类、参数和包上,程序在编译或者运行时可以检测到这些标记而进行一些特殊的处理。
二、创建一个注解的基本元素
修饰符
访问修饰符必须为public,不写默认为pubic;
关键字
关键字为@interface;
注解名称
注解名称为自定义注解的名称
注解类型元素
注解类型元素是注解中内容,根据需要标志参数
三、SpringBoot自定义注解
3.1 创建注解
自定义注解需要使用@interface关键字进行定义,并且需要指定该注解的作用目标(如类、方法、字段等)和需要包含的元数据信息(如属性及其默认值等)。
3.1.1 元注解(@Target、@Retention、@Inherited、@Documented)
@Target、@Retention、@Inherited、@Documented,这四个注解就是元注解,元注解的作用就是负责注解其他注解。Java5.0定义了4个标准的元注解类型,它们被用来提供对其它 注解类型作标志操作(可以理解为最小的注解,基础注解)
- @Target:用于描述注解的使用范围,该注解可以使用在什么地方

备注:例如@Target(ElementType.METHOD),标志的注解使用在方法上。如果我们将这个注解标志在类上,就会报错。
- @Retention:表明该注解的生命周期
| 生命周期类型 | 描述 |
|---|---|
| RetentionPolicy.SOURCE | 在编译时被丢弃,不会包含在编译后生成的字节码中。这意味着注解仅存在于源代码级别,并不会影响程序的运行。 |
| RetentionPolicy.CLASS | 在编译时会被保留到字节码文件中,但在运行时会被丢弃。这意味着编译后的字节码中仍包含注解,但在程序执行时,无法通过反射等方式获取到该注解。 |
| RetentionPolicy.RUNTIME | 在编译时会被保留到字节码文件中,并在运行时可通过反射等方式获取到该注解的信息。这种保留策略允许在运行时动态地读取和使用注解。 |
通常情况下,如果需要在运行时动态地读取和使用注解,就需要使用 @Retention(RetentionPolicy.RUNTIME) 来指定保留策略。这样可以使得注解的信息在运行时可用,从而实现特定的逻辑或行为。
@Inherited 是一个 Java 注解,用于指示一个注解是否可以被自动继承。具体来说,如果一个类使用了被 @Inherited 注解修饰的注解,并且该类的子类没有使用任何注解,则该子类也会默认继承该注解。
例如,如果有一个被 @Inherited 注解修饰的注解 A,同时类 B 使用了注解 A,并且类 C 继承自类 B 但没有使用任何注解,则类 C 也会默认继承注解 A。
@Documented 是一个 Java 注解,用于指示一个被注解的元素是否包含在 Javadoc 中。如果一个注解被 @Documented 注解修饰,则当使用该注解来修饰类、方法、属性等元素时,该元素的 Javadoc 中会包含该注解的信息。
例如,如果有一个被 @Documented 注解修饰的注解 A,同时用注解 A 修饰了一个方法,那么该方法的 Javadoc 中会包含注解 A 的相关信息。
需要注意的是,@Inherited 和 @Documented 注解都不会影响注解本身的功能,它们只是用于修饰注解的特殊说明性注解。
SpringBoot自定义注解 只需要关注@Target、@Retention这两个元注解即可
这是一个自定义注解的示例:
import java.lang.annotation.ElementType;
import java.lang.annotation.Retention;
import java.lang.annotation.RetentionPolicy;
import java.lang.annotation.Target;

@Target(ElementType.TYPE) // 指定这个注解可以用在类上
@Retention(RetentionPolicy.RUNTIME) // 指定这个注解在运行时可用
public @interface MyCustomAnnotation {
    String value() default ""; // 这是一个默认属性
}上面的代码定义了一个名为MyCustomAnnotation的自定义注解。这个注解可以用在类上,并且在运行时可用。这个注解有一个属性value,它的默认值是空字符串。
3.2 使用注解
在需要使用该注解的类、方法或字段上添加该注解即可。
@MyCustomAnnotation("This is a custom annotation example")
public class MyClass {
    // ...
}在这个例子中,我们在MyClass类上使用了MyCustomAnnotation注解,并设置了value属性的值为"This is a custom annotation example"。
3.3 处理注解
可以使用Spring Boot的AOP功能或其他方式编写拦截器来处理带有自定义注解的类、方法或字段。在拦截器中,可以读取自定义注解的元数据信息,并执行相应的逻辑(如打印注解的值或执行其他操作)。
例如,你可以使用AOP的@Before注解来指定在处理带有自定义注解的类之前执行的逻辑:
@Aspect
@Component
public class MyCustomAnnotationAspect {
    @Before("@annotation(MyCustomAnnotation)")
    public void handleMyCustomAnnotation(MyCustomAnnotation annotation) {
        System.out.println("Handling custom annotation: " + annotation.value());
    }
}在这个例子中,我们在一个AOP切面中定义了一个方法,这个方法将在处理带有@MyCustomAnnotation注解的类之前执行。在方法中,我们可以读取MyCustomAnnotation注解的元数据信息(即value属性的值),并执行相应的逻辑。
四、自定义注解的使用DEMO
java自定义注解的使用范围:
一般我们可以通过注解来实现一些重复的逻辑,就像封装了的一个方法,可以用在一些权限校验、字段校验、字段属性注入、保存日志、缓存
1.权限校验注解(校验token)
有些项目进入到接口后调用公用方法来校验token,这样看起来代码就有点不优雅,我们可以写自定义注解来进行校验token。
例如有个项目,前端是把token放到json里面传到后端(也有一些项目放到请求头的header里面,方式一样),没用注解之前,我们可能是通过调用公共的方法去校验token,如validateToken(token),然后每个接口都有这一段代码,我们用注解的模式替换
1) 首先我们创建一个注解,标志那些类需要校验token
@Target(ElementType.METHOD)
@Retention(RetentionPolicy.RUNTIME)
public @interface AppAuthenticationValidate {
    //必填参数
    String[] requestParams() default {};
}
2) 然后再创建一个AOP切面类来拦截这个注解
拦截使用这个注解的方法,同时获取注解上面的requestParams参数,校验json里面必填的属性是否存在
@Aspect
@Component
@Slf4j
public class AppAuthenticationValidateAspect {

    @Reference(check = false, timeout = 18000)
    private CommonUserService commonUserService;

    @Before("@annotation(cn.com.bluemoon.admin.web.common.aspect.AppAuthenticationValidate)")
    public void repeatSumbitIntercept( JoinPoint joinPoint) {

        //获取接口的参数
        Object[] o = joinPoint.getArgs();
        JSONObject jsonObject = null;
        String[] parameterNames = ((CodeSignature) joinPoint.getSignature()).getParameterNames();
        String source = null;

        for(int i=0;i<parameterNames.length;i++){
            String paramName = parameterNames[i];

            if(paramName.equals("source")){
                //获取token来源
                source = (String)o[i];
            }
            if(paramName.equals("jsonObject")){
                jsonObject = (JSONObject) o[i];
            }
        }
        if(jsonObject == null){
            throw new WebException(ResponseConstant.ILLEGAL_PARAM_CODE, ResponseConstant.ILLEGAL_PARAM_MSG);
        }
        String token = jsonObject.getString("token");
        if(StringUtils.isBlank(token)){
            throw new WebException(ResponseConstant.TOKEN_EXPIRED_CODE,"登录超时,请重新登录");
        }

        MethodSignature signature = (MethodSignature) joinPoint.getSignature();
        Method method = signature.getMethod();
        AppAuthenticationValidate annotation = method.getAnnotation(AppAuthenticationValidate.class);
        String[] requestParams = annotation.requestParams();
        //校验必填参数
        ParamsValidateUtil.isNotBlank(jsonObject,requestParams);
        ResponseBean<String> response = null;
        if(StringUtils.isBlank(source)){
            response = this.commonUserService.checkAppToken(token);
        }else{
            response = this.commonUserService.checkAppTokenByAppType(token,source);
        }

        if (response.getIsSuccess() && ResponseConstant.REQUEST_SUCCESS_CODE == response.getResponseCode()) {
            String empCode = response.getData();
            log.info("---token ={}, empCode={}--", token, empCode);
            jsonObject.put(ProcessParamConstant.APP_EMP_CODE,empCode);
        } else {
            log.info("---token验证不通过,token ={}---", token);
            throw new WebException(ResponseConstant.TOKEN_EXPIRED_CODE, "登录超时,请重新登录");
        }
    }
}
3)把注解加在需要校验的接口方法上
这个注解同时校验了必填字段,校验完token后同时会把token的用户信息加在json对象里面

备注:有些项目会把token放到请求头header中,处理方式类似
2.角色校验注解(springsecurity中的角色校验)
我们在使用springsecurity有一个注解@PreAuthorize可以作用在类或方法上,用来校验是否有权限访问,我们可以模仿这个注解,写一个我们自定义注解来实现同样的功能
1)创建一个自定义注解
@Target({ElementType.METHOD, ElementType.TYPE})
@Retention(RetentionPolicy.RUNTIME)
@Inherited
@Documented
public @interface RoleAuthorize {
    String[] value() default {};
}
2)创建一个拦截器
这个拦截器拦截所有访问路径的url,如果访问方法上带有我们创建的自定义注解RoleAuthorize ,则获取这个注解上限定的访问角色,方法没有注解再获取这个类是否有这个注解,如果这个类也没有注解,则这个类的访问没有角色限制,放行,如果有则校验当前用户的springsecurity是否有这个角色,有则放行,没有则抛出和springsecurity一样的异常AccessDeniedException,全局异常捕获这个异常,返回状态码403(表示没有权限访问)
@Component
public class RoleInterceptor extends HandlerInterceptorAdapter{

    @Override
    public boolean preHandle(HttpServletRequest request, HttpServletResponse response,
                             Object handler) throws Exception {
        HandlerMethod handlerMethod = (HandlerMethod)handler;

        //在方法上寻找注解
        RoleAuthorize permission = handlerMethod.getMethodAnnotation(RoleAuthorize.class);
        if (permission == null) {
            //方法不存在则在类上寻找注解则在类上寻找注解
            permission = handlerMethod.getBeanType().getAnnotation(RoleAuthorize.class);
        }

        //如果没有添加权限注解则直接跳过允许访问
        if (permission == null) {
            return true;
        }

        //获取注解中的值
        String[] validateRoles = permission.value();
        //校验是否含有对应的角色
        for(String role : validateRoles){
            //从springsecurity的上下文获取用户角色是否存在当前的角色名称
            if(AuthUserUtils.hasRole("ROLE_"+role)){
                return true;
            }
        }
        throw  new AccessDeniedException("没有权限访问当前接口");
    }

}
3)配置拦截器
@Configuration
public class WebMvcConfig extends WebMvcConfigurerAdapter {

    @Autowired
    private RoleInterceptor roleInterceptor;

    /**
     * 添加拦截器
     *
     * @param registry
     */
    @Override
    public void addInterceptors(InterceptorRegistry registry) {

        registry.addInterceptor(roleInterceptor).addPathPatterns("/**");
        super.addInterceptors(registry);

    }

}
备注:
1.这里添加拦截器可以继承WebMvcConfigurerAdapter (已过时,在springboot2.0是继承 WebMvcConfigurationSupport或实现WebMvcConfigurer)
2.WebMvcConfigurationSupport–>不需要返回逻辑视图,可以选择继承此类.WebMvcCofigurer–>返回逻辑视图,可以选择实现此方法,重写addInterceptor方法
3.继承webmvcconfigurationsupport之后就没有springmvc的自动配置了 建议实现WebMvcConfigurer
4)把注解加到接口的类或方法上验证
可以看到接口会返回无权限访问


3.数据脱敏
1)自定义Jackson注解
import com.fasterxml.jackson.annotation.JacksonAnnotationsInside;
import com.fasterxml.jackson.databind.annotation.JsonSerialize;
import java.lang.annotation.ElementType;
import java.lang.annotation.Retention;
import java.lang.annotation.RetentionPolicy;
import java.lang.annotation.Target;

@Retention(RetentionPolicy.RUNTIME)
@Target(ElementType.FIELD)
@JacksonAnnotationsInside
@JsonSerialize(using = SensitiveJsonSerializer.class)
public @interface Sensitive {
    //脱敏策略
    SensitiveStrategy strategy();
}
2) 指定脱敏策略,这个规则根据业务具体需求去制定,下面只做演示
import java.util.function.Function;

/**
 * 脱敏策略,枚举类,针对不同的数据定制特定的策略
 */
public enum SensitiveStrategy {
    /**
     * 用户名
     */
    USERNAME(s -> s.replaceAll("(\\S)\\S(\\S*)", "$1*$2")),
    /**
     * 身份证
     */
    ID_CARD(s -> s.replaceAll("(\\d{4})\\d{10}(\\w{4})", "$1****$2")),
    /**
     * 手机号
     */
    PHONE(s -> s.replaceAll("(\\d{3})\\d{4}(\\d{4})", "$1****$2")),
    /**
     * 地址
     */
    ADDRESS(s -> s.replaceAll("(\\S{3})\\S{2}(\\S*)\\S{2}", "$1****$2****"));

    private final Function<String, String> desensitizer;
    SensitiveStrategy(Function<String, String> desensitizer) {
        this.desensitizer = desensitizer;
    }
    public Function<String, String> desensitizer() {
        return desensitizer;
    }
}
3) 定制JSON序列化实现
import com.fasterxml.jackson.core.JsonGenerator;
import com.fasterxml.jackson.databind.BeanProperty;
import com.fasterxml.jackson.databind.JsonMappingException;
import com.fasterxml.jackson.databind.JsonSerializer;
import com.fasterxml.jackson.databind.SerializerProvider;
import com.fasterxml.jackson.databind.ser.ContextualSerializer;
import java.io.IOException;
import java.util.Objects;

/**
 * 序列化注解自定义实现
 * JsonSerializer<String>:指定String 类型,serialize()方法用于将修改后的数据载入
 */
public class SensitiveJsonSerializer extends JsonSerializer<String> implements ContextualSerializer {
    private SensitiveStrategy strategy;
    @Override
    public void serialize(String value, JsonGenerator gen, SerializerProvider serializers) throws
            IOException {
        gen.writeString(strategy.desensitizer().apply(value));
    }
    /**
     * 获取属性上的注解属性
     */
    @Override
    public JsonSerializer<?> createContextual(SerializerProvider prov, BeanProperty property) throws
            JsonMappingException {
        Sensitive annotation = property.getAnnotation(Sensitive.class);
        if (Objects.nonNull(annotation)&&Objects.equals(String.class,
                property.getType().getRawClass())) {
            this.strategy = annotation.strategy();
            return this;
        }
        return prov.findValueSerializer(property.getType(), property);
    }
}
4) 新增User类,并对需要脱敏的字段添加注解,并指定脱敏策略
import com.badao.demo.sensitive.Sensitive;
import com.badao.demo.sensitive.SensitiveStrategy;
import lombok.Data;
import java.io.Serializable;

@Data
public class User implements Serializable {

    private static final long serialVersionUID = -5514139686858156155L;

    private Integer id;

    private Integer userId;

    @Sensitive(strategy = SensitiveStrategy.USERNAME)
    private String name;

    private Integer age;

}
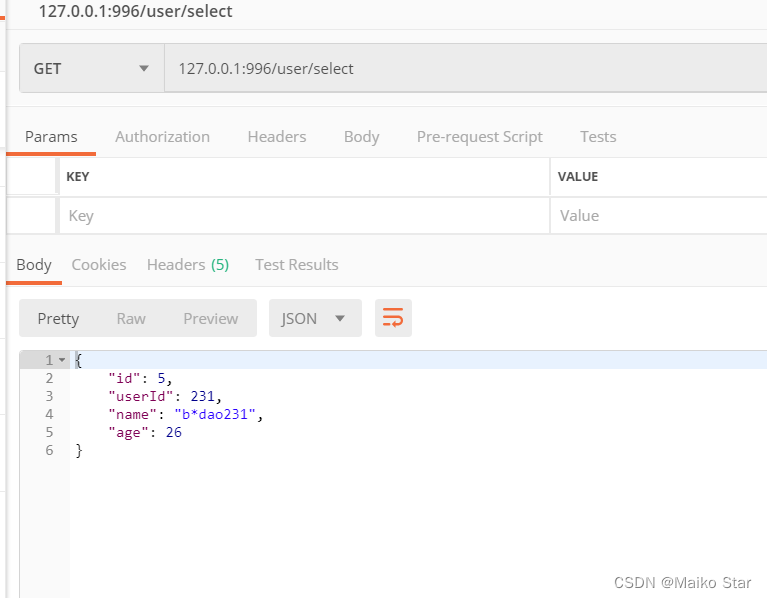
5) 编写controller进行测试
@RequestMapping("user")
@RestController
public class UserController {

    @Autowired
    private UserService userService;

    @RequestMapping("save")
    public String save() {
        User user = new User();
        user.setUserId(new Random().nextInt( 1000 ) + 1);
        user.setName("badao"+user.getUserId());
        user.setAge(new Random().nextInt( 80 ) + 1);
        userService.insert(user);
        return "save success";
    }

    @RequestMapping("select")
    public User select() {
        List<User> all = userService.findAll();
        return all.size()>0?all.get(0):new User();
    }
}
6) 测试效果
其他更多的可参考:springboot项目中自定义注解的使用总结、java自定义注解实战(常用注解DEMO)_自定义方法注解demo-CSDN博客


 407
407


 被折叠的 条评论
为什么被折叠?
被折叠的 条评论
为什么被折叠?
 到【灌水乐园】发言


