


目录
(1)创建一个类,并实现HandlerInterceptor
一.如何把controller数据返回到网页并回显
1.数据回显
在学习servlet时我们使用request和session向网页传递数据:
request: 作用范围: 同一个请求内有效。setAttribute(key,value)
session:作用范围: 同一个会话有效,只要会话不关闭会一直有效。setAttribute(key,value)
网页如何获取保存的数据呢:可以使用EL表达式。${scope.key}
在SpringMVC框架中我们也可以使用request或session,还有我们框架提供的内置函数Model
package com.wt.controller;

import com.wt.entity.Student;
import org.springframework.stereotype.Controller;
import org.springframework.ui.Model;
import org.springframework.web.bind.annotation.RequestMapping;
import org.springframework.web.bind.annotation.ResponseBody;
import org.springframework.web.bind.annotation.SessionAttributes;

import javax.servlet.http.HttpServletRequest;
import javax.servlet.http.HttpSession;
import java.util.ArrayList;
import java.util.Date;
import java.util.List;

/**
 * @Author wt
 * @Date 2022/6/8 19:12
 * @PackageName:com.wt.controller
 * @ClassName: HelloController02
 * @Description: 数据回显
 * @Version 1.0
 */
@Controller
public class HelloController02 {


    @RequestMapping("json02")
    public String json02(HttpServletRequest request){
        Student student = new Student(1,"山涛",23,"修武",new Date());
        //可以保存到request中,同一个请求
        request.setAttribute("s",student);
        return "hello01.jsp";//转发

    }

    //如果你使用request,你和tomcat容器绑定了。 建议使用Model
    @RequestMapping("json03")
    public String json03(Model model){
        Student student = new Student(3,"向秀",15,"山西",new Date());
        //保存到model中,同一个请求 和request是一样
        model.addAttribute("s2",student);
        return "hello01.jsp";
    }

    //保存到session范围
    @RequestMapping("json04")
    public String json04(HttpSession session){
        Student student = new Student(4, "王戎", 18, "开封", new Date());
        session.setAttribute("s3",student);
        return "hello01.jsp";    //转发
    }
    @RequestMapping("json05")
    public String json05(HttpSession session){
        Student student = new Student(4, "王戎", 18, "开封", new Date());
        Student student1 = new Student(5, "阮籍", 28, "焦作", new Date());
        session.setAttribute("s4",student);
        session.setAttribute("s5",student1);
        return "hello01.jsp";    //转发
    }
    //重定向
    @RequestMapping("json06")
    public String json06(){
        System.out.println("!!!!!!!!!!!!!!!!!!!!!!!");
        return "redirect:hello01.jsp";
    }
}
2.如何使用重定向跳转
重定向(Redirect)就是通过各种方法将各种网络请求重新定个方向转到其它位置(如:网页重定向、域名的重定向、路由选择的变化也是对数据报文经由路径的一种重定向
//重定向
    @RequestMapping("json06")
    public String json06(){
        System.out.println("!!!!!!!!!!!!!!!!!!!!!!!");
        return "redirect:hello01.jsp";
    }
3springmvc返回json数据
(1)什么时候需要返回json数据
异步请求时,ajax请求时
(2)之前在servlet时如何返回json数据呢
借助了Fastjson---手动把java对象转换为json格式的数据,并使用out.print(json)输出json数据。 关闭out对象。
(3)springmvc如何返回json数据
a.添加内置的jackson-databind的jar包
<!--  json依赖-->
  <dependency>
    <groupId>com.fasterxml.jackson.core</groupId>
    <artifactId>jackson-databind</artifactId>
    <version>2.13.2.1</version>
  </dependency>
b. 在controller返回的数据类型变成javabean对象
//    转为json格式传输数据
    @RequestMapping(value = "json01")
    @ResponseBody
    public List<Student> json01(){
        List<Student> list = new ArrayList<Student>();
        list.add(new Student(1,"山涛",23,"修武",new Date()));
        list.add(new Student(2,"嵇康",22,"许昌",new Date()));
        list.add(new Student(3,"向秀",15,"山西",new Date()));
        list.add(new Student(4,"王戎",18,"开封",new Date()));
//        request.setAttribute("list",list);
        return list;
    }
c.访问该路径
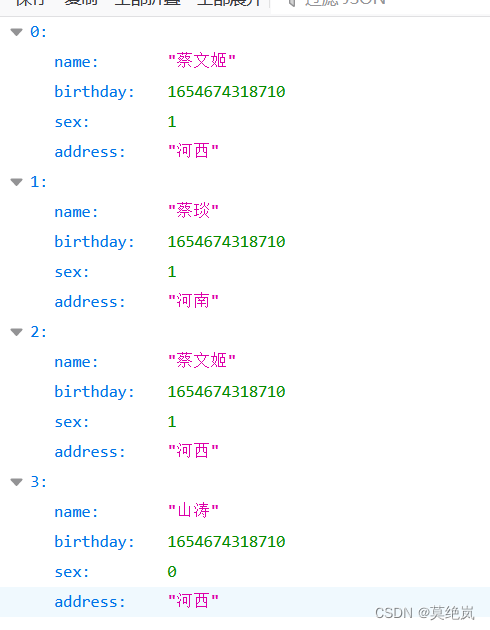
不同浏览器显示的样式可能不同,下图为火狐显示情况:
3.springmvc的全局异常处理类
(1)如何使用全局异常处理类
a.创建一个异常类: @ControllerAdvice注解
 第一种方法:

@ControllerAdvice //表示该为类controller的异常处理类
public class MyExceptinHandle {


     @ExceptionHandler(value = RuntimeException.class) //当发生RuntimeException就会触发该方法
     public String error(){
         return "error.jsp";
     }

    @ExceptionHandler(value = Exception.class) //当发生Exception就会触发该方法
    public String error2(){
        return "error2.jsp";
    }
}
//第二种方法
// 定义一个CommentResult实体类
@ControllerAdvice
public class MyHandler {
@ExceptionHandler(value = RuntimeException.class)
@ResponseBody
public CommentResult erro(){
System.out.println("进入了异常处理类");
return new CommentResult(5000,"程序出现异常",null);
}
}b. 保证springmvc能够扫描到该类
![]()
4.springmvc拦截器
过滤器: 过滤掉某些资源,
拦截器只会拦截controller层的资源路径

如何使用拦截器:
(1)创建一个类,并实现HandlerInterceptor
public class MyInterceptor implements HandlerInterceptor {

    //拦截器的处理方法。
    public boolean preHandle(HttpServletRequest request, HttpServletResponse response, Object handler) throws Exception {
        System.out.println("经过了该拦截器");

        return true;//true:表示拦截器放行 false:不放行
    }
}
(2) 把该类注册到springmvc配置文件上
<!--拦截器的配置-->
    <mvc:interceptors>
        <mvc:interceptor>
            <!--mapping:哪些路径需要经过拦截器
               /**: 表示n层路径
               /*:表示一层路径
                -->
            <mvc:mapping path="/**"/>
            <!--exclude-mapping:设置不经过该拦截的路径-->
            <mvc:exclude-mapping path="/json01"/>
            <mvc:exclude-mapping path="/login"/>
            <!--bean表示你自定义的拦截器类路径-->
            <bean class="com.wt.interceptor.MyInterceptor"/>
        </mvc:interceptor>
    </mvc:interceptors>


 被折叠的 条评论
为什么被折叠?
被折叠的 条评论
为什么被折叠?
 到【灌水乐园】发言


