


一、设置视图的对齐方式
App的视图默认的对齐方式是左上的对齐方式,如果想改变这种对齐方式就要采用到和对齐有关的属性,在xml文件中,有android:layout_gravity和android:gravity这两种属性,这种属性的区别是android:layout_gravity表示当前视图与外部视图的对齐方式,android:gravity表示的的是当前视图与内部视图的对齐方式,其中这两种属性可以赋值的属性值有top、bottom、left、right,center分别表示的是上下左右中,拿其中一个举例android:layout_gravity="bottom"表示的是当前视图位于外部视图的底部,android:gravity="left"表示的是内部视图位于当前视图的左部,其中属性值也可以为left|bottom、right|top,表示为左下、右上这种写法,还有一些类似的属性值不过多赘述,其实这些属性值是比较好知道其中的含义的基本可以做到见名知意,如果还是不太清楚,可以查看相关API文档,目前介绍的这些对于大部分开发都是够用的。
二、设计案例
下面为大家提供一个简单的代码案例,帮助大家更好的了解对齐方式属性的应用,其中的一些本文没有提到的一些属性,大家可以去看我的往期的博文,都有提到相关的含义(布局目前没有讲,不过现在用的都是线性布局,不难)
1、Java代码部分
public class ViewGravityActivity extends AppCompatActivity {

    @Override
    protected void onCreate(Bundle savedInstanceState) {
        super.onCreate(savedInstanceState);
        setContentView(R.layout.activity_view_gravity);
    }
}
2、 xml代码部分
<?xml version="1.0" encoding="utf-8"?>
<LinearLayout xmlns:android="http://schemas.android.com/apk/res/android"
xmlns:app="http://schemas.android.com/apk/res-auto"
xmlns:tools="http://schemas.android.com/tools"
android:layout_width="match_parent"
android:layout_height="300dp"
android:background="#ffff99"
android:padding="5dp"
>
<LinearLayout
android:layout_width="0dp"
android:layout_height="200dp"
android:layout_weight="1"
android:layout_gravity="bottom"
android:gravity="left"
android:background="#ff0000"
android:layout_margin="10dp"
android:padding="10dp"
>
<View
android:layout_width="100dp"
android:layout_height="100dp"
android:background="#00ffff"
></View>
</LinearLayout>
<LinearLayout
android:layout_width="0dp"
android:layout_height="200dp"
android:layout_weight="1"
android:layout_gravity="top"
android:gravity="right"
android:background="#ff0000"
android:layout_margin="10dp"
android:padding="10dp"
>
<View
android:layout_width="100dp"
android:layout_height="100dp"
android:background="#00ffff"
></View>
</LinearLayout>
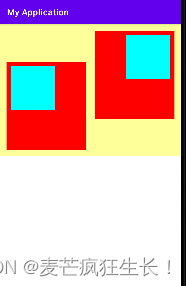
</LinearLayout>3、运行结果演示


 517
517

 被折叠的 条评论
为什么被折叠?
被折叠的 条评论
为什么被折叠?
 到【灌水乐园】发言


