


(一)拦截器
-
拦截器(interceptor 英 /ˌɪntəˈseptə®/):定义在source中 -
作用:用户Source读取,从Event发送到Sink的时候,可在eventheader中加入有用的信息,或者对数据过滤清洗;
-
支持链式调用;
-
可以修改或者丢弃事件;
1.时间戳拦截器
配置范例:
a1.sources = r1
a1.channels = c1
a1.sources.r1.channels = c1
a1.sources.r1.type = seq
a1.sources.r1.interceptors = i1
a1.sources.r1.interceptors.i1.type = timestamp
- 这个拦截器会向每个Event的header中添加一个时间戳属性进去
- key默认是“timestamp ”——headerName修改
- value就是当前的毫秒值——System.currentTimeMillis()方法得到的
如果Event已经存在同名的属性,可以选择是否保留原始的值。
| 属性 | 默认值 | 解释 |
|---|---|---|
| type | – | 组件类型,这个是: timestamp |
| headerName | timestamp | 向Event header中添加时间戳键值对的key |
| preserveExisting | false | 是否保留Event header中已经存在的同名(上面header设置的key,默认是timestamp)时间戳 |
2.Host拦截器
配置范例:
a1.sources = r1
a1.channels = c1
a1.sources.r1.interceptors = i1
a1.sources.r1.interceptors.i1.type = host
a1.sources.r1.interceptors.i2.useIP = false
a1.sources.r1.interceptors.i2.hostHeader = name
- 这个拦截器会把当前Agent的hostname或者IP地址写入到Event的header中
- key默认是“host”(也可以通过配置自定义key)
- value可以选择使用hostname或者IP地址。
| 属性 | 默认值 | 解释 |
|---|---|---|
| type | – | 组件类型,这个是: host |
| preserveExisting | false | 如果header中已经存在同名的属性是否保留 |
| useIP | true | true:使用IP地址;false:使用hostname |
| hostHeader | host | 向Event header中添加host键值对的key |
3.静态拦截器
配置范例:
a1.sources = r1
a1.channels = c1
a1.sources.r1.channels = c1
a1.sources.r1.type = seq
a1.sources.r1.interceptors = i1
a1.sources.r1.interceptors.i1.type = static
a1.sources.r1.interceptors.i1.key = datacenter
a1.sources.r1.interceptors.i1.value = NEW_YORK
- 静态拦截器可以向Event header中写入一个固定的键值对属性。
- 目前不支持写入多个属性,可以通过配置多个静态属性实现
| 属性 | 默认值 | 解释 |
|---|---|---|
| type | – | 组件类型,这个是: static |
| preserveExisting | true | 如果header中已经存在同名的属性是否保留 |
| key | key | 写入header的key |
| value | value | 写入header的值 |
4.添加UUID拦截器
配置范例:
a1.sources.r1.interceptors = i1
a1.sources.r1.interceptors.i1.type =
org.apache.flume.sink.solr.morphline.UUIDInterceptor$Builder
- 此拦截器在所有截获的Event上设置通用唯一标识符。 比如UUID可以是b5755073-77a9-43c1-8fad-b7a586f89757,它是一个128-bit的值。
- Event如果没有可用的应用级唯一ID,就可以考虑使用添加唯一ID拦截器自动为Event分配UUID。
- Event进入Flume网络的第一个节点通常就是Flume的第一个source。 这样可以在Flume网络中进行复制和重新传输以及Event的后续重复数据删除可以实现高可用性和高性能。 如果在应用层有唯一ID的话要比这种自动生成UUID要好一些,因为应用层分配的ID能方便我们在后续的数据存储中心对Event进行集中的更新和删除等操作
| 属性 | 默认值 | 解释 |
|---|---|---|
| type | – | 组件类型,这个是:org.apache.flume.sink.solr.morphline.UUIDInterceptor$Builder |
| headerName | id | 将要添加或者修改的id名称 |
| preserveExisting | true | 如果header中已经存在同名的属性是否保留 |
| prefix | “” | UUID值的固定前缀(每个生成的uuid会在前面拼上这个固定前缀) |
5.查找替换拦截器
配置范例:
a1.sources.r1.interceptors = i1
a1.sources.r1.interceptors.i1.type = search_replace
a1.sources.r1.interceptors.i1.searchPattern = \d{7}
a1.sources.r1.interceptors.i1.replaceString = ********
- 此拦截器基于Java正则表达式提供对Event消息体简单的基于字符串的搜索和替换功能。
- 使用与Java Matcher.replaceAll()方法中的规则相同
- 还可以进行Backtracking / group(跟踪分组)
(二)Flume拦截器实战案例
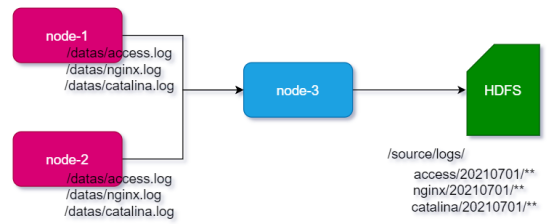
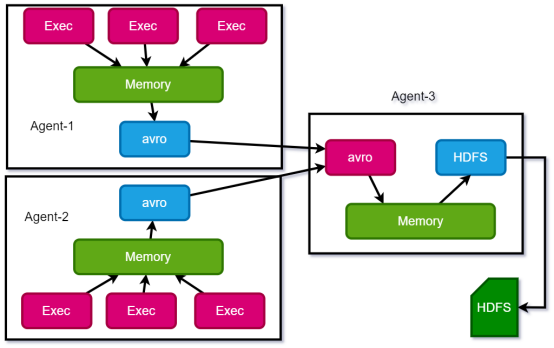
- 场景:A、B两台日志服务机器实时生产日志主要类型为:
access.log、nginx.log、catalina.log - 需求:把A、B 机器中的access.log、nginx.log、catalina.log 采集汇总到C机器上然后统一收集到hdfs中。但是在hdfs中要求的目录为:
/source/logs/access/20210701/**
/source/logs/nginx/20210701/**
/source/logs/catalina/20210701/**
 案例实操:
案例实操:
- 创建文件
节点1:
mkdir -p /home/hadoop/tmp/datas
- 创建配置
节点1:
vim exec_source_avro_sink.conf
# Name the components on this agent命名此代理上的组件——节点1和2相同
a1.sources = r1 r2 r3
a1.sinks = k1
a1.channels = c1

# Describe/configure the source配置源
a1.sources.r1.type = exec
a1.sources.r1.command = tail -F /home/offcn/tmp/datas/access.log
a1.sources.r1.interceptors = i1
a1.sources.r1.interceptors.i1.type = static
##  static拦截器的功能就是往采集到的数据的header中插入自
##	 己定义的key-value对
a1.sources.r1.interceptors.i1.key = type
a1.sources.r1.interceptors.i1.value = access

a1.sources.r2.type = exec
a1.sources.r2.command = tail -F /home/offcn/tmp/datas/nginx.log
a1.sources.r2.interceptors = i2
a1.sources.r2.interceptors.i2.type = static
a1.sources.r2.interceptors.i2.key = type
a1.sources.r2.interceptors.i2.value = nginx

a1.sources.r3.type = exec
a1.sources.r3.command = tail -F /home/hadoop/tmp/datas/catalina.log
a1.sources.r3.interceptors = i3
a1.sources.r3.interceptors.i3.type = static
a1.sources.r3.interceptors.i3.key = type
a1.sources.r3.interceptors.i3.value = web

# Describe the sink描述了沉
a1.sinks.k1.type = avro
a1.sinks.k1.hostname = node-a-3
a1.sinks.k1.port = 41414

# Use a channel which buffers events in memory 使用在内存中缓冲事件的通道
a1.channels.c1.type = memory
a1.channels.c1.capacity = 20000
a1.channels.c1.transactionCapacity = 10000

# Bind the source and sink to the channel
a1.sources.r1.channels = c1
a1.sources.r2.channels = c1
a1.sources.r3.channels = c1
a1.sinks.k1.channel = c1
节点3:
vim avro_source_hdfs_sink.conf
#定义agent名, source、channel、sink的名称
a1.sources = r1
a1.sinks = k1
a1.channels = c1

#定义source
a1.sources.r1.type = avro
a1.sources.r1.bind = node-a-3
a1.sources.r1.port =41414

#添加时间拦截器
a1.sources.r1.interceptors = i1
a1.sources.r1.interceptors.i1.type =timestamp

org.apache.flume.interceptor.TimestampInterceptor$Builder

#定义channels
a1.channels.c1.type = memory
a1.channels.c1.capacity = 20000
a1.channels.c1.transactionCapacity = 10000

#定义sink
a1.sinks.k1.type = hdfs
a1.sinks.k1.hdfs.path=hdfs://node-a-1:8020/source/logs/%{type}/%Y%m%d
a1.sinks.k1.hdfs.filePrefix =events
a1.sinks.k1.hdfs.fileType = DataStream
a1.sinks.k1.hdfs.writeFormat = Text
#时间类型
a1.sinks.k1.hdfs.useLocalTimeStamp = true
#生成的文件不按条数生成
a1.sinks.k1.hdfs.rollCount = 0
#生成的文件按时间生成
a1.sinks.k1.hdfs.rollInterval = 30
#生成的文件按大小生成
a1.sinks.k1.hdfs.rollSize  = 10485760
#批量写入hdfs的个数
a1.sinks.k1.hdfs.batchSize = 10000
flume操作hdfs的线程数(包括新建,写入等)
a1.sinks.k1.hdfs.threadsPoolSize=10
#操作hdfs超时时间
a1.sinks.k1.hdfs.callTimeout=30000

#组装source、channel、sink
a1.sources.r1.channels = c1
a1.sinks.k1.channel = c1
注意:配置节点可能有错误疏忽,检查仔细:node-a-1或者node-a-3
- 分发配置和文件
节点1:分发给节点2和3
scp -r flume-1.9.0/ node-a-2:$PWD
scp -r flume-1.9.0/ node-a-3:$PWD
sudo scp /etc/profile node-a-2:/etc/
sudo scp /etc/profile node-a-3:/etc/
- 刷新环境,启动配置
节点2和3刷新配置
source /etc/profile
- 节点3启动配置
flume-ng agent --conf /home/hadoop/apps/flume-1.9.0/conf --name a1 --conf-file avro_source_hdfs_sink.conf -Dflume.root.logger=INFO,console
- 节点1和2启动配置
flume-ng agent --conf /home/hadoop/apps/flume-1.9.0/conf --name a1 --conf-file exec_source_avro_sink.conf -Dflume.root.logger=INFO,console
最后登录web端HDFS查看结果
(三 )自定义拦截器
准备:
- 在实际的开发中,如果想在数据进入channel前,对数据进行处理(数据格式调整、预处理等),需要我们自己手动编写一个拦截器实现我们的业务。
- 实现步骤
- 创建一个maven项目,并引入以下依赖。
<dependency>
<groupId>org.apache.flume</groupId>
<artifactId>flume-ng-core</artifactId>
<version>1.9.0</version>
</dependency>
- 定义CustomInterceptor类并实现Interceptor接口。
package com.offcn.flume;

import org.apache.flume.Context;
import org.apache.flume.Event;
import org.apache.flume.interceptor.Interceptor;
import org.slf4j.Logger;
import org.slf4j.LoggerFactory;

import java.util.ArrayList;
import java.util.List;


public class CustomInterceptor implements Interceptor {
    private Logger logger =null;

    /**
     * 初始化参数
     */
    @Override
    public void initialize() {
        logger =(Logger) LoggerFactory
                .getLogger(CustomInterceptor.class);
    }

    /**
     * 对数据大写
     */
    @Override
    public Event intercept(Event event) {
        byte[] body = event.getBody();
        String str = new String(body);
        try {
            event.setBody(str.toUpperCase().getBytes());
        }catch (Exception e){
            e.printStackTrace();
        }
        return event;
    }

    /**
     * 批量拦截
     */
    @Override
    public List<Event> intercept(List<Event> events) {
        ArrayList<Event> list = new ArrayList<Event>();
        for (Event event : events) {
            Event intercept = intercept(event);
            list.add(intercept);
        }
        return list;
    }

    /**
     * 拦截器结束执行
     */
    @Override
    public void close() {

    }

    public static class Builder implements Interceptor.Builder {
        /*
         * 功能描述:构建拦截器
         *
         * @auther: BigData-aw
         */
        @Override
        public Interceptor build() {
            return new CustomInterceptor();
        }

        /**
         * 初始化变量
         * @param context
         */
        @Override
        public void configure(Context context) {

        }
    }

}
-
导包进项目lib目录下
-
编辑flume配置文件,添加配置器
a1.sources.r1.interceptors = i1
a1.sources.r1.interceptors.i6.type=com.offcn.flume.CustomInterceptor$Builder
-
使用netcat向配置的指定节点发送信息

-
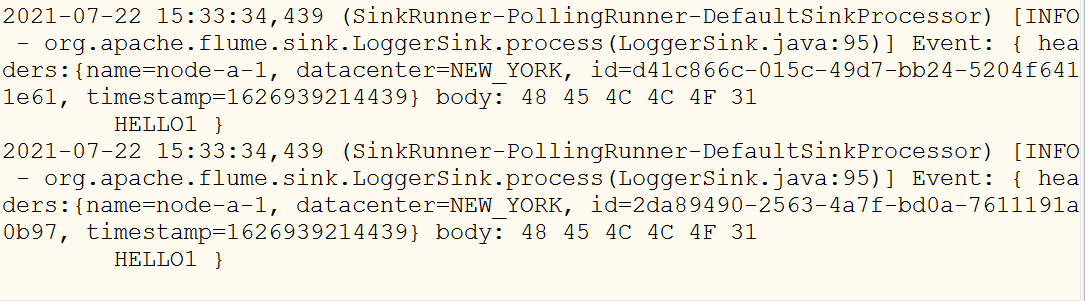
观察控制台打印结果

(四)自定义Source
- 介绍
Source是负责接收数据到Flume Agent的组件。Source组件可以处理各种类型、各种格式的日志数据,包括avro、thrift、exec、jms、spooling directory、netcat、sequence generator、syslog、http、legacy。官方提供的source类型已经很多,但是有时候并不能满足实际开发当中的需求,此时我们就需要根据实际需求自定义某些source。
官方也提供了自定义source的接口:xxx
根据官方说明自定义MySource需要继承AbstractSource类并实现Configurable和PollableSource接口。
实现相应方法:
configure(Context context)//初始化context(读取配置文件内容)
process()//获取数据封装成event并写入channel,这个方法将被循环调用。
- 需求:使用自定义source进行提交
- 编码
- 3.1导入pom依赖
<dependencies>
    <dependency>
        <groupId>org.apache.flume</groupId>
        <artifactId>flume-ng-core</artifactId>
        <version>1.9.0</version>
</dependency>

</dependencies>
- 3.2编写代码
package com.offcn.flume;

import org.apache.flume.Context;
import org.apache.flume.Event;
import org.apache.flume.EventDeliveryException;
import org.apache.flume.PollableSource;
import org.apache.flume.conf.Configurable;
import org.apache.flume.event.SimpleEvent;
import org.apache.flume.source.AbstractSource;
import sun.java2d.pipe.SpanShapeRenderer;

public class CustomSource extends AbstractSource implements Configurable, PollableSource {
    @Override
    //对接数据源
    public Status process() throws EventDeliveryException {
        //构建状态对象
        Status status=null;
        //构建event对象
        try {
            for (int i = 0; i < 10; i++) {
                SimpleEvent event=new SimpleEvent();
                event.setBody(("hello" + 1).getBytes());
                //获取channel执行器,提交event
                getChannelProcessor().processEvent(event);
                status=Status.READY;
            }

            Thread.sleep(5000);
        } catch (InterruptedException e) {
            status=Status.BACKOFF;
            e.printStackTrace();
        }

        return status;
    }

    @Override
    public long getBackOffSleepIncrement() {
        return 0;
    }

    @Override
    public long getMaxBackOffSleepInterval() {
        return 0;
    }

    @Override
    public void configure(Context context) {

    }
}
-
提交到项目lib下
-
修改配置
#a1.sources.r1.type = netcat
#a1.sources.r1.bind = node-1
#a1.sources.r1.port = 4444
a1.sources.r1.type = com.offcn.flume.source.CustomSource
- 执行测试
(五)自定义Sink
- 介绍
Sink不断地轮询Channel中的事件且批量地移除它们,并将这些事件批量写入到存储或索引系统、或者被发送到另一个Flume Agent。
Sink是完全事务性的。在从Channel批量删除数据之前,每个Sink用Channel启动一个事务。批量事件一旦成功写出到存储系统或下一个Flume Agent,Sink就利用Channel提交事务。事务一旦被提交,该Channel从自己的内部缓冲区删除事件。
Sink组件目的地包括hdfs、logger、avro、thrift、ipc、file、null、HBase、solr、自定义。官方提供的Sink类型已经很多,但是有时候并不能满足实际开发当中的需求,此时我们就需要根据实际需求自定义某些Sink。
官方也提供了自定义sink的接口:xxx
定义MySink需要继承AbstractSink类并实现Configurable接口
实现相应方法:
configure(Context context)//初始化context(读取配置文件内容)
process()//从Channel读取获取数据(event),这个方法将被循环调用。
-
需求:
使用flume接收数据,并在模拟loggerSink将数据输出到控制台。 -
编码:
public class CustomSink extends AbstractSink implements Configurable {
    private Logger logger = LoggerFactory
            .getLogger(CustomSink.class);

   //从channel中获取数据,打印到控制台
    @Override
    public Status process() throws EventDeliveryException {
        Status status = null;
        Channel channel = getChannel();
        Transaction transaction = channel.getTransaction();
        try {
            //开启事务
            transaction.begin();
			//获取event数据信息
            Event event = channel.take();
            if (event==null){
                status=Status.BACKOFF;
                transaction.rollback();
                return status;
            }
            logger.info(new String(event.getBody()));
            status=Status.READY;
            //提交事务
            transaction.commit();
        }catch (Exception e){
            status=Status.BACKOFF;
            e.printStackTrace();
            transaction.rollback();
        }finally {
            transaction.close();
        }

        return status;
    }

    @Override
    public void configure(Context context) {

    }
}
- 打包测试
- 上传到指定项目的lib目录下
- 修改配置
#a1.sinks.k1.type = logger
a1.sinks.k1.type = com.offcn.flume.sink.CustomSink
- 执行测试,观察结果

(六)Flume数据流监控
Ganglia由gmond、gmetad和gweb三部分组成。
gmond(Ganglia Monitoring Daemon)是一种轻量级服务,安装在每台需要收集指标数据的节点主机上。使用gmond,你可以很容易收集很多系统指标数据,如CPU、内存、磁盘、网络和活跃进程的数据等。
gmetad(Ganglia Meta Daemon)整合所有信息,并将其以RRD格式存储至磁盘的服务。
gweb(Ganglia Web)Ganglia可视化工具,gweb是一种利用浏览器显示gmetad所存储数据的PHP前端。在Web界面中以图表方式展现集群的运行状态下收集的多种不同指标数据。


 1万+
1万+


 被折叠的 条评论
为什么被折叠?
被折叠的 条评论
为什么被折叠?
 到【灌水乐园】发言


