


SpringMVC
MVC模型:
Model(模型):通常指的就是我们的数据模型,主要作用用于封装数据
View(视图):通常指的是.html或者.jsp应用,作用一般是进行数据展示的
Controller(控制):通常指应用程序中处理用户交互的部分,作用就是处理程序的逻辑
SpringMVC:一种基于java实现MVC设计模型的请求驱动类型的轻量级WEB框架
SpringMVC的入门
开发步骤:
1.导入SpringMVC相关坐标
2.配置SpringMVC核心控制器
3.创建Controller类和实体页面
4.使用注解配置Controller类中业务方法的映射地址
5.配置SpringMVC核心文件
6.测试请求
- 导入SpringMVC相关坐标
<?xml version="1.0" encoding="UTF-8"?>

<project xmlns="http://maven.apache.org/POM/4.0.0" xmlns:xsi="http://www.w3.org/2001/XMLSchema-instance"
  xsi:schemaLocation="http://maven.apache.org/POM/4.0.0 http://maven.apache.org/xsd/maven-4.0.0.xsd">
  <modelVersion>4.0.0</modelVersion>

  <groupId>com.wm</groupId>
  <artifactId>SpringMvc_01</artifactId>
  <version>1.0-SNAPSHOT</version>
  <packaging>war</packaging>

  <name>SpringMvc_01 Maven Webapp</name>
  <!-- FIXME change it to the project's website -->
  <url>http://www.example.com</url>
  <dependencies>
    <dependency>
      <groupId>org.springframework</groupId>
      <artifactId>spring-context</artifactId>
      <version>5.2.9.RELEASE</version>
    </dependency>
    <dependency>
      <groupId>org.springframework</groupId>
      <artifactId>spring-webmvc</artifactId>
      <version>5.2.9.RELEASE</version>
    </dependency>
    <dependency>
      <groupId>javax.servlet</groupId>
      <artifactId>servlet-api</artifactId>
      <version>2.5</version>
      <scope>provided</scope>
    </dependency>
    <dependency>
      <groupId>javax.servlet.jsp</groupId>
      <artifactId>jsp-api</artifactId>
      <version>2.0</version>
      <scope>provided</scope>
    </dependency>
  </dependencies>
</project>
- 配置SpringMVC核心控制器
<!DOCTYPE web-app PUBLIC
 "-//Sun Microsystems, Inc.//DTD Web Application 2.3//EN"
 "http://java.sun.com/dtd/web-app_2_3.dtd" >

<web-app>
  <display-name>Archetype Created Web Application</display-name>
<!-- 配置SpringMVC 的核心控制器  -->
  <servlet>
    <servlet-name>SpringMVCDispatcherServlet</servlet-name>
    <servlet-class>org.springframework.web.servlet.DispatcherServlet</servlet-class>
    <init-param>
<!--   配置初始化参数 用于读取SpringMVC文件   -->
      <param-name>contextConfigLocation</param-name>
      <param-value>classpath:springMVC.xml</param-value>
    </init-param>
<!--   配置Servlet的对象创建时间,服务器启动应用就创建对象   -->
      <load-on-startup>1</load-on-startup>
  </servlet>
  <servlet-mapping>
    <servlet-name>SpringMVCDispatcherServlet</servlet-name>
    <url-pattern>/</url-pattern>
  </servlet-mapping>
</web-app>
- 创建Controller类和实体页面
@Controller
public class HelloController {
    @RequestMapping("/hello")
    public String hello(){
        System.out.println("hello");
        return "index";
    }
}
- 创建SpringMVC的配置文件
<?xml version="1.0" encoding="UTF-8"?>
<beans xmlns="http://www.springframework.org/schema/beans"
       xmlns:xsi="http://www.w3.org/2001/XMLSchema-instance"
       xmlns:context="http://www.springframework.org/schema/context"
       xsi:schemaLocation="http://www.springframework.org/schema/beans http://www.springframework.org/schema/beans/spring-beans.xsd http://www.springframework.org/schema/context https://www.springframework.org/schema/context/spring-context.xsd">
<context:component-scan base-package="com.wm"/>
<!--  配置视图解析器  -->
    <bean class="org.springframework.web.servlet.view.InternalResourceViewResolver">
        <property name="prefix" value="/pages/"/>
        <property name="suffix" value=".jsp"/>
    </bean>
</beans>
- 视图
<!DOCTYPE html>
<html lang="en">
<head>
    <meta charset="UTF-8">
    <title>hello</title>
</head>
<body>
<h1>hello springMVC</h1>
</body>
</html>
程序执行过程
1.tomcat服务器启动,应用被加载(读取web.xml配置文件,实例化DispatcherServlet,加载SpringMVC配置文件,并根据初始化容器中对象InternalResourceViewResolver)
2.浏览器进行访问,请求发送到控制器(DispatcherServlet)
3.匹配到应用方法,执行对应方法,返回该方法的返回值。返回一个相应的字符串
4.通过InternalResourceViewResolver进行相应的字符串拼接,返回视图结果
5.响应浏览器
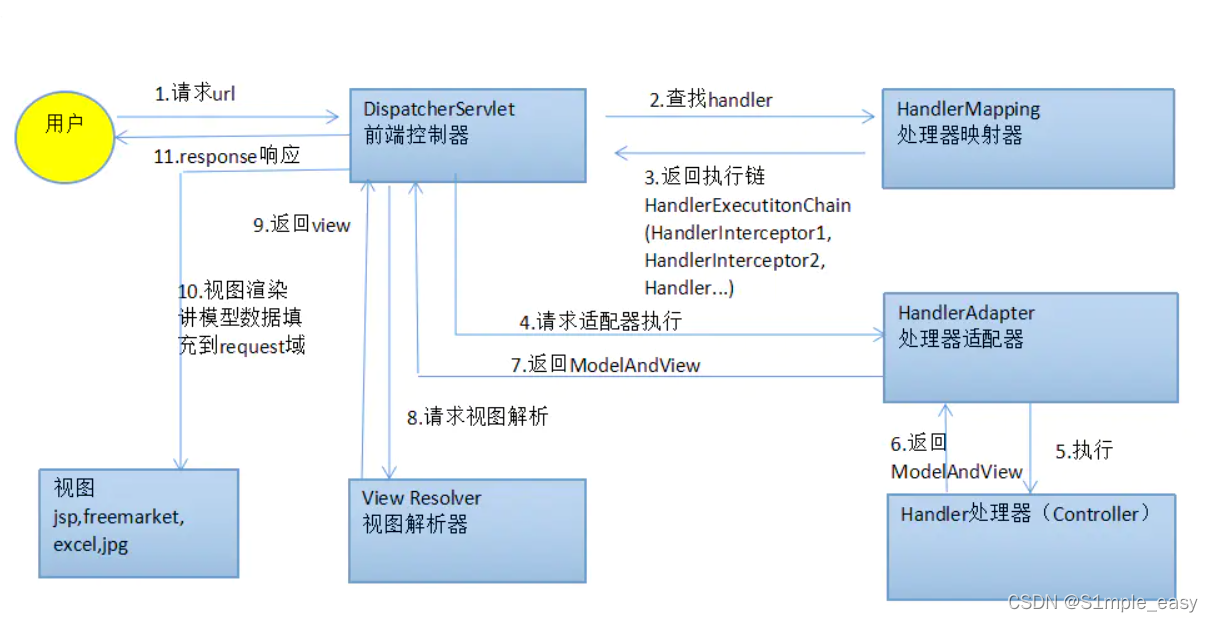
SpringMVC执行流程
RequestMapping注解
@Target({ElementType.TYPE, ElementType.METHOD})
@Retention(RetentionPolicy.RUNTIME)
@Documented
@Mapping
public @interface RequestMapping {
    String name() default "";

    @AliasFor("path")
    String[] value() default {};

    @AliasFor("value")
    String[] path() default {};

    RequestMethod[] method() default {};

    String[] params() default {};

    String[] headers() default {};

    String[] consumes() default {};

    String[] produces() default {};
}
作用 :用于建立请求url和处理请求方法之间建立对应关系
位置 :
作用在类上:请求url的第一级访问的目录,如果不写表示的是根目录
作用在方法上:请求url的二级访问目录
访问路径:通过类上RequestMapping和方法上RequestMapping构建虚拟目录路径
path/value:用于指定请求路径
method:用于指定当前请求方式
@RequestMapping(value="/hello",method = RequestMethod.POST)
params:用于指定限定请求参数的条件
@RequestMapping(value = "/hello",method = RequestMethod.GET,params = "username")
支持简单的表达式
@RequestMapping(value = "/hello",method = RequestMethod.GET,params = {"username","age=10"})
SpringMVC的数据响应
数据响应方式:
1.页面的跳转
直接返回字符串:通过将返回的字符串与视图解析器的前缀后缀进行拼接后跳转
请求转发和重定向
    @RequestMapping("/m1")
    public String method01(){
        System.out.println("method01...");
        return "forward:/pages/index.jsp";
    }
    @RequestMapping("/m2")
    public String method02(){
        System.out.println("method02...");
        return "redirect:/pages/index.jsp";
    }
转发:可以访问WEB-INF下面的文件资源
重定向:无法访问
返回ModelAndView对象
 @RequestMapping("/m4")
    public ModelAndView method04(){
        System.out.println("method04...");
        User user = new User(1,"zs",20.0);//模拟从数据库查询数据
        /*
         * Model 模型 作用:封装数据
         * View 视图 作用:展示数据
         * */
        ModelAndView modelAndView = new ModelAndView();
        //设置视图名称
        modelAndView.setViewName("m4");
        //设置模型数据
        modelAndView.addObject("user",user);//相当于request.setAttribute
        return modelAndView;
    }
<%@ page contentType="text/html;charset=UTF-8" language="java" isELIgnored="false" %>
<html>
<head>
    <title>m4</title>
</head>
<body>
<h1 align="center">information</h1>
<table align="center">
    <tr>
        <th>编号</th>
        <th>姓名</th>
        <th>分数</th>
    </tr>
    <tr>
        <td>${user.id}</td>
        <td>${user.username}</td>
        <td>${user.score}</td>
    </tr>
</table>
</body>
</html>
集合对象的值的使用
@RequestMapping("/m5")
    public ModelAndView method05(){
        System.out.println("method05...");
        /*
         * Model 模型 作用:封装数据
         * View 视图 作用:展示数据
         * */
        ModelAndView modelAndView = new ModelAndView();
        List<User> list = new ArrayList<User>();
        list.add(new User(1,"zs",1.0));
        list.add(new User(2,"li",2.0));
        list.add(new User(3,"ww",3.0));
        list.add(new User(4,"zl",4.0));
        //设置视图名称
        modelAndView.setViewName("m5");
        //设置模型数据
        modelAndView.addObject("list",list);//相当于request.setAttribute
        return modelAndView;
    }
<%@ page import="com.wm.pojo.User" %>
<%@ page import="java.util.List" %>
<%@ page contentType="text/html;charset=UTF-8" language="java" isELIgnored="false" %>
<html>
<head>
    <title>m5</title>
</head>
<body>
<h1>m5</h1>
<hr>
<h1>list集合元素:${list}</h1>
<hr>
<h1>集合中的第一个元素User对象:${list[0]}</h1>
<h1>第一个姓名:${list[0].username}</h1>
<hr>
<table>
    <tr>
        <th>id</th>
        <th>username</th>
        <th>score</th>
    </tr>
    <%
        List<User> list = (List<User>) request.getAttribute("list");
        for (User users : list) {
            request.setAttribute("users",users);
    %>
    <tr>
        <td>${users.id}</td>
        <td>${users.username}</td>
        <td>${users.score}</td>
    </tr>
    <%
        }
    %>
</table>
</body>
</html>
返回ModelAndView对象类型
    @RequestMapping("/m6")
    public ModelAndView method06(ModelAndView modelAndView){
        System.out.println("method-6...");
        modelAndView.addObject("username","zs");
        modelAndView.setViewName("m6");
        return modelAndView;
    }
    @RequestMapping("/m7")
    public String method07(Model model){
        System.out.println("method07...");
        model.addAttribute("username","ww");
        return "m7";
    }
    @RequestMapping("/m8")
//spring对于服务器对象会完成自动注入
    public String method08(HttpServletRequest request){
        System.out.println("method08...");
        request.setAttribute("username","aa");
        return "m8";
    }
2.回写数据
直接返回字符串
 @RequestMapping("/m9")
    @ResponseBody//告知SpringMVC 不进行试图跳转 直接进行数据响应
    public String method09(HttpServletRequest request){
        System.out.println("method09...");
        return "hello springMVC";
    }
    @RequestMapping("/m10")
    public void method10(HttpServletResponse response) throws IOException {
        response.getWriter().print("hello springMVC");//获取输出流并且打印
    }
    @RequestMapping("/m11")
    @ResponseBody//告知SpringMVC 不进行试图跳转 直接进行数据响应
    public String method11(){
        System.out.println("method11...");
        return "{\"name\":\"zhangsan\",\"age\":20}";//json
    }
    @RequestMapping("/m12")
    @ResponseBody
    public String method12() throws JsonProcessingException {
        System.out.println("method12...");
        User user = new User(1,"zs",10.0);
        ObjectMapper objectMapper = new ObjectMapper();
        String s = objectMapper.writeValueAsString(user);
        return s;
    }
返回对象或者集合
SpringMVC会帮助我们将对象或者集合进行json字符串的转换并回写
处理器适配器消息转换参数,指定使用Jackson进行对象或者集合转换,因此需要在SpringMVC.xml中配置适配器处理器
<!--    配置适配器处理器  -->
    <bean class="org.springframework.web.servlet.mvc.method.annotation.RequestMappingHandlerAdapter">
        <property name="messageConverters">
            <list>
                <bean class="org.springframework.http.converter.json.MappingJackson2HttpMessageConverter"/>
            </list>
        </property>
    </bean>
或者直接在SpringMVC.xml配置
<?xml version="1.0" encoding="UTF-8"?>
<beans xmlns="http://www.springframework.org/schema/beans"
       xmlns:xsi="http://www.w3.org/2001/XMLSchema-instance"
       xmlns:context="http://www.springframework.org/schema/context"
       xmlns:mvc="http://www.springframework.org/schema/mvc"
       xsi:schemaLocation="http://www.springframework.org/schema/beans
       http://www.springframework.org/schema/beans/spring-beans.xsd
       http://www.springframework.org/schema/mvc
       http://www.springframework.org/schema/mvc/spring-mvc.xsd
       http://www.springframework.org/schema/context
       https://www.springframework.org/schema/context/spring-context.xsd">

    <!--  配置视图解析器  -->
    <bean class="org.springframework.web.servlet.view.InternalResourceViewResolver">
        <property name="prefix" value="/pages/"/>
        <property name="suffix" value=".jsp"/>
    </bean>
<!--    配置适配器处理器  -->
<!--    <bean class="org.springframework.web.servlet.mvc.method.annotation.RequestMappingHandlerAdapter">-->
<!--        <property name="messageConverters">-->
<!--            <list>-->
<!--                <bean class="org.springframework.http.converter.json.MappingJackson2HttpMessageConverter"/>-->
<!--            </list>-->
<!--        </property>-->
<!--    </bean>-->
<!--    驱动注解 代替了适配器处理器-->
        <mvc:annotation-driven/>
</beans>
返回对象或者集合时
@ResponseBody + <mvc:annotation-driven/>
SpringMVC中,主要三大组件处理器映射器、处理器适配器、视图解析器
使用<mvc:annotation-driven/>配置,自动加载处理器映射器和处理器适配器
mvc:annotation-driven会自动注册RequestMappingHandlerMapping与RequestMappingHandlerAdapter两个Bean 底层默认就是会自动调用Jackson进行对象和集合转换成json格式的字符串
SpringMVC的请求-获取请求参数
基本数据类型
<%@ page contentType="text/html;charset=UTF-8" language="java" isELIgnored="false" %>
<html>
<head>
    <title>m9</title>
</head>
<body>
<form action="${pageContext.request.contextPath}/m14">
    id:<input type="text" name="id"><br>
    username:<input type="text" name="username"><br>
    <input type="submit" value="submit">
</form>
</body>
</html>
    @RequestMapping("m14")
    @ResponseBody
    public void method14(int id ,String username){
        System.out.println(id);
        System.out.println(username);
    }
Controller中的业务方法的参数名称要与请求参数的那么一致,参数值会自动映射配置,并完成自动类型转换(从String类型转换为其他类型)
pojo类型
<%@ page contentType="text/html;charset=UTF-8" language="java" isELIgnored="false" %>
<html>
<head>
    <title>m10</title>
</head>
<body>
<form action="${pageContext.request.contextPath}/m15">
    <input type="text" name="id">
    <input type="text" name="username">
    <input type="text" name="score">
    <input type="submit" value="submit">
</form>
</body>
</html>
    @RequestMapping("m15")
    @ResponseBody
    public void method15(User user){
        System.out.println(user);
    }
数组类型
<%@ page contentType="text/html;charset=UTF-8" language="java" isELIgnored="false" %>
<html>
<head>
    <title>m11</title>
</head>
<body>
<form action="${pageContext.request.contextPath}/m16" method="get">
    <input type="checkbox" name="strs" value="12">
    <input type="checkbox" name="strs" value="123">
    <input type="checkbox" name="strs" value="1234">
    <input type="checkbox" name="strs" value="12345">
    <input type="checkbox" name="strs" value="123456">
    <input type="submit" value="submit">
</form>
</body>
</html>
    @RequestMapping("m16")
    @ResponseBody
    public void method16(String[] strs){
        System.out.println(Arrays.toString(strs));
    }
集合数据类型
获取集合类型参数时,要将集合参数封装到一个POJO中才可以使用
<%@ page contentType="text/html;charset=UTF-8" language="java" isELIgnored="false" %>
<html>
<head>
    <title>m12</title>
</head>
<body>
<form action="${pageContext.request.contextPath}/m17" method="get">
<th>
    <input type="text" name="list[0].id">
    <input type="text" name="list[0].username">
    <input type="text" name="list[0].score">
</th>
    <th>
        <input type="text" name="list[1].id">
        <input type="text" name="list[1].username">
        <input type="text" name="list[1].score">
    </th>
    <input type="submit" value="submit">
</form>
</body>
</html>
public class VO {
    private List<User> list;

    public List<User> getList() {
        return list;
    }

    public void setList(List<User> list) {
        this.list = list;
    }

    @Override
    public String toString() {
        return "VO{" +
                "list=" + list +
                '}';
    }
}
    @RequestMapping("m17")
    @ResponseBody
    public void method17(VO vo){
        System.out.println(vo);
    }
获取json格式的字符串,封装成对象方式
<%@ page contentType="text/html;charset=UTF-8" language="java" isELIgnored="false" %>
<html>
<head>
    <title>index</title>
    <script src = "${pageContext.request.contextPath}/js/jquery-3.3.1.min.js"></script>
    <script>
        var userList = new Array();
        userList.push({username:"ze",age:10});
        userList.push({"username":"z","age":10});
        <!-- 发送请求 传递参数 -->
        $.ajax({
           type:"POST",
            url:"${pageContext.request.contextPath}/t03",
            contentType:"application/json;charset=utf-8",
            data:JSON.stringify(userList)
        });
    </script>
</head>
<body>

</body>
</html>
    @RequestMapping("/t03")
    @ResponseBody
    public void test03(@RequestBody List<User> userList){//@RequestBody 将json格式的字符串转换为指定对象
        System.out.println(userList);
    }
spring-mvc 静态资源的访问设置
<!--    指定放行静态资源 -->
<!--    <mvc:resources mapping="/js/**" location="/js/"/>-->

<!--    当前访问路径是静态资源 将访问交还给tomcat-->
    <mvc:default-servlet-handler/>
获取请求数据 参数绑定@RequestParam
属性:
value:指定请求参数名称对应当前方法参数的名称
required:指定请求参数是否必须包含,默认true,提交请求时,如果没有这个参数,请求会报错
defaultValue:当没有指定请求参数时,则使用当前值设置为默认值
    @RequestMapping("/t04")
    @ResponseBody
    public void test04(@RequestParam(value = "name",required = false,defaultValue = "li") String username,int age){
        System.out.println(username);
        System.out.println(age);
    }
<%@ page contentType="text/html;charset=UTF-8" language="java" isELIgnored="false" %>
<html>
<head>
    <title>Title</title>
</head>
<body>
<form method="get" action="${pageContext.request.contextPath}/t04">
    <input type="text" name="username">
    <input type="text" name="age">
    <input type="submit" name="submit">
</form>
</body>
</html>
解决乱码问题
设置一个过滤器来进行编码的过滤
当请求方式为post请求时 会出现乱码
<%@ page contentType="text/html;charset=UTF-8" language="java" isELIgnored="false" %>
<html>
<head>
    <title>Title</title>
</head>
<body>
<form method="post" action="${pageContext.request.contextPath}/t04">
    <input type="text" name="username">
    <input type="text" name="age">
    <input type="submit" name="submit">
</form>
</body>
</html>
自定义类型转换器
开发步骤
1.定义转换器类,实现Converter接口
public class DateConverter implements Converter<String, Date> {
    public Date convert(String s) {
        SimpleDateFormat simpleDateFormat = new SimpleDateFormat("yy-MM-dd");
        Date date = null;
        try {
            date = simpleDateFormat.parse(s);
        } catch (ParseException e) {
            e.printStackTrace();
        }
        return date;
    }
}
2.配置声明转换器
<!--    声明转换器  -->
    <bean id="conversionService" class="org.springframework.context.support.ConversionServiceFactoryBean">
        <property name="converters">
            <list>
                <bean class="com.wm.converter.DateConverter"></bean>
            </list>
        </property>
    </bean>
3.在<mvc:annotation-driven/>中引用转换器
<mvc:annotation-driven conversion-service="conversionService"/>
SpringMVC对原始ServletAPI的支持,通过控制器方法的参数进行注入
HttpServletRequest
HttpServletResponse
HttpSession
    @RequestMapping("/t06")
    @ResponseBody
    public void test05(HttpServletResponse response, HttpServletRequest request, HttpServlet servlet){
        System.out.println(request);
        System.out.println(response);
        System.out.println(servlet);
    }
web阶段学习中,request.getHeader(String.name)获取请求头信息
SpringMVC提供@RequestHeader注解,可以获取请求头信息
属性:
value:请求头的名称
require:默认值为true,是否必须包含此请求头
   @RequestMapping("/t07")
    @ResponseBody
    public void test05(@RequestHeader(value = "user",required = false) String user ){
        System.out.println(user);
    }
SpringMVC对cookie的支持
@CookieValue注解,可以获取cookie值
属性:
value:指定cookie名称
required:是否必须携带此名称cookie,默认值为true
SpringMVC文件上传应用
文件上传客户端需要满足:
- 表单的提交方式:post
- 表单的类型:type:file
- 表单属性设置enctype属性值为多部分表单形式
- enctype="application/x-www-form-urlencode"表单的正常提交,提交格式:name=value&name1=value1&…
客户端代码
<%@ page contentType="text/html;charset=UTF-8" language="java" isELIgnored="false" %>
<html>
<head>
    <title>Title</title>
</head>
<body>
<form action="${pageContext.request.contextPath}/t10" method="post" enctype="multipart/form-data">
    名称:<input type="text" name="filename"><br>
    文件: <input type="file" name="uploadfile">
    <input type="submit" value="submit">
</form>
</body>
</html>
服务器端代码
1.引入jar包
    <dependency>
      <groupId>commons-io</groupId>
      <artifactId>commons-io</artifactId>
      <version>2.6</version>
    </dependency>
    <dependency>
      <groupId>commons-fileupload</groupId>
      <artifactId>commons-fileupload</artifactId>
      <version>1.3.1</version>
    </dependency>
2.配置多媒体解析器
<!--  配置文件上传解析器  -->
    <bean id="multipartResolver" class="org.springframework.web.multipart.commons.CommonsMultipartResolver">
        <property name="defaultEncoding" value="Utf-8"/>
        <property name="maxInMemorySize" value="10240"/>
    </bean>
3.应用程序
    @RequestMapping("/t10")
    @ResponseBody
    public void test10(String filename, MultipartFile uploadfile) throws IOException {
        System.out.println(filename);
        System.out.println(uploadfile);
        //获取文件名称
        String name = uploadfile.getOriginalFilename();
        System.out.println(name);
        uploadfile.transferTo(new File("D://"+name));
    }
多个文件上传可以使用数组
SpringMVC拦截器
SpringMVC拦截器类似Servlet开发中的filter,用于处理进行预处理和后处理
拦截器和过滤器的区别
| 区别 | 过滤器 | 拦截器 |
|---|---|---|
| 适用范围 | 是Servlet规范中的一部分,只要是web工程都可以使用 | SpringMVC框架自己使用 |
| 拦截范围 | 在url-pattern中进行配置,如果配置/*,所有资源都可以拦截 | 只会拦截访问控制器的方法。如果访问jsp、html、css、js、img…不会拦截 |
拦截器的使用
-
创建实现类。实现HandlerInterceptor接口
public class InterceptorTe implements HandlerInterceptor { //在目标方法之前执行(符合要求进行放行) public boolean preHandle(HttpServletRequest request, HttpServletResponse response, Object handler) throws Exception { System.out.println("pre"); return true;//false 不进行放行 } //在目标方法之后执行,在视图对象返回值前执行 public void postHandle(HttpServletRequest request, HttpServletResponse response, Object handler, ModelAndView modelAndView) throws Exception { System.out.println("post"); } //在流程都执行完毕后进行执行 public void afterCompletion(HttpServletRequest request, HttpServletResponse response, Object handler, Exception ex) throws Exception { System.out.println("after"); } } -
配置拦截器
<!--    配置拦截器-->
    <mvc:interceptors>
        <mvc:interceptor>
            <mvc:mapping path="/**"/>
            <bean class="com.wm.interceptor.InterceptorTe"></bean>
        </mvc:interceptor>
    </mvc:interceptors>
应用
    @RequestMapping("/t11")
    @ResponseBody
    public ModelAndView test11(){
        System.out.println("11....");
        ModelAndView mv = new ModelAndView();
        mv.addObject("name","zs");
        mv.setViewName("success");
        return mv;
    }


 348
348


 被折叠的 条评论
为什么被折叠?
被折叠的 条评论
为什么被折叠?
 到【灌水乐园】发言


