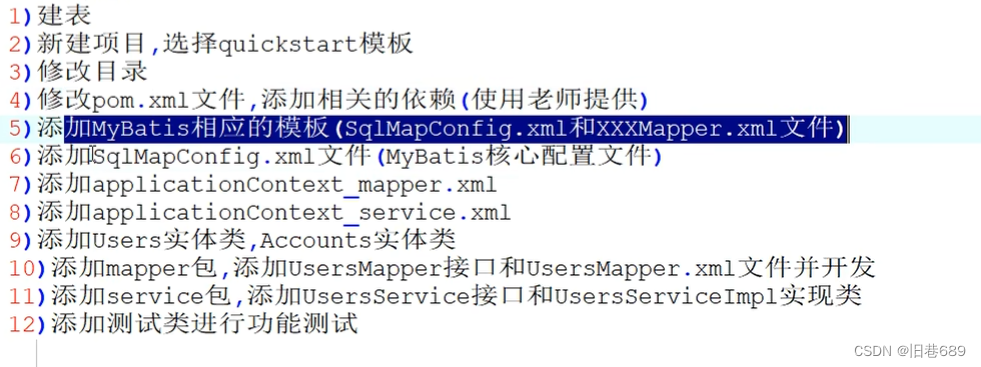
一、SM整合的步骤
1.pom文件
<?xml version="1.0" encoding="UTF-8"?>
<project xmlns="http://maven.apache.org/POM/4.0.0" xmlns:xsi="http://www.w3.org/2001/XMLSchema-instance"
xsi:schemaLocation="http://maven.apache.org/POM/4.0.0 http://maven.apache.org/xsd/maven-4.0.0.xsd">
<modelVersion>4.0.0</modelVersion>
<groupId>com.sm</groupId>
<artifactId>Spring-MyBatis</artifactId>
<version>1.0-SNAPSHOT</version>
<properties>
<project.build.sourceEncoding>UTF-8</project.build.sourceEncoding>
<maven.compiler.source>8</maven.compiler.source>
<maven.compiler.target>8</maven.compiler.target>
</properties>
<dependencies>
<!--单元测试的依赖-->
<dependency>
<groupId>junit</groupId>
<artifactId>junit</artifactId>
<version>4.13.2</version>
<scope>test</scope>
</dependency>
<!--aspectj的依赖-->
<dependency>
<groupId>org.springframework</groupId>
<artifactId>spring-aspects</artifactId>
<version>5.3.23</version>
</dependency>
<!--spring核心依赖-->
<dependency>
<groupId>org.springframework</groupId>
<artifactId>spring-context</artifactId>
<version>5.3.23</version>
</dependency>
<!--spring事务的依赖-->
<dependency>
<groupId>org.springframework</groupId>
<artifactId>spring-tx</artifactId>
<version>5.3.23</version>
</dependency>
<dependency>
<groupId>springframework</groupId>
<artifactId>spring-jdbc</artifactId>
<version>1.2.6</version>
</dependency>
<!--mybatis依赖-->
<dependency>
<groupId>org.mybatis</groupId>
<artifactId>mybatis</artifactId>
<version>3.5.11</version>
</dependency>
<!--mybatis和spring集成依赖-->
<dependency>
<groupId>org.mybatis</groupId>
<artifactId>mybatis-spring</artifactId>
<version>2.0.7</version>
</dependency>
<!--mysql驱动依赖-->
<dependency>
<groupId>mysql</groupId>
<artifactId>mysql-connector-java</artifactId>
<version>8.0.30</version>
</dependency>
<!--阿里数据库连接池-->
<dependency>
<groupId>com.alibaba</groupId>
<artifactId>druid</artifactId>
<version>1.2.12</version>
</dependency>
</dependencies>
<build>
<resources>
<resource>
<directory>src/main/java</directory>
<includes>
<include>***.properties</include>
</includes>
</resource>
<resource>
<directory>src/main/resources</directory>
<includes>
<include>***.properties</include>
</includes>
</resource>
</resources>
</build>
</project>
2.applicationContext_mapper.xml文件整合mybatis核心配置文件
<?xml version="1.0" encoding="UTF-8"?>
<beans xmlns="http://www.springframework.org/schema/beans"
       xmlns:xsi="http://www.w3.org/2001/XMLSchema-instance"
       xmlns:context="http://www.springframework.org/schema/context"
       xsi:schemaLocation="http://www.springframework.org/schema/beans http://www.springframework.org/schema/beans/spring-beans.xsd http://www.springframework.org/schema/context https://www.springframework.org/schema/context/spring-context.xsd">

    <!--读取属性文件 jdbc.properties-->
    <context:property-placeholder location="jdbc.properties"/>
    <!--创建数据源-->
    <bean id="dataSource" class="com.alibaba.druid.pool.DruidDataSource">
        <property name="driver" value="${jdbc.driver}"/>
        <property name="url" value="${jdbc.url}"/>
        <property name="username" value="${jdbc.username}"/>
        <property name="password" value="${jdbc.password}"/>
    </bean>
    <!--配置SqlSessionFactoryBean类-->
    <bean class="org.mybatis.spring.SqlSessionFactoryBean">
        <!--配置数据源-->
        <property name="dataSource" ref="dataSource"/>
        <!--配置mybatis的核心配置文件-->
        <property name="configLocation" value="mybatis-config.xml"/>
        <!--注册实体类的别名-->
        <property name="typeAliasesPackage" value="com.sm.bean"/>
    </bean>
    <!--注册mapper.xml文件-->
    <bean class="org.mybatis.spring.mapper.MapperScannerConfigurer">
        <property name="basePackage" value="com.sm.mapper"/>
    </bean>
</beans>
3.applicationContext_service.xml文件
<?xml version="1.0" encoding="UTF-8"?>
<beans xmlns="http://www.springframework.org/schema/beans"
       xmlns:xsi="http://www.w3.org/2001/XMLSchema-instance"
       xmlns:context="http://www.springframework.org/schema/context"
       xsi:schemaLocation="http://www.springframework.org/schema/beans http://www.springframework.org/schema/beans/spring-beans.xsd http://www.springframework.org/schema/context https://www.springframework.org/schema/context/spring-context.xsd">

    <!--SM是基于注解开发的,所以添加包扫描-->
    <context:component-scan base-package="com.sm.service"/>
    <!--事务处理-->
</beans>
4.添加注解式事务
<?xml version="1.0" encoding="UTF-8"?>
<beans xmlns="http://www.springframework.org/schema/beans"
xmlns:xsi="http://www.w3.org/2001/XMLSchema-instance"
xmlns:context="http://www.springframework.org/schema/context" xmlns:tx="http://www.springframework.org/schema/tx"
xsi:schemaLocation="http://www.springframework.org/schema/beans http://www.springframework.org/schema/beans/spring-beans.xsd http://www.springframework.org/schema/context https://www.springframework.org/schema/context/spring-context.xsd http://www.springframework.org/schema/tx http://www.springframework.org/schema/tx/spring-tx.xsd">
<!--导入applicationContext_mapper.xml文件-->
<import resource="applicationContext_mapper.xml"/>
<!--SM是基于注解开发的,所以添加包扫描-->
<context:component-scan base-package="com.sm.service"/>
<!--事务处理-->
<!--1.添加事务管理器-->
<bean id="transactionManager" class="org.springframework.jdbc.datasource.DataSourceTransactionManager">
<!--因为事务必须关联数据库处理,所以要配置数据源-->
<property name="dataSource" ref="dataSource"/>
</bean>
<!--2.添加事务的注解驱动-->
<tx:annotation-driven transaction-manager="transactionManager"/>
</beans>
@Service("accountsServiceImpl")
@Transactional(propagation = Propagation.REQUIRED)
public class AccountsServiceImpl implements AccountsService {}
@Transactional(propagation = Propagation.REQUIRED,
noRollbackForClassName = "ArithmeticException",
noRollbackFor = ArithmeticException.class,
timeout = -1,
readOnly = false,
isolation = Isolation.DEFAULT)
二、spring的事务处理
1.注解式事务
使用@Transactional注解完成事务控制
(1)
可以添加到类上,则对类中所有的方法执行此事务设定
(2)
可以添加到方法上,只对此方法执行此事务处理
2.声明式事务(必须掌握)
在配置文件中添加一次,整个项目遵循事务设定。

要求项目中的方法命名有规范
(1)完成增加操作必须包含 add,save,insert set
(2)更新操作必须包含 update change modify
(3)删除操作包含 delete drop remove clead
(4)查询操作包含 select find search get

这样做的话,配置事务切面的时候可以使用 通配符* 来匹配所有方法
<?xml version="1.0" encoding="UTF-8"?>
<beans xmlns="http://www.springframework.org/schema/beans"
       xmlns:xsi="http://www.w3.org/2001/XMLSchema-instance"
       xmlns:context="http://www.springframework.org/schema/context" xmlns:tx="http://www.springframework.org/schema/tx"
       xmlns:aop="http://www.springframework.org/schema/aop"
       xsi:schemaLocation="http://www.springframework.org/schema/beans http://www.springframework.org/schema/beans/spring-beans.xsd http://www.springframework.org/schema/context https://www.springframework.org/schema/context/spring-context.xsd http://www.springframework.org/schema/tx http://www.springframework.org/schema/tx/spring-tx.xsd http://www.springframework.org/schema/aop https://www.springframework.org/schema/aop/spring-aop.xsd">

    <!--导入applicationContext_mapper.xml文件-->
    <import resource="applicationContext_mapper.xml"/>

    <!--SM是基于注解开发的,所以添加包扫描-->
    <context:component-scan base-package="com.sm.service"/>

    <!--事务处理-->
    <!--1.添加事务管理器-->
    <bean id="transactionManager" class="org.springframework.jdbc.datasource.DataSourceTransactionManager">
        <!--因为事务必须关联数据库处理,所以要配置数据源-->
        <property name="dataSource" ref="dataSource"/>
    </bean>
    <!--2.添加事务的注解驱动-->
<!--    <tx:annotation-driven transaction-manager="transactionManager"/>-->
    <!--配置事务切面-->
    <tx:advice id="maAdvice" transaction-manager="transactionManager">
        <tx:attributes>
            <tx:method name="*select*" read-only="true"/>
            <tx:method name="*find*" read-only="true"/>
            <tx:method name="*search*" read-only="true"/>
            <tx:method name="*get*" read-only="true"/>
            <tx:method name="*insert*" propagation="REQUIRED"/>
            <tx:method name="*add*" propagation="REQUIRED"/>
            <tx:method name="*save*" propagation="REQUIRED"/>
            <tx:method name="*set*" propagation="REQUIRED"/>
            <tx:method name="*update*" propagation="REQUIRED"/>
            <tx:method name="*change*" propagation="REQUIRED"/>
            <tx:method name="*modify*" propagation="REQUIRED"/>
            <tx:method name="*delete*" propagation="REQUIRED"/>
            <tx:method name="*remove*" propagation="REQUIRED"/>
            <tx:method name="*drop*" propagation="REQUIRED"/>
            <tx:method name="*clear*" propagation="REQUIRED"/>
            <tx:method name="*" propagation="SUPPORTS"/>
        </tx:attributes>
    </tx:advice>
    <!--绑定切面和切入点-->
    <aop:config>
        <!--切入点表达式-->
        <aop:pointcut id="myCut" expression="execution(* com.sm.service.impl.*.*(..))"/>
        <!--绑定切面和切入点-->
        <aop:advisor advice-ref="maAdvice" pointcut-ref="myCut"/>
    </aop:config>
</beans>
3.spring事务的五大隔离级别

4.为什么添加事务管理器
事务管理器用来生成相应技术的连接+执行语句的对象

如果使用MyBatis框架,必须使用 DataSourceTransactionManager类完成处理

项目中所有的事务必须添加到业务逻辑层上
5.事务的传播特性
多个事务之间的合并、互斥等都可以通过设置事务的传播特性来解决


 6860
6860


 被折叠的 条评论
为什么被折叠?
被折叠的 条评论
为什么被折叠?
 到【灌水乐园】发言


