


目录
前言
作为一名测试工程师,最基本的是掌握功能测试,但是只掌握功能测试是远远不够的,想要成长,必不可少的就是学习自动化测试相关技术和性能测试相关技术。
测试工程师需要掌握的测试技术篇总结如下:

目前市场上常用的自动化测试技术在之前的博文中已经对自动化框架选型做了简单的对比,详情可了解:自动化测试框架对比与选型-CSDN博客
可通过之前的博文:Jenkins+Pytest+Python+Allure持续化集成-CSDN博客了解如何通过Jenkins+Pytest+Python+Allure框架实现代码持续集成。
本文想要简单介绍下Pytest框架在自动化测试中的应用。
一、接口自动化项目构成
以下是我的接口自动化项目组成。

common:封装公共方法
config:yaml配置文件(包括不同环境,登陆获取的token等)
log:存放日志
reports:生成的测试报告
results:生成的临时测试结果
testcase:测试用例合集
until:一些公共集成的方法
main.py:执行所有测试用例的入口(可以不要)
pytest.ini:pytest的配置
二、Pytest基础介绍
1.安装Pytest
pip install pytest2.PyCharm中设置使用Pytest
配置路径:依次点击【File】→【Settings】→【Tools】→【Python Integrated Tools】,【Default test runner】选择“pytest”,然后点击【Apply】→【OK】,就可以使用Pytest啦
3.pytest使用规则
- 测试文件以test_开头或者以_test结尾
- 测试类以Test开头,且类中不能包含__init__方法
- 测试函数/方法以test_开头
- 断言使用基本的assert即可
4.pytest运行方式
a.读取配置文件pytest.ini
配置文件示例内容如下:
[pytest]
addopts = -vs
testpaths = testcase
python_files = test_*.py
python_classes = Test*
python_functions = test_*
log_cli = True

markers =
    smoke : 冒烟用例
    mode1 : 模块1
    mode2 : 模块2
b.主函数模式
需要在项目根目录下新建一个可运行py文件,比如:test_login.py
if __name__ == '__main__':
    pytest.main(['-vs', 'test_login.py', '--clean-alluredir', '--alluredir=allure-results'])
    os.system(r"allure generate -c -o allure-report")
可通过上述执行主函数,运行py文件。
c.命令行模式
pytest ../Pytest								# 执行包中所有模块的用例
pytest -vs test_login.py						# 执行单独的pytest模块,test_learn.py文件
pytest -vs test_login.py::Testpy				# 只执行文件中的Testpy类
pytest -vs test_login.py::Testpy::test_method	# 只执行文件中Testpy类下的test_method方法
pytest -vs test_login.py::test_function			# 只执行文件中test_function函数
5.pytest参数化
可通过pytest装饰器来实现参数化,pytest.mark.parametrize(argnames,argvalues),参数化的名字要与方法中的参数名一一对应。
代码示例:
//测试方法和函数使用
@pytest.mark.parametrize("test_input,expected", [("3+5", 8), ("2+4", 6), ("3*9", 22)])
def test_eval(test_input, expected):
    assert eval(test_input) == expected


//测试类使用
@pytest.mark.parametrize("n,expected", [(1, 2), (3, 4)])
class TestClass:
    def test_simple_case(self, n, expected):
        assert n + 1 == expected

    def test_weird_simple_case(self, n, expected):
        assert (n * 1) + 1 == expected

//模块全局使用
pytestmark = pytest.mark.parametrize("n,expected", [(1, 2), (3, 4)])

class TestClass:
    def test_simple_case(self, n, expected):
        assert n + 1 == expected

//mark标记使用
@pytest.mark.parametrize(
    "test_input,expected",
    [("3+5", 8), ("2+4", 6), pytest.param("3*9", 22, marks=pytest.mark.xfail)],
)
def test_eval(test_input, expected):
    assert eval(test_input) == expected
6.pytest前置和后置
模块级别:setup_module、teardown_module
函数级别:setup_function、teardown_function,不在类中的方法
类级别:setup_class、teardown_class
方法级别:setup_method、teardown_method
方法细化级别:setup、teardown
代码示例
def setup_module():
    print("---整个.py模块开始前只执行一次:打开浏览器---")

def teardown_module():
    print("---整个.py模块结束后只执行一次:关闭浏览器---")

def setup_function():
    print("---每个函数级别用例开始前都执行setup_function---")

def teardown_function():
    print("---每个函数级别用例结束后都执行teardown_function---")

def test_one():
    print("one")

class TestCase():
    def setup_class(self):
        print("---整个测试类开始前只执行一次setup_class---")

    def teardown_class(self):
        print("---整个测试类结束后只执行一次teardown_class---")

    def setup_method(self):
        print("---类里面每个用例执行前都会执行setup_method---")

    def teardown_method(self):
        print("---类里面每个用例结束后都会执行teardown_method---")

    def setup(self):
        print("---类里面每个用例执行前都会执行setup---")

    def teardown(self):
        print("---类里面每个用例结束后都会执行teardown---")

    def test_two(self):
        print("two")
7.pytest断言
pytest断言就用assert就好了。
代码示例:
def test_001(self):
    assert 1+1 == 2
三、自动化实现部分源码
test_allure.py代码示例:
import allure
import pytest
import os
import sys


@allure.feature('test_success')
def test_success():
    """this test succeeds"""
    assert True


@allure.feature('test_xfail_expected_failure')
@pytest.mark.xfail(reason='该功能尚未实现')
def test_xfail_expected_failure():
    print("该功能尚未实现")
    assert False


@allure.feature('test_xfail_unexpected_pass')
@pytest.mark.xfail(reason='该Bug尚未修复')
def test_xfail_unexpected_pass():
    print("该Bug尚未修复")
    assert True


'''当条件为True则跳过执行'''
@allure.feature("test_skipif")
@pytest.mark.skipif("darwin" in sys.platform,reason="如果操作系统是Mac则跳过执行")
def test_skipif():
    print("操作系统是Mac,test_skipif()函数跳过执行")


@allure.step("步骤一")
def test_with_nested_steps():
    passing_step()
    step_with_nested_steps()

@allure.step("步骤二")
def passing_step():
    pass


@allure.step("步骤三")
def step_with_nested_steps():
    nested_step()


@allure.step("步骤四")
def nested_step():
    nested_step_with_arguments(1, 'abc')


@allure.step("步骤五")
def nested_step_with_arguments(arg1, arg2):
    pass


@allure.title("动态标题: {param1} + {param2} = {expected}")
@pytest.mark.parametrize('param1,param2,expected', [(2, 2, 4),(1, 2, 3)])
def test_with_parameterized_title(param1, param2, expected):
    assert param1 + param2 == expected


if __name__ =='__main__':
    pytest.main(['-vs', 'test_allure.py','--clean-alluredir','--alluredir=allure-results'])
    os.system(r"allure generate -c -o allure-report")
查看Jenkins上配置:

四、生成Allure报告
执行上述Jenkins,点击Build Now构建自动化任务,生成Allure报告结果图:


五、发送邮件通知
首先配置邮件(Jenkins全局配置+项目中配置),这里不再赘述!简单贴个图片~

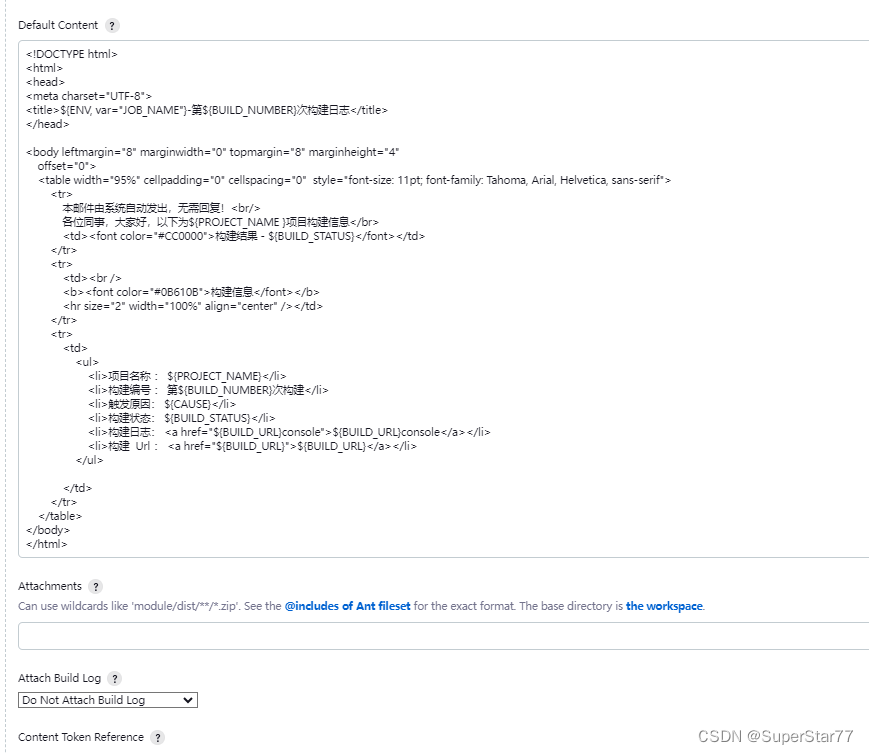
可附上邮件内容源码!!
<!DOCTYPE html>
<html>
<head>
<meta charset="UTF-8">
<title>${ENV, var="JOB_NAME"}-第${BUILD_NUMBER}次构建日志</title>
</head>

<body leftmargin="8" marginwidth="0" topmargin="8" marginheight="4"
    offset="0">
    <table width="95%" cellpadding="0" cellspacing="0"  style="font-size: 11pt; font-family: Tahoma, Arial, Helvetica, sans-serif">
        <tr>
            本邮件由系统自动发出,无需回复!<br/>
            各位同事,大家好,以下为${PROJECT_NAME }项目构建信息</br>
            <td><font color="#CC0000">构建结果 - ${BUILD_STATUS}</font></td>
        </tr>
        <tr>
            <td><br />
            <b><font color="#0B610B">构建信息</font></b>
            <hr size="2" width="100%" align="center" /></td>
        </tr>
        <tr>
            <td>
                <ul>
                    <li>项目名称 : ${PROJECT_NAME}</li>
                    <li>构建编号 : 第${BUILD_NUMBER}次构建</li>
                    <li>触发原因: ${CAUSE}</li>
                    <li>构建状态: ${BUILD_STATUS}</li>
                    <li>构建日志: <a href="${BUILD_URL}console">${BUILD_URL}console</a></li>
                    <li>构建  Url : <a href="${BUILD_URL}">${BUILD_URL}</a></li>
                </ul>

            </td>
        </tr>
    </table>
</body>
</html>


 1762
1762


 被折叠的 条评论
为什么被折叠?
被折叠的 条评论
为什么被折叠?
 到【灌水乐园】发言


