


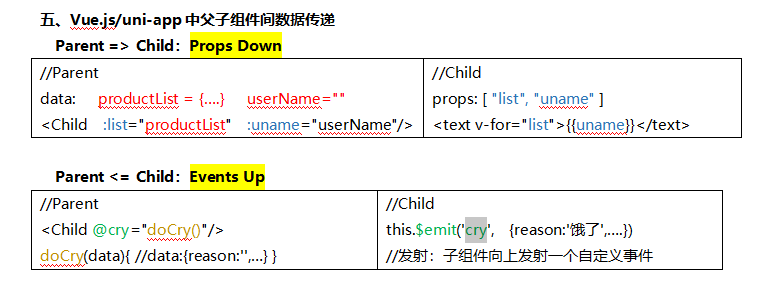
父子之间的传参,父向子传参通过Props接收,子向父传参通过$emit发射
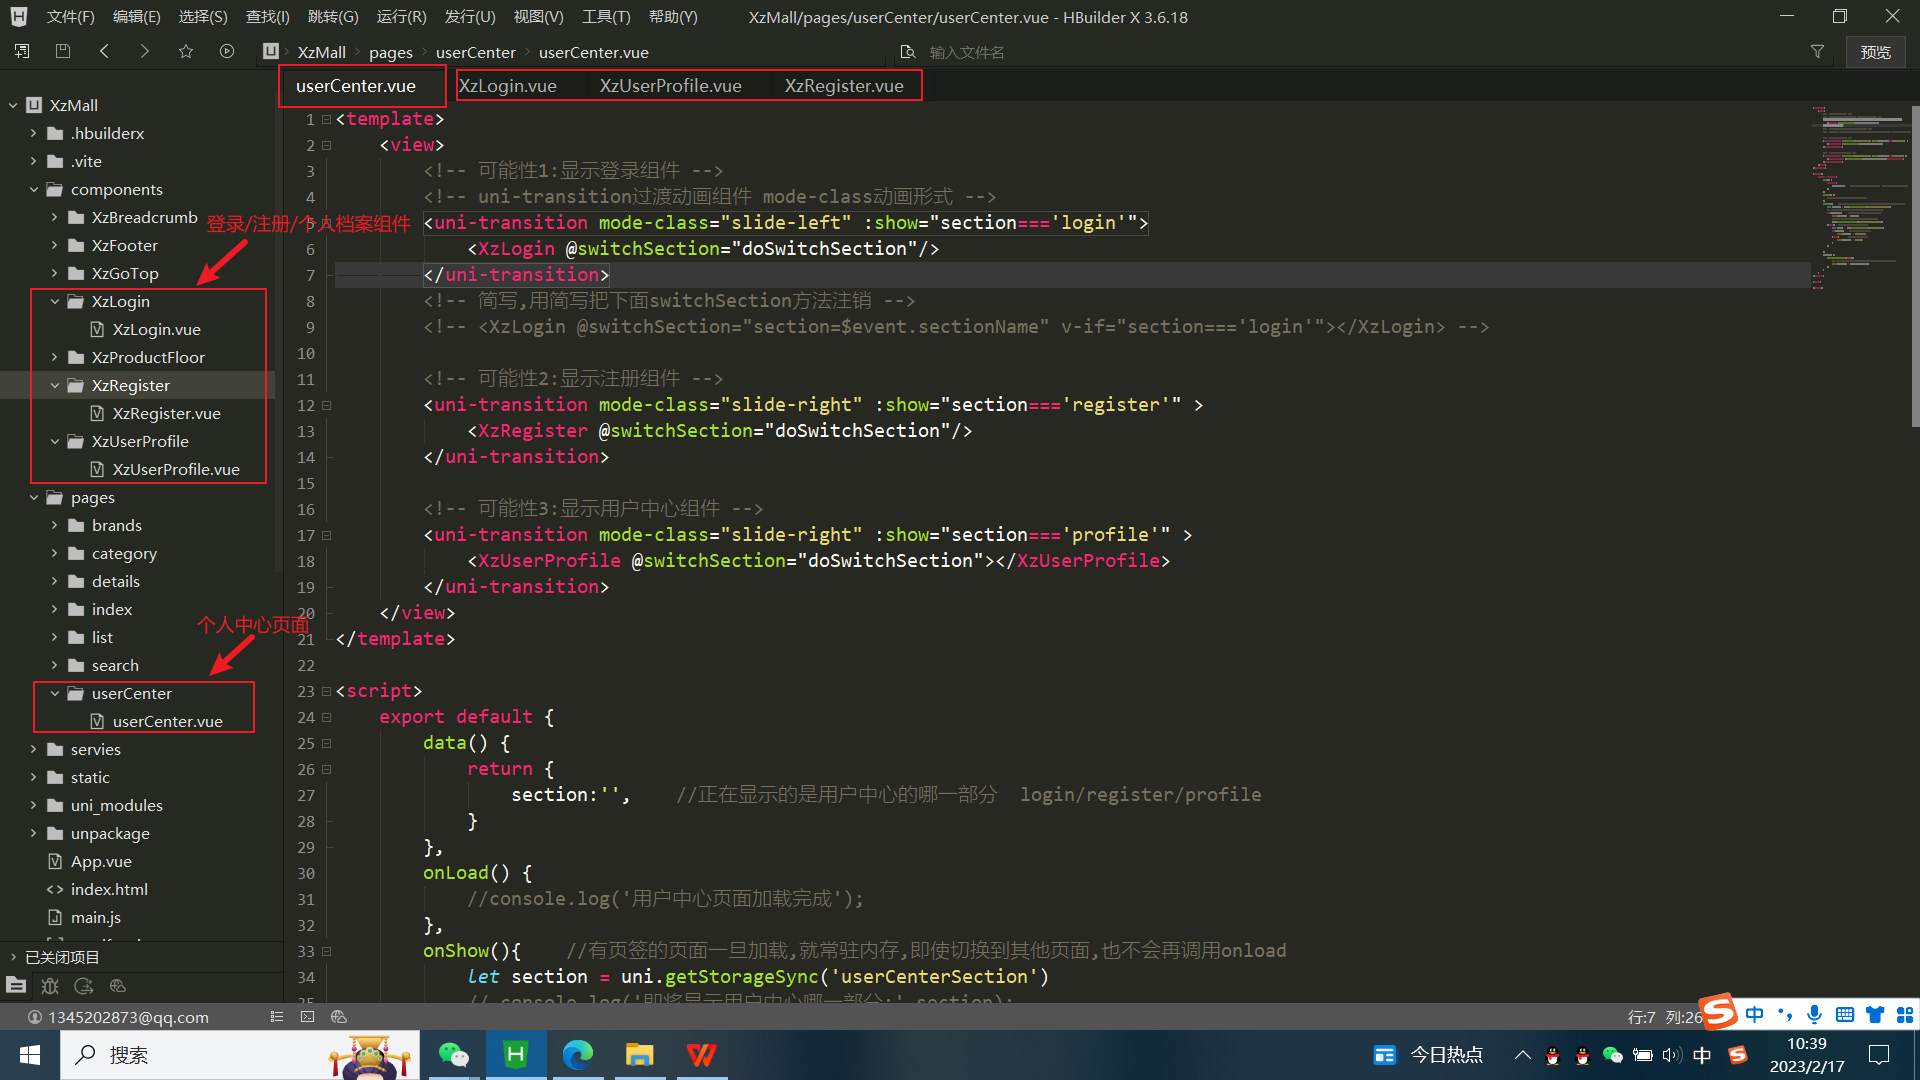
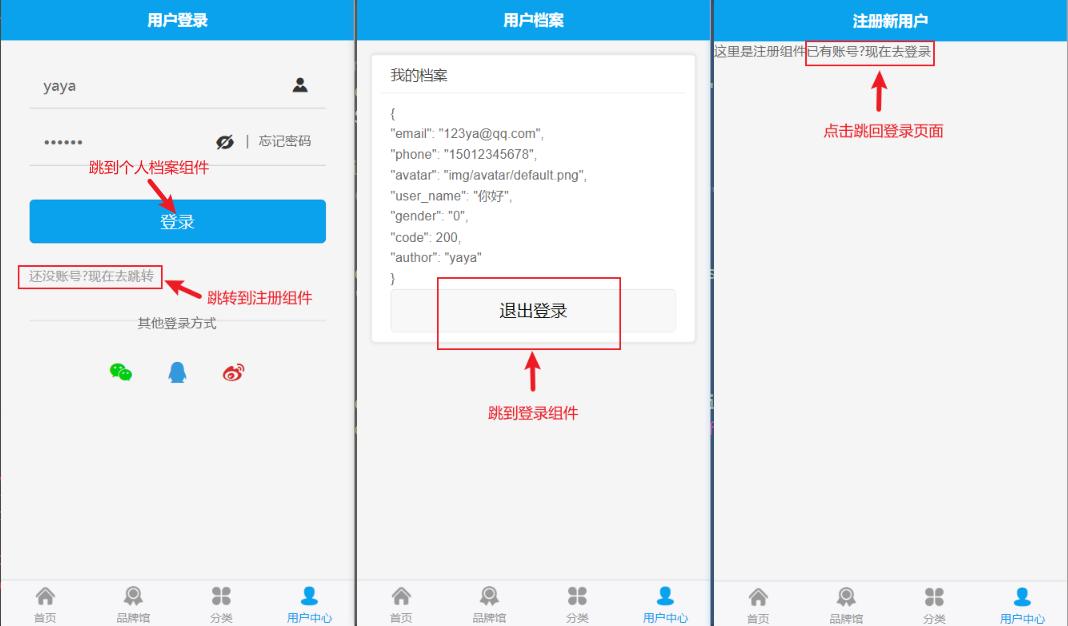
个人中心页面,内有三个组件(注册组件 登录组件 个人档案组件)
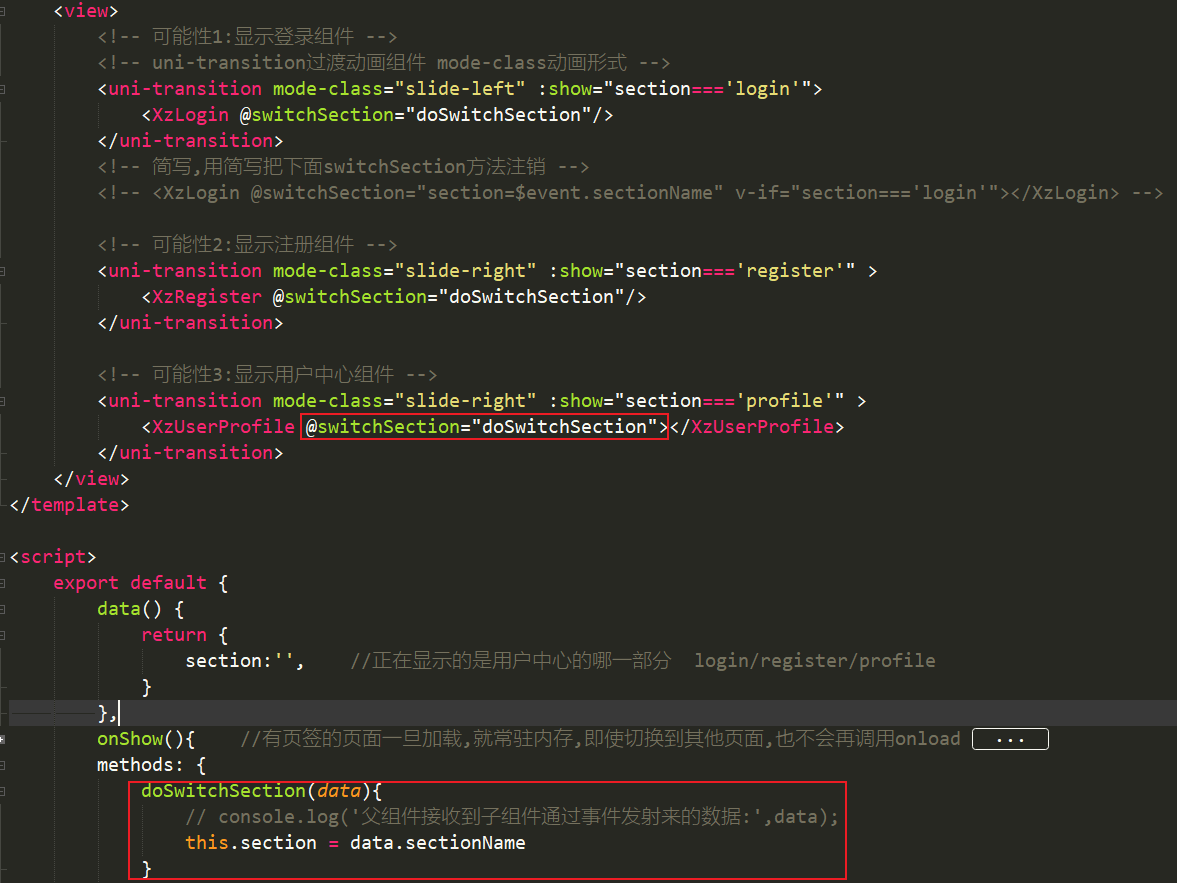
个人中心页面(相当于父组件),接收到子组件传过来的变量名,通过@子组件发射的变量名="自定义方法名",在methods中书写自定义方法,通过子组件发射过来的数据获取自己所需的变量(section),记得在return中定义自己所需的变量
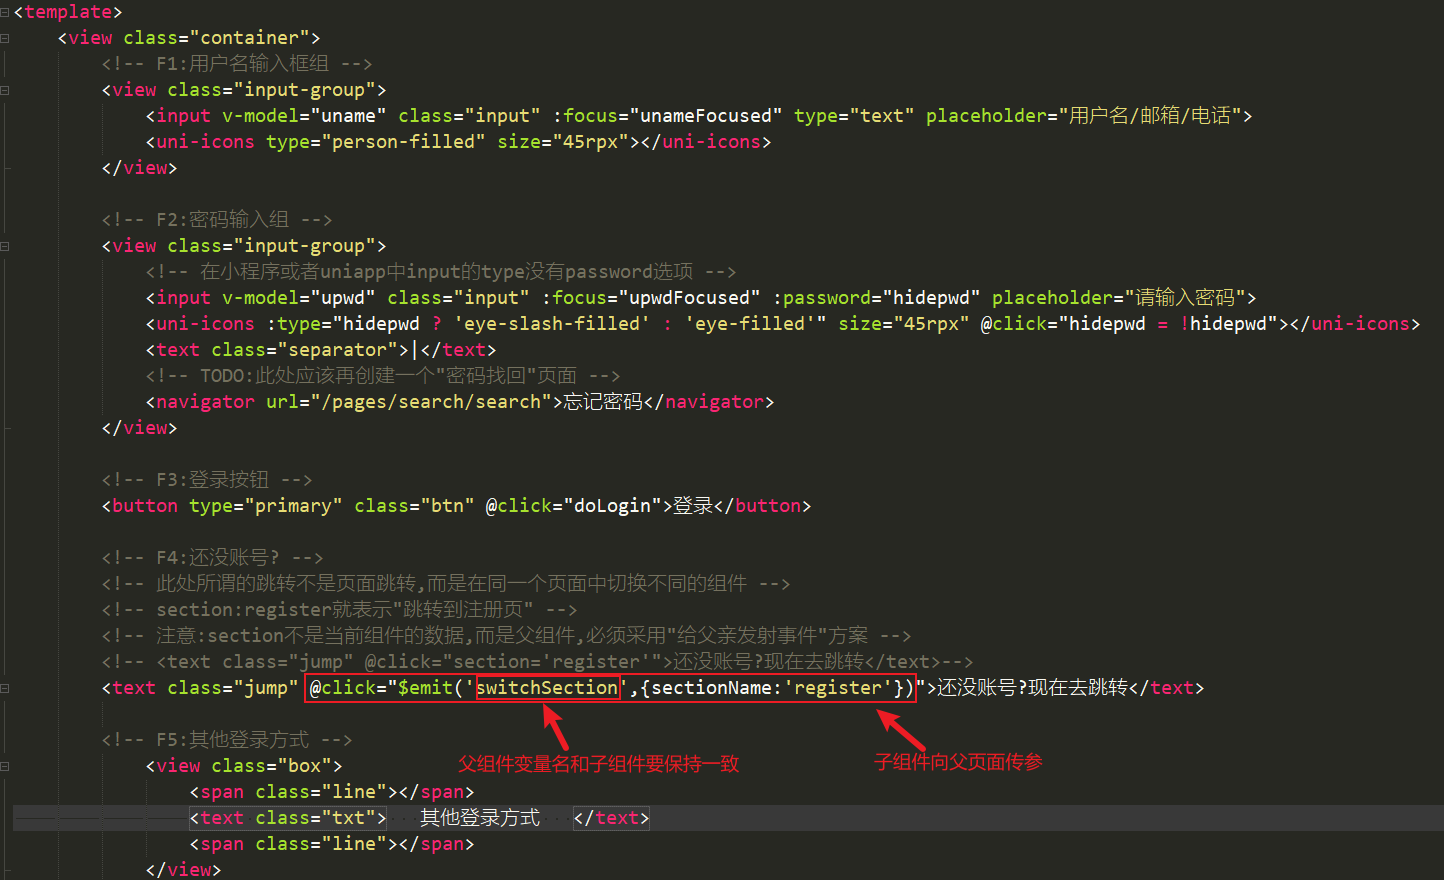
子组件向父页面传参,通过@click="$emit('switchSection',{sectionName:'register'})"
switchSection:自定义事件 sectionName:'register':向父组件发射的数据
运行页面
个人中心页面代码
<template>
    <view>
        <!-- 可能性1:显示登录组件 -->
        <!-- uni-transition过渡动画组件 mode-class动画形式 -->
        <uni-transition mode-class="slide-left" :show="section==='login'">
            <XzLogin @switchSection="doSwitchSection"/>
        </uni-transition>
        <!-- 简写,用简写把下面switchSection方法注销 -->
        <!-- <XzLogin @switchSection="section=$event.sectionName" v-if="section==='login'"></XzLogin> -->

        <!-- 可能性2:显示注册组件 -->
        <uni-transition mode-class="slide-right" :show="section==='register'" >
            <XzRegister @switchSection="doSwitchSection"/>
        </uni-transition>

        <!-- 可能性3:显示用户中心组件 -->
        <uni-transition mode-class="slide-right" :show="section==='profile'" >
            <XzUserProfile @switchSection="doSwitchSection"></XzUserProfile>
        </uni-transition>
    </view>
</template>

<script>
    export default {
        data() {
            return {
                section:'',    //正在显示的是用户中心的哪一部分  login/register/profile
            }
        },
        onLoad() {
            //console.log('用户中心页面加载完成');
        },
        onShow(){    //有页签的页面一旦加载,就常驻内存,即使切换到其他页面,也不会再调用onload
            let section = uni.getStorageSync('userCenterSection')
            // console.log('即将显示用户中心哪一部分:',section);
            if(section){     //上一页页面指定要显示哪个部分的内容
                this.section = section
                //从本地缓存中删除存储的userCenterSection数据
                uni.removeStorageSync('userCenterSection')
            }else{   //上一页面没有指示要显示哪个部分
                let token = uni.getStorageSync('userToken')
                if(token){    //客户端存在登录后的令牌
                    this.section = 'profile'
                }else{       //客户端没有存登录令牌
                    this.section = 'login'
                }
            }

        },
        methods: {
            //处理切换部分
            doSwitchSection(data){
                // console.log('父组件接收到子组件通过事件发射来的数据:',data);
                this.section = data.sectionName
            }
        }
    }
</script>
<style>
</style>
登录组件代码
<template>
    <view class="container">
        <!-- F1:用户名输入框组 -->
        <view class="input-group">
            <input v-model="uname" class="input" :focus="unameFocused" type="text" placeholder="用户名/邮箱/电话">
            <uni-icons type="person-filled" size="45rpx"></uni-icons>
        </view>

        <!-- F2:密码输入组 -->
        <view class="input-group">
            <!-- 在小程序或者uniapp中input的type没有password选项 -->
            <input v-model="upwd" class="input" :focus="upwdFocused" :password="hidepwd" placeholder="请输入密码">
            <uni-icons :type="hidepwd ? 'eye-slash-filled' : 'eye-filled'" size="45rpx" @click="hidepwd = !hidepwd"></uni-icons>
            <text class="separator">|</text>
            <!-- TODO:此处应该再创建一个"密码找回"页面 -->
            <navigator url="/pages/search/search">忘记密码</navigator>
        </view>

        <!-- F3:登录按钮 -->
        <button type="primary" class="btn" @click="doLogin">登录</button>

        <!-- F4:还没账号? -->
        <!-- 此处所谓的跳转不是页面跳转,而是在同一个页面中切换不同的组件 -->
        <!-- section:register就表示"跳转到注册页" -->
        <!-- 注意:section不是当前组件的数据,而是父组件,必须采用"给父亲发射事件"方案 -->
        <!-- <text class="jump" @click="section='register'">还没账号?现在去跳转</text>-->
        <text class="jump" @click="$emit('switchSection',{sectionName:'register'})">还没账号?现在去跳转</text>

        <!-- F5:其他登录方式 -->
            <view class="box">
                <span class="line"></span>
                <text class="txt">   其他登录方式   </text>
                <span class="line"></span>
            </view>
            <view class="f5">
                <uni-icons class="icon" type="weixin" color="#01ce0d" size="30"></uni-icons>
                <uni-icons class="icon" type="qq" color="#3399dd" size="30"></uni-icons>
                <uni-icons class="icon" type="weibo" color="#d82b2a" size="30"></uni-icons>
            </view>
    </view>
</template>

<script>
import { userLogin } from '../../servies';
    export default {
        name:"XzLogin",
        data() {
            return {
                hidepwd:true,   //是否隐藏输入框的密码内容
                uname:'yaya',   //用户名
                upwd:'123456',  //密码
                unameFocused:true,  //用户名输入框获得输入焦点
                upwdFocused:false,   //密码输入框获得输入焦点
            };
        },
        mounted() {
            // console.log('登录组件被挂载了');
            uni.setNavigationBarTitle({
                title:'用户登录'
            })
        },
        methods:{
            async doLogin(){   //处理登录操作
                    // console.log('用户输入的登录信息:',this.uname,this.upwd);
                    //1.判断用户时候完成输入了,如果未完成,让对应的输入框获得输入焦点并弹出提示框
                    let uname = this.uname.trim()
                    if(!uname){
                        uni.showToast({
                            title:'用户名不能为空',
                            icon:'error'
                        })
                        this.unameFocused = true
                        this.upwdFocused = false
                        return
                    }
                    let upwd = this.upwd.trim()
                    if(!upwd){
                        uni.showToast({
                            title:'密码不能为空',
                            icon:'error'
                        })
                        this.unameFocused = false
                        this.upwdFocused = true
                        return
                    }

                    //2.提交uname和upwd到服务器端接口,进行登录验证
                    let result = await userLogin(uname,upwd)
                    //console.log(result);

                    //3.如果服务器返回登录失败,则弹出提示,否则,跳转到用户档案
                    if(result.code !==200){  //登录失败
                        uni.showModal({  //显示一个模态对话框
                            title:'错误',
                            content:'登录失败!服务器返回错误信息:' + result.msg,
                            showCancel:false   //不显示"取消按钮"
                        })
                    }else{  //登录成功
                        uni.showToast({
                            title:"欢迎回来"
                        })
                        //客户端保存当前登录的用户登录的身份信息---即令牌(token)
                        uni.setStorageSync('userToken',result.token)
                        //"跳转"到用户当前组件
                        this.$emit('switchSection',{sectionName:'profile'})  //"跳转"到用户当前组件
                    }

            }
        }
    }
</script>

<style lang="scss">
.container{
    padding: $uni-spacing-col-lg*2 $uni-spacing-row-lg*2;
    .input-group{
        display: flex;
        border-bottom: $uni-border-width $uni-border-style $uni-border-color;
        padding: $uni-spacing-col-lg $uni-spacing-row-lg;
        margin-bottom: $uni-spacing-col-lg;
        .input{
            flex: 1;
        }
        .separator{
            margin: 0 $uni-spacing-row-base;
        }
    }
    .btn{
        background-color: $uni-color-primary;
        margin-top:$uni-spacing-col-lg*3;
        margin-bottom:$uni-spacing-col-lg*2;
    }
    .jump{
        color: $uni-text-color-grey;
        &:active{
            color: $uni-text-color;
        }
    }
    .txt{
        display: block;
        text-align: center;
        margin-top: $uni-spacing-col-lg*3;
        margin-bottom:$uni-spacing-col-lg*2;
    }
    .box{
        display: flex;
        align-items: center;
        justify-content: center;
        .line{
             // height:40px;
            height:2px;
            background-color:#e7e7e4;
            flex-grow:1;
        }
        .txt{
             top:0;
             transform:translateY(-5PX);
        }
    }
    .f5{
        display: flex;
        align-items: center;
        justify-content: center;
        .icon{
            display: inline-block;
            margin: 0 $uni-spacing-row-lg;
        }


    }
}
</style>
注册组件代码(未写样式)
<template>
    <view>
        <text>这里是注册组件</text>
        <text @click="$emit('switchSection',{sectionName:'login'})">已有账号?现在去登录</text>
    </view>
</template>

<script>
    export default {
        name:"XzRegister",
        data() {
            return {

            };
        },
        mounted() {
            // console.log('登录组件被挂载了');
            uni.setNavigationBarTitle({
                title:'注册新用户'
            })
        }
    }
</script>

<style>

</style>
个人档案组件代码(样式未写)
<template>
    <view>
        <uni-card title="我的档案">
            <text>{{userInfo}}</text>
            <!-- F1:用户头像 image -->
            <!-- F2:用户详情 uList -->
            <!-- F3:退出按钮 uButton -->
            <button type="default" @click="doLogout">退出登录</button>
        </uni-card>
    </view>
</template>

<script>
import { userGetBasic, userLogout } from '../../servies';
    export default {
        name:"XzUserProfile",
        data() {
            return {
                userInfo:{},    //当前登录用户的详细信息
            };
        },
        async mounted() {
            // console.log('登录组件被挂载了');
            uni.setNavigationBarTitle({
                title:'用户档案'
            })
            //向服务器端口接口请求当前登录用户信息
            let result = await userGetBasic()
            // console.log(result);
            this.userInfo = result
        },
        methods:{
            async doLogout(){
                //提交请求给服务器,完成服务器端的退出登录
                let result = await userLogout()
                // console.log(result);
                //清除客户端保存的身份认证token
                uni.removeStorageSync('userToken')
                //"跳转"回登录组件---子给父传数据,子组件发射自定义事件,修改父组件数据 section
                this.$emit('switchSection',{sectionName:'login'})
            }
        }
    }
</script>
<style>
</style>


 2万+
2万+

 被折叠的 条评论
为什么被折叠?
被折叠的 条评论
为什么被折叠?
 到【灌水乐园】发言


