


1. fixture的声明
我们使用@pytest.fixture()来声明fixture函数。fixture()即可无参数进行声明,也可以带参数声明。
示例1:
@pytest.fixture()无参数进行声明
|
1
2
3
4
5
6
7
|
import pytest
@pytest.fixture #fixture()未带任何参数,声明一个fixture函数
def fixture_demo():
print("这个是一个fixture的demo演示")
def test_demo(fixture_demo): #调用fixture函数——fixture_demo
print("这是一个测试demo。")
|
@pytest.fixture()有参数的进行声明
通过上文pytest中fixtureAPI简单说明,我们对fixture()的参数有了一定了解。fixture()可以带着这些参数去声明一个fixture函数。
|
1
2
3
4
5
6
7
8
|
import pytest
@pytest.fixture(params=[1,2,3]) #fixture()带着parmas对ids()进行fixture函数的声明
def ids(request):
data=request.param
print(f'获取测试数据{data}')
return data
def test_ids(ids): #调用fixture函数-ids()
print(ids)
|
2. fixture的调用
2.1 fixture的调用方式
fixture有三种调用方式,分别为:
1. 使用 fixturename
2. 使用@pytest.mark.usefixtures(“fixturename”)
3. autouse——自动应用
2.1.1 使用fixturename
通过pytest中fixtureAPI简单说明中对@fixture()参数的介绍,我们知道fixturename默认是@pytest.fixture()所装饰的函数的函数名,如果传入name参数,则fixturename就是name传入的内容。
当要调用fixture的时候,只要将fixturename作为参数传入测试函数即可。
示例2:
1.使用被装饰的函数的函数名
|
1
2
3
4
5
6
|
import pytest
@pytest.fixture() #未传入name,因此fixturename为函数名login
def login():
print('login')
def test_case1(login): #将fixturename作为参数传入
print('这是testcase1')
|
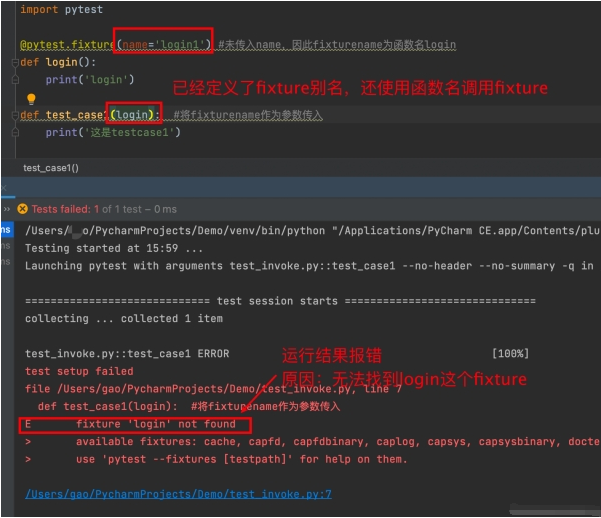
2.使用fixture别名
|
1
2
3
4
5
6
|
import pytest
@pytest.fixture(name='login1') #传入name,因此fixturename为login1
def login():
print('login')
def test_case1(login1): #将fixturename作为参数传入
print('这是testcase1')
|
注意:
当使用fixture的别名后,被装束函数的函数名失效,无法再继续使用其进行fixture的调用。
2.1.2 使用@pytest.mark.usefixtures("fixturename")
根据pytest官方文档的介绍,如果想让某个fixture适用于类、模块和项目中所有测试函数的话,会使用usefixtures来调用fixture。当然,单个测试函数也可以使用此方法来调用fixture。
使用usefixtures调用fixture和直接使用fixturename来调用fixture是有区别的,可总结为:
使用usefixtures调用的fixture只能用于配置测试前系统的初始状态,无法为测试用例提供测试数据;但使用fixturename调用的fixture却可以实现这两个功能。
示例:
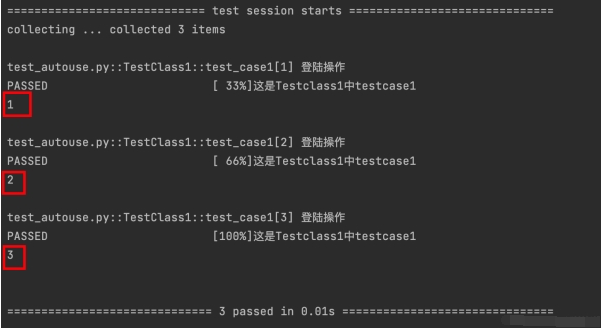
1.声明一个名为login的fixture,并通过fixture()传入测试数据集。test_case1使用usefixtures的方法调用login,并且在函数内部想要打印login的返回值。
| 1 2 3 4 5 6 7 8 9 10 |
|
运行后发现,结果和我们预期的不一样,print(login)打印出的是函数对象信息,不是返回值。
2.修改刚刚的代码,使用fixturename来调用login
| 1 2 3 4 5 6 7 8 9 10 |
|
运行后我们可以发现,结果和我们预期的一致,把login的返回值成功打印出来。
usefixtures调用fixture的方法只适用于测试函数,对于fixture函数不生效;使用fixturename调用fixture的方法对测试函数和fixture函数都适用。
示例:
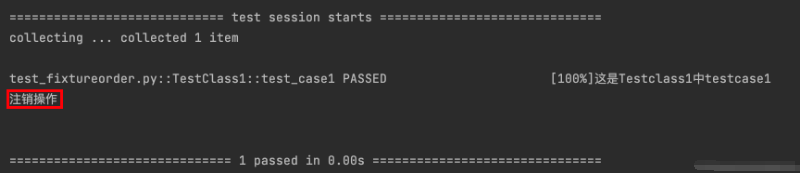
1.以下demo想要实现执行测试用例前打印“登陆操作”,用例执行结束后打印“注销操作”。声明login和logout为fixture函数,并且让logout使用usefixtures的方法调用login,再让test_case1调用logout。
| 1 2 3 4 5 6 7 8 9 10 |
|
通过运行结果我们发现,结果只在执行测试函用例后打印了“注销操作”,与我们预期的结果不一致。
2.修改上面的demo代码,让logout使用fixturename的方式调用login。
| 1 2 3 4 5 6 7 8 9 10 11 12 13 |
|
运行后我们发现,结果与我们预期的一致。

由此可以看出来,userfixtures的调用方法对于fixture函数无效。
下面我们将通过示例来演示userfixtures的使用方法:
为了演示效果,我们新建一个包,并在里面创建一个conftest.py。用于定义fixture函数。关于conftest.py的相关内容,后面会单独写一遍文章详细介绍。

在conftest.py中声明的一个login函数。
| 1 2 3 4 5 |
|
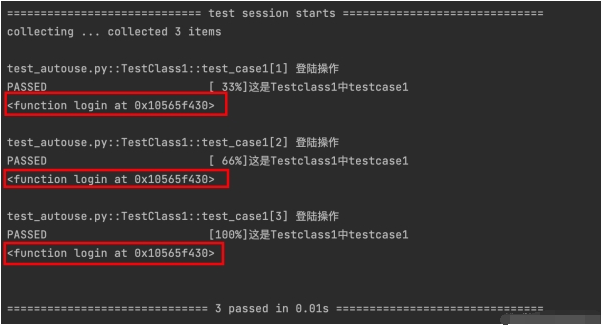
1.整个类中应用fixture
使用usefixtures,让TestClass1这个类中所有测试函数都调用login。
| 1 2 3 4 5 6 7 8 9 10 |
|
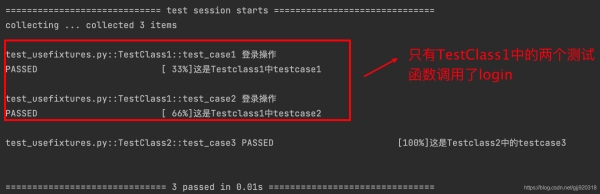
运行结果:
通过结果我们可以发现,只有TestClass1中的test_case1和test_case2调用了login。
2.整个模块应用fixture
根据官方文档说明,在整个模块中应用fixture,可在模块使用
pytestmark=pytest.mark.usefixtures("fixturename")。
修改测试代码如下:
| 1 2 3 4 5 6 7 8 9 10 |
|
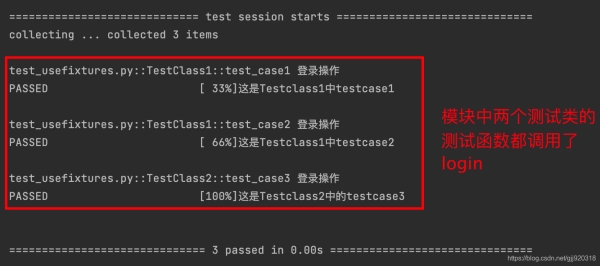
运行结果:
通过运行结果可发现,整个模块中,所有测试类里面的测试函数都调用了login。
3.整个项目中使用
在pytest.ini中配置usefixtures。
演示项目结构如图:
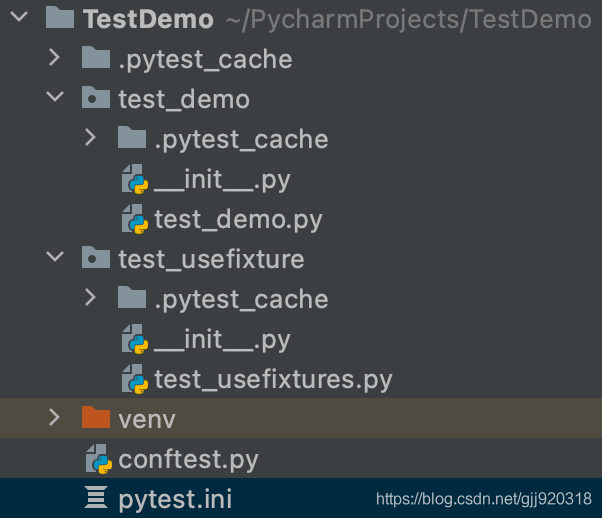
对应文件中的代码如下:
test_demo中的test_demo.py:
| 1 2 3 4 5 6 |
|
test_usefixtures中的test_usefixtures.py:
| 1 2 3 4 5 6 |
|
TestDemo根目录下的conftest.py:
| 1 2 3 4 5 6 |
|
TestDemo根目录下的pytest.ini:
| 1 2 |
|
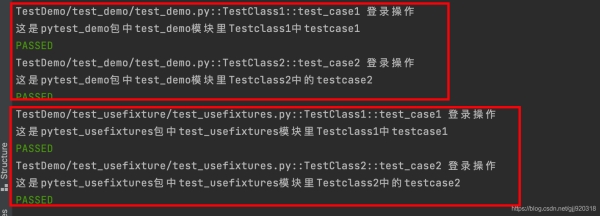
运行整个项目:
项目中的测试函数都调用了conftest.py中的login。
4.使用usefixtures调用多个fixture
我们可以使用@pytest.mark.usefixtures('fixturename1','fixturename2')来调用多个fixture。
conftest.py中新增一个fixture:
| 1 2 3 4 5 6 7 |
|
修改test_usefixtures.py:
| 1 2 3 4 |
|
运行后结果:
test_case1测试函数调用login和printids两个fixture。

2.1.3 autouse——自动应用
fixture()的autouse参数,是fixture自动应用的标识。
如果autouse=True,则在同作用域下的测试函数,会自动调用该fixture;如果autouse=False,则测试函数需要主动去调用该fixture。
autouse默认是False。
示例4:
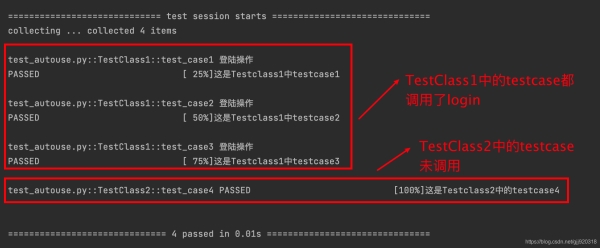
1.在TestClass1这个类中定义了一个login函数,声明为fixture,并且autouse设置为True。
TestClass1中的test_case1主动调用了login,但是其他测试函数未主动调用。
我们还写了一个TestClass2类,类中有一个test_case4的测试函数。
| 1 2 3 4 5 6 7 8 9 10 11 12 13 14 |
|
运行结果:
通过运行结果我们可以知道,当fixture的autouse=True的时候,在同作用域内的测试函数会自动调用fixture,非同作用域内的测试函数无法调用。
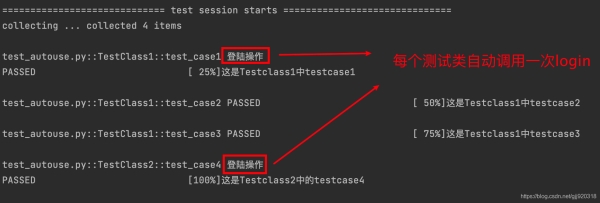
2.我们给fixture()带上更多的参数,修改上面的demo,并设置fixture的scope=‘class'。
| 1 2 3 4 5 6 7 8 9 10 11 12 13 14 |
|
运行结果:
通过运行结果我们可以看出,当设置login的scope=‘class'的使用,每一个测试类都会自动调用一次login。
autouse的使用也是遵照fixture函数的设置来进行的。
2.2 fixture使用的灵活性
通过官方文档的说明,我们知道了pytest的fixture系统是极其的灵活和强大的,官方文档也为我们以下几个灵活使用fixture的例子。
2.2.1 一个fixture函数可以调用其他的fixture
文章前面我们有演示过一个fixture函数调用其他fixture的例子。
代码如下:
| 1 2 3 4 5 6 7 8 9 10 11 12 |
|
login()实现了测试执行的前置操作,logout()实现了测试执行的后置操作。logout()调用了login,测试函数则直接调用了logout。
fixture在执行的时候是依次执行的。假如fixture A 调用了fixture B,那么执行的时候会先执行fixture B,然后再执行fixture A。因为fixture B是fixture A的依赖条件。
所以我们运行上面代码的时候,是会先调用login()然后再调用logout()的。而logout()中的yield会让测试用例执行的时候先执行login中的测试前置操作,然后再执行测试用例中的内容,最后执行logout中yield后面测试后置操作。
这样的一个操作,可以将复杂的测试需求,变成一个一个简单而又有组织性的的功能函数,更加方便后期进行维护。
2.2.2 fixture函数可被反复重用
两个不同的测试函数可以调用同一个fixture,并且获得各自的运行结果。测试函数之间并不会因为调用了同一个fixture而相互之间产生任何影响。
示例5:
演示代码:
| 1 2 3 4 5 6 7 8 9 10 11 12 13 14 15 |
|
运行结果:
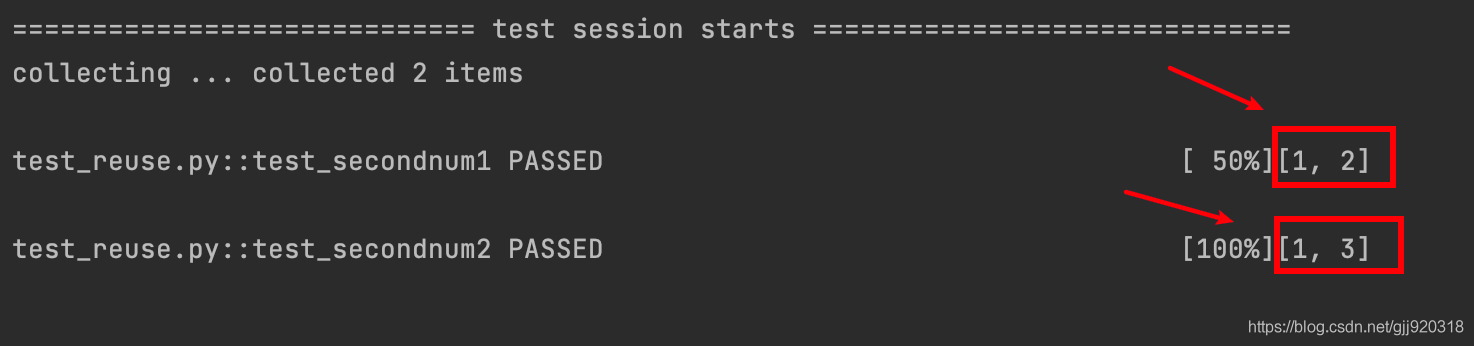
上面这段代码我们声明了:
两个fixture——first_number和order。first_number有一个返回值: 1 ;order调用了first_number,并返回一个列表: [1] 。
我们还定义了:
两个测试函数——test_secondnum1和test_secondnum2,这两个测试函数都调用了order。
test_secondnum1对order的返回值做了一个append(2)的操作;test_secondnum1对order的返回值做了一个append(3)的操作。
根据运行结果我们可以看出,两个测试函数对调用的fixture都做出了各自的操作,并且得到各自的一个运行结果。两者的运行结果没有因为都调用了order而相互产生影响。
fixture可被反复重用这一特点,对于确保测试之间彼此不受影响是非常有用的。我们可以声明一个通用的fixture函数,并使用这个特性来确保每个测试都能得到未受污染的测试数据,并且能从一个干净的初始状态开始执行。
2.2.3 测试函数/fixture函数可以一次调用多个fixture
文章前面我们有介绍过如何使用usefixtures来调用多个fixture,由此我们可以知道,pytest是允许测试函数和fixture函数按照自己的需求一次调用多个fixture的。
示例6:
演示代码:
| 1 2 3 4 5 6 7 8 9 10 11 12 13 14 15 16 17 18 19 20 21 22 23 |
|
运行结果:

演示代码中我们声明了:
四个fixture——first_number、second_number、third_number和order;
一个测试函数——test_case。
order 调用了first_number和second_number;test_case调用了order和third_number。他们都根据自己的需求调用了多个fixture,并且正常被执行。
2.2.4 同一测试执行期间,fixture可被多次请求
其实在看官方文档的时候,我有点不太理解这部分的内容。当时看文字的描述感觉与“fixture能够被重复调用“这一点有冲突,但是通过官方文档的代码示例,我才明白这两点其实是不冲突的。
下面我们先看一下官方示例。
示例7:
演示代码:
| 1 2 3 4 5 6 7 8 9 10 11 12 13 14 15 16 17 |
|
运行结果:
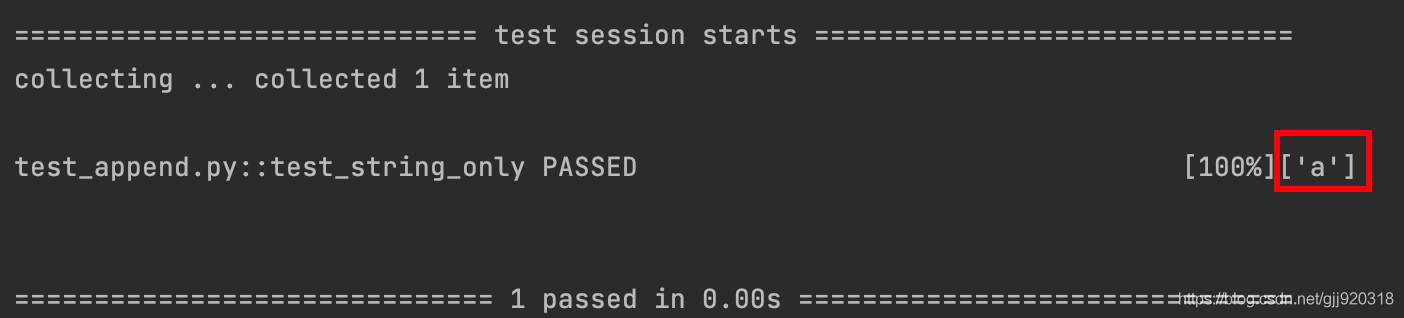
示例代码中声明了:
三个fixture函数——first_entry、order和append_first;
一个测试函数——test_string_only。
first_entry返回了一个str: "a";order返回一个空list:[];append_first调用了first_entry和order,并且返回 order.append(first_entry)。
test_string_only调用了first_entry、order和append_first,并做了一个打印order值的操作和断言操作。
通过运行结果我们可以看到,test_string_only断言成功,并且打印的order的值是['a']。
如果按照”fixture能够被重复调用“这一特点看,打印的order不应该是空list的吗?为什么会是[‘a']呢?
test_string_only在执行期间,先执行append_first,而append_first调用了order,并且对order进行了添加元素的操作,更改了order的值,此时order返回的值会存在缓存中。当test_string_only后面再去”调用“order的时候,其实和append_first引用的是同一个order对象,因此测试断言才会成功。
通过pytest官方文档我们知道,pytest一次只缓存一个fixture的实例,这意味着在使用参数化fixture时,pytest可以在给定范围内多次调用一个fixture。
当测试过程中先调用的fixture对其他fixture有依赖关系的话,在调用这个fixture的时候它所依赖的fixture也会被调用。所以后面测试执行过程中,如果再次有请求到这些fixture的话,fixture就不会被再次执行,此时会直接从缓存中获取到之前fixture执行后返回的数据来使用。
“fixture能够被重复调用“——针对不同的测试过程,目的是为了保障每个测试执行时都是一个干净的环境。
“同一测试执行期间,fixture可被多次请求”——同一测试过程中,目的是为了保障在测试过程中,前后使用的数据不会被重置。
现在我也找了很多测试的朋友,做了一个分享技术的交流群,共享了很多我们收集的技术文档和视频教程。
如果你不想再体验自学时找不到资源,没人解答问题,坚持几天便放弃的感受
可以加入我们一起交流。而且还有很多在自动化,性能,安全,测试开发等等方面有一定建树的技术大牛
分享他们的经验,还会分享很多直播讲座和技术沙龙
可以免费学习!划重点!开源的!!!
qq群号:485187702【暗号:csdn11】最后感谢每一个认真阅读我文章的人,看着粉丝一路的上涨和关注,礼尚往来总是要有的,虽然不是什么很值钱的东西,如果你用得到的话可以直接拿走! 希望能帮助到你!【100%无套路免费领取】


 435
435


 被折叠的 条评论
为什么被折叠?
被折叠的 条评论
为什么被折叠?
 到【灌水乐园】发言


