


一、Swagger2介绍
前后端分离开发模式中,api文档是最好的沟通方式。
Swagger 是一个规范和完整的框架,用于生成、描述、调用和可视化 RESTful 风格的 Web 服
务。
1.
及时性
(接口变更后,能够及时准确地通知相关前后端开发人员)
2.
规范性
(并且保证接口的规范性,如接口的地址,请求方式,参数及响应格式和错误信息)
3.
一致性
(接口信息一致,不会出现因开发人员拿到的文档版本不一致,而出现分歧)
4.
可测性
(直接在接口文档上进行测试,以方便理解业务)
二、配置Swagger2
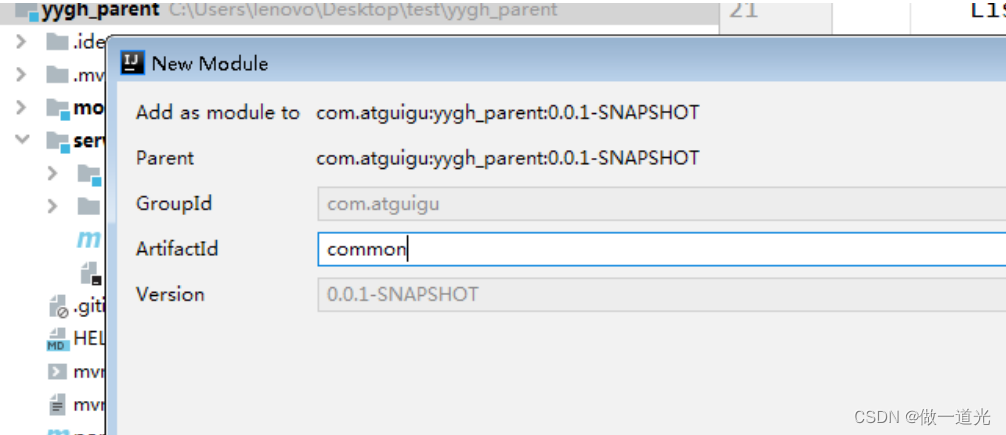
1
、创建
common
模块
在
yygh_parent
下创建模块
common
配置:
groupId
:
com.atguigu
arƟ factId
:
common
2、在common中引入相关依赖
1
<dependencies>
2
<dependency>
3
<groupId>
org.springframework.boot
</groupId>
4
<artifactId>
spring-boot-starter-web
</artifactId>
5
<scope>
provided
</scope>
6
</dependency>
7
8
<!--mybatis-plus-->
9
<dependency>
10
<groupId>
com.baomidou
</groupId>
11
<artifactId>
mybatis-plus-boot-starter
</artifactId>
12
<scope>
provided
</scope>
13
</dependency>
14
15
<!--lombok
用来简化实体类:需要安装
lombok
插件
-->
16
<dependency>
17
<groupId>
org.projectlombok
</groupId>
18
<artifactId>
lombok
</artifactId>
19
</dependency>
20
21
<!--swagger-->
22
<dependency>
23
<groupId>
io.springfox
</groupId>
24
<artifactId>
springfox-swagger2
</artifactId>
25
</dependency>
26
<dependency>
27
<groupId>
io.springfox
</groupId>
28
<artifactId>
springfox-swagger-ui
</artifactId>
29
</dependency>
30
31
<dependency>
32
<groupId>
com.alibaba
</groupId>
33
<artifactId>
fastjson
</artifactId>
34
</dependency>
35
</dependencies>
3、在common下面创建子模块service_utils
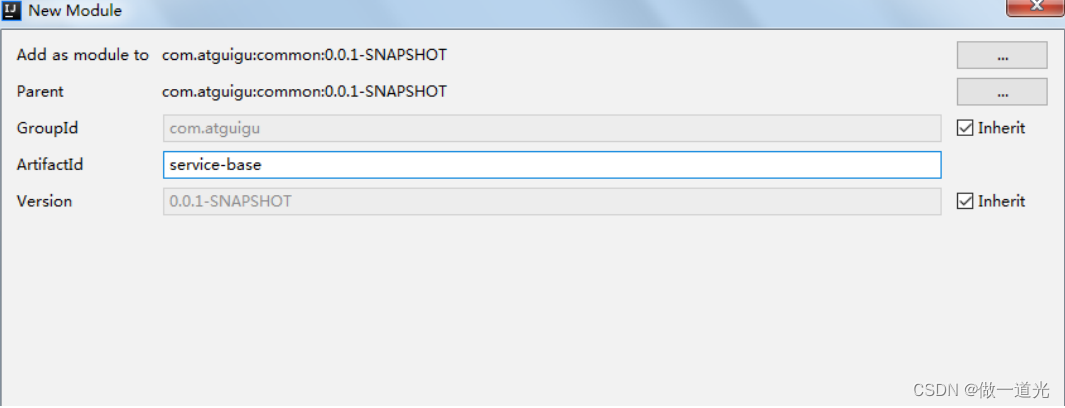
3
、在模块
service-base
中,创建
swagger
的配置类
创建包
com.atguigu.yygh.common.config
,创建类
Swagger2Config
1
@Configuration
2
@EnableSwagger2
3
public class
Swagger2Config
{
4
@Bean
5
public
Docket webApiConfig(){
6
return new
Docket(DocumentationType.SWAGGER_2)
7
.groupName(
"webApi"
)
8
.apiInfo(webApiInfo())
9
.select()
10
//
只显示
api
路径下的页面
11
//.paths(Predicates.and(PathSelectors.regex("/api/.*")))
12
.build();
13
}
14
15
@Bean
16
public
Docket adminApiConfig(){
17
return new
Docket(DocumentationType.SWAGGER_2)
18
.groupName(
"adminApi"
)
19
.apiInfo(adminApiInfo())
20
.select()
21
//
只显示
admin
路径下的页面
22
.paths(Predicates.and(PathSelectors.regex(
"/admin/.*"
)))
23
.build();
24
}
25
26
private
ApiInfo webApiInfo(){
27
return new
ApiInfoBuilder()
28
.title(
"
网站
-API
文档
"
)
29
.description(
"
本文档描述了网站微服务接口定义
"
)
30
.version(
"1.0"
)
31
.contact(
new
Contact(
"atguigu"
,
"http://atguigu.com"
,
"493211102@qq.c
32
.build();
33
}
34
35
private
ApiInfo adminApiInfo(){
36
return new
ApiInfoBuilder()
37
.title(
"
后台管理系统
-API
文档
"
)
38
.description(
"
本文档描述了后台管理系统微服务接口定义
"
)
39
.version(
"1.0"
)
40
.contact(
new
Contact(
"atguigu"
,
"http://atguigu.com"
,
"49321112@qq.co
41
.build();
42
}
43
}
4
、在模块
service
模块中引入
service_utils
1
<dependency>
2
<groupId>
com.atguigu
</groupId>
3
<artifactId>
service_utils
</artifactId>
4
<version>
0.0.1-SNAPSHOT
</version>
5
</dependency>
5
、在
service_hosp
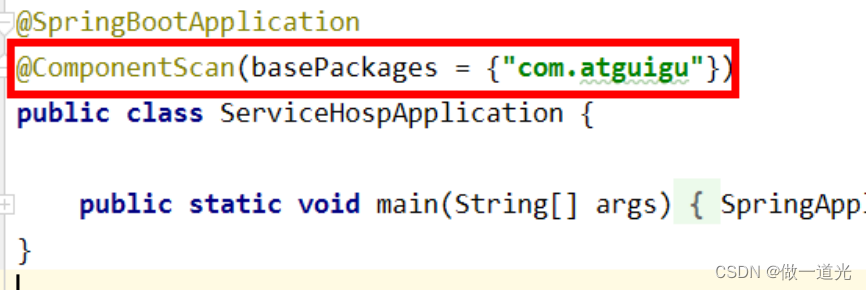
启动类上添加注解,进行测试
6、通过地址访问测试

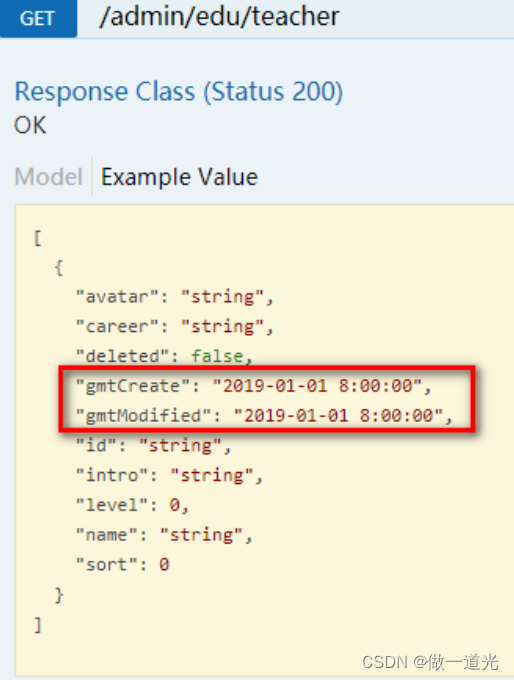
可以添加一些自定义设置,例如:
定义样例数据
1
@ApiModelProperty
(value =
"
创建时间
"
, example =
"2019-01-01 8:00:00"
)
2
@TableField
(fill = FieldFill.INSERT)
3
private
Date gmtCreate;
4
5
@ApiModelProperty
(value =
"
更新时间
"
, example =
"2019-01-01 8:00:00"
)
6
@TableField
(fill = FieldFill.INSERT_UPDATE)
7
private
Date gmtModified;
5、定义接口说明和参数说明
定义在方法上:
@ApiOperation
定义在参数上:
@ApiParam
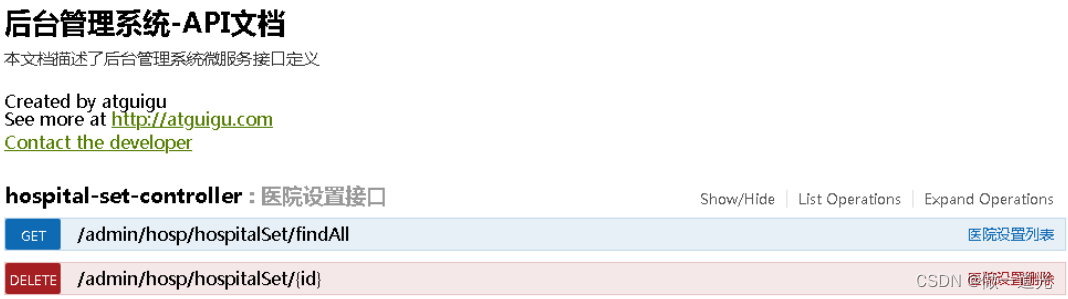
1
//
医院设置接口
2
@Api
(description =
"
医院设置接口
"
)
3
@RestController
4
@RequestMapping
(
"/admin/hosp/hospitalSet"
)
5
public class
HospitalSetController
{
6
7
@Autowired
8
private
HospitalSetService hospitalSetService;
9
10
//
查询所有医院设置
11
@ApiOperation
(value =
"
医院设置列表
"
)
12
@GetMapping
(
"findAll"
)
13
public
List<HospitalSet> findAll() {
14
List<HospitalSet> list = hospitalSetService.list();
15
return
list;
16
}
17
18
@ApiOperation
(value =
"
医院设置删除
"
)
19
@DeleteMapping
(
"{id}"
)
20
public
boolean removeById(
@ApiParam
(name =
"id"
, value =
"
讲师
ID"
, required =
tru
21
return
hospitalSetService.removeById(id);
22
}
23
}


 2693
2693


 被折叠的 条评论
为什么被折叠?
被折叠的 条评论
为什么被折叠?
 到【灌水乐园】发言


