


随板AC方案:核心交换机做有线无线用户认证点,业务随行
案例描述
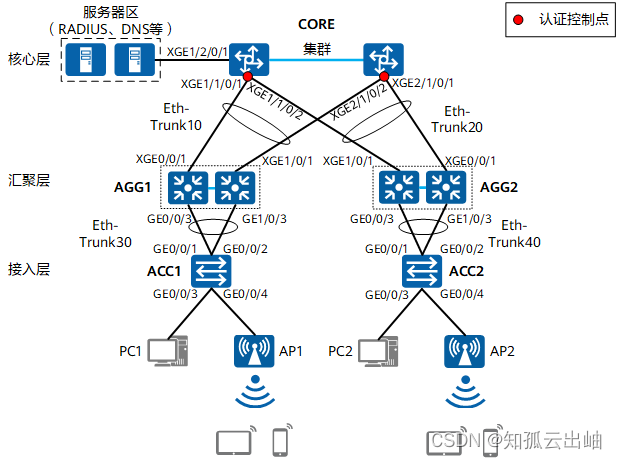
核心层交换机组建集群,作为整个园区网络的核心,实现网络高可靠性和网络大数据量转发,同时配置随板AC管理全网的AP,承载全网的无线业务,实现有线无线深度融合。汇聚层交换机组建堆叠,实现设备级备份的同时,也扩展了设备的端口密度和转发带宽。
本案例中,核心交换机作为全网有线无线用户的网关和认证点,有线用户和无线用户在核心交换机认证通过后才能接入网络。其中:
- Agile Controller-Campus作为接入认证服务器和用户业务数据源服务器,采用集中式认证服务器部署方案。
- 用户角色包括员工(包括有线和无线)和访客(仅无线),员工使用802.1X认证、访客使用MAC优先的Portal认证。
- 采用业务随行方案,通过在Agile Controller-Campus上配置安全组+组间策略控制用户访问权限。
设备要求和版本
| 位置 | 设备要求 | 本案例使用的设备 | 本案例使用的版本 |
|---|---|---|---|
| 核心层 |
| S12700E | V200R019C10 |
| 汇聚层 | - | S5731-H | |
| 接入层 | - | S5735-L | |
| AP | - | AP6050DN | V200R019C00 |
部署思路
| 步骤 | 部署思路 | 涉及设备 |
|---|---|---|
| 1 | 配置AAA,包括:配置RADIUS服务器模板、AAA方案和认证域,用来指定用户使用RADIUS进行认证、授权和计费,以及设备与RADIUS服务器对接的各项参数。 | 核心交换机(CORE) |
| 2 | 配置认证前域、认证后域,实现用户在认证通过前、认证通过后和Agile Controller-Campus故障时具备相应的权限。 | 核心交换机(CORE) |
| 3 | 配置员工使用802.1X认证。 | 核心交换机(CORE) |
| 4 | 配置访客使用MAC优先的Portal认证。 | 核心交换机(CORE) |
| 5 | 配置与Agile Controller-Campus对接的XMPP参数,开启业务随行功能。 | 核心交换机(CORE) |
| 6 | 配置802.1X报文透传功能。 | 汇聚交换机(AGG1、AGG2)、接入交换机(ACC1、ACC2) |
| 7 | 登录Agile Controller,包括:
| Agile Controller-Campus |
数据规划
| 项目 | VLAN ID | 网段 |
|---|---|---|
| 无线AP管理VLAN | VLAN 20 | 192.168.20.0/24 |
| 无线用户的业务VLAN | VLAN 30 | 172.16.30.0/24 |
| VLAN 40 | 172.16.40.0/24 | |
| 有线用户的业务VLAN(PC1) | VLAN 50 | 172.16.50.0/24 |
| 有线用户的业务VLAN(PC2) | VLAN 60 | 172.16.60.0/24 |
| 连接服务器的VLAN | VLAN 1000 | 192.168.11.254/24 |
| 项目 | 数据 |
|---|---|
| AP组 | ap-group1 |
| 域管理模板 | domain1 |
| SSID模板 | test01、test02 |
| VAP模板 | vap1、vap2、隧道转发方式 |
| 项目 | 数据 |
|---|---|
| AAA方案 |
认证方案:
计费方案:
|
| RADIUS服务器 |
|
| Portal服务器 |
|
| 802.1X接入模板 |
|
| Portal接入模板 | 名称:web1 |
| MAC接入模板 | 名称:mac1 |
| 认证前域 | 员工和访客认证通过前能够将域名发往DNS服务器(IP地址为192.168.11.2)进行解析。 |
| 项目 | 数据 |
|---|---|
| 核心交换机IP地址 | 192.168.11.254 |
| RADIUS参数 |
|
| Portal参数 |
|
| XMPP密码 | YsHsjx_202206 |
| 账户 |
员工:
访客:
|
| 安全组 |
|
| 认证后域 |
|
部署注意事项
-
业务随行仅在NAC统一配置模式下支持。
-
本例中的Agile Controller-Campus以V100R003C50版本为例。
其他注意事项请参见对应款型“使用注意事项合集”中的“业务随行使用注意事项”。
部署步骤
- 基础网络连通部署,请参见随板AC方案:核心交换机做有线无线用户网关。
对于无线用户,不同的用户接入认证方式对应安全模板的安全策略不同:
用户接入认证方式
安全策略
MAC认证、Portal认证
开放认证
802.1X认证
WPA/WPA2-802.1X认证,本案例中使用的是WPA2认证模式
员工使用802.1X认证,对应的安全模板“sec1”配置如下:
<span style="color:#333333"><span style="background-color:#dddddd">[CORE-wlan-sec-prof-sec1] <strong>security wpa2 dot1x aes</strong></span></span>访客使用MAC优先的Portal认证,对应的安全模板“sec2”配置如下:
<span style="color:#333333"><span style="background-color:#dddddd"> [CORE-wlan-sec-prof-sec2] <strong>security open</strong></span></span> - 在核心交换机上,配置AAA。
# 配置RADIUS服务器模板“tem_rad”,指定核心交换机与RADIUS服务器的对接参数。包括RADIUS认证服务器和RADIUS计费服务器的IP地址、端口号和共享密钥。
<span style="color:#333333"><span style="background-color:#dddddd"><CORE> <strong>system-view</strong>
[CORE] <strong>radius-server template tem_rad</strong>
[CORE-radius-tem_rad] <strong>radius-server authentication 192.168.11.1 1812</strong>
[CORE-radius-tem_rad] <strong>radius-server accounting 192.168.11.1 1813</strong>
[CORE-radius-tem_rad] <strong>radius-server shared-key cipher YsHsjx_202206</strong>
[CORE-radius-tem_rad] <strong>quit</strong></span></span>
# 配置RADIUS授权服务器。
<span style="color:#333333"><span style="background-color:#dddddd">[CORE] <strong>radius-server authorization 192.168.11.1 shared-key cipher YsHsjx_202206 </strong></span></span># 配置AAA方案,指定认证、授权和计费方式均为RADIUS,计费时间间隔为15分钟。<span style="color:#333333"><span style="background-color:#dddddd">[CORE] <strong>aaa</strong> [CORE-aaa] <strong>authentication-scheme auth</strong> [CORE-aaa-authen-auth] <strong>authentication-mode radius</strong> [CORE-aaa-authen-auth] <strong>quit</strong> [CORE-aaa] <strong>accounting-scheme acco </strong> [CORE-aaa-accounting-acco] <strong>accounting-mode radius</strong> [CORE-aaa-accounting-acco] <strong>accounting realtime 15</strong> [CORE-aaa-accounting-acco] <strong>quit</strong></span></span># 配置域“huawei.com”,在域下绑定AAA方案和RADIUS服务器模板。<span style="color:#333333"><span style="background-color:#dddddd">[CORE-aaa] <strong>domain huawei.com</strong> [CORE-aaa-domain-huawei.com] <strong>authentication-scheme auth</strong> [CORE-aaa-domain-huawei.com] <strong>accounting-scheme acco</strong> [CORE-aaa-domain-huawei.com] <strong>radius-server tem_rad </strong> [CORE-aaa-domain-huawei.com] <strong>quit</strong> [CORE-aaa] <strong>quit</strong></span></span> - 在核心交换机上,配置认证前域,放通到DNS服务器的报文。
<span style="color:#333333"><span style="background-color:#dddddd">[CORE] <strong>free-rule-template name default_free_rule</strong> [CORE-free-rule-default_free_rule] <strong>free-rule 1 destination ip 192.168.11.2 mask 32</strong> [CORE-free-rule-default_free_rule] <strong>quit</strong></span></span> - 在核心交换机上,配置员工使用802.1X认证。
# 将NAC配置模式切换成统一模式。
设备默认为统一模式。通过命令display authentication mode查看设备当前的认证模式。传统模式与统一模式相互切换后,设备会自动重启。
<span style="color:#333333"><span style="background-color:#dddddd">[CORE] <strong>authentication unified-mode</strong></span></span># 配置802.1X接入模板。<span style="color:#333333"><span style="background-color:#dddddd">[CORE] <strong>dot1x-access-profile name d1</strong> [CORE-dot1x-access-profile-d1] <strong>dot1x authentication-method</strong><strong> eap</strong> [CORE-dot1x-access-profile-d1] <strong>quit</strong></span></span># 配置员工使用的认证模板。
<span style="color:#333333"><span style="background-color:#dddddd">[CORE] <strong>authentication-profile name p1</strong>
[CORE-authen-profile-p1] <strong>dot1x-access-profile d1</strong>
[CORE-authen-profile-p1] <strong>free-rule-template default_free_rule</strong>
[CORE-authen-profile-p1] <strong>access-domain huawei.com force</strong> <span style="color:#00b050"> //配置域huawei.com为强制域</span>
[CORE-authen-profile-p1] <strong>quit</strong></span></span>
# 在下行接口Eth-trunk10和Eth-trunk20上,配置有线员工使用802.1X认证。
<span style="color:#333333"><span style="background-color:#dddddd">[CORE] <strong>interface eth-trunk 10</strong>
[CORE-Eth-Trunk10] <strong>authentication-profile p1</strong>
[CORE-Eth-Trunk10] <strong>quit</strong>
[CORE] <strong>interface eth-trunk 20</strong>
[CORE-Eth-Trunk20] <strong>authentication-profile p1</strong>
[CORE-Eth-Trunk20] <strong>quit</strong></span></span>
# 在VAP模板VAP1上,配置无线员工使用802.1X认证。
<span style="color:#333333"><span style="background-color:#dddddd">[CORE] <strong>wlan</strong> [CORE-wlan-view] <strong>vap-profile name vap1</strong> [CORE-wlan-vap-prof-vap1] <strong>authentication-profile p1 </strong> [CORE-wlan-vap-prof-vap1] <strong>quit</strong> [CORE-wlan-view] <strong>quit</strong></span></span> - 在核心交换机上,配置访客使用MAC优先的Portal认证。
# 配置Portal服务器模板“tem_portal”。指定核心交换机与Portal服务器的对接参数。包括Portal服务器的IP地址、端口号和共享密钥。
<span style="color:#333333"><span style="background-color:#dddddd">[CORE] <strong>web-auth-server tem_portal </strong>
[CORE-web-auth-server-tem_portal] <strong>server-ip 192.168.11.1</strong>
[CORE-web-auth-server-tem_portal] <strong>port 50200</strong>   <span style="color:#00b050">//Agile Controller-Campus作为Portal服务器时端口固定为50200</span>
[CORE-web-auth-server-tem_portal] <strong>shared-key cipher YsHsjx_202206</strong>
[CORE-web-auth-server-tem_portal] <strong>url http://192.168.11.1:8080/portal</strong>
[CORE-web-auth-server-tem_portal] <strong>quit</strong> </span></span>
# 配置Portal接入模板。
<span style="color:#333333"><span style="background-color:#dddddd">[CORE] <strong>portal-access-profile name web1</strong>
[CORE-portal-acces-profile-web1] <strong>web-auth-server tem_portal direct</strong>
[CORE-portal-acces-profile-web1] <strong>quit</strong></span></span>
# 配置MAC接入模板。
<span style="color:#333333"><span style="background-color:#dddddd">[CORE] <strong>mac-access-profile name mac1</strong>
[CORE-mac-access-profile-mac1] <strong>quit</strong></span></span>
# 配置访客使用的认证模板。
<span style="color:#333333"><span style="background-color:#dddddd">[CORE] <strong>authentication-profile name p2 </strong>
[CORE-authen-profile-p2] <strong>portal-access-profile web1</strong>
[CORE-authen-profile-p2] <strong>mac-access-profile mac1</strong>
[CORE-authen-profile-p2] <strong>free-rule-template default_free_rule</strong>
[CORE-authen-profile-p2] <strong>access-domain huawei.com force </strong> <span style="color:#00b050">//配置域huawei.com为强制域</span>
[CORE-authen-profile-p2] <strong>quit</strong></span></span>
# 在VAP模板VAP2上,配置访客使用MAC优先的Portal认证。
<span style="color:#333333"><span style="background-color:#dddddd">[CORE] <strong>wlan</strong> [CORE-wlan-view] <strong>vap-profile name vap2</strong> [CORE-wlan-vap-prof-vap2] <strong>authentication-profile p2</strong> [CORE-wlan-vap-prof-vap2] <strong>quit</strong> [CORE-wlan-view] <strong>quit</strong></span></span> - 配置与Agile Controller-Campus对接的XMPP参数,使能业务随行功能。
<span style="color:#333333"><span style="background-color:#dddddd">[CORE] <strong>group-policy controller 192.168.11.1 password YsHsjx_202206 src-ip 192.168.11.254</strong> <span style="color:#00b050">//scr-ip</span><span style="color:#00b050">为VLANIF1000的IP地址</span></span></span> - 在汇聚交换机和接入交换机上配置802.1X透传。以接入交换机ACC1(S5735-L)为例,其他交换机配置与之类似。
对于支持bpdu enable命令的交换机,接口下需配置命令bpdu enable和命令l2protocol-tunnel user-defined-protocol 802.1x enable命令即可。
<span style="color:#333333"><span style="background-color:#dddddd">[ACC1] <strong>l2protocol-tunnel user-defined-protocol 802.1x protocol-mac 0180-c200-0003 group-mac 0100-0000-0002</strong> [ACC1] <strong>interface eth-trunk 30</strong><strong> </strong> [ACC1-Eth-Trunk30] <strong>l2protocol-tunnel user-defined-protocol 802.1x enable</strong> [ACC1-Eth-Trunk30] <strong>quit </strong> [ACC1] <strong>interface gigabitethernet 0/0/3</strong> [ACC1-GigabitEthernet0/0/3] <strong>l2protocol-tunnel user-defined-protocol 802.1x enable</strong> [ACC1-GigabitEthernet0/0/3]<strong> quit </strong> [ACC1] <strong>interface gigabitethernet 0/0/4 </strong> [ACC1-GigabitEthernet0/0/4] <strong>l2protocol-tunnel user-defined-protocol 802.1x enable </strong> [ACC1-GigabitEthernet0/0/4] <strong>quit</strong></span></span> - 配置Agile Controller-Campus。
-
添加交换机设备。
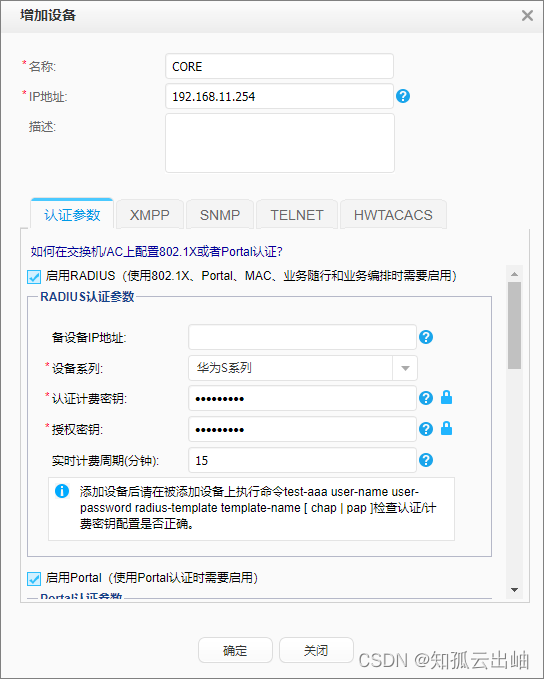
表5 Agile Controller-Campus与核心交换机(CORE)参数对应关系 Agile Controller-Campus参数
Agile Controller-Campus取值
核心交换机CORE上的配置
名称
CORE
-
IP地址
192.168.11.254
核心交换机与Agile Controller-Campus通信的VLANIF1000接口IP地址
设备系列
华为S系列
-
认证计费密钥
YsHsjx_202206
radius-server shared-key cipher YsHsjx_202206
授权密钥
YsHsjx_202206
radius-server authorization 192.168.11.1 shared-key cipher YsHsjx_202206
实时计费周期
15
accounting realtime 15
端口
2000
核心交换机缺省使用2000,可在系统视图执行命令web-auth-server listening-port port-number修改
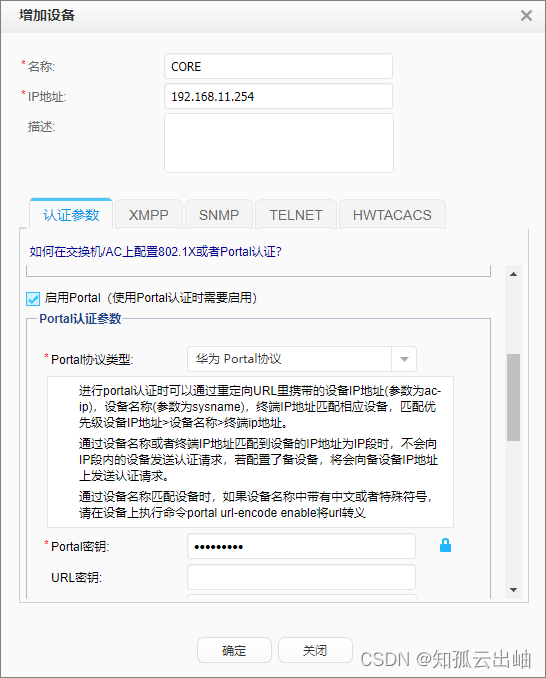
Portal密钥
YsHsjx_202206
shared-key cipher YsHsjx_202206
接入终端IP地址列表
172.16.30.0/24;172.16.40.0/24
访客的IP地址列表,对应VLANIF30和VLANIF40接口的IP地址池
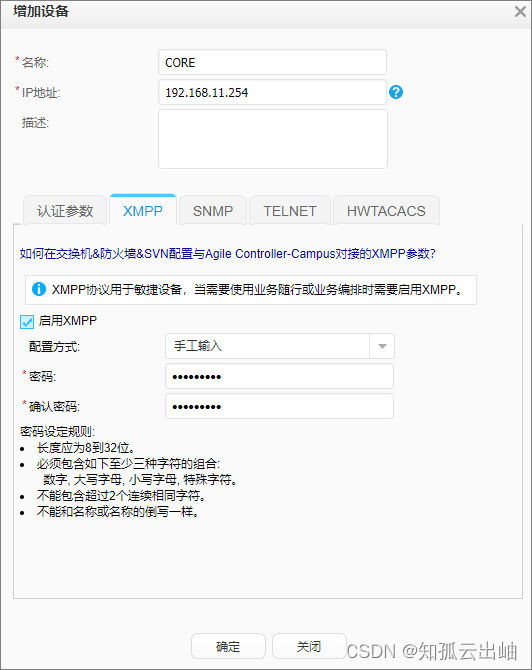
XMPP密码
YsHsjx_202206
group-policy controller 192.168.11.1 password YsHsjx_202206 src-ip 192.168.11.254
- 选择“资源 > 设备 > 设备管理”,单击“增加”。
图2 增加设备
-
图3 XMPP
- 单击“确定”后,勾选上设备CORE。点击“同步”。设备的“通信状态”为,“同步状态”为“同步成功”。
- 在核心交换机上查看其与Agile Controller-Campus通信状态。
<span style="color:#333333"><span style="background-color:#dddddd">[CORE] <strong>display group-policy status </strong>
Controller IP address: 192.168.11.1
Controller port: 5222
Backup controller IP address: -
Backup controller port: -
Source IP address: 192.168.11.254
State: working
Connected controller: master
Device protocol version: 2
Controller protocol version: 2  </span></span>
- 选择“资源 > 设备 > 设备管理”,单击“增加”。
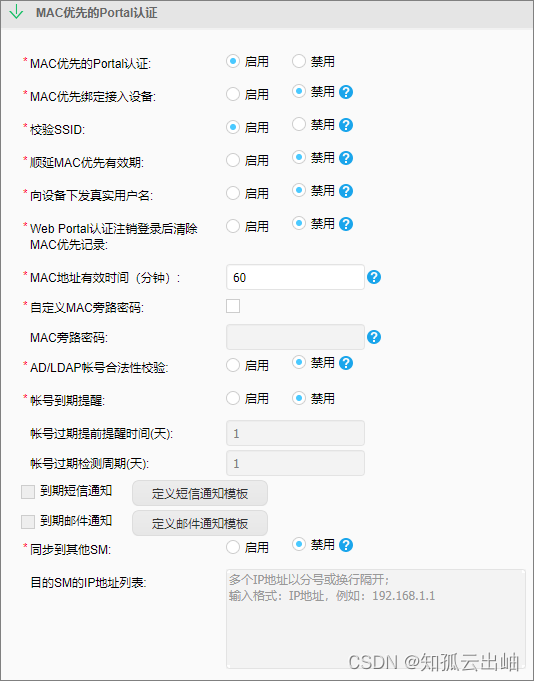
- 启用MAC优先的Portal认证
图4 MAC优先的Portal认证
-
创建员工和访客的账号。以员工账号“user1”为例,访客账号的创建过程与之类似。
选择“资源 >用户> 用户管理”。单击“增加”,创建“user1”。
图5 增加账号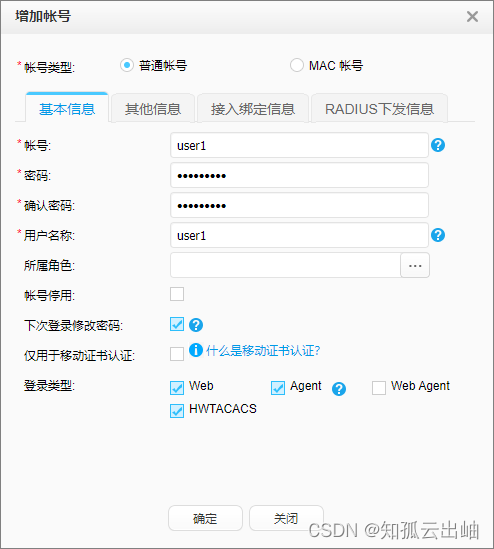
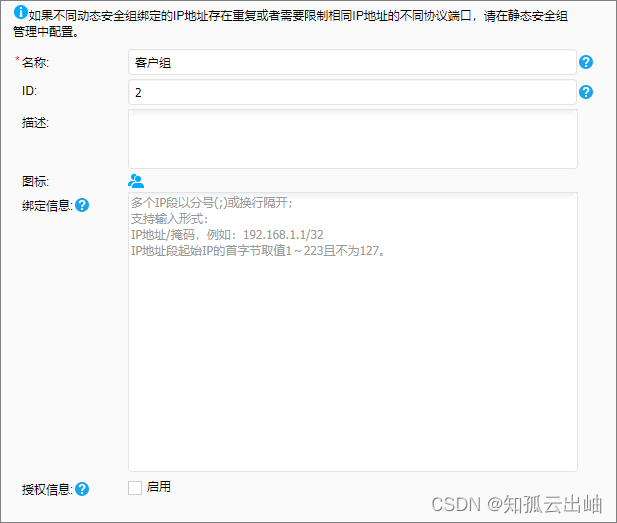
- 通过快速授权将“员工组”和“客户组”分别授权给员工和客户,员工和客户认证通过后分别加入到“员工组”和“客户组”。
选择“策略 > 准入控制 > 快速授权”。按照下表,将员工映射到“员工组”,单击“确定”。将客户映射到“客户组”,单击“确定”。
表6 快速授权 用户分类
用户条件-用户-账号
用户条件-地点-SSID
接入方式
用户权限-安全组
有线员工
user1
-
有线接入
员工组
无线员工
user1
test01
无线接入
员工组
访客
user2
test02
-
客户组
图10 快速授权
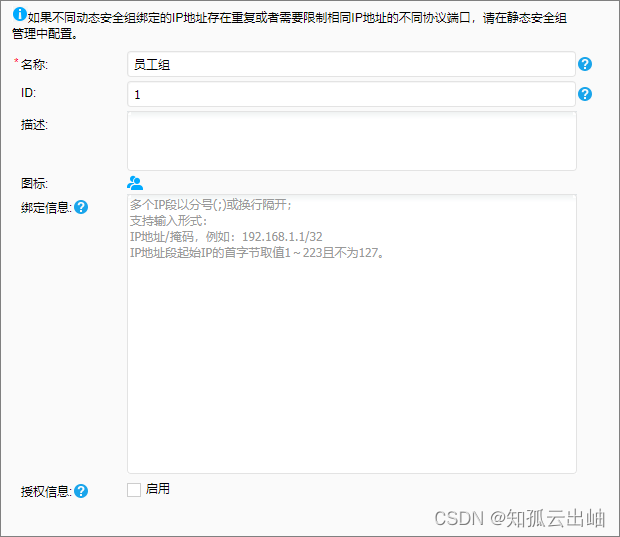
- 配置访问控制权限策略和全网部署。
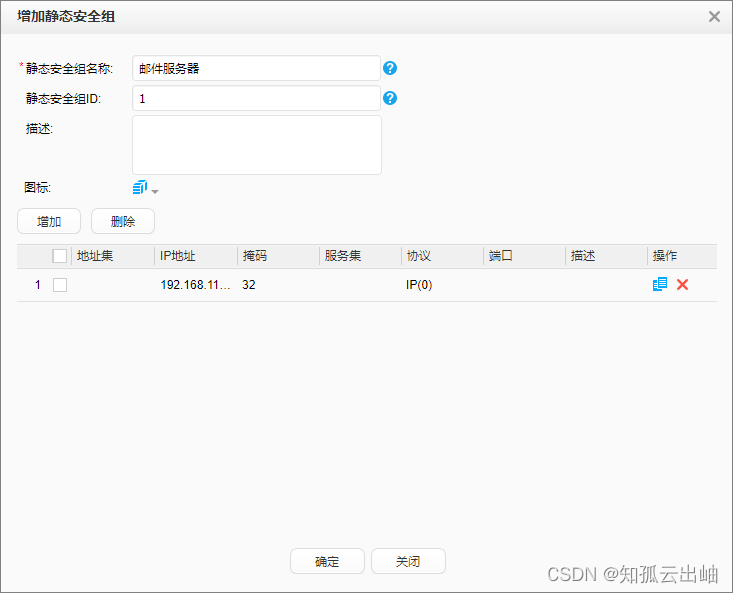
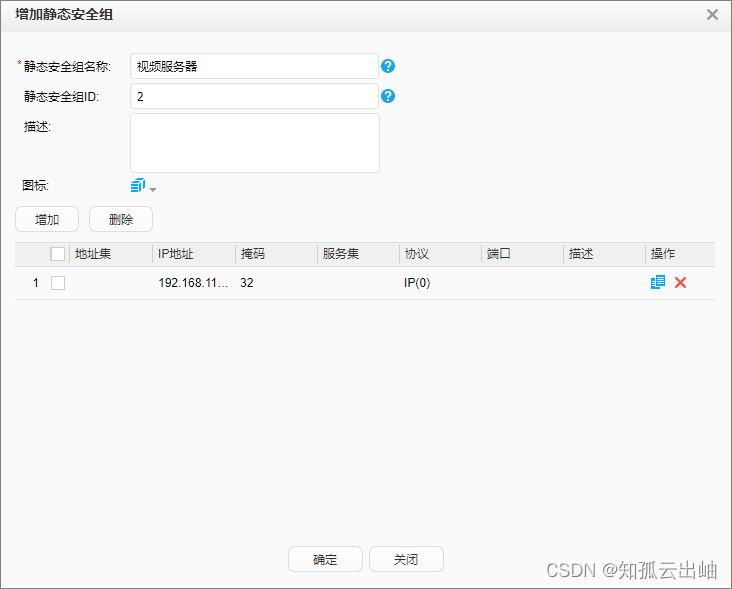
- 选择“策略 > 业务随行 > 策略配置 > 访问权限控制”,增加通用策略。以员工组允许访问邮件服务器和视频服务器为例,其他策略请按照表7设置。
图11 增加访问权限

-
图12 部署详情
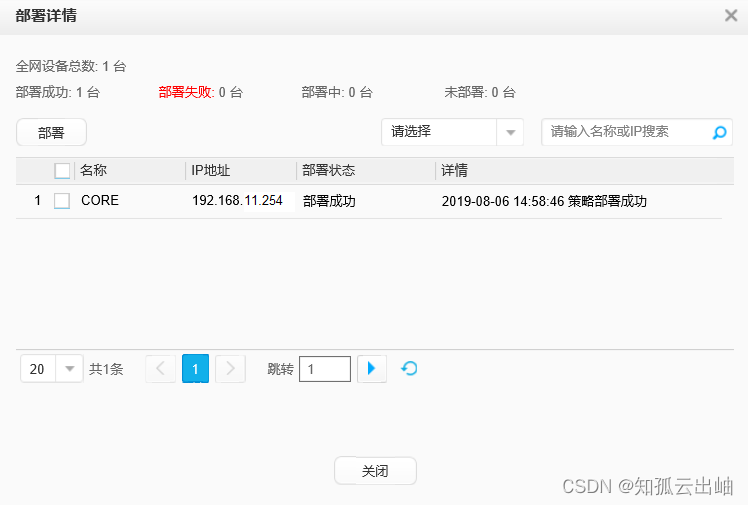
部署成功后可以在核心交换机上通过以下命令查看部署情况。
-
<span style="color:#333333"><span style="background-color:#dddddd">[CORE] <strong id="ZH-CN_TOPIC_0177315618__b5119164715435">display ucl-group all</strong> ID UCL group name -------------------------------------------------------------------------------- 1 2 -------------------------------------------------------------------------------- Total : 2 </span></span> -
<span style="color:#333333"><span style="background-color:#dddddd">[CORE] <strong id="ZH-CN_TOPIC_0177315618__b14943123774314">display acl all</strong>
 Total nonempty ACL number is 2

Advanced ACL Auto_PGM_OPEN_POLICY 3999, 0 rule
Acl's step is 5

Ucl-group ACL Auto_PGM_U2 9997, 4 rules
Acl's step is 5
 rule 1 deny ip source ucl-group 2 destination 192.168.11.100 0
 rule 2 permit ip source ucl-group 2 destination 192.168.11.110 0
 rule 3 deny ip source ucl-group 2 destination ucl-group 1
 rule 4 permit ip source ucl-group 2

Ucl-group ACL Auto_PGM_U1 9998, 4 rules
Acl's step is 5
 rule 1 permit ip source ucl-group 1 destination 192.168.11.100 0
 rule 2 permit ip source ucl-group 1 destination 192.168.11.110 0
 rule 3 deny ip source ucl-group 1 destination ucl-group 2
 rule 4 permit ip source ucl-group 1

Ucl-group ACL Auto_PGM_PREFER_POLICY 9999, 0 rule
Acl's step is 5</span></span>
-
-
结果验证
- 在核心交换机上,执行命令display access-user username user-name detail查看用户的具体上线信息(采用802.1X还是Portal认证、终端IP地址、所属安全组)。
<span style="color:#333333"><span style="background-color:#dddddd">[CORE] <strong>display access-user username user1 detail</strong>

Basic:
  User ID                         : 49523
  <strong>User name                       : </strong><strong>user1</strong>
  Domain-name                     : huawei.com
  User MAC                        : 00e0-fc12-4466
  User IP address                 : 172.16.30.133
  User vpn-instance               : -
  User IPv6 address               : -
  User access Interface           : Wlan-Dbss5111
  User vlan event                 : Success
  QinQVlan/UserVlan               : 0/30
  User vlan source                : user request
  User access time                : 2019/08/08 08:45:00
  User accounting session ID      : CORE00220000000030aa****0104173
 <strong> User access type                : </strong><strong>802.1x</strong>
  AP name                         : area_2
  Radio ID                        : 1
  AP MAC                          : 00e0-fc12-3390
  SSID                            : <strong>test01</strong>
  Online time                     : 43(s)
<strong>  Dynamic group index(Effective)  : 1</strong>
  Service Scheme Priority         : 0

AAA:
  User authentication type        : <strong>802.1x authentication</strong>
  Current authentication method   : RADIUS
  Current authorization method    : -
  Current accounting method       : RADIUS

 ------------------------------------------------------------------------------

Basic:
  User ID                         : 115814
  <strong>User name                       : </strong><strong>user1</strong>
  Domain-name                     : huawei.com
  User MAC                        : 00e0-fc12-3344
  User IP address                 : 172.16.60.133
  User vpn-instance               : -
  User IPv6 address               : FE80::E9AA:9FE9:95F9:C499
  User IPv6 link local address    : FE80::E9AA:9FE9:95F9:C499
  <strong>User access Interface           : Eth-Trunk20</strong>
  User vlan event                 : Success
  QinQVlan/UserVlan               : 0/60
  User vlan source                : user request
  User access time                : 2019/08/08 08:12:29
  User accounting session ID      : CORE002200000000604e****0304466
  <strong>User access type                : </strong><strong>802.1x</strong>
  Terminal Device Type            : Data Terminal
 <strong> Dynamic group index(Effective)  : 1</strong>

AAA:
  <strong>User authentication type        : </strong><strong>802.1x authentication</strong>
  Current authentication method   : RADIUS
  Current authorization method    : -
  Current accounting method       : RADIUS

 ------------------------------------------------------------------------------
 Total: 2, printed: 2</span></span>
<span style="color:#333333"><span style="background-color:#dddddd">[CORE] <strong>display access-user username user2 detail</strong> Basic: User ID : 52993 <strong>User name : </strong><strong>user2</strong> Domain-name : huawei.com User MAC : 00e0-fc12-4466 User IP address : 172.16.40.9 User vpn-instance : - User IPv6 address : - User access Interface : Wlan-Dbss5112 User vlan event : Success QinQVlan/UserVlan : 0/40 User vlan source : user request User access time : 2019/08/08 08:57:47 User accounting session ID : CORE0022000000004005****0104f01 <strong> User access type : </strong><strong>WEB</strong> AP name : area_2 Radio ID : 1 AP MAC : 00e0-fc12-3390 <strong>SSID : </strong><strong>test02</strong> Online time : 23(s) Web-server IP address : 192.168.100.10 <strong>Dynamic group index(Effective) : 2</strong> Service Scheme Priority : 0 AAA: <strong>User authentication type : WEB authentication</strong> Current authentication method : RADIUS Current authorization method : - Current accounting method : RADIUS ------------------------------------------------------------------------------ Total: 1, printed: 1</span></span> - 在Agile Controller-Campus选择“资源 > 用户 > 在线用户管理”,查看用户的上线信息和所属安全组。以有线用户user1的显示为例
图13 在线用户管理

- 员工帐号无论在何处的终端通过802.1X认证成功后都可以访问邮件服务器和视频服务器。
客户帐号无论在何处的终端通过MAC优先的Portal方式认证成功后都不可以访问邮件服务器,只可以访问视频服务器。
员工和客户端可以互访。
配置文件
- 核心交换机CORE的配置文件
<span style="color:#333333"><span style="background-color:#dddddd"># sysname CORE # vlan batch 20 30 40 50 60 1000 # authentication-profile name p1 dot1x-access-profile d1 free-rule-template default_free_rule access-domain huawei.com force authentication-profile name p2 mac-access-profile mac1 portal-access-profile web1 free-rule-template default_free_rule access-domain huawei.com force ucl-group 1 ucl-group 2 # dhcp enable # dhcp snooping enable # radius-server template tem_rad radius-server shared-key cipher %^%#3^oCZ#^K<9>lUH"Mg_%U3aNI>aQqK!^:syMdU*&S%^%# radius-server authentication 192.168.11.1 1812 weight 80 radius-server accounting 192.168.11.1 1813 weight 80 radius-server authorization 192.168.11.1 shared-key cipher %^%#gRHYK,u,HU'@T$~SK\IK'%P".ySe/6;4[4'HJ(/<%^%# # acl name Auto_PGM_OPEN_POLICY 3999 # acl name Auto_PGM_U9 9997 rule 1 deny ip source ucl-group 9 destination 192.168.11.100 0 rule 2 permit ip source ucl-group 9 destination 192.168.11.110 0 rule 3 deny ip source ucl-group 9 destination ucl-group 8 rule 4 permit ip source ucl-group 9 acl name Auto_PGM_U8 9998 rule 1 permit ip source ucl-group 8 destination 192.168.11.100 0 rule 2 permit ip source ucl-group 8 destination 192.168.11.110 0 rule 3 deny ip source ucl-group 8 destination ucl-group 9 rule 4 permit ip source ucl-group 8 acl name Auto_PGM_PREFER_POLICY 9999 # free-rule-template name default_free_rule free-rule 1 destination ip 192.168.11.2 mask 255.255.255.255 # web-auth-server tem_portal server-ip 192.168.11.1 port 50200 shared-key cipher %^%#}czkQj/H4NTr~B$84qB."XQ(;1'$}:;L4z;K~c]P%^%# url http://192.168.11.1:8080/portal # portal-access-profile name web1 web-auth-server tem_portal direct # vlan 30 dhcp snooping enable vlan 40 dhcp snooping enable vlan 50 dhcp snooping enable vlan 60 dhcp snooping enable # aaa authentication-scheme auth authentication-mode radius accounting-scheme acco accounting-mode radius accounting realtime 15 domain huawei.com authentication-scheme auth accounting-scheme acco radius-server tem_rad # interface Vlanif20 ip address 192.168.20.1 255.255.255.0 dhcp select interface # interface Vlanif30 ip address 172.16.30.1 255.255.255.0 arp-proxy inner-sub-vlan-proxy enable dhcp select interface dhcp server dns-list 192.168.11.2 # interface Vlanif40 ip address 172.16.40.1 255.255.255.0 arp-proxy inner-sub-vlan-proxy enable dhcp select interface dhcp server dns-list 192.168.11.2 # interface Vlanif50 ip address 172.16.50.1 255.255.255.0 arp-proxy inner-sub-vlan-proxy enable dhcp select interface dhcp server dns-list 192.168.11.2 # interface Vlanif60 ip address 172.16.60.1 255.255.255.0 arp-proxy inner-sub-vlan-proxy enable dhcp select interface dhcp server dns-list 192.168.11.2 # interface Vlanif1000 ip address 192.168.11.254 255.255.255.0 # interface Eth-Trunk10 description con to AGG1 port link-type trunk port trunk allow-pass vlan 20 50 authentication-profile p1 # interface Eth-Trunk20 description con to AGG2 port link-type trunk port trunk allow-pass vlan 20 60 authentication-profile p1 # interface XGigabitEthernet1/1/0/1 eth-trunk 10 # interface XGigabitEthernet1/1/0/2 eth-trunk 20 # interface XGigabitEthernet1/2/0/1 port link-type access port default vlan 1000 # interface XGigabitEthernet2/1/0/1 eth-trunk 20 # interface XGigabitEthernet2/1/0/2 eth-trunk 10 # traffic-secure inbound acl name Auto_PGM_OPEN_POLICY traffic-filter inbound acl name Auto_PGM_PREFER_POLICY traffic-filter inbound acl name Auto_PGM_U8 traffic-filter inbound acl name Auto_PGM_U9 traffic-filter inbound acl 9996 # group-policy controller 192.168.11.1 password %^%#XGq,C@c*6=1\8d)="S(&r>iERYpE"@|0X!RThfz$%^%# src-ip 192.168.11.254 # capwap source interface vlanif20 # wlan traffic-profile name traff1 user-isolate l2 traffic-profile name traff2 user-isolate l2 security-profile name sec1 security wpa2 dot1x aes security-profile name sec2 security open ssid-profile name ssid1 ssid test01 ssid-profile name ssid2 ssid test02 vap-profile name vap1 forward-mode tunnel service-vlan vlan-id 30 ssid-profile ssid1 security-profile sec1 traffic-profile traff1 authentication-profile p1 ip source check user-bind enable arp anti-attack check user-bind enable learn-client-address dhcp-strict vap-profile name vap2 forward-mode tunnel service-vlan vlan-id 40 ssid-profile ssid2 security-profile sec2 traffic-profile traff2 authentication-profile p2 ip source check user-bind enable arp anti-attack check user-bind enable learn-client-address dhcp-strict ap-group name ap-group1 regulatory-domain-profile domain1 radio 0 vap-profile vap1 wlan 1 vap-profile vap2 wlan 2 radio 1 vap-profile vap1 wlan 1 vap-profile vap2 wlan 2 ap-id 1 type-id 30 ap-mac 00e0-fc12-4400 ap-sn 2102355547W0E3000316 ap-name area_1 ap-group ap-group1 ap-id 2 type-id 56 ap-mac 00e0-fc12-3390 ap-sn 21500829352SGA900583 ap-name area_2 ap-group ap-group1 # dot1x-access-profile name d1 # mac-access-profile name mac1 # return</span></span> - 汇聚交换机AGG1的配置文件
<span style="color:#333333"><span style="background-color:#dddddd"># sysname AGG1 # vlan batch 20 50 # l2protocol-tunnel user-defined-protocol 802.1x protocol-mac 0180-c200-0003 group-mac 0100-0000-0002 # interface Eth-Trunk10 description connect to CORE port link-type trunk undo port trunk allow-pass vlan 1 port trunk allow-pass vlan 20 50 l2protocol-tunnel user-defined-protocol 802.1x enable # interface Eth-Trunk30 port link-type trunk undo port trunk allow-pass vlan 1 port trunk allow-pass vlan 20 50 l2protocol-tunnel user-defined-protocol 802.1x enable port-isolate enable group 1 # interface GigabitEthernet0/0/3 eth-trunk 30 # interface GigabitEthernet0/0/10 mad detect mode direct # interface GigabitEthernet1/0/3 eth-trunk 30 # interface GigabitEthernet1/0/10 mad detect mode direct # interface XGigabitEthernet0/0/1 eth-trunk 10 # interface XGigabitEthernet1/0/1 eth-trunk 10 # return</span></span> - 汇聚交换机AGG2的配置文件
<span style="color:#333333"><span style="background-color:#dddddd"># sysname AGG2 # vlan batch 20 60 # l2protocol-tunnel user-defined-protocol 802.1x protocol-mac 0180-c200-0003 group-mac 0100-0000-0002 # interface Eth-Trunk20 description connect to CORE port link-type trunk undo port trunk allow-pass vlan 1 port trunk allow-pass vlan 20 60 l2protocol-tunnel user-defined-protocol 802.1x enable # interface Eth-Trunk40 port link-type trunk undo port trunk allow-pass vlan 1 port trunk allow-pass vlan 20 60 l2protocol-tunnel user-defined-protocol 802.1x enable port-isolate enable group 1 # interface GigabitEthernet0/0/3 eth-trunk 40 # interface GigabitEthernet0/0/10 mad detect mode direct # interface GigabitEthernet1/0/3 eth-trunk 40 # interface GigabitEthernet1/0/10 mad detect mode direct # interface XGigabitEthernet0/0/1 eth-trunk 20 # interface XGigabitEthernet1/0/1 eth-trunk 20 # return</span></span> - 接入交换机ACC1的配置文件
<span style="color:#333333"><span style="background-color:#dddddd"># sysname ACC1 # vlan batch 20 50 # l2protocol-tunnel user-defined-protocol 802.1x protocol-mac 0180-c200-0003 group-mac 0100-0000-0002 # interface Eth-Trunk30 port link-type trunk undo port trunk allow-pass vlan 1 port trunk allow-pass vlan 20 50 l2protocol-tunnel user-defined-protocol 802.1x enable # interface GigabitEthernet0/0/1 eth-trunk 30 # interface GigabitEthernet0/0/2 eth-trunk 30 # interface GigabitEthernet0/0/3 port link-type access port default vlan 50 stp edged-port enable l2protocol-tunnel user-defined-protocol 802.1x enable port-isolate enable group 1 # interface GigabitEthernet0/0/4 port link-type access port default vlan 20 stp edged-port enable l2protocol-tunnel user-defined-protocol 802.1x enable port-isolate enable group 1 # return</span></span> - 接入交换机ACC2的配置文件
<span style="color:#333333"><span style="background-color:#dddddd">#
sysname ACC2
#
vlan batch 20 60
#
l2protocol-tunnel user-defined-protocol 802.1x protocol-mac 0180-c200-0003 group-mac 0100-0000-0002
#
sysname ACC2
#
vlan batch 20 60
#
interface Eth-Trunk40
 port link-type trunk
 undo port trunk allow-pass vlan 1
 port trunk allow-pass vlan 20 60
 l2protocol-tunnel user-defined-protocol 802.1x enable
#
interface GigabitEthernet0/0/1
 eth-trunk 40
#
interface GigabitEthernet0/0/2
 eth-trunk 40
#
interface GigabitEthernet0/0/3
 port link-type access
 port default vlan 60
 stp edged-port enable
 l2protocol-tunnel user-defined-protocol 802.1x enable
 port-isolate enable group 1
#
interface GigabitEthernet0/0/4
 port link-type access
 port default vlan 20
 stp edged-port enable
 l2protocol-tunnel user-defined-protocol 802.1x enable
 port-isolate enable group 1
#
return</span></span>


 1167
1167

 被折叠的 条评论
为什么被折叠?
被折叠的 条评论
为什么被折叠?
 到【灌水乐园】发言


