


邂逅React和React的技术特点
React的介绍
React:用于构建用户界面的JS库
-
声明式编程:
他允许我们只需要维护自己的状态,当状态改变时,React可以根据最新的状态去渲染我们的UI界面
-
组件化开发:将复杂的界面拆分成小的组件
-
多平台适配:
- ReactNative:用于开发移动端跨平台
- ReactVR:用于开发虚拟显示Web应用程序
React 的开发依赖和基本代码编写
开发React必须依赖三个库:
- react:包含react所必须的核心代码
- react-dom:react渲染在不同平台所必需的核心代码
- babel:将jsx转换为React代码的工具
hello world案例
<!DOCTYPE html>
<html lang="en">

<head>
    <meta charset="UTF-8">
    <meta http-equiv="X-UA-Compatible" content="IE=edge">
    <meta name="viewport" content="width=device-width, initial-scale=1.0">
    <script crossorigin src="https://unpkg.com/react@18/umd/react.development.js"></script>
    <script crossorigin src="https://unpkg.com/react-dom@18/umd/react-dom.development.js"></script>
    <script src="https://unpkg.com/babel-standalone@6/babel.min.js"></script>
    <title>Hello React</title>
</head>
<body>
    <div id="root"></div>
    <div id="app"></div>
</body>
<script type="text/babel">
    //渲染Hello World
    //React18之前:ReactDom.render
    // ReactDOM.render(<h2>hello world</h2>,document.querySelector("#root"));

    //react18之后:从一步变成了两步,可以创建多个根
    const root = ReactDOM.createRoot(document.querySelector("#root"));
    root.render(<h2>hello root</h2>);

    const app = ReactDOM.createRoot(document.querySelector("#app"));
    app.render(<h2>hello app</h2>);
</script>
</html>
实现点击按钮修改文字的案例:
<body>
    <div id="app"></div>
</body>
<script type="text/babel">
    const app = ReactDOM.createRoot(document.querySelector("#app"));
    //1.将文本定义成变量
    let message = "Hello World"
    //2.监听按钮的点击
    function btnClick() {
        console.log(1);
        //1.1修改数据
        message = "hello React";
        //1.2重新渲染数据
        rootRender();
    }
    //封装渲染函数
    function rootRender(){
        app.render((
        <div>
            <h2>{message}</h2>
            <button onClick={btnClick}>修改文本</button>
        </div>
    ));
    }
    //初始渲染一次
    rootRender();
</script>
hello world-组件化开发
hello world案例可以看成一个整体,既然是整体,那么就可以将其封装成一个组件
- root.render的参数是一个html元素或者一个组件
- 我们可以将helloworld案例封装成一个组件,传入到ReactDOM.render中
如何封装一个组件?(类组件)
- 定义一个类(类名大写,否则会被认为是html元素),继承React.Component
- 实现当前组件的render函数,就是之后渲染的内容
组件化-数据依赖
组件中的数据分为两类:
- 参与界面更新的数据:我们可以称为参与数据流,这个数据是定义在当前对象的state中的
- 我们可以通过在构造函数中this.state={定义的数据}
- 当我们的数据发生变化时,我们可以调用this.setState来更新数据,并且通知React进行update操作;(在进行update操作时,就会重新调用render函数,使用最新的数据,来渲染界面)
组件化-事件绑定
- 组件化问题二:事件绑定中的this
- 在类中直接定义一个函数,并且将这个函数绑定到元素的onClick事件上,那么这个函数的this指向谁?
- 默认情况下是undefined
- 因为在正常的DOM操作中,监听点击,监听函数中的this是节点对象(比如button对象)
- 因为react并不是直接渲染成真实的DOM,我们所编写的button只是一个语法糖,他的本质是react的Element对象
- 在这里发生监听时,react在执行函数时并没有绑定this,默认情况下就是一个undefined(严格模式下)
btnClick方法中的this将指向undefined或者是全局window对象,取决于是否在严格模式下。
将helloworld案例组件化重构
<body>
    <div id="root"></div>
</body>
<script type="text/babel">
    class App extends React.Component {
        //组件数据
        constructor() {
            super();
            this.state = {
                message: "hello world"
            }
            //对需要绑定的方法,提前绑定好this,写在这里,只需绑定一次
            this.btnClick = this.btnClick.bind(this)
        }
        //组件方法(实例方法)
        btnClick() {
            //如果button绑定方法时没有改变this的指向,严格模式下会指向undefinde。
            //因为事件绑定过程中会执行类似 const click = this.btnClick;click(),这在babel的严格模式下会指向undefined
            //所以我们需要将this指向数据所在的实例对象
            console.log(this);
            //父类的方法,内部完成了两件事情:1.将state中的message值修改掉,2.重新执行render方法
            this.setState({
                message: "hello react"
            })
        }
        //渲染内容render方法
        render() {
            console.log("render:", this)//this指向当前组件实例
            return (
                <div>
                    <h2>{this.state.message}</h2>
                    <button onClick={this.btnClick}>修改文本</button>
                </div>
            )
        }
    }
    //this指向的问题
    // const app = new App()
    // const foo = app.btnClick()
    // foo();//默认绑定 => window => 严格模式下 => undefined
    // function bar() {
    //     console.log("bar:", this);默认绑定 => window => 严格模式下 => undefined
    // }
    // bar();
    const root = ReactDOM.createRoot(document.querySelector("#root"));
    //App可以作为一个根组件
    root.render(<App />)
</script>
电影列表案例
<!DOCTYPE html>
<html lang="en">
<head>
    <meta charset="UTF-8">
    <meta http-equiv="X-UA-Compatible" content="IE=edge">
    <meta name="viewport" content="width=, initial-scale=1.0">
    <script src="./lib/react.js"></script>
    <script src="./lib/react-dom.js"></script>
    <script src="./lib/babel.js"></script>
    <title>Document</title>
</head>

<body>
    <div id="root"></div>
</body>
<script type="text/babel">
    //1创建root
    const root = ReactDOM.createRoot(document.querySelector("#root"))
    //创建组件
    class App extends React.Component {
        constructor() {
            super()
            this.state = {
                movies: ["我爱你", "消失的她", "封神榜"]
            }
        }
        render() {
            //1.使用for循环
            // const lis = []
            // for(let i = 0;i<this.state.movies.length;i++){
            //     const movie = this.state.movies[i];
            //     const li = <li>{movie}</li>
            //     lis.push(li);
            // }
            //2.使用map
            const lis = this.state.movies.map(item=><li>{item}</li>)
            return (
                <div>
                    <h2>电影列表</h2>
                    <ul>
                        {lis}
                    </ul>
                </div>
            )
        }
    }
    //写成<App/>,这是JSX语法,=React.createElement
    root.render(<App/>)
</script>
</html>
倒计时案例
<body>
    <div id="root"></div>
</body>
<script type="text/babel">
    const root = ReactDOM.createRoot(document.querySelector("#root"))

    class App extends React.Component {
        constructor() {
            super();
            this.state = {
                counter: 100
            }
            this.increment = this.increment.bind(this)
            this.decrement = this.decrement.bind(this)
        }
        increment() {
            this.setState({
                counter: this.state.counter + 1
            })
        }
        decrement() {
            this.setState({
                counter: this.state.counter - 1
            })
        }
        render() {
            const { counter } = this.state
            return (
                <div>
                    <h2>{counter}</h2>
                    <button onClick={this.increment}>+1</button>
                    <button onClick={this.decrement}>-1</button>
                </div>
            )
        }
    }
    root.render(<App />)
</script>
VSCode代码片段
具体步骤:
- 复制自己需要生成代码片段的代码
- https://snippet-generator.app/在该网站生成代码片段
- 在VSCode中配置代码片段
React基础-JSX语法
认识JSX语法
const element = <div>hello world</div>
这就是一段jsx语法(就是把html代码写到js当中),在js中会报错,因为js中不能直接给一个变量赋值html
JSX是什么?
- jSX是一种javaScript的语法扩展,也称为JavaScript XML
- 用于描述我们的UI界面,可以和JS融合使用
为什么React选择了JSX
- React认为渲染逻辑(js)本质上与其他UI逻辑存在内在耦合
- 比如UI需要绑定事件;
- 比如UI需要展示数据状态
- 比如在某些状态发生改变时,又需要改变UI
- 因为html和JS这些逻辑密不可分,所以React干脆将他们组合到一起(html in js =>JSX),形成组件
JSX的基本使用
JSX的书写规范
- JSX结构中只能有一个根元素
- jsx结构通常就包裹一个(),将整个jsx当作一个整体,实现换行
- 可以是单标签或者双标签,单标签必须以**/>结尾**
JSX的注释编写
render(){
    const { message }  = this.state
    return(
    	<div>
        	{/* JSX的注释写法 */}
        </div>
    )
}
JSX插入内容作为子元素
class App extends React.Component {
        constructor() {
            super();
            this.state = {
                a:10,
                b:"string",
                c:["1","2","3"],
                d:undefined,
                e:null,
                f:true,
                friend:{
                    name:"hhh"
                }
            }
        }
        render() {
            const {a,b,c,d,e,f,friend} = this.state
            return (
                <div>
                    {/*number,string,array类型可以直接显示*/}
                    <h2>{a}</h2>
                    <h2>{b}</h2>
                    <h2>{c}</h2>
                    {/*undefined,null,boolean会被忽略,不显示,需要将其转换为字符串*/}
                    <h2>{d}</h2>
                    <h2>{e}</h2>
                    <h2>{f}</h2>
                    {/*将undefined,null,boolean转换为字符串*/}
                    <h2>{String(d)}</h2>
                    <h2>{e+""}</h2>
                    <h2>{f.toString()}</h2>
                    {/*object类型不能作为子元素显示 会报错*/}
                    <h2>{friend}</h2>
                </div>
            )
        }
    }
JSX中嵌入不同的表达式
- 运算表达式
- 三元运算符
- 执行一个函数
<script type="text/babel">
    const root = ReactDOM.createRoot(document.querySelector("#root"))
    class App extends React.Component {
        constructor() {
            super();
            this.state = {
                firstname: "kobe",
                lastname: 'bryant',
                age: 20,
                movies: ["流浪地球", "星际穿越", "独行月球"]
            }
        }
        render() {
            const { firstname, lastname, age, movies } = this.state
            const ageText = age > 18 ? "成年人" : "未成年人"
            const lis = movies.map(item => <li key={item}>{item}</li>)
            return (
                <div>
                    {/*插入不同的表达式*/}
                    <h2>{10 + 20}</h2>
                    <h2>{firstname + "" + lastname}</h2>
                    {/*插入三元运算符*/}
                    <h2>{ageText}</h2>
                    <h2>{age > 18 ? "成年人" : "未成年人"}</h2>
                    {/*调用方法获取结果*/}
                    <h2>{lis}</h2>
                    <h2>{movies.map(item => <li key={item}>{item}</li>)}</h2>
                    <ul>{this.getMovies()}</ul>
                </div>
            )
        }
        //以下逻辑如果非常复杂,可以封装成一个方法
        getMovies() {
            const lis = this.state.movies.map(item => <li key={item}>{item}</li>)
            return lis
        }
    }
    root.render(<App />)
</script>
在执行map函数展示列表的时候,当我们没有向列表添加key时,会报错
- 这个警告是告诉我们需要在列表展示的jsx中添加一个key
- key主要的作用是为了提高diff算法时的效率
JSX的事件绑定
- 如果原生DOM有一个监听事件,我们可以如何操作呢?
- 获取DOM原生,添加监听事件
- 在HTML原生中,直接绑定onclick
- 在React中实现事件监听
- React事件命名采用小驼峰式,而不是纯小写
- 我们通过**{}传入一个事件处理函数**,这个函数会在事件发生时被执行
this的绑定问题
- this的四种绑定规则
- 默认绑定:独立执行foo() => 非严格模式下指向window,严格模式下undefined
- 隐式绑定:被一个对象执行obj.foo() => 指向obj
- 显式绑定:call//apply//bind => foo.call(“aaa”) => 指向aaa
- new绑定:new Foo() => 创建一个新对象,并且赋值给this
- 在react中,事件执行之后,我们可能需要获取当前类的对象中的相关属性,这个时候需要用到this
- 我们直接打印这个this,会发现它是一个undefined
- 为什么是undefined呢?
- 原因是btnClick函数并不是我们主动调用的,而是当button发生改变时,react内部调用了btnClick函数
- 而它内部调用时,并不知道要如何绑定正确的this
- 如何解决this的问题?
- bind给btnClick显示绑定this
- 使用ES6 class fields语法
- 事件监听时传入箭头函数
案例:
  btn1Click() {
            console.log("btn1Click", this);
            this.setState({
                counter: 1
            })
        }
         render() {
            const { message, counter } = this.state
            return (
                <div>
                    <h2>{counter}</h2>
                    {/*1. this绑定方式一:bind绑定*/}
                    <button onClick={this.btn1Click.bind(this)}>btn1</button>
                </div>
            )
        }
-
onClick={this.btn1Click}这里通过this.的方法调用,为什么不是隐式绑定?
-
因为这里并没有对btn1Click进行调用,只是引用
-
内部执行类似于:
React.createElement(“button”,{onClick:this.btn1Click})
const click = config.onClick
click()* 所以我们需要通过bind改变this指向 -
-
我们模拟一下内部调用:
-
 //模拟react中事件监听的执行
    const app = {
        foo: function () {
            console.log("foo:", this)
        }
    }
    const config = {
        element: "button",
        onClick: app.foo.bind(app)
    }
    const click = config.onClick
    click();
-
-
-
三种this绑定方式的实例
-
 class App extends React.Component {
        constructor() {
            super();
            this.state = {
                message: "hello world",
                counter: 100
            }
        }
        btn1Click() {
            console.log("btn1Click", this);
            this.setState({
                counter: 1
            })
        }
        btn2Click = () => {
            console.log("btn2Click", this);
            this.setState({
                counter: 2
            })
        }
        btn3Click() {
            console.log("btn3Click", this);
            this.setState({
                counter: 3
            })
        }
        render() {
            const { message, counter } = this.state
            return (
                <div>
                    <h2>{counter}</h2>
                    {/*1. this绑定方式一:bind绑定*/}
                    <button onClick={this.btn1Click.bind(this)}>btn1</button>
                    {/*2. this绑定方式二:ES6 class fields*/}
                    <button onClick={this.btn2Click}>btn2</button>
                    {/*3. this绑定方式三:直接传入箭头函数
                    直接传入一个箭头函数,箭头函数的this指向执行上下文,
                    点击按钮时执行箭头函数,再用箭头函数调用btn3Click,隐式绑定this指向*/}
                    <button onClick={()=>this.btn3Click()}>btn3</button>
                </div>
            )
        }
    }
-
传递event参数和额外参数
<script type="text/babel">
    const root = ReactDOM.createRoot(document.querySelector("#root"))
    class App extends React.Component {
		//...代码省略
        render() {
            const { message, counter } = this.state
            return (
                <div>
                    {/*event参数的传递*/}
                    <button onClick={this.btn1Click.bind(this)}>按钮1</button>
                    <button onClick={(event)=>{this.btn2Click(event)}}>按钮2</button>

                    {/*额外的参数传递*/}
                     {/*这种方法不推介,因为参数顺序会发生变化*/}
                    <button onClick={this.btn3Click.bind(this,"kobe",30)}>按钮3</button>
                    <button onClick={(event)=>this.btn4Click(event,"why",18)}>按钮4</button>
                </div>
            )
        }
    }
    root.render(<App />)
</script>
总而言之,多使用箭头函数
电影列表案例
<style>
    .active {
        color: red;
    }
</style>
<body>
    <div id="root"></div>
</body>
<script type="text/babel">
    const root = ReactDOM.createRoot(document.querySelector("#root"))
    class App extends React.Component {
        constructor() {
            super();
            this.state = {
                movies: ["a", "b", "c", "d"],
                currentindex: 0
            }
        }
        itemClick(index) {
            this.setState({
                currentindex: index
            })
        }
        render() {
            const { movies, currentindex } = this.state
            return (
                <div>
                    <ul>
                        {
                            movies.map((item, index, obj) => {
                                return (
                                    <li
                                        key={index}
                                        onClick={() => { this.itemClick(index) }}
                                        className={currentindex === index ? "active" : " "}
                                    >
                                        {item}
                                    </li>
                                )
                            })
                        }
                    </ul>
                </div>
            )
        }
    }
    root.render(<App />)
</script>

</html>
jsx绑定属性
- 比如元素会有title属性
- img元素会有src属性
- a元素会有href属性
- 元素可能需要绑定class
- 原生使用内联样式style
- 就是使用{}
<script type="text/babel">
    const root = ReactDOM.createRoot(document.querySelector("#root"))
    class App extends React.Component {
        constructor() {
            super();
            this.state = {
                title: "哈哈哈",
                imgURL: "https://img1.baidu.com/it/u=3626182028,65532742&fm=253&fmt=auto&app=138&f=JPEG?w=500&h=750",
                href: "http://www.baidu.com",
                isActive: true
            }
        }
        render() {
            const { title, imgURL, href, isActive } = this.state
            //class绑定的写法一:
            const classname = `abc cba ${isActive ? "a" : ""}`
            //class绑定的写法二,将所有的class方法放到数组中:
            const classList = ["abc", "cba"]
            if (isActive) classList.push("active")
            //class绑定的写法三:使用第三方库classnames

            return (
                <div >
                    {/*基本绑定*/}
                    <h2 title={title}>hello world</h2>
                    <img src={imgURL} alt="" />
                    <a href={href}>baidu</a>

                    {/*绑定class 最好使用classname,因为这是jsx,而class是js的关键字,可能产生误解*/}
                    <h2 className="abc cba">hahahaha</h2>

                    {/*需要根据判断动态添加类名*/}
                    <h2 className={classname}>xxxxx</h2>
                    <h2 className={classList.join(" ")}>xxxxx</h2>

                    {/*绑定style属性*/}
                    <h2 style={{color:"red",fontSize:"30px"}}>gggggg</h2>
                </div>
            )
        }
    }
    root.render(<App />)
</script>
JSX的条件渲染
- 方式一:条件判断语句
- 适合逻辑较多的情况
- 方式二:三元运算符
- 适合逻辑比较简单
- 方式三:与运算符&&
- 适合如果条件成立,渲染某一个组件;如果条件不成立,什么内容也不渲染
- 适合使用在某一个值有可能为undefined时
代码实例:
<script type="text/babel">
    const root = ReactDOM.createRoot(document.querySelector("#root"))
    class App extends React.Component {
        constructor() {
            super();
            this.state = {
                message: "hello world",
                isReady:true,
                friend:{
                    name:"name",
                    age:"age"
                }
            }
        }
        render() {
            const {isReady,friend} = this.state
            //条件渲染的第一种写法
            let showElement = null
            if(isReady){
                showElement = <h2>10</h2>
            }else{
                showElement = <h2>20</h2>
            }
            return (
                <div>
                    {/*条件渲染的第一种写法*/}
                  <div>{showElement}</div>

                    {/*方式二:三元运算符*/}
                    <div>{isReady ? <button>true</button>:<button>false</button>}</div>

                     {/*方式三:&&运算符*/}
                      {/*friend有值的情况下执行渲染,否则不渲染
                        防止在friend数据还没生成的时候,程序报错
                    */}
                     <div>{friend && <div>{friend.name + " "+ friend.age}</div>}</div>
                </div>
            )
        }
    }
    root.render(<App />)
</script>
程序案例
点击按钮切换文字的显示与否:
<script type="text/babel">
    const root = ReactDOM.createRoot(document.querySelector("#root"))
    class App extends React.Component {
        constructor() {
            super();
            this.state = {
                message: "hello world",
                isShow:true
            }

        }
        btn(){
            this.setState({
                isShow:!this.state.isShow
            })
        }
        render() {
            const {message,isShow} = this.state
            let element = null
            if(isShow){
                element = <h2>方式一</h2>
            }
            return (
                <div>
                    <button onClick={()=>{this.btn()}}>show</button>
                   {element}

                   {isShow&& <h2>方式二</h2>}

                   {/*实现v-show的效果*/}
                    <h2 style={{display:isShow ? 'block':"none"}}>方式三</h2>
                </div>
            )
        }
    }
    root.render(<App />)
</script>
JSX的列表渲染
- 真实开发中我们会从服务器请求到大量的数据,数据会以列表的形式存储
- 比如歌曲、歌手排行榜列表的数据
- 在React中,展示列表最多的方式就是使用数组的map高阶函数
- 过滤到一些内容:filter函数
- 截取数组中的一部分内容:slice函数
- 案例:展示分数在100以上的前两条数据
<script type="text/babel">
    const root = ReactDOM.createRoot(document.querySelector("#root"))
    class App extends React.Component {
        constructor() {
            super();
            this.state = {
                message: "hello world",
                students: [
                    { id: "1", name: "1", score: "101" },
                    { id: "2", name: "2", score: "99" },
                    { id: "3", name: "3", score: "102" },
                    { id: "4", name: "4", score: "98" },
                    { id: "5", name: "5", score: "103" },
                ]
            }
        }
        //需求:展示分数在100以上的前两条数据
        render() {
            const { message, students } = this.state
            return (
                <div>
                    <h2>{message}</h2>
                    {
                        students.filter((item) => item.score > 100).slice(0, 2).map((item, index, obj) => {
                            return(<ul key={item.id}>
                                <li>{item.id}</li>
                                <li>{item.name}</li>
                                <li>{item.score}</li>
                            </ul>)
                        })
                    }
                </div>
            )
        }
    }
    root.render(<App />)
</script>
JSX的原理和本质
- 实际上,jsx仅仅只是**React.createElement(component,props,…children)**的语法糖。
- 所有的jsx最终都会被转换为React.createElement的函数调用
- createElement需要传递三个参数:
- 参数一:Type
- 当前ReactElement的类型
- 如果是标签元素,那么就使用字符串表示"div"
- 如果是组件元素,那么就直接使用组件的名称
- 参数二:config
- 所有jsx中的属性都在config中以对象的属性和值的形式存储
- 比如传入className作为元素的class
- 参数三:children
- 存放在标签中的内容,以children数组的方式进行存储
- 如果是多个元素,React内部有对他们进行处理
- 参数一:Type
babel转换代码案例
 (	//jsx代码
                <div>
                    <div className="header">Header</div>
                    <div className="content">
                        <div>Banner</div>
                        <ul>
                            <li>列表数据1</li>
                            <li>列表数据2</li>
                            <li>列表数据3</li>
                            <li>列表数据4</li>
                            <li>列表数据5</li>
                        </ul>
                    </div>
                </div>
            )
由babel转换为js代码
在这段代码中,_jsx 和 _jsxs 可以被理解为 React.createElement函数的替代,用于创建 React 元素。
import { jsx as _jsx } from "react/jsx-runtime";
import { jsxs as _jsxs } from "react/jsx-runtime";

//_jsx 和 _jsxs 这两个函数,它们分别是 React.createElement 和 React.jsxs 的包装函数。

/*#__PURE__*/_jsxs("div", {
  children: [/*#__PURE__*/_jsx("div", {
    className: "header",
    children: "Header"
  }), /*#__PURE__*/_jsxs("div", {
    className: "content",
    children: [/*#__PURE__*/_jsx("div", {
      children: "Banner"
    }), /*#__PURE__*/_jsxs("ul", {
      children: [/*#__PURE__*/_jsx("li", {
        children: "\u5217\u8868\u6570\u636E1"
      }), /*#__PURE__*/_jsx("li", {
        children: "\u5217\u8868\u6570\u636E2"
      }), /*#__PURE__*/_jsx("li", {
        children: "\u5217\u8868\u6570\u636E3"
      }), /*#__PURE__*/_jsx("li", {
        children: "\u5217\u8868\u6570\u636E4"
      }), /*#__PURE__*/_jsx("li", {
        children: "\u5217\u8868\u6570\u636E5"
      })]
    })]
  })]
});
虚拟dom到真实dom
- 虚拟DOM的创建过程
- 我们通过React.createElement最终创建出来一个ReactElement对象:
- ReactElement对象的作用?为什么要创建它?
- 原因是React利用ReactElement对象组成了一个JS的对象树(嵌套对象)
- JS的对象树就是虚拟DOM
- 虚拟DOM到真实DOM的过程
- jsx代码
- 创建ReactElement对象(虚拟DOM)jsx = > React.createElement(“div”)
- 渲染真实DOM:document.createElement(“div”)
- 虚拟DOM的作用
- 重新渲染时,在新旧虚拟dom之间进行diff算法,然后只更新需要更新的部分
- 可以跨平台,虚拟dom可以渲染成web端,也可以是ios或者安卓端代码
- 虚拟DOM帮助我们从命令式编程转到了声明式编程的模式(不用直接操作dom)
- React官方的说法:Virtual DOM是一种编程理念
- 这个理念中,UI以一种理想化或者虚拟化的方式保存在内存中,并且它是一个相对简单的JS对象
- 我们可以通过ReactDOM.render让虚拟dom和真实dom同步起来,这个过程叫做协调
- 这种编程的方式赋予了React声明式的API
- 你只需要告诉React希望让UI是什么状态
- React来确保DOM和这些状态是匹配的
- 你不需要直接进行DOM操作,就可以从手动更改DOM、属性操作、事件处理中解放出来
购物车案例
<!DOCTYPE html>
<html lang="en">

<head>
    <meta charset="UTF-8">
    <meta http-equiv="X-UA-Compatible" content="IE=edge">
    <meta name="viewport" content="width=device-width, initial-scale=1.0">
    <script src="./lib/react.js"></script>
    <script src="./lib/react-dom.js"></script>
    <script src="./lib/babel.js"></script>
    <title>react demo</title>
</head>
<script src="/data.js"></script>
<style>
    table {
        border-collapse: collapse;
        text-align: center;
    }

    th,
    td {
        padding: 10px 16px;
        border: 1px solid #ddd;
    }
</style>

<body>
    <div id="root"></div>
</body>
<script type="text/babel">
    const root = ReactDOM.createRoot(document.querySelector("#root"))
    class App extends React.Component {
        constructor() {
            super();
            this.state = {
                message: "hello world",
                books: books
            }
        }
        changeCount(index, count) {
 //对于存储在 state 中的可变数据,比如数组,你需要确保在修改这些数据时,遵循不可变性的原则。不可变性是指在修改数据时,不直接修改原始数据,而是创建一个新的副本进行修改,从而保持原始数据的不变性。
            const newbooks = [....this.state.books];
            newbooks[index].number += count;
            this.setState({
                books: newbooks
            })
        }
        delete(index) {
            const newbooks = this.state.books;
            newbooks.splice(index, 1);
            this.setState({
                books: newbooks
            })
        }
        renderBookList() {
            const { books } = this.state
            //求总价格方式一:
            // let totalPrice = 0
            // for(let i = 0; i<books.length;i++){
            //     totalPrice += books[i].price * books[i].number
            // }
            //方式二:使用高阶函数
            const totalPrice = books.reduce((acc, cur) => acc += cur.price * cur.number, 0);
            return <div>
                <table>
                    <thead>
                        <tr>
                            <th>序号</th>
                            <th>书籍名称</th>
                            <th>出版日期</th>
                            <th>价格</th>
                            <th>购买数量</th>
                            <th>操作</th>
                        </tr>
                    </thead>
                    <tbody>
                        {
                            books.map((item, index, obj) => {
                                return (
                                    <tr key={index}>
                                        <td>{index + 1}</td>
                                        <td>{item.name}</td>
                                        <td>{item.date}</td>
                                        <td>{"¥" + item.price}</td>
                                        <td>
                                            <button
                                                disabled={item.number <= 1}
                                                onClick={() => { this.changeCount(index, -1) }}
                                            >-</button>
                                            {item.number}
                                            <button onClick={() => { this.changeCount(index, +1) }}>+</button>
                                        </td>
                                        <td>
                                            <button onClick={() => { this.delete(index) }}>删除</button>
                                        </td>
                                    </tr>
                                )
                            })
                        }
                    </tbody>
                </table>
                <h2>总价格:{totalPrice}</h2>
            </div>
        }
        renderBookEmpty() {
            return <h2>购物车为空,请添加书籍~</h2>
        }
        render() {
            return (
                <div>
                    {
                        books.length ? this.renderBookList() : this.renderBookEmpty()
                    }
                </div>
            )
        }
    }
    root.render(<App />)
</script>

</html>
补充知识:
reduce 方法来实现对象数组中根据某一key值求和
其中,reduce方法的第一个参数是一个回调函数,它接收两个参数:累加器(acc)和当前元素(cur)。回调函数的返回值会作为下一次调用回调函数时的累加器的值。reduce方法的第二个参数是累加器的初始值,这里设置为0。
在回调函数中,我们将累加器和当前元素的price属性相加,最终得到了所有元素的price属性的总和。
React脚手架
- 前端工程的复杂化
- 如果是小的demo程序,不需要考虑一些复杂的问题
- 目录结构如何组织划分
- 如何管理文件之间的相互依赖
- 如何管理第三方模块的依赖
- 项目发布前如何压缩、打包项目
- 如果是小的demo程序,不需要考虑一些复杂的问题
- 传统的脚手架指的是建筑学的一种结构:在搭建楼房、建筑物时,临时搭建出来的一个框架
- 编程中提到的脚手架,可以帮助我们快速生成项目的工程化结构
- 脚手架让项目从搭建到开发,再到部署,整个流程变得快速和便捷
前端脚手架
- 前端脚手架:
- Vue的脚手架:@vue/cli
- Angular的脚手架:@angular/cli
- React的脚手架:create-react-app
- 使用这些脚手架需要依赖什么?
- 都是使用node编写的,并且都是基于webpack
创建React项目
- create-react-app app (项目名称不能包含大写字母)
- cd app
- npm start
目录结构分析
- node_modules: 第三方依赖包
- public:
- index.html: 应用的index.html入口文件(存放在html写代码时除了script部分的代码)
- manifest.json : 和Web app配置相关
- robots.txt: 指定搜索引擎可以或者无法爬取哪些文件
- src:编写源代码
- App.test.js //App组件的测试代码文件
- index.css //全局的样式文件
- index.js //整个应用程序的入口文件
- setupTests.js //测试初始化文件
- gitignore: git的忽略文件
- package-lock.json: 记录每个安装的包的真实版本
- package.json: 对整个应用程序的描述:包括应用名称、版本号、一些依赖包、以及项目的启动、打包等等
- README.md: 项目描述
了解PWA
- PWA全称Progressive Web App,即渐进式WEB应用
- 一个PWA应用首先是一个网页,可以通过WEB技术编写一个网页应用
- 随后添加App Manifest和Service Worker 来实现PWA的安装和离线等功能
- 这种Web存在的形式,我们称之为Web App
脚手架下编写代码
index.js文件中的代码(类似html中写代码的部分)
//为什么不用引入babel,因为react项目是基于webpack的,webpack中已经配置好了babel
import ReactDOM from "react-dom/client"
import App from "./App"

//编写react代码,并且通过React渲染出来对应的内容
const root = ReactDOM.createRoot(document.querySelector("#root"))
root.render(<App />)
App.js文件代码(类似将html中写的组件分离出来)
import React from "react"
import HelloWorld from "./Components/HelloWorld"
//编写一个组件
class App extends React.Component{
  constructor(){
    super()
    this.state = {
      message:"hello world"
    }
  }
  render(){
    const {message} = this.state

    return(
      <div>
        <h2>{message}</h2>
        <HelloWorld/>
      </div>
    )
  }
}
//导出App
export default App
新建一个Components文件夹,然后新建HelloWorld.jsx
import React from "react";

class HelloWorld extends React.Component{
    constructor(){
        super()
    }
    render(){
        return(
            <div>
                <h2>hello world</h2>
            </div>
        )
    }
}
export default HelloWorld
React组件化开发
什么是组件化开发?
- 组件化开发是一种分而治之的思想:
- 如果我们将一个页面中所有的处理逻辑全部放在一起,处理起来就会变得非常复杂,而且不利于后续的管理以及扩展
- 所以我们将一个页面拆分成一个个小的功能块,方便复用和后续的管理和维护
React的组件化
- 根据组件定义的方式:函数组件和类组件
- 根据组件内部是否有状态需要维护:有状态组件(this.state={})和无状态组件
- 根据组件的不同职责:展示型组件和容器型组件
- 函数组件、无状态组件、展示型组件主要关注UI的展示
- 类组件、有状态组件、容器型组件主要关注数据逻辑
类组件
- 类组件的定义如下要求:
- 组件的名称是大写字符开头(无论是类组件还是函数组件)
- 类组件需要继承React.Component
- 类组件必须实现render函数
- 使用class定义一个组件:
- constructor是可选的,通常在constructor中初始化一些数据
- this.state中维护的就是我们组件内部的数据
- render()方法是class组件中唯一必须实现的方法
render函数的返回值
- 当render函数被调用时,它会检查this.props和this.state的变化并返回以下类型之一::
- React元素:
- 通过JSX编写的代码会被编译成React.createElementk,所以返回的就是一个React元素
- **数组或者fragments:**使得render方法可以返回多个元素
- **Portals:**可以渲染子节点到不同的DOM子树中
- **字符串或数值类型:**它们在DOM中会被渲染成文本节点
- **布尔类型或者NULL:**不显示
- React元素:
函数组件
- 函数组件是使用function来进行定义的函数,会返回和类组件中render函数返回一样的内容。
- 特点(hooks出现之前)
- 没有生命周期,也会被更新并挂载,但是没有生命周期函数
- this关键字不能指向组件实例(因为没有组件实例)
- 没有内部状态(state,没有构造器,不能初始化状态,也不能维护状态变化)
- 主要为了展示东西,比如展示传入的参数props
//函数式组件
fucntion App(props){
	//返回值:和类组件中render函数返回的是一致
    return <h1>hello world</h1>
}
export default App
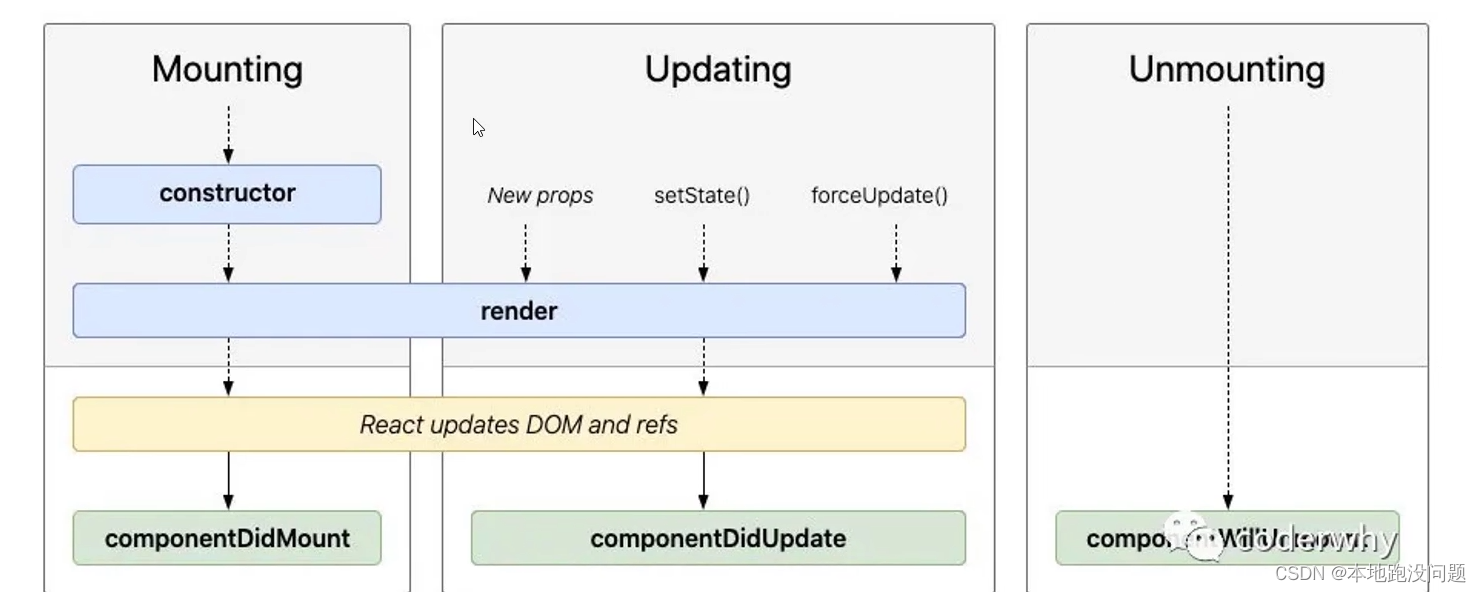
类组件的生命周期
- 事物从创建到销毁的过程称之为生命周期
- 了解React组件的生命周期可以让我们在最合适的地方完成自己想要的功能
- 生命周期与生命周期函数的关系
- 在生命周期中分为很多个阶段
- 比如装载阶段(Mount),组件第一次在DOM树中被渲染的过程
- 更新过程(Update),组件状态发生变化,重新更新渲染的过程
- 卸载过程(Unmount),组件从DOM树中被移除的过程
- React内部为了告诉我们当前处于哪些阶段,会对我们组件内部实现的某些函数进行回调,这些函数就是生命周期函数
- componentDidMount函数:组件已经挂载到DOM上时,就会回调
- componentDidUpdate函数:组件已经发生更新时,就会回调
- componentWillUnmount函数:组件即将被移除时,就会回调
- 在生命周期中分为很多个阶段
生命周期函数
- Constructor
- 如果不初始化state或不进行方法绑定,则不需要为React组件实现构造函数
- 通常只做两件事件
- 给this.state赋值对象来初始化内部的state
- 为事件绑定实例(this)
- componentDidMount
- 会在组件挂载后(插入DOM树中)立即调用
- 类似于 :
$(document).ready(function(){}) - 通常进行的操作
- 依赖于DOM的操作
- 发送网络请求
- 添加一些订阅(会在componentWillUnmount取消订阅)
- componentDidUpdate
- 更新后立即调用,首次渲染不会执行此方法
- 组件更新后,可以在此对DOM进行操作
- 当props更新后,进行网络请求
- 更新后立即调用,首次渲染不会执行此方法
- componentWillUnmount
- 组件卸载之前调用
- 执行清理操作
- 清除timer,取消网络请求、订阅等
- 组件卸载之前调用
不常用生命周期函数
- getDerivedStateFromProps:
- state的值在任何时候都依赖于props时使用;该方法返回一个对象来更新state
- getSnapshotBeforeUpdate:
- 在React更新DOM之前回调的一个函数,可以获取DOM更新前的一些信息
- shouldComponentUpdate:
- state改变是否发生重新render
组件的嵌套
补充:
安装插件:ES7+ React/Redux/React-Native snippets
可以使用快捷键生成代码片段,提高开发效率
比如:rcc、rce、rpc
组件之间的通信
父传子
- 父组件通过属性=值的形式来传递给子组件数据
- 子组件通过props参数获取父组件传递过来的数据
实例代码:
//父组件
import React from "react"
import HelloWorld from "./Components/HelloWorld"

//编写一个组件
class App extends React.Component {
  constructor() {
    super()
    this.state = {
      message: "hello world"
    }
  }
  render() {
    const { message } = this.state
    const data = "hello props"
    return (
      <div>
        <h2>{message}</h2>
        <HelloWorld data={data} />
      </div>
    )
  }
}
//导出App
export default App
子组件:
import React from "react";
class HelloWorld extends React.Component{
    //这里可以省略
    // constructor(props){
    //     super(props)
    //     console.log(this.props)
    // }
    render(){
        const {data} = this.props
        return(
            <div>
                <h2>{data}</h2>
            </div>
        )
    }
}
export default HelloWorld
父子通信真实数据
- npm install axios
- 编写代码
代码:
import React from "react"
import HelloWorld from "./Components/HelloWorld"
import axios from "axios"

//编写一个组件
class App extends React.Component {
  constructor() {
    super()
    this.state = {
      message: "hello world",
      data: []
    }
  }
  componentDidMount() {
    axios.get("http://123.207.32.32:8000/home/multidata")
      .then(res => {
        this.setState({
          data: res.data.data.banner.list
        })
      })
  }
  render() {
    const { message, data } = this.state
    return (
      <div>
        <h2>{message}</h2>
        <HelloWorld data={data} />
      </div>
    )
  }
}
//导出App
export default App
import React from "react";
class HelloWorld extends React.Component{
    //这里可以省略
    // constructor(props){
    //     super(props)
    //     console.log(this.props)
    // }
    render(){
        const {data} = this.props
        console.log(data)
        return(
            <div>
                <h2>{
                        data.map((item,index,obj)=>{
                            return(
                                <li key={index}>{item.title}</li>
                            )
                        })
                    }</h2>
            </div>
        )
    }
}
export default HelloWorld
props类型验证
- 参数propTypes
- 对于传递给子组件的数据,我们可能希望进行验证,特别是对于大型项目来说:
- 如果项目中默认继承了Flow或TypeScript,直接就可以进行类型验证
- 没有的话,也可以通过prop-types库进行参数验证
代码实例:
<div>
        <h2>{message}</h2>
        <HelloWorld data={data} title={"123"}/>
        <HelloWorld/>
</div>
HelloWorld.jsx:
import React from "react";
//导入Proptypes包
import PropTypes from "prop-types"

//省略代码

//验证类型
HelloWorld.propTypes = {
    data:PropTypes.array.isRequired ,//要求是数组类型并且必传
    title:PropTypes.string
}
//设置默认值
HelloWorld.defaultProps = {
    data:[],
    title:"默认值"
}
export default HelloWorld
子传父
- 某些情况,我们需要子组件向父组件传递消息:
- 父组件给子组件传递一个有参数的回调函数,在子组件中调用这个函数即可;
代码实例:
//父组件代码
import React, { Component } from 'react'
import AddCount from './Components/AddCount'

class App extends Component {
  constructor() {
    super()
    this.state = {
      count: 0
    }
  }
  addCount(count) {
    this.setState({
      count: this.state.count + count
    })
  }
  render() {
    const { count } = this.state
    return (
      <div>
        <h2>{count}</h2>
        <AddCount add={(count) => { this.addCount(count) }} />
      </div>
    )
  }
}

export default App
//子组件代码
import React, { Component } from 'react'

class AddCount extends Component {

    addClick(count) {
        this.props.add(count);
    }
    render() {
        return (
            <div>
                <button onClick={() => { this.addClick(1) }}>+1</button>
                <button onClick={() => { this.addClick(-1) }}>-1</button>
            </div>
        )
    }
}

export default AddCount
父子通信案例
//Nav.css
.m-nav {
    display: flex;
    width: 300px;
    align-items: center;
    height: 40px;
    text-align: center;
}

.item {
    flex: 1;
}

.item>span {
    cursor: pointer;
}

.isactive>span {
    padding: 0 3px;
    border-bottom: 2px solid rgb(226, 46, 46);
}

.isactive {

    color: brown;
}
//Nav.jsx
import React, { Component } from 'react'
import './Nav.css'
class Nav extends Component {
    constructor() {
        super()
        this.state = {
            currentIndex: 0
        }
    }
    btnClick(index) {
        this.setState({
            currentIndex: index
        })
        this.props.itemClick(index)
    }
    render() {
        const { titles } = this.props
        const { currentIndex } = this.state
        return (
            <div className='m-nav'>{
                titles.map((item, index, obj) => {
                    return (
                        <div
                            className={`item  ${index === currentIndex ? "isactive" : ""}`}
                            key={index}
                            onClick={() => { this.btnClick(index) }}
                        >
                            <span>{item}</span>
                        </div>
                    )
                })
            }</div>
        )
    }
}

export default Nav
//App.jsx
import React, { Component } from 'react'
import Nav from './Components/Nav'

class App extends Component {
  constructor() {
    super()
    this.state = {
      titles: ["流行", "新款", "精选"],
      currentIndex: 0
    }
  }
  itemClick(index) {
    this.setState({
      currentIndex: index
    })
  }
  render() {
    const { titles, currentIndex } = this.state
    return (
      <div>
        <Nav titles={titles} itemClick={(index) => { this.itemClick(index) }} />
        <h2>{titles[currentIndex]}</h2>
      </div>
    )
  }
}

export default App
组件的插槽(slot)实现
- 在开发中,我们抽取一个组件,但是为了这个组件有更强的通用性,我们不能将组件中的内容限制为固定的div、span等等
- 我们应该让使用者可以决定某一块区域到底放什么内容
- 总之,就是页面结构确定,而具体内容根据需求变化
- Vue中有一个固定的做法是通过slot来完成的
- React对于这种需要插槽的情况非常灵活,有两种方案可以实现
- 组件的children子元素
- **每个组件都可以获取到props.children:**它包含组件的开始标签和结束标签之间的内容
- **弊端:**通过索引值获取传入的元素很容易出错,不能精准的获取传入的原生DOM
- props属性传递React元素
- 组件的children子元素
实现插槽效果的代码实例:
//Nav.css
h1,
h2,
body {
    margin: 0;
    padding: 0;
}

.nav-bar {
    display: flex;
    height: 40px;
    line-height: 40px;
    text-align: center;
}

.left,
.right {
    width: 80px;
}

.center {
    flex: 1;
    background-color: #f80;
}
//Nav.jsx
import React, { Component } from 'react'
import "./Nav.css"
import PropTypes from "prop-types"
class Nav extends Component {
    render() {
        const { children } = this.props
        const { leftSlot, centerSlot, rightSlot } = this.props
        return (
            // 保持这样的结构,然后在三部分实现插槽效果
            <div className="nav-bar">
                {/* 插槽方式一 */}
                {/* <div className="left">{children[0]}</div>
                <div className="center">{children[1]}</div>
                <div className="right">{children[2]}</div> */}


                {/* 插槽方式二: */}
                <div className="left">{leftSlot}</div>
                <div className="center">{centerSlot}</div>
                <div className="right">{rightSlot}</div>
            </div>
        )
    }
}
Nav.propTypes = {
    //只传一个的验证
    // children:PropTypes.element
    //传递数组的验证,传递多个
    children: PropTypes.array
}
export default Nav
//App.jsx
import React, { Component } from 'react'
import Nav from './Components/Nav'
class App extends Component {
  render() {
    return (
      <div>
        {/* 插槽方式一:通过子元素 */}
        <Nav>
          {/* 以下元素会传入到Nav组件的this.props.children中 */}
          <button>按钮</button>
          <h2>我是标题</h2>
          <i>斜体文字</i>
        </Nav>
        {/*插槽方式二:使用props实现插槽*/}
          <Nav
          leftSlot={<button>按钮</button>}
          centerSlot={ <h2>我是标题</h2>}
          rightSlot={ <i>斜体文字</i>}
          />
      </div>
    )
  }
}
export default App
作用域插槽效果的实现
- 父组件定义元素标签类型,而子组件设置标签内数据
- 根据回调函数实现
代码实例:
//App.jsx
      <div>
          <Nav
          leftSlot={(data)=>{return <button>{data}</button>}}
          centerSlot={ (data) => <h2>{data}</h2>}
          rightSlot={ (data)=><i>{data}</i>}
          />
      </div>
//Nav.jsx
    render() {
        const { children } = this.props
        const { leftSlot, centerSlot, rightSlot } = this.props
        return (
            // 保持这样的结构,然后在三部分实现插槽效果
            <div className="nav-bar">
                <div className="left">{leftSlot("left")}</div>
                <div className="center">{centerSlot("center")}</div>
                <div className="right">{rightSlot("right")}</div>
            </div>
        )
    }
非父子组件通信
- 非父子组件数据的共享:
- 在开发中,比较常见的数据传递方式是通过props属性自上而下(由父到子)进行传递
- 但是对于一些场景:需要一些数据在多个组件中进行共享(地区偏好、UI主题、用户登录状态、用户信息等)
- 如果我们在顶层的App中定义这些信息,之后一层层传递下去,那么对于一些中间层不需要数据的组件来说,是一种冗余的操作
- Spread扩展运算符:
如果你想使用props属性一层层的传递数据,使用扩展运算符可以方便一点,但是不推介
如果你已经有了一个props对象,你可以使用**展开运算符…**来在JSX中传递整个props对象,以下两个组件是对等的
function App1(){
    return <Greeting firstName="Ben" ;lastName='Hector'/>
}

function App2(){
    const props = {firstName:"Ben",lastName:"HEctor"};
    return <Greeting {...props}/>
}
#####Context介绍
- 通过props的话,在层级更多的情况下,代码冗余而且麻烦
- React提供了一个API:Context
- Context提供了一种在组件之间共享此类值的方式,而不必显式地通过组件树的逐层传递props
- Context是为了共享对于一个组件树而言是”全局“的数据
Context的基本使用
-
新建context文件夹,创建theme-context.js文件,创建一个Context
import React from 'react' const ThemeContext = React.createContext() export default ThemeContext -
包裹后代组件,并在value中传值
//App.js import ThemeContext from "./context/ThemeContext" <ThemeContext.Provider value={{color:red}}> <Son/> <Fun/> </ThemeContext.Provider> -
子组件拿值
//Son.jsx import ThemeContext from "./context/ThemeContext" //确定是哪一个Context实例 Son.contextType = ThemeContext //获取到数据 console.log(this.context) -
函数式组件中使用Context共享数据**(类组件在使用多个context时也可以采取这种方法)**
 //Fun.jsx
import ThemeContext from "./context/ThemeContext"

function Fun(){
    return <div>
    	<ThemeContext.Consumer>
            {
                value => {
                    return <h2>{value.color}</h2>
                }
            }
        </ThemeContext.Consumer>
    </div>
}
Context相关API
-
React.createContext
- 创建一个需要共享的Context对象:
- defaultValue时组件在顶层查找过程中没有找到对应的Provider,就使用默认值
-
Context.Provider
- 每个Context对象都会返回一个Provider React组件,允许消费组件订阅context的变化
- Provider接受一个value属性,传递给消费组件
- 一个Provider可以和多个消费组件有对应关系
- 多个Provider可以嵌套使用,里层的会覆盖外层的数据
- 当Provider的value值发生变化时,它内部的所有消费组件都会重新渲染
-
Class.contextType
- 挂载在class上的contextType属性会被重新赋值为一个由React.createContext()创建的Context对象
- 这能让你使用this.context来消费最近Context上的那个值
- 你可以在任何生命周期函数访问到它
-
Context.Consumer
-
这里,React组件也可以订阅到context变更。这能让你在函数式组件中完成订阅context
-
需要函数作为子元素
{ value =>{ return <h2>{value.color}</h2> } } -
这个函数接收当前的context值,返回一个React节点
-
-
什么时候使用默认值defaultValue?
- 当组件不被Provider包裹时
-
什么时候使用Context.Consumer?
- 当使用value组件是一个函数式组件时
- 当组件中需要使用多个Context时
非父子组件通信-事件总线(event-bus)
-
子组件中的点击事件将事件或者数据分享给其他组件
-
使用事件总线-hy-event-store库
- npm install hy-event-store
- 封装一个utils文件夹,放工具
- 新建event-bus.js
import {HYEventBus} from "hy-event-store"

//创建一个eventBus
const eventBus = new HYEventBus()

export default eventBus
-
代码实例:
//App.jsx
import React, { Component } from 'react'
import Home from './Components/Home'
import eventBus  from './utils/event-bus'
export class App extends Component {

  constructor(){
    super()
    this.state = {
      name:"App",
      age:0,
      height:0
    }
  }
  componentDidMount(){
    //在这里监听子组件事件"bannerPrev",并执行回调函数
    // eventBus.on("bannerPrev",(name,age,height)=>{
    //     console.log("app中监听到bannerPrev","参数:",name,age,height)
    //     //对象解构赋值
    //     this.setState({name,age,height})
    // })
    //参数:事件名  回调函数名  this指向
    eventBus.on("bannerPrev",this.bannerPrevClick,this)
  }
  bannerPrevClick(name,age,height){
    console.log("app中监听到bannerPrev","参数:",name,age,height)
    this.setState({name,age,height})
  }
  componentWillUnmount(){
    //在这里移除事件监听
    eventBus.off("bannerPrev",this.bannerPrevClick)
  }
  render() {
    return (
      <div>
          <h2>{this.state.name}</h2>
          <Home/>
      </div>
    )
  }
}

export default App
//Home.jsx
import React, { Component } from 'react'
import HomeBanner from './HomeBanner'

export class Home extends Component {
  render() {
    return (
      <div>
        <h2>Home</h2>
        <HomeBanner/>
      </div>
    )
  }
}

export default Home
//HomeBanner.jsx
import React, { Component } from 'react'
import eventBus from '../utils/event-bus'

export class HomeBanner extends Component {
prevClick(){
    console.log("上一个")

    //发出去事件和参数
    eventBus.emit("bannerPrev","why",18,1.88)
}
nextClick(){
    console.log("下一个")
}
  render() {
    return (
      <div>
            <h2>HomeBanner</h2>
            {/* 我们希望当点击两个按钮时传递数据到App.js中 */}
            <button onClick={()=>{this.prevClick()}}>上一个</button>
            <button onClick={()=>{this.nextClick()}}>下一个</button>
      </div>
    )
  }
}

export default HomeBanner
Setstate的同步和异步
为什么使用setState
- 开发中我们不能直接修改state的值后来让界面发生更新
- 直接修改state中的值,React不知道数据发生了变化
- React没有实现Vue3中Proxy的方式来监听数据的变化
- vue中有数据劫持,react没有
- 必须通过setState来告知React数据已经发生了变化
- setState方法是从Component中继承过来的
setState的详细使用
setState的实现不是替换原来的state,而是合并
//react大概怎么实现setState?

Object.assign(this.state,newState)//新旧对象合并

render()
-
基本使用
this.setState({message:"hello world"})
-
setState可以传入一个回调函数,返回对象
this.setState(()=>{ return { message:"hello world"}})- 好处是可以在回调函数中编写新的state的逻辑,写在这里增强内聚性
- 好处二是当前的回调函数会将之前的state和props传递进来,在函数内可以直接获取
-
setState在react事件处理中是异步调用
测试代码:
this.setState({message:"hello react"}) console.log("--------",this.state.message)//此时输出message的旧值 -
如果希望在数据更新之后,获取到对应的结果执行一些逻辑代码,那么可以在setState中传入第二个参数:callback
测试代码:
this.setState({message:"hello react"},()=>{
    console.log("++++++",this.state.message)
})
为什么setState要设置成异步?
Redux的作者在github上回答过:
- setState设计成异步,可以显著的提升性能
- 如果每次调用setState都进行一次更新,那么render会被频繁调用,效率很低
- 最好的办法应该是获取到多个更新,之后进行批量更新
- 如果同步更新了state,但是还没有执行render函数,那么state和props不能保持同步
- 这会在开发中产生很多问题,会导致子组件的props值和父组件的state不一致
- 因为子组件的props值,需要父组件render函数执行之后,才会更新
- 父组件的state已经变化了,但是还没render,传递给子组件的props还是旧值
setState一定是异步的吗?(React18之前)
验证一:在setTimeout中的更新
changeText(){
    setTimeout(()=>{
        this.setState({
            message:"hello react"
        });
        console.log(this.state.message)//"hello react"
    },0)
}
验证二:原生DOM事件
componentDidMount(){
    const btnEl = document.getElementById('btn');
    btnEl.addEventListener("click",()=>{
        this.setState({
            message;"hello react"
        });
        console.log(this.state.message);
    })
}
- React18之前有两种情况
- 在组件生命周期或React合成事件中,setState是异步的
- 在setTimeout或者原生dom事件中,setState是同步
- React18之后,默认所有的操作都被放到批处理中(异步处理)
React开发高级内容
React性能优化
新旧DOM树的算法优化
-
React渲染流程:JSX => 虚拟DOM => 真实DOM
-
React更新流程:props/state改变 =>render函数重新执行 => 产生新的DOM树
=>新旧DOM树进行diff=>计算出差异进行更新=>更新到真实的DOM
- React在调用React的render方法,会创建一个不同的树
- React需要基于这两颗不同的树之间的差别来判断如何有效的更新UI
- 如果一棵树参考另外一棵树进行完全比较更新,算法复杂度为O(n^2),n为树中元素数量
- 如果有1000个元素,那么计算量会在十亿数量级,更新性能会非常低效
- 于是,React对这个算法进行了优化,优化成了O(n)
- 同层节点之间相互比较,不会跨节点比较
- 不同类型的节点,产生不同的树结构
- 开发中,可通过key来指定哪些节点在不同的渲染下保持稳定,尽量不更新(可能只是调整下位置)
keys的优化
- keys的优化
- 在最后位置插入数据
- 这种情况,有无key意义不大
- 在前面插入数据
- 这种做法,在没有key的情况下,所有的li都需要修改
- 子元素拥有key时,React使用key来匹配原有树上的子元素以及最新树上的子元素:
- key为1和2的元素仅仅进行位移,不需要进行任何的修改
- 将key为3的元素插入到最前面的位置即可
- key的注意事项
- key应该是唯一的
- key不要使用随机数(随机数在render执行后会变化)
- 使用index作为key,对性能没有优化(因为当你插入一个新的item时,index会变)
- 在最后位置插入数据
SCU优化
- 开发中,我们只要修改了父组件(App)中的数据(即使数据没有变),所有的子组件都需要重新render,进行diff算法,性能非常低。
- 我们应该在依赖的数据发生改变时,在调用自己的render方法
- 我们可以通过shouldComponentUpdate方法实现
- 参数一:nextProps修改之后,最新的props属性
- 参数二:nextState修改之后,最新的state属性
shouldComponentUpdate(nextProps,newState){
    if(this.state.message !== newState.message){
        return ture
    }
    return false
}
PureComponent和memo性能优化
-
手动实现SCU优化,会非常繁琐
- 即手动判断props或者state中的数据是否发生了改变,来决定shouldComponentUpdate返回true或者false
-
其实,React默认已经帮我们实现好了
- 将class继承自PureComponent
import React,{PureComponent} from 'react' export class App extends PureComponent{ //.... }- 函数组件:使用memo高阶函数包裹
import {memo} from "react"

const Profile = memo(function(props){
    return <h2>{props.message}</h2>
})
export default Profile
State数据不可变
即不要直接去修改state中的数据,而是将整个东西指向的内存全部修改(栈中的内存改变)
construct(){
    super()
    this.state = {
        array:["1","2","3",]
    }
}
//错误代码,这在pureComponent模式下,不会重新渲染
const newdata = "4"
this.state.push(newdata)
this.setState({array:this.state.array})

//错误代码,这在pureComponent模式下,不会重新渲染
const newdata = "4"
const arr = this.state.array
arr.push(newdata)
this.setState({array:arr})

//正确代码,修改整个内存
const newdata = "4"
//使用扩展运算符创建了一个新的数组副本,然后 newbooks 引用了这个新的数组,所以在栈中的内存位置是不同的。
const arr = [...this.state.array]
arr.push(newdata)
this.setState({array:arr})
pureComponent的浅层比较
pureComponent在底层确定是否要执行shouldComponentUpdate时进行了浅层比较
shouldComponentUpdate(nextProps,nextState){
    //浅层比较
   return !shallowEqual(nextProps,this.props)|| !shallowEqual(nextState,this.state)

}
//react中shallowEqual源码
funtion shallowEqual(objA:mixed,objB:mixed):boolean{
    //这里首先比较两个对象,如果我们直接用this.state 改变值,在这里会判断true
    if(is(objA,objB)){
        return true
    }
    //.....
}
修改深层数据也要拷贝
- 保证重新执行render函数
addBookCount(index){
    //错误写法:直接改,不会执行render函数
    this.state.books[index].count++
    //正确写法
    const books  = [...this.state.books]
    books[index].count++
    this.setState({books:books})
}
ref获取DOM操作
- 在React开发中,不建议直接操作DOM原生,但是在某些特殊情况,确实需要获取DOM进行某些操作
- 管理焦点,文本选择或媒体播放
- 触发强制动画
- 集成第三方DOM库
- 我们可以使用refs获取DOM
- 如何创建refs来获取DOM
- 在React元素上绑定一个ref字符串(已弃用)
- 导入createRef并且提前创建好ref对象,将创建出来的对象绑定到元素上
- 在ref中放入回调函数,在对应的元素被渲染之后,回调函数执行,并且将元素传入
代码实例:
import React, { PureComponent ,createRef} from 'react'
export class App extends PureComponent {
    //创建ref
    this.titleRef = createRef()

    this.titleEl = null
  }
  getNativeDOM(){
    //1.在React元素上绑定一个ref字符串(已弃用)
    console.log(this.refs.why)

    //2.导入createRef并且提前创建好ref对象,将创建出来的对象绑定到元素上
    console.log(this.titleRef.current)

    //方式三:在ref中放入回调函数,在对应的元素被渲染之后,回调函数执行,并且将元素传入
    console.log(this.titleEl)
  }
  render() {
    return (
      <div>
        <h2 ref="why">方式一</h2>
        <h2 ref={this.titleRef}>方式二</h2>
        <h2 ref={el => {this.titleEl = el}}>方式三</h2>
        <button onClick={e=>this.getNativeDOM()}>获取DOM</button>
      </div>
    )
  }
}
export default App
ref获取组件
-
当ref属性用于HTML时,React.createRef()创建的ref接收底层DOM元素作为其current属性
-
用于自定义组件时,ref对象接收组件的挂载实例作为其current属性
-
ref不能应用于函数式组件:
- 因为函数式组件没有实例,所以不能获取到对应的组件对象
-
获取函数式组件中某个元素的DOM的方式
- 直接传入ref属性(错误)
- 通过forwardRef高阶函数
通过forwardRef函数获取函数组件中DOM元素的代码:
//获取函数组件的某个DOM
//使用forwardRef之后,可以传入两个参数,第二个为ref,我们可以实现ref转发
const Fun = forwardRef(function (props,ref) {
  return (
    <h1 ref={ref}>hello react</h1>
  )
})
<FUN ref ={this.hwRef}/>

this.hwRef.current
通过ref获取类组件,然后调用类组件方法:
import React, { PureComponent, createRef, forwardRef } from 'react'

//类子组件
class HelloWorld extends PureComponent {
  test() {
    console.log("test---")
  }
  render() {
    return (
      <h1>hello world</h1>
    )
  }
}
export class App extends PureComponent {
  constructor() {
    super()
    this.state = {}
    this.hwRef = createRef()
  }
  getComponent() {
    //调用类组件实例的方法
    console.log(this.hwRef.current)
    this.hwRef.current.test()
  }
  render() {
    return (
      <div>
        <HelloWorld ref={this.hwRef} />
        <button onClick={e => this.getComponent()}>获取组件实例</button>
      </div>
    )
  }
}
export default App
受控和非受控组件
- 当给input、textarea 设置默认value时,元素变为受控组件,必须设置监听函数,否则会报错
- 在非受控组件中,表单元素的值由 DOM 自身维护,React 并不会控制输入的值。你可以使用
defaultValue属性来设置初始值,但 React 无法跟踪用户的输入或更改。 - 受控组件:在受控组件中,表单元素的值由 React 的状态(state)来管理。你需要使用
value属性将表单元素的值绑定到组件的状态,并使用onChange事件监听器来更新状态。这使得 React 可以实时追踪输入元素的值,而不必直接操作 DOM。
代码实例:
  inputChange(event){
    this.setState({
      username:event.target.value
    })
  }
  render() {
    const {username} = this.state
    return (
      <div>
        {/* 受控组件 */}
        {/* 当给input、textarea 设置默认value时,元素变为受控组件,必须设置监听函数,否则会报错 */}
        <input type="text" value={username}  onChange={(e)=>this.inputChange(e)}/>

        {/* 非受控组件 */}
        <input type="text" />
        <h2>{username}</h2>
      </div>
    )
  }
- 在html中,表单元素(如、和)之类的表单元素通常自己维护state(即浏览器维护=>event.target.value),并根据用户输入进行更新
- 而在React中,可变状态通常保存在组件的State属性中,并且只能通过使用setState()来更新
- 我们将两者结合起来,使React的state成为“唯一的数据源”
- 渲染表单的React组件还控制着用户输入过程中表单发生的操作
- 被React以这种方式控制取值的表单输入元素就叫做**“受控组件”**
受控组件的基本使用
import React, { PureComponent } from 'react'

export class App extends PureComponent {
  constructor() {
    super()
    this.state = {
      username: "hello world"
    }
  }

  handleSubmitClick(event) {
    //阻止默认行为
    event.preventDefault()
    //获取到所有的表单数据,对数据进行组件
    console.log("在这里获取所有的输入内容")
    console.log(this.state.username)
    //以网络请求的方式传递给服务器
  }

  handleUsernameChange(e) {
    this.setState({ username: e.target.value })
  }
  render() {
    const { username } = this.state
    return (
      <div>
        {/*原生的表单数据提交服务器,会刷新页面*/}
        {/* <form action="/abc"> */}
        <form onSubmit={e => this.handleSubmitClick(e)}>
          {/* 加上label,实现点击文本,锁定input */}
          <label htmlFor="username">
            用户:<input
              id='username'
              type="text"
              name="username"
              value={username}
              onChange={e => this.handleUsernameChange(e)} />
          </label>
          <button type='submit'>提交</button>
        </form>
      </div>
    )
  }
}

export default App
多个受控组件被一个函数控制
import React, { PureComponent } from 'react'

export class App extends PureComponent {
  constructor() {
    super()
    this.state = {
      username: "",
      password: ""
    }
  }

  handleSubmitClick(event) {
    //阻止默认行为
    event.preventDefault()
    //获取到所有的表单数据,对数据进行组件
    console.log("在这里获取所有的输入内容")
    console.log(this.state.username, this.state.password)
    //以网络请求的方式传递给服务器
  }

  // handleUsernameChange(e) {
  //   this.setState({ username: e.target.value })
  // }
  // handlePasswordChange(e) {
  //   this.setState({ password: e.target.value })
  // }
  //将以上两个函数合并
  handleInputChange(event) {
    //计算属性名
    const keyName = event.target.name
    console.log(keyName)
    this.setState({
      //方括号是计算属性名的语法,如果去掉方括号,那么属性名将不会动态变化
      [keyName]: event.target.value
    })
  }

  render() {
    const { username, password } = this.state
    return (
      <div>
        {/*原生的表单数据提交服务器,会刷新页面*/}
        {/* <form action="/abc"> */}
        <form onSubmit={e => this.handleSubmitClick(e)}>
          {/* 加上label,实现点击文本,锁定input */}
          <label htmlFor="username">
            用户:<input
              id='username'
              type="text"
              name="username"
              value={username}
              onChange={e => this.handleInputChange(e)} />
          </label>
          <label htmlFor="password">
            密码:<input
              id='password'
              type="password"
              name="password"
              value={password}
              onChange={e => this.handleInputChange(e)} />
          </label>
          <button type='submit'>提交</button>
        </form>
      </div>
    )
  }
}

export default App
checkBox单选和多选
  this.state = {
      hobbies: [
        { value: "sing", text: "唱", isChecked: false },
        { value: "dance", text: "跳", isChecked: false },
        { value: "rap", text: "rap", isChecked: false }
      ]
    }
//单选事件
  handleCheckChange(event) {
    this.setState({
      isAgree: event.target.checked
    })
  }
//多选事件
handlehobbiesChange(e,index){
    const hobbies = [...this.state.hobbies]
    hobbies[index].isChecked = e.target.checked
    //结构赋值
    this.setState({
     hobbies
    })
  }
  {/* 将checkbox变为受控组件 绑定checked*/}
          <label htmlFor="agree">
            <input
              id='agree'
              type="checkbox"
              checked={isAgree}
              onChange={e => this.handleCheckChange(e)}
            />同意协议
          </label>

  {/* 多选CheckBox */}
          <div>
            爱好:
            {
              hobbies.map((item,index) => {
                return (
                  <label key={item.value} htmlFor={item.value}>
                    <input
                      type="checkbox"
                      id={item.value}
                      checked={item.isChecked}
                      onChange={e=>this.handlehobbiesChange(e,index)}
                    />
                    {item.text}
                  </label>
                )
              })
            }
Select单选和多选的受控
Select单选:
constructor() {
    super()
    this.state = {
      fruit:"orange"
    }
  }
 handleFruitChange(e){
    this.setState({
      fruit:e.target.value
    })
  }
 {/* select的受控 */}
         <div>
              {/* 这里的value是默认值 */}
            <select value={fruit} onChange={e => this.handleFruitChange(e)}>
              <option value="apple">苹果</option>
              <option value="orange">橘子</option>
              <option value="banana">香蕉</option>
            </select>
            </div>
         <div>
select多选:
handleFruitChange(e) {
    console.log(e.target.selectedOptions)//HTMLCollection (类数组类型)
    //将类数组转换为数组,Array.from可以把一个可迭代的对象转换为数组
    const options = Array.from(e.target.selectedOptions)
    const values = options.map(item => item.value)
    console.log(values)
    this.setState({ fruit: values })
  }
<div>
            {/* 这里的value是默认值 */}
            <select value={fruit} onChange={e => this.handleFruitChange(e)} multiple>
              <option value="apple">苹果</option>
              <option value="orange">橘子</option>
              <option value="banana">香蕉</option>
            </select>
          </div>
          <div>
补充知识:Array.from(可迭代对象, callback)
Array.from(arguments)
非受控组件的使用过程
- React推介大多数情况下使用受控组件来处理数据:
- 一个受控组件中,表单数据是由React组件来管理的
- 使用非受控组件,这时表单数据交由DOM节点来处理
- 在非受控组件中,我们需要使用ref来从DOM节点中获取表单数据
- 在非受控组件中通常使用defaultValue或者defaultChecked来设置默认值
 constructor() {
    super()
    this.state = {
      intro: "hello world"
    }
this.introRef = createRef()
  }
  handleSubmitClick(event) {
    //阻止默认行为
    event.preventDefault()
    //获取到所有的表单数据,对数据进行组件
    console.log("在这里获取所有的输入内容")

    console.log(this.introRef.current.value)//操作原生DOM
    //以网络请求的方式传递给服务器
  }
{/* 非受控组件 */}
<input type="text" defaultValue={intro} ref={this.introRef} />
高阶组件的定义方式和作用
- 高阶函数
- 接受一个或多个函数作为输入
- 或者输出一个函数
- JS中的filter、map、reduce都是高阶函数
- 高阶组件
- 定义为参数为组件,返回值为新组件的函数
- 高阶组件本身不是一个组件,而是一个函数
- 这个函数的参数是一个组件,返回值也是一个组件
定义方式和作用演示
import React, { PureComponent } from 'react'

//定义一个高阶组件(定义方式)
function hoc(Cpn) {
  //1.定义类组件
  class NewCpn extends PureComponent {
    render() {
      return (
        <div>
          <h2>高阶组件作用:</h2>
          {/* 高阶组件的作用:对组件进行拦截,可以传入props */}
          <Cpn name="why" />
        </div>
      )
    }
  }
  return NewCpn
  //定义函数组件
  // function NewCon2(props){}
  // return NewCon2
}
class HelloReact extends PureComponent {
  render() {
    return <h1>hello React</h1>
  }
}
//高阶组件的作用
const HelloWorldHOC = hoc(HelloReact)
export class App extends PureComponent {
  render() {
    return (
      <div>
        <HelloWorldHOC />
      </div>
    )
  }
}

export default App
应用场景一:给一些需要特殊数据的组件,注入props
function enhancedUserInfo(OldComponent){
    class NewComponent extends PureComponent{
        constructor(props){
            super(props)
            this.state = {
                userInfo:{
                 name:"coderwhy",
    			level:99
                }
			}
        }
        render(){
            return <OldComponent {...this.props} {...this.state.userInfo}/>
        }
    }
    return NewComponent
}
import enhancedUserInfo from "./enhanced_props"

class About extends PureComponent{
    ....
}
//在导出时进行props的增强
export default enhancedUserInfo(About)
使用高阶组件实现Context共享
-
新建Context文件夹,创建theme-context.js文件
import React from 'react' const ThemeContext = React.createContext() export default ThemeContext -
App.jsx
import React, { PureComponent } from 'react' import Product from './Components/Product' import ThemeContext from './Context/theme-context' export class App extends PureComponent { render() { return ( <div> <ThemeContext.Provider value={{ color: "red", size: "30" }}> <Product /> </ThemeContext.Provider> </div> ) } } export default App -
创建hoc文件夹,建立with-theme.jsx文件,定义高阶组件
import ThemeContext from "../Context/theme-context" //定义高阶组件 function withTheme(OriginComponent){ // function NewComponent(props){ // } // return NewComponent //上面三行简单写法 return (props)=>{ return ( <ThemeContext.Consumer> { value=>{ return <OriginComponent {...value}{...props}/> } } </ThemeContext.Consumer> ) } } export default withTheme -
然后我们用withTheme高阶组件包裹其他组件
import React, { PureComponent } from 'react'
import ThemeContext from '../Context/theme-context'
import withTheme from '../hoc/with_theme'
//普通写法
// export class Product extends PureComponent {
//     render() {
//         return (
//             <div>
//                 Product:
//                 <ThemeContext.Consumer>
//                     {
//                         value => {
//                             return <h2>theme: {value.color} - {value.size}</h2>
//                         }
//                     }
//                 </ThemeContext.Consumer>

//             </div>
//         )
//     }
// }

// export default Product

//使用高阶组件写法
export class Product extends PureComponent {
    render() {
        return (
            <div>
                Product:{this.props.color}
            </div>
        )
    }
}

export default withTheme(Product)
应用场景二:登录鉴权
//登录鉴权
function loginAuth(OriginComponent) {
    return props => {
        //在这里从localStorage中获取token
        const token = localStorage.getItem("token")
        if (token) {
            return <OriginComponent {...props} />
        } else {
            return <h2>请先登录</h2>
        }

    }
}
export default loginAuth
应用场景三:生命周期劫持(记录组件渲染时间)
import { PureComponent } from "react";

function logRenderTime(OriginComponent) {
    return class  extends PureComponent {
        //记录组件渲染时间
        componentWillMount() {
            this.beginTime = new Date().getTime()
        }
        componentDidMount() {
            this.endTime = new Date().getTime()
            const interval = this.endTime - this.beginTime
            console.log(`${OriginComponent.name}页面花费了${interval}`)
        }
        render() {
            return <OriginComponent {...this.props}/>
        }
    }
}
export default logRenderTime
高阶组件的意义
- 使用高阶组件可以针对某些React代码进行更加优雅的处理
- HOC的缺陷
- HOC需要在原组件上进行包裹或者嵌套,如果大量使用HOC,将会产生大量的嵌套,这让维护变得非常困难
- HOC可以劫持props,在不遵守约定的情况下可能造成冲突
Portals的使用
某些情况下,我们希望渲染的内容独立于父组件,甚至是独立于当前挂载的DOM元素中(#root)
- Portal提供了一种将子节点渲染到存在于父组件之外的DOM节点上
- 第一个节点是任何**可渲染的React子元素,**例如一个元素,字符串或fragment
- 第二个参数是一个DOM元素
示例代码
//App.jsx
import React, { PureComponent } from 'react'
import { createPortal } from "react-dom"
import Modal from './Modal'
export class App extends PureComponent {
  render() {
    return (
      <div className='app'>
        <h1>App h1</h1>
        {
          createPortal(
            <h2>App h2</h2>,
            document.querySelector("#why")
          )
        }
        {/* Modal 组件 */}
        <Modal>
          {/* 放在子组件的children中 */}
          <h2>我是标题</h2>
          <p>我是内容</p>
        </Modal>
      </div>
    )
  }
}

export default App
//Modal.jsx
import React, { PureComponent } from 'react'
import { createPortal } from 'react-dom'
export class Modal extends PureComponent {
  render() {
    return createPortal(this.props.children,document.querySelector("#modal"))
  }
}
export default Modal
fragment
- 在之前的开发中,我们总是在一个组件中返回内容时包裹一个div元素
- 不渲染包裹的div
- 使用Fragment
- Fragment允许你将子列表分组,而无需向DOM添加额外节点
- Fragment的短语法
- <> </>
- 但是我们需要在Fragment中添加key,就不能使用短语法
示例代码:
import React, { PureComponent, Fragment } from 'react'

export class App extends PureComponent {
  render() {
    return (
      //使用Fragment去掉包裹的div

      // <Fragment>
      //   <h2>我是App的标题</h2>
      //   <p>我是App的内容,hhhh</p>
      // </Fragment>

      //fragement的语法糖写法,在map回调函数中不建议这种写法,因为不好绑定key
      <>
        <h2>我是App的标题</h2>
        <p>我是App的内容,hhhh</p>
      </>
    )
  }
}

export default App
StrictMode
- StrictMode是一个用来突出显示应用程序中潜在问题的工具
- 与Fragment一样,StrictMode不会渲染任何可见的UI
- 它为其后代元素触发额外的检查和警告
- 严格模式检查仅在开发模式下运行,它们不会影响生产构建
- 可以为应用程序的任何部分启用严格模式:
- 不会对Header和Footer组件运行严格模式检查
- 但是,ComponentOne和ComponentTwo以及他们的后代元素会进行检查
<Header/>
<React.StrictMode>
	<div>
    	<ComponentOne/>
        <ComponentTwo/>
    </div>
</React.StrictMode>
<Footer/>
给App以及后代子元素全部开启严格模式
import ReactDOM from "react-dom/client"

//...

//给App后代子元素全部开启严格模式
root.render(
    <StrictMode>
        <App/>
    </StrictMode>
)
- 严格模式检测什么
- 识别不安全的生命周期
- 使用过时的refAPI
- 检查意外的副作用
- 组件的construct被调用两次
- 检查这里的逻辑代码在调用多次时,是否会出错
- 在生产环境中,是不会被调用两次的
- 使用废弃的findDOMNode方法
- 检查过时的context API
React过渡动画的使用
react-transition-group
- 如果我们想实现一个组件的显示和消失添加动画
- 我们可以使用css来实现
- 但是react社区为我们提供了react-transition-group
- 这个库可以帮我们方便的实现入场和离场动画,使用时需要额外安装
npm install react-transition-group --save

yarn add react-transition-group
- react-transition-group主要包含四个组件
-
Transitioon
- 该组件是一个与平台无关的组件(不一定哟啊结合CSS)
- 在前端开发中,我们一般是结合CSS来完成样式,比较常用CSSTransition
-
CSSTransition
- 在前端开发中,通常使用
-
SwitchTransition
- 两个组件显示和隐藏切换时,使用该组件
-
TransitionGroup
- 将多个动画组件包裹其中,一般用于列表中元素的动画
-
CSSTransition动画
-
- 执行过程中有三个状态:appear、enter、exit
- 它们有三种状态,需要定义对应的CSS样式
- 开始状态:对应的类是-appear、-enter、exit
- 执行动画:对应的类是-appear-active、-enter-active、-exit-active
- 执行结束:对应的类是-appear-done、-enter-done、-exit-done
- CSSTransition常见对应的属性
- in:触发进入或者退出的状态
- 如果添加了unmountOnExit={true},那么组件会在执行退出动画结束后被移除掉
- **当in为true时,触发触发进入状态,**会添加-enter、-enter-active的class开始执行动画,动画结束之后,移除两个class,并且添加-enter-done的class
- **当in为false时,触发退出状态,**会添加-exit、-exit-active的退出动画,动画结束之后,添加-exit-done的class
- className:动画class的名称
- timeout:过渡动画的时间
- appear:是否在初次进入添加动画(需要和in同时为true)
- unmountOnExit:退出后卸载组件
- 对应的钩子函数,来完成一些JS操作
- onEnter:进入动画之前触发
- onEntering:进入动画时触发
- onEntered:进入动画结束后触发
- in:触发进入或者退出的状态
//进入动画
.why-enter{
//进入的初始状态
  opacity:0;
}
.why-enter-active{
    opacity:1
    transition:opacity 1s ease;
}
.why-enter-done{

}
//退出动画
.why-exit{
  opacity: 1;
}
.why-exit-active{
  opacity: 0;
  transition: opacity 2s ease;
}

//总之就是自动帮我们切换类名
import React, { PureComponent } from 'react'
import { CSSTransition } from "react-transition-group"
import "./App.css"
export class App extends PureComponent {
  constructor(props) {
    super(props)
    this.state = {
      isShowTitle: false
    }
  }
  render() {
    const { isShowTitle } = this.state
    return (
      <div>
        <button onClick={e => this.setState({ isShowTitle: !isShowTitle })}>切换</button>
        {/* {isShowTitle &&  <h2>哈哈哈</h2>} */}
        <CSSTransition in={isShowTitle} unmountOnExit={true} classNames="why" timeout={2000}>
          <h2>hhh</h2>
        </CSSTransition>
      </div>
    )
  }
}

export default App
SwitchTransition动画
- SwitchTransition可以完成两个组件之间切换的炫酷动画
- 比如我们有一个按钮需要在on和off之间切换,我们希望看到on先从左侧退出,off从右侧进入
- 这个动画在vue中称为vue transition modes
- 主要属性:mode
- in-out:新组件先进入,旧组件再移除
- out-in:组件先移除,新组件再进入
- 使用SwitchTransition
- 里面要有CSSTransition或者Transition组件
- 并且用key属性代替in属性判断元素是何种状态
实现代码:
//App.css
.login-enter{
  transform: translateX(100px);
  opacity: 0;
}
.login-enter-active{
  transform: translateX(0);
  opacity: 1;
  transition: all 1s ease;
}
.login-exit{
  transform: translateX(0);
  opacity: 1;
}
.login-exit-active{
  transform: translateX(-100px);
  opacity: 0;
  transition: all 1s ease;
}
//App.jsx
import React, { PureComponent } from 'react'
import { SwitchTransition, CSSTransition } from "react-transition-group"
import "./App.css"
export class App extends PureComponent {
  constructor() {
    super()
    this.state = {
      isLogin: true
    }
  }
  render() {
    const { isLogin } = this.state
    return (
      <div>
        <SwitchTransition mode="out-in">
          <CSSTransition
            key={isLogin ? "exit" : "login"}
            classNames="login"
            timeout={1000}
          >
            <button
              onClick={e => this.setState({ isLogin: !isLogin })}
            >
              {isLogin ? "退出" : "登录"}
            </button>
          </CSSTransition>
        </SwitchTransition>
      </div>
    )
  }
}

export default App
TransitionGroup动画
实现代码:
//App.css
.book-enter {
  transform: translateX(100px);
  opacity: 0;
}

.book-enter-active {
  transform: translateX(0);
  opacity: 1;
  transition: all 1s ease;
}

.book-exit {
  transform: translateX(0);
  opacity: 1;
}

.book-exit-active {
  transform: translateX(100px);
  opacity: 0;
  transition: all 1s ease;
}
//App.jsx
import React, { PureComponent } from 'react'
import { TransitionGroup, CSSTransition } from 'react-transition-group'
import "./App.css"
export class App extends PureComponent {
  constructor() {
    super()
    this.state = {
      books: [
        { id: 11, name: "你不知道的JS", price: 99, count: 1 },
        { id: 12, name: "JS高级程序设计", price: 89, count: 1 },
        { id: 13, name: "你不知道的Vue", price: 79, count: 1 },
      ]
    }
  }
  addNewBook() {
    const books = [...this.state.books]
    books.push({ id: new Date().getTime(), name: "西游记", price: 78, count: 2 })
    this.setState({
      books: books
    })
  }
  removeBook(index) {
    const books = [...this.state.books]
    books.splice(index, 1)
    this.setState({ books })
  }
  render() {
    const { books } = this.state
    return (
      <div>
        <h2>书籍列表</h2>
        <TransitionGroup component="ul">
          {
            books.map((item, index) => {
              return (
                <CSSTransition key={item.id} classNames="book" timeout={1000}>
                  <li>
                    <span>{item.name}</span>
                    <button onClick={e => this.removeBook(index)}>删除</button>
                  </li>
                </CSSTransition>
              )
            })
          }
        </TransitionGroup>
        <button onClick={e => { this.addNewBook() }}>添加新书籍</button>
      </div>
    )
  }
}

export default App
React中的CSS方式
组件化的CSS
- 在组件化中的css方案应该符合以下条件
- 可以编写局部CSS:具备自己的作用域,不会随意污染其他组件中的元素
- 可以编写动态的CSS:根据组件的状态生成不同的CSS样式
- 编写方便
- 等等…
方案一:内联样式的编写
- 内联样式是官方推介的一种css样式的写法:
- style接受一个采用小驼峰命名属性的JS对象,而不是CSS字符串
- 可以使用state中的状态来设置相关样式
- 优点
- 样式之间不会有冲突
- 可以动态获取当前state中的状态
- 缺点
- 使用驼峰标识(font-size => fontSize)
- 没有提示
- 代码混乱
- 某些样式无法编写(比如伪类/伪元素)
render(){
	const titleColor = "red"
    <div style={{color:titleColor}}></div>
}
方案二:CSS的普通编写
- 编写到一个单独的文件,之后在进行引入
- 普通的css属于全局的css,样式之间会相互影响
方案三:CSS模块化的编写
- css modules在所有使用了类似与webpack配置的环境下都可以使用的
- 比如配webpack.config.js中的modules:true等
- React脚手架已经内置了CSS modules的配置
- .css/.less/.scss等样式文件都需要修改成.modules.css/less/scss等
- 之后就可以引用并且使用了
- css modules解决了局部作用域的问题
- 缺点
- 引用的类名,不能使用连接符(.home-title),在JS中不识别
- className必须使用{style.className}的形式编写
- 不方便动态来修改某些样式
/* Button.module.css */
.button {
  background-color: blue;
  color: white;
}
// Button.js
import React from 'react';
import styles from './Button.module.css';

const Button = () => {
  return <button className={styles.button}>Click me</button>;
};

export default Button;
方案四:Less的配置和编写方式
-
less的配置(使用craco)
-
npm install @craco/craco
-
修改package.json文件(使用craro启动项目,可以合并less文件)
"scripts": { "start": "craco start", "build": "craco build", "test": "craco test", "eject": "react-scripts eject" }, -
npm i craco-less
-
在项目中新建craco.config.js文件
//craco.config.js
const CracoLessPlugin = require("craco-less");

module.exports = {
    plugins:[
        {
            plugin:CracoLessPlugin,
            //options配置可选
            options:{
                lessLoaderOptions:{
                    lessOptions:{
                        modifyVars:{"@primary-color":"#1DA57A"},
                        javascriptEnabled:true
                    }
                }
            }
        }
    ]
}
-
终极方案:css in js
- CSS由JavaScript生成而不是在外部文件中定义
- 由第三方库提供
- 目前流行的CSS-in-js库
- style-components
- emotion
- glamorous
styled-component的使用
-
安装styled-component(npm install styled-components)
-
安装vscode-styled-components 插件,实现语法高亮
-
新建style.js
//新建style.js文件,然后导入styled-components import styled from "styled-components" export const AppWrapper = styled.div` .section{ border:1px solid red; .title{ font-size: 30px; &:hover{ background-color: purple; } } } .footer{ border:1px solid orange } ` -
在App.jsx中导入并且包裹
import React, { PureComponent } from 'react'
import { AppWrapper } from "./style"
export class App extends PureComponent {
  render() {
    return (
      <AppWrapper>
        <div className="app">
          <div className="section">
            <h2 className="title">我是标题</h2>
            <p className="content">我是内容</p>
          </div>
          <div className="footer">
            <p>免责声明</p>
            <p>版权声明</p>
          </div>
        </div>
      </AppWrapper>

    )
  }
}

export default App
ES6标签模版字符串
function(...args){}
foo("why",18,1.88)
foo`my name is ${name}`
sc子元素的抽取
//子元素单独抽取一个样式组件
export const SectionWrapper = styled.div`
        border:1px solid red;
        .title{
            font-size: 30px;
            &:hover{
                background-color: purple;
            }
        }
`
//App.jsx
    <AppWrapper>
        <div className="app">
          <SectionWrapper>
            <h2 className="title">我是标题</h2>
            <p className="content">我是内容</p>
            </SectionWrapper>
          <div className="footer">
            <p>免责声明</p>
            <p>版权声明</p>
          </div>
        </div>
      </AppWrapper>
引入外部的js变量
-
使用props传递
<SectionWrapper size={size} color={color}> </SectionWrapper> -
props可以被传递给styled组件
- 获取props需要通过${}传入一个插值函数,props会作为该函数的参数
- 这种方式可以有效的解决动态样式的问题
添加attrs属性
//使用attrs设置默认值
export const SectionWrapper = styled.div.attrs(
	 props => {
        return {
            tcolor:props.color || 'blue'
        }
    }
)`
        border:1px solid red;
        .title{
            /* 插入一个函数 */
            font-size: ${props => props.size}px;
            color:${props => props.tcolor};
            &:hover{
                background-color: purple;
            }
        }
`
共享主题的变量
方式一:新建style文件夹,新建variable.js文件,设置全局变量
//方便全局修改样式
export const primaryColor = "#ff8800"
export const secondColor = "#ff7788"

export const smallSize = "12px"
export const middleSize = "14px"
export const largeSize = "18px"
//style.js
import styled from "styled-components"
import {
    primaryColor,
    secondColor,
    largeSize
} from "./style/variables"

export const SectionWrapper = styled.div`
        .content{
            font-size:${largeSize}px;
            color:${primaryColor}
        }
`
方式二:使用styled-component的ThemeProvier
//index.js
//使用ThemeProvider包裹,并传入变量
import ReactDOM from "react-dom/client"
import App from "./App"
import { ThemeProvider } from "styled-components"
//编写react代码,并且通过React渲染出来对应的内容
const root = ReactDOM.createRoot(document.querySelector("#root"))
root.render(
    <ThemeProvider theme={{color:"red",size:"50px"}}>
        <App />
    </ThemeProvider>
)
//style.js
//在子组件中使用props.theme.color的方式接受变量
 .bottom{
        .header{
            color:${props=>props.theme.color};
            font-size:${props => props.theme.size}
        }
样式的继承
const HYButton = styled.button`
	padding:8px 30px;
	border-radius:5px
`
const HYWarnButton = styled(HYButton)`
	background-color:red;
	color:#fff;
`
React动态添加class
- 借助于第三方的库:classnames
- 过于简单
Redux的使用
- 纯函数
- 确定的输入,一定会产生确定的输出(不能使用了外界会变化的值)
- 函数在执行过程中,不能产生副作用(不能改变了外界的值)
- 纯函数的案例
- slice:截取数组不会对原数组进行任何操作,而是生成一个新的数组
- splice:截取数组,会返回一个新数组,也会对原数组进行修改
- slice就是一个纯函数
- React要求我们所有组件必须像纯函数一样,保护它们的props不被修改
- redux中,reducer被要求是一个纯函数
为什么需要redux
- 前端变得非常复杂
- 需要管理的状态越来越多,包括服务器返回的数据、缓存数据、用户操作产生的数据等等
- 管理不断变化的state非常困难
- React是在视图层帮助我们解决了DOM的渲染过程,但是State依然留给我们自己来管理
- Redux就是一个帮助我们管理State的容器:Redux是JavaScript的状态容器,提供了可预测的状态管理
Redux的核心理念-Store
- 比如我们有一个朋友列表需要管理
- 如果没有统一的规范来操作这段数据,那么整个数据的变化是无法跟踪的
- 比如页面的某处增加了一条数据
- 比如页面的某处修改了一条数据
- 就需要将数据存到Store中
const initialState = {
    friends:[
        {name:"thy",age:18},
        {name:"kobe",age:40},
        {name:"lilei",age:30}
    ]
}
Redux的核心理念-action
-
React要求我们通过action来更新数据:
- 所有的数据变化,必须通过派发(dispatch)action来更新
- action是一个普通的JS对象,用来描述这次的更新的type和content
-
更新friends的action
- 强制使用action的好处是可以清晰的知道数据到底发生了什么样的变化,所有的数据变化都可追踪,可预测
- 目前action是一个固定的对象
- 真实应用中,我们会通过函数来定义,返回一个action
const action = {type:"ADD_FRIEND",info:{name:"lucy",age:20}}
Redux的核心理念-reducer
- reducer用来将state和action联系在一起
- reducer是一个纯函数
- reducer将传入的state和action结合起来生成一个新的state
Store的创建过程和使用
- yarn init -y
- yarn add redux
- \src\store\index.js
const { createStore} = require("redux")

//初始化数据
const initialState = {
    name:"why",
    counter:100,
}
//定义的reducer函数:纯函数
function reducer(){
    return initialState
}

//创建的store
const store = createStore(reducer)

module.exports = store
- LEARN_REDUX\src\使用store中的数据.js
const store = require("./store")
console.log(store.getState())
派发action以及reducer
\src\store\index.js
const { createStore} = require("redux")

//初始化数据
const initialState = {
    name:"why",
    counter:100,
}
//定义的reducer函数:纯函数
//两个参数
//参数一:store中目前保存的state
//参数二:action  一旦调用dispatch这里的reducer会重新执行
//返回值:它的返回值会作为store之后存储的state
function reducer(state = initialState,action){
    console.log(state,action)
   //有新数据进行更新的时候,返回一个新的state
    if(action.type === "change_name"){
 //这里使用了对象的扩展语法({...state})来复制现有的 state 对象的属性。然后,新的 name 属性被设置为 action.name,这是从 action 中传递过来的新名称。
//请注意,这种写法会创建一个新的状态对象,并在新状态中仅更新 name 属性,而保留其他属性不变。这遵循了 Redux 的不可变性原则,即每次状态变化都会返回一个新的状态对象,而不是直接修改现有状态。
        return{...state,name:action.name}
    }else if(action.type === "add_number"){
        return {...state,counter:state.counter + action.num}
    }
   //没有新数据更新,返回之前的state
    return state
}

//创建的store
const store = createStore(reducer)

module.exports = store
src\修改store当中的数据.js
const store = require("./store")

console.log(store.getState())

//修改store中的数据(必须通过action)
const nameAction = {type:"change_name",name:"kobe"}
store.dispatch(nameAction)
console.log(store.getState())

const nameAction2 = {type:"change_name",name:"lilei"}
store.dispatch(nameAction2)
console.log(store.getState())

//修改counter
const counterAction = {type:"add_number",num:10}
store.dispatch(counterAction)
console.log(store.getState())
Store数据的订阅和reduce优化
LEARN_REDUX\src\订阅store中的数据.js
const store = require("./store")
//订阅数据的变化
const unsubscribe = store.subscribe(()=>{
    console.log("订阅数据的变化:",store.getState())
})

//修改store中的数据(必须通过action)
store.dispatch({type:"change_name",name:"kobe"})
store.dispatch({type:"change_name",name:"lilei"})
//取消订阅
unsubscribe()

store.dispatch({type:"add_number",num:10})
LEARN_REDUX\src\store\index.js
const store = require("./store")
//订阅数据的变化
const unsubscribe = store.subscribe(()=>{
    console.log("订阅数据的变化:",store.getState())
})

//修改store中的数据(必须通过action)
store.dispatch({type:"change_name",name:"kobe"})
store.dispatch({type:"change_name",name:"lilei"})
//取消订阅
unsubscribe()

store.dispatch({type:"add_number",num:10})
代码重构-优化-拆分文件过程
- 优化一:将action的创建抽到一个actionCreators函数中
- 优化二:将action的创建函数放到一个独立的文件中(actionCreators.js)
- 优化三:因为actionCreators和reducer中使用的字符串常量一致,所以将字符串替换成常量并抽离到一个独立的文件中(constants.js)
- 优化四:将reducer和默认值抽离到一个文件(reducer.js)
//actionCreators.js
//将字符串替换成常量
const {CHANGE_NAME,ADD_NUMBER} = require("./constants")
//actionCreators:帮助我们创建action(js对象)
 const changeNameAction = (name) =>({
    type:CHANGE_NAME,
    //如果对象属性的键和值有相同的名称,你可以使用对象属性值简写来简化代码
    name
})
//修改counter
const addNumberAction = (num)=>({
    type:ADD_NUMBER,
    num
})
module.exports = {
    changeNameAction,
    addNumberAction
}
//constants.js
const ADD_NUMBER = "add_number"
const CHANGE_NAME = "change_name"

module.exports={
    ADD_NUMBER,
    CHANGE_NAME
}
//reducer.js
const {CHANGE_NAME,ADD_NUMBER} = require("./constants")
//初始化数据
const initialState = {
    name:"why",
    counter:100,
}
//定义的reducer函数:纯函数
function reducer(state = initialState,action){
    switch(action.type){
        case CHANGE_NAME:
            return{...state,name:action.name}
        case ADD_NUMBER:
            return{...state,counter:state.counter + action.num}
        default:
            return state
    }
}
module.exports = reducer
//index.js
const { createStore} = require("redux")
const reducer = require("./reducer.js")
//创建的store
const store = createStore(reducer)
module.exports = store
Redux的三大原则和流程图分析
- 单一数据源
- 整个应用程序的state被存储在一棵object tree中,并且这个object tree只存储在一个store中
- 方便state的维护,追踪
- State是只读的
- 唯一修改State的方法是触发action
- 我们只能通过action来描述自己想要如何修改state
- 保证所有的修改都被集中处理,按照严格的顺序进行,不需要担心竞态
- 使用纯函数来修改
- 通过reducer将旧state和action联系在一起,并且返回一个新的State
- reducer应该是纯函数,不能产生副作用
- 我们可以将reducer拆分成多个小的reducers,分别操作不同state tree的一部分
Redux在React中的基本使用
app\src\store\actionCreators.js
import * as actionTypes from "./constants"
export const addNumberAction = (num) => ({
    type: actionTypes.ADD_NUMBER,
    num
})
export const subNumberAction = (num) => ({
    type: actionTypes.SUB_NUMBER,
    num
})
app\src\store\constants.js
export const ADD_NUMBER = "add_number"
export const SUB_NUMBER = "sub_number"
app\src\store\index.js
import { createStore } from "redux"
import reducer from "./reducer"
const store = createStore(reducer)

export default store
app\src\store\reducer.js
import * as actionTypes from "./constants"

const initialState = {
    counter: 100
}

function reducer(state = initialState, action) {
    switch (action.type) {
        case actionTypes.ADD_NUMBER:
            return { ...state, counter: state.counter + action.num }
        case actionTypes.SUB_NUMBER:
            return { ...state, counter: state.counter - action.num }
        default:
            return state
    }
}

export default reducer
app\src\App.jsx
import React, { PureComponent } from 'react'
import Home from './Components/home'
import Profile from './Components/profile'
import "./App.css"
import store from "./store"
export class App extends PureComponent {
  constructor() {
    super()
    this.state = {
      counter: store.getState().counter
    }
  }
  componentDidMount() {
    store.subscribe(() => {
      const state = store.getState()
      this.setState({ counter: state.counter })
    })
  }
  render() {
    const { counter } = this.state
    return (
      <div>
        <h2>App Counter: {counter} </h2>
        <div className="pages">
          <Home />
          <Profile />
        </div>
      </div>
    )
  }
}

export default App
app\src\Components\home.jsx
import React, { PureComponent } from 'react'
import store from "../store"
import { addNumberAction } from '../store/actionCreators'
export class Home extends PureComponent {
    constructor() {
        super()
        this.state = {
            counter: store.getState().counter
        }
    }
    componentDidMount() {
        store.subscribe(() => {
            const state = store.getState()
            this.setState({ counter: state.counter })
        })
    }
    addNumber(num) {
        store.dispatch(addNumberAction(num))
    }
    render() {
        const { counter } = this.state
        return (
            <div>
                <h2>Home Counter: {counter}</h2>
                <div>
                    <button onClick={e => this.addNumber(1)}>+1</button>
                    <button onClick={e => this.addNumber(5)}>+5</button>
                    <button onClick={e => this.addNumber(8)}>+8</button>
                </div>
            </div>
        )
    }
}

export default Home
将组件和store分离
- 使用react-redux库
- npm install react-redux
- 使用Provider包裹组件,共享store
- 使用connect将store数据放到组件props中
//app\src\index.js
//底层用的context
import { Provider } from "react-redux"
import store from "./store"

const root = ReactDOM.createRoot(document.querySelector("#root"))
root.render(
    <Provider store={store}>
        <App />
    </Provider>
)
//app\src\Components\about.jsx
import React, { PureComponent } from 'react'
import { connect } from "react-redux"
export class About extends PureComponent {
    render() {
        const { counter } = this.props
        return (
            <div>About Page:{counter}</div>
        )
    }
}
//connect()返回值是一个高阶组件
//将state以props形式传递到组件中
// function mapStateToProps(state) {
//     return {
//         counter: state.counter
//     }
// }
const mapStateToProps = (state) => ({
    counter: state.counter
})
export default connect(mapStateToProps)(About)
将组件与派发dispath解耦
使用connect的第二个参数,在点击事件调用this.props.addNumber()即可
//app\src\Components\about.jsx
const mapDispatchToProps = (dispatch) =>({
    addNumber(num){
        dispatch(addNumberAction(num))
    },
    subNumber(num){
        dispatch(subNumberAction(num))
    }
})
//connect本身是一个高阶函数
//connect的第一个参数是将store数据映射到组件props中
//connect的第二个参数是将dispath方法映射到组件props中
export default connect(mapStateToProps,mapDispatchToProps)(About)
异步请求数据和存储到state中
//app\src\Components\home.jsx
import React, { PureComponent } from 'react'
import axios from "axios"
import { connect } from "react-redux"
import { changeBannersAction, changeRecommendsAction } from '../store/actionCreators'
export class Home extends PureComponent {
    componentDidMount() {
        axios.get("http://123.207.32.32:8000/home/multidata").then(res => {
            const banners = res.data.data.banner.list
            const recommends = res.data.data.recommend.list
            console.log(banners, recommends)
            this.props.changeBanners(banners)
            this.props.changeRecommend(recommends)
        })
    }
    render() {
        return (
            <div>Home Page</div>
        )
    }
}
const mapDispatchToProps = (dispatch) => ({
    changeBanners(banners) {
        dispatch(changeBannersAction(banners))
    },
    changeRecommend(recommends) {
        dispatch(changeRecommendsAction(recommends))
    }
})
export default connect(null, mapDispatchToProps)(Home)
异步网络请求的操作(从组件部分放到redux部分)
-
真实开发中,redux中保存的很多数据可能来自服务器,我们需要进行异步的请求,将数据保存到redux中
-
网络请求的数据也属于我们状态管理的一部分,更好的方式是将其交给redux来管理
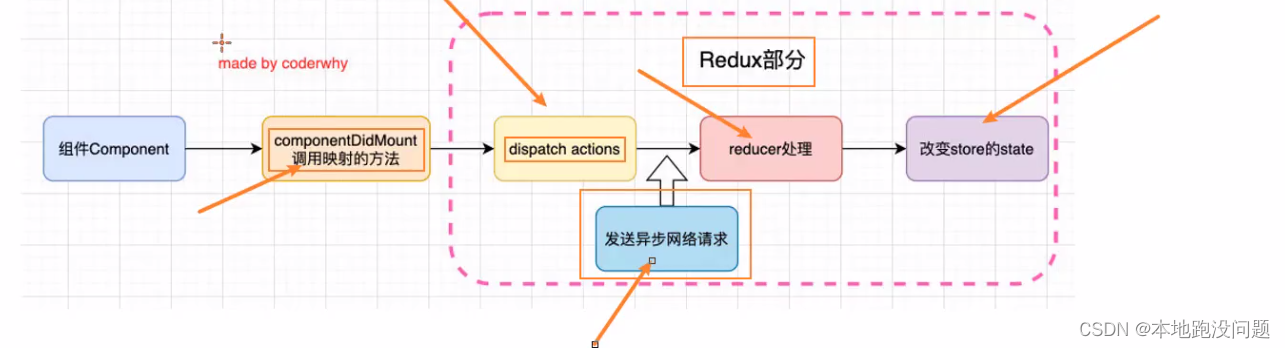
-
我们想将异步网络请求数据放到actionCreator当中,但是网络请求是异步的,无法及时将数据作为action对象的参数返回
-
我们想返回一个函数,在这个函数中执行网络请求
-
redux需要使用中间件(redux-thunk)得到增强,才能实现这个功能
//app\src\store\index.js
import { createStore, applyMiddleware } from "redux"
import reducer from "./reducer"
import thunk from "redux-thunk"

//正常情况下,store.dispatch(object)
//想要派发函数,store.dispatch(function),必须增强
const store = createStore(reducer, applyMiddleware(thunk))

export default store
//app\src\store\actionCreators.js
export const fetchHomeMultidataAction = () =>{
    //如果是一个普通的action,返回action对象
    //但是对象不能直接拿到从服务器中请求的异步数据,所以返回函数
    return function (dispatch,getState){
        //异步操作:网络请求
        axios.get("http://123.207.32.32:8000/home/multidata").then(res => {
            const banners = res.data.data.banner.list
            const recommends = res.data.data.recommend.list
            console.log(banners)
            console.log(recommends)
            dispatch(changeBannersAction(banners))
            dispatch(changeRecommendsAction(recommends))
        })


    }
    // //如果返回一个函数,redux不支持
    // return foo
}
function (dispatch,getState)中的参数从哪里来的 ?
fetchHomeMultidataAction 函数被定义为一个异步 action 创建函数,**它通过 redux-thunk 中间件获得了 dispatch 和 getState 作为参数。**这允许你在函数体内执行异步操作,如网络请求,然后根据请求结果使用 dispatch 来分发同步的 action,以更新 Redux store 的状态。
//app\src\Components\home.jsx(在某一个组件中派送action)
import React, { PureComponent } from 'react'
import { connect } from "react-redux"
import { fetchHomeMultidataAction } from '../store/actionCreators'
export class Home extends PureComponent {
    componentDidMount() {
        this.props.fetchHomeMultidata()
    }
    render() {
        return (
            <div>Home Page</div>
        )
    }
}
const mapDispatchToProps = (dispatch) => ({
    fetchHomeMultidata() {
        dispatch(fetchHomeMultidataAction())
    }
})
export default connect(null, mapDispatchToProps)(Home)
React和Redux的开发工具安装
redux-devtools
react-devtool
Redux的模块拆分
- 即按照页面新建文件夹
- 每个文件夹建立自己的actionCreators.js、constants.js、reducer.js文件
- 最后在index.js中将每个模块的reducer综合
- 每个模块有自己的代码,不会相互影响
//index.js
//导入combineReducers
import { createStore, applyMiddleware,compose,combineReducers} from "redux"
//import reducer from "./reducer"
import thunk from "redux-thunk"
import counterReducer from "./counter"
import homeReducer from "./home"

//将两个reducer合并在一起
const reducer = combineReducers({
    counter:counterReducer,
    home:homeReducer
})
const composeEnhancers = (typeof window !== 'undefined' && window.__REDUX_DEVTOOLS_EXTENSION_COMPOSE__) || compose;
const store = createStore(reducer, composeEnhancers(applyMiddleware(thunk)))

export default store
combineReducers的底层原理
- combineReducer可以方便的对多个reducer进行合并
//combineReducers的实现原理
function reducer(state = {} ,action){
//返回一个对象,store的state
    return{
        counter:counterReducer(state.counter,action),
        home:homeReducer(state.home,action)
    }
}
RTK工具包的介绍和基本使用
-
官方推介的编写Redux的方法
- 解决redux编写过于繁琐和麻烦的问题
-
安装Redux Toolkit:
npm install @reduxjs/toolkit react-redux -
RTK的核心API:
- configureStore:包装createStore以提供简化的配置选项和良好的默认值。默认包含redux-thunk,其中传入一个对象
- 参数一:reducer:将slice中的reducer可以组成一个对象传入此处
- 参数二:middleware:可以使用参数,传入其他中间件
- 参数三:devTools:是否配置devTools工具,默认为true
- createSlice:接受reducer函数的对象,创建一个slice,对counter的reducer进行重构
- 参数一:name:用户标记slice的名词
- 在之后的redux-devtool中会显示对应的名词
- 会根据name生成type名
- 参数二:initialState:初始化值
- 第一次初始化时的值
- 参数三:reducers:相当于之前的reducer函数
- 对象类型:可以添加很多的函数
- 函数类似于redux原来reducer中的一个case语句
- 函数的参数:
- state
- action
- 返回值是一个对象,包含所有的actions
- 参数一:name:用户标记slice的名词
- configureStore:包装createStore以提供简化的配置选项和良好的默认值。默认包含redux-thunk,其中传入一个对象
Redux Toolkit 的 createSlice 将原本需要分别定义 action 和 reducer 的步骤合并在一起,使得代码更加紧凑和直观。
在传统的 Redux 中,通常需要定义 action creators 来创建 action 对象,然后在 reducer 中使用 action 的 type 来匹配并进行相应的状态更新操作。这导致了在多个地方定义 action type、action creators 和 reducer 逻辑的分离,可能会让代码变得冗长和难以维护。
而使用 Redux Toolkit 的 createSlice,你可以将 action 和 reducer 相关的逻辑组合在一起。每个 reducer 函数都包含了操作状态的逻辑,并且 Redux Toolkit 会自动生成对应的 action type。这简化了代码结构,提高了代码的可读性和可维护性。
虽然 Redux Toolkit 将 action 和 reducer 结合在一起,但它仍然遵循 Redux 的核心原则,即**单向数据流和不可变性。**在背后,Redux Toolkit 使用了 “Immer” 库来确保状态的不可变性,即使你在 reducer 中看似直接修改了状态。
这种设计使得开发者可以更专注于业务逻辑,减少了繁琐的状态管理代码,同时保留了 Redux 提供的强大功能。所以,你可以将 Redux Toolkit 视为一个让 Redux 更简洁和易用的工具集。
app\src\store\index.js
import {configureStore} from "@reduxjs/toolkit"
import counterReducer from "./features/counter"

const store = configureStore({
    reducer:{
        counter:counterReducer
    }
})

export default store
app\src\store\features\counter.js
import {createSlice} from "@reduxjs/toolkit"

const counterSlice = createSlice({
    name:"counter",//影响 reducer 和 action 的生成。
    initialState:{
        counter:888
    },
    reducers:{
        //相当于之前的case
        //函数中执行之前的case操作,但是本身可以当action使用
        addNumber(state,{payload}){
            //看起来好像直接修改了 state.counter 的值。但实际上,Redux Toolkit 的 "Immer" 会拦截这个操作,并在后台创建一个新的状态副本,然后将 state.counter 的值更新为新值
            state.counter = state.counter + payload
        },
        subNumber(state,action){
            console.log("counter reducer subNumber",action)
            const payload = action.payload
            state.counter = state.counter - payload
        }
    }
})
//对于 addNumber reducer,其对应的 action type 将会是 "counter/addNumber"。这就是 Redux Toolkit 自动为你生成的 action type。
//当你在其他地方使用这些 action 时,你可以直接引用它们的名字,而无需手动创建 action type
export const {addNumber,subNumber} = counterSlice.actions

export default counterSlice.reducer
app\src\index.js
import ReactDOM from "react-dom/client"
import App from "./App"
import { UserContext, ThemeContext } from "./context"
import { Provider } from "react-redux"
import store from "./store"

const root = ReactDOM.createRoot(document.querySelector("#root"))
root.render(

        <Provider store={store}>
                <App />
        </Provider>

)
app\src\pages\Home.jsx
import React, { PureComponent } from 'react'
import {connect} from "react-redux"
import { addNumber } from '../store/features/counter'
export class home extends PureComponent {
    addNumber(num){
        this.props.addNumber(num)
    }
  render() {
    const {counter} = this.props
    return (
      <div>
        <h2>Home Counter:{counter}</h2>
        <button onClick={e=>this.addNumber(5)}>+5</button>
        <button onClick={e=>this.addNumber(8)}>+8</button>
      </div>
    )
  }
}
const mapStateToProps = (state)=>({
    counter:state.counter.counter
})
const mapDispatchToProps = (dispatch)=>({
    addNumber(num){
        dispatch(addNumber(num))
    }
})
export default connect(mapStateToProps,mapDispatchToProps)(home)
RTK中执行异步操作的方式
- 在之前的开发中,我们通过redux-thunk中间件让dispatch可以进行异步操作。
- RTK默认给我们集成了thunk相关的功能:createAsyncThunk
- 当createAsyncThunk创建出来的action被dispatch时,会存在三种状态:
- pending:action被发出,但是没有最终的结果
- fulfilled:获取到最终的结果(有返回值的结果)
- rejected:执行过程中有错误或者抛出了异常
- 我们可以在createSlice的entraReducers中监听这些结果
- 即我们使用createAsyncThunk执行异步操作(网络请求),并在createSlice的entraReducers中监听这些结果
app\src\store\features\home.js
import { createSlice, createAsyncThunk } from "@reduxjs/toolkit"
import axios from 'axios'

//RTK中的异步操作
export const fetchHomeMultidataAction = createAsyncThunk("fetch/homemultidata", async () => {
    const res = await axios.get("http://123.207.32.32:8000/home/multidata")
    return res.data.data
})
const homeSlice = createSlice({
    name: "home",
    initialState: {
        banners: [],
        recommends: []
    },
    extraReducers: {
        [fetchHomeMultidataAction.fulfilled](state, { payload }) {
            state.banners = payload.banner.list
            state.recommends = payload.recommend.list
        },
    }
})
export default homeSlice.reducer
app\src\pages\Home.jsx
 componentDidMount(){
      this.props.fetchHomeMultidata()
    }
//...省略

const mapDispatchToProps = (dispatch)=>({
    fetchHomeMultidata(){
      dispatch(fetchHomeMultidataAction())
    }
})
export default connect(mapStateToProps,mapDispatchToProps)(home)
extraReducers的另一种写法
- extraReducers还可以传入一个函数,函数接受一个builder参数
- 我们可以向builder中添加case来监听异步操作的结果
    extraReducers:(builder) => {
        builder.addCase(fetchHomeMultidataAction.pending,(state,action)=>{
            console.log("pending")
        }).addCase(fetchHomeMultidataAction.fulfilled,(state,{payload})=>{
            state.banners = payload.banner.list
            state.recommends = payload.recommend.list
        })
    }
- 我们可以在createAsyncThunk 直接使用dispatch,而不用监听其三种状态
//RTK中的异步操作
//如果这里可以拿到dispatch,那么可以直接在其中赋值给state
//函数中第二个参数是store
export const fetchHomeMultidataAction = createAsyncThunk(
    "fetch/homemultidata",
    async (extraInfo, store) => {
        const res = await axios.get("http://123.207.32.32:8000/home/multidata")
        const banners = res.data.data.banner.list
        const recommends = res.data.data.recommend.list
        store.dispatch(changeBanners(banners))
        store.dispatch(changeRecommends(recommends))
    })
const homeSlice = createSlice({
    name: "home",
    initialState: {
        banners: [],
        recommends: []
    },
    //同步action
    reducers: {
        changeBanners(state, { payload }) {
            state.banners = payload
        },
        changeRecommends(state, { payload }) {
            state.recommends = payload
        }
    }
})
RTK中数据的不可变性(了解)
- React中,我们强调数据的不可变性
- 类组件中的state
- redux中的state
- 所以之前我们进行浅拷贝完成这些操作
- 浅拷贝会造成性能的浪费
- 深层改变时,依然会对之前的对象产生影响
- RTK底层使用了immerjs的一个库来保证数据的不可变性
- 使用新算法
- 当数据被修改时,会返回一个对象,新的对象会尽可能利用之前的数据结构而不会对内存造成浪费
connect函数实现原理(了解)
conect函数的store解耦(了解)
Redux实现打印日志的中间件(了解)
实现Thunk库的核心逻辑(了解)
实现ApplyMiddleware(了解)
React应用程序的状态如何管理(理解)
Mobx
mobx介绍
- Mobx是一个功能强大,上手非常容易的状态管理工具
- Mobx的哲学:任何源自应用状态的东西都应该自动的获取
- Mobx利用getter和setter来收集组件的数据依赖关系,从而在数据发生变化的时候精确知道哪些组件需要重绘,在界面的规模变大的时候,往往会有很多细粒度更新
mobx与redux的区别
- Mobx写法上更偏向OOP(面向对象编程)
- 对一份数据直接进行修改操作,不需要返回一个新的数据
- 并非单一store,可以多个store
- Redux默认以JS原生对象形式存储数据,而Mobx使用可观察对象
- 优点:
- 学习成本小
- 面向对象编程,对TS友好
- 缺点:
- 过于自由:Mobx提供的约定及模版代码很少,代码编写自由,如果不做一些约定,比较容易导致团队代码风格不统一
- 相关中间件很少,逻辑层业务整合是问题
mobx的使用
//store.js
import { observable, autorun, configure, action } from 'mobx'

// 开启严格模式,不能直接修改store中的数据,必须通过action
configure({
    enforceActions: 'always'
})
// 将数据集中管理在store中,出现错误统一在这里来查找错误
const store = observable({
    isTabbarShow: true,
    list: [],
    cityName: "北京",
    changeShow() {
        this.isTabbarShow = true
    },
    changeHide() {
        this.isTabbarShow = false
    }
}, {
    // 标记两个方法是action,专门修改可观测的value
    changeHide: action,
    changeShow: action
})

export default store
//store简便写法.js
import { observable, autorun, configure, action,runInAction } from 'mobx'

// 开启严格模式,不能直接修改store中的数据,必须通过action
configure({
    enforceActions: 'always'
})

class Store {
    // @:装饰器,包装一个函数,将后面的变量或者方法传入
    // 需要安装插件,支持装饰器语法
    @observable isTabbarShow = true
    @observable list = []

    @action changeShow()[
        this.isTabbarShow = true
    ]
    @action changeHide(){
        this.isTabbarShow = false
    }
    @action getList(){
        axios({
            url:"xxxxxx",
            method:"get",
        }).then(res=>{
            // 异步任务:也不能直接改数据
            // this.list = res.data.data.cinemas
            // 需要使用runInAction方法
            runInAction(()=>{
                this.list = res.data.data.cinemas
            })
        })
    }
}

// 导出唯一的store实例
export default new Store()
Mobx-react的使用
- 如果希望不自己订阅或者取消订阅
- 使用mobx-react
-
npm i mobx-react
-
//index.js //使用高阶组件包裹App组件,传输store数据 //原理是context的跨组件通信方式 import {Provider} from 'mobx-react' ReactDOM.render( <Provider store={store}> <App/> </Provider> ,document.getElementById("root") ) -
//App.js import { inject, observer } from "mobx-react" //使用inject方法获取store数据 @inject("store") //监听组件 @observer class App extends Component { componentDidMount() { console.log(this.props.store) } } export default App -
import { Observer } from "mobx-react "
import store from '../mobx/store'
//函数组件
function cimema(props) {
    return (
    	<div>
        //帮我们监听数据变化,重新执行回调函数,获取到最新数据
        	<Observer>
        {
            ()=>{
            		reutrn store.List.map(item=><div>{item}</div>)
       			}
        }
        	</Observer>
        </div>
    )
}
ReactRouter
- 前端路由的核心:改变URL,但是页面不进行整体的刷新
react-Router的基本使用
- 安装React Router:
- 安装时,我们选择react-router-dom
- react-router会包含一些react-native的内容,web开发不需要
- react-router最主要的API是给我们提供的一些组件:
- BrowserRouter或Hashrouter
- Router中包含了对路径改变的监听,并且会将相应的路径传递给子组件
- BrowserRouter使用history模式
- HashRouter使用hash模式
路由映射配置
- Routes:包裹所有的Route,在其中匹配一个路由
- Router5.x使用的是Switch组件
- Route:Route用于路径的匹配:
- path属性:用于设置匹配到的路径
- element属性:设置匹配到路径后,渲染的组件;
- Router5.x使用的是component属性
- exact:精准匹配,只有精准匹配到完全一致的路径,才会渲染对应的组件
- Router6.x不支持该属性
路由跳转
- Link和NavLink:
- 通常路径的跳转是使用Link组件,最终渲染成a元素
- NavLink是在Link基础上增加了一些样式属性
- to属性:Link中最重要的属性,用于设置跳转到的路径
app\src\index.js
//在这使用Hashrouter或者BrowseRouter包裹App组件
import { HashRouter } from "react-router-dom"
//编写react代码,并且通过React渲染出来对应的内容
const root = ReactDOM.createRoot(document.querySelector("#root"))
root.render(
        <HashRouter>
                <App />
        </HashRouter>
)
app\src\App.jsx
import React, { PureComponent } from 'react'
import { Route, Routes } from 'react-router-dom'
import { Link } from "react-router-dom"
import Home from "./pages/Home"
import About from "./pages/About"
export class App extends PureComponent {
  render() {
    return (
      <div className='app'>
        <div className="header">
          <span>header</span>
          <div className="nav">
            <Link to="/home">首页</Link>
            <Link to="/about">关于</Link>
          </div>
        </div>
        <div className="content">
          {/* 映射关系:path => Component */}
          <Routes>
            <Route path='/' element={<Home />} />
            <Route path='/home' element={<Home />} />
            <Route path='/about' element={<About />} />
          </Routes>
        </div>
        <div className="footere">Footer</div>
      </div>
    )
  }
}

export default App
NavLink的使用和Link的使用
- 使用NavLink时,当前页面的链接会添加一个样式
- style:传入函数,函数接受一个对象,包含isActive属性
- className:传入函数,接受一个对象,包含isActive属性
Navigate组件的使用
- Navigate用于路由的重定向,当这个组件出现时,就会执行跳转到对应的to路径中:
- 重定向:在用户访问某个特定路径或 URL 时,将其自动导航到另一个指定的路径或 URL
- 自动跳转页面
- 案例
- 用户跳转到Profile界面:
- Profile有一个isLogin用于记录用户是否登录
- true:显示用户的名称
- false:直接重定向到登录界面
//在登录界面中
{!isLogin ? <button>登录</button>:<Navigate to="/home"/>}
//在映射关系中,默认路径使用navigate
<Routes>
	<Route path="/" element={<Navigate to="/home"/>}
     <Route path="/home" element={<Home/>}>
</Routes>
- NotFound页面配置
//使用通配符
   <Route path='*' element={<NotFound/>} />
路由嵌套的配置和展示Outlet
- 路由嵌套
       <div className="content">
          {/* 映射关系:path => Component */}
          <Routes>
            <Route path='/' element={<Navigate to="/home"/>} />
              <Route path='/home' element={<Home />} >
                  <Route path="/home" element={<Navigate to="/home/recommend"/>}/>
              	<Route path="/home/recommend" element={<Homerecommend/>}/>
                 <Route path="/home/ranking" element={<Homeranking/>}/>
              </Route>
            <Route path='/about' element={<About />} />
            <Route path='*' element={<NotFound/>} />
          </Routes>
        </div>
- 占位组件Outlet
//Home.jsx
<div>
	<div>
    	<Link to="/home/recommend">推介</Link>
        <Link to="/home/ranking">排行榜</Link>
    </div>
    {/*路由组件在这里展示*/}
    <Outlet/>
</div>
代码的JS跳转-useNavigate
- useNavigate只能在函数组件用
function App(props){
    const navigate = useNavgate()
    function navigateTo(path){
        navigate(path)
    }
    return(
    	//...
        <button onClick={e => navigateTo("/home")}></button>
    )
}
- 想在类组件中使用useNavigate
- 使用高阶组件封装
//高阶组件:函数
function withRouter(WrapperComponent){
    return function(props){
        //导航
        const navigate = useNavigate()
        //动态路由的参数:/detail/:id
        const params = useParams()
     	//查询字符串的参数:/user?name=why&age=18
        const location = useLocation()
        const [searchParams,serSearchParams] = useSearchParams()
        const router = {navigate,params,location}
        return<WrapperComponent {...props} router={router}/>
    }
}
路由参数传递、动态路由、查询字符
路由参数传递
方式一:动态路由
//路由配置中
<Route path="/detail/:id element={<Detail/>}"/>
//点击事件中传入参数id
NavigateToDetail(id){
    const {navigate} = this.props.router
    navigate("/detail/" + id)
}
const id =123
<button onClick={e=>this.NavigateToDetail(id)}></button>
//获取路由参数id,使用useParams函数,类似于useNavigate
	const {params} = this.props.router
    console.log(params.id)
方式二:拼接查询字符串
//传递方式
<Link to="/user?id=123&age=18">user</Link>
//获取方式,使用useLocation()函数或者useSearchParams()
 const location = useLocation()
 console.log(location.params)
   const [searchParams,serSearchParams] = useSearchParams()
   //将searchParams转成一个普通的对象
   const query = Object.fromEntries(searchParams)
   console.log(query.name)
路由的配置方式使用
不写在App组件中,而以配置的方式写
新建router文件夹-index.js
const routes = [
    {
        path:"/",
        element:<Navigate to="/home"/>
    },
    {
        path:"/home",
        element:<Home/>,
        children:[
        	{
       			path:"/home",
        		element:<Navigate to="/home/recommend"/>
    		}
        ]
    }
]

export default routes
在App中导入路由配置
import {useRoutes} from "react-router-dom"
<div className= "content">
    {useRoutes(routes)}
</div>
路由的懒加载和suspense
在路由配置中要导入所有组件,如果不做处理这些组件会被打包到一个地方。
我们想要将一些大的组件单独打包,即分包处理
不要直接import
//举例
const About = React.lazy(()=>import("../pages/About"))
并在index.js中配置Suspense
import {Suspense} from 'react';
root.render(
	<HashRouter>
    //如果异步加载的东西还没有加载出来的话,先显示Loading
    	<Suspense fallback={<h3>Loading</h3>}>
    		<App/>
    	</Suspense>
    </HashRouter>
)
Hooks
为什么需要Hook?
- Hook是React16.8的新增特性,可以让我们在不编写class的情况下使用state以及其他的React特性(比如生命周期)
- 函数式组件的缺陷:
- 修改状态之后,组件不会重新渲染
- 如果页面重新渲染,函数重新执行时,会重新给状态置为初始化
- 没有生命周期的回调
- class组件的优势
- 可以定义自己的state,保存自己的状态
- 有自己的生命周期
- class组件的缺陷
- 随着业务的增多,容易越来越复杂
- 难以拆分
- 难以理解
- 组件复用很难(需要使用高阶组件)
UseState的使用详解
- UseState来自react,需要从react中导入,它是一个hook
- 参数:初始化值,如果不设置为undefined
- 返回值:数组,包含两个元素;
- 元素一:当前状态的值
- 元素二:设置状态值的函数
- 调用setCount函数之后,会设置一个新的值,组件会重新渲染
- 可以勾入React state和生命周期
- 额外规则:
- 只能在**函数最外层调用Hook,**不要在循环、条件判断或者子函数中调用
- 只能在函数组件中使用,也可以在**自定义hook(use开头)**中使用
useEffect基本使用
- Effect Hook可以让你来完成一些class中生命周期的功能
- 类似于网络请求、手动更新DOM、事件监听,都是React更新DOM的一些副作用
修改标题案例:
//类组件实现过程
import React, { PureComponent } from 'react'

export class App extends PureComponent {
  constructor() {
    super()
    this.state = {
      counter: 100
    }
  }
  componentDidMount() {
    //初始加载时执行一次
    document.title = this.state.counter
  }
  componentDidUpdate() {
    //数据更新时执行一次
    document.title = this.state.counter
  }
  render() {
    const { counter } = this.state
    return (
      <div>
        <h2>App:{counter}</h2>
        <button onClick={e => this.setState({ counter: counter + 1 })}>+1</button>
      </div>
    )
  }
}

export default App
//函数组件
import React, { memo } from 'react'
import { useEffect } from 'react'
import { useState } from 'react'

const App = memo(() => {
  const [count, setCount] = useState(200)
  useEffect(() => {
    //当前传入的回调函数会在组件被渲染完成后,自动执行
    //每次渲染都会执行
    //网络请求/DOM操作/事件监听
    document.title = count
  })
  return (
    <div>
      <h2>当前计数:{count}</h2>
      <button onClick={e => setCount(count + 1)}>+1</button>
    </div>
  )
})

export default App
useEffect-清除机制
- 在类组件中,某些副作用的代码,我们需要在componentWillUnmount中进行清除
- 比如事件总线或者Redux中手动调用subscribe
- useEffect可以有一个返回值(回调函数),组件被重新渲染或者组件卸载时执行
import React, { memo } from 'react'
import { useEffect } from 'react'
import { useState } from 'react'

const App = memo(() => {
  const [count, setCount] = useState(200)
  useEffect(() => {
    console.log("监听redux")
    //这个返回的回调函数在第一次渲染时不执行,重新渲染或者组件卸载时执行
    return () => {
      console.log("取消监听")
    }
  })
  return (
    <div>
      <h2>当前计数:{count}</h2>
      <button onClick={e => setCount(count + 1)}>+1</button>
    </div>
  )
})

export default App
多个Effect的使用-逻辑分离
- 一个函数式组件中可以存在多个useEffect(依次执行)
- 进行逻辑分离,而不像类组件中写到一个生命周期函数中
Effect的执行机制性能优化
- 默认情况下,useEffect的回调函数在每次渲染时都会重新执行
- 但是某些代码我们希望执行一次
- 多次执行会导致一定的性能问题
- useEffect的两个参数
- 参数一:回调函数
- 参数二:该useEffect在哪些state发生变化时,才重新执行
- 空数组 [] : 只执行一次
- [data] : 监听data变化时,执行
其他的Hooks重要性的说明
- State/Effect两个Hook足够开发项目了
- 其他Hook:
- 特殊场景使用
- 性能优化Hook
- 自定义Hooks(抽离复用)
- React18新增的Hooks
useContext使用共享数据
- 之前在组件中使用共享Context的方式
- 类组件中类名.contextType = MyContext方式,在类中获取context
- 函数式组件中通过MyContext.Consumer方式共享context
- 多个Context共享时会存在大量嵌套
- Context Hook允许我们通过Hook来直接获取某个Context的值
//不适用useContext
import React, { memo } from 'react'
import { UserContext, ThemeContext } from './context'
const App = memo(() => {
  //使用Context
  return (
    <div>
      <UserContext.Consumer>
        {
          value => {
            return <h2>{value.name}</h2>
          }
        }
      </UserContext.Consumer>
    </div>
  )
})
export default App
使用useContext会方便很多
//使用useContext
import React, { memo, useContext } from 'react'
import { UserContext, ThemeContext } from './context'
const App = memo(() => {
  //使用useContext获取数据
  const user = useContext(UserContext)
  const theme = useContext(ThemeContext)
  return (
    <div>
      <h2>{user.name}</h2>
      <h2>{theme.color}</h2>
    </div>
  )
})

export default App
useReducer管理复杂的数据
- useReducer是useState的替代方案
- 使用场景:
- state是一个对象或者数组,并且经常一个操作需要修改很多state
- 你的应用程序比较大,希望UI和业务能够分开维护
//useReducer的基本使用

import React, { memo } from 'react'
import { useReducer } from 'react'

const initialState = { count: 0 }

function reducer(state, action) {
  switch (action.type) {
    case "increment":
      return { ...state, counter: state.counter + 1 }
    case "decrement":
      return { ...state, counter: state.counter - 1 }
    default:
      return state
  }
}

const App = memo(() => {
  const [state, dispatch] = useReducer(reducer, initialState)
  return (
    <div>
      <h2>当前计数:{state.counter}</h2>
      <button onClick={e => dispatch({ type: "increment" })}>+1</button>
    </div>
  )
})

export default App
useCallback
- 当函数组件重新执行时,其中的函数会被定义很多次
- useCallback实际的目的是为了进行性能的优化
- 返回一个函数的memoized(记忆)值
- 在依赖不变的情况下,多次定义的时候,返回的值是相同的(第二个参数设为空数组[ ])
//闭包回顾
function foo(name){
    function bar(){
        console.log(name)
    }
    return bar
}
const bar1 = foo("why")
bar1() //why
bar1() //why

const bar2 = foo("kobe")
bar2() //kobe

bar1()//why  因为在foo中定义了两个bar,两个内存地址。bar1中捕获的是why,所以这里依然是why
###useCallback的优势一:
- 发现如果不用useCallback()修改message时,虽然跟子组件没有关系,但是子组件会重新渲染, 说明使用普通函数时,会传入一个定义的新函数
- 但是使用useCallback时,当**依赖count不变时,返回记忆的函数 **
- 所以将定义的函数传入子组件时,使用useCallback可以提高很大性能
import React, { memo, useState, useCallback } from 'react'

//props中的属性发生改变时,组件本身就会被重新渲染
const HYIncrement = memo(function (props) {
  const { increment } = props
  console.log("渲染了")
  return (
    <div>
      <button onClick={increment}>increment + 1</button>
    </div>
  )
})
const App = memo(() => {
  const [count, setCount] = useState(0)
  const [message, setMessage] = useState("helloworld")
  //每次返回同一个函数
  //闭包陷阱:
  const increment = useCallback(function () {
    setCount(count + 1)
  }, [count])
  return (
    <div>
      <h2>计数:{count}</h2>
      <button onClick={increment}>+1</button>

      <HYIncrement increment={increment} />
      {/* 发现如果不用useCallback()修改message时,虽然跟子组件没有关系,但是子组件会重新渲染 说明使用普通函数时,会传入一个定义的新函数*/}
      {/* 但是使用useCallback时,当依赖count不变时,返回记忆的函数 */}
      {/* 所以将定义的函数传入子组件时,使用useCallback可以提高很大性能 */}
      <h2>message;{message}</h2>
      <button onClick={e => setMessage("message")}>修改message</button>
    </div>
  )
})

export default App
进一步优化:当count发生改变时,也使用同一个函数
- 将count依赖移除,缺点:闭包陷阱,counter不能+1
- useRef,在组件多次渲染时,返回同一个值
  const countRef = useRef()
  //countRef在组件渲染后保持同一个对象
  countRef.current = count
  const increment = useCallback(function () {
    setCount(countRef.current + 1)
  }, [])
useMemo
- useCallback优化的是回调函数
- **useMemo优化的是返回值,之后组件渲染不用重新执行 **,同样需要传入依赖
- 用useMemo实现同useCallback一样的效果
 //用useMemo实现同useCallback一样的效果
   const increment = useCallback(fn,[])
   const increment2 = useMemo(()=>fn,[])
###优化大量计算操作,不会重新计算
import React, { memo, useCallback, useMemo, useState } from 'react'

function calcNumTotal(num) {
  console.log("calcNumTotal执行了")
  let total = 0;
  for (let i = 1; i < num; i++) {
    total += i
  }
  return total
}
const App = memo(() => {
  const [count, setCount] = useState(0)
  // useCallback优化的是回调函数
  // useMemo优化的是返回值,之后组件渲染不用重新执行
  // 同样需要传入依赖
  let result = useMemo(() => {
    return calcNumTotal(50)
  }, [])
  return (
    <div>
      <h2>计算结果:{result}</h2>
      <h2>计数器:{count}</h2>
      {/* 当我点击按钮,组件重新渲染,从上到下的逻辑重新执行 */}
      {/* 但是我想让没有变化的calcNumTotal函数只执行一次 */}
      <button onClick={e => setCount(count + 1)}>+1</button>
    </div>
  )
})

export default App
使用useMemo对子组件渲染进行优化
- 当传递对象给子组件时,自定义对象在组件重新渲染时,会重新定义,导致子组件重新渲染
- 传入值没区别,但是对象类型会重新定义
//使用useMemo优化,对象不会重新定义,不会导致子组件重新渲染
const info = useMemo(()=>({name:"why",age:18}),[])
useRef
- useRef返回一个ref对象,返回的ref对象在组件的整个生命周期保持不变
用法一:引入DOM(或者class组件)元素
//绑定DOM
import React, { memo, useRef } from 'react'

const App = memo(() => {
  const titleRef = useRef()
  const inputRef = useRef()
  function showTitleDom() {
    console.log(titleRef.current)
    inputRef.current.focus()
  }
  return (
    <div>
      {/* 用法一:绑定DOM */}
      <h2 ref={titleRef}>hello world</h2>
      <input type="text" ref={inputRef} />
      <button onClick={showTitleDom}>查看title的DOM</button>
    </div>
  )
})

export default App
用法二:保存在整个生命周期中不变的数据,解决闭包陷阱
import React, { memo } from 'react'
import { useState ,useRef,useCallback} from 'react'
let obj = null
const App = memo(() => {
  const [count,setCount] = useState(0)
  const nameRef = useRef()
  //验证是否是同一个对象
  console.log(obj === nameRef)
  obj = nameRef
  //通过useRef解决儿闭包陷阱
  const countRef = useRef()
  countRef.current = count
  const increment = useCallback(()=>{
          setCount(countRef.current + 1 )
  },[])
  return (
    <div>
      <h2>hello world:{count}</h2>
      <button onClick={e => setCount(count+1)}>+1</button>
    </div>
  )
})
export default App
useImperativeHandle
在获取子组件DOM后,在子组件中使用useImperativeHandle限制父组件对DOM元素的操作权限
import React, { memo, useRef, forwardRef, useImperativeHandle } from 'react'

const HelloWorld = memo(forwardRef((props, ref) => {

  const inputRef = useRef()
  //子组件对父组件传入的ref进行处理
  useImperativeHandle(ref, () => {
    //父组件只能调用我这里返回的方法
    return {
      focus() {
        console.log("focus")
        inputRef.current.focus()
      },
      setValue(value) {
        inputRef.current.value = value
      }
    }
  })
  return <input type="text" ref={inputRef} />
}))

const App = memo(() => {
  const titleRef = useRef()
  const inputRef = useRef()
  function handleDOM() {
    console.log(titleRef.current)
    //将子组件的input中的内容清空
    //父组件的权限太大,我们希望限制父组件的权限
    // inputRef.current.value = ""
    inputRef.current.focus()
    inputRef.current.setValue("hello world")
  }
  return (
    <div>
      <h2 ref={titleRef}>hhh</h2>
      <HelloWorld ref={inputRef} />
      <button onClick={handleDOM}>DOM操作</button>
    </div>
  )
})

export default App
useLayoutEffect
- useEffect会在渲染的内容更新到DOM后执行,不会阻塞DOM的更新
- useLayoutEffect会在渲染的内容更新到DOM上之前执行,会阻塞DOM的更新
- 某些内容改变之后,我们会根据它的内容再进行改变时,使用useLayoutEffect函数
使用场景:
import React, { memo, useLayoutEffect } from 'react'
import { useEffect } from 'react'
import { useState } from 'react'

const App = memo(() => {
  const [count, setCount] = useState(100)
  useLayoutEffect(() => {
    console.log("useLayoutEffect")
    //会在0在dom渲染之前,劫持掉设置随机数
    if (count === 0) {
      setCount(Math.random() + 99)
    }
  })
  // useEffect(()=>{
  //   console.log("useEffect")
  //   if(count === 0){
  //     //这里会出现闪烁现象,此时需要使用useLayoutEffect
  //     setCount(Math.random() + 99)
  //   }
  // })
  console.log("App render")
  return (
    <div>
      <h2>count:{count}</h2>
      <button onClick={e => setCount(0)}>设置为0</button>
    </div>
  )
})

export default App
自定义Hook
- 自定义Hook本质上只是一种函数代码逻辑的抽取,严格意义上来说,本身不算React的特性
- 函数名必须以use开头
- 就是一个内部使用了hook的函数
打印生命周期
需求:组件创建时和销毁时打印一次生命周期
import React, { memo } from 'react'
import { useEffect, useState } from 'react'

//自定义hook,hook本身是一个函数
function useLogLife() {
  useEffect(() => {
    console.log("组件被创建")
    return () => {
      console.log("组件被销毁")
    }
  }, [])
}
const Home = memo(() => {
  useLogLife()
  return <h1>Home Page</h1>
})
const About = memo(() => {
  useLogLife()
  return <h1>About Page</h1>
})
const App = memo(() => {
  const [isShow, setIsShow] = useState(true)
  //监听组件的生命周期,但是如果每个组件都需要监听
  //就需要多次编写重复代码,我们希望抽离
  //方式一:高阶组件
  //方式二:抽取到单独的hook中,然后调用自定义hook
  // useEffect(()=>{
  //   console.log("组件被创建")
  //   return () => {
  //     console.log("组件被销毁")
  //   }
  // },[])
  useLogLife()
  return (
    <div>
      <h1>App Component</h1>
      <button onClick={e => setIsShow(!isShow)}>切换</button>
      {isShow && <Home />}
      {isShow && <About />}
    </div>
  )
})

export default App
获取Context
//app\src\hooks\useUserToken.js
import { useContext } from "react"
import { UserContext, ThemeContext } from "../context/index"

function useUserToken() {
    //将这两行代码变成一行代码
    const user = useContext(UserContext)
    const token = useContext(ThemeContext)

    return [user, token]
}

export default useUserToken
//app\src\hooks\index.js
import useUserToken from "./useUserToken"
export {
    useUserToken
}
监听窗口滚动位置
import { useEffect, useState } from 'react'
function useScrollPosition() {
    const [scrollX, setscrollX] = useState(0)
    const [scrollY, setscrollY] = useState(0)
    useEffect(() => {
        function handleScroll() {
            console.log(window.scrollX, window.scrollY)
            setscrollX(window.scrollX)
            setscrollY(window.scrollY)
        }
        window.addEventListener("scroll", handleScroll)
        return () => {
            window.removeEventListener("scroll", handleScroll)
        }
    }, [])
    return [scrollX, scrollY]
}
export default useScrollPosition
localStorage数据存储
- 将state和localStorage结合起来使用
//app\src\hooks\useLocalStorage.js
import { useEffect, useState } from "react"

function useLocalStorage(key) {
    //如果useState中的逻辑很多,可以写成回调函数
    //从lacalStorage中获取数据,并创建组件的state
    const [data, setDate] = useState(() => {
        return JSON.parse(localStorage.getItem(key))
    })
    //将useState与localStorage结合
    //监听data的改变,一旦发生变化就存储data的最新值
    useEffect(() => {
        localStorage.setItem(key, JSON.stringify(data))
    }, [data])

    return [data, setDate]
}
export default useLocalStorage
//app\src\App.jsx
import React, { memo } from 'react'
import "./style.css"
import userLocalStorage from './hooks/useLocalStorage'
const App = memo(() => {
  //通过一个key从localStorage中获取一个数据
  const [token, setToken] = userLocalStorage("token")
  function setTokenHandle() {
    //使用自定义hook,在这里改变时,localStorage本地也会改变
    setToken("hhh")
  }
  const data = localStorage.getItem("token")
  return (
    <div className='app'>
      <h1>App Root Component{token}</h1>
      <button onClick={setTokenHandle}>设置token</button>
    </div>
  )
})

export default App
redux hooks
- 之前的redux开发中,使用了react-redux中的connect来让组件和redux结合起来
- 但是这种方法必须使用高阶函数结合返回的高阶组件
- 并且必须编写:mapStateToProps和mapDispatchToProps映射的函数
- 在Redux7.1开始,提供了Hook的方式
useSelector
- 作用是将state映射到组件中
- 参数一:将state映射到需要的数据中
- 参数二:可以进行比较来决定是否组件重新渲染
- 默认情况下useSelector监听整个state的变化
- useSelector默认会比较我们返回的两个对象是否相等
useDispatch
- 直接获取dispatch函数,之后在组件中直接使用即可
代码实例
import React, { memo } from 'react'
import { useSelector, useDispatch } from "react-redux"
import { addNumber, subNumber } from "./store/modules/counter"
const App = memo(() => {
  //使用useSelector将redux中store的数据映射到组件内
  const { count } = useSelector((state) => ({ count: state.counter.counter }))
  //使用dispatch直接派发action
  const dispatch = useDispatch()
  function addNumberHandle(num, isAdd = true) {
    if (isAdd) {
      dispatch(addNumber(num))
    } else {
      dispatch(subNumber(num))
    }
  }
  return (
    <div>
      <h2>当前计数:{count}</h2>
      <button onClick={e => addNumberHandle(1)}>+1</button>
      <button onClick={e => addNumberHandle(6)}>+6</button>
      <button onClick={e => addNumberHandle(6, false)}>-6</button>
    </div>
  )
})
export default App
useSelector的浅层比较
- useSelector在默认情况下监听整个state的变化
- 即使我们只在父组件中修改了counter的值,
- 为了解决这个问题,我们需要使用useSelector的第二个参数(传入shallowEqual)
import { useSelector, useDispatch ,shallowEqual} from "react-redux"
//重新渲染的原因:默认情况下useSelector监听整个state的变化
  //虽然我们只在app组件中改变了counter,但是state这里也会变化,就会重新渲染一次
  const {message} = useSelector((state)=>({
    message:state.counter.message
  }),shallowEqual)
SPA页面的缺陷和SSR的优点
- useId是一个用于生成横跨服务端和客户端的稳定的唯一ID的同时避免hydration不匹配的hook
- 要理解hydration,我们想理解服务端渲染(SSR)
- 什么是SSR?
- 指的是,页面在服务端已经生成了完整的HTML页面结构,不需要浏览器通过js代码来创建页面结构了
- 对应的是CSR(客户端渲染):我们开发的SPA页面通常依赖的就是客户端渲染
- SPA(单页面富应用)
- 问题一:首屏的渲染速度
- 问题二:不利于SEO优化(搜索引擎优化)
- 搜索引擎爬虫主要爬的是index.html中的东西
- 而SPA页面中index.html中东西很少,搜索过程匹配的就很少,导致排名靠后
- 浏览器的渲染过程:
- 请求一个文件:index.html(在SPA页面中,里面东西很少)
- 下载js文件,并执行js文件,生成html页面结构(可以通过node完成,通过node在服务端渲染完成就是SSR),script.src = “bundle.js” 的下载速度很慢,下载完之后浏览器执行一次
SSR同构应用
- 同构:一套代码既可以在服务端运行又可以在客户端运行,这就是同构应用
- 为什么在服务端执行了,还需要在客户端执行代码:
- 因为服务端执行了之后生成字符串,其中交互的js代码需要客户端执行
- 客户端将交互js代码执行完成注入到网站中的过程叫注入hydrate
- 同构是一种SSR的形态
- 当用户发出请求时,先在服务器通过SSR渲染出首页的内容
- 但是对应的代码同样可以在客户端执行
- 执行的目的包括事件绑定等以及其他页面切换时也可以在客户端渲染
Hydration
- 在进行SSR时,我们的页面会呈现HTML
- 但仅HTML不足以使页面具有交互性
- 为了使我们的页面具有交互性,除了在node.js中将页面呈现为HTML外,我们的UI框架还在加载和呈现页面(这个过程就叫hydration)
- hydration是同构中的一个步骤
React18新增useId的作用
useId是一个用于生成横跨服务端和客户端的稳定的唯一ID的同时避免hydration不匹配的hook
- 当使用某些API生成id时,在服务端和客户端生成的结果可能不一样
- 客户端在第二次渲染时,如果有一样的id,就可以不渲染,进行性能优化
- 结论
- useId是用于react的同构应用开发的
- useId可以保证在服务端和客户端生成的id一致
useTransition
- 返回一个状态值表示过渡任务的等待状态,以及一个启动该过渡任务的函数
- 告诉react对于某部分更新优先级较低的任务,可以稍后进行更新
import React, { memo, useState, useTransition } from 'react'
import namesArray from './namesArray'

const App = memo(() => {
  const [showNames, setShowNames] = useState(namesArray)
  const [pending, startTransition] = useTransition()

  function valueChangeHandle(event) {
    //出现的问题:因为列表和input中的输入是同一时刻更新的,当列表的数据很大时,input的输入会变得很卡顿
    //我们希望input的输入优先级更高,先更新
    startTransition(() => {
      const keyword = event.target.value
      const filterShowNames = namesArray.filter(item => item.includes(keyword))
      setShowNames(filterShowNames)
      console.log(event.target.value)
    })
  }
  return (
    <div>
      <input type="text" onInput={e => valueChangeHandle(e)} />
      {/* 使用pending,实现加载过程中提示内容 */}
      <h2>用户名列表:{pending && <span>Loading...</span>}</h2>
      <ul>
        {
          showNames.map(item => {
            return <li key={item}>{item}</li>
          })
        }
      </ul>
    </div>
  )
})

export default App
useDeferredValue的使用
- useDeferredValue接受一个值,并返回该值的新副本,该副本将推迟到更紧急地更新之后
- 和useTransition的作用是一样的效果,可以让我们的更新延迟
import React, { memo, useState, useDeferredValue } from 'react'
import namesArray from './namesArray'

const App = memo(() => {
  const [showNames, setShowNames] = useState(namesArray)
  //生成一个副本
  const deferedShowNames = useDeferredValue(showNames)
  function valueChangeHandle(event) {
    const keyword = event.target.value
    const filterShowNames = namesArray.filter(item => item.includes(keyword))
    setShowNames(filterShowNames)
    console.log(event.target.value)
  }
  return (
    <div>
      <input type="text" onInput={e => valueChangeHandle(e)} />
      <h2>用户名列表:</h2>
      <ul>
        {
          // 在这里遍历新副本,对新副本的遍历会有延迟
          deferedShowNames.map((item, index) => {
            return <li key={index}>{item}</li>
          })
        }
      </ul>
    </div>
  )
})

export default App


 3058
3058


 被折叠的 条评论
为什么被折叠?
被折叠的 条评论
为什么被折叠?
 到【灌水乐园】发言


