


1、源码,因为是在jq上用,所以用了new Vue,用的朋友请提前在jq引入element组件
<div class="customTimeline" id="timeline">
    <div class="container-timeline">
        <div class="btn-box">
            <i :class="['play-icon', isPlay ? 'el-icon-video-pause' : 'el-icon-video-play']" @click="playFn"></i>
        </div>
        <el-slider v-model="value" range :max="max" :marks="marks" :format-tooltip="formatTooltip"
            @input="onChage"></el-slider>
        <div class="tick-mark">
            <div :class="['tick-mark-box-line', index % 5 === 0 ? 'tick-mark-box-splitline' : 'tick-mark-box-line']"
                v-for="(item, index) in 101" :key="index"></div>
        </div>
        <div class="tooltip-box">
            <template v-for="(item, index) in dateTimeRange">
                <div class="tooltip-box-line" :style="{left: Object.keys(marks)[index] / max * 100 + '%'}"
                    v-if="item.name">
                    <div class="tooltip-box-content">{{ item.name }}</div>
                </div>
            </template>
        </div>
    </div>
</div>

<script>
    var timeline = new Vue({
        el: "#timeline",
        data() {
            return {
                isPlay: false, // 是否播放
                value: [0, 0],
                max: 100, // 最大值
                marks: {}, // 标注对象
                stepToSecond: 1, // 1步长代表多少分(默认1步长代表1分钟)
                dateTimeRange: [],
                timer: null,
                pageName: '',
            };
        },
        methods: {

            // 获取传参,进行初始化
            setDateTimeRange(val) {
                if (Array.isArray(val)) {
                    this.dateTimeRange = val
                    this.init()
                }
            },
            // 初始化方法,定义最大值、标注对象、添加信息展示
            init() {
                this.marks = {}
                if (this.dateTimeRange.length > 0) { // 判断传进来的参数是非空参数
                    let totalTime = new Date(this.dateTimeRange[this.dateTimeRange.length - 1].date).getTime() - new Date(this.dateTimeRange[0].date).getTime()
                    totalTime = Math.round(totalTime / 1000 / 60) // 总时长(分)
                    this.stepToSecond = totalTime > 500 ? Math.floor(totalTime / 500) : 1;
                    this.max = Math.round(totalTime / this.stepToSecond)
                    for (let i = 0, j = this.dateTimeRange.length - 1; i < j; i++) { // 循环数据,根据数据中的时间计算标注的位置
                        let arr = this.dateTimeRange[i].date.substring(11, 19).split(':')
                        arr = arr.slice(0, 2)
                        this.marks[Math.round((new Date(this.dateTimeRange[i].date).getTime() - new Date(this.dateTimeRange[0].date).getTime()) / 60 / 1000 / this.stepToSecond)] = arr.join(':')
                    } // marks对象的属性名称是数字,表示该标注的位置
                }
            },
            // 拖动滑块时tooltip的格式化方法
            formatTooltip(val) {
                let time = new Date(val * this.stepToSecond * 60 * 1000 + new Date(this.dateTimeRange[0]?.date).getTime())
                return `${time.getHours()}:${time.getMinutes().toString().padStart(2, 0)}`
            },
            // 播放方法
            playFn() {
                this.isPlay = !this.isPlay
                this.timer && clearInterval(this.timer)
                if (this.isPlay) {
                    this.value = [0, 0]
                    this.timer = setInterval(() => { // 添加定时器,重复进行滑块移动直到最大值时停止
                        if (this.value[1] < this.max) {
                            this.value = [0, this.value[1] + this.stepToSecond * 2]
                        } else {
                            this.isPlay = false
                            this.timer && clearInterval(this.timer)
                        }
                    }, 20)
                }
            },
        },
    })
</script>

<style lang="less">
    .customTimeline {
        width: 100%;
        height: 100%;
        padding: 10px 40px;
    }

    .container-timeline {
        width: 100%;
        height: 100%;
        position: relative;
        display: flex;
        align-items: center;

        .btn-box {
            position: absolute;
            left: -33px;
            top: 17px;

            .play-icon {
                font-size: 22px;
                cursor: pointer;
            }
        }

        .el-slider {
            width: 100%;
        }

        .tick-mark {
            width: calc(100% + 1px);
            position: absolute;
            height: 50%;
            top: 0;
            display: flex;
            justify-content: space-between;
            align-items: flex-end;
            z-index: -2;

            .tick-mark-box-line {
                width: 0;
                height: 50%;
                border-right: 2px solid #8CEDEC;
            }

            .tick-mark-box-splitline {
                height: 70%;
            }
        }

        .tooltip-box {
            width: 100%;
            position: absolute;
            height: 50%;
            top: 0;
            z-index: -1;

            .tooltip-box-line {
                height: 100%;
                position: absolute;
                width: 0;
                border-right: 2px solid #FFF;

                .tooltip-box-content {
                    position: absolute;
                    top: calc(-100% - 50px);
                    width: 140px;
                    height: 60px;
                    padding: 7px;
                    background-color: #0342caab;
                    border-radius: 7px;
                    left: -69px;
                    font-size: 14px;
                }

                .tooltip-box-content::before {
                    content: '';
                    width: 0;
                    height: 0;
                    display: block;
                    border-style: solid;
                    border-width: 8px 6px 0 6px;
                    border-color: #0342caab transparent;
                    position: absolute;
                    bottom: -8px;
                    left: 50%;
                    transform: translate(-50%);
                }
            }
        }
    }
</style>
2、这里是动态传入的标题,不管有几个标题,都需要传一个结束时间
         $('#customTimeline').show()
           //这里是动态传入的标题,不管有几个标题,都需要传一个结束时间
                    timeline.setDateTimeRange([
                        {
                            date: '2024-02-25 9:00:00',
                            name: '课程的要素',
                        }, {
                            date: '2024-02-25 14:00:00',
                            name: '课程的内容',
                        }, {
                            date: '2024-02-25 19:00:00',
                            name: ''
                        }
                    ])
效果图: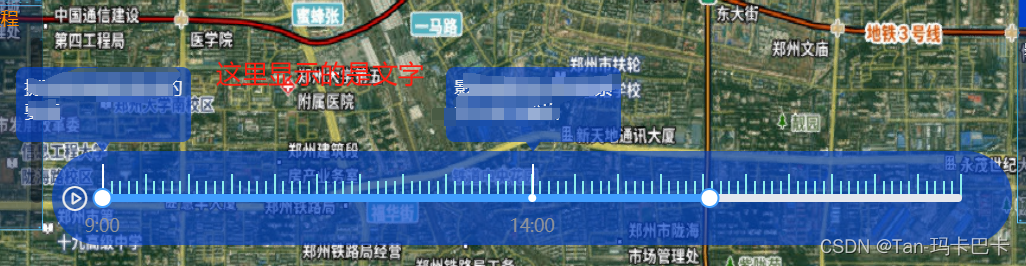


 3437
3437


 被折叠的 条评论
为什么被折叠?
被折叠的 条评论
为什么被折叠?
 到【灌水乐园】发言


