


Nginx
nginx是一个开源的,高拓展的web服务器
Nginx和Tomcat
nginx和tomcat其实都是web服务器
tomcat,是一种动态资源服务器,是一种servlet容器,更多的是处理像jsp这样的动态资源,因为它把html和java(jsp)代码耦合在一起了
而nginx则是一个静态资源的服务器,它具有高性能,低内存等优势
简单来说,tomcat更适合做容器,nginx更适合负责请求的发送的任务。
功能
- 静态服务器
- 反向代理(负载均衡)
- 做一级缓存
优点
- 响应快
- 高拓展
- 单机支持高并发
- 低内存消耗
- 支持热部署
- BSD开源,支持阅读源码而且自行升级
Nginx的安装
因为只是学习需要,所以我选择安装windows版本的nginx。
安装步骤
1,下载nginx
2,在解压目录打开cmd命令窗口
#打开nginx
start nginx

#查看nginx进程
tasklist /fi "imagename eq nginx.exe"
注意,你的解压目录不可以有中文不然启动会失败,查不到nginx进程。具体的可以在nginx的解压目录下的logs文件里面的日志文件。
当时我的报错是这样的
2022/10/27 16:38:32 [emerg] 74004#76280: CreateFile() "E:\分布式组件\nginx-1.22.1/conf/nginx.conf" failed (1113: No mapping for the Unicode character exists in the target multi-byte code page)
3,在浏览器输入localhost验证nginx是否启动成功,他默认的80端口
[外链图片转存失败,源站可能有防盗链机制,建议将图片保存下来直接上传(img-ghUJbPDn-1667013479824)(C:\Users\86135\AppData\Roaming\Typora\typora-user-images\image-20221027164956187.png)]
nginx的配置文件
也就是解压目录的conf目录
[外链图片转存失败,源站可能有防盗链机制,建议将图片保存下来直接上传(img-0Wz0G9lH-1667013479825)(C:\Users\86135\AppData\Roaming\Typora\typora-user-images\image-20221027165558956.png)]
nginx的配置文件
有一些服务器的配置
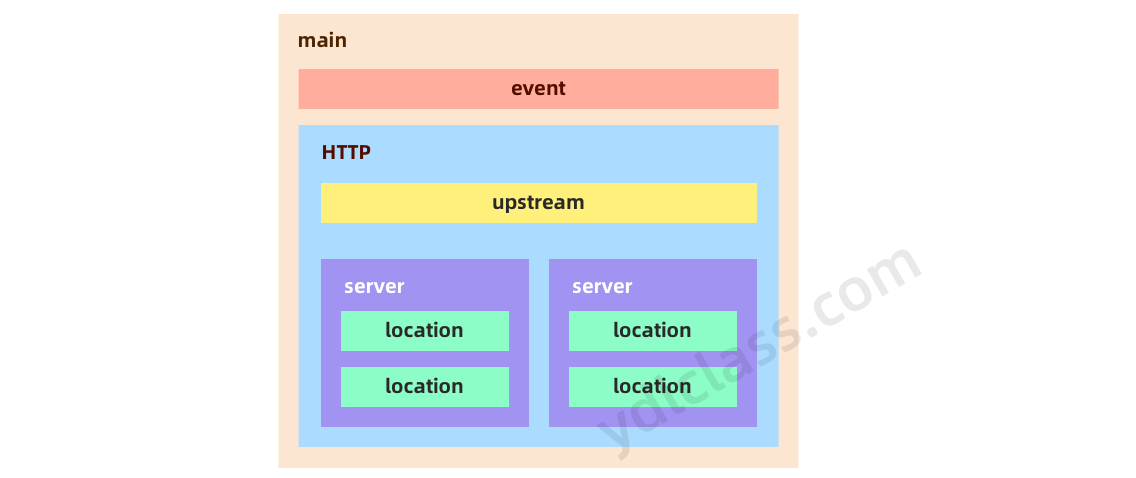
其中
- server主机
- location就是url
其中一些重要的东西
-
worker_processes 1
- 工作进程 默认为一个
-
event配置
-
nio
-
events {
	use epoll
    worker_connections  1024;
}
这个use poll就是nio的,异步线程极大提高性能。
-
连接数就是处理个数
-
对于这个进程我们一般设置为我们电脑的核数,不建议过多,因为cpu的切换耗费时间,多出IO操作的时间
#user  nobody;
worker_processes  1;

#error_log  logs/error.log;
#error_log  logs/error.log  notice;
#error_log  logs/error.log  info;

#pid        logs/nginx.pid;


events {
    worker_connections  1024;
}


http {
    include       mime.types;
    default_type  application/octet-stream;

    #log_format  main  '$remote_addr - $remote_user [$time_local] "$request" '
    #                  '$status $body_bytes_sent "$http_referer" '
    #                  '"$http_user_agent" "$http_x_forwarded_for"';

    #access_log  logs/access.log  main;

    sendfile        on;
    #tcp_nopush     on;

    #keepalive_timeout  0;
    keepalive_timeout  65;

    #gzip  on;

    server {
        listen       80;
        server_name  localhost;

        #charset koi8-r;

        #access_log  logs/host.access.log  main;

        location / {
            root   html;
            index  index.html index.htm;
        }

        #error_page  404              /404.html;

        # redirect server error pages to the static page /50x.html
        #
        error_page   500 502 503 504  /50x.html;
        location = /50x.html {
            root   html;
        }

        # proxy the PHP scripts to Apache listening on 127.0.0.1:80
        #
        #location ~ \.php$ {
        #    proxy_pass   http://127.0.0.1;
        #}

        # pass the PHP scripts to FastCGI server listening on 127.0.0.1:9000
        #
        #location ~ \.php$ {
        #    root           html;
        #    fastcgi_pass   127.0.0.1:9000;
        #    fastcgi_index  index.php;
        #    fastcgi_param  SCRIPT_FILENAME  /scripts$fastcgi_script_name;
        #    include        fastcgi_params;
        #}

        # deny access to .htaccess files, if Apache's document root
        # concurs with nginx's one
        #
        #location ~ /\.ht {
        #    deny  all;
        #}
    }


    # another virtual host using mix of IP-, name-, and port-based configuration
    #
    #server {
    #    listen       8000;
    #    listen       somename:8080;
    #    server_name  somename  alias  another.alias;

    #    location / {
    #        root   html;
    #        index  index.html index.htm;
    #    }
    #}


    # HTTPS server
    #
    #server {
    #    listen       443 ssl;
    #    server_name  localhost;

    #    ssl_certificate      cert.pem;
    #    ssl_certificate_key  cert.key;

    #    ssl_session_cache    shared:SSL:1m;
    #    ssl_session_timeout  5m;

    #    ssl_ciphers  HIGH:!aNULL:!MD5;
    #    ssl_prefer_server_ciphers  on;

    #    location / {
    #        root   html;
    #        index  index.html index.htm;
    #    }
    #}

}
nginx的pid
这个是在logs目录下的pid
http服务器
http{
  include       mime.types;
  default_type  application/octet-stream;
  #charset  gb2312;
  sendfile        on;
  keepalive_timeout  60s;
}
- nclude是个主模块指令,实现对配置文件所包含的文件的设定,可以减少主配置文件的复杂度。该文件也在conf目录中。
- default_type属于HTTP核心模块指令,这里设定默认类型为二进制流,也就是当文件类型未定义时使用这种方式。
- charset gb2312; 指定客户端编码格式。
- sendfile实际上是 Linux2.0+以后的推出的一个系统调用,web服务器可以通过调整自身的配置来决定是否利用 sendfile这个系统调用。sendfile是个比 read 和 write 更高性能的系统接口。 当 Nginx 是一个静态文件服务器的时候,开启 SENDFILE 配置项能大大提高 Nginx 的性能。 但是当 Nginx 是作为一个反向代理来使用的时候,SENDFILE 则没什么用。
- Nginx 使用 keepalive_timeout 来指定 KeepAlive 的超时时间(timeout)。指定每个 TCP 连接最多可以保持多长时间。Nginx 的默认值是 75 秒,有些浏览器最多只保持 60 秒,所以可以设定为 60 秒。若将它设置为 0,就禁止了 keepalive 连接。
前后端分离Nginx
后端只有一个接口,端口为8080
localhost:8080
nginx静态服务器

在nginx的默认初始页面在这个文件夹
其中在配置文件中也可以发现
server {
    listen       80;
    server_name  localhost;

    location / {
        root   html;
        index  index.html index.htm;
    }
}
/就是匹配全部呗,然后index初始页就去html这个目录找,里面都是静态页面
匹配所有index.html
所以第一行是指定路劲,第二行是去匹配资源
-
listen
- 监听的端口为80
-
server_name
- 主机名
-
location就是匹配规则了
-
优先等值匹配
-
location [=|~|~*|^~] /uri/ {}- ^~前缀
- ~*忽略大小写
- ~大小写敏感
- =全部匹配
-
-
root和alias的区别
-
错误重定向
-
error_page 404 /404.html
error_page 502 503 504 /50x.html
-
比如下列
server{
    listen 80 default;
    server_name www.ydlclass.com;
    index index.html index.htm index.php;
    root /data/www;

    location ~ .*\.(gif|jpg|jpeg|png|bmp|swf)${
        expires      30d;
    }

    location ~ .*\.(js|css)?${
        expires      1h;
    }
}
root和alias
location ^~ /backend {
	root /data/www/backend
}


location ^~ /backend {
	alias /data/www/backend
}
try_files
try_files /a/b.html $uri $uri/index.html $uri.html @other;
location @other {
    proxy_pass http://backend
}
压缩图片
我们可以在配置文件中nginx.conf中的http模块添加以下代码
gzip on;
gzip_min_length 1k;
gzip_buffers    4 16k;
gzip_http_version 1.1;
gzip_comp_level 5;
gzip_types image/png;
gzip_vary on;
- gzip on
- 参数来启动压缩,默认关闭
- gzip_min_length 1k
- 小于设定值不会压缩
- gzip_buffers 4 16k
- 压缩缓冲区的大小
- gzip_http_version 1.1
- 压缩协议版本
- gzip_comp_level 5
- 压缩比例由低到高从1到9,默认为1
- gzip_types image/png
- 指明资源类型进行压缩
- gzip_vary on
- 该指令用于设置在使用Gzip功能时是否发送带有“Vary: Accept-Encoding”头域的响应头部。该头域的主要功能是告诉接收方发送的数据经过了压缩处理。开启后的效果是在响应头部添加了Accept-Encoding: gzip,这对于本身不支持Gzip压缩的客户端浏览器是有用的。
http {
    include       mime.types;
    default_type  application/octet-stream;

    #log_format  main  '$remote_addr - $remote_user [$time_local] "$request" '
    #                  '$status $body_bytes_sent "$http_referer" '
    #                  '"$http_user_agent" "$http_x_forwarded_for"';

    #access_log  logs/access.log  main;

    sendfile        on;
    #tcp_nopush     on;

    #keepalive_timeout  0;
    keepalive_timeout  65;

    #gzip  on;

	gzip on;
	gzip_min_length 1k;
	gzip_buffers    4 16k;
	gzip_http_version 1.1;
	gzip_comp_level 5;
	gzip_types image/png;
	gzip_vary on;

    server {
        listen       80;
        server_name  localhost;

        #charset koi8-r;

        #access_log  logs/host.access.log  main;

        location / {
            root   html;
            index  index.html index.htm;
        }

        #error_page  404              /404.html;

        # redirect server error pages to the static page /50x.html
        #
        error_page   500 502 503 504  /50x.html;
        location = /50x.html {
            root   html;
        }

        # proxy the PHP scripts to Apache listening on 127.0.0.1:80
        #
        #location ~ \.php$ {
        #    proxy_pass   http://127.0.0.1;
        #}

        # pass the PHP scripts to FastCGI server listening on 127.0.0.1:9000
        #
        #location ~ \.php$ {
        #    root           html;
        #    fastcgi_pass   127.0.0.1:9000;
        #    fastcgi_index  index.php;
        #    fastcgi_param  SCRIPT_FILENAME  /scripts$fastcgi_script_name;
        #    include        fastcgi_params;
        #}

        # deny access to .htaccess files, if Apache's document root
        # concurs with nginx's one
        #
        #location ~ /\.ht {
        #    deny  all;
        #}
    }


    # another virtual host using mix of IP-, name-, and port-based configuration
    #
    #server {
    #    listen       8000;
    #    listen       somename:8080;
    #    server_name  somename  alias  another.alias;

    #    location / {
    #        root   html;
    #        index  index.html index.htm;
    #    }
    #}


    # HTTPS server
    #
    #server {
    #    listen       443 ssl;
    #    server_name  localhost;

    #    ssl_certificate      cert.pem;
    #    ssl_certificate_key  cert.key;

    #    ssl_session_cache    shared:SSL:1m;
    #    ssl_session_timeout  5m;

    #    ssl_ciphers  HIGH:!aNULL:!MD5;
    #    ssl_prefer_server_ciphers  on;

    #    location / {
    #        root   html;
    #        index  index.html index.htm;
    #    }
    #}

}
反向代理
1,配置nginx反向代理
proxy_pass设置反向代理服务器
location / {
    proxy_pass http://ydl.com;
}
2,解析uri
前端访问后端的接口均使用**/api**为前缀,识别到它后就代理去后台
前端如下
mounted(){
  var ip_addr = document.location.hostname
  axios.get('http://'+ip_addr+'/api/host').then(res=>{
   this.host = res.data
  })
}
前端访问的接口:http://192.168.111.200:80/api/host
后端的接口:http://192.168.111.200:8080/host
开始解析
location ^~ /api/ {
    rewrite ^/api(.*)$ $1 break;
    proxy_pass http://127.0.0.1:8080;
}
就匹配/api呗,然后proxy_pass反向到后端服务器,其实也就是把
- rewrite break
- url重写后,直接使用当前资源,不再执行location里余下的语句,完成本次请求,地址栏url不变
- rewrite last
- url重写后,马上发起一个新的请求,再次进入server块,重试location匹配,超过10次匹配不到报500错误,地址栏url不变
- rewrite redirect
- 返回302临时重定向,地址栏显示重定向后的url
负载均很
后端工程在堕胎服务器,我们就可以对多台服务器进行负载均衡
upstream模块
upstream backend {
    ip_hash;
    server backend1.example.com;
    server backend2.example.com:8080;
    server 127.0.0.1:8080;
    server backup2.example.com:8080;
}
location / {
    proxy_pass http://backend;
}
以上写法的意思就是,将来同一个url访问我们的服务时,服务可以由backend中的服务器按照某种特定规则轮流提供。
5种负载均衡算法
1,轮询
默认算法,挂掉自动剔除
upstream bakend {
   server 192.168.0.1 down;
   server 192.168.0.2;
}
2,权重设置
也就是权重越大访问次数越多
upstream bakend {
    server 192.168.0.1 weight=20;
    server 192.168.0.2 weight=10;
}
3,ip_hash
哈希ip分配,同一个ip的访问固定一个后端服务器,有效解决session共享问题
upstream bakend {
    ip_hash;
    server 192.168.0.1:88;
    server 192.168.0.2:80;
}
4,url_hash
这个是额外的,需要安装nginx的hash软件包,和上面的ip差不多,只是变成uri
upstream backend {
    server 192.168.0.1:88;     //使用hash语句时,不能在使用weight等其他参数
    server 192.168.0.2:80;
    hash $request_uri;
    hash_method crc32;    //使用hash算法
}
5,fair
只能分配,根据服务响应时间来分配请求
upstream backend {
    server 192.168.0.1:88;
    server 192.168.0.2:80;
    fair;
}
举例
现在开两个端口
-
8080和8081
-
然后定义一个upstream指定规则,同时把服务声明在里面
-
upstream ydlclass {
    server 127.0.0.1:8080 weight 10;
    server 127.0.0.1:8081 weight 20;
}
-
-
反向代理到我们定义的upstream上面
-
location ^~ /api/ {
    proxy_pass http://ydlclass/;
}
就是有api前缀的,我们就可以匹配到下面这个地址,会自动代理两个端口服务中的一个
-
不同服务器的跨域问题
因为刚刚那种是同一台服务器下不同端口的跨域问题,而下面这种就是不同一台服务下面,
比如另一台服务器的前端项目访问我们的后端api接口
我们可以在location下加多个跨域配置
location ^~ /api/ {
    add_header 'Access-Control-Allow-Origin' '*';
	add_header 'Access-Control-Allow_Credentials' 'true';
	add_header 'Access-Control-Allow-Headers' 'Authorization,Accept,Origin,DNT,X-CustomHeader,Keep-Alive,User-Agent,X-Requested-With,If-Modified-Since,Cache-Control,Content-Type,Content-Range,Range';
	add_header 'Access-Control-Allow-Methods' 'GET,POST,OPTIONS,PUT,DELETE,PATCH';
    proxy_pass http://ydlclass/;
}
nginx监控
1,开启状态页
#设定查看Nginx状态的地址
location = /status {
  stub_status on;   	#表示开启stubStatus的工作状态统计功能。
}
2,访问这个localtion的uri
curl http://127.0.0.1/status

Active connections:  1
server accepts handled requests
 16 16 18
Reading: 0 Writing: 1 Waiting: 0

# active connections – 活跃的连接数量
# server accepts handled reque
上面就返回了这些信息

| 属性 | 意义 |
|---|---|
| Active connections | 当前打开的连接数 |
| accepts | 总共处理连接数 |
| handled | 握手次数 |
| requests | 总共处理请求 |
| Reading | 处于接收请求状态的连接数 |
| Writing | 正在处理请求或响应的连接数 |
| Waiting |
其他配置
1、访问控制 allow/deny
Nginx 的访问控制模块默认就会安装,而且写法也非常简单,可以分别有多个allow,deny,允许或禁止某个ip或ip段访问,依次满足任何一个规则就停止往下匹配。如:
location /status {
  stub_status on;
  access_log off;
  allow 192.168.10.100;
  allow 172.29.73.0/24;
  deny all;
}
2、列出目录 autoindex
Nginx默认是不允许列出整个目录的。如需此功能,打开nginx.conf文件,在location,server 或 http段中加入如下参数:这个功能我们可以做一个资源下载站。
location ^~ /file {
    root   /data/www;
    autoindex on;
    autoindex_exact_size off;
    autoindex_localtime on;
    charset utf-8,gbk;
}
autoindex on;运行列出目录内容。另外两个参数最好也加上去。autoindex_exact_size off;默认为on,显示出文件的确切大小,单位是bytes。改为off后,显示出文件的大概大小,单位是kB或者MB或者GB。autoindex_localt ime on;默认为off,显示的文件时间为GMT时间。改为on后,显示的文件时间为文件的服务器时间。
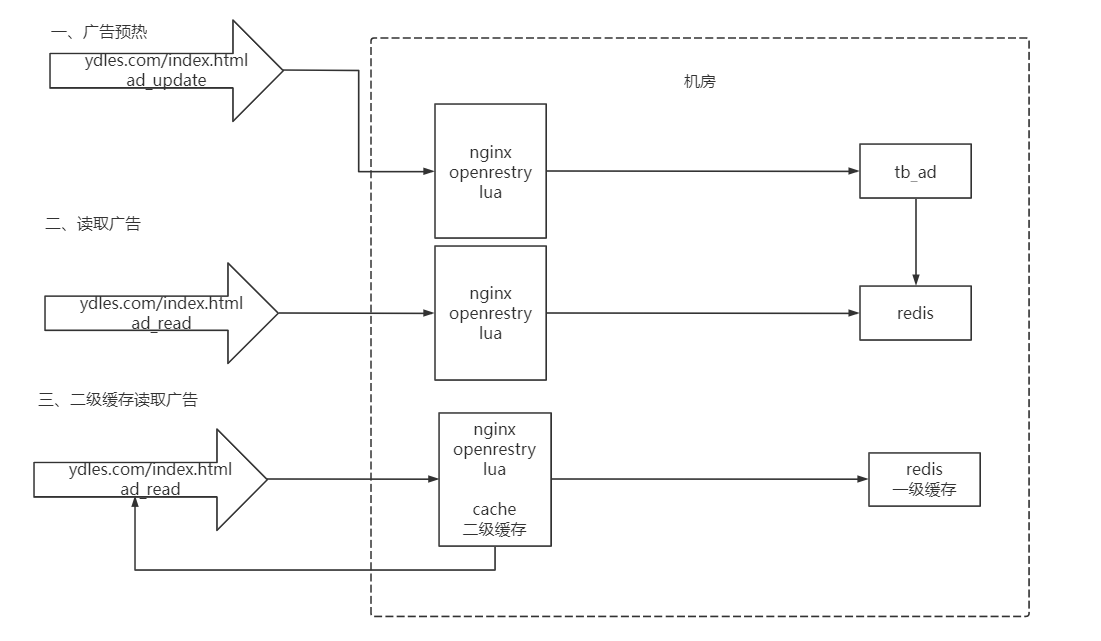
做缓存
本次实现一个广告的轮播图,就像京东首页的广告的轮播图
本次采用的是nginx+redis+lua实现
先说整体思路
tb_ad (广告表)
| 字段名称 | 字段含义 | 字段类型 | 字段长度 | 备注 |
|---|---|---|---|---|
| id | ID | INT | ||
| name | 广告名称 | VARCHAR | ||
| position | 广告位置 | VARCHAR | 系统定义 | |
| start_time | 开始时间 | DATETIME | ||
| end_time | 到期时间 | DATETIME | ||
| status | 状态 | CHAR | 0:无效 1:有效 | |
| image | 图片地址 | VARCHAR | ||
| url | URL | VARCHAR | ||
| remarks | 备注 | VARCHAR | ||
| web_index_lb | 首页轮播图 | |||
| web_index_amusing | 有趣区 | |||
| web_index_ea_lb | 家用电器楼层轮播图 | |||
| web_index_ea | 家用电器楼层广告 | |||
| web_index_mobile_lb | 手机通讯楼层轮播图 | |||
| web_index_mobile | 手机通讯楼层广告 |
缓存预热
编写lua脚本加载缓存,就是读取数据库中数据到redis中。
这个一般都是每天晚上深夜的时候运维执行一个lua脚本读取数据库加载进redis缓存。
注意这里并没有广告的这个微服务,它是直接用lua脚本读取数据,加入缓存,后面访问的话只读取缓存。
nginx读取缓存
因为我们的是实现两级缓存,nginx实现一级缓存,redis实现二级缓存
实现
1,编写脚本
因为在linux,所以要创建一个lua脚本
编写/root/lua/ad_update.lua。大致看懂即可。
ngx.header.content_type="application/json;charset=utf8"
--加载json和mysql
local cjson = require("cjson")
local mysql = require("resty.mysql")

--获取uri中的参数
local uri_args = ngx.req.get_uri_args()
local position = uri_args["position"]

--mysql的连接
local db = mysql:new()
db:set_timeout(1000)
local props = {
    host = "192.168.200.128",
    port = 3306,
    database = "ydles_business",
    user = "root",
    password = "root"
}

--查询
local res = db:connect(props)
local select_sql = "select url,image from tb_ad where status ='1' and position='"..position.."' and start_time<= NOW() AND end_time>= NOW()"
res = db:query(select_sql)
db:close()

--引入redis和连接
local redis = require("resty.redis")
local red = redis:new()
red:set_timeout(2000)

local ip ="192.168.200.128"
local port = 6379
red:connect(ip,port)

--载入缓存
red:set("ad_"..position,cjson.encode(res))
red:close()

ngx.say("{\"flag\":true,\"position\":\""..position.."\"}")
就是去连接了mysql和redis
cjson就是去引入一个json的工具类
2,修改nginx的配置文件
映射拦截
vim /usr/local/openresty/nginx/conf/nginx.conf
在监听80的端口的server下添加转发
content_by_lua_file是执行lua脚本
#添加广告
location /ad_update {
	content_by_lua_file /root/lua/ad_update.lua;
}
重启nginx
cd /usr/local/openresty/nginx/sbin
./nginx -s reload
运维人员的话直接发送下面这个请求就可以完成缓存预热
http://192.168.200.128/ad_update?position=web_index_lb
3,开始一级广告缓存
发送请求,执行lua脚本,从redis中读取数据
创建文件 vim /root/lua/ad_read.lua。
ngx.header.content_type="application/json;charset=utf8"
local uri_args = ngx.req.get_uri_args();
local position = uri_args["position"];
local redis = require("resty.redis");
local red = redis:new()
red:set_timeout(2000)
local ok, err = red:connect("192.168.200.128", 6379)
local rescontent=red:get("ad_"..position)
--返回客户端
ngx.say(rescontent)
red:close()
在监听80端口的server下,添加location拦截
#读取广告
location /ad_read {
	content_by_lua_file /root/lua/ad_read.lua;
}

cd /usr/local/openresty/nginx/sbin
./nginx -s reload
发送请求完成读取一级缓存
http://192.168.200.128/ad_read?position=web_index_lb
4,加入二级缓存
openresty也就是nginx的web客户端,我们可以进行二级缓存,也就是把缓存放入nginx
所以我们需要修改上面的读取数据问lua脚本文件
--设置响应头类型
ngx.header.content_type="application/json;charset=utf8"
--获取请求中的参数ID
local uri_args = ngx.req.get_uri_args();
local position = uri_args["position"];

--获取本地缓存
local cache_ngx = ngx.shared.dis_cache;
--根据ID 获取本地缓存数据
local adCache = cache_ngx:get('ad_cache_'..position);

--先看看nginx有无值,有的话直接返回
if adCache == "" or adCache == nil then

    --引入redis库
    local redis = require("resty.redis");
    --创建redis对象
    local red = redis:new()
    --设置超时时间
    red:set_timeout(2000)
    --连接
    local ok, err = red:connect("192.168.200.128", 6379)
    --获取key的值
    local rescontent=red:get("ad_"..position)
    --输出到返回响应中
    ngx.say(rescontent)
    --关闭连接
    red:close()
    --将redis中获取到的数据存入nginx本地缓存 这个超时时间为10分钟放入nginx
    cache_ngx:set('ad_cache_'..position, rescontent, 10*60);

else
 --nginx本地缓存中获取到数据直接输出
 ngx.say(adCache)
end
http://192.168.200.128/ad_read?position=web_index_lb读取缓存
5,梳理请求流程
- 发送http://192.168.200.128/ad_update?position=web_index_lb请求
- nginx拦截,执行lua脚本,完成mysql读取和redis缓存载入
- 发送http://192.168.200.128/ad_read?position=web_index_lb请求
- nginx拦截,执行lua脚本,从缓存中读取数据
限流
nginx作为服务器可以进行限流操作,gateway网关也可以进行限流操作。
控制速率的方式之一就是漏桶算法
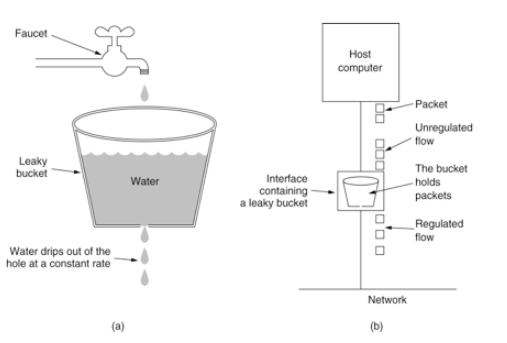
在配置文件中配置就可以
# 设置限流配置 限速,每秒2个,内存区域10m,大概16万个session
limit_req_zone $binary_remote_addr zone=myRateLimit:10m rate=2r/s;

server {
     listen       8081;
     server_name  localhost;
     charset utf-8;
     location / {
          limit_req zone=myRateLimit;
          root   html;
          index  index.html index.htm;
     }
}
- 10m内存也就是16w的ip足够了
- 速率一秒2个
cd /usr/local/openresty/nginx/sbin

./nginx -s reload
也就是每个用户每秒内发送的请求大于2就会限制
突发流量
limit_req_zone $binary_remote_addr zone=myRateLimit:10m rate=2r/s;

server {
     listen       8081;
     server_name  localhost;
     charset utf-8;
     location / {
          limit_req zone=myRateLimit burst=5 nodelay;
          root   html;
          index  index.html index.htm;
     }
}
配合burst,也就是把多出来的不要直接503,而是先放入队列0.5秒处理一个
但是这样会阻塞很长时间,所以加上nodelay无延迟处理
现在的话每秒钟可以处理2+5个请求,当第8个请求来的话会503
如上两种配置结合就达到了速率稳定,但突然流量也能正常处理的效果。


 587
587


 被折叠的 条评论
为什么被折叠?
被折叠的 条评论
为什么被折叠?
 到【灌水乐园】发言


