


总结(先看)
- Vue全局事件总线就是一种组件间通信的方式,适用于
任意组件间通信。 - 安装全局事件总线:
new Vue({
	......
    //必须beforeCreate钩子里安装。原因:与生命周期有关
	beforeCreate() {
		Vue.prototype.$bus = this //安装全局事件总线,$bus就是当前应用的vm
	},
    ......
})
补充: 全局事件总线的本质就是 自定义组件事件的妙用。
$bus就是全局事件总线,他其实就是vm(Vue的实例 ),$bus只是开发中常用变量名,用他来代表全局事件总线,你叫X也行。
因为vm能被所有的组件看到,所以,它就像一个卫星,
所有组件都能看到,利用它实现任意组件通信。
A组件想接收数据,则在A组件中给$bus绑定一个自定义事件xxx,回调函数留在A组件自己身上。
B组件要给A发送数据,则在B组件中使用$emit()触发xxx事件,并用形参将要传的数据带过去,即把数据传给A。
3. 使用事件总线:
1). 接收数据:A组件想接收数据,则在A组件中给$bus绑定自定义事件,事件的回调留在A组件自身。
API介绍:.$on(参1,参2),参1是要绑的事件,参2是事件触发后执行的回调函数**
methods(){
  demo(data){......}
}
......
mounted() {
    //挂载后绑定
  this.$bus.$on('xxxx',this.demo) //非箭头函数。demo方法要在methods里声明好.即使有参数,这里也直接写this.函数名
}

或者:
mounted(){
    this.$bus.$on('xxx',箭头函数)
}
2)提供数据:B组件提供数据,使用this.$bus.$emit('xxxx',数据)。触发自定义事件并发送数据
4. 最好在beforeDestroy钩子中,用$off去解绑当前组件所用到的事件。
5. 一个组件可以在$bus上绑多个不同的自定义事件,这样它就可以收到多个来自多个组件的数据。同理,一个组件可以触发$bus上多个事件,这样它就可以向多个组件发数据。
例子:School收,Student发
School.vue
<template>
  <div>
    <h2>{{name}}</h2>
    <h2>{{address}}</h2>
  </div>
</template>
<script>
export default {
  name: "School",
  data(){
    return{
      name:'尚硅谷',
      address:'北京'
    }
  },
  mounted() {
    //给$bus 绑定一个hello事件.$bus可以被所有的组件看到
    //$bus就是一个公交车,一个邮递员
    this.$bus.$on('hello',data=>console.log('我是School组件,收到了数据',data))
    /** 我感觉$bus就是一个卫星,上面这一步就是把我的线插上去,当有人联系我时(即触发这个事件),我就能收到消息*/
  },
      //组件销毁前,将hello事件从$bus身上解绑
  beforeDestroy() {
    this.$bus.off('hello')//一定要写事件名,若不写,这其他组件给$bus绑的事件也都会解绑
  }
}
</script>
Student.vue
<template>
<div>
<h2>{{name}}</h2>
<h2>{{age}}</h2>
<button @click="sendStuName">把学生名给School组件</button>
</div>
</template>
<script>
export default {
name: "Student",
data(){
return{
name:'张三',
age:19
}
},
methods:{
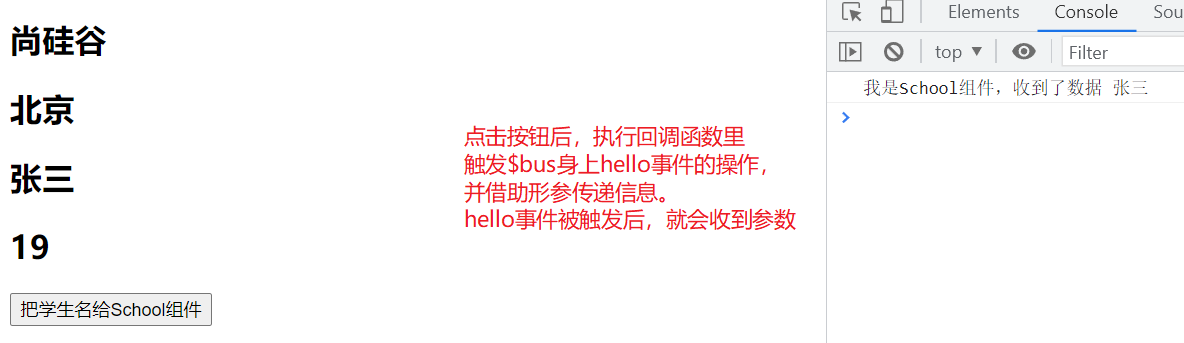
//点击按钮后,执行sendStuName回调函数
sendStuName(){
//拿到$bus,触发它身上的hello事件,参数传过去。第二个是可变形参,可以传多个
this.$bus.$emit('hello',this.name)
}
}
}
</script>
App.vue
<template>
 <div>
   <School/>
   <Student/>
 </div>
</template>

<script>
import School from "@/components/School";
import Student from "@/components/Student";
export default {
  name: "App",
  components: {School,Student}
}
</script>

<style scoped>

</style>
main.js
import Vue from 'vue'
import App from './App'

Vue.config.productionTip = false
//创建vm
new Vue({
    el:'#app', //容器在index.html里
    render:h => h(App),
    //借助生命周期钩子。不明白的去看看Vue官网的生命周期图,this就是vm
    beforeCreate() {
        Vue.prototype.$bus = this //安装全局事件总线
    }
})
index.html
<div id="app"></div>
结语
要分清在某一情况下,谁是接收方,谁是发送方。因为2个组件之间 接收方和发送方这个身份是相对的,比如传输数据a时,组件1是发送方,组件2是接收方;而传输数据b时,组件1是接收方,组件2是发送方。
要记住:
在main.js安装全局事件总线的代码。
接收方给$bus绑自定义事件,一般在mounted里绑。
发送方触发自定义事件。


 1939
1939


 被折叠的 条评论
为什么被折叠?
被折叠的 条评论
为什么被折叠?
 到【灌水乐园】发言


