


Vue2
脚手架安装:
npm i @vue/cli -g
eslint关闭
在vue.config.js中
const { defineConfig } = require('@vue/cli-service')
// 当前项目使用的配置文件
module.exports = defineConfig({
  transpileDependencies: true,
  lintOnSave: false,//关闭eslint
  configureWebpack: {
    entry: './day6/index.js'
  }
})
入口js设置
// Vue2 是个类
import Vue from 'vue'
import App from './App1.vue'
// .vue文件经过vue-loader处理之后会变成一个对象
console.log(App)
let vm = new Vue({
  // el:'#app'
  render(createElement) {
    return createElement(App)
  }
}).$mount('#app')
1.常用指令
在Vue2中 v-for 和v-if 一起使用v-for的优先级更高
<template>
  <div>
    <h1 v-if="name.length < 4">hello world{{ name }}</h1>
    <h2 v-show="name.length < 4">hello world{{ name }}</h2>
    <div v-html="str"></div>
    <div v-text="str"></div>
    <input type="text" v-model="name">
    <ul>
      <li v-for="(item, index)  in  ary" :key="item">{{ index }}--{{ item }}</li>
      <li v-for="(value, key) of obj">{{ value }}</li>
    </ul>
    <ul v-pre>
      <li>1</li>
      <li>2</li>
      <li>3</li>
      <li>4</li>
      <li>5</li>
      <li>6</li>
      <li>7</li>
      <li>8</li>
      <li>9</li>
      <li>10</li>
      <li>11</li>
      <li>12</li>
      <li>13</li>
      <li>14</li>
      <li>15</li>
      <li>16</li>
      <li>17</li>
      <li>18</li>
    </ul>
  </div>
</template>
<script>
/*
  Vue中的指令: 就是一些v-xxx的行内属性
  v-model 一般用在表单元素或者组件

  // 不常用的
    v-cloak 为了解决小胡子的显示问题  这个指令vue渲染完成之后会删除这个行内属性;工程化中没有
    v-pre 他是一个优化的指令
    v-html  利用的就是原生的innerHTML;
    v-text  利用的就是原生的innerText


  //常用的
  v-show
  v-if
  这两者后跟的都会转成一个布尔类型
  v-show 是控制了元素的显示隐藏 有较大的初始加载开销
  v-if 控制的是元素的加载   有较大的切换开销
  v-else-if
  v-else

  v-for 循环展示标签的一个指令  可以用来循环 “数组”  对象 数字 字符串

*/
export default {
  data() {
    // 要求必须是函数返回一个对象的格式: 为了保证组件数据的独立性
    return {
      name: "珠峰",
      str: '<i>666</i>',
      ary: [111, 222, 333, 444],
      obj: {
        q: 1, w: 2, e: 3
      }
    }
  },
  created() {
    console.log(this)
  }
}
</script>
2.事件处理及数据的挂载
虚拟dom vnode ,在node_modules -> vue - > src -> core -> vdom ->vnode.js
双向数据绑定事靠defineproperty
在node_modules -> vue - > src -> core -> vdom ->index.js 原生
在node_modules -> vue - > src -> core -> instance -> state.js (initState函数)
options是我们组件script里写的配置项,可以拿到props、methods、data,先初始化data,先拿到自己写的在组件data,检测data是不是函数,是函数调用getData(data和vm实例穿进去),不是则直接把data还给他。getData先去返回data.call(vm,vm),拿属性名、props、methods,属性名的长度,先检查有没有报错,
<template>
  <div>
    <input type="text" v-model="name" @keydown.enter="add(5)">
    <input type="text" :value="name" @input="name = $event.target.value">
    <h2 v-for="item in ary" :key="item" class="qqq" :class="{ box: name.length > 3 }">{{ name }}
    </h2>
    <div :style="{ color: 'red' }">666</div>
    <button @click="add(10, $event)">+</button>
  </div>
</template>
<script>
export default {
  name: 'XXX',
  data() {
    // this 当前实例
    return {
      // 这里边的属性 最终都会变成当前实例的私有属性
      name: 100,
      cla: "box",
      ary: [1]
    }
  },
  methods: {
    // methods中的方法 不能写成箭头函数;
    // 里边的函数中的this都是当前实例
    // 这里边的属性 最终都会变成当前实例的私有属性
    add(n, e) {
      //
      console.log(n, e)
      this.name++
    },
  },
  components: {

  }
}
// @ is an alias to /src
/*
  key  是用来提升虚拟DOM的diff算法效率的  同层比较
    虚拟DOM: 使用JS对象模拟真实DOM
    {
      tag:'div',
      children:[
        {
          tag:input
        },
        {
          tag:'h2'
        }
      ]
    }

    {
      tag:'div',
      children:[
        {
          tag:input
        },
        {
          tag:'h2'
        },
        {
          tag:'h2'
        }
      ]
    }


  v-bind  专门用来处理行内属性的一个指令  简写 :
    这个指令在处理 class和style专门做过加强

  v-on 专门用来处理事件的一个指令  简写 @
    事件修饰符
    @click.stop='fn'  //阻止冒泡
    @click.prevent='fn'  //阻止默认事件
    @click.self = 'fn' // 只有点击自己的时候才会触发 冒泡触发不了这个执行

  v-model的修饰符: v-model.lazy     v-model.number  v-model.trim
    v-model 是 :value 和 @input 结合体
    v-model.lazy  把input事件改成了 change事件
     v-model.number 把input的内容使用parseFloat转成数字, 转成NaN的就不转了
     v-model.trim  去除尾首空格的

  v-bind的修饰符  .sync 说组件的时候 在讲
  按键修饰符
    @keydown.enter="add(5)"  敲回车触发后边的函数
*/
</script>
<style lang="less">
</style>
3.生命周期函数
<template>
  <div>

  </div>
</template>
<script>
// @ is an alias to /src
// Vue在渲染组件的时候 会分成几个节点;会在对应的节点 执行对应的函数 这些函数咱们叫做钩子函数
export default {
  beforeCreate() {
    // 咱们一般不用
    // 获取不到 像data props methods中的属性的
  },
  created() {
    // 这个钩子函数 咱们一般用来发送ajax请求
  },
  beforeMount() {
    // 一般不用
  },
  mounted() {
    // 可以用来做一些需要使用DOM的操作: echarts  提供一个DOM 元素
  },
  beforeUpdate() {
    // 当页面渲染用的数据 更新的时候触发 但是视图还没有更新
  },
  updated() {
    // 视图更新完成之后触发
  },
  beforeDestroy() {
    // 一般用于像定时器 或者 原生事件绑定 这个类的清除工作
  },
  destroyed() {

  },
}
</script>
<style lang="less">
</style>
4.数组的变异方法
<template>
  <div>
    {{ ary }}
    <button @click="fn">按钮</button>
  </div>
</template>
<script>
// @ is an alias to /src
export default {
  name: 'XXX',
  data() {
    return {
      obj: {
        a: 1, b: 3
      },
      ary: [111, 666, 333]
    }
  },
  methods: {
    fn() {
      // // this.obj.ttt = 666
      // this.$set(this.obj, 'ttt', 666)
      // console.log(this.$set)
      // this.ary[0] = 888
      // push pop unshift shift  splice  reverse  sort
      // this.ary.splice(0, 1, 888)
      // this.$set(this.ary, 0, 888)
      console.log(this.ary.pop == Array.prototype.pop)
      console.log(this.ary.concat == Array.prototype.concat)
      // 通过 Object.create 创造了一个对象 这个对象的__proto__是指向数组的原型的
      //  然后把这七个变异方法 添加到了 这个对象中,在把vue中的数组的原型指向 都换成了
      // 这个对象,那这样的话 当前vue的数组调用push方法的时候其实调用的是这个对象的push方法
      // 这个方法执行的时候 会通知视图更新
    }
  }
}
</script>
<style lang="less">
</style>
5.计算属性+侦听器+过滤器+混入
计算属性+侦听器
<template>
  <div>
    <input type="text" v-model="age">
    <input type="text" v-model="name">
    {{ obj }}
    <button @click="fn">清空</button>
    <ul>
      <li v-for="item in list" :key="item">{{ item }}</li>
    </ul>
  </div>
</template>
<script>
// @ is an alias to /src
/*
  v-for v-if同时使用 v-for的优先级较高
  v-for和 v-if不建议同时使用  有性能上的浪费
*/
export default {
  data() {
    return {
      age: 100,
      name: "珠峰",
      ary: [111, 222, 333, 25, 67, 46, 89],
      obj: { a: 123 }
    }
  },
  methods: {
    fn() {
      console.log(this)
      // this.name = 999
      // this.ary.push(999)
      this.obj.a = 99
      // this.obj = { a: 999 }
    }
  },
  watch: {
    // 侦听器 侦听的都是this上存在的属性
    // name(newValue, oldValue) {
    //   console.log("只要当name改变了,就会触发这个回调函数", newValue, oldValue)
    // },
    // obj(newValue, oldValue) {
    //   console.log("只要当obj改变了,就会触发这个回调函数", newValue, oldValue)
    // }
    // watch obj 相当 创建了一个watcher 被这个watcher放到 obj的事件池中
    obj: {
      deep: true,// 深度监听  新老值是一样的
      immediate: true,//初始化的时候 执行一次handler
      handler(newVal, oldVal) {
        console.log(newVal, oldVal, '--------------  ')
      }
    }
  },
  computed: {
    // 计算属性中的属性 也会被挂载到当前实例上
    // list() {
    //   // this.ary 和 this.age 称为list的依赖
    //   // 当前函数中"同步"使用的属性 都属于list的依赖
    //   // 只要依赖不发生改变  那么 list对应的这个函数就不会执行 ---> 这就是所谓计算属性有缓存
    // 缓存 靠的是 当前这个watcher的dirty属性 属性是true就会重新执行get获取新值,false就不会执行get
    //   console.log(66666)
    //   setTimeout(() => {
    //     console.log(this.name)
    //   }, 10);
    //   return this.ary.filter(item => item < this.age)
    // }
    list: {
      // 计算属性本质就是Watcher实例; list的值 本质是 当前watcher的value属性值;
      get() {
        return this.ary.filter(item => item < this.age)
      },
      set(val) {
        // 当外界给 list赋予值的时候 就会触发set,val对应的就是被赋予的那个值
        console.log(val)
        this.ary = val

      }
    }
  }
}
</script>
<style lang="less">
</style>
过滤器+混入
import Vue from 'vue'
import App from './App4'
/*
  混入: 全局混入  局部混入
  混入的一个原则就是  数据以组件自身为准。
  钩子函数 混入的先执行 自己的后执行。
*/
// vuex vue-router 独立插件的可以考虑使用全局混入
// 业务组件最好不要使用
// Vue.mixin({
//   data() {
//     return {
//       age: 111,
//       name: 666
//     }
//   },
//   methods: {
//     fn2() { }
//   },
//   created() {
//     console.log("混入的狗子")
//     this.name = 888
//   }
// })


Vue.filter('format', function (val) {
  // val 对应是 |符 前边的那个值
  return `¥${(val / 100).toFixed(2)}元`
})
let vm = new Vue({
  render: h => h(App),
  methods: {
    qqq() { }
  },
  created() {
    console.log('vm自己的狗子')
  }
}).$mount('#app')
console.log(vm)
局部过滤器↓
<template>
  <div>
    <input type="text" v-model="money">
    <h1>当前商品的单价是{{ money | format }}</h1>
    <ul>
      <li v-for="item in goodsList">{{ item.price | format }}</li>
    </ul>
  </div>
</template>
<script>
// @ is an alias to /src
export default {
  data() {
    return {
      money: 1000,
      goodsList: [{ price: 30000 }, { price: 30000 }, { price: 30000 }]
    }
  },
  // filters: {  // 局部过滤器
  //   format(val) {
  //     return `¥${(val / 100).toFixed(2)}元`
  //   }
  // }

}
</script>
<style lang="less">
</style>
局部混入
<template>
  <div>
    <input type="text" v-model="name">
    <input type="text" v-model="age">
    <button @click="fn">===</button>
    <button @click="fn2">===</button>
  </div>
</template>
<script>
// @ is an alias to /src
import js from './App3mixin' // 负责js逻辑抽离
import js2 from './common' //公用逻辑的抽离
export default {
  mixins: [js, js2]
}
</script>
<style lang="less">
</style>
6.nextTick
next原理 node_modules -> vue ->src -> core ->util ->next-tick.js
nextTick本质是 异步+发布订阅
/* @flow */
/* globals MutationObserver */

import { noop } from 'shared/util'
import { handleError } from './error'
import { isIE, isIOS, isNative } from './env'


/*
  一个异步 + 发布订阅

*/

export let isUsingMicroTask = false;// 记录的是 使用的异步是否是一个微任务

const callbacks = [];// 一个事件池   用来存储回调函数
let pending = false;// 是否处在一个异步的等待态

function flushCallbacks() {
  // 一个发布的过程  就是用来执行事件池中的所有回调函数 并且清空事件池
  pending = false
  const copies = callbacks.slice(0)
  callbacks.length = 0
  for (let i = 0; i < copies.length; i++) {
    copies[i]()
  }
}

let timerFunc = () => {
  setTimeout(flushCallbacks, 0)
};// 用来存储一个异步函数的

// 这一通判断 其实就是为了创造一个异步函数 原则就是能用微任务就是用微任务 不行 在使用宏任务
/* if (typeof Promise !== 'undefined' && isNative(Promise)) {
  const p = Promise.resolve()
  timerFunc = () => {
    p.then(flushCallbacks)

    if (isIOS) setTimeout(noop)
  }
  isUsingMicroTask = true
} else if (!isIE && typeof MutationObserver !== 'undefined' && (
  isNative(MutationObserver) ||
  // PhantomJS and iOS 7.x
  MutationObserver.toString() === '[object MutationObserverConstructor]'
)) {

  let counter = 1
  const observer = new MutationObserver(flushCallbacks)
  const textNode = document.createTextNode(String(counter))
  observer.observe(textNode, {
    characterData: true
  })
  timerFunc = () => {
    counter = (counter + 1) % 2
    textNode.data = String(counter)
  }
  isUsingMicroTask = true
} else if (typeof setImmediate !== 'undefined' && isNative(setImmediate)) {
  // Fallback to setImmediate.
  // Technically it leverages the (macro) task queue,
  // but it is still a better choice than setTimeout.
  timerFunc = () => {
    setImmediate(flushCallbacks)
  }
} else {
  // Fallback to setTimeout.
  timerFunc = () => {
    setTimeout(flushCallbacks, 0)
  }
} */


export function nextTick(cb, ctx) {
  let _resolve
  callbacks.push(() => {
    if (cb) {
      try {
        cb.call(ctx)
      } catch (e) {
        handleError(e, ctx, 'nextTick')
      }
    } else if (_resolve) {
      _resolve(ctx)
    }
  })
  if (!pending) {
    pending = true
    timerFunc() //异步执行flushcallbacks
  }
  // $flow-disable-line
  if (!cb && typeof Promise !== 'undefined') {
    return new Promise(resolve => {
      _resolve = resolve
    })
  }
}
// 创造一个全局自定义指令
// 一般会一些权限相关的指令
import Vue from 'vue'
import App from './App2.vue'
import Button from './components/button'
console.log(Button);

let userLevel = 2;
/*
  v-xxx的行内属性
*/
// 创造一个全局自定义指令
// 一般会一些权限相关的指令
Vue.directive('color', function (el, obj) {
  // console.log(el, obj)
  el.style.color = obj.value || '#000'
})
// Vue.directive('permission', function (el, { value }) {
//   if (value > userLevel) {
//     // el.style.display = 'none'
//     el.parentNode.removeChild(el)
//   }
// })
// 函数的写法 其实是 bind和update的一个结合体
Vue.directive('permission', {
  // 自定义指令的钩子函数
  bind() { },
  inserted(el, { value }) {
    // 当前节点被插入到了父节点当中,
    if (value > userLevel) {
      el.parentNode.removeChild(el)
    }
  },
  update() {

  },
  componentUpdated() { },
  unbind() {
    // console.log(666)
  }
})
Vue.component('my-button', Button)


new Vue({
  render(h) {
    return h(App)
  },
  created() {
    console.log(this);
  },
}).$mount('#app')
ref也可以拿到DOM元素
<template>
  <div>
    <input type="text" v-model="name">
    <h1 v-color ref="qqq">{{ name }}</h1>
    <h1 v-permission="3" v-if="flag">{{ name }}</h1>
    <ul>
      <li v-for="item in ary" ref="li">{{ item }}</li>
    </ul>
  </div>
</template>
<script>
// @ is an alias to /src
import Vue from 'vue'
export default {
  name: 'XXX',
  data() {
    return {
      name: "珠峰",
      col: 'red',
      flag: true,
      ary: [11, 222, 333]
    }
  },
  created() {
    setTimeout(() => {
      this.flag = false
    }, 3000);
  },
  mounted() {
    // console.log(this.$refs.li.length)
    // Vue的DOM更新是一个异步操作
    this.ary.push(444)
    this.$nextTick(() => {
      console.log(this.$refs.li.length)
    })
    this.ary.push(555)
    this.$nextTick(function () {
      console.log(this.$refs.li.length)
    })
    console.log(this.$nextTick)
    //  Vue.prototype.$nextTick = function(cb){return nextTick(cb,this)}
    console.log(Vue.nextTick === this.$nextTick)
    console.log(Vue.prototype.$nextTick === this.$nextTick)

  }
}
</script>
<style lang="less">
</style>
7.组件及数据交互
父组件
<template>
  <div>
    <input type="text" v-model="title">
    <my-list :qqq='title' @ccc='f' />
    <my-button />
  </div>
</template>
<script>
// @ is an alias to /src
import MyList from './components/list'
//  组件的data为啥得是个函数 ?? >> 为了保证数据的独立性
/*
 A组件中 使用了 B组件 ; 那么 我们就把B称为A的子组件; A称为B的父组件

父传子 是通过自定义属性+props
子传父 是通过自定义事件+$emit
*/
export default {
  name: 'XXX',
  data() {
    return {
      title: "珠峰"
    }
  },
  methods: {
    f(n) {
      console.log("子组件传了一个", n)
      this.title = n
    }
  },
  components: {
    MyList
  }
}
</script>
<style lang="less">
</style>
子组件
<template>
  <div>
    <h1>{{ qqq }}</h1>
    <button @click="fn">修改名字</button>
    <ul>
      <li v-for="item in ary">{{ item }}
        <my-button />
      </li>
    </ul>
  </div>
</template>
<script>
// @ is an alias to /src
/*
  每一个vue文件的tempate只能有一个根元素  vue3没有这种要求
*/
export default {
  // props data methods computed 里边的属性名不能重复
  // props: ['qqq'],// 这种简写的意思就不做任何限制
  props: {
    // 一般 在创造一些 复用型组件的时候 才会写成 对象格式
    qqq: {
      type: [Number, String],  //对传递的类型做限制
      // required: true, // 必穿属性
      default() { //默认值
        return 'hahaha'
      },
      // validator(val) {
      //   // 若这个函数返回执行是false 那么vue就理解成校验失败了
      //   // return false
      //   if (val.length < 4) {
      //     console.error("要求qqq值的长度不能小于4")
      //     return false
      //   }
      // }
    }
  },
  data() {
    return {
      ary: [111, 222, 333, 444]
    }
  },
  methods: {
    fn() {
      // this.qqq = 888
      this.$emit('ccc', 888)
    }
  },
  created() {
    console.log(this)
  }
}
</script>
<style lang="less">
</style>
# 组件传参
1 - 自定义属性 + props
自定义事件 + $emit
2 - ref 获取组件实例 然后通过实例来使用组件中的数据或者方法
- $children/$parent
$children 指的是 当前组件中的使用的所有的子组件实例 是个数组;Vue3 移除了这个API
$parent 指的是 当前组件的父组件实例 只有一个
以上3种方式 其实都是通过获取组件实例的方式 来使用对应的数据或者属性
3-provide/inject 祖先组件注册 所有的后代组件都能使用
4-$attrs/$listeners
$attrs 里边存储的是没有被props接收的哪些属性
$listeners 里边存储的是 所有的父组件传进来的事件 ;Vue3 移除了这个API
我们一般会使用这两个api去做一些 ui组件的二次封装
v-bind="$attrs" v-on="$listeners"
5-eventBus: $on $emit $off 本质就是一个发布订阅
6-vuex
7-$root
8.v-model+ sync修饰符+组件插槽
v-model ==>
:value + @input
组件上的表现 :value="xxx" @input="xxx = $event"
表单上的表现 :value="xxx" @input="xxx = $event.target.value
<template>
  <div>
    <!-- <AA ref="qq" tt="1" yy="2" uu="3" @ff="f" @ff2="f"></AA> -->
    <!-- <button @click="f"></button> -->
    <h1>{{ age }}</h1>
    <!-- <my-input v-model='age' />
    <my-input :value="age" @input="age = $event" /> -->
    <!--
      v-model ==>
      :value + @input
      组件上的表现 :value="xxx" @input="xxx = $event"
      表单上的表现 :value="xxx" @input="xxx = $event.target.value"
      -->
    <my-input v-model='age' :xxx="name" @update:xxx="name = $event" />
    <my-input v-model='age' :xxx.sync="name" />
  </div>
</template>
<script>
// @ is an alias to /src
import AA from './components/A.vue'
import myInput from './components/my-input2'

export default {
  name: 'XXX',
  data() {
    return {
      name: "珠峰",
      age: 100
    }
  },
  methods: {
    f() {
      // console.log(this.$refs.qq.name)
      // this.$refs.qq.fn()
      console.log(this.$children)
    }
  },
  components: {
    AA, myInput
  }
}
</script>
<style lang="less">
</style>
组件插槽
slot ,作用域插槽(v-slot )、具名插槽(#名字)、匿名插槽
9.父子组件钩子顺序+递归(组件)+keep-alive
/*
父子组件的钩子函数的执行顺序
父 beforeCreated -> 父 created -> 父 beforeMount -> 要渲染结构了,发现结构里边有儿子
子 beforeCreated -> 子 created -> 子 beforeMount -> 渲染儿子的结构 儿子结构渲染完成之后
子 mounted -> 父 mounted
父组件更新 子组件不一定更新 若子组件使用了父组件的数据 那么父组件更新子组件才会跟着跟新
子组件更新 父组件也不一定更新
父 -> beforeUpdate -> 子beforeUpdate -> 子 updated -> 父 updated
父 -> beforeDestory -> 子 beforeDestory -> 子 destoryed -> 父 destoryed
*/
递归+keep-alive
父组件:
keep-alive
<template>
  <div>
    <!-- <child :list='ary' /> -->
    <button @click="flag = !flag">666</button>
    <!-- :include="/a/"  意思就是说 只缓存哪些 name中包含a的组件 ;  exclude用法一样 意思相反-->
    <!-- :include="['aaa']"  意思就是说 只缓存哪些 name是 aaa 的组件 -->
    <keep-alive :include="/a/">
      <AAA v-if="flag" />
      <BBB v-else />
    </keep-alive>

  </div>
</template>
<script>
// @ is an alias to /src
import child from './components3/child'
import AAA from './components3/AAA'
import BBB from './components3/BBB'
export default {
  name: 'XXX',
  data() {
    return {
      flag: true,
      ary: [
        {
          til: '1',
          children: [
            {
              til: '1-1'
            },
            {
              til: '1-2',
              children: [
                {
                  til: '1-2-1',
                  children: [
                    {
                      til: '1-2-1-1'
                    },
                    {
                      til: '1-2-1-2'
                    }
                  ]
                },
                {
                  til: '1-2-2'
                }
              ]
            }
          ]
        },
        {
          til: 2
        }
      ]
    }
  },
  components: {
    child, AAA,
    BBB
  }
}
</script>
<style lang="less">
</style>
子组件:
这里的qqq 使用的是name v-if item.children 是递归组件
<template>
  <ul class="ul_box">
    <li v-for="item in list" :key="item.til">
      {{ item.til }}
      <qqqq v-if="item.children" :list="item.children"></qqqq>
    </li>
  </ul>
</template>
<script>
// @ is an alias to /src
export default {
  name: 'qqqq',
  props: ['list'],
  data() {
    return {

    }
  },
  components: {

  }
}
</script>
<style lang="less">
</style>
10.keep-alive原理
vue -> src -> core -> components ->keep-alive.js
原理 就是利用一个对象把加载过的需要缓存的组件 存起来 ;下载再去加载的时候 先看缓存中有没有对应属性
activated 当前组件被展示的时候触发
deactivated 是当前组件被隐藏的时候触发
keep-alive源码↓
/* @flow */

import { isRegExp, remove } from 'shared/util'
import { getFirstComponentChild } from 'core/vdom/helpers/index'


// 获取组件的名字
function getComponentName(opts) {
  return opts && (opts.Ctor.options.name || opts.tag)
}
// 判断 组件的名字 是否满足 include 或 exclude
function matches(pattern, name) { // 'qqq,www'
  if (Array.isArray(pattern)) {
    return pattern.indexOf(name) > -1
  } else if (typeof pattern === 'string') {
    return pattern.split(',').indexOf(name) > -1
  } else if (isRegExp(pattern)) {
    return pattern.test(name)
  }
  /* istanbul ignore next */
  return false
}

function pruneCache(keepAliveInstance, filter) {
  const { cache, keys, _vnode } = keepAliveInstance
  for (const key in cache) {
    const entry = cache[key]
    if (entry) {
      const name = entry.name
      if (name && !filter(name)) {
        pruneCacheEntry(cache, key, keys, _vnode)
      }
    }
  }
}

function pruneCacheEntry(
  cache,
  key,
  keys,
  current
) {
  const entry = cache[key]
  if (entry && (!current || entry.tag !== current.tag)) {
    entry.componentInstance.$destroy()
  }
  cache[key] = null
  remove(keys, key)
}

const patternTypes = [String, RegExp, Array]

export default {
  name: 'keep-alive',
  abstract: true,

  // props: ['include', 'exclude', 'max'],
  props: {
    include: patternTypes,
    exclude: patternTypes,
    max: [String, Number]
  },

  methods: {
    cacheVNode() {
      const { cache, keys, vnodeToCache, keyToCache } = this
      if (vnodeToCache) {
        const { tag, componentInstance, componentOptions } = vnodeToCache
        cache[keyToCache] = {
          name: getComponentName(componentOptions),
          tag,
          componentInstance,
        }
        keys.push(keyToCache)
        // prune oldest entry
        if (this.max && keys.length > parseInt(this.max)) {
          pruneCacheEntry(cache, keys[0], keys, this._vnode)
        }
        this.vnodeToCache = null
      }
    }
  },
  // data() {
  //   return {
  //     cache: Object.create(null),
  //     keys: []
  //   }
  // },

  created() {
    this.cache = Object.create(null) // 存储需要缓存的哪些实例的对象
    this.keys = []// 存储 缓存的实例对应的key
  },

  destroyed() {
    for (const key in this.cache) {
      pruneCacheEntry(this.cache, key, this.keys)
    }
  },

  mounted() {
    this.cacheVNode()
    this.$watch('include', val => {
      pruneCache(this, name => matches(val, name))
    })
    this.$watch('exclude', val => {
      pruneCache(this, name => !matches(val, name))
    })
  },
  // watch: {
  //   include() { },
  //   exclude() { }
  // },

  updated() {
    this.cacheVNode()
  },

  render() {
    const slot = this.$slots.default // 获取keep-alive 包含的内容
    const vnode = getFirstComponentChild(slot)// 获取插槽里的第一个组件实例
    const componentOptions = vnode && vnode.componentOptions// 组件的一些属性
    if (componentOptions) {
      // check pattern
      const name = getComponentName(componentOptions) // keep 包含的那个组件的名字
      const { include, exclude } = this
      if (
        // not included
        (include && (!name || !matches(include, name))) ||
        // excluded
        (exclude && name && matches(exclude, name))
      ) {
        // 若要渲染的那个组件 不满足 include 或者满足 exclude  那么直接使用新创造的实例
        return vnode
      }
      // 能走到这里的 证明 要加载的组件是需要缓存的

      const { cache, keys } = this
      const key = vnode.key == null
        // same constructor may get registered as different local components
        // so cid alone is not enough (#3269)
        ? componentOptions.Ctor.cid + (componentOptions.tag ? `::${componentOptions.tag}` : '')
        : vnode.key
      if (cache[key]) {
        // 若缓存对象中有这一项 那么就直接使用缓存的组件实例
        vnode.componentInstance = cache[key].componentInstance
        // make current key freshest
        // LRU 算法
        remove(keys, key)
        keys.push(key)
        // 因为keys里边去删除多余的key的时候 是从第一个开始删除的
      } else {
        // 缓存对象中没有 当前实例  那么就要把当前实例缓存起来
        this.vnodeToCache = vnode
        this.keyToCache = key
      }

      vnode.data.keepAlive = true
    }
    return vnode || (slot && slot[0])
  }
}
11.异步组件
官方文档:
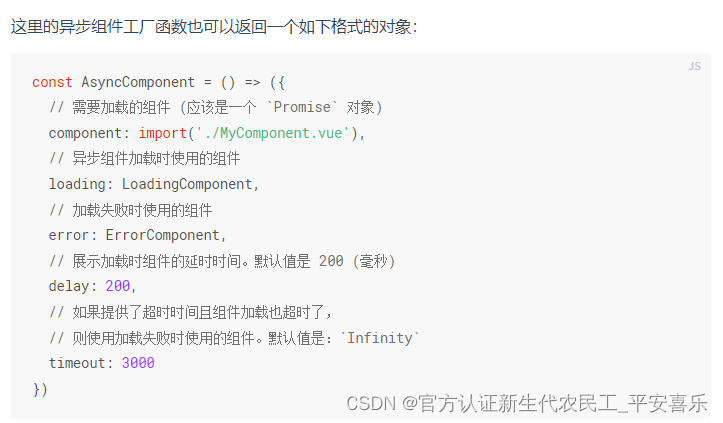
异步组件实际写法↓
<template>
  <div>
    <AA v-if='flag' />
    <BB v-else />
    <CC />
    <button @click="flag = !flag">q q</button>
  </div>
</template>
<script>
// @ is an alias to /src
// import AA from './components/AA'
// import BB from './components/BB'
import myLoading from './components/my-loading'
import CC from './components/CC.jsx'
export default {
  name: 'XXX',
  data() {
    return {
      flag: true
    }
  },
  components: {
    CC,// 异步组件
    AA: () => ({
      component: import('./components/AA'),
      loading: myLoading
    }),
    BB: () => import(/*webpackChunkName:"bbbbbbbb"*/'./components/BB')
  }
}
</script>
<style lang="less">
</style>
render函数
12.vue插件(vue.use)
vue.use
import Vue from 'vue'
import App from './App3.vue'
function toArray(list, start) {
  start = start || 0
  let i = list.length - start
  const ret = new Array(i)
  while (i--) {
    ret[i] = list[i + start]
  }
  return ret
}
Vue.use = function (plugin) {
  // this._installedPlugins 存储的是已经装过的插件
  // debugge  r
  const installedPlugins = (this._installedPlugins || (this._installedPlugins = []))
  if (installedPlugins.indexOf(plugin) > -1) {
    // r若是已经安装的插件  则 不逊要再去执行下边的安装逻辑了  优化
    return this
  }

  // additional parameters
  const args = toArray(arguments, 1) //从实参集合中 从索引为1的地方把后边的参数放到一个数组力
  // [1, 2, 3, 4, 5]
  args.unshift(this)// [Vue,1, 2, 3, 4, 5]
  if (typeof plugin.install === 'function') {
    plugin.install.apply(plugin, args)
  } else if (typeof plugin === 'function') {
    plugin.apply(null, args)
  }
  installedPlugins.push(plugin)
  return this
}
Vue.use({
  install(_Vue) {
    console.log(arguments)//Vue,1, 2, 3, 4, 5
  }
}, 1, 2, 3, 4, 5)
function plug1() {
  console.log(arguments)//Vue,1, 2, 3, 4, 5
}
plug1.install = function (_Vue) {
  console.log('plug1的instatll')
  _Vue.component()
}
Vue.use(plug1, 1, 2, 3, 4, 5)
Vue.use(plug1, 1, 2, 3, 4, 5)

Vue.component('my-loading2', {
  render(h) {
    return h('h1', { class: 'box', attrs: { qqq: '111' } }, ['loading', h('span', '666')])
  },
  // template
})
new Vue({
  render: h => h(App)
}).$mount('#app')
13.vuex
原理 就是 在use的时候 执行了vuex的install
install执行的时候 使用的 全局混入mixin
全局混入了一个 beforeCreate钩子函数
这个钩子函数 给每一个组件添加了 $store属性;
import Vuex from 'vuex'
import Vue from 'vue'
Vue.use(Vuex)
// 一旦使用了vuex 那么 每一个组件都可以使用$store了 : 怎么实现的????
/*
  原理 就是  在use的时候 执行了vuex的install
  install执行的时候 使用的 全局混入mixin
  全局混入了一个 beforeCreate钩子函数
  这个钩子函数 给每一个组件添加了 $store属性;

*/
let store = new Vuex.Store({
  state: {
    // 放那些公用数据的一个地方
    count: 100
  }
})
// console.log(store)
export default store
strict: true,// 开启严格模式
state数据 ,
mutations 定义方法接收两个参数 state ,payload传递来的参数, 使用commit
actions
getters 相当于vue的计算属性
import Vuex from 'vuex'
import Vue from 'vue'
Vue.use(Vuex)
let store = new Vuex.Store({
  strict: true, // 开启严格模式
  state: {
    // 想要修改这里边的数据  唯一的方法是提交mutation
    count: 100,
    count2: 100,
    count3: 100
  },
  mutations: {
    // 这里存储的都是一些用来修改vuex数据的方法
    // 执行这里边的方法是通过 store.commit(函数名字,传递的参数)
    changeCount(state, payload) {
      // 这些函数最少有一个参数 最多两个
      state.count = payload

    },
    add(state) {
      state.count++
      return 888
    },
    changeCount2(state, payload) {
      // 这些函数最少有一个参数 最多两个
      state.count = payload.qqq
      // setTimeout(() => {
      //   state.count = payload.qqq
      // }, 1000);

    }
  },
  actions: {
    // 编写一些异步函数 然后 再去调用mutations中的函数
    // 执行这里边的方法是通过 store.dispatch(函数名字,传递的参数)
    changeCountAsync(store, payload) {
      // 这些函数最少有一个参数 最多两个
      setTimeout(() => {
        store.commit('add')
      }, 1000);
      return 888888
    }
  },
  getters: {
    // 这里边的属性 相当于vue的计算属性
    type123(state) {
      return state.count % 2 ? '奇数' : '偶数'
    }
  }
})

export default store
map辅助函数,例如 mapState, mapMutations, mapActions等
辅助函数有数组和对象两种写法:
数组解构的写法
...mapState(['count', 'count2', 'count3'])

对象 type即方法名,qqq为payload
 this.$store.commit({
     type: 'changeCount2',
     qqq: this.count + 1
 })
modules模块+vuex数据持久化
模块的使用语法
 components: {
    myA, myB
  },
  methods: {
    add() {
      let ary = [{ text: this.todo, id: Math.random() }, ...this.list]
      this.$store.commit('myA/changeList', ary)
      this.todo = ''
    }
  },
  computed: {
    ...mapState('myA', ['list'])
  }
vuex数据持久化2中方案
1.监听beforunload事件,页面关闭前存到本地(本质仅支持字符串,所以使用JSON.stringify转换);
模块从本地读取保存的数据
let initData = JSON.parse(localStorage.getItem('vuex/myA')) || {
  name: 'AAA',
  list: [{ text: '弛放', id: 1 }]
}
export default {
  namespaced: true,// 模块独立
  state: initData,
  mutations: {
    changeName(state, name) {
      state.name = name
    },
    changeList(state, arr) {
      state.list = arr
    }
  },
  actions: {}
}
2.使用插件的方式来存储数据
import Vuex from 'vuex'
import Vue from 'vue'
import AAA from './modules/A'
import BBB from './modules/B'
Vue.use(Vuex)

const myPlugin = store => {
  // 当 store 初始化后调用
  store.subscribe((mutation, state) => {
    // 每次 mutation 之后调用
    // mutation 的格式为 { type, payload }
    console.log(mutation, state)
    if (/myA/.test(mutation)) {
      localStorage.setItem('vuex/myA', JSON.stringify(state.myA))
    }

  })
}
let store = new Vuex.Store({
  strict: true, // 开启严格模式
  plugins: [myPlugin],
  modules: {
    myA: AAA,
    myB: BBB
  }
})
// 如何实现vuex的数据持久化
// window.addEventListener('beforeunload', () => {
//   // 页面关闭之前触发这个事件
//   localStorage.setItem('vuex/myA', JSON.stringify(store.state.myA))
// })
export default store页面加水印,但不能影响点击事件(css属性)
css 点击穿透 pointer-events: none;一般用于遮罩_MrLi-2018的博客-CSDN博客_css点击穿透
14.vueRouter
hash模式利用的是 hashchange事件
history模式 利用的是 popstate事件 + pushState方法和replaceState方法
redirect 路由重定向;
router-view 是router创造的一个全局组件;用来展示当前路径对应的那个组件
路由传参的方式: query params
编程式导航: 使用$router实例实现页面跳转
push replace go back go(-1) == back()
push 会新增历史记录 ; replace不会新增历史记录
import Vue from 'vue'
import VueRouter from 'vue-router'
console.log(VueRouter.install)
Vue.use(VueRouter)
let obj = {
  '../components/B.vue': function () { return import('../components/B.vue') },
  '../components/A.vue': function () { return import('../components/A.vue') },
}
let routes = [
  // 路由映射表
  {
    path: '/',
    redirect: '/home'
  },
  {
    path: '/home',
    name: 'home',
    meta: {
      // 路由元信息 这里可以用来存储一些当路径需要某些固定参数 像页面标题  权限之类的
      til: "首页",
      role: ['admin', 'user', 'super']
    },
    component: () => import('../views/home.vue'),
    children: [
      {
        path: '/home/a',
        name: 'home_a',
        component: obj['../components/A.vue'],
        meta: {
          // 路由元信息 这里可以用来存储一些当路径需要某些固定参数 像页面标题  权限之类的
          til: "A页",
          role: ['super']
        },
      }
    ]
  },
  {
    path: '/user',
    name: 'user123',
    meta: {
      // 路由元信息 这里可以用来存储一些当路径需要某些固定参数 像页面标题  权限之类的
      til: "用户页",
      role: ['user']
    },
    component: () => import('../views/user.vue')
  },
  {
    path: '/list/:pn',
    name: 'list123',
    component: () => import('../views/list.vue')
  },
  // {
  //   path: '/*', // 页面的路径跟上边的路由 没有一个匹配上的时候 就会走到这里
  //   redirect: '/home'
  // }
]
let router = new VueRouter({
  routes,
  mode: 'history',
  // linkActiveClass: 'qqq',
  // linkExactActiveClass: 'www'
})

let userRole = 'user'

// router.beforeEach((to, from, next) => {
//   // to 和 from的格式 等同  $route
//   console.log(to, from)
//   document.title = to.meta.til || "珠峰"
//   // if (to.path == '/user') {
//   //   next()
//   // } else {
//   //   next('/user') // next 参数 等同于 push的参数 //使用next进行路径跳转的时候 也会触发前置守卫
//   // }
//   if (!to.meta.role || to.meta.role.includes(userRole)) {
//     //证明有权限
//     next()
//   } else {
//     next('/404')
//   }
// })

setTimeout(() => {
  // 使用addRoute的时候 要注意  404配置的位置
  let ary = [{
    path: '/home/qqq',
    componentUrl: '../components/B.vue'
  },
  {
    path: '/ttt',
    componentUrl: '../components/B.vue'
  }]

  ary.forEach(item => {
    router.addRoute('home', {
      path: item.path,
      component: obj[item.componentUrl]
      // component: () => import(item.componentUrl)
    })
  })
  router.addRoute({
    path: '/*', // 页面的路径跟上边的路由 没有一个匹配上的时候 就会走到这里
    redirect: '/home'
  })

}, 2000);


export default router
/*
  hash模式利用的是 hashchange事件
  history模式 利用的是  popstate事件  +  pushState方法和replaceState方法
    前端使用history模式是需要后端配合的,当用户刷选 要返回404的时候 后端不要返回404而是返回我们的html即可

  $route 和 $router的区别????
    $route   是我们用来获取参数的一个都西昂
    $router  是router实例 一边用来调用方法 push replace go back addRoute...
*/
15.TypeScript(常用)
安装:
cnpm i typescript -g (其他包管理工具也可以)
执行:
tsc helloworld.ts
生成配置文件:
tsc --init
ts中 冒号 后边的都是对前边的那个变量进行的一个类型声明;
number[] 是个数组 而且里边的内容必须是数字
元组 可以理解成一个特殊的数组 特殊在长度固定 内容固定
枚举 可以通过属性名拿到属性值,也可通过属性值拿到属性名
  ts中 冒号 后边的都是对前边的那个变量进行的一个类型声明;


let flag: boolean = false;
flag = true;

let a: number = 123;

let b: (string | number) = '';
b = 9

number[] 是个数组 而且里边的内容必须是数字↓
let ary: (number | boolean | string)[] = [1, 2, 3, 4, '', true];

let ary2: Array<number | boolean> = [1, 2, 3, 4, true]

元组 可以理解成一个特殊的数组 特殊在长度固定 内容固定

let ary3: [number, number, boolean] = [1, 1, true]
ary3.push(777)
console.log(ary3)

枚举
enum qqq {
  '零', '一', '二', '三'
}
console.log(qqq['零'])
console.log(qqq[0])
关闭严格模式
void 类型只能接收null或者undefined
never 完整性保证
类型断言和双重断言
字面量type声明
// let n: number = 100
// // n = null // 关闭了严格模式
// n = undefined

// let a: void; //void类型只能接收 null 或者 undefined
// a = null;
// a = undefined

function fn(): void { } // 代表这个函数没有任何返回结果


//  never   完整性保证
function f2(): never {
  throw new Error()
}

// function f(x:number|string){
//   if(typeof x == 'number'){
//     return 1
//   }else if(typeof x == 'string'){
//     return ''
//   }else{

//   }

// }

let ele = document.getElementById('#app');
(ele as HTMLElement).style.color = 'red'// 类型断言; ele肯定是一个html元素

let a: number | string;

// ((a! as any) as boolean) // 双重断言

// 字面量类型
type Role = 'super' | "admin" | 'user'
let role: Role = 'admin'

function f3(a: number, b: number): number {
  return a + b
}


f3(1, 2)

type F = (x: string, y: string) => number
let f4 = (a: number, b: number): number => {
  return a + b
}
let f5: F = (a, b) => {
  return 666
}
f5('1', '2')


// 可选参数
let f6 = function (a: string, b?: string): string {
  return a + b
}
f6('q')

// 默认参数
let f7 = function (a: string, b: string = '6'): string {
  return a + b
}
f7('q')

// 剩余参数

let f8 = function (a: string, ...arg: string[]) { }
f8('q', '', '', '', '')


class Person {
  public name: string    // 这个属性是一个谁都可以访问的一个属性  不写默认就是public
  protected age?: number  // 受保护的属性 只有当前类及其子类可以访问
  private sex: number = 0 // 受保护的属性 只有当前类能访问
  readonly height: number = 180
  constructor(name: string, age: number) {
    this.name = name
    this.age = age
    this.sex = 1
    this.height = 888
  }
  f() {
    console.log(this.age)
    console.log(this.sex)
  }
}
class Student extends Person {
  fn() {
    console.log(this.age)
    console.log(this.sex)
  }
}
let p = new Person('qqq', 123)
// p.name = ''
p.sex

export { }
接口(interface)是一个用来限制对象形状的工具
interface type 都是ts中的关键字
接口是一个用来限制对象形状的工具
interface type 都是ts中的关键字
interface IObj {
  name: string,
  age: number,
  sex: number,
  qq?: string, // 可有可无
  [qqwwwereee: string]: any  // 上述四个属性是受限制的 其他的属性可有可无 之没有任何限制
}

let obj: IObj = {
  name: "zhufeng ",
  age: 13,
  sex: 1,
  yy: 78,
  uu: true
}
obj.age = 99
obj.qq = '345'


interface IObj1 {
  qq: string
}
interface IObj1 {
  ww: string,
  f(a: string, b: string): string
}

let obj2: IObj1 = {
  qq: '',
  ww: '',
  f(q, y) {
    return ''
  }
}
obj2.f('1', '2')


interface Iobj3 extends IObj1 {
  tt: number
}
// let obj3: Iobj3 = {

// }
泛型 可以理解成一个 类型 变量
// 泛型 可以理解成一个 类型 变量
function createAry<QQQ>(length: number, value: QQQ): QQQ[] {
  let ary = []
  for (let i = 0; i < length; i++) {
    if (i % 2) {
      ary[i] = value
    } else {
      // ary[i] = '111'
    }

  }
  return ary
}

createAry<boolean>(5, true)
createAry<string>(5, 'true')
createAry<number>(5, 2)

interface IUser<T> {
  <QQQQ>(x: T, y: T): QQQQ
}


// let f5: IUser = function <Q>(a: Q, b: Q): Q {
//   return a
// }
let f6: IUser<number> = function <Q>(a: number, b: number): Q {
  return ('' as any)
}

f6<boolean>(1, 2)
export { }
declare 声明全局变量
| 是两个类型 满足其中一个即可 & 是必须满足所有的;相当于一个合并
// declare 声明全局变量
declare let age: number

declare interface IUser {
  name: string,
  age: number,
  sex: 0 | 1
}

declare type IQQ = {
  q: string,
  w: number
} | {
  t: number
}

declare type IQQ2 = {
  q: string,
  w: number
} & {
  t: number
}

//  | 是两个类型 满足其中一个即可    & 是必须满足所有的;相当于一个合并
Vue3
app.config.globalProperties.$http=function(){}
globalProperties这个属性可以实现 Vue.prototype.xxx的功能
Vue.mixin --> app.mixin
Vue.directive --> app.directive
Vue.component --> app.component
Vue.use --> app.use
API(学习):isRef, markRaw, onMounted, reactive, ref, toRaw, toRef, toRefs, unref
常用:reactive, ref, toRefs
ref
ref的作用就是把一个值类型做成响应式数据
通过ref 产生的响应式数据 在模板中直接使用 JS中需要加上.value
reactive
把一个对象做成一个响应式数据
toRef和toRefs
把变量变成响应式
toRef只转一个,toRefs转全部变成响应式
isRef
检测是不是一个Ref对象
unRef
如果参数是一个 ref,则返回内部值,否则返回参数本身。
通过ref获取dom元素:
vue3 setup通过ref获取DOM元素或者组件使用ref声明一个响应式数据
然后返出去 然后模板中直接写ref=‘变量’
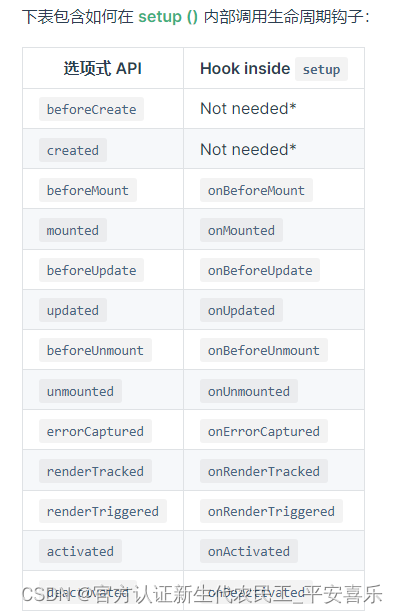
生命周期钩子:
props:
  props: ['data'],
  emits: ['qqq'],
  setup(props, ctx) { // props对应的是父组件传进来的数据(前提是上边有props接收)  ctx
    console.log(props.data, ctx)
}
<!-- vue2 :value + @input -->
<!-- vue3 :modelValue + @update:modelValue -->
<!-- v-model:count='count' 等价于 vue2 的 :count.sync='count' -->
计算属性:
在Vue3中需要从Vue中导入computed函数
 let str = computed(() => {
      return `姓名是${userInfo.name};年龄是${userInfo.age}`
    })
    let checkAll = computed({
      get() {
        return state.ary.every(item => item.checked)
      },
      set(val) {
        state.ary.forEach(item => item.checked = val)
      }
    })
侦听器:
Computed 与 watch | Vue.js (官方地址)
在vue中导入 watch
一般 当被监听的内容是一个普通值的时候 需要使用箭头函数返回的格式 ;
监听的是一个响应式数据直接写
    // 一般 当被监听的内容是一个普通值的时候 需要使用箭头函数返回的格式
    watch(() => userInfo.obj, (newV, oldV) => {
      console.log(newV, oldV)
    }, { deep: true })
    watch(userInfo.obj, (newV, oldV) => {
      console.log(newV, oldV)
    })

  // let name2 = toRef(userInfo, 'name')
    //把userInfo中的name 复制一份变成响应式数据 ;name2会保持对userInfo.name的依赖性

    let name2 = ref(userInfo.name) //把userInfo中的name 复制一份变成响应式数据
    let name3 = userInfo.name // 把userInfo中的name 复制一份
vuex
import { createStore } from 'vuex'

let store = createStore({
  // 等价于 new Vuex.Store({这个对象})
  state: {
    count: 100
  },
  mutations: {
    add(state, n) {
      state.count += n
    }
  },
  actions: {
    add(store, m) {
      setTimeout(() => {
        store.commit('add', m)
      }, 1000);
    }
  }
})

export default store
import { useStore } from 'vuex'
let store = useStore(); // 等价于 this.$store
vueRouter
import { createRouter, createWebHistory, createWebHashHistory } from 'vue-router'


let router = createRouter({
  history: createWebHashHistory(), //createWebHashHistory() hash模式;createWebHistory() history模式
  routes: [
    //  路由映射表
    {
      path: '/',
      redirect: '/home'
    },
    {
      path: '/home',
      component: () => import('../views/home.vue')
    },
    {
      path: '/list',
      component: () => import('../views/list.vue')
    },
    {
      path: '/goods/:id',
      component: () => import('../views/goods.vue')
    },
    { path: '/:pathMatch(.*)*', redirect: '/home' },
  ]
})
router.beforeEach((to, from) => {
  console.log(to)
  // return true // 相当于以前的不走next函数了  不写return 和 return true相当于以前的next()
})

export default router
在组件中传参
<template>
  <div>
    <h1>{{ count }}</h1>
    <Child />
    <router-link to="/home?q=123&w=567">home</router-link>
    <router-link to="/list">list</router-link>
    <router-link to="/goods/123">123</router-link>
    <router-link to="/goods/456">456</router-link>
    <router-link to="/goods/789">789</router-link>
    <router-view></router-view>
  </div>
</template>

<script>
import { useStore } from 'vuex'
import { computed, watch } from 'vue'
import Child from './child'
import { useRoute } from 'vue-router'
export default {
  components: { Child },
  setup() {
    let store = useStore(); // 等价于 this.$store
    let route = useRoute()
    console.log(store)
    let count = computed(() => store.state.count)
    watch(route, () => {
      // watch:{$route(){}}
      console.log('route')
    })
    return {
      count: count
    }
  }
}
</script>
import { useRoute, useRouter } from 'vue-router'
export default {
setup() {
let route = useRoute() // 等价于vue2的this.$route
let router = useRouter(); // 等价于vue2的this.$router
}}
Vite项目
开始 {#getting-started} | Vite中文网下一代前端开发与构建工具![]() https://vitejs.cn/guide/
https://vitejs.cn/guide/
npm7+ 使用模板创建
npm init vite@latest 项目名 -- --template vue-ts(vue-ts模板)
配置@提示
1.在vite.config.ts中输入下方代码
import { resolve } from "path"

// https://vitejs.dev/config/
export default defineConfig({
  plugins: [vue()],
  resolve:{
    alias:{
      '@':resolve(__dirname,'src')
    }
  }
})
2.并在tsconfig.js中添加下方代码
"baseUrl": ".",
    "paths": {
      "@": [
        "src"
      ],
      "@/*": [
        "src*"
      ]
    }
vite-plugin-style-import 该插件可以实现样式导入


 4509
4509


 被折叠的 条评论
为什么被折叠?
被折叠的 条评论
为什么被折叠?
 到【灌水乐园】发言


