


文章目录
远程登录服务器
ssh user@hostname
user:用户名hostname:IP地址或域名
第一次登陆会显示信息:
The authenticity of host ‘123.57.47.211 (123.57.47.211)’ can’t be established.
ECDSA key fingerprint is SHA256:iy237yysfCe013/l+kpDGfEG9xxHxm0dnxnAbJTPpG8.
Are you sure you want to continue connecting (yes/no/[fingerprint])?
我们直接输入yes,远程服务器的信息就会被记录在~/.ssh/known_hosts中
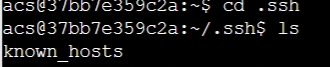
文件中的内容为:

配置远程服务器相关信息
这一步主要是为了简化登录,因为我们的用户名可能会很长,而且ip地址也不太好记
创建config文件
第一步进入.ssh文件夹,然后在.ssh文件夹下创建config文件

配置config文件
Host server
    HostName IP地址或域名 	·
    User 用户名

经过上面的配置之后我们可以在直接用server来代替之前输入的user@hostname
也就是说我们直接输入ssh server,然后再输入密码就可以登陆到我们远程服务器上。
配置密钥登陆
先创建密钥
ssh-keygen
执行完上面命令后我们会发现.ssh目录下多了两个文件id_rsa和id_rsa.pub
id_rsa:私钥,一般是不能给别人看的
id_rsa.pub:公钥,可以给别人看,我们登录要用的

配置密钥文件
将公钥(id_rsa.pub)中的内容复制到server中的~/.ssh/authorized_keys文件中即可
一键添加公钥
ssh-copy-id-server
执行命令
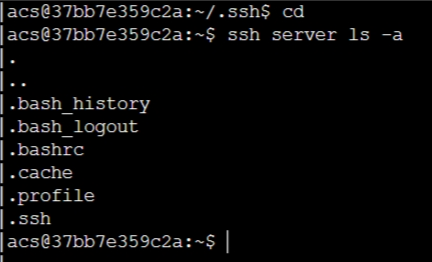
格式
ssh user@hostname command
举个栗子:
ssh server ls -a
scp传文件
copy文件
格式:
scp source destination
source:源文件路径
destination:目标文件路径
含义:将source中的内容copy到destination中
copy文件夹
格式:
scp -r ~/tmpyserver:homework/
-r:在scp中==-r==一定要放在scp后和源路径之前,这个-r应该表示的是文件夹的含义我们在删除文件夹时也用到rm filename -r
含义:将本地家目录下的tmp文件copy到myserver中的/home/arc目录下
scp -r server:homework .
含义:将本地家目录下的tmp文件copy到myserver中的/home/arc目录下
配置我们的vim和tmux
scp ~/.vimrc ~/.tmux.conf server:
.vimrc 文件
" An example for a vimrc file.
"
" To use it, copy it to
"     for Unix and OS/2:  ~/.vimrc
"             for Amiga:  s:.vimrc
"  for MS-DOS and Win32:  $VIM\_vimrc
"           for OpenVMS:  sys$login:.vimrc

" When started as "evim", evim.vim will already have done these settings.
if v:progname =~? "evim"
  finish
endif

" Use Vim settings, rather then Vi settings (much better!).
" This must be first, because it changes other options as a side effect.
set nocompatible

" allow backspacing over everything in insert mode
set backspace=indent,eol,start

if has("vms")
  set nobackup          " do not keep a backup file, use versions instead
else
  set backup            " keep a backup file
endif
set history=50          " keep 50 lines of command line history
set ruler               " show the cursor position all the time
set showcmd             " display incomplete commands
set incsearch           " do incremental searching
"==========================================================================
"My Setting-sunshanlu
"==========================================================================
vmap <leader>y :w! /tmp/vitmp<CR>
nmap <leader>p :r! cat /tmp/vitmp<CR>

"语法高亮
syntax enable
syntax on
"显示行号
set nu

"修改默认注释颜色
"hi Comment ctermfg=DarkCyan
"允许退格键删除
"set backspace=2
"启用鼠标
set mouse=a
set selection=exclusive
set selectmode=mouse,key
"按C语言格式缩进
set cindent
set autoindent
set smartindent
set shiftwidth=4

" 允许在有未保存的修改时切换缓冲区
"set hidden

" 设置无备份文件
set writebackup
set nobackup

"显示括号匹配
set showmatch
"括号匹配显示时间为1(单位是十分之一秒)
set matchtime=5
"显示当前的行号列号:
set ruler
"在状态栏显示正在输入的命令
set showcmd

set foldmethod=syntax
"默认情况下不折叠
set foldlevel=100
" 开启状态栏信息
set laststatus=2
" 命令行的高度,默认为1,这里设为2
set cmdheight=2


" 显示Tab符,使用一高亮竖线代替
set list
"set listchars=tab:\|\ ,
set listchars=tab:>-,trail:-


"侦测文件类型
filetype on
"载入文件类型插件
filetype plugin on
"为特定文件类型载入相关缩进文件
filetype indent on
" 启用自动补全
filetype plugin indent on


"设置编码自动识别, 中文引号显示
filetype on "打开文件类型检测
"set fileencodings=euc-cn,ucs-bom,utf-8,cp936,gb2312,gb18030,gbk,big5,euc-jp,euc-kr,latin1
set fileencodings=utf-8,gb2312,gbk,gb18030
"这个用能很给劲,不管encoding是什么编码,都能将文本显示汉字
"set termencoding=gb2312
set termencoding=utf-8
"新建文件使用的编码
set fileencoding=utf-8
"set fileencoding=gb2312
"用于显示的编码,仅仅是显示
set encoding=utf-8
"set encoding=utf-8
"set encoding=euc-cn
"set encoding=gbk
"set encoding=gb2312
"set ambiwidth=double
set fileformat=unix


"设置高亮搜索
set hlsearch
"在搜索时,输入的词句的逐字符高亮
set incsearch

" 着色模式
set t_Co=256
"colorscheme wombat256mod
"colorscheme gardener
"colorscheme elflord
colorscheme desert
"colorscheme evening
"colorscheme darkblue
"colorscheme torte
"colorscheme default

" 字体 && 字号
set guifont=Monaco:h10
"set guifont=Consolas:h10

" :LoadTemplate       根据文件后缀自动加载模板
"let g:template_path='/home/ruchee/.vim/template/'

" :AuthorInfoDetect   自动添加作者、时间等信息,本质是NERD_commenter && authorinfo的结合
""let g:vimrc_author='sunshanlu'
""let g:vimrc_email='sunshanlu@baidu.com'
""let g:vimrc_homepage='http://www.sunshanlu.com'
"
"
" Ctrl + E            一步加载语法模板和作者、时间信息
""map <c-e> <ESC>:AuthorInfoDetect<CR><ESC>Gi
""imap <c-e> <ESC>:AuthorInfoDetect<CR><ESC>Gi
""vmap <c-e> <ESC>:AuthorInfoDetect<CR><ESC>Gi


" ======= 引号 && 括号自动匹配 ======= "
"
":inoremap ( ()<ESC>i

":inoremap ) <c-r>=ClosePair(')')<CR>
"
":inoremap { {}<ESC>i
"
":inoremap } <c-r>=ClosePair('}')<CR>
"
":inoremap [ []<ESC>i
"
":inoremap ] <c-r>=ClosePair(']')<CR>
"
":inoremap < <><ESC>i
"
":inoremap > <c-r>=ClosePair('>')<CR>
"
"":inoremap " ""<ESC>i
"
":inoremap ' ''<ESC>i
"
":inoremap ` ``<ESC>i
"
":inoremap * **<ESC>i

" 每行超过80个的字符用下划线标示
""au BufRead,BufNewFile *.s,*.asm,*.h,*.c,*.cpp,*.java,*.cs,*.lisp,*.el,*.erl,*.tex,*.sh,*.lua,*.pl,*.php,*.tpl,*.py,*.rb,*.erb,*.vim,*.js,*.jade,*.coffee,*.css,*.xml,*.html,*.shtml,*.xhtml Underlined /.\%81v/
"
"
" For Win32 GUI: remove 't' flag from 'guioptions': no tearoff menu entries
" let &guioptions = substitute(&guioptions, "t", "", "g")

" Don't use Ex mode, use Q for formatting
map Q gq

" This is an alternative that also works in block mode, but the deleted
" text is lost and it only works for putting the current register.
"vnoremap p "_dp

" Switch syntax highlighting on, when the terminal has colors
" Also switch on highlighting the last used search pattern.
if &t_Co > 2 || has("gui_running")
  syntax on
  set hlsearch
endif

" Only do this part when compiled with support for autocommands.
if has("autocmd")

  " Enable file type detection.
  " Use the default filetype settings, so that mail gets 'tw' set to 72,
  " 'cindent' is on in C files, etc.
  " Also load indent files, to automatically do language-dependent indenting.
  filetype plugin indent on

  " Put these in an autocmd group, so that we can delete them easily.
  augroup vimrcEx
  au!

  " For all text files set 'textwidth' to 80 characters.
  autocmd FileType text setlocal textwidth=80

  " When editing a file, always jump to the last known cursor position.
  " Don't do it when the position is invalid or when inside an event handler
  " (happens when dropping a file on gvim).
  autocmd BufReadPost *
    \ if line("'\"") > 0 && line("'\"") <= line("$") |
    \   exe "normal g`\"" |
    \ endif

  augroup END

else

  set autoindent                " always set autoindenting on

endif " has("autocmd")

" 增加鼠标行高亮
set cursorline
hi CursorLine  cterm=NONE   ctermbg=darkred ctermfg=white

" 设置tab是四个空格
set ts=4
set expandtab

" 主要给Tlist使用
let Tlist_Exit_OnlyWindow = 1
let Tlist_Auto_Open = 1
.tmux.conf 文件
set-option -g status-keys vi
setw -g mode-keys vi

setw -g monitor-activity on

# setw -g c0-change-trigger 10
# setw -g c0-change-interval 100

# setw -g c0-change-interval 50
# setw -g c0-change-trigger  75


set-window-option -g automatic-rename on
set-option -g set-titles on
set -g history-limit 100000

#set-window-option -g utf8 on

# set command prefix
set-option -g prefix C-a
unbind-key C-b
bind-key C-a send-prefix

bind h select-pane -L
bind j select-pane -D
bind k select-pane -U
bind l select-pane -R

bind -n M-Left select-pane -L
bind -n M-Right select-pane -R
bind -n M-Up select-pane -U
bind -n M-Down select-pane -D

bind < resize-pane -L 7
bind > resize-pane -R 7
bind - resize-pane -D 7
bind + resize-pane -U 7


bind-key -n M-l next-window
bind-key -n M-h previous-window


set -g status-interval 1
# status bar
set -g status-bg black
set -g status-fg blue


#set -g status-utf8 on
set -g status-justify centre
set -g status-bg default
set -g status-left " #[fg=green]#S@#H #[default]"
set -g status-left-length 20


# mouse support
# for tmux 2.1
# set -g mouse-utf8 on
set -g mouse on
#
# for previous version
#set -g mode-mouse on
#set -g mouse-resize-pane on
#set -g mouse-select-pane on
#set -g mouse-select-window on


#set -g status-right-length 25
set -g status-right "#[fg=green]%H:%M:%S #[fg=magenta]%a %m-%d #[default]"

# fix for tmux 1.9
bind '"' split-window -vc "#{pane_current_path}"
bind '%' split-window -hc "#{pane_current_path}"
bind 'c' new-window -c "#{pane_current_path}"

# run-shell "powerline-daemon -q"

# vim: ft=conf


 2万+
2万+


 被折叠的 条评论
为什么被折叠?
被折叠的 条评论
为什么被折叠?
 到【灌水乐园】发言


