


1. Bean 的作用域
对于全局变量,局部变量等的作用域相信大家都已经很清楚了,但是对于对象作用域有点摸不着头脑,下面通过一个简单的案例,康康对象的作用域
1.1 案例引入
现有一个公共的 Bean 对象
package com.bean.model;

import org.springframework.stereotype.Component;

@Component
public class Dog {
    public String name;
    public String color;

    public String getName() {
        return name;
    }

    public void setName(String name) {
        this.name = name;
    }

    public String getColor() {
        return color;
    }

    public void setColor(String color) {
        this.color = color;
    }

    @Override
    public String toString() {
        return "Cat{" +
                "name='" + name + '\'' +
                ", color='" + color + '\'' +
                '}';
    }
}
然后把该对象的一个示例对象注入容器
package com.bean.controller;

import com.bean.model.Dog;
import org.springframework.context.annotation.Bean;
import org.springframework.stereotype.Component;

@Component
public class DogBean {
    @Bean
    public Dog dog() {
        Dog dog = new Dog();
        dog.setName("旺财");
        dog.setColor("黑色");
        return dog;
    }
}
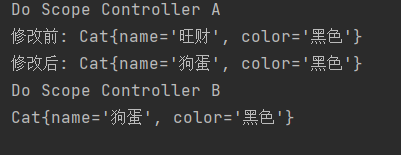
现在 A程序员 和 B程序员 就可以使用, A程序员把该对象修改了
package com.bean.controller;

import com.bean.model.Dog;
import org.springframework.beans.factory.annotation.Autowired;
import org.springframework.stereotype.Component;

@Component
public class ScopeControllerA {

    @Autowired
    private Dog dog;

    public void DoScope() {
        System.out.println("Do Scope Controller A");
        System.out.println("修改前: " + dog.toString());

        Dog dog1 = dog;
        dog1.setName("狗蛋");
        System.out.println("修改后: " + dog.toString());
    }
}
然后B程序员再去使用该对象
package com.bean.controller;


import com.bean.model.Dog;
import org.springframework.beans.factory.annotation.Autowired;
import org.springframework.stereotype.Component;

@Component
public class ScopeControllerB {
    @Autowired
    public Dog dog;

    public void DoScope() {
        System.out.println("Do Scope Controller B");
        System.out.println(dog.toString());
    }
}
预期结果是B程序员得到一个没有修改的对象,而A程序员得到的是修改后的对象,下面康康输出结果
import com.bean.controller.ScopeControllerA;
import com.bean.controller.ScopeControllerB;
import org.springframework.context.ApplicationContext;
import org.springframework.context.support.ClassPathXmlApplicationContext;

public class App {
    public static void main(String[] args) {
        // 1. 获取上下文对象
        ApplicationContext context = new ClassPathXmlApplicationContext("spring-config.xml");
        ScopeControllerA scopeControllerA = context.getBean("scopeControllerA", ScopeControllerA.class);
        scopeControllerA.DoScope();

        ScopeControllerB scopeControllerB = context.getBean("scopeControllerB", ScopeControllerB.class);
        scopeControllerB.DoScope();
    }
}
最后B程序员得到的是修改后的对象,原因是Bean再默认情况下的设计模式是单例模式,也就是在对象注入到容器中后,不会创建新的对象,所以人使用的是同一个对象,导致修改出错,如何解决呢?既然Spring采用的是单例模式,从始至终只有一个对象,那么我可以在注册时注入两个相同的对象,AB操作不同的对象,而不相互影响.
package com.bean.controller;

import com.bean.model.Dog;
import org.springframework.context.annotation.Bean;
import org.springframework.stereotype.Component;

@Component
public class DogBean {
    @Bean(value = "dog_1")
    public Dog dog1() {
        Dog dog = new Dog();
        dog.setName("旺财");
        dog.setColor("黑色");
        return dog;
    }
    @Bean(value = "dog_2")
    public Dog dog2() {
        Dog dog = new Dog();
        dog.setName("旺财");
        dog.setColor("黑色");
        return dog;
    }
}
package com.bean.controller;

import com.bean.model.Dog;
import org.springframework.beans.factory.annotation.Autowired;
import org.springframework.stereotype.Component;

@Component
public class ScopeControllerA {

    @Autowired
    private Dog dog_1;

    public void DoScope() {
        System.out.println("Do Scope Controller A");
        System.out.println("修改前: " + dog_1.toString());

        Dog dog1 = dog_1;
        dog1.setName("狗蛋");
        System.out.println("修改后: " + dog_1.toString());
    }
}
package com.bean.controller;

import com.bean.model.Dog;
import org.springframework.beans.factory.annotation.Autowired;
import org.springframework.stereotype.Component;

@Component
public class ScopeControllerB {
    @Autowired
    public Dog dog_2;

    public void DoScope() {
        System.out.println("Do Scope Controller B");
        System.out.println(dog_2.toString());
    }
}
最后肯定能够得到预期结果: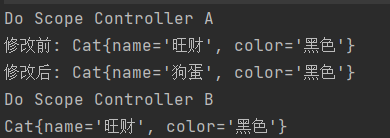
那么这些和 Bean 的作用域有什么关联吗?
1.2 作用域定义
Bean作用域定义: 指的是 Bean 在 Spring 整个框架中的某种行为模式, 例如单例模式, 就表示 Bean 在整个 Spring 中只有一份.
在Spring 官方文档中https://docs.spring.io/spring-framework/docs/current/reference/html/core.html#beans-factory-scopes
介绍了 Spring 支持的六个作用域
| Scope | Description |
|---|---|
| singleton | (Default) Scopes a single bean definition to a single object instance for each Spring IoC container. |
| prototype | Scopes a single bean definition to any number of object instances. |
| request | Scopes a single bean definition to the lifecycle of a single HTTP request. That is, each HTTP request has its own instance of a bean created off the back of a single bean definition. Only valid in the context of a web-aware Spring .ApplicationContext |
| session | Scopes a single bean definition to the lifecycle of an HTTP . Only valid in the context of a web-aware Spring .SessionApplicationContext |
| application | Scopes a single bean definition to the lifecycle of a . Only valid in the context of a web-aware Spring .ServletContextApplicationContext |
| websocket | Scopes a single bean definition to the lifecycle of a . Only valid in the context of a web-aware Spring .WebSocketApplicationContext |
在普通的Spring 项目中只有前两种, 后面的4个是在 Spring MVC 中的状态
1.3 Bean的六种作用域
Singleton Scope
- 描述: 单例模式在 Bean 注入到 IoC容器中后, 任何时间在单例范围中获取到的示例对象都是同一个.
- 应用场景: 通常在无状态的Bean使用该作用域, 无状态代表 Bean对象的属性不需要改变
- 备注: 默认作用域
Prototype Scope
- 描述: 原型模式, 在原型范围中的每次 请求都会创建一个新的实例对象
- 应用场景: 通常在 有状态 的Bean 使用该作用域
- 备注: 多例模式
Request Scope
- 描述: 请求作用域, 每次Http请求都会创建一个 Bean 实例对象, 类似于原型模型
- 应用场景: 一次Http 的请求和响应的共享 Bean
- 备注: 只能在 Spring MVC 中使用
Session Scope
- 描述: 会话作用域, 每次http 会话(session)中, 使用一个 bean 对象
- 应用场景: 用户返回共享的 Bean ,例如记录一个用户的登录信息
- 备注: 只能在 Spring MVC 中使用
Application Scope
- 描述: 全局作用域, 在一个 http servlet context中, 定义一个Bean 实例
- 应用场景: Web应用的上下文信息, 比如:记录一个应用的共享信息
- 备注: 只能在 Spring MVC 中使用
WebSocket Scope
- 描述: HTTP WebSocket 作用域, 在一个 HTTP WebScoket 的生命周期中, 定义一个 Bean 实例
- 应用场景: WebSocket的每次会话中,保存了⼀个Map结构的头信息,将⽤来包裹客户端消息头。第⼀次初始化后,直到WebSocket结束都是同⼀个Bean
- 备注: 只能在 Spring MVC 中使用
### 单例作用域 VS 全局作用域
- singleton 是 Spring Core 的作⽤域;application 是 Spring Web 中的作⽤域
- singleton 作⽤于 IoC 的容器,⽽ application 作⽤于 Servlet 容器
1.4 设置作用域
1. 在 Bean 标签中设置
<bean id="Dog" class="com.bean.model.Dog" scope="prototype"></bean>
import com.bean.model.Dog;
import org.springframework.context.ApplicationContext;
import org.springframework.context.support.ClassPathXmlApplicationContext;

public class App {
    public static void main(String[] args) {
//        // 1. 获取上下文对象
        ApplicationContext context = new ClassPathXmlApplicationContext("spring-config.xml");
        Dog dog1 = (Dog) context.getBean("Dog");
        Dog dog2 = (Dog) context.getBean("Dog");
        System.out.println(dog1.equals(dog2));
    }
}
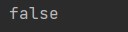
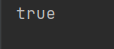
当使用单例模式时获取的对象就是同一个
<bean id="Dog" class="com.bean.model.Dog" scope="singleton"></bean>
2. 使用 注解 设置作用域
标签@Scope 中通过设置字段设置对象注入时的作用域.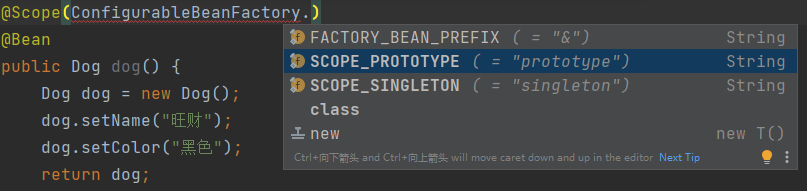
可以看出 Scope 中的内容就是一个字符串, 也就说使用类提供的枚举值和自己输入作用域标识串效果是相同的,但是建议使用类提供的枚举值,方便且不会发生拼写错误
@Scope(ConfigurableBeanFactory.SCOPE_PROTOTYPE)
@Scope("prototype")
2. Spring 的执行流程
1. 启动容器
通过 加载配置文件, 启动容器
import org.springframework.context.ApplicationContext;
import org.springframework.context.support.ClassPathXmlApplicationContext;

public class App {
    public static void main(String[] args) {
        ApplicationContext context = new ClassPathXmlApplicationContext("spring-config.xml");
    }
}
2. Bean 的初始化
通过扫描配置文件下的标签, 确定扫描包路径或者直接注册 的 Bean
<?xml version="1.0" encoding="UTF-8"?>
<beans xmlns="http://www.springframework.org/schema/beans"
       xmlns:xsi="http://www.w3.org/2001/XMLSchema-instance"
       xmlns:content="http://www.springframework.org/schema/context"
       xsi:schemaLocation="http://www.springframework.org/schema/beans http://www.springframework.org/schema/beans/spring-beans.xsd http://www.springframework.org/schema/context https://www.springframework.org/schema/context/spring-context.xsd">
    <content:component-scan base-package="com.bean"></content:component-scan>
    <bean id="Dog" class="com.bean.model.Dog" scope="singleton"></bean>
</beans>
注: 扫描包路径下的类要有 @Component @Configuration @Controller @Repository等注解时IoC容器才会去初始化这些对象
3. 注册 Bean
在上面已经报对象都初始化完成下一步就是把这些对象注入到容器中
@Component
public class UComponent {
}
4. 装配 Bean 属性
如果当前 Bean 需要 使用已经注册好的 Bean 对象作为属性, 可以使用 Spring 提供的 @Autowired 或者 Java 提供的 @Resource
package com.bean.controller;

import com.bean.service.UserService;
import org.springframework.beans.factory.annotation.Autowired;
import org.springframework.beans.factory.annotation.Qualifier;
import org.springframework.stereotype.Controller;

import javax.annotation.Resource;

@Controller
public class UserController2 {

    @Resource
    public void setUserService(UserService userService) {
        this.userService = userService;
    }

    public void doController() {
        System.out.println("Do Controller 2.0");
        userService.doService();
    }
}
5. 使用 Bean
import com.bean.model.User;
import org.springframework.context.ApplicationContext;
import org.springframework.context.support.ClassPathXmlApplicationContext;

public class App {
    public static void main(String[] args) {
        ApplicationContext context = new ClassPathXmlApplicationContext("spring-config.xml");
        User user = (User) context.getBean("u1", User.class);
        System.out.println(user.toString());
    }
}
6. Spring 的销毁
关闭Spring 线程
3. Bean 生命周期
在Spring中 类的生命周期是交付给 IoC容器管理, 而类的生命周期指的是 Bean 从创建到销毁的过程. Bean的生命周期为下面五个部分
- 实例化 Bean
实例化 Bean 只是为 Bean 分配内存空间, 还未为这些空间初始化
- 设置属性
Bean 的属性设置 或者 Bean 中对其他 Bean的注入
- Bean 的初始化
- 3.1 实现各种 Aware 通知方法, 如 BeanNameAware, BeanFactoryAware, ApplicationContextAware 的接⼝⽅法
- 3.2 执⾏ BeanPostProcessor 初始化前置⽅法;
- 3.3 执⾏ @PostConstruct 初始化⽅法,依赖注⼊操作之后被执⾏.
- 3.4 执⾏⾃⼰指定的 init-method ⽅法(如果有指定的话)
- 3.5 执⾏ BeanPostProcessor 初始化后置⽅法
- 使用 Bean
- 销毁 Bean
如 @PreDestroy、DisposableBean 接⼝⽅法、destroy-method
3.1 生命周期演示
- 创建BeanLifeComponent 类作为 演示生命周期类
package com.bean.component;

import org.springframework.beans.factory.BeanNameAware;
import org.springframework.beans.factory.annotation.Autowired;
import org.springframework.stereotype.Component;
import javax.annotation.PostConstruct;

@Component(value = "BeanLifeComponent")
public class BeanLifeComponent implements BeanNameAware {
    private UserComponent userComponent;

    /**
     * 属性注入
     * @param userComponent
     */
    @Autowired
    public BeanLifeComponent(UserComponent userComponent) {
        userComponent.doComponent();
    }

    /**
     * Aware 通知方法
     * @param s
     */
    @Override
    public void setBeanName(String s) {
        System.out.println("执⾏了 setBeanName ⽅法:" + s);
    }

    @PostConstruct
    public void postConstruct() {
        System.out.println("执⾏ PostConstruct()");
    }
    /**
     * 初始化方法
     */
    public void init() {
        System.out.println("执行 init()");
    }

    /**
     * 销毁方法
     */
    public void destroy() {
        System.out.println("执⾏:destroy()");
    }
    /**
     * 使用方法
     */
    public void doBeanLifeComponent() {
        System.out.println("使用 BeanLifeComponent");
    }
}
- 创建UserComponent类 作为 属性注入
package com.bean.component;

import org.springframework.stereotype.Component;

@Component
public class UserComponent {
    public void doComponent() {
        System.out.println("Do Component");
    }
}
- 配置扫描路径和指定 bean 的初始化方法 和 销毁方法(注: Bean 的id 要和 注解中的value相同,否则注入的是不同的 Bean)
<?xml version="1.0" encoding="UTF-8"?>
<beans xmlns="http://www.springframework.org/schema/beans"
       xmlns:xsi="http://www.w3.org/2001/XMLSchema-instance"
       xmlns:content="http://www.springframework.org/schema/context"
       xsi:schemaLocation="http://www.springframework.org/schema/beans http://www.springframework.org/schema/beans/spring-beans.xsd http://www.springframework.org/schema/context https://www.springframework.org/schema/context/spring-context.xsd">
    <content:component-scan base-package="com.bean.component"></content:component-scan>
    <bean id="BeanLifeComponent" class="com.bean.component.BeanLifeComponent" init-method="init" destroy-method="destroy"></bean>

</beans>
- 创建启动类,创建IoC容器,使用 Bean 和销毁容器
import com.bean.component.BeanLifeComponent;
import org.springframework.context.support.ClassPathXmlApplicationContext;

public class BeanListTest {
    public static void main(String[] args) {
        ClassPathXmlApplicationContext context = new ClassPathXmlApplicationContext("spring-config.xml");
        BeanLifeComponent beanLifeComponent = context.getBean("BeanLifeComponent", BeanLifeComponent.class);
        beanLifeComponent.doBeanLifeComponent();
        context.destroy();
    }
}
- 执行结果
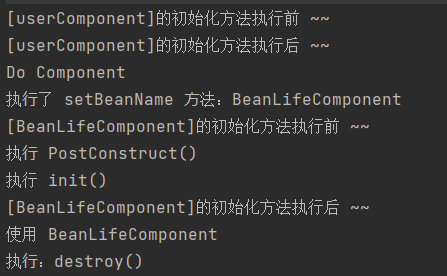
注: UserComponent类会执行 PostProcess 类的初始化前后方法是因为这UserComponent类被注入容器中,自然会被执行.
3.2 总结
Bean 的生命周期流程如图: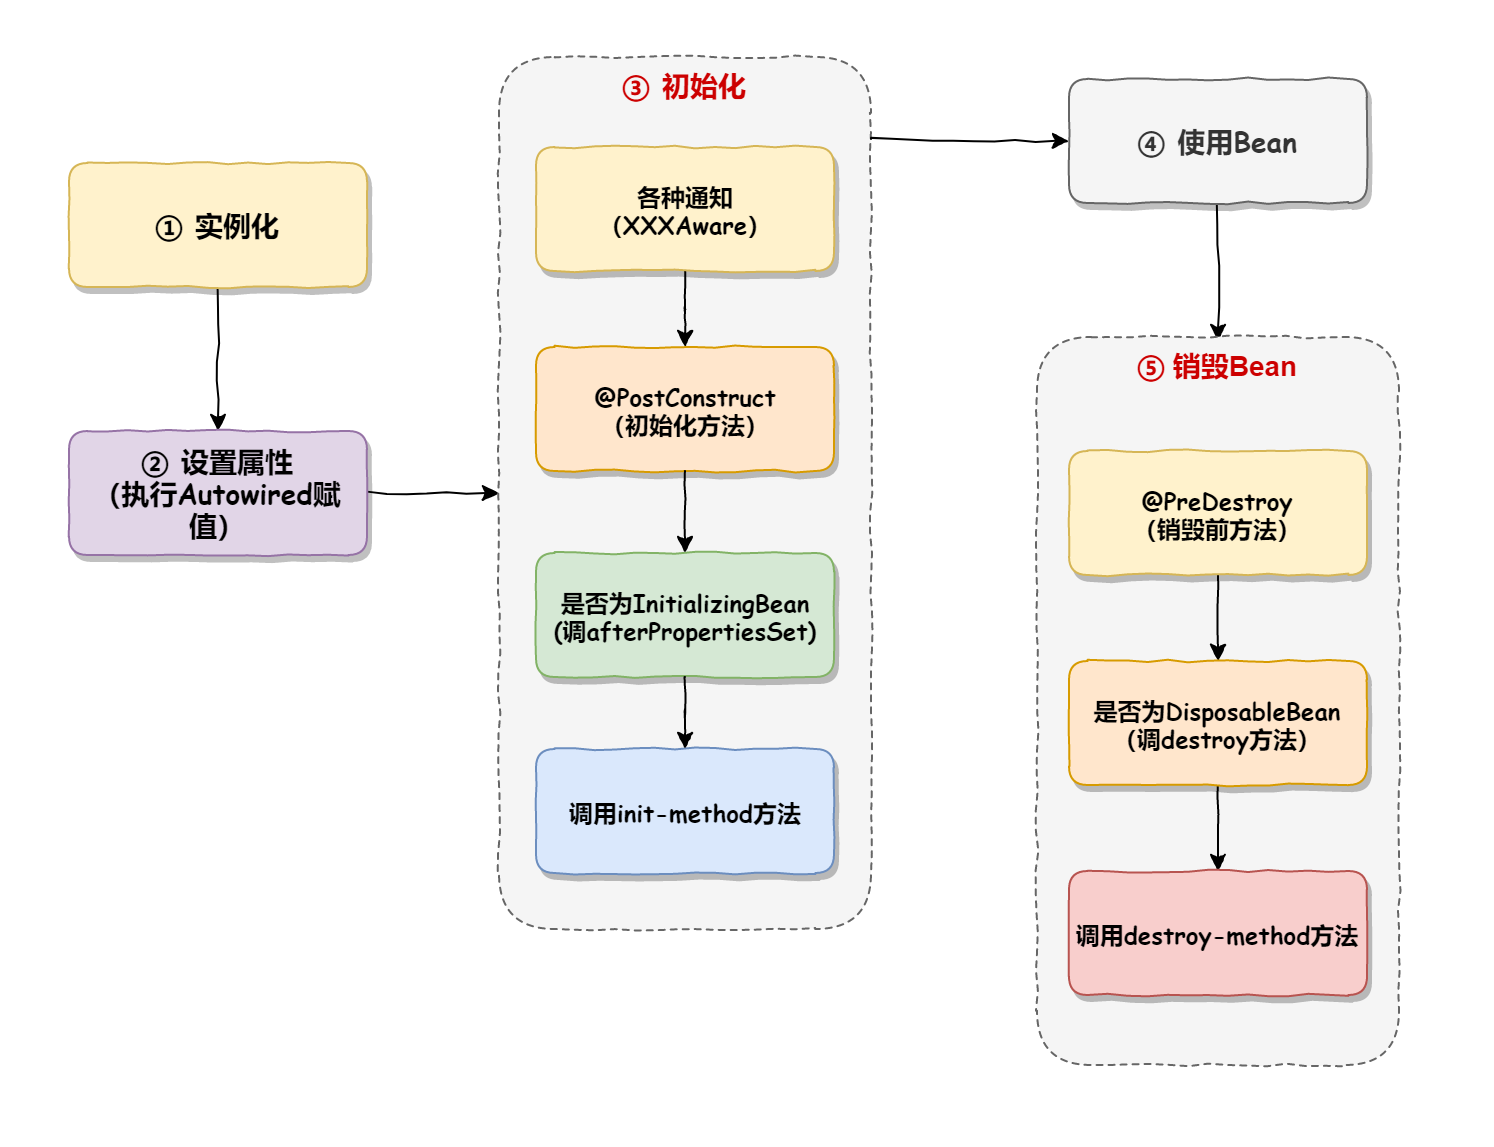
Bean 的生命周期 看起来繁琐, 实际上可以和现实生活中的买房子作类比
- 买房子 - 实例化
买的房子是没有装修的毛坯房, 相当于分配内存空间
- 装修 - 设置属性
- 购买家电 - 各种初始化
- 入住 - 使用Bean
- 卖房子 - Bean销毁


 450
450


 被折叠的 条评论
为什么被折叠?
被折叠的 条评论
为什么被折叠?
 到【灌水乐园】发言


