前端请求 (uploadFile)
一开始考虑使用现成的图床api上传,但是图床上传要求必须是file格式的图片对象,不支持uni自带的uploadFile上传,然后考虑在node上发送请求,但是试了很多种方法还是获取不到需要的file格式对象,所以使用node管理图片,所以用filePath 来存储临时图片路径,这里我用vue3+ts,配置了baseURL就不需要写完整路径。剩下你们看着来~
  // 点击图片区域,选择图片并上传
  uni.chooseImage({
    // 选择图片
    count: 1,
    sizeType: ['original', 'compressed'], //可以指定是原图还是压缩图,默认二者都有
    sourceType: ['album'], //从相册选择
    success: (res) => {
      console.log('3333333333333333333333331111')

      console.log(res)
      // 图片选择成功的回调(必传),会返回一个对象
    // 用于更新视图
      userInfo.value.mid[0] = res.tempFilePaths[0]
      uni.uploadFile({
        url: '/api/Img', // 请求地址/hospital/user/updateAvatar
        filePath: res.tempFilePaths[0], // 临时文件路径
        name: 'avatarfile', // 文件对应的key值
        header: {
          type: 'client',
          // 需要带的请求头,token等等
          'content-type':'multipart/form-data',
        },
        formData: {
          // 额外的请求数据
          uesrName: userInfo.value.userName,
        },
        success: (res) => {
          // 成功后的回调
          userInfo.value.picAddress = res.data
          console.log(res.data,'修改成功')
        },
      })
    },
    fail: (err) => {
      console.log(err)

      console.log('555555')
    },
  })
多张图片上传
    chooseImage: async function () {
      // #ifdef APP-PLUS
      // TODO 选择相机或相册时 需要弹出actionsheet,目前无法获得是相机还是相册,在失败回调中处理
      if (this.sourceTypeIndex !== 2) {
        let status = await this.checkPermission()
        if (status !== 1) {
          return
        }
      }
      // #endif

      if (this.imageList.length === 9) {
        let isContinue = await this.isFullImg()
        console.log('是否继续?', isContinue)
        if (!isContinue) {
          return
        }
      }
      uni.chooseImage({
        sourceType: sourceType[this.sourceTypeIndex],
        sizeType: sizeType[this.sizeTypeIndex],
        count:
          this.imageList.length + this.count[this.countIndex] > 9
            ? 9 - this.imageList.length
            : this.count[this.countIndex],
        success: (res) => {
          // res.tempFilePaths.forEach((item) => {
          //   // 上传图片
          //   this.$H
          //     .upload('/image/uploadmore', {
          //       token: true,
          //       name: 'imglist[]',
          //       filePath: item,
          //     })
          //     .then((result) => {
          //       this.imageList.push(result.data.list[0])
          //       this.$emit('change', this.imageList)
          //     })
          // })

          // this.imageList = this.imageList.concat(res.tempFilePaths);
          // console.log("W KANN",this.imageList);
          // this.$emit("change", this.imageList)
          const tempFilePaths = res.tempFilePaths

          //循环遍历传入,达到一次性上传多张的效果
          for (let i = 0; i < tempFilePaths.length; i++) {
            uni.uploadFile({
              // 后端api接口
              url: '/api/Img',

              // uni.chooseImage函数调用后获取的本地文件路劲
              filePath: tempFilePaths[i],

              name: 'avatarfile', //后端通过'file'获取上传的文件对象

              //这里是请求头需要携带的token数据
              // getStorageSync获取本地缓存的token
              header: {
                token: uni.getStorageSync('token'),
              },
              success: (uploadFileRes) => {
                if (this.imageList.code == 0) {
                  uni.showToast({
                    title: imgRes.msg,
                    icon: 'error',
                    duration: 2000,
                  })
                  return
                }
                console.log(uploadFileRes.data, '修改成功111111')
                this.imageList.push(uploadFileRes.data)
                console.log(this.imageList, '我看看')
                this.$emit('change', this.imageList)
              },
            })
          }
        },
        fail: (err) => {
          console.log('err: ', err)
          // #ifdef APP-PLUS
          if (err['code'] && err.code !== 0 && this.sourceTypeIndex === 2) {
            this.checkPermission(err.code)
          }
          // #endif
          // #ifdef MP
          if (err.errMsg.indexOf('cancel') !== '-1') {
            return
          }
          uni.getSetting({
            success: (res) => {
              let authStatus = false
              switch (this.sourceTypeIndex) {
                case 0:
                  authStatus = res.authSetting['scope.camera']
                  break
                case 1:
                  authStatus = res.authSetting['scope.album']
                  break
                case 2:
                  authStatus = res.authSetting['scope.album'] && res.authSetting['scope.camera']
                  break
                default:
                  break
              }
              if (!authStatus) {
                uni.showModal({
                  title: '授权失败',
                  content: 'Hello uni-app需要从您的相机或相册获取图片,请在设置界面打开相关权限',
                  success: (res) => {
                    if (res.confirm) {
                      uni.openSetting()
                    }
                  },
                })
              }
            },
          })
          // #endif
        },
      })
    },
后端 node
var express = require('express');
var router = express.Router();
var fs = require("fs");

const path = require('path')

// 引入导入模块
const multiparty = require('multiparty');

const multer = require('multer')
//设置临时目录 存放上传的图片
const upload = multer({dest: "tmp/"});
// 上传文件
router.post("/api/Img", upload.single("avatarfile"), function (req, res) {
  let imgFile = req.file;//获取图片上传的资源
  console.log(imgFile)
  let tmp = imgFile.path;//获取临时资源
  let ext = path.extname(imgFile.originalname);//利用path模块获取 用户上传图片的 后缀名
  let newName = "" + (new Date().getTime()) + Math.round(Math.random() * 10000) + ext;  //给用户上传的图片重新命名 防止重名
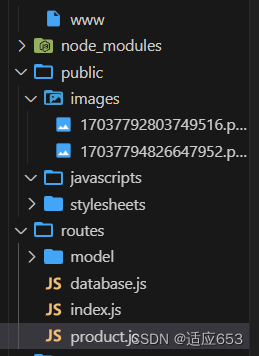
  let newPath = "../public/images/" + newName; //给图片设置存放目录  提前给当前文件夹下建立一个   images文件夹  !!!!
  let fileData = fs.readFileSync(tmp);//将上传到服务器上的临时资源 读取到 一个变量里面
  fs.writeFileSync(path.join(__dirname, newPath), fileData);//重新书写图片文件  写入到指定的文件夹下
  console.log('http://127.0.0.1:3005/img/' + newName)
  let newurl = 'http://127.0.0.1:3005/images/' + newName;
  res.send(newurl);//上传成功之后  给客户端响应
  // http://127.0.0.1:3007/img/1647057754040334.jpg

})
module.exports = router;
后端列表

这里 前端拿到数据后,如果图片不能出来,请参考,教程利用 Express 托管静态文件 - Express中文文档 | Express中文网 (expressjs.com.cn)


 813
813


 被折叠的 条评论
为什么被折叠?


