


1.前后端分离状态识别
1.1 场景问题
用户登录数据的整个的交互有两种形式,其中第二种形式问题较多:
- 同域前后端访问
- 前后端分离访问(跨域)
-
- 存在数据跨域问题
- session共享的问题
- sessionid 唯一性问题
前端端分离访问--数据跨域问题
对于前后端分离的架构会存在跨域问题,这会导致请求无法携带Cookie,而Session机制是基于Cookie的,所以会导致session失效;
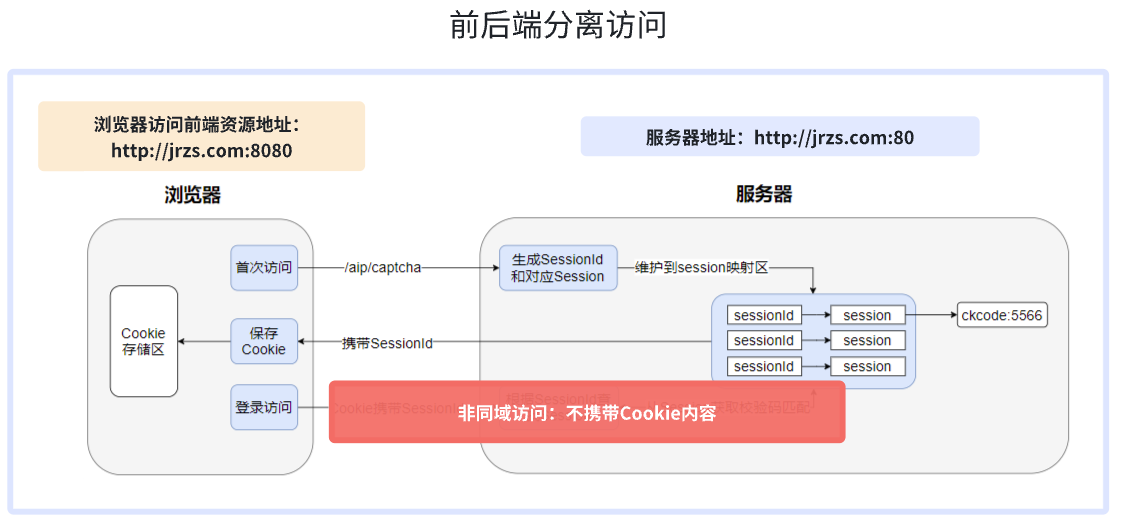
PS:由于是前后端分离,设计到跨域。前端不会携带 Cookie 值,导致服务端无法通过sessionid查找session数据内容
前端端分离访问--session共享的问题
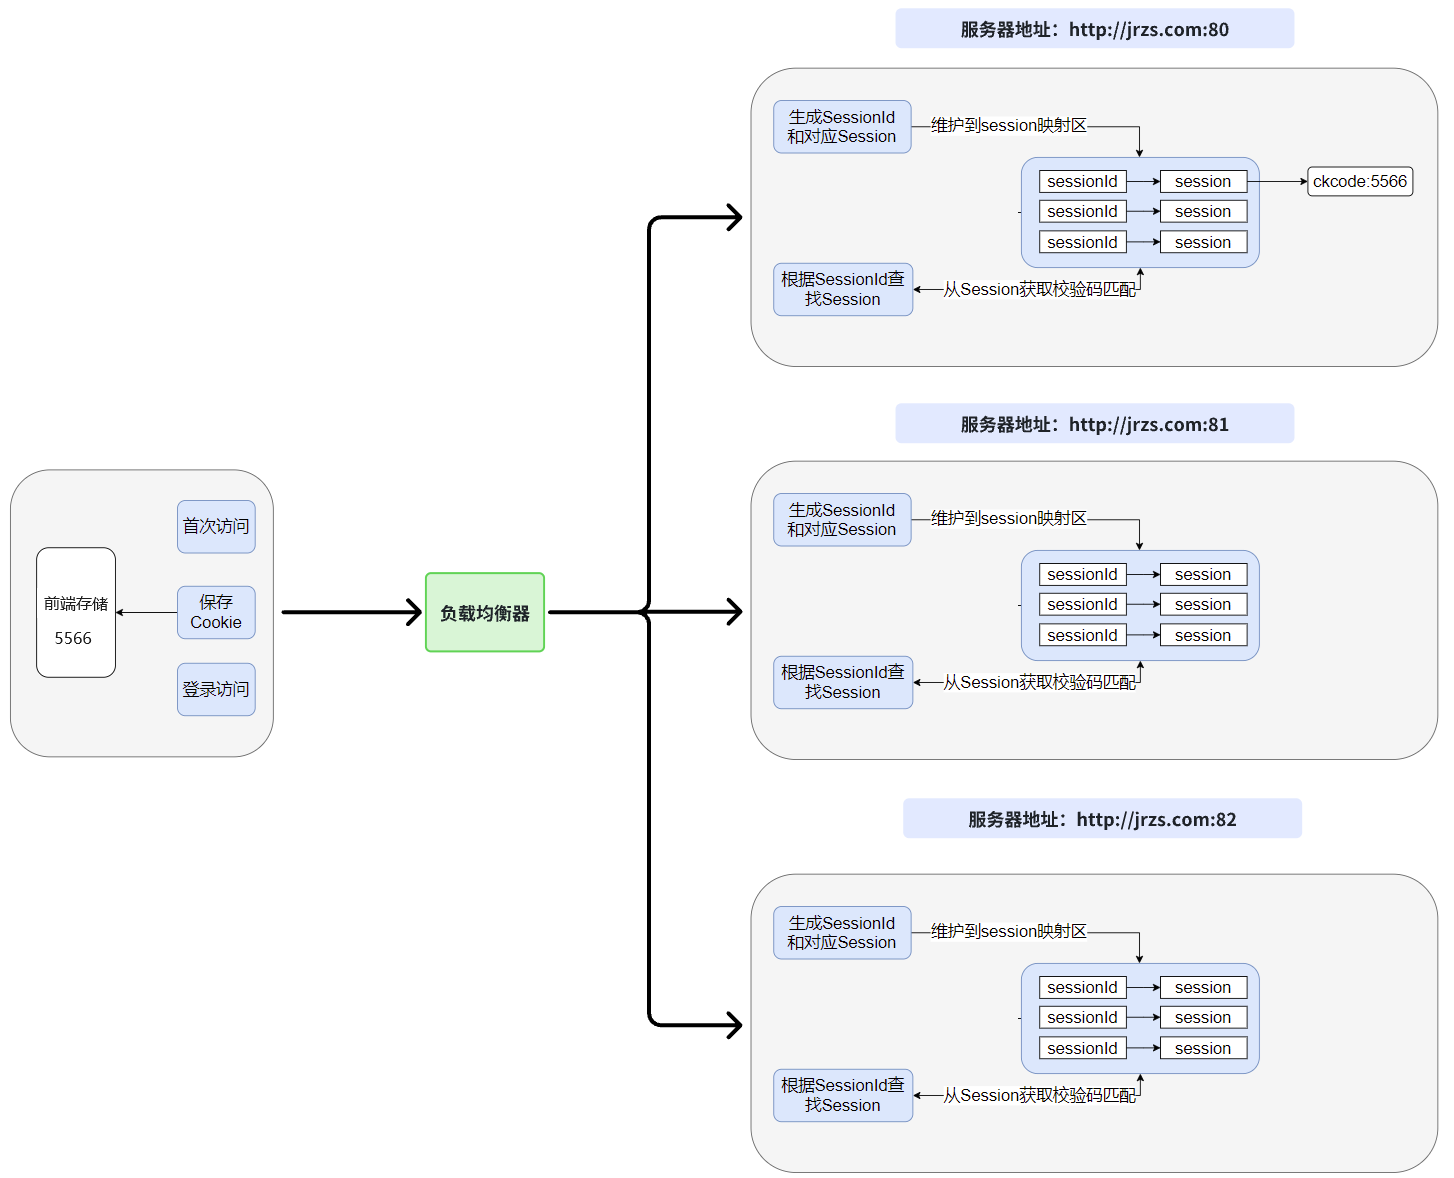
PS:用户第一访问服务后,将数据存储到了 80 端口号服务,第二次访问由于负载均衡访问的为 81 端口号服务则找不到对应的信息,多个服务间的session数据是不共享的。
前端端分离访问--sessionid 唯一性的问题
1.2 场景解决思路
前端端分离访问--数据跨域解决
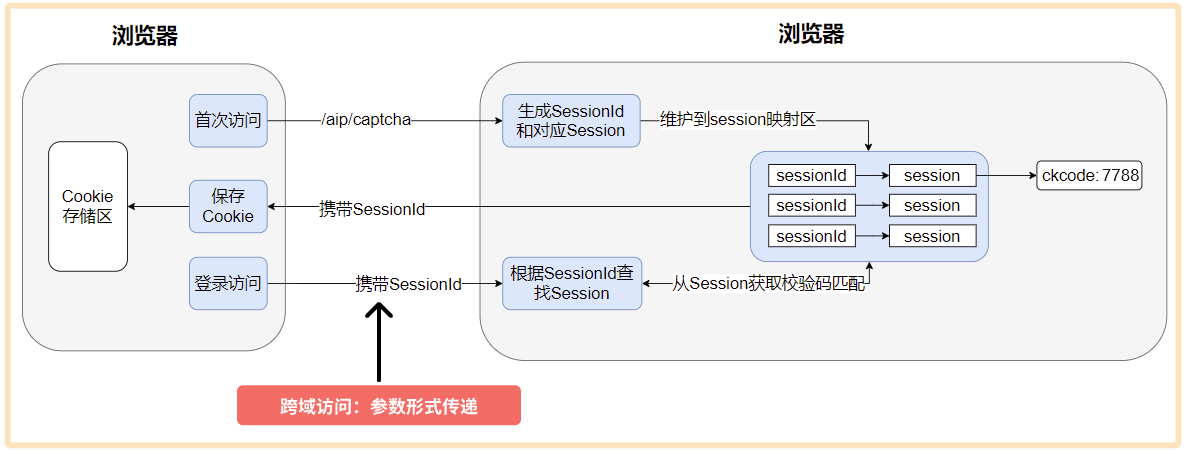
PS:跨域携带 sessionid 将 Cookie 的形式改为参数的形式进行传递
前端端分离访问--session共享的解决
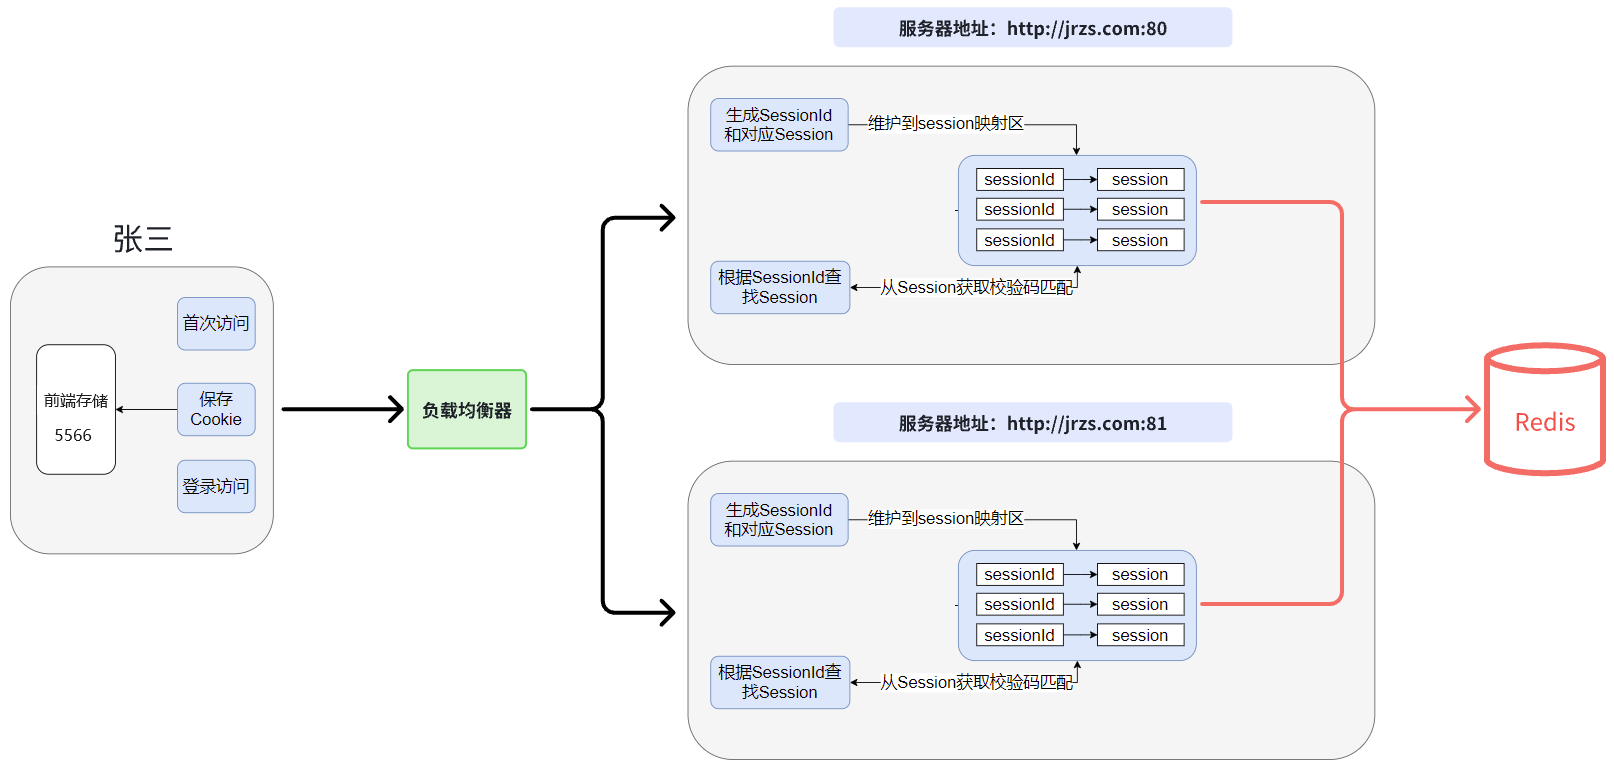
PS:将服务端存储 session 数据改为数据集中存储形式
前端端分离访问--sessionid 唯一性的解决
1.3 场景实现
1.3.1 session 共享实现
redis 服务构建--sesson共享
在 Linux 的 docker 中构建 redis 容器,如下命令:
docker run -dit --privileged=true -p 6379:6379 --restart=always -v /usr/soft/redis/conf/redis.conf:/etc/redis/redis.conf -v /usr/soft/redis/data:/data --name redis redis:6.0 --requirepass "itcast"redis集成到项目中--sessong
在stock_backend工程引入redis相关依赖:
<!--redis场景依赖-->
<dependency>
    <groupId>org.springframework.boot</groupId>
    <artifactId>spring-boot-starter-data-redis</artifactId>
</dependency>
<!-- redis创建连接池,默认不会创建连接池 -->
<dependency>
    <groupId>org.apache.commons</groupId>
    <artifactId>commons-pool2</artifactId>
</dependency>
定义application.yml文件专门配置缓存信息:
spring:
  # 配置缓存
  redis:
    host: 192.168.200.129
    port: 6379
    database: 0 #Redis数据库索引(默认为0)
    lettuce:
      pool:
        max-active: 8 # 连接池最大连接数(使用负值表示没有限制)
        max-wait: -1ms # 连接池最大阻塞等待时间(使用负值表示没有限制)
        max-idle: 8 # 连接池中的最大空闲连接
        min-idle: 1  # 连接池中的最小空闲连接
    timeout: PT10S # 连接超时时间
    password: itcast
自定义RedisTemplate序列化:
@Configuration
public class RedisCacheConfig {
    /**
     * 配置redisTemplate bean,自定义数据的序列化的方式
     * @param redisConnectionFactory 连接redis的工厂,底层有场景依赖启动时,自动加载
     * @return
     */
    @Bean
    public RedisTemplate redisTemplate(@Autowired RedisConnectionFactory redisConnectionFactory){
        //1.构建RedisTemplate模板对象
        RedisTemplate<String, Object> template = new RedisTemplate<>();
        template.setConnectionFactory(redisConnectionFactory);
        //2.为不同的数据结构设置不同的序列化方案
        //设置key序列化方式
        template.setKeySerializer(new StringRedisSerializer());
        //设置value序列化方式
        template.setValueSerializer(new Jackson2JsonRedisSerializer<>(Object.class));
        //设置hash中field字段序列化方式
        template.setHashKeySerializer(new StringRedisSerializer());
        //设置hash中value的序列化方式
        template.setHashValueSerializer(new Jackson2JsonRedisSerializer<>(Object.class));
        //5.初始化参数设置
        template.afterPropertiesSet();
        return template;
    }
}
redis客户端操作
测试redis基础环境:
package com.itheima.stock;

import org.junit.jupiter.api.Test;
import org.springframework.beans.factory.annotation.Autowired;
import org.springframework.boot.test.context.SpringBootTest;
import org.springframework.data.redis.core.RedisTemplate;

/**
 * @author by itheima
 * @Date 2021/12/30
 * @Description
 */
@SpringBootTest
public class TestRedis {

    @Autowired
    private RedisTemplate<String,String> redisTemplate;

    @Test
    public void test01(){
        //存入值
        redisTemplate.opsForValue().set("myname","zhangsan");
        //获取值
        String myname = redisTemplate.opsForValue().get("myname");
        System.out.println(myname);
    }
}
1.3.2 唯一ID
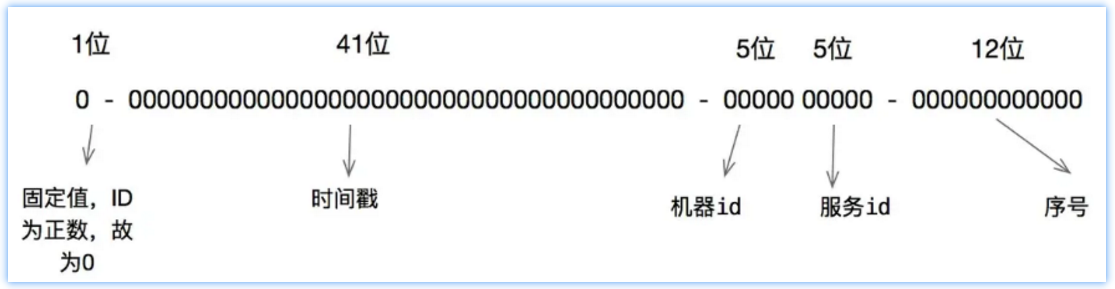
- 后台生成SessionId需要保证全局唯一,我们可借鉴SnowFlake(雪花算法)来实现;
- 什么是雪花算法?
-
- 雪花算法是Twitter公司内部为分布式环境下生成唯一ID的一种算法解决方案,底层会帮助我们生成一个64位(比特位)的long类型的Id;
- 雪花算法是Twitter公司内部为分布式环境下生成唯一ID的一种算法解决方案,底层会帮助我们生成一个64位(比特位)的long类型的Id;
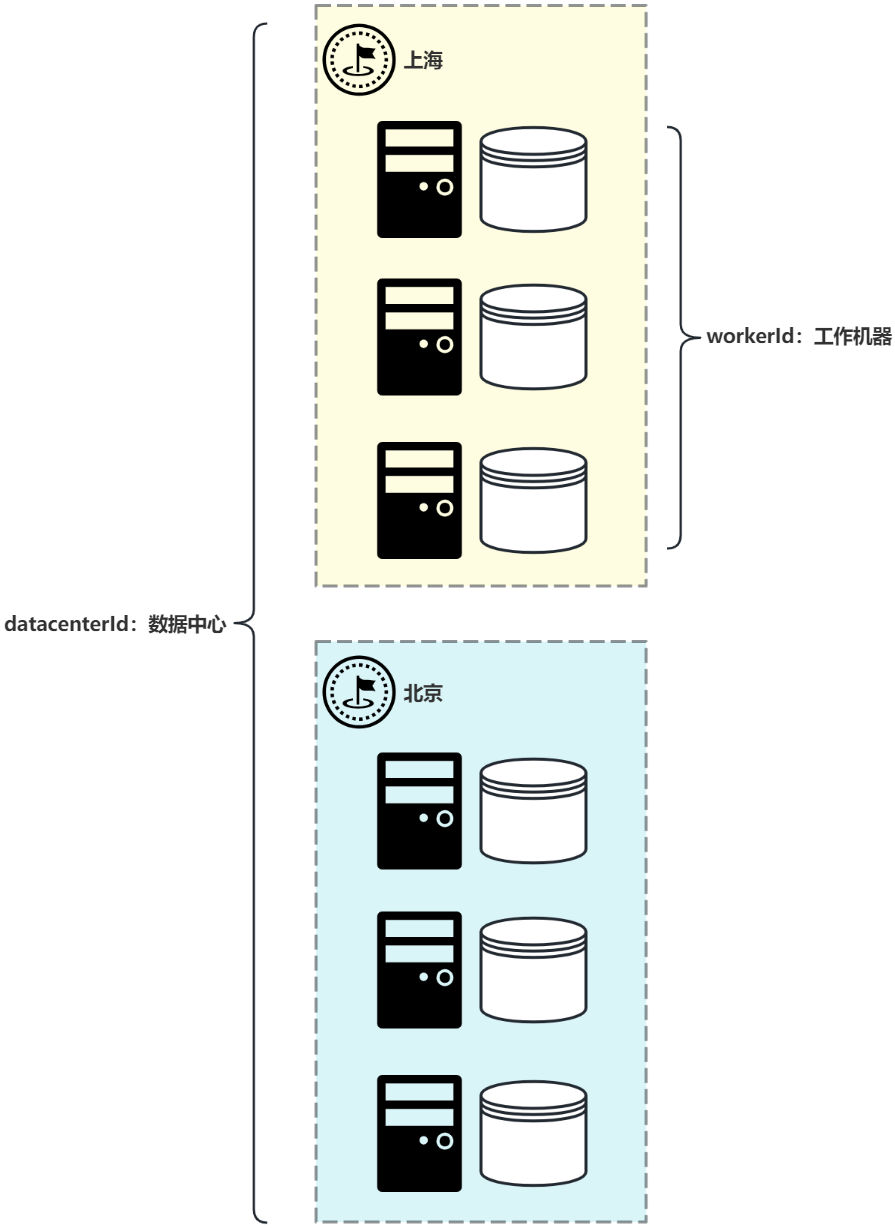
机器id和服务id说明
各种开发语言都有对雪花算法的实现,我们直接在stock_common工程中引入已写好的工具类即可:
package com.itheima.stock.utils;

import java.lang.management.ManagementFactory;
import java.net.InetAddress;
import java.net.NetworkInterface;

/**
 * 分布式自增长ID实现,底层基于Twitter的Snowflake
 * 64位ID (42(时间戳)+5(机房ID)+5(机器ID)+12(序列号-同毫秒内重复累加))
 * @author itheima
 */
public class IdWorker {
    // 时间起始标记点,作为基准,一般取系统的最近时间(一旦确定不能变动)
    private final static long twepoch = 1288834974657L;
    // 机器标识位数
    private final static long workerIdBits = 5L;
    // 数据中心标识位数
    private final static long datacenterIdBits = 5L;
    // 机器ID最大值
    private final static long maxWorkerId = -1L ^ (-1L << workerIdBits);
    // 数据中心ID最大值
    private final static long maxDatacenterId = -1L ^ (-1L << datacenterIdBits);
    // 毫秒内自增位
    private final static long sequenceBits = 12L;
    // 机器ID偏左移12位
    private final static long workerIdShift = sequenceBits;
    // 数据中心ID左移17位
    private final static long datacenterIdShift = sequenceBits + workerIdBits;
    // 时间毫秒左移22位
    private final static long timestampLeftShift = sequenceBits + workerIdBits + datacenterIdBits;

    private final static long sequenceMask = -1L ^ (-1L << sequenceBits);
    /* 上次生产id时间戳 */
    private static long lastTimestamp = -1L;
    //同毫秒并发控制
    private long sequence = 0L;
	//机器ID
    private final long workerId;
    //机房ID
    private final long datacenterId;

    public IdWorker(){
        this.datacenterId = getDatacenterId(maxDatacenterId);
        this.workerId = getMaxWorkerId(datacenterId, maxWorkerId);
    }
    /**
     * @param workerId
     *            工作机器ID
     * @param datacenterId
     *            序列号
     */
    public IdWorker(long workerId, long datacenterId) {
        if (workerId > maxWorkerId || workerId < 0) {
            throw new IllegalArgumentException(String.format("worker Id can't be greater than %d or less than 0", maxWorkerId));
        }
        if (datacenterId > maxDatacenterId || datacenterId < 0) {
            throw new IllegalArgumentException(String.format("datacenter Id can't be greater than %d or less than 0", maxDatacenterId));
        }
        this.workerId = workerId;
        this.datacenterId = datacenterId;
    }
    /**
     * 获取下一个ID
     *
     * @return
     */
    public synchronized long nextId() {
        long timestamp = timeGen();
        if (timestamp < lastTimestamp) {
            throw new RuntimeException(String.format("Clock moved backwards.  Refusing to generate id for %d milliseconds", lastTimestamp - timestamp));
        }

        if (lastTimestamp == timestamp) {
            // 当前毫秒内,则+1
            sequence = (sequence + 1) & sequenceMask;
            if (sequence == 0) {
                // 当前毫秒内计数满了,则等待下一秒
                timestamp = tilNextMillis(lastTimestamp);
            }
        } else {
            sequence = 0L;
        }
        lastTimestamp = timestamp;
        // ID偏移组合生成最终的ID,并返回ID
        long nextId = ((timestamp - twepoch) << timestampLeftShift)
                | (datacenterId << datacenterIdShift)
                | (workerId << workerIdShift) | sequence;

        return nextId;
    }

    private long tilNextMillis(final long lastTimestamp) {
        long timestamp = this.timeGen();
        while (timestamp <= lastTimestamp) {
            timestamp = this.timeGen();
        }
        return timestamp;
    }

    private long timeGen() {
        return System.currentTimeMillis();
    }

    /**
     * <p>
     * 获取 maxWorkerId
     * </p>
     */
    protected static long getMaxWorkerId(long datacenterId, long maxWorkerId) {
        StringBuffer mpid = new StringBuffer();
        mpid.append(datacenterId);
        String name = ManagementFactory.getRuntimeMXBean().getName();
        if (!name.isEmpty()) {
            /*
             * GET jvmPid
             */
            mpid.append(name.split("@")[0]);
        }
        /*
         * MAC + PID 的 hashcode 获取16个低位
         */
        return (mpid.toString().hashCode() & 0xffff) % (maxWorkerId + 1);
    }

    /**
     * <p>
     * 数据标识id部分
     * </p>
     */
    protected static long getDatacenterId(long maxDatacenterId) {
        long id = 0L;
        try {
            InetAddress ip = InetAddress.getLocalHost();
            NetworkInterface network = NetworkInterface.getByInetAddress(ip);
            if (network == null) {
                id = 1L;
            } else {
                byte[] mac = network.getHardwareAddress();
                id = ((0x000000FF & (long) mac[mac.length - 1])
                        | (0x0000FF00 & (((long) mac[mac.length - 2]) << 8))) >> 6;
                id = id % (maxDatacenterId + 1);
            }
        } catch (Exception e) {
            System.out.println(" getDatacenterId: " + e.getMessage());
        }
        return id;
    }
}
在stock_backend 的 application.yml 配置文件中添加配置:
jrzs:
  idwork:
    dataCenterId: 1 #指定数据中心
    workerId: 1     #指定工作机器
在stock_backend工程配置ID生成器bean对象:
package com.itheima.stock.config;

import com.itheima.stock.utils.IdWorker;
import lombok.Data;
import org.springframework.boot.context.properties.ConfigurationProperties;
import org.spri
最低0.47元/天 解锁文章


 1743
1743


 被折叠的 条评论
为什么被折叠?
被折叠的 条评论
为什么被折叠?
 到【灌水乐园】发言


