


一、需求描述
有一个添加打分点按钮,点击添加会新增一个打分点内容,默认只有一个打分点的时候不显示删除按钮,如果有多个打分点,就都显示删除按钮。在分类内容里面有一个添加分类,与打分点类似。分类内容里面包含打分点内容。即可以动态新增删除多个分类,分类里面也可以动态新增多个打分点。文字描述有点抽象,看下图好理解一些:


二、思路
将打分点内容和分类内容封装成组件,然后在分类组件中引用打分点组件(组件嵌套)。打分点和分类序号采取v-for之后的index索引+1显示就好了,这样不管是删除3个打分点中间的,还是哪个,索引也能对应得上。点击删除打分点,在打分点数组中将数组列表根据索引删除,分类也是。添加的话,直接创建一个对象,将他们push到对应的数组列表中。在打分点填好的数据,要传回上一级组件,将数据逐级向上传,得到最终的数据列表。
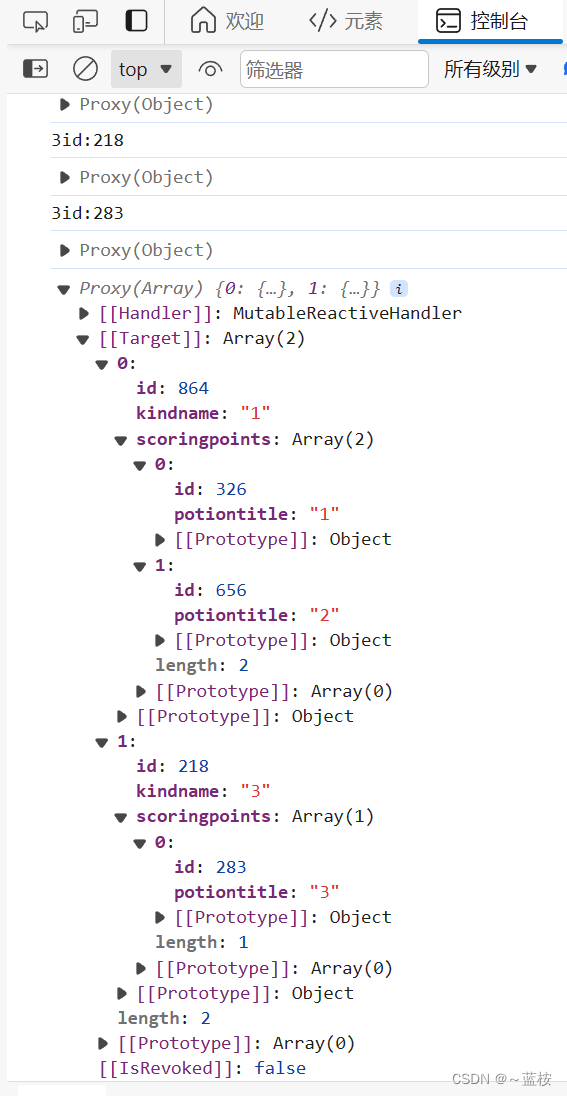
三、预期数据结构(数据结构模拟,具体按接口的数据结构来使用)
const KindsList = ref([
  {
    kindname: "",
    id: Math.floor(Math.random() * 1000),
    scoringpoints: [
      {
        id: Math.floor(Math.random() * 1000),
        potiontitle: "",
      },
      // 其他节点
    ],
  },
  //其它分类
]);
四、保存所填的信息,不至于删除处于3个中间的数据,而导致后面的数据丢失,也就是未让组件之间传递的数据保留
<el-input
            v-model="props.Kindsinfo.kindname"
            placeholder="点击输入标题"
            clearable
            @change="changeData"
            style="width: 550px;margin-left: 10px;"/>
props.Kindsinfo.kindname采用这种方式,使用v-model将传过来的数据进行双向绑定。
五、将所填的数据向上回传
//子组件中自定义事件
  const emits = defineEmits(["KindListData"]);
    const changeData = () => {
    emits("KindListData",props.Kindsinfo);
  }
在上一级组件接受到传过来的数据,进行更新。
// 更新分类列表数据
const KindListData = (Kindsinfo) => {
  console.log(Kindsinfo.kindname + "id:" + Kindsinfo.id);
  KindsList.value.forEach((item, index) => {
    if (item.id === Kindsinfo.id) {
      KindsList.value[index] = Kindsinfo;
      console.log(KindsList.value[index]);
    }
  });
};
六、删除操作
首先先提示是否删除,确认删除之后,在确认的方法后面进行删除操作,将要删除的索引传到上级组件,由上一级组件进行把对应索引的数据从数组中删除。
<div class="btn">
        <div class="add-btn" @click="addNewPoints">添加打分点</div>
        <div class="delete-btn">
          <el-popconfirm
          title="是否要删除该分类?"
          @confirm="confirmEvent"
          @cancel="cancelEvent"
        >
          <template #reference>
            <el-button type="danger" round v-show="listLength>1">删除此分类</el-button>
          </template>
        </el-popconfirm>
        </div>
      </div>
// 告诉父组件删除该分类
//子组件中自定义事件
const emits = defineEmits(["deleteKind","KindListData"]);
// 确认删除该分类
const confirmEvent = () => {
console.log("确认删除该分类!");
emits("deleteKind", props.title);
};// 删除分类
const deleteKind = (index) => {
// 使用findIndex方法找到具有特定ID的对象的索引
// let index = kindsList.value.findIndex((obj) => obj.id === id);
// 如果找到了具有特定ID的对象,则将其从数组中移除
if (index !== -1) {
KindsList.value.splice(index, 1);
}
};七、添加操作
创建一个新的对像,将它往数组中push一个新的对象就好。
// 添加分类
const addNewKind = () => {
const newKind = {
id: Math.floor(Math.random() * 1000),
scoringpoints: [
{
id: Math.floor(Math.random() * 1000),
potiontitle: "",
},
],
};
KindsList.value.push(newKind);
};八、点击保存获取最终的数据
获取到最终的数据,用于接下来的操作,传递给接口啥的。反正这一步是必须的,获取的最终数据要进行保存,请求接口。
// 保存按钮
const save = () => {
console.log(KindsList.value);
};

九、包含分类组件和打分点组件的页面完整代码
<template>
<div class="container">
<Commonhead :title="title"></Commonhead>
<div class="main">
<div class="head">巡检配置</div>
<div class="form">
<!-- 路线 -->
<div class="kind">
<Classify
v-for="(item, index) in KindsList"
:key="index"
:pointsList="KindsList[index].scoringpoints"
:title="index"
:Kindsinfo="KindsList[index]"
@KindListData="KindListData"
:id="KindsList[index].id"
:listLength="KindsList.length"
@deleteKind="deleteKind"
></Classify>
<div class="addkind-btn" @click="addNewKind">添加分类</div>
</div>
</div>
<div class="save-btn" @click="save">保存</div>
</div>
</div>
</template>
<script setup>
import Classify from "../src/components/Classify.vue";
import Commonhead from "../src/components/Commonhead.vue";
const title = ref("项目管理 > 巡检打分表单");
const KindsList = ref([
{
kindname: "",
id: Math.floor(Math.random() * 1000),
scoringpoints: [
{
id: Math.floor(Math.random() * 1000),
potiontitle: "",
},
// 其他节点
],
},
//其它分类
]);
// 添加分类
const addNewKind = () => {
const newKind = {
id: Math.floor(Math.random() * 1000),
scoringpoints: [
{
id: Math.floor(Math.random() * 1000),
potiontitle: "",
},
],
};
KindsList.value.push(newKind);
};
// 删除分类
const deleteKind = (index) => {
// 使用findIndex方法找到具有特定ID的对象的索引
// let index = kindsList.value.findIndex((obj) => obj.id === id);
// 如果找到了具有特定ID的对象,则将其从数组中移除
if (index !== -1) {
KindsList.value.splice(index, 1);
}
};
// 保存按钮
const save = () => {
console.log(KindsList.value);
};
// 更新分类列表数据
const KindListData = (Kindsinfo) => {
console.log(Kindsinfo.kindname + "id:" + Kindsinfo.id);
KindsList.value.forEach((item, index) => {
if (item.id === Kindsinfo.id) {
KindsList.value[index] = Kindsinfo;
console.log(KindsList.value[index]);
}
});
};
</script>
<style scoped>
.container {
padding: 20px;
}
.main {
width: 1200px;
margin: 0 auto;
}
.head {
text-align: center;
background-color: #f9f1f1;
height: 40px;
line-height: 40px;
}
.form {
width: 800px;
margin: 0 auto;
}
.save-btn {
width: 100px;
margin: 40px auto;
height: 30px;
background-color: #f5b90f;
color: #fff;
text-align: center;
line-height: 30px;
font-size: 14px;
border-radius: 5px;
cursor: pointer;
}
.addkind-btn {
width: 100px;
height: 30px;
background-color: #f5b90f;
color: #fff;
text-align: center;
font-size: 14px;
border-radius: 5px;
line-height: 30px;
margin: 40px auto;
cursor: pointer;
}
</style>
十、 分类组件的完整代码
<template>
<div class="kind-con">
<div class="name">
<div class="name-title">分类名称:</div>
<el-input
v-model="props.Kindsinfo.kindname"
placeholder="点击输入标题"
clearable
@change="changeData"
style="width: 550px;margin-left: 10px;"/>
</div>
<Scoringpoints
v-for="(item, index) in pointsList"
:key="item.id"
:title="index"
:id="item.id"
:listLength="pointsList.length"
:pointsinfo="pointsList[index]"
@deletepoint="deletepoint"
@pointsListData="pointsListData"
></Scoringpoints>
<div class="btn">
<div class="add-btn" @click="addNewPoints">添加打分点</div>
<div class="delete-btn">
<el-popconfirm
title="是否要删除该分类?"
@confirm="confirmEvent"
@cancel="cancelEvent"
>
<template #reference>
<el-button type="danger" round v-show="listLength>1">删除此分类</el-button>
</template>
</el-popconfirm>
</div>
</div>
</div>
</template>
<script setup>
import Scoringpoints from "./Scoringpoints.vue";
// Props 接收打分点信息
const props = defineProps({
// 打分点列表
pointsList: {
type: Array,
required: true,
},
// 分类列表的长度
listLength:Number,
title: Number,
// 分类的id
id: {
type: null, // id可以是任何类型
required: true, // 如果id是必需的话
},
Kindsinfo:Object
});
// 将 props 转换为可修改的引用
const { pointsList } = toRefs(props);
// 分类名称
const name = ref("");
// 添加打分点
const addNewPoints = () => {
const scoringpoints = {
id: Math.floor(Math.random() * 1000), // 生成一个随机的节点ID
potiontitle: "",
};
pointsList.value.push(scoringpoints);
};
// 告诉父组件删除该分类
  //子组件中自定义事件
  const emits = defineEmits(["deleteKind","KindListData"]);
  // 确认删除该分类
  const confirmEvent = () => {
    console.log("确认删除该分类!");
    emits("deleteKind", props.title);
  };
// 取消删除该分类
const cancelEvent = () => {
console.log("取消删除该分类!");
};
// 删除打分点
const deletepoint = (index) => {
// 使用findIndex方法找到具有特定ID的对象的索引
// let index = pointsList.value.findIndex((obj) => obj.id === id);
// 如果找到了具有特定ID的对象,则将其从数组中移除
if (index !== -1) {
pointsList.value.splice(index, 1);
}
};
// 更新打分点数据
const pointsListData = ( pointsinfo ) => {
console.log(pointsinfo.potiontitle+"id:"+pointsinfo.id);
pointsList.value.forEach((item,index)=>{
if(item.id === pointsinfo.id){
pointsList.value[index] = pointsinfo
console.log(pointsList.value[index]);
}
})
}
const changeData = () => {
emits("KindListData",props.Kindsinfo);
}
</script>
<style scoped>
.kind-con {
margin-bottom: 20px;
}
.route-title {
width: 200px;
text-align: end;
margin-left: 10px;
color: #f5b90f;
font-weight: 600;
margin-bottom: 10px;
}
.btn {
display: flex;
align-items: center;
}
.add-btn {
width: 100px;
height: 30px;
background-color: #f5b90f;
color: #fff;
text-align: center;
font-size: 14px;
border-radius: 5px;
line-height: 30px;
margin-left: 235px;
cursor: pointer;
}
.delete-btn {
margin-left: 10px;
}
.name {
padding-left: 20px;
display: flex;
font-size: 13px;
margin: 20px 0;
}
.name-title {
width: 200px;
text-align: end;
font-size: 13px;
}
.name-title::before {
content: "*";
left: 0;
top: 0;
}
</style>
十一、打分点完整代码
<template>
    <div class="con">
      <div class="points">
        <!-- 节点名称 -->
        <div class="points-title">打分点{{ title + 1 }}:</div>
        <div class="points-input">
          <el-input
            v-model="props.pointsinfo.potiontitle"
            placeholder="点击输入标题"
            clearable
            @change="changeData"/>
        </div>
      </div>
      <div class="delete-btn">
        <el-popconfirm
          title="是否要删除该打分点?"
          @confirm="confirmEvent"
          @cancel="cancelEvent"
        >
          <template #reference>
            <el-button type="danger" round v-show="listLength>1">删除打分点</el-button>
          </template>
        </el-popconfirm>
      </div>
    </div>
  </template>

  <script setup>
  const props = defineProps({
    // 打分点序号
    title: Number,
    // 打分点列表的长度
    listLength:Number,
    // 打分点的id
    id: {
      type: null, // id可以是任何类型
      required: true, // 如果id是必需的话
    },
    //打分点信息
    pointsinfo : Object,
  });
  const Inputvalue = ref("");

  //子组件中自定义事件
  const emits = defineEmits(["deletepoint","pointsListData"]);
  const confirmEvent = () => {
    console.log("确认删除该打分点!");
    emits("deletepoint", props.title);
  };
  const cancelEvent = () => {
    console.log("取消删除该打分点!");
  };
  const changeData = () => {
    emits("pointsListData",props.pointsinfo);
  }
  </script>

  <style scoped>
  .con {
    padding: 0 20px 10px 10px;
  }
  .points {
    display: flex;
    justify-content: space-between;
  }
  .points-title {
    width: 200px;
    text-align: end;
    font-size: 13px;
  }
  .points-title::before {
    content: "*";
    left: 0;
    top: 0;
  }
  .points-input {
    width: 550px;
    flex-wrap: wrap;
    display: flex;
    align-items: center;
  }
  .delete-btn {
    margin-left: 225px;
    margin-top: 5px;
  }
  </style>
前提是安装好element-plus才可以使用哦!
以上做参考!


 2957
2957


 被折叠的 条评论
为什么被折叠?
被折叠的 条评论
为什么被折叠?
 到【灌水乐园】发言


