


ActiveMQ是MQ的早期产品,在AMQP协议没有出现之前,占据了消息中间件市场的绝大部分份额
现在使用很少
ActiveMQ的安装
windows版安装包下载地址:https://activemq.apache.org/components/classic/download/
解压完毕后会有如下目录:

点击bin-win64-activemq.bat启动ActiveMQ服务


springboot整合ActiveMQ
1、导入jar包
<?xml version="1.0" encoding="UTF-8"?>
<project xmlns="http://maven.apache.org/POM/4.0.0" xmlns:xsi="http://www.w3.org/2001/XMLSchema-instance"
         xsi:schemaLocation="http://maven.apache.org/POM/4.0.0 https://maven.apache.org/xsd/maven-4.0.0.xsd">
    <modelVersion>4.0.0</modelVersion>
    <parent>
        <groupId>org.springframework.boot</groupId>
        <artifactId>spring-boot-starter-parent</artifactId>
        <version>2.5.4</version>
        <relativePath/> <!-- lookup parent from repository -->
    </parent>

    <groupId>com.itheima</groupId>
    <artifactId>springboot_24_mq</artifactId>
    <version>0.0.1-SNAPSHOT</version>


    <properties>
        <java.version>8</java.version>
    </properties>

    <dependencies>
        <dependency>
            <groupId>org.springframework.boot</groupId>
            <artifactId>spring-boot-starter-web</artifactId>
        </dependency>

        <dependency>
            <groupId>org.springframework.boot</groupId>
            <artifactId>spring-boot-starter-test</artifactId>
            <scope>test</scope>
        </dependency>

        <!--整合ActiveMQ-->
        <dependency>
            <groupId>org.springframework.boot</groupId>
            <artifactId>spring-boot-starter-activemq</artifactId>
        </dependency>
    </dependencies>

    <build>
        <plugins>
            <plugin>
                <groupId>org.springframework.boot</groupId>
                <artifactId>spring-boot-maven-plugin</artifactId>
            </plugin>
        </plugins>
    </build>

</project>
2、修改配置文件信息
server:
  port: 80
spring:
  activemq:
    broker-url: tcp://localhost:61616   #连接服务端口
  jms:
    template:
      default-destination: itheima    #消息队列保存位置
    pub-sub-domain: true              #false(默认)点对点模式 true消息订阅
3、创建客户端对象
MessageServie为消息队列处理
OrderService为下订单时进入消息队列
package com.itheima.service;

public interface MessageService {
    /**
     * 将订单存入消息队列
     * @param id
     */
    void sendMessage(String id);

    /**
     * 将订单从消息队列中取出
     */
    void doMessage();
}
package com.itheima.service.impl.activemq;

import com.itheima.service.MessageService;
import org.springframework.beans.factory.annotation.Autowired;
import org.springframework.jms.core.JmsMessagingTemplate;
import org.springframework.stereotype.Service;

@Service
public class MessageServiceActivemqImpl implements MessageService {

    //创建客户端时使用jms的实现规范接口
    @Autowired
    private JmsMessagingTemplate jmsMessagingTemplate;


    @Override
    //指定存储的位置,也可以在配置文件中指定存储位置
    public void sendMessage(String id) {
        jmsMessagingTemplate.convertAndSend("order.id",id);
        System.out.println("订单进入消息队列,id=" + id);
    }

    @Override
    //从指定位置中消费
    public void doMessage() {
        String id = jmsMessagingTemplate.receiveAndConvert("order.id",String.class);
        System.out.println("从消息队列中取出消息,id=" + id);
    }
}
package com.itheima.service;
public interface OrderService {
void order(String id);
}
package com.itheima.service.impl;

import com.itheima.service.MessageService;
import com.itheima.service.OrderService;
import org.springframework.beans.factory.annotation.Autowired;
import org.springframework.stereotype.Service;

@Service
public class OrderServiceImpl implements OrderService {

    @Autowired
    private MessageService messageService;

    @Override
    public void order(String id) {
        //订单前的一系列操作,包括服务调用、处理业务
        System.out.println("订单处理开始");
        //订单处理(调用消息处理中间件,存入消息队列)
        messageService.sendMessage(id);
        System.out.println("订单处理结束");
        System.out.println();
    }
}
package com.itheima.controller;

import com.itheima.service.MessageService;
import com.itheima.service.OrderService;
import org.springframework.beans.factory.annotation.Autowired;
import org.springframework.web.bind.annotation.*;

@RestController
@RequestMapping("/msgs")
public class OrderController {

    @Autowired
    private OrderService orderService;
    @Autowired
    private MessageService messageService;


    //处理订单并存入消息队列
    @PostMapping("/{id}")
    public void order(@PathVariable String id){
        orderService.order(id);
    }

    //从消息队列中取出订单
    //通过手动方式从消息队列中消费消息
    @GetMapping
    public void doMessage(){
        messageService.doMessage();
    }
}
@Component
public class MessageServiceListen {
//JmsListener监听指定队列位置中的生产的消息并自动消费
@JmsListener(destination = "order.id")
//SendTo将生产的消息发送到指定队列中(该方法必须有返回值才会进入到消息队列)
@SendTo("pub.sub.domain.order.id")
public String receiveMessage(String id){
System.out.println("使用监听器从消息队列中消费消息");
return id;
}
//监听上一个消息队列自动消费,并生产到下一个消息队列中
@JmsListener(destination = "new.order.id")
@SendTo("new.order.other.id")
public String listenOtherId(String id){
System.out.println("使用监听器从消息队列中消费消息");
return id;
}
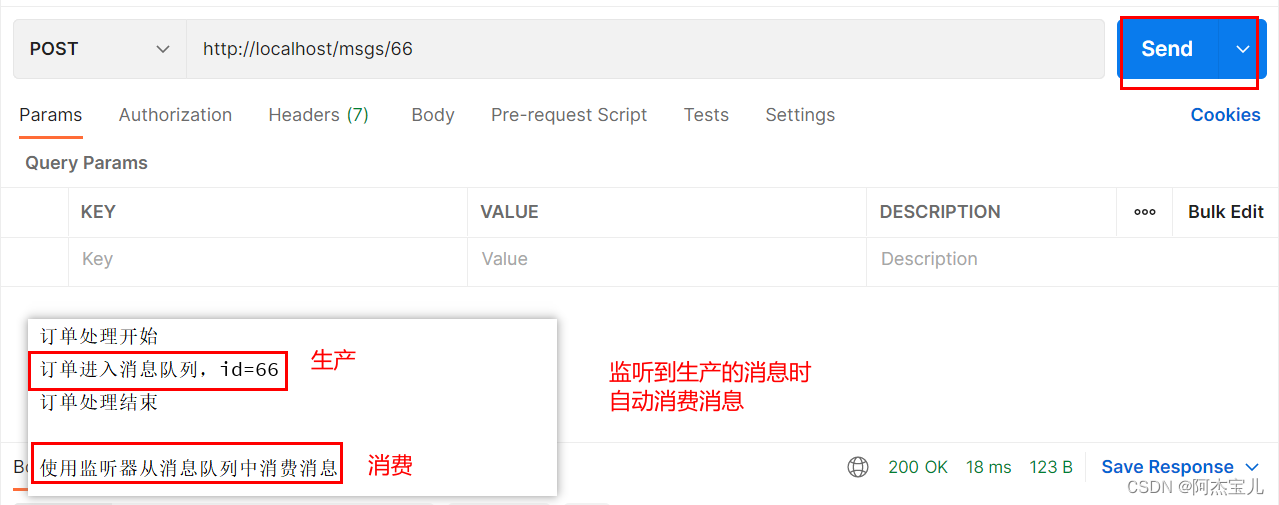
}实际业务中不可能通过手动方式消费消息,可以通过监听器自动消费消息
监听器使用效果
ActiveMQ客户端各个选项的说明


 2851
2851


 被折叠的 条评论
为什么被折叠?
被折叠的 条评论
为什么被折叠?
 到【灌水乐园】发言


